Introduction
This document describes the step-by-step process for preparing and configuring Catalyst Center, ServiceNow, and a MID server to be integrated.
Prerequisites
Ensure that these prerequisites are met:
- Administrator access to ServiceNow.
- Administrator access to Cisco Catalyst Center.
- A virtual machine (VM) server running Ubuntu, RHEL, Windows, or CentOS to host the MID server.
- TCP port 443 must be allowed between Cisco Catalyst Center, ServiceNow, and the MID server.
Components Used
These components were used for this guide:
- Cisco Catalyst Center release: 2.3.7.9
- ServiceNow release: Yokohama
- Ubuntu VM release: 22.04
The information in this document was created from the devices in a specific lab environment. All of the devices used in this document started with a cleared (default) configuration. If your network is live, ensure that you understand the potential impact of any command.
Acronyms
- CatC = Cisco Catalyst Center
Section 1: Setting up the Cisco Catalyst Center
- Log in to the Cisco Catalyst Center graphical user interface (GUI).
- Navigate to System > Settings > System Configurations > Integration Settings.
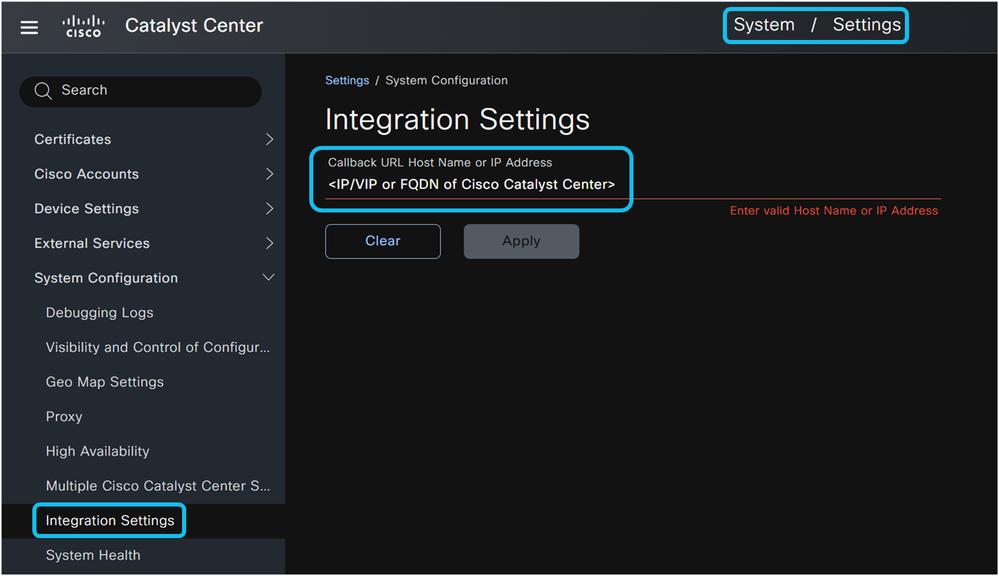
The Integration Settings page is crucial for enabling event notifications. When you enter an IP address, Virtual IP (VIP) address, or Fully Qualified Domain Name (FQDN) for Cisco Catalyst Center on this page, it establishes the callback URL that Cisco Catalyst Center uses when sending event notifications to external systems such as ServiceNow, webhook servers, or SMTP servers. This configuration is mandatory for Cisco Catalyst Center to successfully send event notifications and automatically create change and incident tickets in ServiceNow. Proper configuration of the IP address on the Integration Settings page ensures that ServiceNow can route API calls (for ticket details, approval details, ticket closure details, and CMDB synchronization details) to the correct Cisco Catalyst Center instance, especially when multiple Cisco Catalyst Center instances are connected to the same ServiceNow instance.

Note: The IP address, VIP address, or FQDN configured in the Integration Settings page must be reachable by end-users who access links sent from ServiceNow in incident and change tickets.
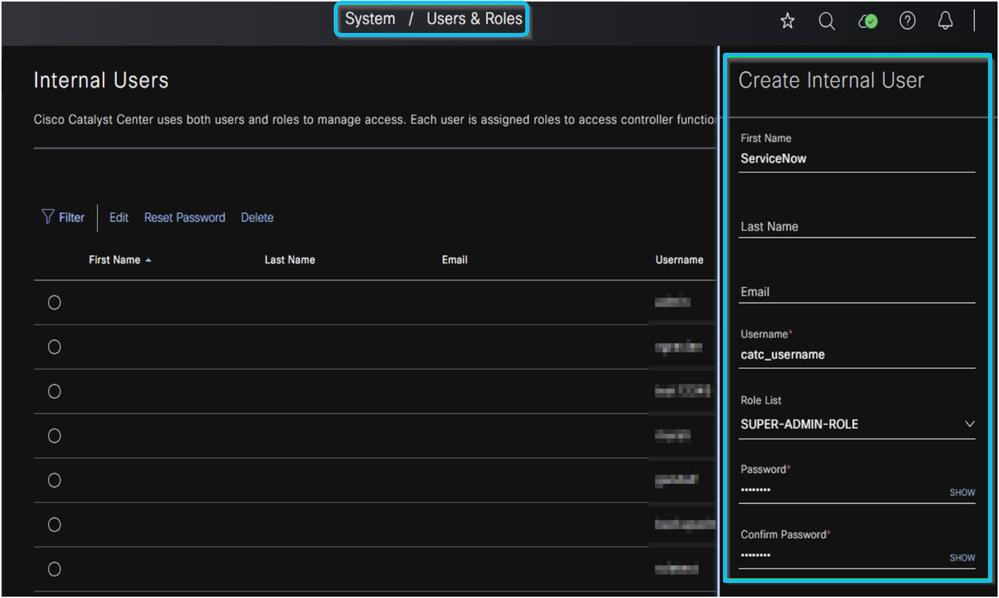
Next, create a username and password with super-administrator privileges. This account enables the Cisco Catalyst Center application within ServiceNow to connect to the Cisco Catalyst Center platform using HTTPS and ITSM APIs via the MID server.
Section 2: Creating and Setting up a ServiceNow User
- Log in to the ServiceNow GUI using administrator credentials.
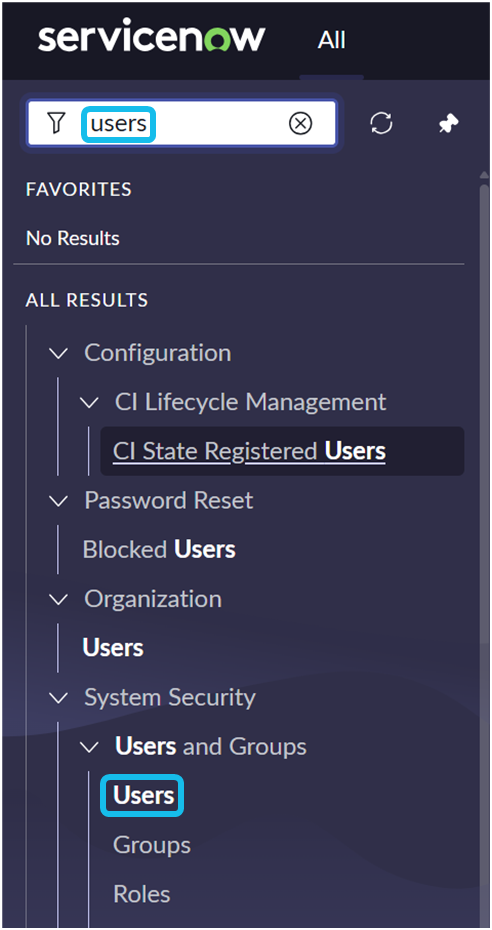
2. In the search field, type users and click Users under Users and Groups.
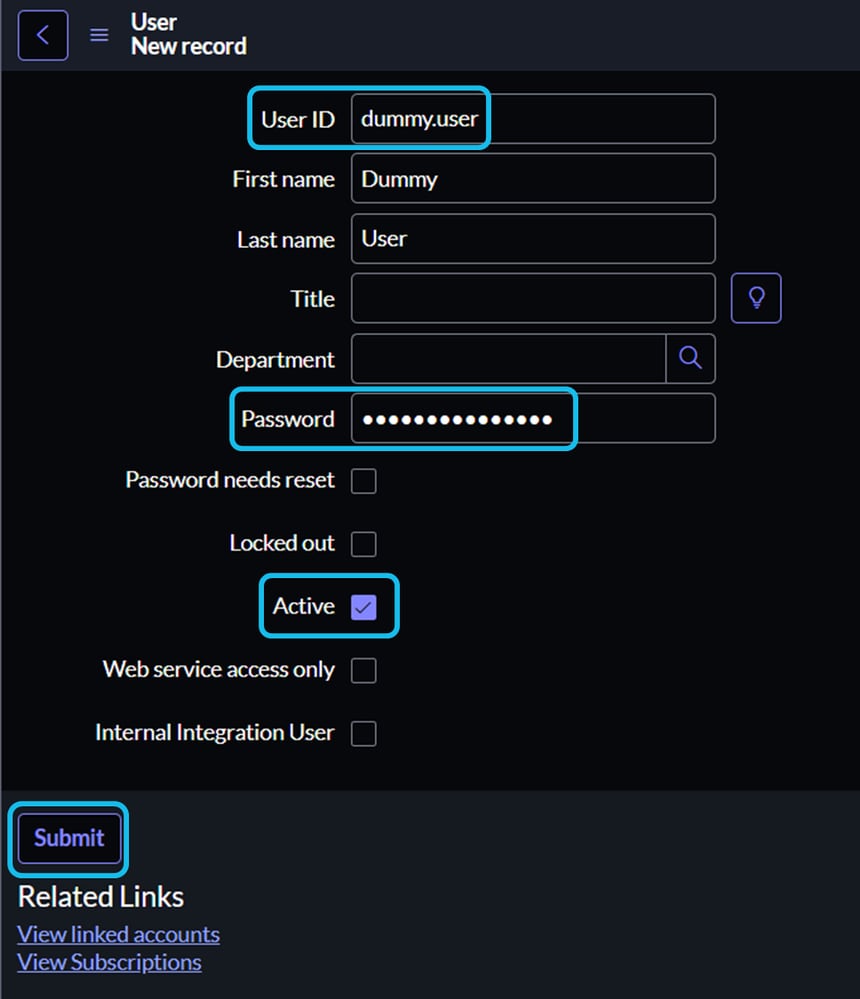
3. Click on the New button.

4. Complete the user information. At a minimum, populate the User ID and Password fields, and ensure the Active checkbox is selected.
• If you enter the password directly into the Password field, the blue message prompt is a redundant step and can be disregarded.
5. While still in the Users section, search for the newly created user and click on their entry.
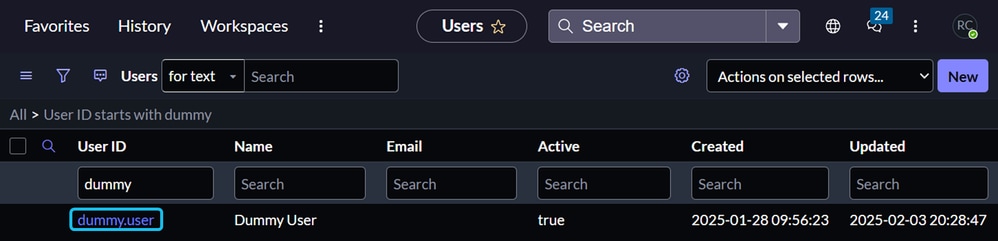
6. Click the Roles tab, then click Edit.
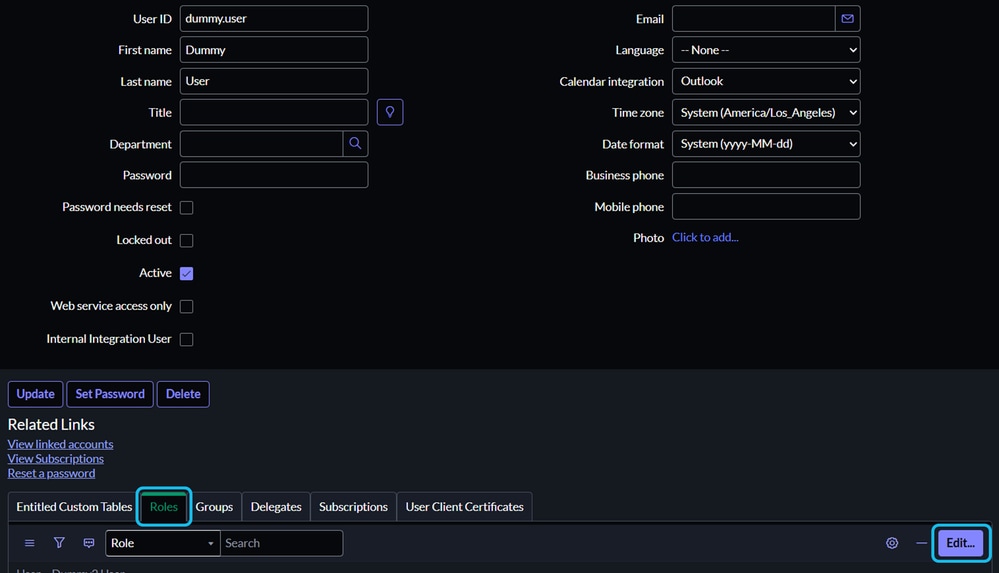
7. Add these required roles for a successful integration:
- Admin
- Catalog_admin
- Import_transformer
- Inventory_admin
- Inventory_user
- Itil
- Mid_server
- Pa_admin
- Personalize_choices
- Web_service_admin
- All roles beginning with x_caci.
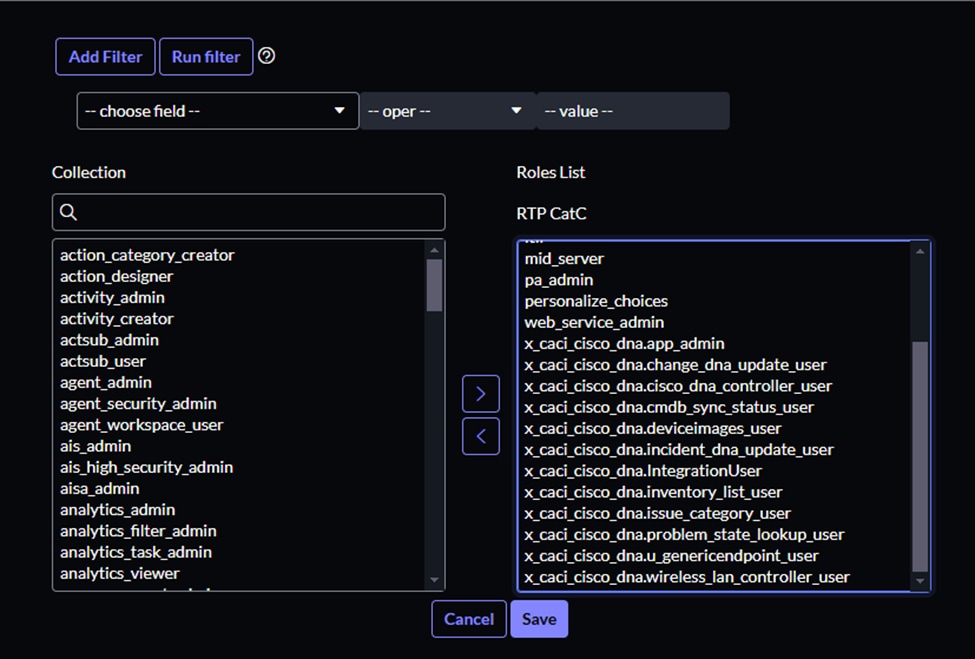
8. Click the Save button.
• Assigning the mid_server role to this user eliminates the need to create a separate user specifically for the MID server in a subsequent step.
9. Log out of ServiceNow and verify the credentials of the new user.
Section 3: Setting up the MID server
Before downloading and deploying the MID server package, select one of these compatible operating systems for the virtual machine (VM):
• Ubuntu
• CentOS
• RedHat
• Windows
Deploy the VM. The VM must have internet access and HTTPS access to both ServiceNow and Cisco Catalyst Center.
1. In the ServiceNow GUI search field, type mid and select Downloads.
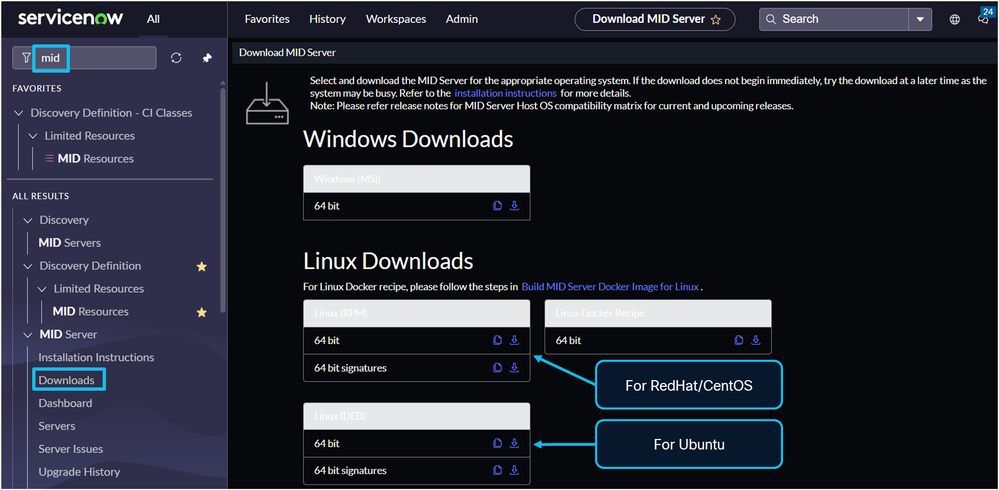
2. Download the MID server installation package. You can either:
• Download it to a local computer and then transfer it to the VM server.
• Access the terminal of the VM and use the wget command with the URL of the package to download it directly to the VM server.
• Click the Copy icon, located next to the Download icon, to copy the URL of the package.
Note: This section provides examples using the Ubuntu command-line interface (CLI). The steps for deploying the MID server package vary for CentOS, RedHat, or Windows VMs. For more information, refer to the external ServiceNow documentation, "Install a MID Server on Linux" and "Install a MID Server on Windows" available on the ServiceNow website.
3. Use the "Install a MID server on Linux" guide to download and deploy the MID server package on the VM.
Use the wget command with the URL of the MID server installation package to download the package.


Install the DEB package.

Obtain root privileges using sudo -i and change directories to /opt/servicenow/mid/agent.
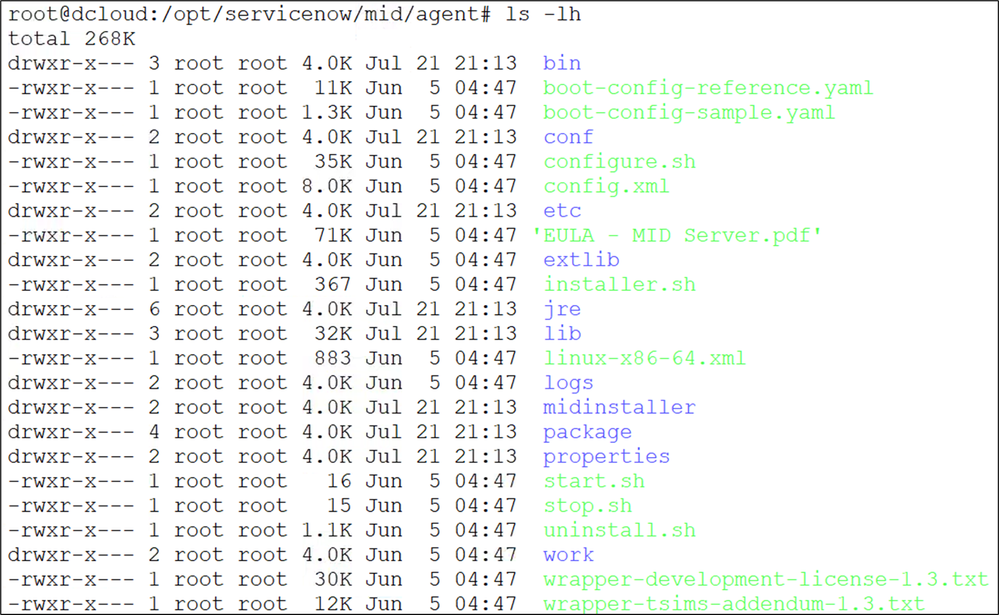
4. Configure the MID server by executing the installer.sh bash script (./installer.sh) and completing the prompts.
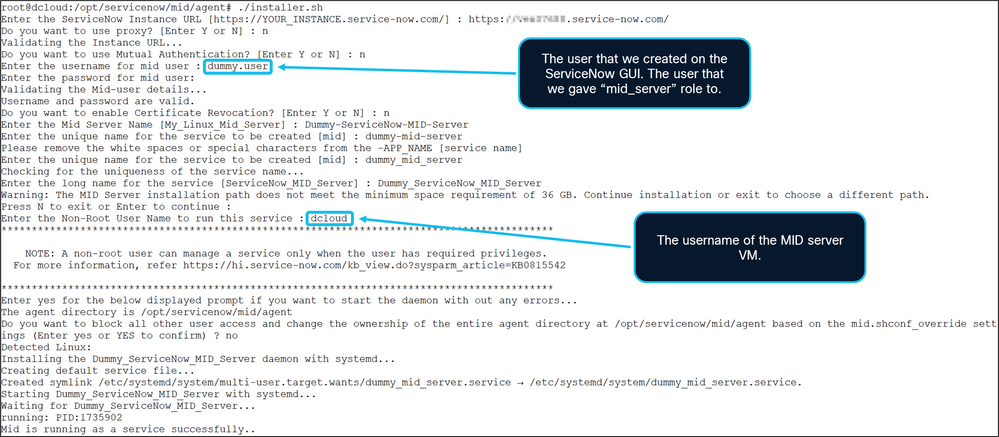
5. To verify if the MID server has started, execute the start.sh bash script.

If the MID server did not start after configuration, use start.sh to initiate its services. To stop the MID server, run stop.sh. To uninstall the MID server service, run uninstall.sh.
For recent logs detailing interactions between Cisco Catalyst Center and ServiceNow, examine the logs/agent0.log.0 file
https://www.servicenow.com/docs/bundle/vancouver-servicenow-platform/page/product/mid-server/reference/r_MIDServerTroubleshooting.html

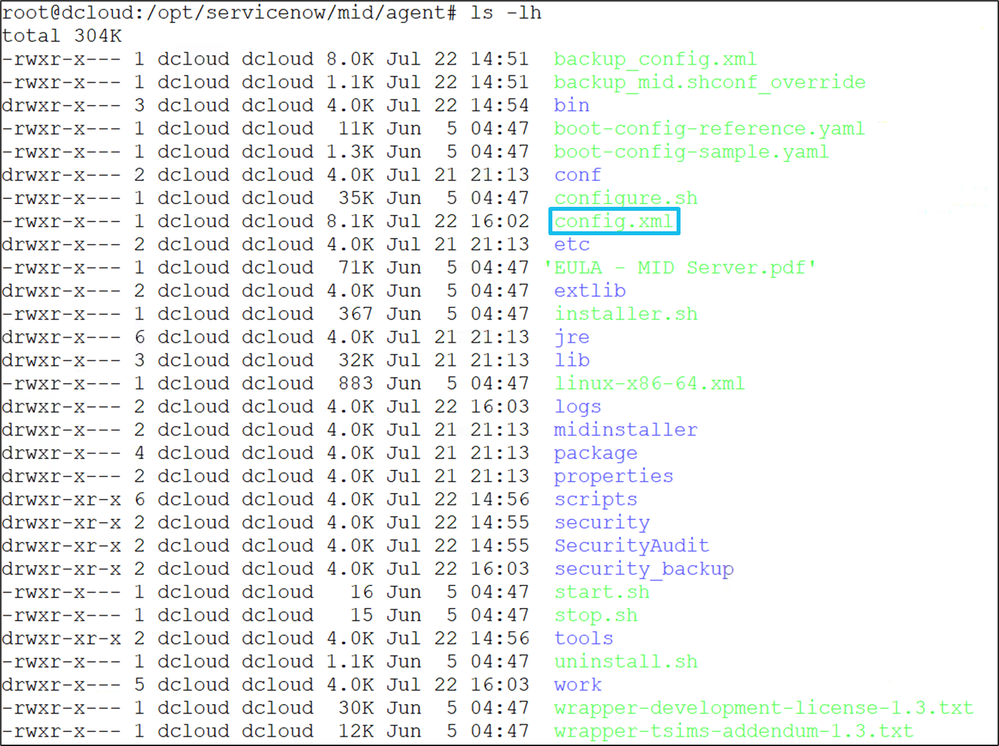
6. Temporarily stop the MID server: ./stop.sh
7. Edit the config.xml file (for example using nano)
• Set mid.proxy.use_proxy to false if no proxy server exists between the MID server and ServiceNow.
• Set TLS values from true to false. This action disables certificate, certificate chain, and CRL checks, and prevents values on the ServiceNow "MID Security Policy" page from overwriting config.xml settings.
• Save the changes.


In the ServiceNow GUI, navigate to the MID Security Policy page. Verify that the values on this page align with the changes made in the config.xml file of the MID server. Correct configuration and matching values enable successful trust and connectivity during the validation process between ServiceNow and the MID server.
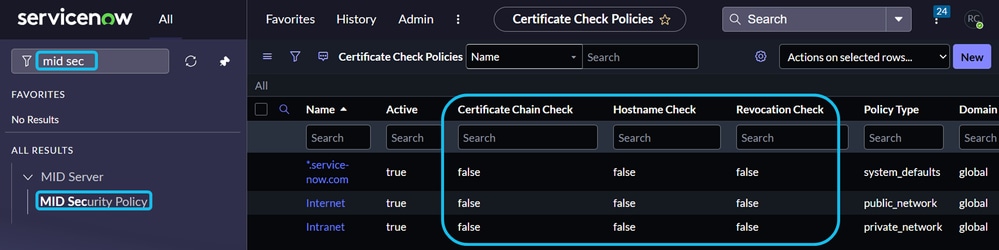
Note: If your company policy mandates certificate usage, update the relevant settings on both ServiceNow and the MID server to ensure proper certificate implementation for a successful connection.
8. Start the MID server: ./start.sh

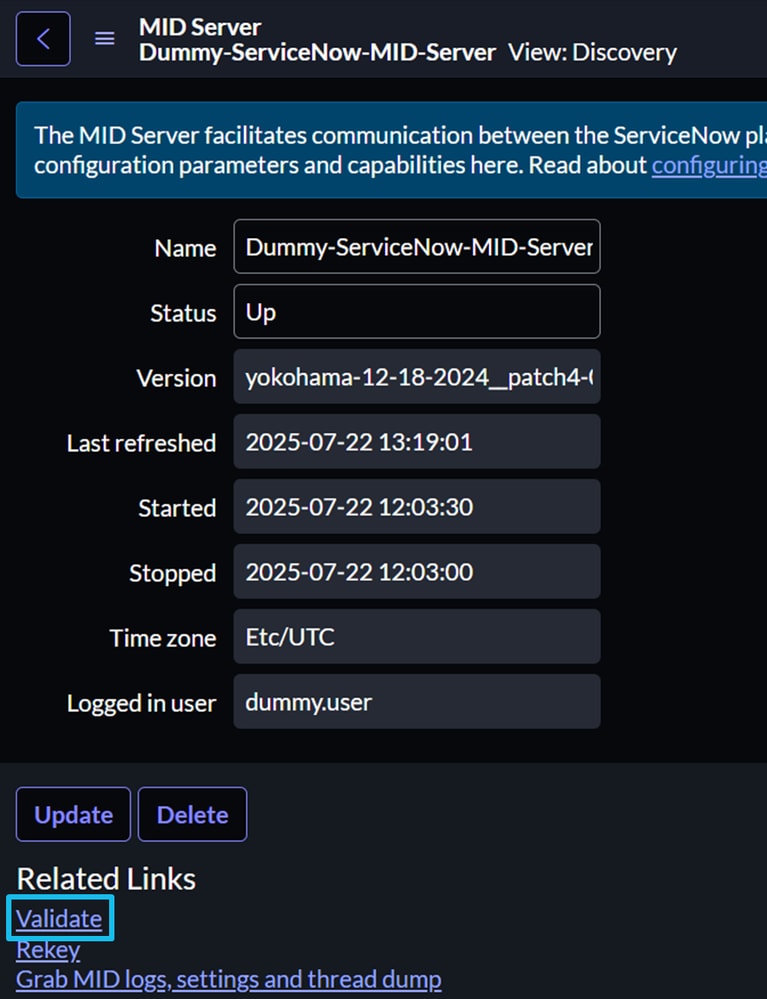
9. In the ServiceNow GUI, type mid in the search field and select MID Servers.
• Locate the newly created MID server entry (for example "Dummy-ServiceNow-MID-Server").
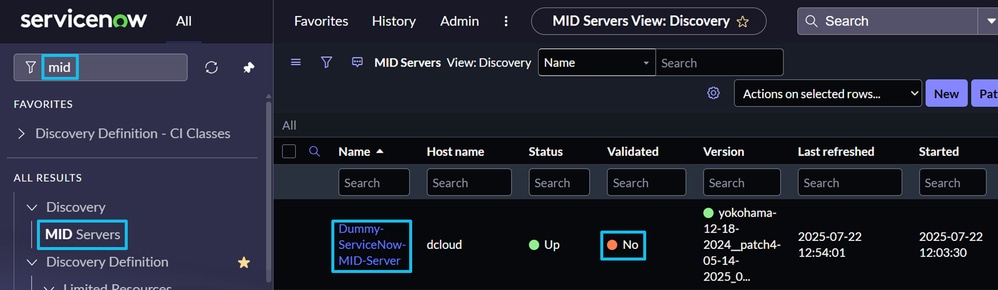
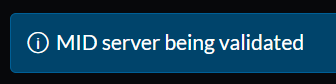
10. Click the MID server entry, then click Validate.
11. ServiceNow initiates a validation process to confirm connectivity, configuration, and assigned roles.
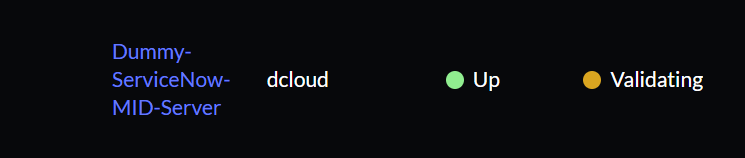
12. The validation process typically completes within 5 minutes. If the status remains "Validating" for more than 10 minutes, perform these checks:
• Recheck the configuration settings on both ServiceNow and the MID server.
• Verify HTTPS connectivity between ServiceNow and the MID server.
• If these checks are successful examine the agent0.log.0 file on the MID server for certificate or other issues.
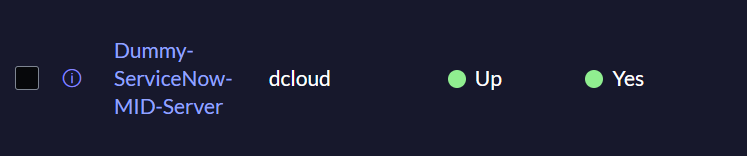
A successful validation, with correct configuration and HTTPS connectivity, displays the expected status on the ServiceNow "MID Server" page.
Section 4: Create a CatC Entry on ServiceNow
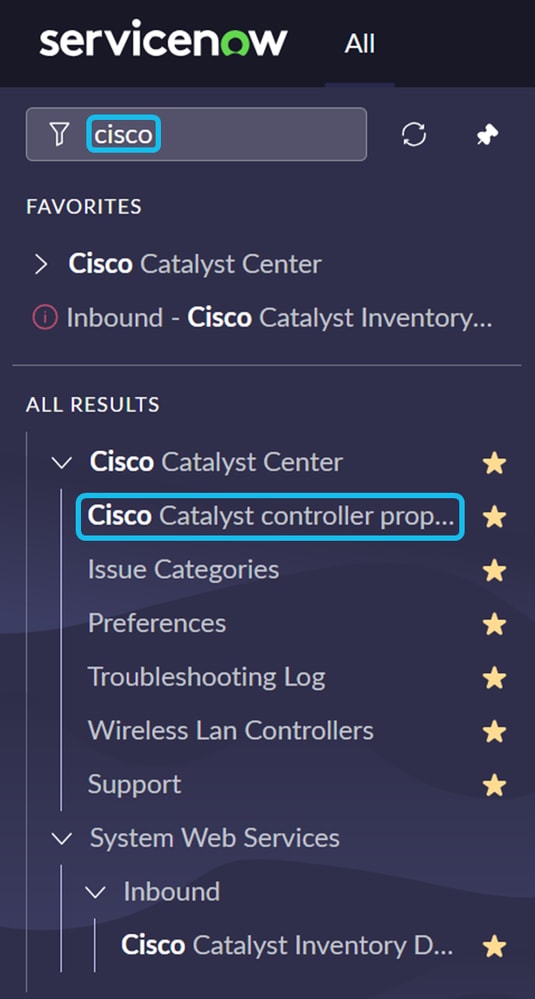
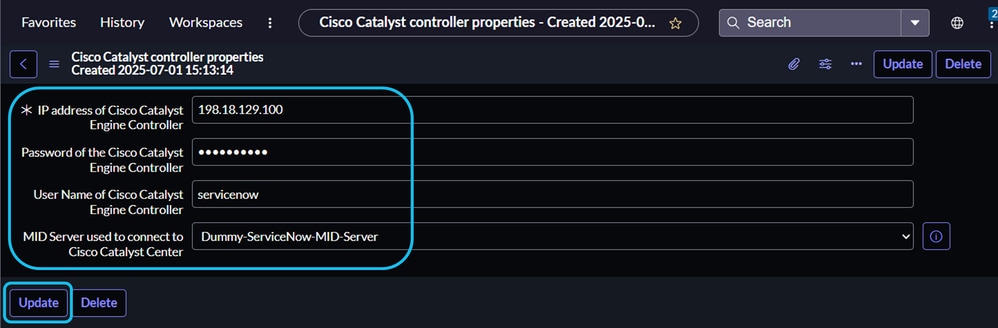
1. Open the ServiceNow GUI and enter “cisco” in the search bar. Select Cisco Catalyst Controller Properties.
Click New, complete the required fields, and then click Submit.
Passwords are encrypted and stored securely. When the property is used to generate the x-auth-token for CatC connections, the password is decrypted as needed.
The MID Server dropdown lists all available MID servers in your ServiceNow instance. Select the MID server you want to use to communicate with CatC.

Section 5: Start the Integration in the CatC GUI
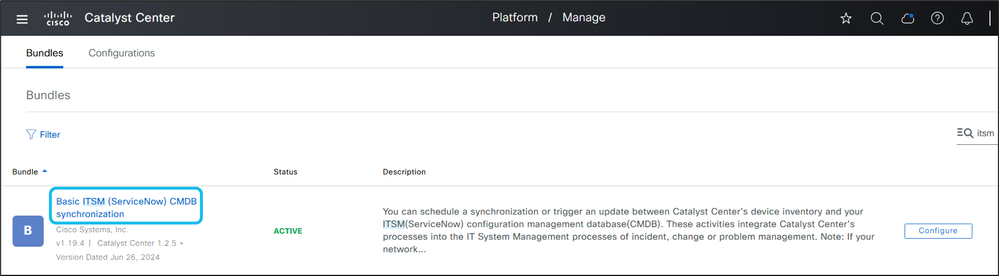
1. Open the Cisco Catalyst Center GUI. Navigate to Platform > Manage > Bundles. Enter itsm in the search field.
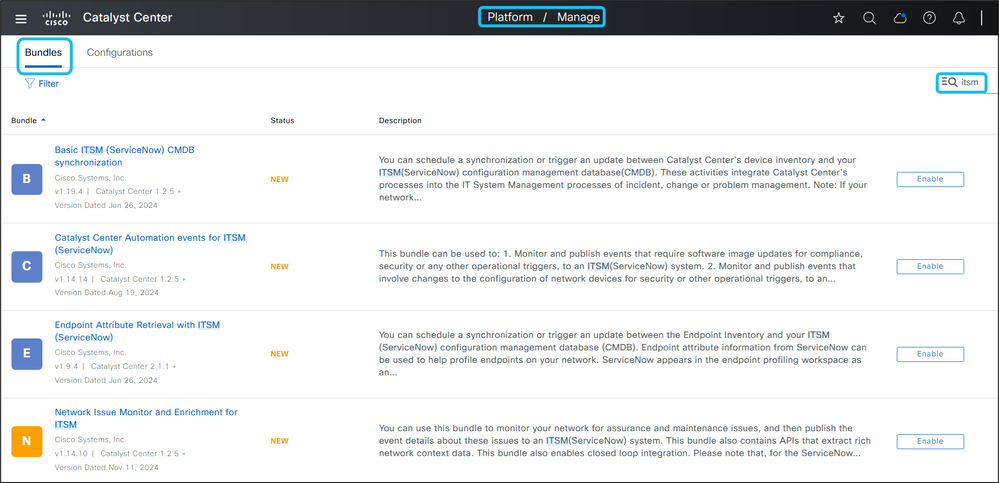
2. Click Enable for the Basic ITSM (ServiceNow) CMDB Synchronization bundle. In the confirmation pop-up, click Enable again.
Note: You must enable the Basic ITSM (ServiceNow) CMDB Synchronization bundle before enabling other ITSM bundles.
3. Click Configure and complete the required fields:
- Instance Name: Enter a descriptive name for the ServiceNow instance.

- URL, Username, and Password: Enter the ServiceNow instance credentials and test the connection. Communication from CatC to ServiceNow uses TCP port 443.
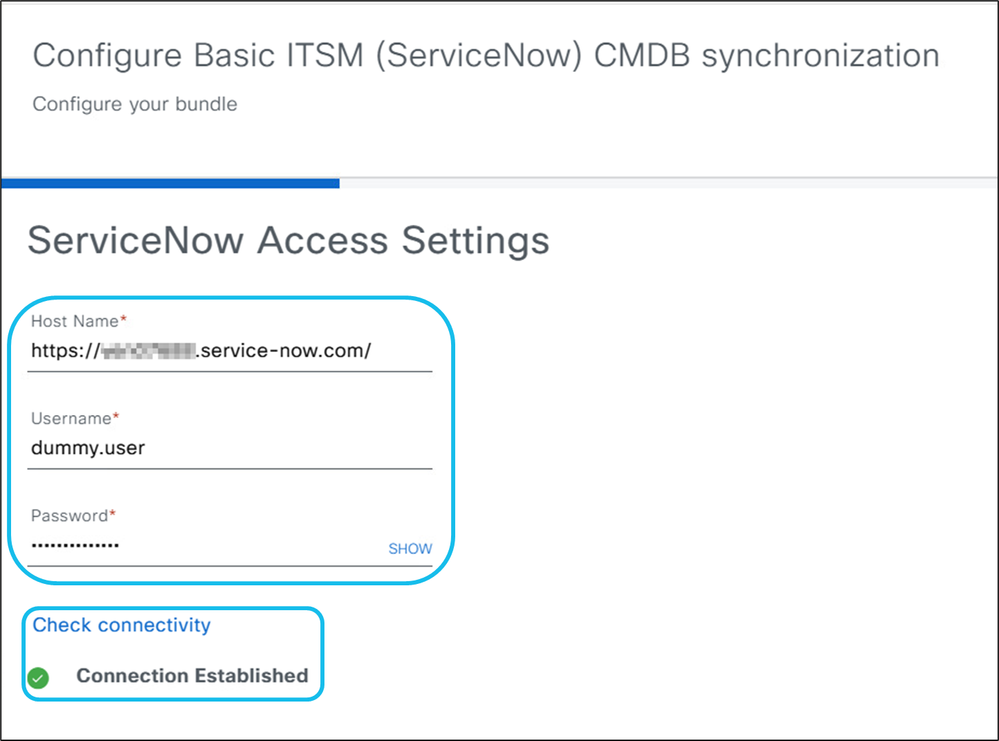
Note: Disable Multi-Factor Authentication (MFA) in the ServiceNow GUI to allow successful integration. If MFA is enabled an error is returned instead of the “Connection Established” message.
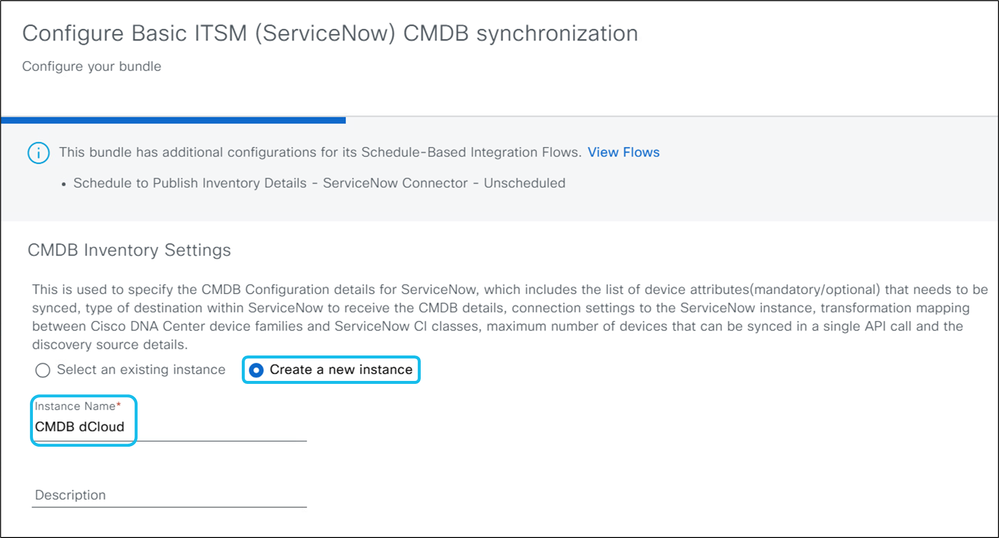
4. Enter a name for the CMDB instance.
- Specify the CMDB configuration details, including which device attributes to sync, the ServiceNow destination for CMDB details, connection settings, transformation mapping between Catalyst Center device families and ServiceNow Cl classes, the maximum number of devices per API call, and discovery source information.
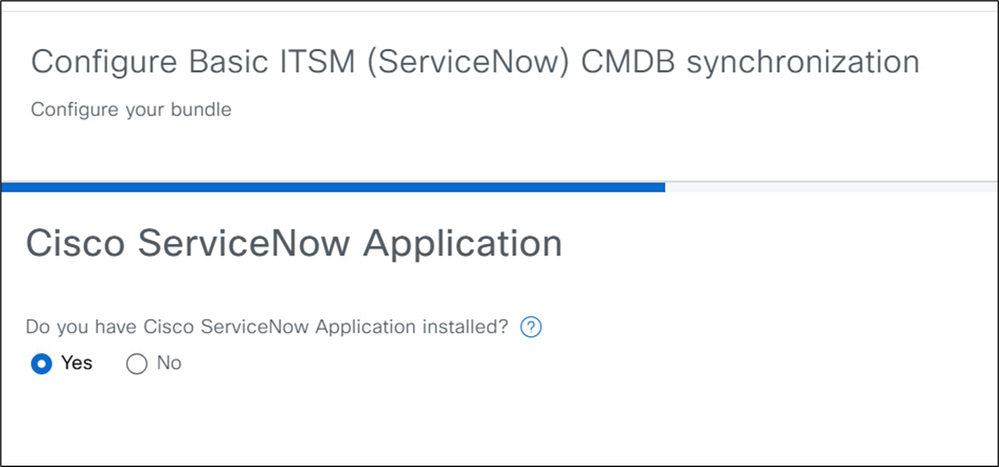
5. Select Yes if the CatC App is installed on ServiceNow.
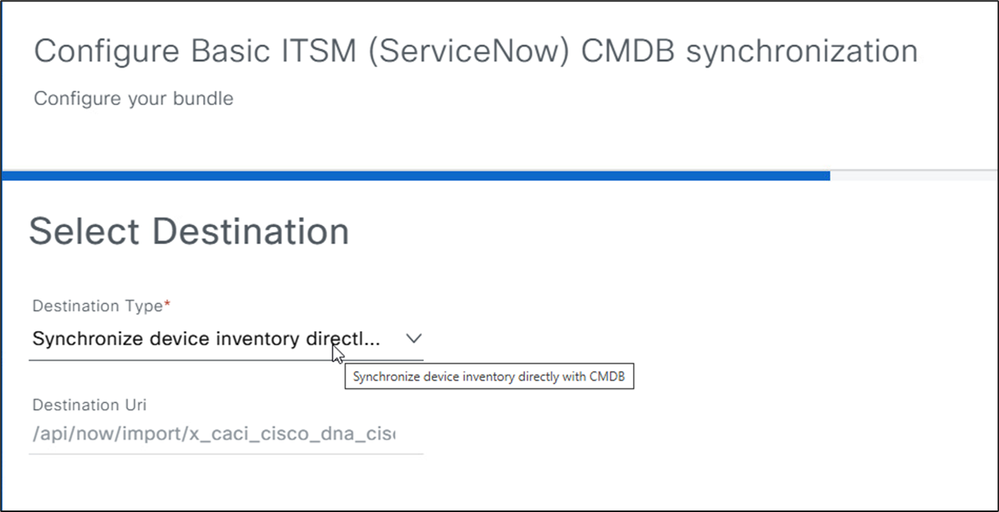
6. Choose Synchronize device inventory directly with CMDB. This option sends data to a REST API endpoint within the CatC App on ServiceNow.
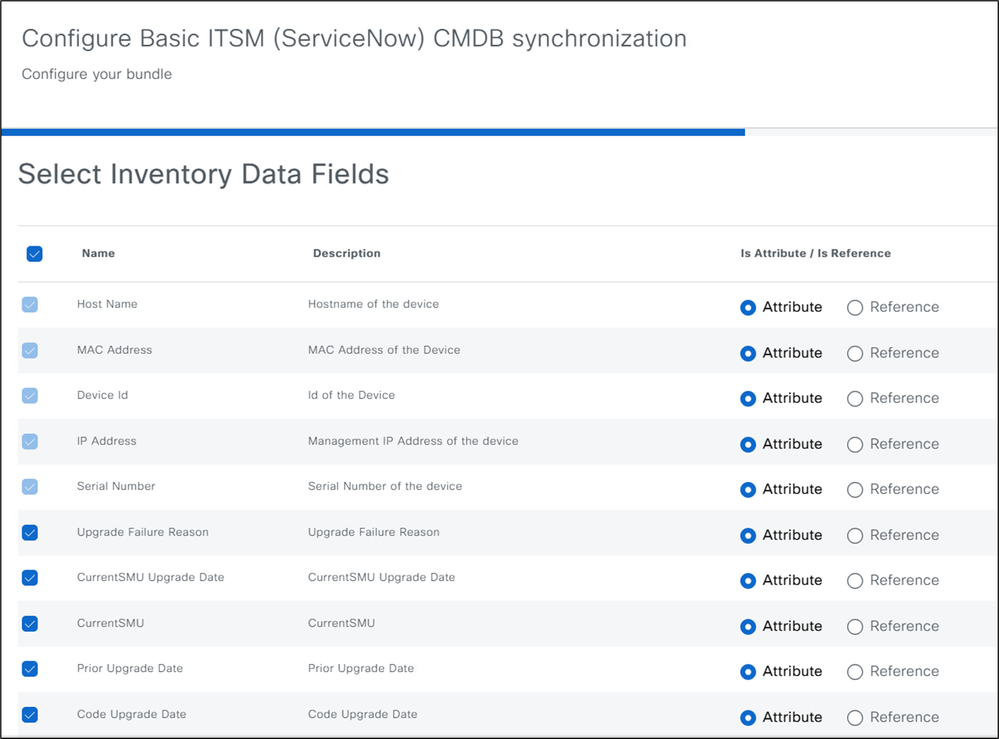
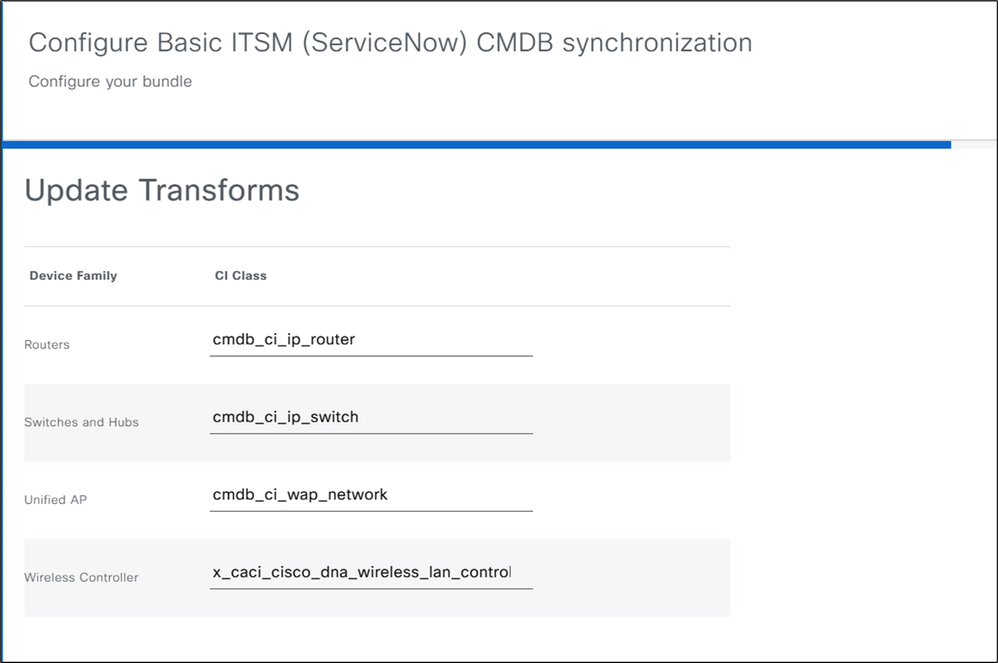
7. Use the default inventory data fields or add additional fields as needed. Click Next on the Update Transforms page.
7. In this section, device families are mapped to Cl classes in ServiceNow. Most device families are mapped, but you can edit the mappings. Only valid Cl classes under the “Network Gear” parent class can be selected. Valid classes appear in the “Update Transforms” section when configuring the Basic ITSM (ServiceNow) CMDB Synchronization bundle.
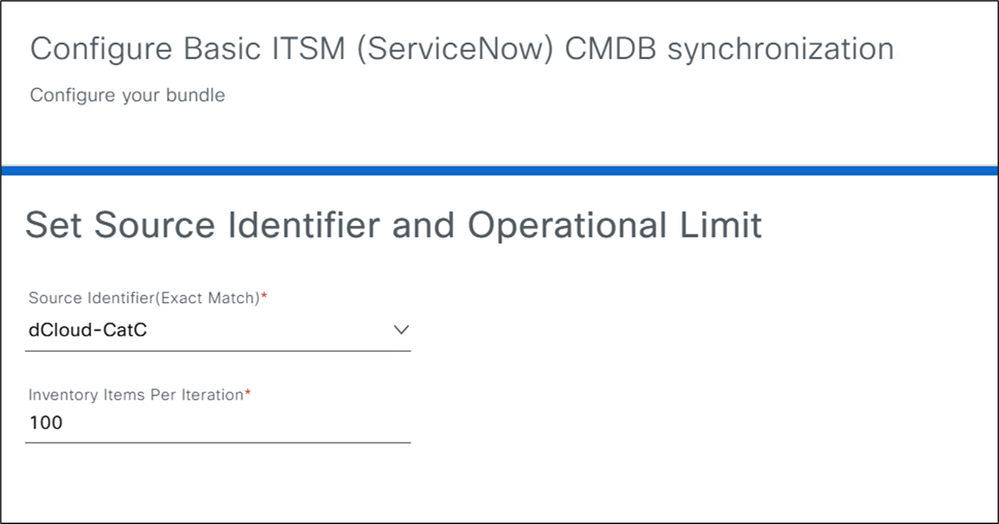
8. In the Source Identifier (Exact Match) dropdown, select Cisco Catalyst Inventory, Other Automated, or a custom identifier created in ServiceNow. The CatC retrieves the Cl list via API. This field is for record-keeping and does not impact system behavior. In theInventory Items per Iterationfield, enter a low value (such as 25 or 100). This allows ServiceNow adequate time to process each batch before the next is sent.
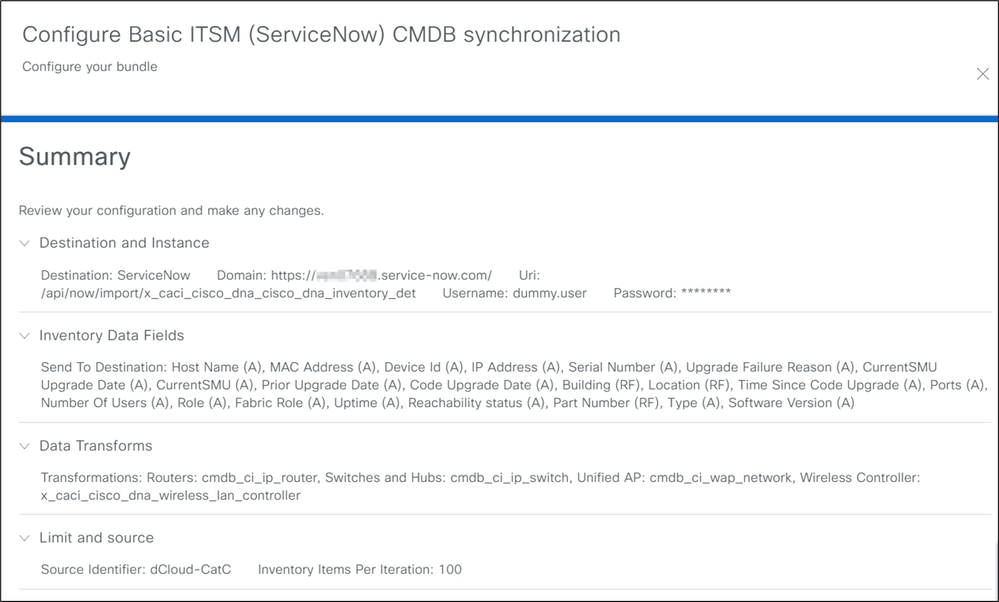
9. Review the summary page for the Basic ITSM (ServiceNow) CMDB Synchronization bundle. Click Configure to finish the setup.
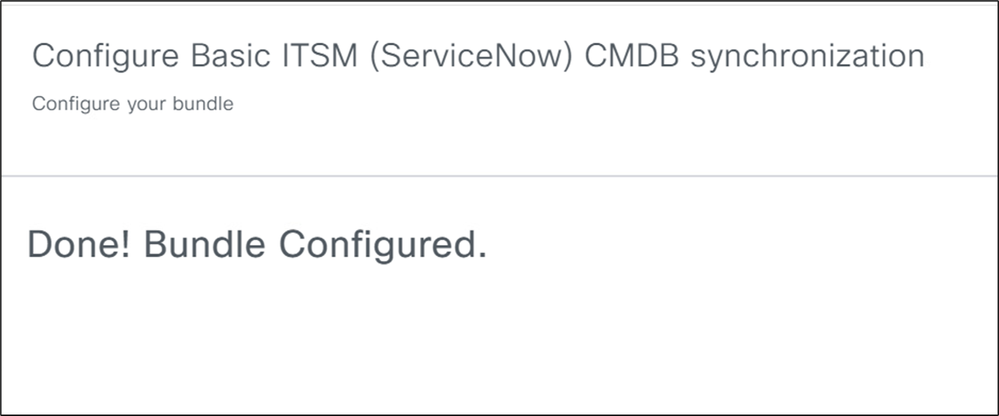
The bundle has been configured!
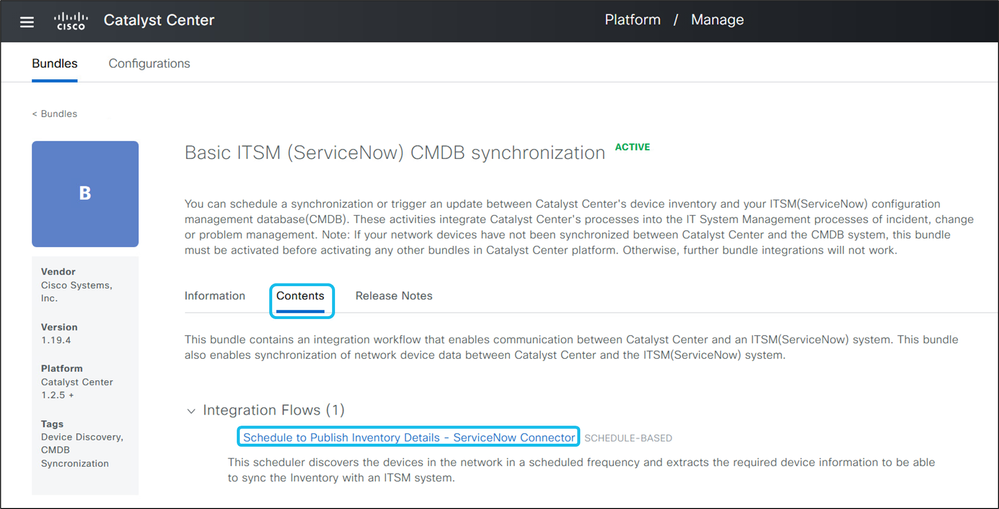
10. Return to the Bundles page and select Basic ITSM (ServiceNow) CMDB Synchronization.
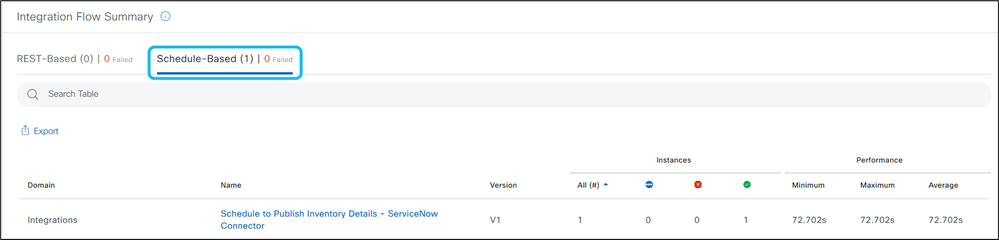
11. Go to the Contents tab, expand Integration Flows, and select Schedule to Publish Inventory Details – ServiceNow Connector.
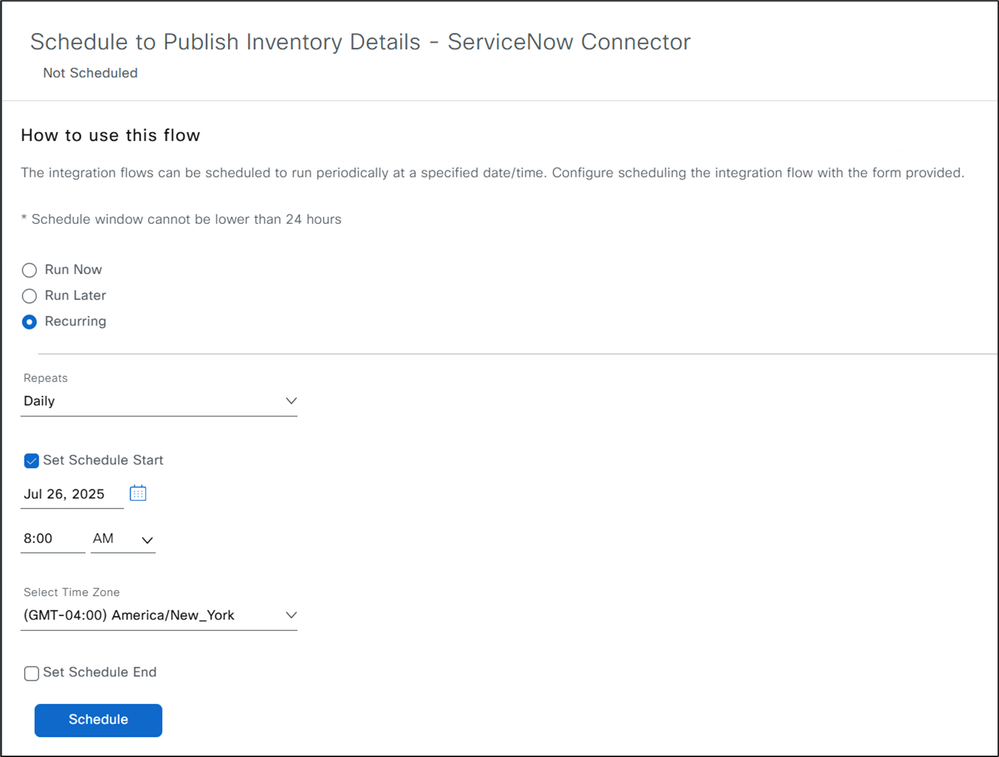
12. Set a daily or weekly schedule, or run the synchronization immediately to send managed device data from CatC to ServiceNow.
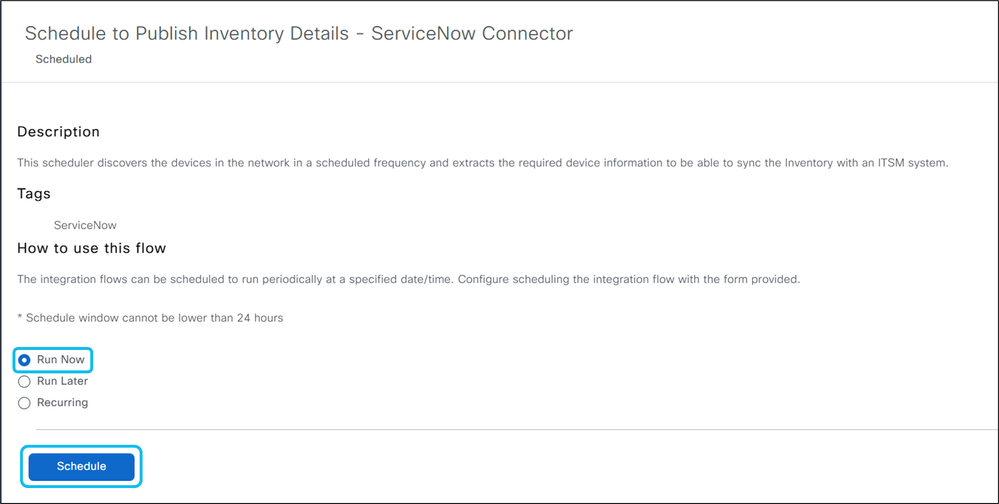
13. We can also run the synchronization process immediately to view managed devices from the CatC inventory page in the ServiceNow CMDB CI device list right away.
14. Navigate to Platform > Runtime Dashboard to view the status and success of the CMDB inventory sync.
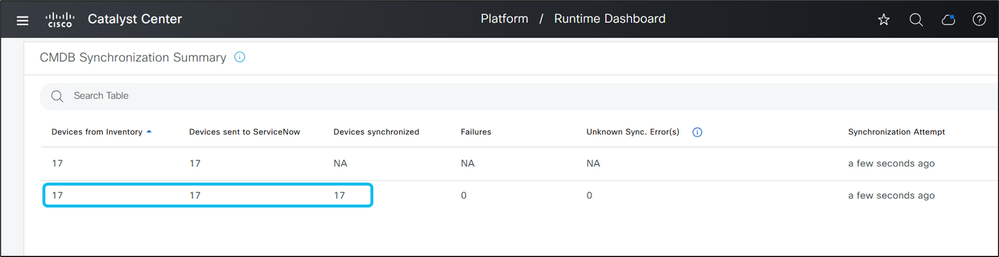
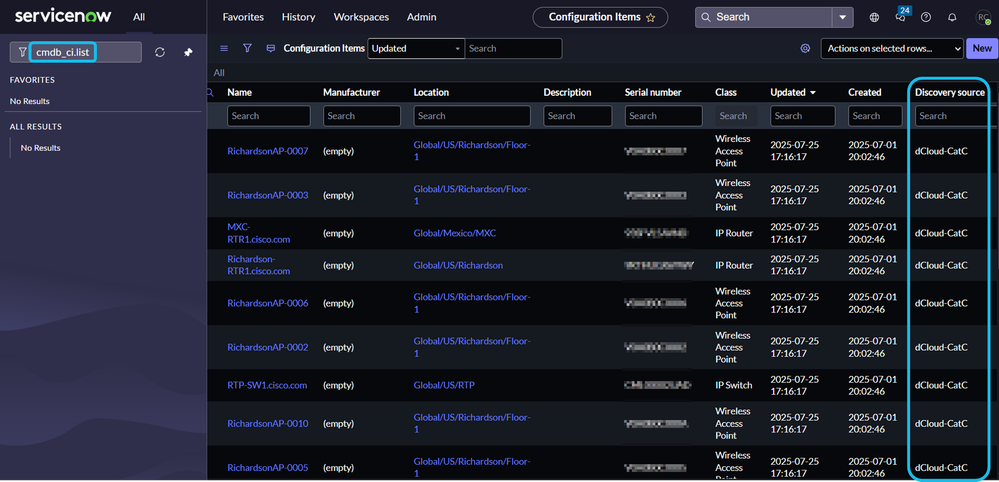
15. In the ServiceNow GUI, enter cmdb_ci.list in the search bar and press Enter. Confirm that managed devices from the CatC inventory appear in the CMDB Cl device list and are associated with the correct source identifier.
I hope this workflow has been helpful!
References
Cisco Catalyst Center ITSM Integration Guide, Release 2.3.7.x
External Documentation on the feature with the Cisco Catalyst Center integrating with ServiceNow:
Scope Underlying Concepts of Catalyst Center and ITSM Integration
Synchronize Catalyst Center Inventory with ServiceNow CMDB System
Use Catalyst Center Network Issue Monitor and Enrichment for ITSM
Monitor Catalyst Center Automation (SWIM) Events for ITSM
 Feedback