Accelerate FlexPod with Cisco UCS X440p PCIe Node and Nvidia GPU
Available Languages
Bias-Free Language
The documentation set for this product strives to use bias-free language. For the purposes of this documentation set, bias-free is defined as language that does not imply discrimination based on age, disability, gender, racial identity, ethnic identity, sexual orientation, socioeconomic status, and intersectionality. Exceptions may be present in the documentation due to language that is hardcoded in the user interfaces of the product software, language used based on RFP documentation, or language that is used by a referenced third-party product. Learn more about how Cisco is using Inclusive Language.
The Cisco UCS X-Series Modular System simplifies your data center, adapting to the unpredictable needs of modern applications while also providing for traditional scale-out and enterprise workloads. The X-Series supports both blade and rack server functions by offering computing density, storage capacity, and expandability in a single system. This modular system is managed from the cloud using the Cisco Intersight™ platform. It has an adaptable, future-ready, modular design that meets the needs of modern applications and improves operational efficiency, agility, and scalability. Powered by the Cisco Intersight cloud-operations platform, it shifts your focus from administrative details to business outcomes with hybrid-cloud infrastructure that is assembled from the cloud, shaped to your workloads, and continuously optimized.
The Cisco UCS X-Series was engineered to be modular and flexible to offer adaptability and workload flexibility. With the introduction of the PCIe node and Cisco UCS X-Fabric Technology, the X-Series now supports workloads that require graphics processing units (GPUs). The unique architecture simplifies the addition and removal of GPUs to Computing nodes. The Cisco UCS X440p PCIe Node allows you to add up to four GPUs to a Cisco UCS X210c M6 Compute Node with X-Fabric Technology.
This document helps Cisco customers and business partners deploy the Cisco UCS X440p PCIe Node on the Cisco UCS X210c M6 Compute Node in Cisco UCS X-Series systems in a FlexPod environment. The document describes the X440p PCIe Node and its components and the hardware and software requirements for installing this node on the X210c M6 Compute Node. The document also shows how to verify the installed X440p PCI Node on servers in the Cisco Intersight interface after installation.
This document demonstrates the installation and verification of multiple operating systems on the X210c M6 Compute Node with the X440p PCIe Node installed. The document also covers verification of multiple operating systems on X210c M6 compute node with X440 PCIe Node installed and highlights Nvidia virtual GPU (vGPU) capability on VMware vSphere which allows customers to share a single GPU across multiple virtual machines (VMs). For each operating system, document provide details on key steps required to boot from Netapp storage, installing drivers and licensing from Nvidia.
UCS X-Series system provides a distinctive architecture where users can customize UCS X-Series chassis based on their application needs. UCS X-Series chassis is designed to add additional resource to the Cisco UCS X210c compute node by using specific PCIe nodes. These PCIe nodes on UCS-X chassis can be connected to the Compute Nodes using Cisco X9416 X-Fabric modules. Cisco X9416 serves as a high speed PCIe connector to Cisco UCS X210c. This unique architecture seamlessly adds additional resources to the UCS X-Series compute nodes based on the application needs. The PCIe Node module can be a dedicated GPU module, a memory module (future) or a disk space module (future).
The Cisco UCS X440p PCIe node with GPUs can be integrated into the Cisco UCS X-Series modular system for applications that require the additional processing power of the GPUs. The Cisco X440p PCIe node covered in this document contains Nvidia Tesla T4 GPUs. This document focuses on Cisco X440p PCIe node integration into a FlexPod environment. Customers interested in understanding the FlexPod design and deployment details used in this paper, should refer to the Cisco Validated Designs(CVDs): https://www.cisco.com/c/en/us/td/docs/unified_computing/ucs/UCS_CVDs/flexpod_xseries_esxi7u2_design.html
Data center solution design with FlexPod
Cisco and NetApp have partnered to deliver a series of FlexPod solutions that enable strategic data center platforms with these characteristics. FlexPod delivers an integrated architecture that incorporates computing, storage, and network design best practices, reducing IT risks by validating the integrated architecture to help ensure compatibility among the system components. The content in this document focuses on Cisco UCS X440p PCIe node installation and verification but the FlexPod implementation is not covered. Please refer to the cisco CVD links below for setting up a FlexPod environment using Cisco Intersight Managed Mode (IMM).
For design guide please refer to: https://www.cisco.com/c/en/us/td/docs/unified_computing/ucs/UCS_CVDs/flexpod_xseries_esxi7u2_design.html
For deployment guide please refer to: https://www.cisco.com/c/en/us/td/docs/unified_computing/ucs/UCS_CVDs/flexpod_xseries_VMware_7u2.html
All the servers showcased in this document utilize boot from SAN using iSCSI storage. Several operating systems are installed on the Cisco UCS X210c compute nodes and GPUs from the Cisco UCS X440p PCIe node are made available to be used by the operating systems.
Following components are utilized as part of the setup:
● Cisco X440p PCIe node containing two Tesla T4 GPUs presented to the adjacent compute node for a 1:1 mapping.
● Cisco UCS 6454 Fabric Interconnects provide the chassis and network connectivity.
● Cisco UCS X9508 Chassis connects to the fabric interconnects using Cisco UCS 9108 25G intelligent fabric modules (IFMs), where four 25 Gigabit Ethernet ports are used on each IFM to connect to the appropriate fabric interconnect. If additional bandwidth is required, all eight 25 Gigabit Ethernet ports can be used.
● Cisco UCS X210c M6 compute nodes contain the fourth-generation Cisco UCS Virtual Interface Card (VIC) 14425.
● Cisco Nexus 93180YC-FX3 Switches in Cisco NX-OS mode provide the switching fabric.
● Cisco UCS 6454 Fabric Interconnect 100 Gigabit Ethernet uplink ports connect to Cisco Nexus 93180YC-FX3 Switches in a virtual port-channel (vPC) configuration.
● The NetApp AFF A400 controller connects to the Cisco Nexus 93180YC-FX3 Switches using four 25 GE ports from each controller configured as a vPC.
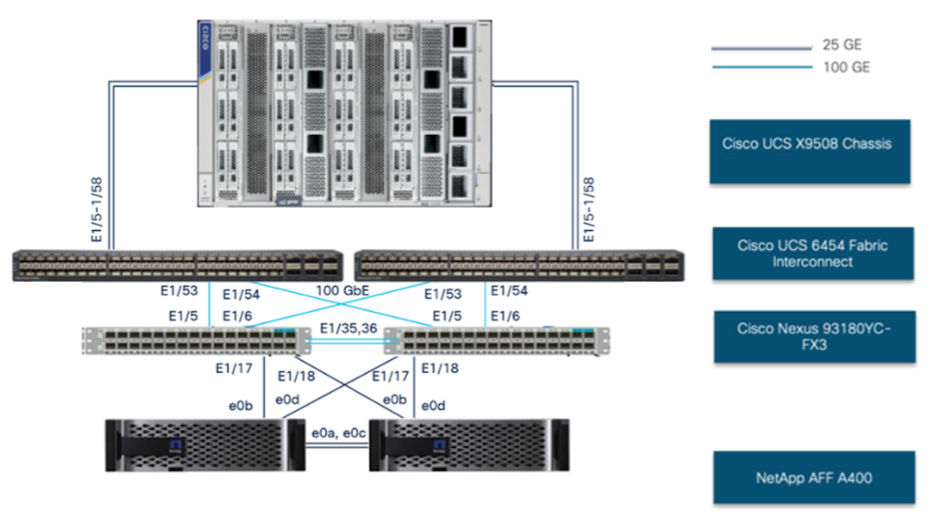
Physical connectivity of FlexPod setup for Cisco UCS X-Series chassis with Cisco UCS X440p PCIe Node
Table 1 lists the hardware and software versions used to validate the solution described here. Note that the validated FlexPod solution explained in this document adheres to the Cisco, NetApp, NVIDIA, and VMware interoperability matrix to determine support for various software and driver versions. You can use the same interoperability matrix to determine support for components that are different from the current validated design.
Table 1. Hardware and software versions used in this solution
|
|
Component |
Software version |
Comments |
| Network |
Cisco Nexus 93180YC-FX3 |
Release 9.3(7) |
Download from Cisco.com |
| Computing |
Cisco UCS Fabric Interconnect 6454 and Cisco UCS X9108 25G IFM |
Release 4.2(2b) |
Cisco UCS X-Series GA release for infrastructure including fabric interconnects and I/O module (IOM) and IFM |
|
|
Cisco UCS X210c with Cisco UCS VIC 14425 |
Release 5.0(2b) |
|
|
|
VMware ESXi |
Release 7.0 U2 |
Custom image for ESXi 7.0 U2 installation ISO |
|
|
VMware vCenter |
Enterprise Plus Edition (required) |
|
|
|
Cisco VIC driver for ESXi |
Release 1.0.35.0 |
Download from Cisco.com under Cisco UCS X-Series software driver downloads |
|
|
Microsoft Windows |
Release 2016, 2019, and 2022 |
Used as bare metal and virtual machine |
|
|
Red Hat Enterprise Linux (RHEL) |
Release 8.6 |
Used as bare metal and virtual machine |
|
|
Ubuntu Linux |
Release 20.04.4 |
Used as bare metal and virtual machine |
| Storage |
NetApp AFF A400 |
Release 9.9.1P2 |
|
|
|
NetApp ONTAP Tools for VMware |
Release 9.11 |
|
| NVIDIA vGPU drivers |
VMware ESXi |
vGPU Manager Release 510.85.02vG Product version 14.2 Platform version 7.0 |
Requires NVIDIA account; download from Nvidia.com and refer release notes at https://docs.nvidia.com/grid/index.html |
| NVIDIA AI Enterprise (NVAIE) drivers |
VMware ESXi |
NVAIE Manager Release 510.85.03 |
|
|
|
Microsoft Windows 2016, 2019, and 2022 |
516.31-NVIDIA-data-center-tesla-desktop-winserver-2016-2019-2022-dch-international |
|
|
|
RHEL |
Release 8.6 NVIDIA-Linux-x86_64-510.85.02-grid.run |
|
|
|
Ubuntu |
20.04.4-live-server-amd64 NVIDIA-GRID-Ubuntu-KVM-510.73.06-510.73.08-512.78 |
Cisco Intersight managed mode configuration
The Cisco Intersight platform is a management solution delivered as a service with embedded analytics for Cisco and third-party IT infrastructures. The Cisco Intersight managed mode (also referred to as Cisco IMM or Intersight managed mode) is a new architecture that manages Cisco Unified Computing System™ (Cisco UCS) fabric interconnect–attached systems through a Redfish-based standard model. To deploy and test server profiles for different operating systems, Intersight Managed Mode was utilized.
The following guide was referenced to create all the policies to boot the server from storage: https://www.cisco.com/c/en/us/td/docs/unified_computing/ucs/UCS_CVDs/flexpod_xseries_vmware_7u2.html#CiscoIntersightManagedModeConfiguration.
When creating the server profile, refer to the following link for system BIOS and CPU optimization policies. The settings depend on whether you are using a bare-metal server or ESX virtualization.
Note: Refer to Table 6 in the performance tuning guide for various settings to tweak the BIOS for better CPU optimization:
Cisco UCS X440p GPU node hardware and software requirements
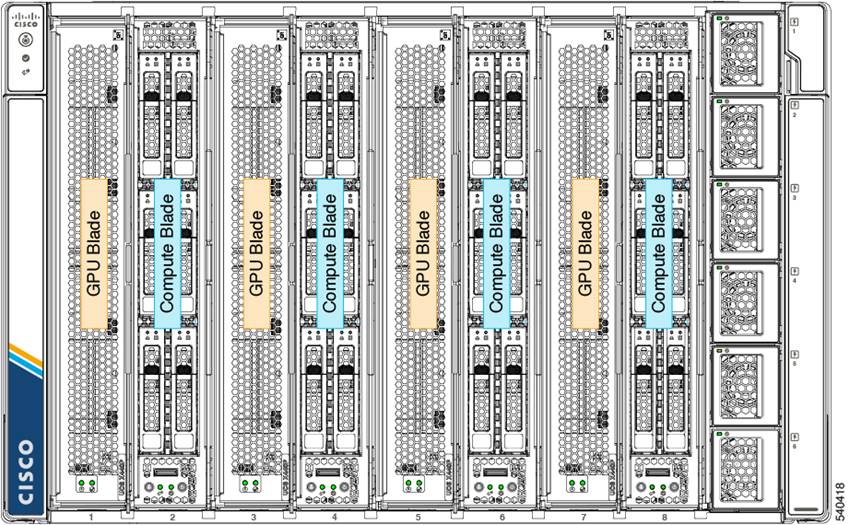
The Cisco UCS X9508 Chassis has eight node slots. Up to four of these slots can be X440p PCIe Nodes when paired with a Cisco UCS X210c M6 Compute Node.
The Cisco UCS X440p PCIe Node (Figures 2 and 3) supports two x16 full-height, full-length dual-slot PCIe cards or four x8 full-height, full-length single-slot PCIe cards and requires both Cisco UCS X9416 X-Fabric modules for PCIe connectivity. This configuration provides up to 16 GPUs per chassis to accelerate your applications. If your application needs even more GPU acceleration, you can add up to two more GPUs on each compute node using the optional GPU front mezzanine card on the X210c Compute Node. The vertically oriented X210c Compute Nodes and the X440p PCIe Nodes connect directly to horizontally oriented X-Fabric modules. The Cisco UCS X440p PCIe Node is a full-height module that supports GPU computing offload for Cisco UCS X-Series Compute Nodes. The module is hot swappable and supports PCIe connectivity for a variety of GPU form factors. This feature enables seamless upgrades to future computing nodes, resource nodes, and X-Fabric modules without requiring a major system upgrade.
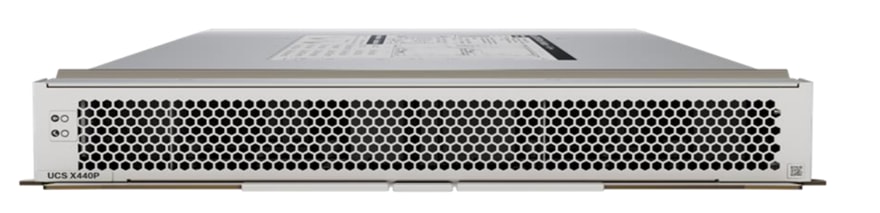
Front view

Rear view
Cisco UCS X440p PCIe Node
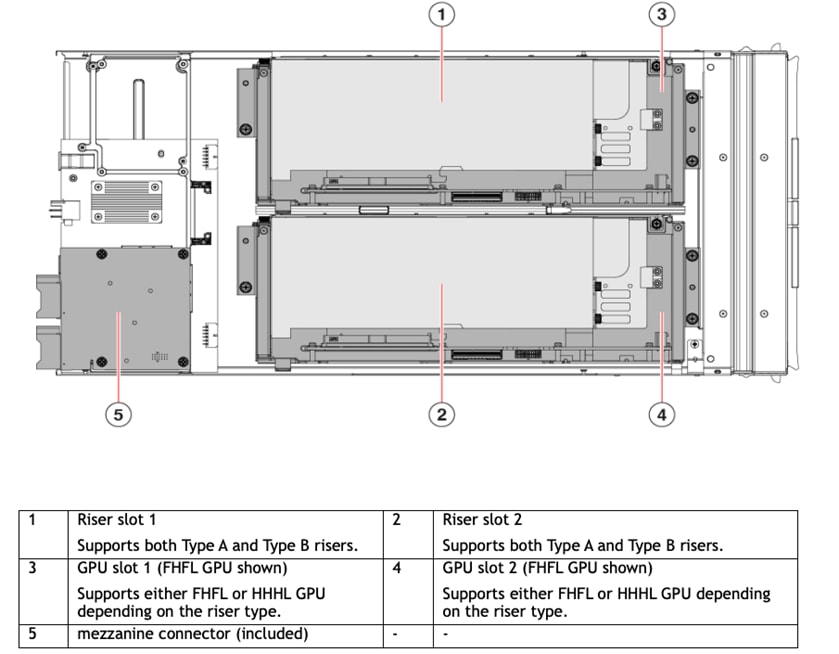
Top view of the Cisco UCS X440p PCIe Node system board
Mezzanine connector (included)
Cisco UCS X440p supports the following GPU options:
● NVIDIA A100 Tensor Core GPU (dual slot)
● NVIDIA A16 GPU (dual slot)
● NVIDIA A40 GPU (dual slot)
● NVIDIA T4 Tensor Core GPU (single slot)
Note the following guidelines and limitations when installing the Cisco UCS X440p PCIe Node:
● The X440p PCIe Node is supported in the Cisco UCS X9508 Chassis only. Do not attempt to install the PCIe node in any other Cisco UCS server chassis.
● Each X440p PCIe node must be paired with an X-Series Compute Node and therefore has specific configurations. Either of the following are supported. Be aware of these configurations, especially when removing and installing computing nodes and PCIe nodes in your deployment.
◦ The PCIe node must be installed in a pair with a compute node. The module and the node work together to provide computing and GPU processing acceleration.
◦ When you install, replace, or upgrade the PCIe node, make sure that you install it next to a supported companion module, such as a Cisco UCS X210c Compute Node.
● Cisco X-Fabric Technology does not limit or restrict slot use. PCIe nodes are not required. Computing nodes can be installed in any slot without restriction where PCIe nodes are not used.
The X-Fabric Technology solution has software, hardware and chassis slot installation requirements that must be met for the X440p to be detected. GPU nodes can only be installed adjacent to X210c node. A chassis can either have X440p on all even slots or on all odd slots, either of the two node placement configurations shown in Figure 4 are required for GPU node to be detected by the chassis
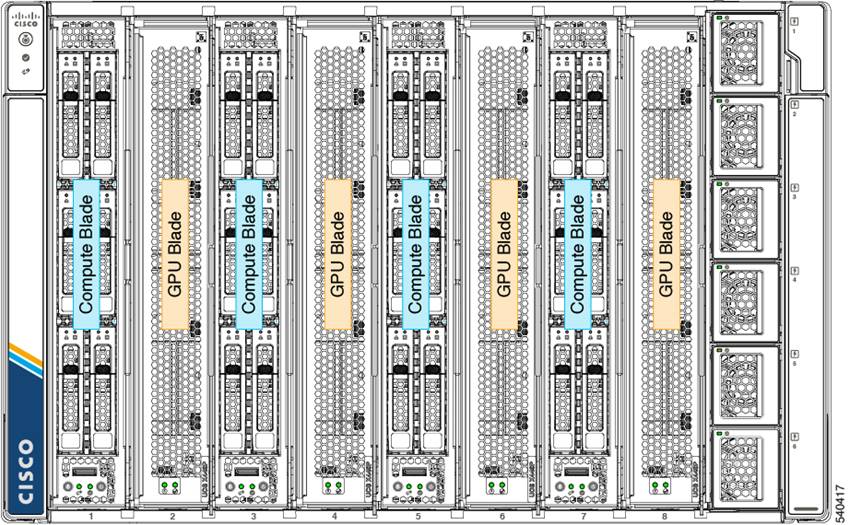
GPU node installation configurations
For the X440p to be detected, four components are needed in addition to the X210c node already installed in the X-Fabric chassis:
● Cisco UCS X440p module with a GPU selected
● GPU Riser cards
● Cisco UCS X9416 X-Fabric modules
● Rear mezzanine VIC and bridge adapters
The X440p node consists of a GPU card and the riser module. The X210c node needs UCS PCI Mezz Card for X-Fabric or Rear mezzanine VIC, and the connectivity between the GPU node and the compute node requires both X9416 X-Fabric Modules.. The following sections provide details about each component.
Cisco UCS X440p PCIe Node hosting the GPU
The base Cisco UCS X440p PCIe Node, part number UCSX-440P, does not include any components or options. Appropriate components or options must be selected during product ordering from the list of available PCIe GPU cards, shown in Table 2.
Table 2. Available PCIe GPU cards
| GPU part number |
Part description |
Riser slot compatibility |
| UCSX-GPU-T4-161 |
NVIDIA T4 PCIE 75W 16GB |
Riser 1B (Gen 4), Riser 2B (Gen 4) |
| UCSX-GPU-A162 |
NVIDIA A16 PCIE 250W 4 X 16GB |
Riser 1A (Gen 4), Riser 2A (Gen 4) |
| UCSX-GPU-A402 |
TESLA A40 RTX, PASSIVE, 300W, 48GB |
Riser 1A (Gen 4), Riser 2A (Gen 4) |
| UCSX-GPU-A100-802 |
TESLA A100, PASSIVE, 300W, 80GB |
Riser 1A (Gen 4), Riser 2A (Gen 4) |
Notes:
1. The maximum number of GPUs per node is 4
2. The maximum number of GPUs per node is 2
3. Required power cables are included with the riser cards
Note: Each PCIe node must be configured with the same type of GPU. Mixed use of a x16 and x8 PCIe cards in the same PCIe node is not supported.
The riser card is selected based on the GPU node selected, as shown in Table 3. The PCIe node requires both the risers to be configured.
Table 3. Available riser cards
| Part number |
Part description |
| UCSX-RIS-A-440P |
Riser A for 1x dual slot GPU per riser, 440P PCIe node
● Riser 1A (controlled with CPU1 on UCS X210C)
● Riser 2A (controlled with CPU2 on UCS X210C)
|
| UCSX-RIS-B-440P |
Riser B for 2x single slot GPUs per riser, 440P PCIe node
● Riser 1B (controlled with CPU1 on UCS X210C)
● Riser 2B (controlled with CPU2 on UCS X210C)
|
Note: Each PCIe node must have the same type of riser: either two Type A or two Type B risers. You cannot mix riser types in the same PCIe node.
Cisco UCS X9416 X-Fabric Module
The Cisco UCS X9416 X-Fabric Module is required for connectivity between the Cisco UCS X210c Compute Node and X440p PCIe Node (Table 4). When a computing node is inserted into the chassis, the computing node's mezzanine card plugs directly into the two fabric module slots (with no midplane) for PCIe connectivity to the X440p PCIe Node.
Table 4. Available X-Fabric Module
| Part number |
Part description |
| UCSX-F-9416 |
UCS 9416 X-Fabric module for 9508 chassis |
Rear mezzanine VIC and bridge adapters
The Cisco UCS X210c Compute Node can connect to the X440p PCIe Node through the computing node's mezzanine card. The mezzanine card can be either the Cisco UCS PCIe mezzanine card for X-Fabric connectivity or the Cisco UCS VIC 14825. The VIC 14825 requires a bridge connector to connect the X210c Compute Node to the Cisco UCS X9108 25G IFM for network connectivity.
The X210c Compute Node has one rear mezzanine adapter connector (Table 5).
Table 5. Available VICs and bridge cards
| Part number |
Part description |
Number of CPUs required |
Connector type |
| Cisco VIC Card |
|||
| UCSX-V4-Q25GME |
UCS VIC 14825 4x25G Mezz card for the X210c Compute Node |
2 CPUs required |
Rear Mezzanine connector on motherboard |
| UCSX-V4-PCIME1 |
UCS PCI Mezz card for X-Fabric connectivity |
2 CPUs required |
Rear Mezzanine connector on motherboard |
| Cisco VIC Card2 |
|||
| UCSX-V4-BRIDGE |
UCS VIC 14000 bridge to connect the Cisco VIC 14425 mLOM and Cisco VIC Mezz for the X210c Compute Node |
2 CPUs required |
One connector on Mezz card and one connector on mLOM card |
Notes:
1. The rear mezzanine options provide one x16 PCie connection each from CPU1 to XFM1 and from CPU2 to XFM2.
2. Included with the Cisco VIC 14825
Figure 5 provides a simplified block diagram of the Cisco UCS X440p PCIe Node system board.
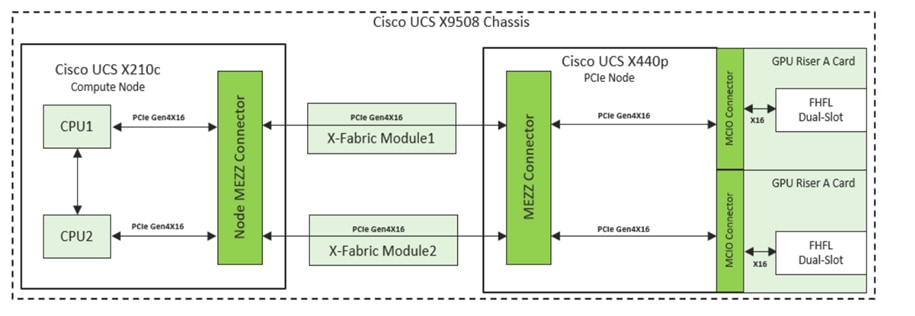
Cisco UCS X440p PCIe Node simplified block diagram with Riser A
Figure 6 shows a simplified block diagram of the Cisco UCS X 440p PCIe Node system board.
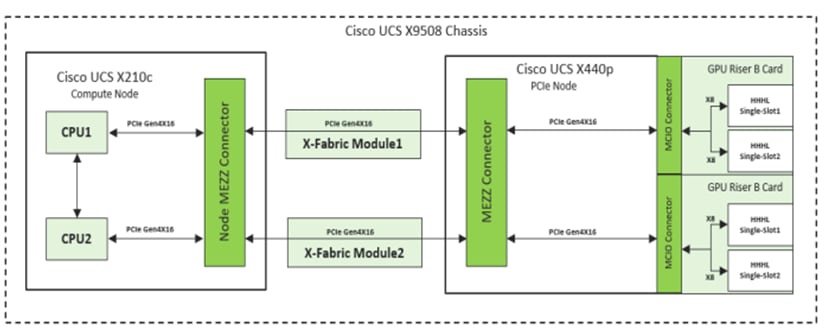
Cisco UCS X440p PCIe Node simplified block diagram with Riser B
For more details and step-by-step hardware selection and configuration guidance, refer to the X440p specifications sheet at https://www.cisco.com/c/dam/en/us/products/collateral/servers-unified-computing/ucs-x-series-modular-system/x440p-specsheet.pdf.
Following versions of software are required on the fabric interconnect and the compute node:
Minimum software version
● Fabric Interconnects: 4.2(2b)
● Cisco UCS compute node X210c firmware: 5.0(2b)
Firmware versions can be verified using Cisco Intersight and upgraded before installing the Cisco UCS X440p PCIe node.
Follow the steps described in this section to verify your software and hardware for the X440c node. The module is hot swappable and supports PCIe connectivity for a variety of GPU form factors. When you insert the module, you should be able to detect it as described here.
You need to verify your software version.
To verify the software versions running on the fabric interconnect, follow these steps:
1. Log into Cisco intersight.com
2. Click the fabric interconnect in the left panel.
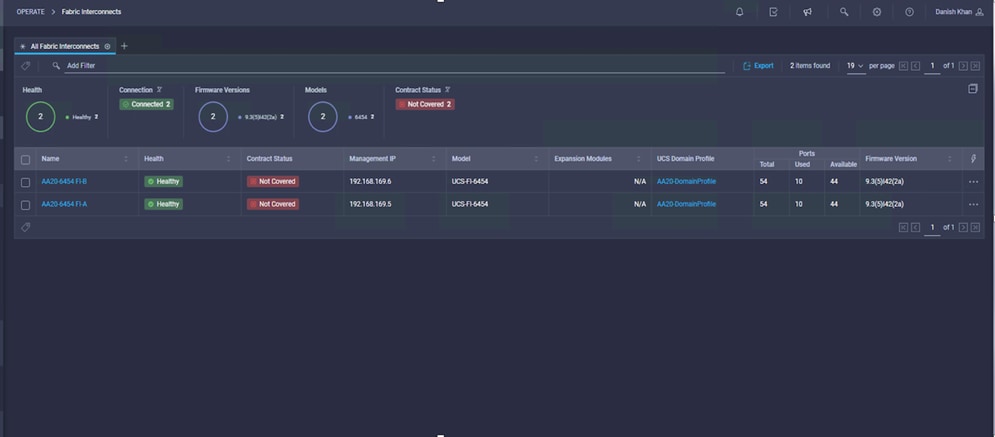
3. Select the required fabric interconnect pair and under the firmware version tab verify the version is 9.3(5)I42(2a.316) or later.
Checking the firmware version
For Cisco UCS X210c compute node firmware verification,
1. Click the server under the left panel
2. Verify the firmware version (Figure 8).
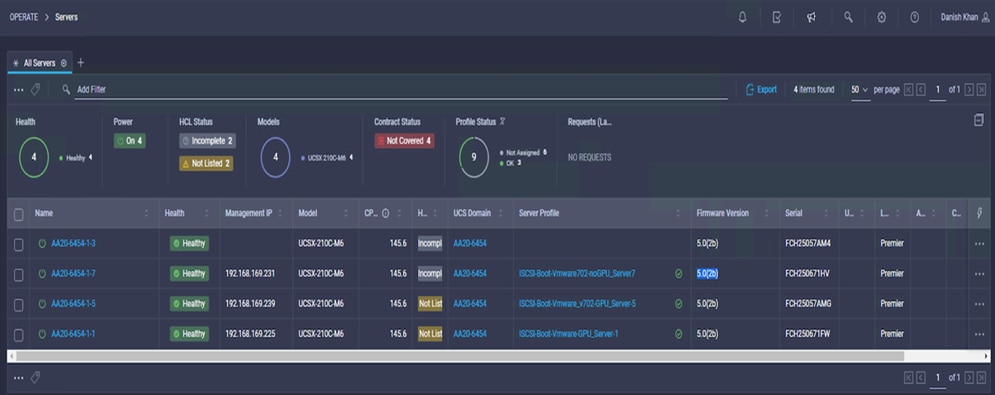
Checking the Cisco UCS 210c firmware
After you have confirmed that the software firmware is correct, the PCIe node. Now verify that the hardware is correctly installed and detected on the computing node. Several ways are available to confirm that the node is detected and is ready for server profile and OS installation.
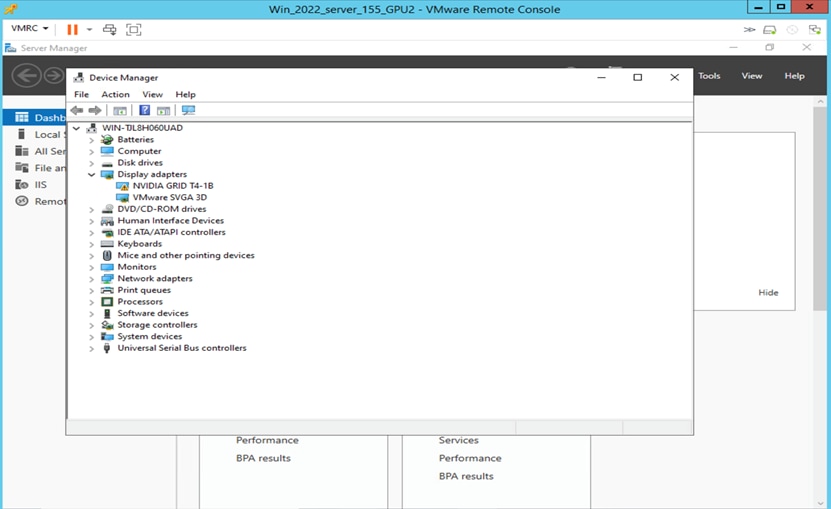
1. Select the correct chassis in the Chassis panel to display the hardware installed. You should see the PCIe node installed in the expected slot (Figure 9).
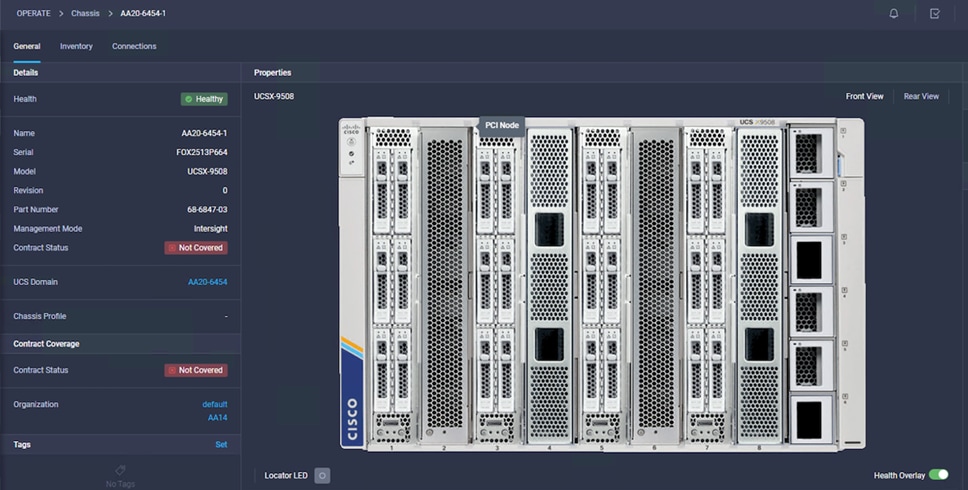
PCIe nodes in slot 2 and slot 6 next to X210c Compute Nodes in slot 1 and slot 5
2. The X-Fabric is in the bottom two slots of the chassis. Click the rear view to confirm that the X-Fabric is installed (Figure 10).
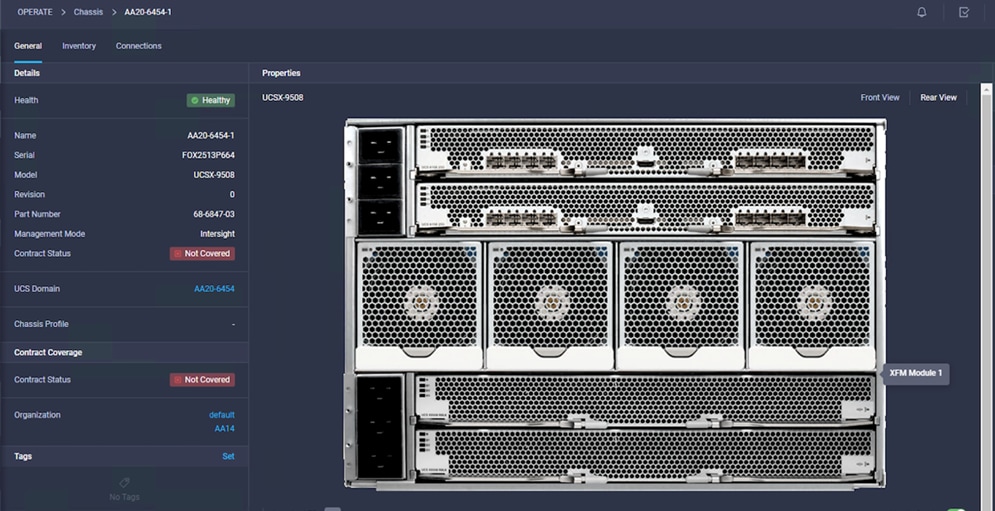
Rear view to see X-Fabric installation
3. Check the Inventory tab on the chassis X-Fabric Module (XFM) to confirm that the correct version is installed (Figure 11).
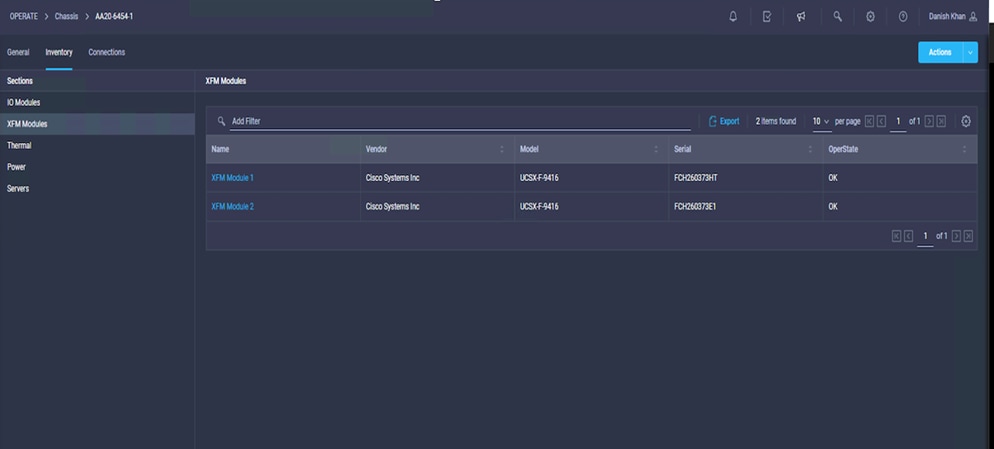
XFM version confirmation in bottom two slots of the chassis
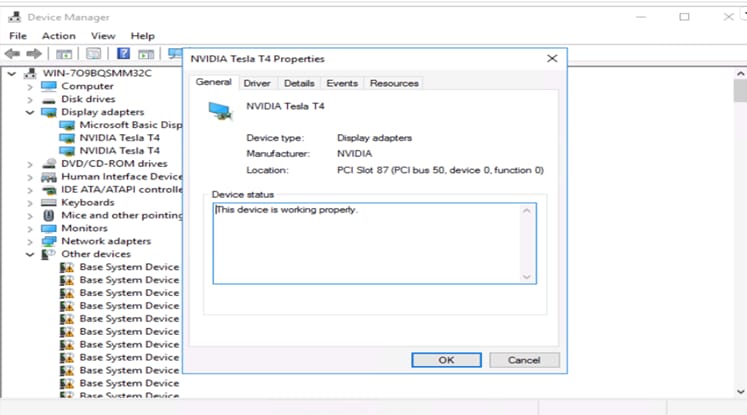
4. Choose Operate > Servers and the server number in the left panel and click the Inventory tab. Expand the PCIe and GPUs nodes to verify the node installation. Verify the mezzanine card and GPU node installation (Figures 12 and 13).
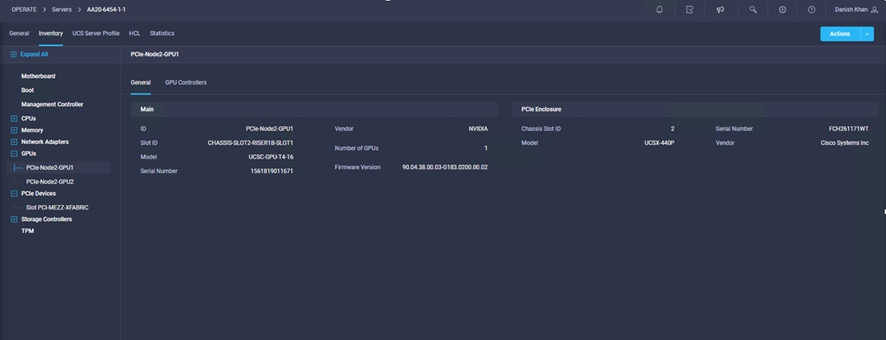
GPUs and mezzanine cards installed
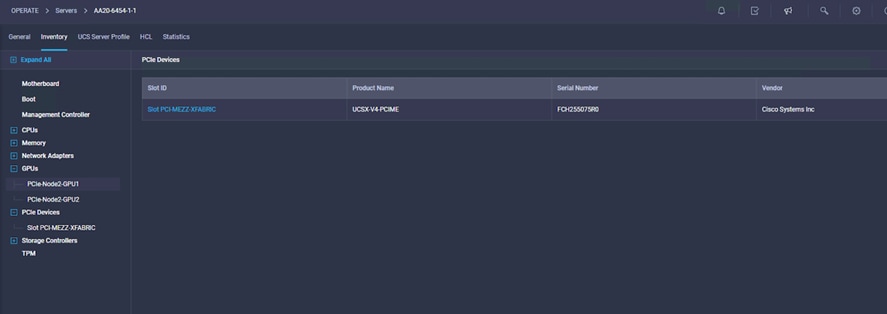
GPUs and mezzanine cards installed
If you cannot detect the GPU node, you need to rediscover the server node as shown in Figure 14.
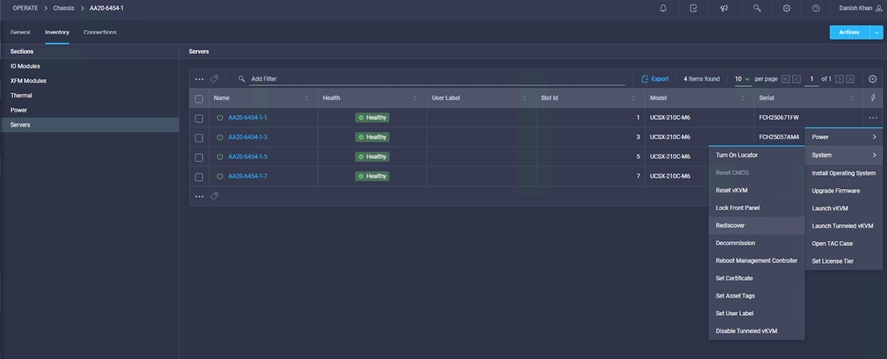
Where to click to rediscover the server in the chassis
NVIDIA driver installation and licensing requirements
After you have verified the installation of the Cisco UCS X440 PCIe Node hardware and the operating system, you need to install drivers and licenses from NVIDIA for proper functioning. Both are explained in this section using several different operating systems.
NVIDIA drivers and licenses are required for the GPUs and virtual GPUs (vGPUs) to work properly. NVIDIA presents two types of drivers: hypervisor drivers, known as host drivers, and client OS (virtual machine) drivers, known as guest drivers. A bare-metal installation of the OS requires just the guest driver, whereas hypervisor platforms such as VMware require host drivers for the hypervisor and different OS drivers for the guest machines matching the version of the hypervisor. Requirements for installing each type of hypervisor driver depend on the type of licensing profile you have purchased from NVIDIA. Profiles and the driver types required are discussed in detail in the next section.
The NVIDIA portal lists drivers either individually or bundled in a compressed file. When you extract the bundle, you obtain both the host and guest drivers (Figure 15). Host and guest driver versions must match the compatibility requirements listed on the NVIDIA website. After the hypervisor drivers are installed, you allocate the GPUs and vGPUs to virtual machines and then install the guest drivers depending on the NVIDIA vGPU profile assigned. You then can operate NVIDIA vGPU Manager software on the host and OS (guest) running various commands to verify the installation and functions.
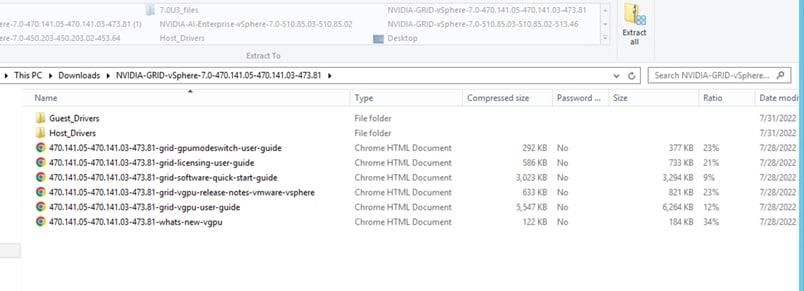
Extracted bundle of NVIDIA drivers showing both guest and host drivers for VMware
NVIDIA requires vGPU licenses to virtualize GPUs presented to different virtual machines. Licenses for vGPUs are based on the number of active running virtual machines. Every time a virtual machine boots, the virtual machine registers itself to the NVIDIA licensing server. Therefore, when acquiring licenses, you we need to have an estimate of the number of active virtual machines you will need.
Starting with NVIDIA Release 13.0, NVIDIA provides two methods for licensing servers:
● Cloud License Service (CLS), the preferred method: A CLS instance is hosted at the NVIDIA Licensing portal.
● Delegated License Service (DLS): A DLS instance is hosted on-premises at a location that is accessible from your private network, such as inside your data center.
Note: A legacy licensing method that reaches end-of-life in 2023 is not covered here.
Refer to the following NVIDIA document for more information about licensing: https://docs.nvidia.com/license-system/latest/nvidia-license-system-user-guide/index.html#configuring-nls-licensed-client.
You can obtain a license for four profiles defined according to your application requirements. You generate a client configuration token file and upload it to the required virtual machine for use (this process is demonstrated at later in this document).
You can also generate a 90-day evaluation license for testing purposes. See https://www.nvidia.com/en-us/data-center/resources/vgpu-evaluation/.
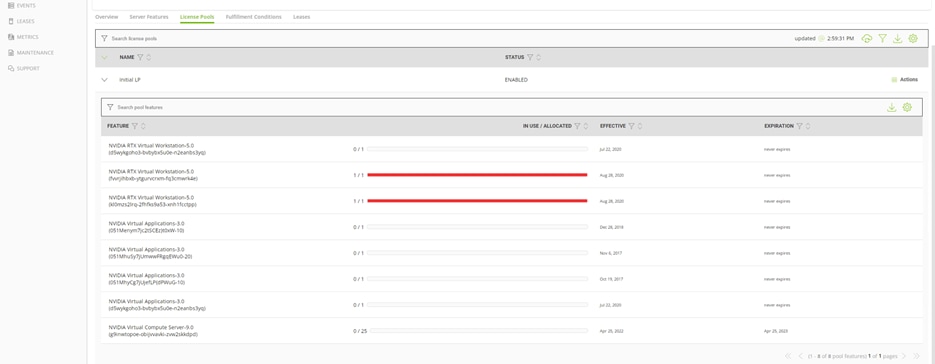
NVIDIA defines vGPU licenses according to four software product types based on application needs and requirements (Table 6):
● NVIDI RTX Virtual Workstation (vWS)
● NVIDIA Virtual PC (vPC)
● NVIDIA Virtual Applications (vApps)
● NVIDIA Virtual Compute Server (vCS)
Table 6. NVIDIA license types
| NVIDIA vGPU software licensed product |
Target users |
Supported NVIDIA vGPU software deployments |
| vApps |
Users of PC-level applications and server-based desktops that use Citrix Virtual Apps and Desktops, VMware Horizon, Remote Desktop Session Host (RDSH), or other application-streaming or session-based solutions |
● A-series NVIDIA vGPU’s
● GPU passthrough
● Microsoft Discrete Device Assignment (DDA)
● VMware Virtual Dedicated Graphics Acceleration (vDGA)
● Bare metal
|
| vPC |
Users of business virtual desktops who require a great user experience with PC applications for Windows, web browsers, and high-definition video |
● B-series NVIDIA vGPU’s
● Microsoft RemoteFX vGPU
● VMware Virtual Shared Graphics Acceleration (vSGA)
|
| vCS |
Users of computing-intensive virtual servers for artificial intelligence (AI), deep learning, or high-performance computing (HPC) workloads |
● C-series NVIDIA vGPU’s
● GPU pass through
● Microsoft DDA
● VMware vDGA
|
| vWS |
Users of mid-range and high-end workstations who require access to remote professional graphics applications with full performance on any device anywhere |
● Q-series NVIDIA vGPUs
● C-series NVIDIA vGPUs
● B-series NVIDIA vGPUs
● GPU passthrough
● Microsoft DDA
● VMware vDGA
● Bare metal
|
The vCS profile is designed for computing-intensive virtual servers for AI, deep learning, or HPC workloads. It is designed for Linux-based operating systems. Its profile is not supported on Windows servers, and the driver installation process does not detect hardware on a Windows server when you use this profile.
For NVIDIA vPC and vDWS profiles, verify that you have remote desktop access (using Remote Desktop Protocol [RDP]) for the virtual machine before you install the NVIDIA graphic card drivers. Otherwise, after the system installs the driver and reboots, you will see a black screen if you try to access the console from VMware vCenter or using VMware Remote Console (VMRC). Only RDP access will display the screen.
For more information about NVIDIA license types, see these resources:
● https://docs.nvidia.com/grid/13.0/grid-licensing-user-guide/index.html
● https://www.nvidia.com/content/dam/en-zz/Solutions/design-visualization/solutions/resources/documents1/Virtual-GPU-Packaging-and-Licensing-Guide.pdf
Starting with NVIDIA Release 13.0, vCS is not supported on VMware vSphere. C-series vGPU types are not available. Instead, vCS is supported with NVIDIA AI Enterprise Edition. See https://docs.nvidia.com/grid/14.0/grid-vgpu-release-notes-vmware-vsphere/index.html#vcs-not-supported.
The preceding discussion implies that you have separate vGPU Manager drivers (*.vib files) if you want to use vPC and vDWS profiles or the vCS profile on the ESX host, and you cannot use multiple profiles on the same host.
For more information, see the NVIDIA support matrix at https://docs.nvidia.com/ai-enterprise/latest/product-support-matrix/index.html#support-matrix.
This document presents the steps for installing vGPU Manager for NVIDIA vPC and vDWS profiles. It also presents the steps for assigning a profile and installing drivers for a Windows Server 2022 virtual machine and RHEL 8.6 virtual machine for these profiles. The document also shows how to install licenses and provides snapshots of verification commands.
This document also shows how to install NVIDIA AI Enterprise vGPU Manager on a separate host, assign the vCS profile, and install drivers and licenses on a RHEL 8.6 virtual machine.
In addition, the document shows how to install a bare-metal operating system and drivers and licenses.
vGPU installation requirements and verification on VMware
After the hardware has been detected and verified and the server profile is installed on Cisco Intersight IMM, you install the VMware ESXi 7.0 U2 platform. The ESXi host resides on NetApp storage using iSCSI as the boot option. This ESXi host is then registered to vCenter. To use VMware with a vGPU, the vCenter Enterprise Plus Edition is required.
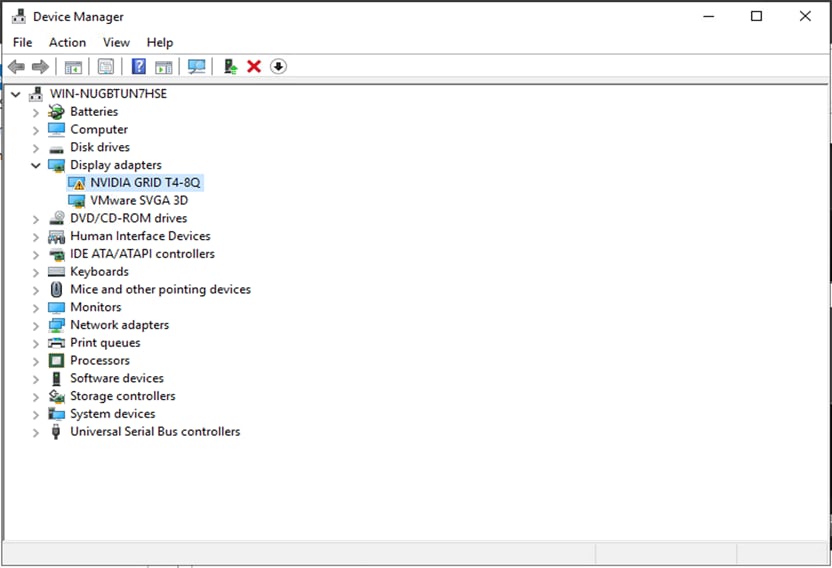
After the ESXi installation is complete on the X210c node that contains the X440p PCIe Node, verify that the X440p GPUs are presented to the ESXi host software by hardware.
1. In vCenter, navigate to Host > Configuration > Hardware > Graphics. Figure 16 shows two Tesla T4 cards presented to the ESXi software by the hardware.
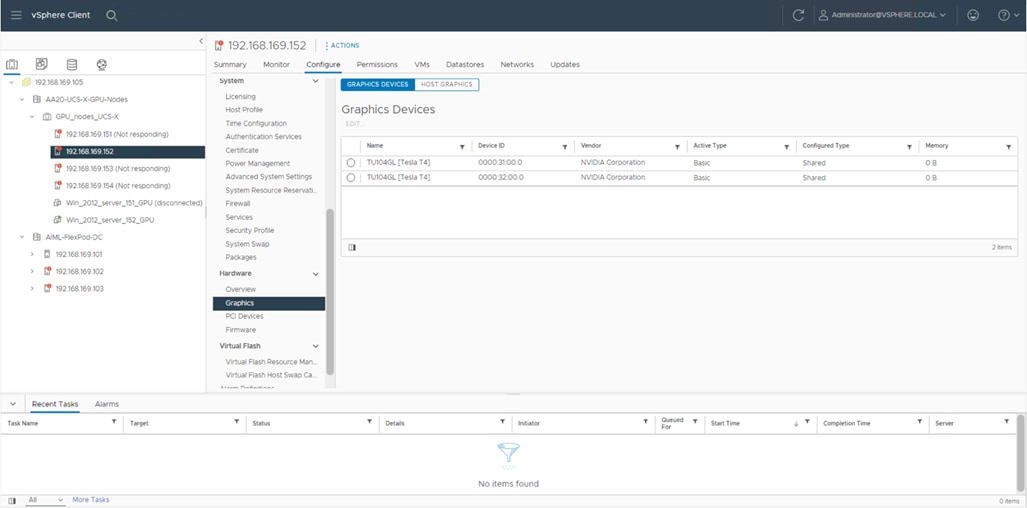
Tesla T4 cards presented to the ESXi software by the hardware.
2. At the host command-line interface (CLI), verify the GPUs (Figure 17).

Verifying the GPUs from the host CLI
NVIDIA drivers and licensing on the ESXi host
To present GPUs from the VMware ESXi host to virtual machines, you need the appropriate drivers. You also need licenses to operate the GPUs effectively. As stated earlier, hypervisor drivers are required on the ESXi host, and virtual machine (guest) drivers are required on the OS that is to be installed. Also, to virtualize the GPUs to be presented to virtual machines according to your application needs, licenses are required from NVIDIA.
After you have obtained the licenses, follow the steps presented here to correctly operate vGPU’s on virtual machines:
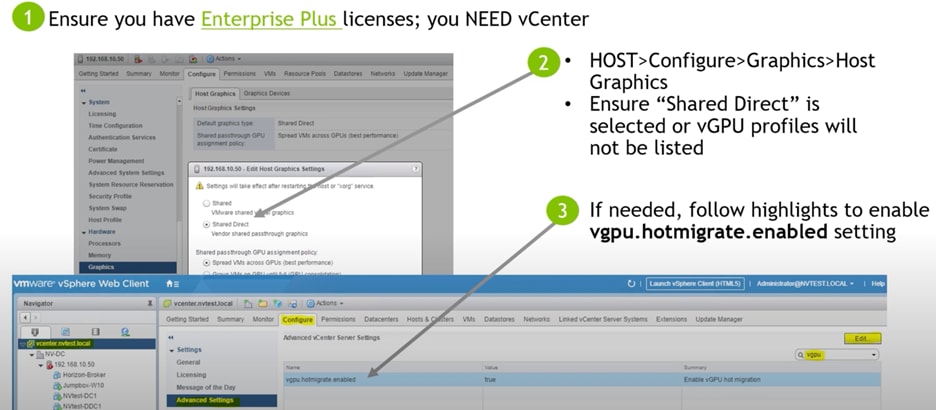
1. Although the NVIDIA driver for NVIDIA Manager is installed on the ESXi host itself, vCenter is used for all purposes for deploying and managing the vGPU. You must use vCenter Enterprise Plus Edition licenses for vGPU installation and usability.
2. For vGPU vMotion migration, enable emotion.hot.migrate.
3. In vCenter, change the ESXi host setting to Shared Direct. You will also need to reboot the host to allocate the vGPU’s to the virtual machines from the ESXi host.
4. Install the ESXi host driver according to the profile to be used (this action also allows you to use NVIDIA vGPU Manager).
5. Create a virtual machine on the ESXi host on which vGPU Manager is installed.
6. Edit the virtual machine setting and add a PCIe vGPU device by selecting the appropriate vGPU profile.
7. Install the operating system and confirm that the hardware is detected on the virtual machine.
8. Install NVIDIA drivers according to the profile you selected. Verify that the installed OS driver matches the NVIDIA compatibility matrix. You can do this by using installation drivers from the same bundle from which you obtained the NVIDIA Manager driver.
9. Generate a token file from the NVIDIA licensing server and copy it to the required virtual machine directory.
10. In the virtual machine settings, allocate the correct vGPU resources profile according to virtual machine requirements.
11. In the virtual machine settings, allocate the correct CPU and memory according to your requirements.
See these documents for information about vGPU and AI Enterprise requirements:
● vGPU requirements: https://docs.nvidia.com/grid/13.0/grid-vgpu-user-guide/index.html#prereqs-vgpu
● AI Enterprise requirements: https://docs.nvidia.com/ai-enterprise/latest/user-guide/index.html#prereqs-nvidia-ai-enterprise
Deploying NVIDIA vGPU Manager on the ESXi host
NVIDIA has published the latest driver to date for VMware 7.0U2. To install the NVIDIA driver for the required VMware hypervisor, you need to download the latest driver from the NVIDIA website. The “platform version” is the version of the operating system installed, and the “product version” is the NVIDIA driver version for which you need to find the matching platform version; you then need to find the latest product version to get the latest driver.
Based on your license profile, select the product family and required drivers:
● For vPC and vDWS profiles, deploy NVIDIA vGPU Manager downloading from the NVIDIA website: https://ui.licensing.nvidia.com/software. In the product family list, filter the vGPU option and download the zip file that contains host drivers and guest drivers. Host drivers have a VIB file that you need to install on the ESXi host to make NVIDIA Manager commands available.
● For vCS, you need to deploy NVIDIA NVAIE Manager downloading from the NVIDIA website: https://ui.licensing.nvidia.com/software. In the product family list, filter the NVAIE option and download the zip file that contains host drivers and guest drivers. Host drivers have a VIB file that you need to install on the ESXi host to make NVIDIA Manager commands available.
See Figures 18 through 23.
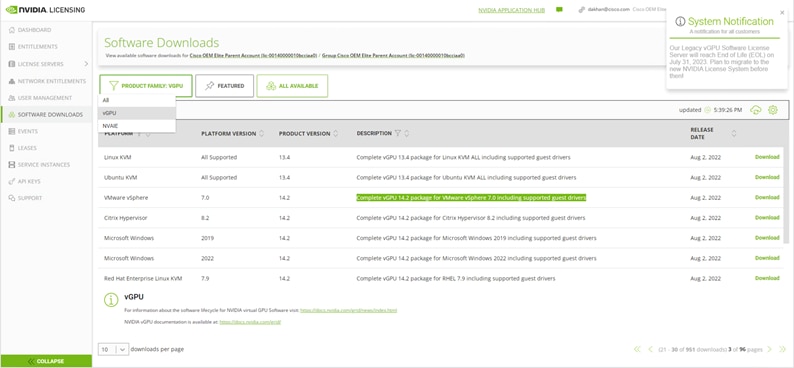
vGPU product family vPC and vDWS profile highlighted in green
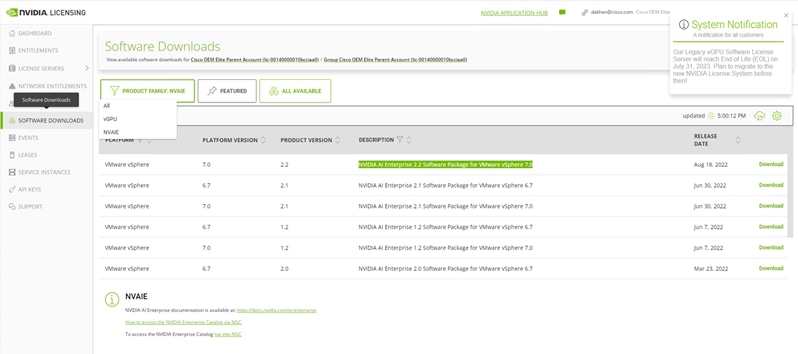
NVAIE product family vCS profile highlighted in green
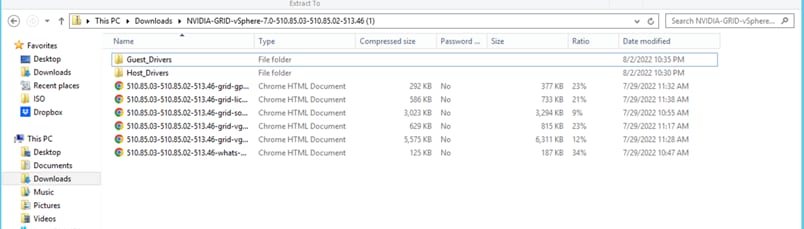
vGPU product family: Downloaded zip file extraction presents host and guest drivers

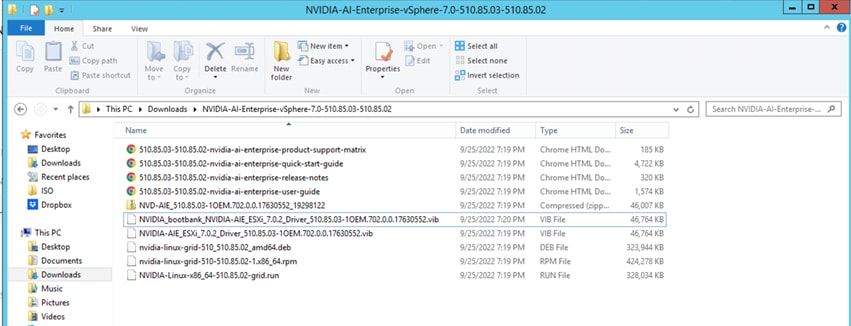
Host (ESXi) vGPU product family driver provides a VIB file with this path: C:\Users\Administrator\AppData\Local\Temp\2\Temp1_NVIDIA-GRID-vSphere-7.0-510.85.03-510.85.02-513.46.zip\Host_Drivers\NVD-VGPU_510.85.03-1OEM.702.0.0.17630552_20186461.zip\vib20\NVIDIA-VMware_ESXi_7.0.2_Driver
NVAIE product family: Downloaded zip file extraction presents host and guest drivers
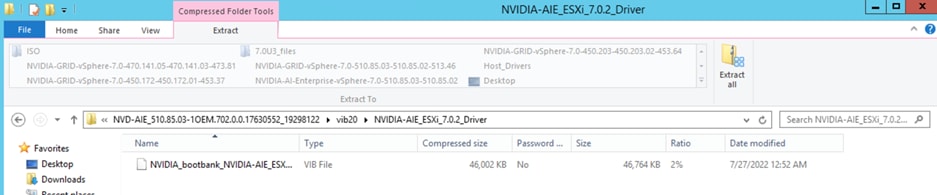
Host (ESXi) vGPU product family driver provides a VIB file with this path: C:\Users\Administrator\Downloads\NVIDIA-AI-Enterprise-vSphere-7.0-510.85.03-510.85.02\NVD-AIE_510.85.03-1OEM.702.0.0.17630552_19298122.zip\vib20\NVIDIA-AIE_ESXi_7.0.2_Driver
For this document, there are two ESXi hosts: 192.168.169.151 running the vGPU NVIDIA Manager for vPC and vDWS profiles, and 192.168.169.155 running the NVAIE NVIDIA Manager for the vCS profile. The snapshots that follow show the installation process for the host and virtual machines for each profile.
The installation link for the vGPU and AIE VIB is https://docs.nvidia.com/grid/latest/grid-vgpu-user-guide/index.html#install-vgpu-vib-vmware-vsphere.
As part of the process, the ESXi host needs to be in maintenance mode, and the VIB file needs to be uploaded to the ESXi host and installed on the host.
Here are the commands that need to be run:
[root@localhost:~] esxcli system maintenanceMode set --enable=true
[root@localhost:~] esxcli software vib install -v /vmfs/volumes/aiml_infra_datastore_1/NVIDIA_bootbank_NVIDIA-VMware_ESXi_7.0.2_Driver_510.85.03-1OEM.702.0.0.17630552.vib
[root@localhost:~] esxcli system maintenanceMode set --enable=false
[root@localhost:~] reboot
Verify installed vib via blow commands
[root@localhost:~] esxcli software vib list | grep -i nvidia
[root@localhost:~] nvidia-smi
On completion, you should see the message shown in Figure 24 or Figure 25. It says that a reboot is not required. However, as the NVIDIA documentation says, a reboot is required.

vGPU VIB installation host with successful installation

AIE VIB installation host with successful installation
After the reboot is complete, you should be able to run NVIDIA commands from the CLI after you take the host out of maintenance mode. Use the command shown in Figure 26 or Figure 27 to verify the driver for ESXi.

Host with vGPU VIB running the nvidia-smi command
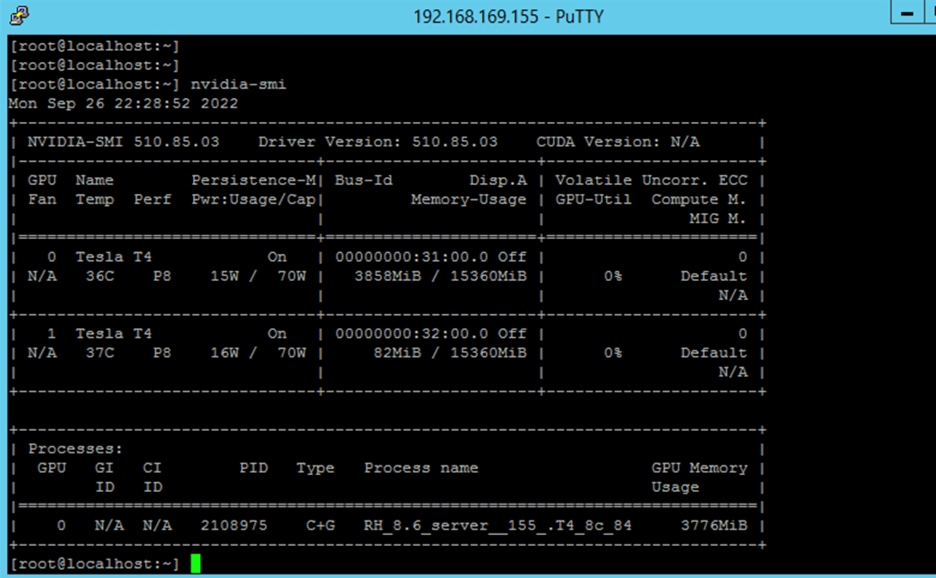
Host with NVAIE VIB running the nvidia-smi command
After the host reboots and is out of maintenance mode, verify from vCenter the three steps listed in Figure 28.
Verifying the driver installation from vCenter
As stated in Figure 29, use only the drivers from the licensing portal.
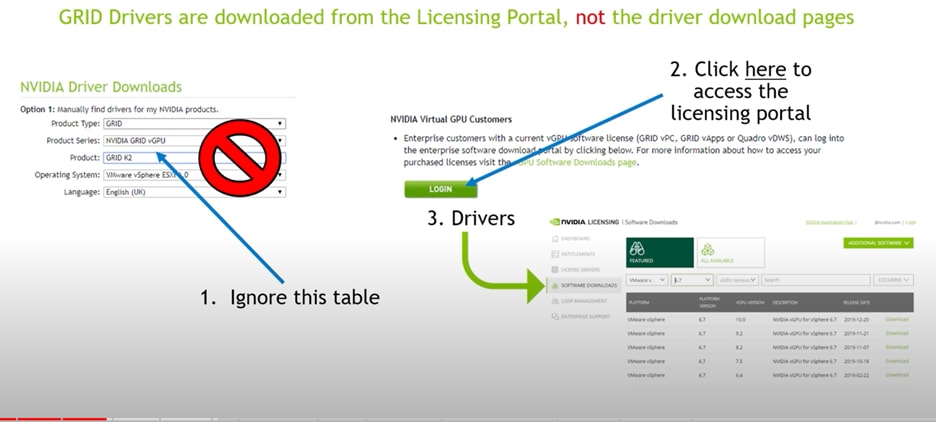
Downloading licenses
After the vGPU or NVAIE Manager is installed, you can edit the virtual machine setting for the PCIe slot. Adding the correct profile will complete the host requirements. Figures 30 and 31 show the settings for the vGPU and NVAIE Managers. Note that t4-c profiles does not exist on the NVAIE vGPU.

Host with NVAIE vGPU virtual machine setting; note that there are no t4-c profiles
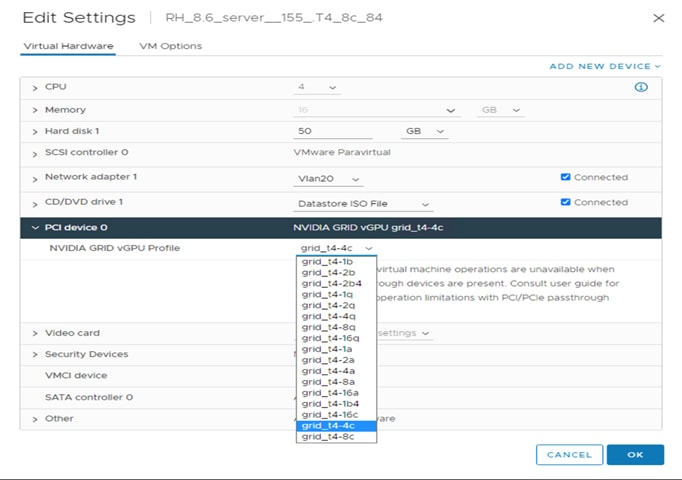
Host with NVAIE VIB virtual machine setting with t4-c profiles
Figure 32 summarizes profile naming conventions.
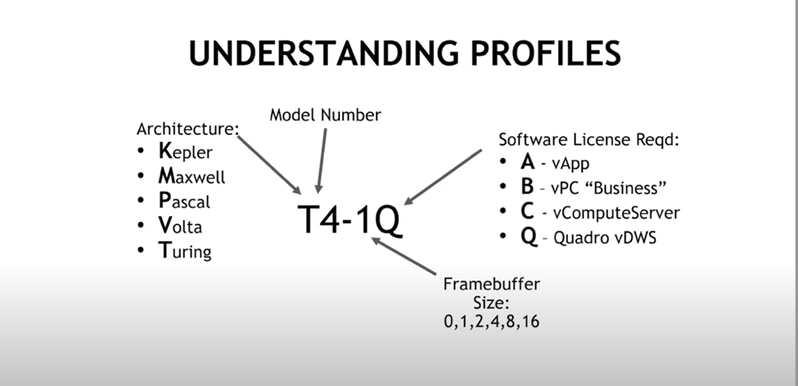
Profile naming conventions
You may need to turn off error-correcting code (ECC) memory if you see the error message shown in Figure 33.
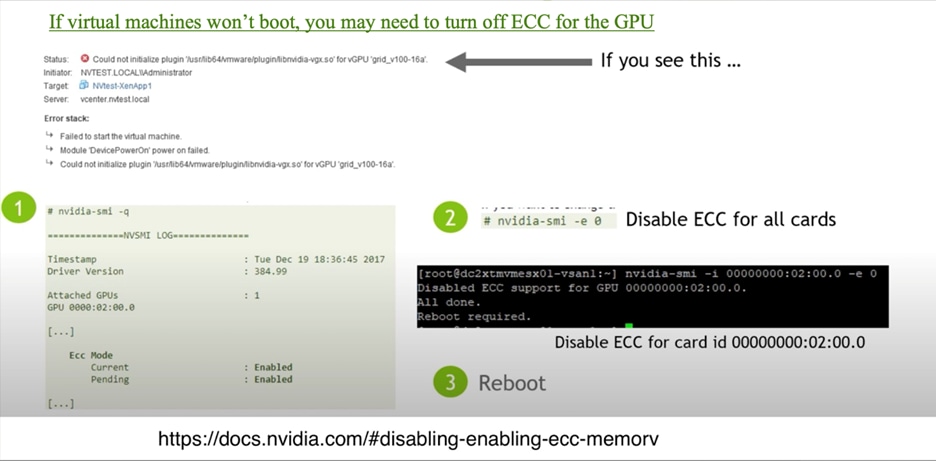
Error message requiring ECC to be disabled
The host requirements for deployment are now complete. Next, you need to install the OS, drivers, and licenses on the virtual machines.
vGPU installation requirements and verification on Windows Server 2022 as a virtual machine on VMware
With NVIDIA vGPU Manager installed on the hypervisor (in the solution here, VMware) and the vGPU profile assigned in the virtual machine PCIe settings, the next step is to install the OS and its required guest NVIDIA drivers. Windows Server is supported only with vPC and vDWS profiles. For additional details, see the following document: https://docs.nvidia.com/grid/13.0/grid-vgpu-user-guide/index.html#guest-os-support-grid-vgpu.
After the driver is installed, final step is to apply the token file generated in the NVIDIA licensing portal to the OS so that you can use vGPUs assigned.
Here is the sequence of steps you need to follow:
1. Install the virtual machine operating system (Windows Server 2022).
2. Install the NVIDIA driver from the guest drivers folder for Windows 2022.
3. Install VMware tools.
4. Assign IP addressing and configure remote desktop to get essential remote access, because after you switch the display to vGPU, a black screen will appear on the VMware virtual machine console.
5. Verify that the Network Time Protocol (NTP) is synchronized between the virtual machine and the NVIDIA licensing server.
6. Verify that TCP ports 443, 8080, 8081, and 8082 are open to reach out to NVIDIA licensing server.
7. Install the vGPU license.
8. Check the logs for verification.
Installing NVIDIA driver in the OS: Windows Server 2022 virtual machine on ESXi host
Figures 34 and 35 show two different profiles: one for each vPC and vDWS profile before and after driver installation.

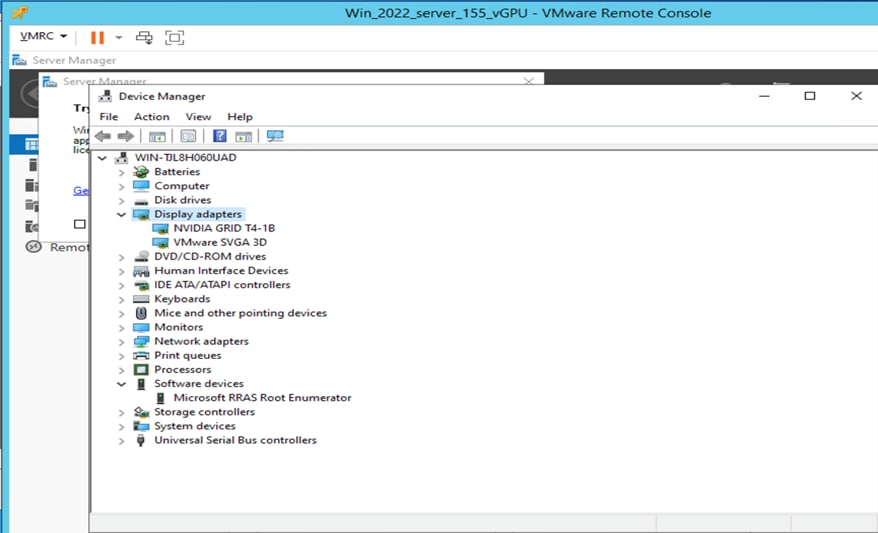
Device Manager setting in Windows Server 2022 before driver installation for T4-1B profile (vPC)
Device Manager setting in Windows Server 2022 before driver installation for T4-8Q profile (vDWS)
Install the required driver from the guest drivers folder (Figures 36 and 37).
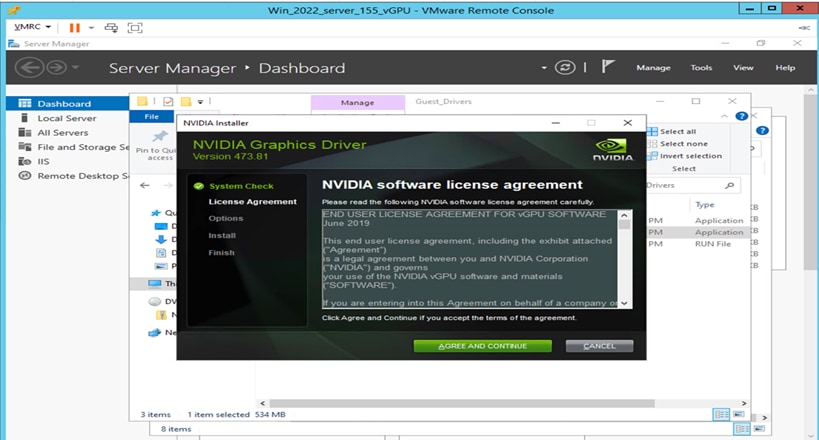
NVIDIA license agreement
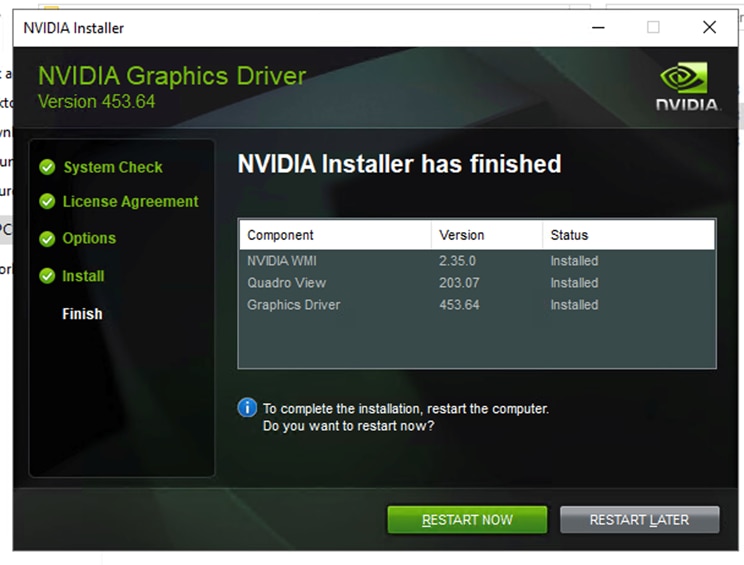
Installing the NVIDIA driver
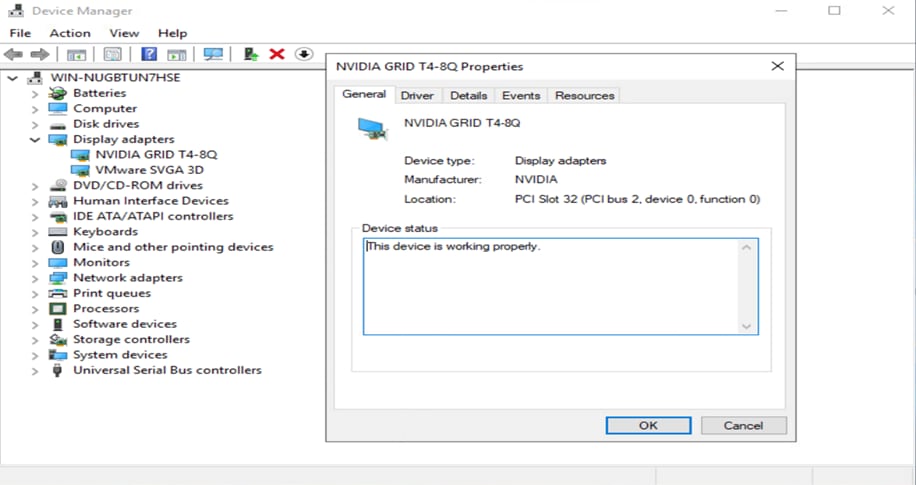
Before you restart the virtual machine, check the Device Manager to see the displayed graphic card options (Figure 38).
After the driver is installed, you can see NVIDIA in the display adapter options
Similarly, for the vDWS profile, you can see the driver installed (Figure 39).
NVIDIA driver installed for vDWS profile
At this point, restarting the virtual machine will apply the vGPU as the display driver. However, you need to use a remote desktop client from another system as the VMware console for the virtual machine displays a black screen.
Installing NVIDIA license in Windows Server OS
To use an NVIDIA vGPU software licensed product, each Microsoft Windows Server must be able to obtain a license from the NVIDIA license system directly. The Windows Server can be a virtual machine that is configured with an NVIDIA vGPU, a virtual machine that is configured for GPU passthrough, or a physical host to which a physical GPU is assigned in a bare-metal deployment.
Follow these steps to install a license on Windows Server:
1. Download the token file from the NVIDIA license server to the required directory in the operating system.
2. Apply the Microsoft Windows registry to create FeatureType DWord.
3. Restart the NvDisplayContainer service.
4. Verify the license installation using the events log and the Nvidia-smi -q command.
Note: To install licenses, synchronize the virtual machine time with the DLS server. Connect the hypervisor console of the DLS server, log in as dls_system, and run timedatectl status to confirm the time on the DLS server.
For the process for licensing the client OS, see https://docs.nvidia.com/grid/14.0/grid-licensing-user-guide/index.html#configuring-nls-licensed-client-on-windows.
Before you install the license, you will see notifications reporting that a license is not present (Figure 40).
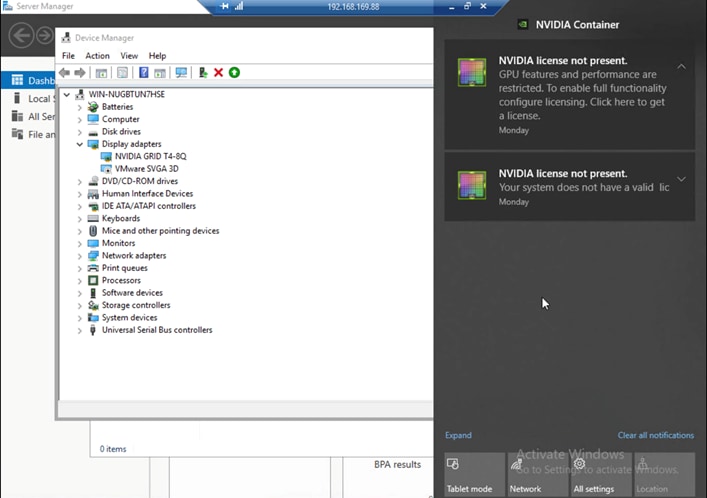
Message reporting that no license is present
The steps for installing licensing on the Windows Server host are presented here.
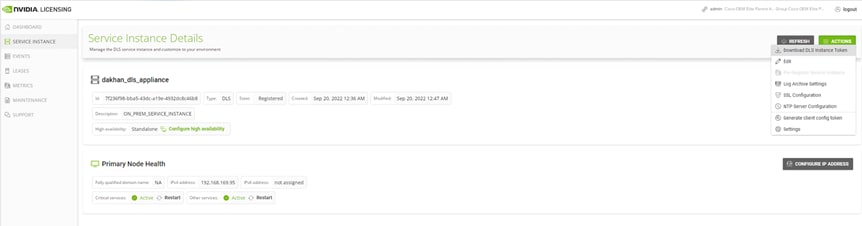
1. To install the licensing token file, log in to the NVIDIA licensing portal at https://ui.licensing.nvidia.com/login.
2. Download the token file from the DLS server created following the licensing process (Figure 41).
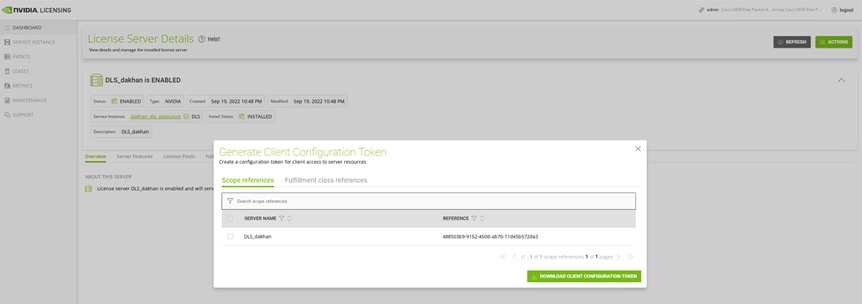
Download the token file
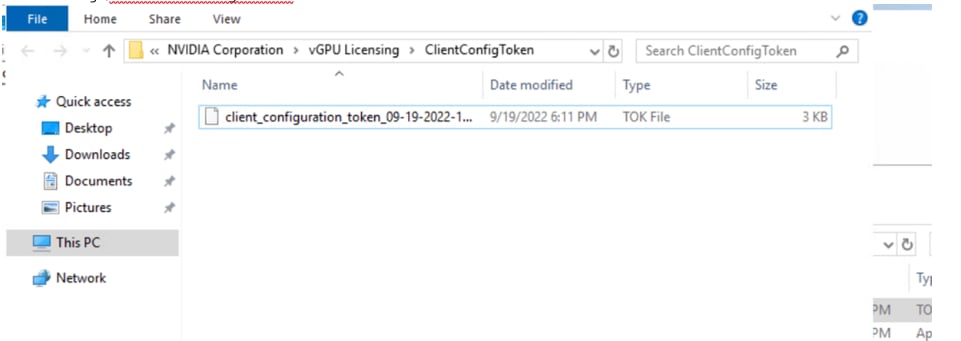
3. Copy the client configuration token to the %SystemDrive%:\Program Files\NVIDIA Corporation\vGPU Licensing\ClientConfigToken folder (Figure 42).
Copy the client configuration token
4. Add the FeatureType DWord (REG_DWORD) registry value to the Windows registry key HKEY_LOCAL_MACHINE\SOFTWARE\NVIDIA Corporation\Global\GridLicensing (Figure 43).

Adding the REG_DWORD FeatureType
Table 7 shows the value of the FeatureType DWord.
Table 7. FeatureType DWord value
| GPU type |
Setting |
| NVIDIA vGPU |
Do not change the value of this registry key. NVIDIA vGPU software automatically selects the correct type of license based on the vGPU type. |
| Physical GPU |
The feature type of a GPU in passthrough mode or a bare-metal deployment is as follows: 0: NVIDIA vApps 2: NVIDIA RTX vWS |
5. Restart the NvDisplayContainer service (Figure 44).
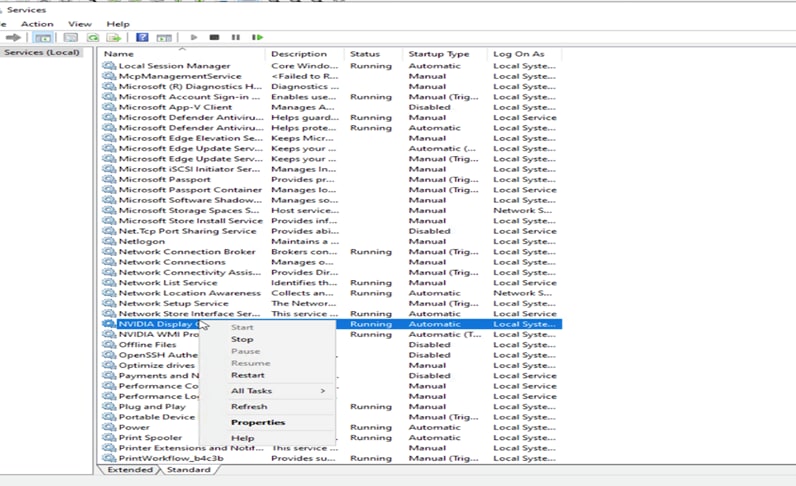
Restarting the NvDisplayContainer service
6. Verify the setup.
a. In Windows Server, licensing events are logged in the plain-text file %SystemDrive%\Users\Public\Documents\NvidiaLogging\Log.NVDisplay.Container.exe.log. View this file (Figures 45, 46, and 47).
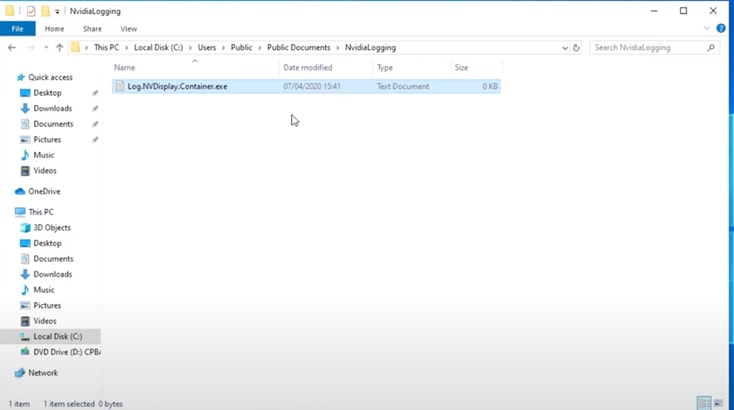
Checking the plain-text log file in Windows Server

Logged events in Windows Server
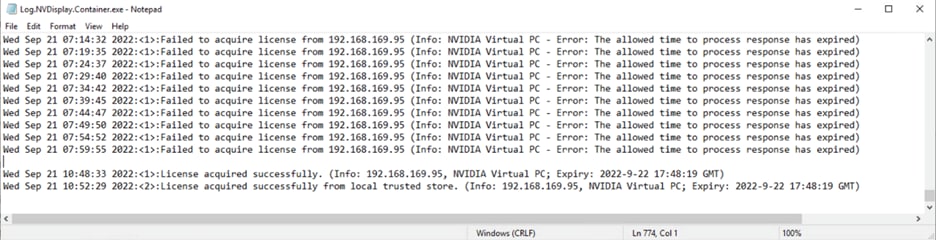
Logged events in Windows Server
To verify the license status of a licensed client, run nvidia-smi with the –q or --query option. If the product is licensed, the expiration date is shown in the license status (Figures 48 and 49).
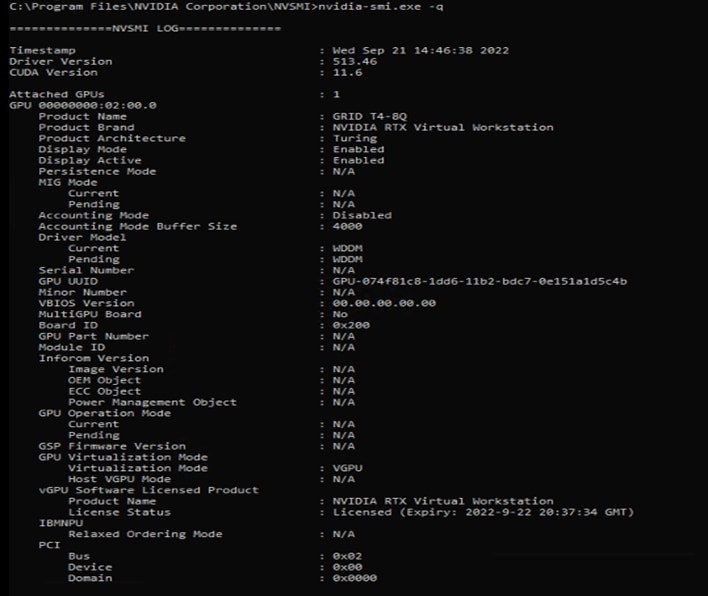
NVIDIA vPC displaying the installed driver
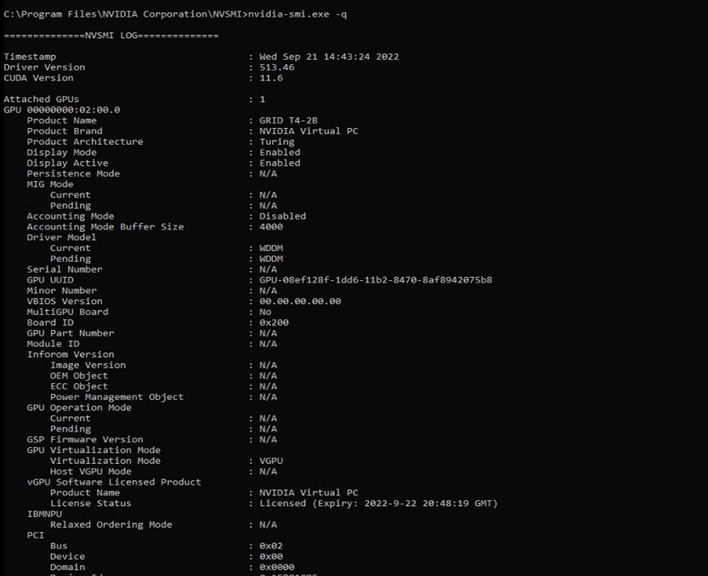
NVIDIA vCS displaying the installed driver
b. Check the NVIDIA Control Panel to verify the driver and other details (Figure 50).
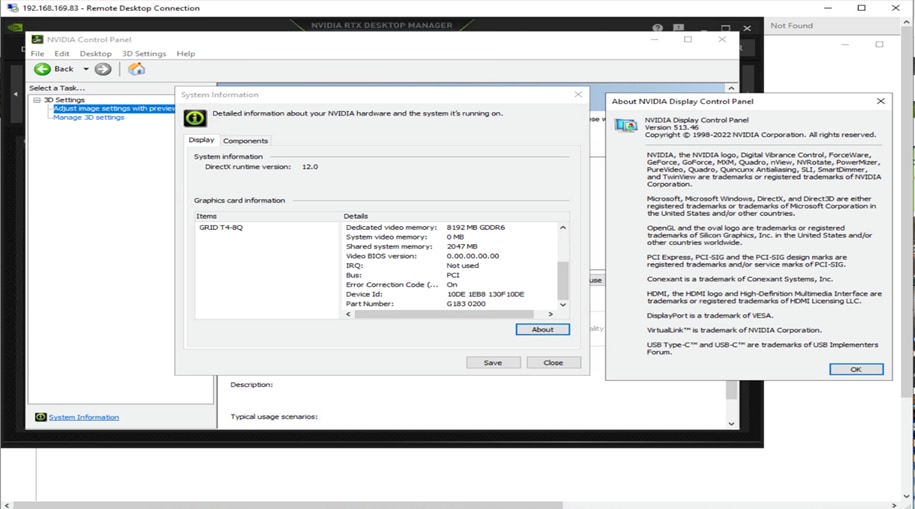
Verifying the driver on the NVIDIA Control Panel
c. Verify leased licenses for virtual machines by checking the NVIDIA server (Figure 51).

Verifying leased licenses on the NVIDIA server
vGPU installation requirements and verification on an RHEL 8.6 server as an ESXi host virtual machine
As with the Windows virtual machine installation process, after you have an NVIDIA vGPU profile assigned in the virtual machine settings of the VMware hypervisor, the next step is to install the OS. In this case, you install the RHEL OS and guest NVIDIA drivers for RHEL 8.6. You use the same token file generated for NVIDIA licensing to apply licenses; however, the process is slightly different. Linux-based operating systems are supported on all profiles and so consequently are supported on vGPU as well as NVAIE NVIDIA Managers. For computing-intensive virtual servers for AI, deep learning, or HPC workloads, the NVAIE profile and the vCS Manager and license is deployed, and for the vPC and vDWS profiles, the vGPU Manager and license is deployed.
The example presented here shows two virtual machines: one on each host running a vGPU and the NVAIE profile.
The following steps are required for RHEL 8.6 driver and license installation:
1. Install the virtual machine operating system (RHEL 8.6).
2. Install VMware tools.
3. Installing the RHEL virtual machine base configuration.
4. Install RDP access.
5. Install the NVIDIA driver guest driver for RHEL 8.6.
6. Assign IP addressing to configure the remote desktop to get essential remote access, because after you switch the display to vGPU, a black screen will appear.
7. Install the vGPU licensing.
8. Verify that TCP ports 443, 8080, 8081, and 8082 are open to reach out to the NVIDIA licensing server.
9. Check the logs for verification.
After the virtual machine has been assigned vGPUs and the RHEL virtual machine is installed and present, verify that the hardware is installed.
1. To verify the vGPU assignment and RHEL virtual machine installation, use the Terminal application on the RHEL OS (Figure 52).
Use the Terminal application to verify hardware installation
2. After verifying that the hardware is present in the OS, you are ready to install the driver and related base configurations. First, update the packages. Log in as root and run the following commands:
[root@localhost /]#yum -y update
[root@localhost /]# yum groupinstall "Development Tools"
[root@localhost /]# yum -y install kernel-devel
[root@localhost /]# yum install dkms
3. After the built-in driver is disabled for RHEL, you will see a black screen when you log in to the VMware Remote Console (VMRC). To gain access to the GUI when NVIDIA GPU is enabled, enable RDP on the Red Hat system by entering the following commands:
[root@localhost /]# yum install -y https://dl.fedoraproject.org/pub/epel/epel-release-latest-8.noarch.rpm
[root@localhost /]# yum install -y tigervnc-server xrdp
[root@localhost /]# systemctl start xrdp
[root@localhost /]# netstat -antup | grep xrdp
[root@localhost /]# systemctl enable xrdp
[root@localhost /]# firewall-cmd --permanent --add-port=3389/tcp
[root@localhost /]# firewall-cmd --reload
4. Blacklist the NVIDIA nouveau driver by entering the following commands:
[root@localhost /]# sudo bash -c "echo blacklist nouveau > /etc/modprobe.d/blacklist-nvidia-nouveau.conf"
[root@localhost /]# sudo bash -c "echo options nouveau modeset=0 >> /etc/modprobe.d/blacklist-nvidia-nouveau.conf"
[root@localhost /]# mv /boot/initramfs-`uname -r`.img /boot/initramfs-`uname -r`.img.nouveau
[root@localhost /]# dracut
[root@localhost /]# reboot
5. Confirm that nouveau is disabled and stop the X server by entering the following commands:
# lsmod | grep -i nouveau
If nouveau is not disabled, run the blacklist procedure again:
# init 3 or sudo service gdm3 stop to stop the X server
6. Install the NVIDIA GRID driver for Linux. NVIDIA drivers are available in three formats for use with Linux distributions:
◦ Runfile installers
◦ Package managers
◦ Containerized drivers
All methods are mentioned at https://docs.nvidia.com/grid/latest/grid-vgpu-user-guide/index.html#installing-vgpu-drivers-linux.
The example in this document uses the .run file method. The .run file is different for a vCS profile than for the vPC and vDWS profiles.
[root@localhost Desktop]# pwd
/root/Desktop
[root@localhost Desktop]# ls
NVIDIA-Linux-x86_64-510.85.02-grid.run.
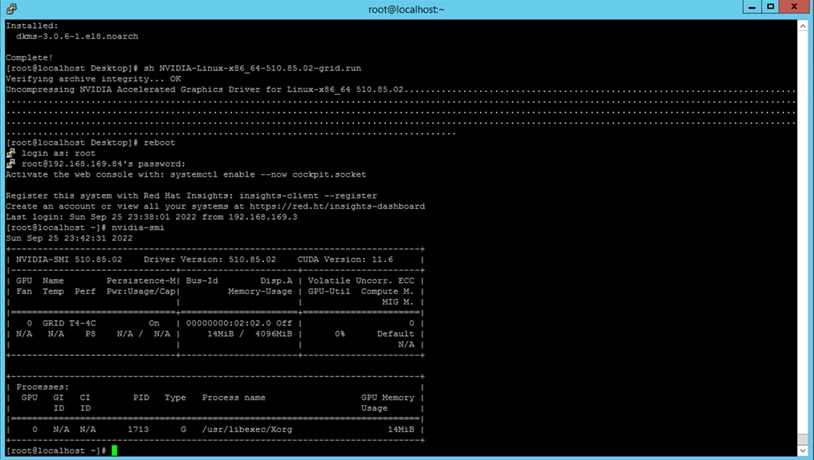
[root@localhost Desktop]# sh NVIDIA-Linux-x86_64-510.85.02-grid.run
Figures 53, 54, and 55 show the process of installing drives using .run package.
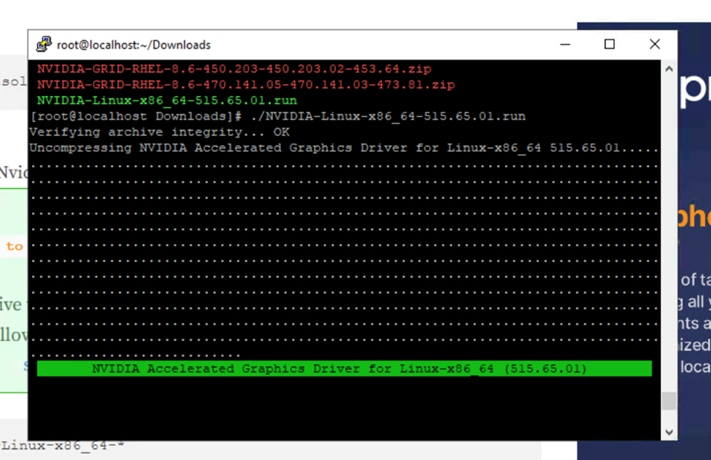
Installing drives using the .run package
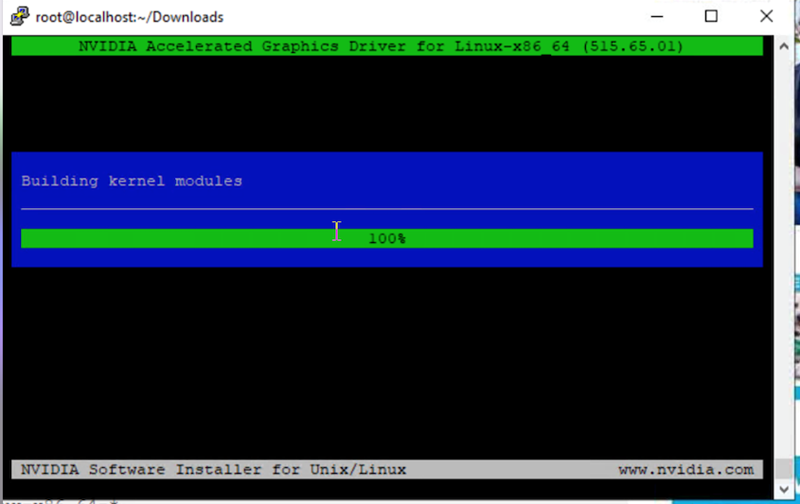
Building kernel modules
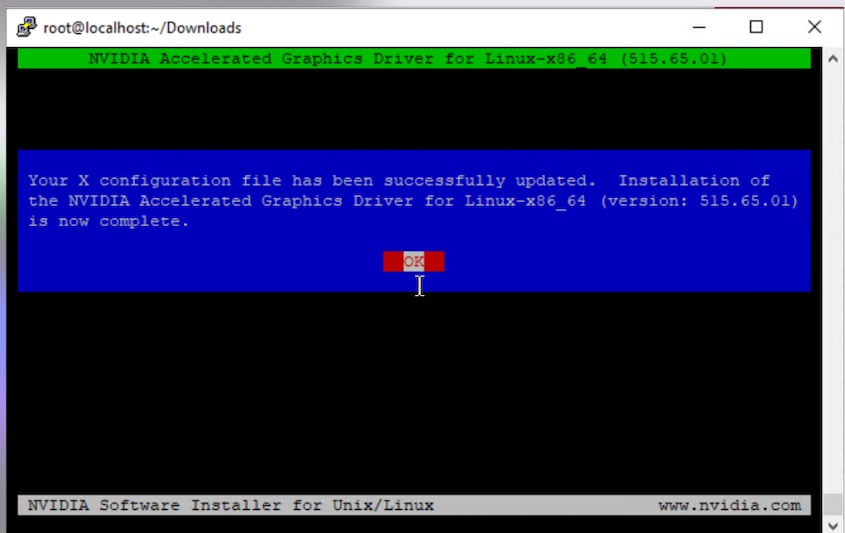
X configuration file successfully updated
7. After the installation process succeeds, run nvidia-smi commands to verify that they are operable (Figures 56 and 57).
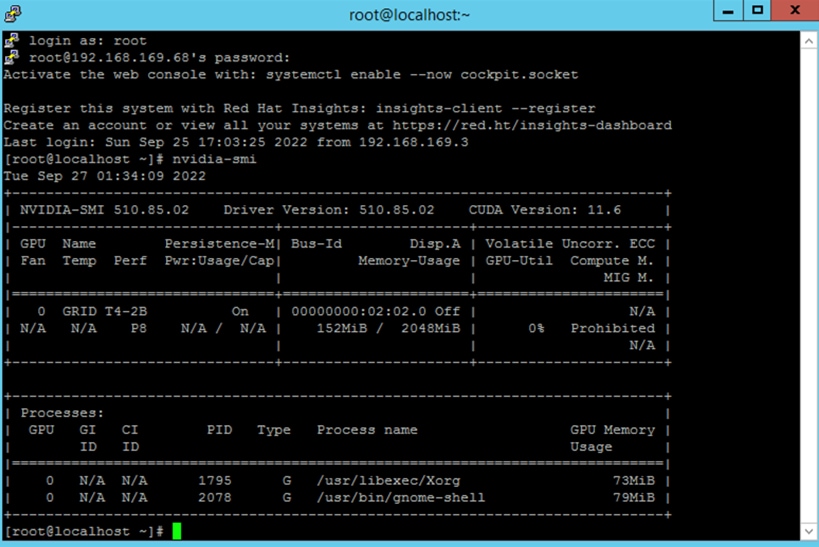
Verification on vPC and vDWS profiles with the host running vGPU Manager
Verification on a vCS profile with the host running NVAIE Manager
8. As another means of verification, check the video driver running after the driver is installed and the system rebooted (Figure 58).

Checking the video driver
NVIDIA licensing on RHEL 8.6 virtual machine
After you have downloaded the token file, you follow the licensing installation steps described at the following link: https://docs.nvidia.com/license-system/latest/nvidia-license-system-user-guide/index.html#configuring-nls-licensed-client-on-linux.
1. Download the token file and copy it to the RHEL directory:
/etc/nvidia/ClientConfigToken
2. Change permissions for the client token file:
[root@localhost:~] cd /etc/nvidia/ClientConfigToken
[root@localhost:~] chmod 744 client_configuration_token_09-25-2022-16-45-15.tok
[root@localhost:~] service nvidia-gridd restart
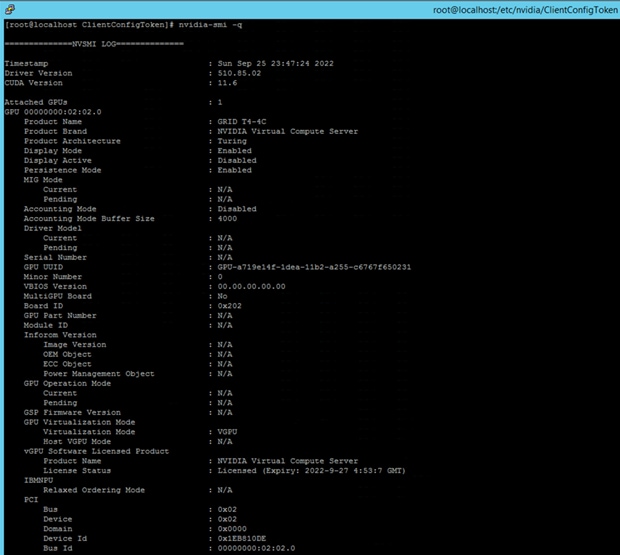
3. Use nvidia-smi -q to confirm that the license is installed correctly (Figures 59 and 60).

License verification on vPC and vDWS profile with host running vGPU Manager
License verification on vCS profile with host running NVAIE Manager
In Linux, logging is enabled by default. The licensing events are logged in the standard activity log in the /var/log directory (Figure 61). The name of the log file in this directory depends on the Linux distribution. For example:
● For RHEL and CentOS distributions, the file name is “messages.”
● For Ubuntu distributions, the file name is “syslog.”
Log file
GPU installation requirements and verification on FlexPod bare-metal Windows Server 2016 and 2022
This section and the next two discuss OS installation on the bare-metal hardware deployed in the FlexPod environment and how to boot these operating systems from NetApp storage. The operating systems and versions used here are the same as those described previously for VMware ESXi virtual machines.
Although this document provides details for Windows Server 2022, Windows Server 2016 was also tested and the same findings were confirmed.
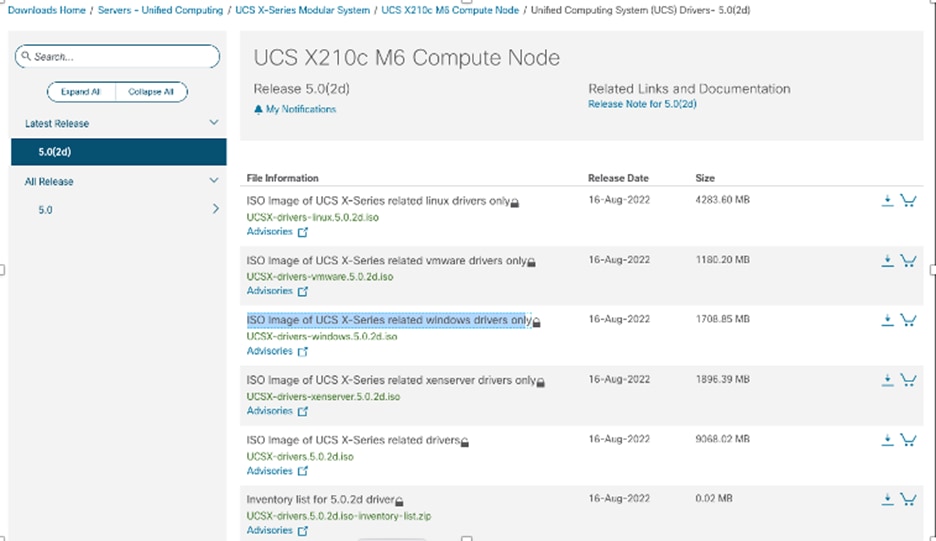
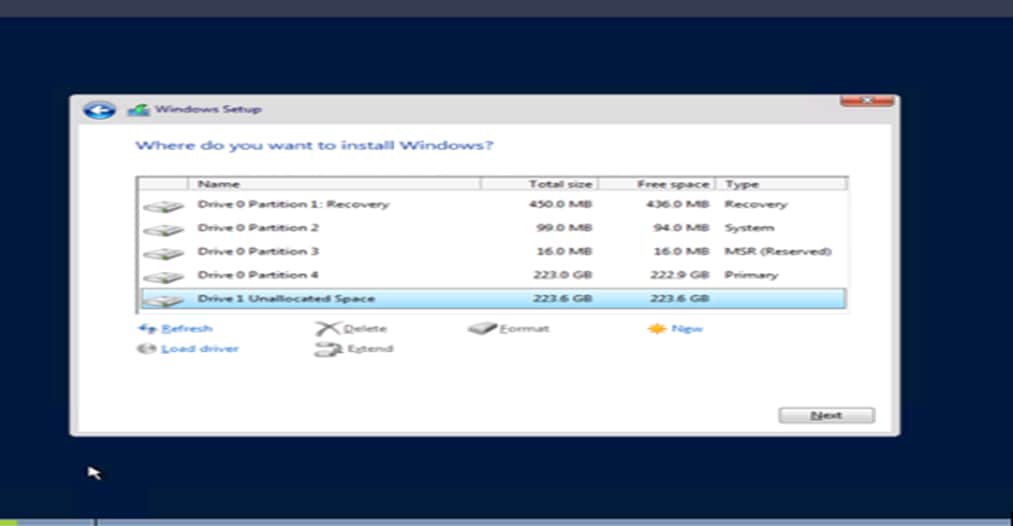
When installing the Windows Server setup, when you are required to select a storage disk, you will not be able to see the NetApp storage logical unit number (LUN) until you install the Cisco VIC drivers. You can download the Cisco drivers ISO file from Cisco.com by searching for X210c drivers at https://software.cisco.com/download/home/286329080/type/283853158/release/5.0(2d).
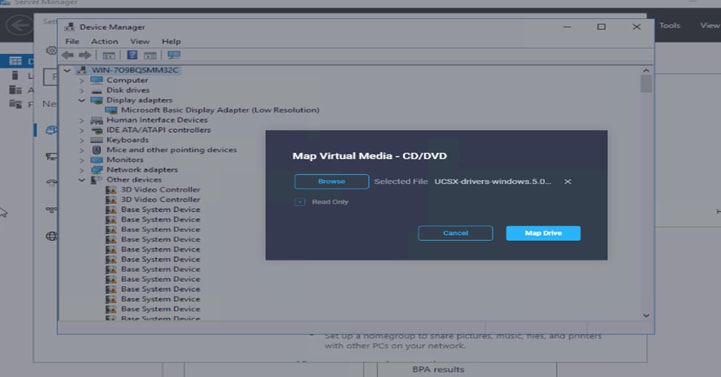
1. Download the ISO “Image of UCS X-Series related Windows drivers only” ISO file and mount the file on the Linux Kernel-based Virtual Machine (KVM). Click to load the drivers and refresh the screen (Figure 62).
2. Select the appropriate OS and browse to the network drive (Figure 63).
3. Install the VIC driver and mount the Windows OS ISO file.
4. Refresh the drivers again. The NetApp boot LUN will appear to continue the installation.
Download the ISO file
Choose the network drive
5. After the Windows server OS is installed, each NVIDIA GPU will be listed as a 3D Video Controller under Other Devices and require driver installation (Figure 64).

NVIDIA GPUs listed as 3D Video Controller instances
6. Use the same ISO file mounted earlier and check the Video section to install NVIDIA drivers (Figures 65 and 66).
Browsing to the drive
Installing the NVIDIA drivers
Figure 67 shows the drivers successfully installed.
Drivers successfully installed
The installation process for licenses on bare-metal servers is the same as the process discussed earlier for a Windows Server 2022 virtual machine.
GPU installation requirements and verification on FlexPod bare-metal RHEL 8.6
As was case with Windows Server, multiple RHEL OS versions were tested: in this case, RHEL 8.4, 8.6, and 9.0. Release 8.6 was the one with the latest support drivers in the NVIDIA portal.
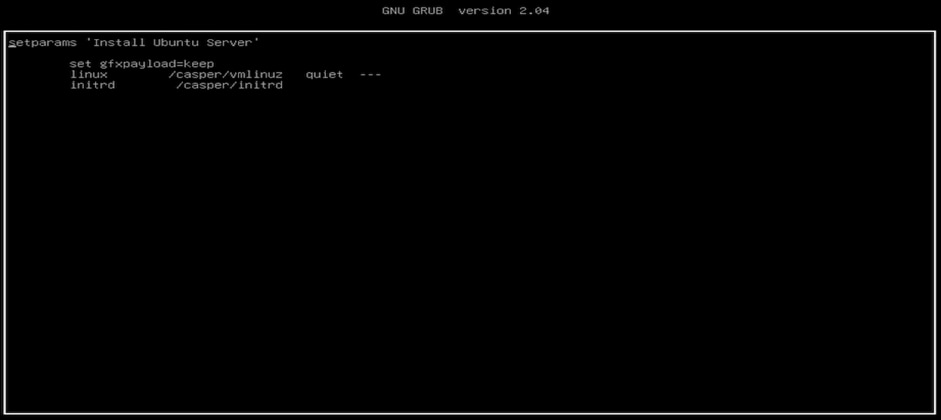
1. When attempting to boot the RHEL storage LUN as a disk, you need to modify the settings. Open the installation screen (Figure 68).

Getting ready to modify the settings to boot the RHEL storage LUN as a disk
2. Press e. Then type rd.iscsi.ibtf=1 and press Ctrl-X (Figure 69).
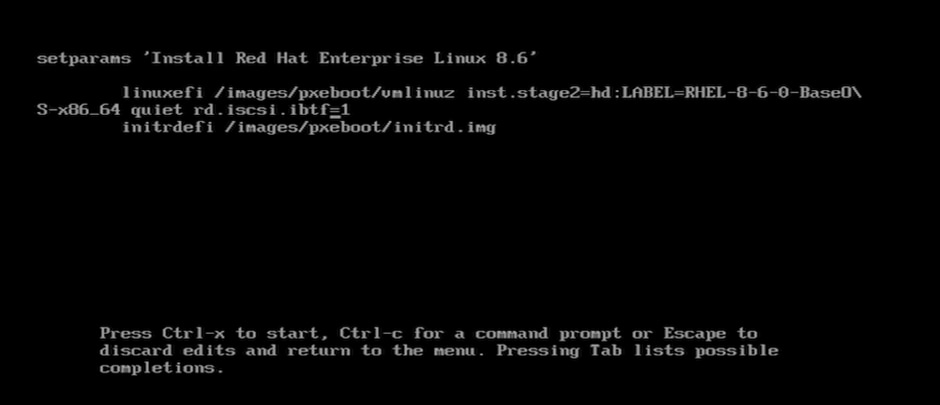
Editing the file
3. When the installation summary screen appears, select the installation destination. Then click Add a Disk and click Refresh List to see the storage LUN for the software installation (Figures 70 and 71).
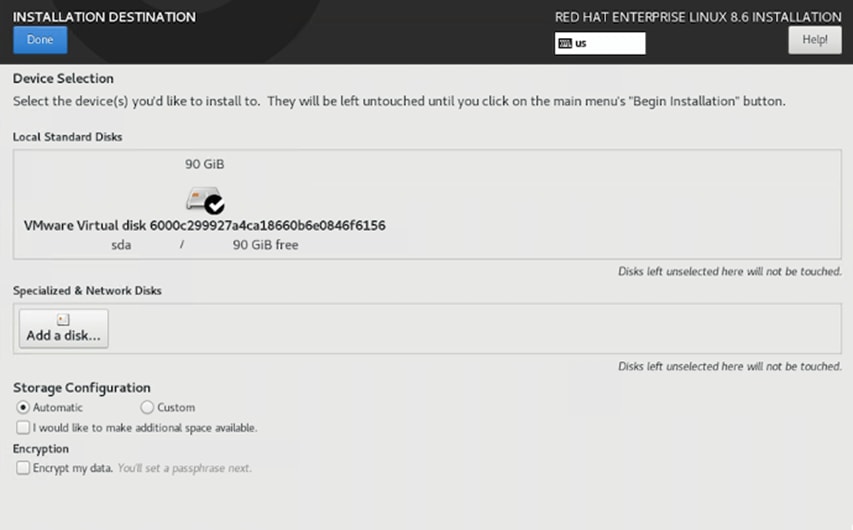
Select the installation destination
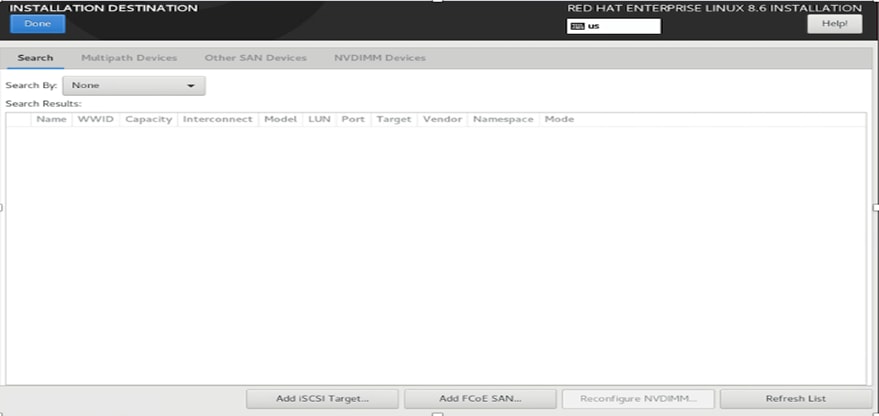
Click Refresh List
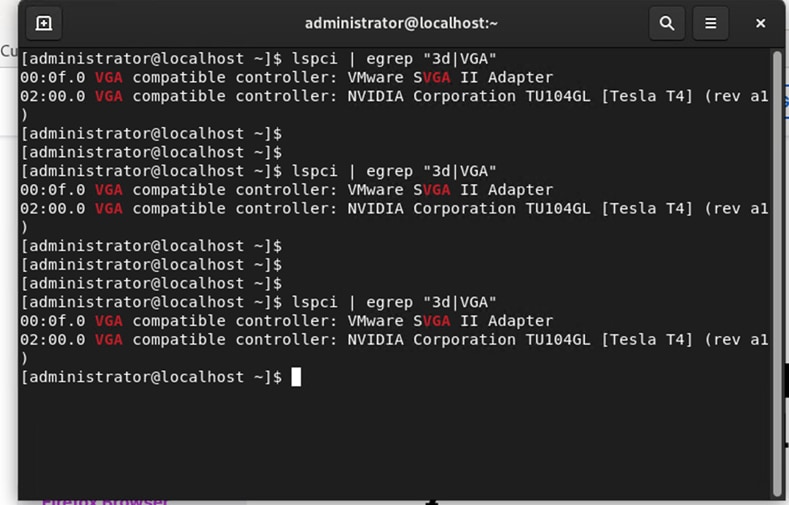
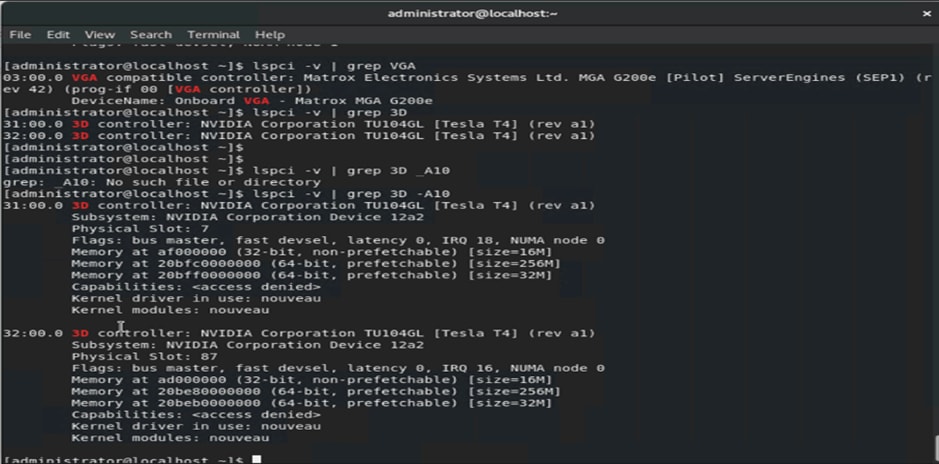
4. After the OS is installed, use the grep command lspci -v | egrep NVIDIA -A10 to confirm that hardware GPUs are present for the OS (Figures 72 and 73).
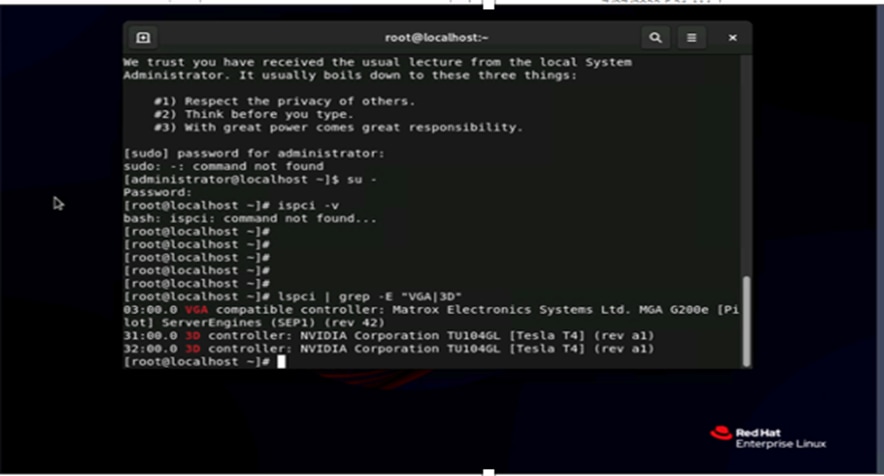
Using the grep command to check for hardware GPUs
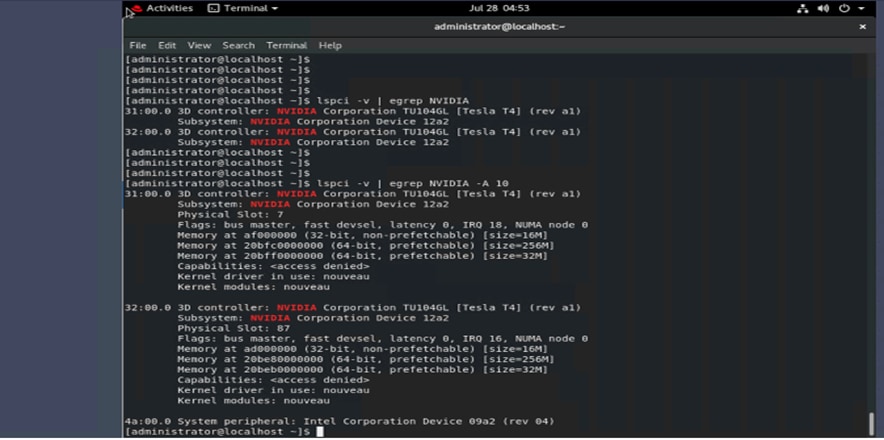
Checking for hardware GPUs
RHEL can be used as a hypervisor or a regular OS client. If you use it as a hypervisor, you need to install the Red Hat hypervisor driver (host driver) from the NVIDIA portal to install NVIDIA GPU Manager. If you are using it as a regular client, you need to install guest drivers for Red Hat only.
You can use the same links and process as were described to install the drivers for the virtual machine installation of RHEL drivers. However, the licensing process differs a little. See the following link to learn more about the licensing process: https://docs.nvidia.com/license-system/latest/nvidia-license-system-user-guide/index.html#configuring-nls-licensed-client-on-linux.
GPU installation requirements and verification on FlexPod bare-metal Ubuntu 20.04.4
Ubuntu follows same process as the RHEL OS (Figures 74 and 75).
Editing and adding a path for the storage LUN boot by pressing “e”
Edited file
The following links confirm that this setup was tested and that the NVIDIA GPU T4 appeared on the OS as a PCIe device:
● Driver installation follows same steps as earlier stated for RHEL OS: https://docs.nvidia.com/grid/latest/grid-vgpu-user-guide/index.html#ubuntu-install-configure-vgpu
This section includes links to various product pages related to the topics in this document.
Computing
● Cisco Intersight: https://www.intersight.com
● Cisco Intersight managed mode: https://www.cisco.com/c/en/us/td/docs/unified_computing/Intersight/b_Intersight_Managed_Mode_Configuration_Guide.html
● Cisco Unified Computing System: http://www.cisco.com/en/US/products/ps10265/index.html
● Cisco UCS 6400 Series Fabric Interconnects: https://www.cisco.com/c/en/us/products/collateral/servers-unified-computing/datasheet-c78-741116.html
● NVIDIA licensing:
◦ https://docs.nvidia.com/license-system/latest/
◦ https://docs.nvidia.com/license-system/latest/nvidia-license-system-user-guide/index.html#about-cls-instances
● NVIDIA vGPU profile: https://docs.nvidia.com/grid/13.0/grid-vgpu-user-guide/index.html
● NVIDIA deploying virtual machine for virtual desktop: https://docs.omniverse.nvidia.com/prod_deployment/prod_deployment/vgpu-virtual-desktop.html
● NVIDIA software download: https://ui.licensing.nvidia.com/software
● NVIDIA vGPU Manager deployment: https://docs.omniverse.nvidia.com/prod_deployment/prod_deployment/installing-vgpu-Manager.html#preparing-the-vib-file-for-install
● NVIDIA license generation: https://ui.licensing.nvidia.com/
Network
● Cisco Nexus 9000 Series Switches: http://www.cisco.com/c/en/us/products/switches/nexus-9000-series-switches/index.html
● Cisco MDS 9132T Switches: https://www.cisco.com/c/en/us/products/collateral/storage-networking/mds-9100-series-multilayer-fabric-switches/datasheet-c78-739613.html
Storage
● NetApp ONTAP: https://docs.netapp.com/ontap-9/index.jsp
● NetApp Active IQ Unified Manager: https://docs.netapp.com/ocum-98/index.jsp?topic=%2Fcom.netapp.doc.onc-um-isg-lin%2FGUID-FA7D1835-F32A-4A84-BD5A-993F7EE6BBAE.html
● ONTAP storage connector for Cisco Intersight platform: https://www.netapp.com/pdf.html?item=/media/25001-tr-4883.pdf
Virtualization
● VMware vCenter Server: http://www.vmware.com/products/vcenter-server/overview.html
● VMware vSphere: https://www.vmware.com/products/vsphere
Interoperability matrix
● Cisco UCS Hardware Compatibility Matrix: https://ucshcltool.cloudapps.cisco.com/public/
● VMware and Cisco Unified Computing System: http://www.vmware.com/resources/compatibility
● NetApp Interoperability Matrix Tool: http://support.netapp.com/matrix/
About the authors
Danish Khan, Technical Marketing Engineer
Danish Khan has over 14 years of experience at Cisco in the Datacenter, Enterprise and Service Provider Solutions and Technologies. As a member of various solution teams and Advanced Services, As a technical marking engineer at Cisco UCS Solutions group, Danish focuses on network, compute, virtualization, storage, and orchestration aspects of various Compute Stacks. Danish holds a master's degree in Electronics Engineering from the New Jersey Institute of Technology and is has dual Cisco Certified Internetwork Expert in routing and Data center (CCIE# 41056)
Acknowledgements
For their support and contribution to the design, validation, and creation of this Cisco Validated Design, the authors would like to thank:
Haseeb Niazi, Principal Technical Marketing Engineer, Cisco Systems, Inc
Sreeni Edula, Technical Marketing Engineering Technical Leader, Cisco Systems, Inc