
المقدمة
يوفر الطراز ™Cisco IQ للعملاء التحسينات والميزات المصممة لتحسين إمكانية رؤية الأصول وتوفير رؤى أكثر ذكاء عبر بيئاتهم، فضلا عن تبسيط إدارة الحالات. بالإضافة إلى ذلك، تعمل ميزات الذكاء الاصطناعي مثل مساعد الذكاء الاصطناعي على تحسين النتائج التشغيلية وتجربة مستخدم مستوى الذكاء الذكاء في Cisco من خلال توفير فهم سياقي يمكن المستخدمين من إتخاذ قرارات إستباقية قائمة على المعرفة وتبسيط العمليات لإشراك العملاء والنجاح.
يوفر هذا المستند معلومات حول بدء التشغيل مع Cisco IQ وتطبيقاته. للحصول على مزيد من المعلومات، راجع ملاحظات إصدار Cisco IQ ومستندات الأسئلة المتكررة من Cisco IQ.
ضم
المتطلبات الأساسية
تأكد من استيفاء المتطلبات الأساسية التالية قبل إستخدام مستوى ذكاء Cisco.
المتصفحات المدعومة
يتم دعم IQ من Cisco على أحدث الإصدارات الثابتة من المستعرضات التالية:
-
Google Chrome
-
Microsoft Edge
-
أبل سفاري
-
Mozilla Firefox
حساب Cisco
للوصول إلى Cisco IQ، يجب أن يكون لديك حساب Cisco.com. راجع تعليمات تسجيل الدخول والحساب للحصول على مزيد من المعلومات حول حسابات Cisco.
إنشاء الحساب
إنشاء حساب IQ جديد من Cisco
لإنشاء حساب IQ جديد من Cisco:
-
انتقل إلى Cisco IQ. تظهر صفحة تسجيل الدخول من Cisco.
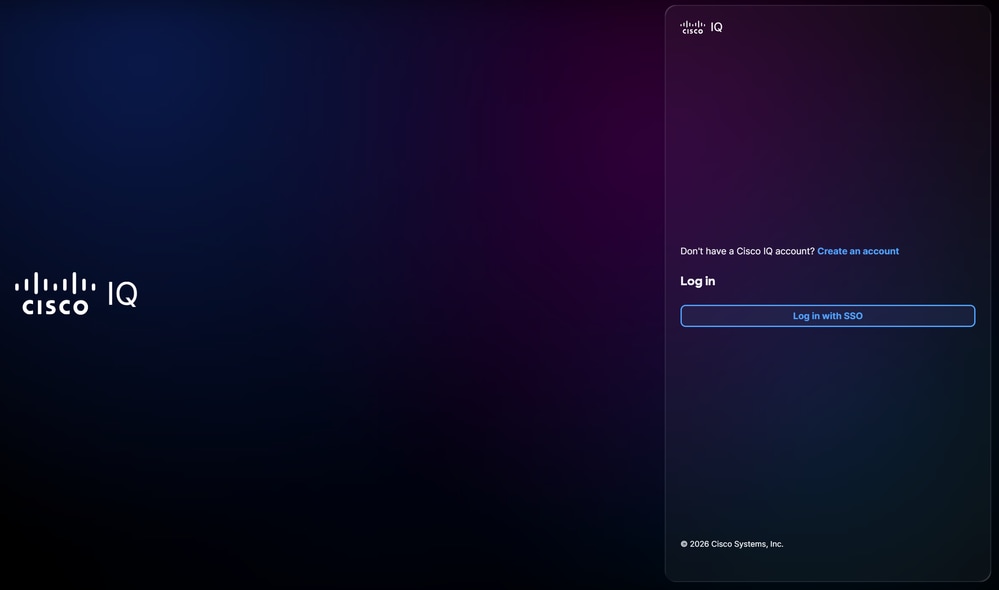 تسجيل الدخول إلى Cisco IQ
-
انقر فوق إنشاء حساب.
- أدخل بيانات اعتماد معرف اتصال Cisco Connection Online (CCO) في حقل البريد الإلكتروني.
- انقر فوق Next (التالي).
- أدخل كلمة المرور.
-
انقر فوق التحقق من الصحة. تظهر صفحة إنشاء حساب IQ من Cisco.
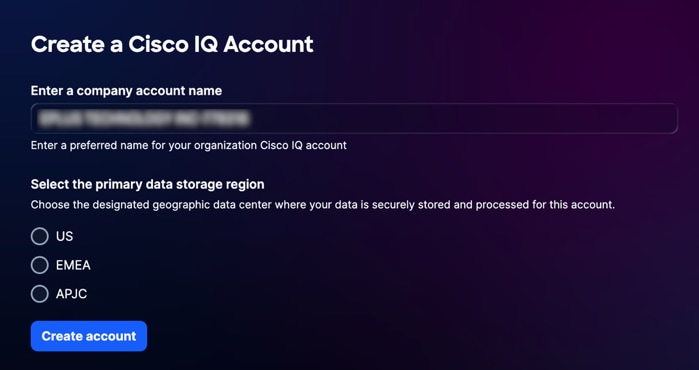 إنشاء حساب IQ من Cisco
-
أدخل الاسم الفريد الذي تريد إستخدامه لحساب Cisco IQ الخاص بمؤسستك في حقل إدخال اسم حساب الشركة.
-
حدد منطقة تخزين البيانات الأساسية.
-
انقر فوق إنشاء حساب. تتم إعادة توجيهك إلى منصة عمل Cisco IQ.
ترحيل حسابات سحابة CX إلى Cisco IQ
إذا كان لديك حساب شبكة CX موجود، فيمكنك ترحيل بيانات سحابة CX الموجودة إلى Cisco IQ. يتم ترحيل البيانات التالية تلقائيا من حساب CX Cloud الموجود:
-
المستخدمون ومجموعات المستخدمين (باستثناء المستخدمين والمجموعات الشريكة)
-
العقود
-
إضافة مصدر بيانات السحابة ل Intersight، و Webex، و Software-defined Wide Area Network (SD-WAN)، و Meraki
لترحيل حساب CX Cloud موجود:
-
انتقل إلى Cisco IQ. تظهر صفحة تسجيل الدخول من Cisco.
-
انقر فوق إنشاء حساب.
- أدخل بيانات اعتماد معرف اتصال Cisco Connection Online (CCO) في حقل البريد الإلكتروني.
- انقر فوق Next (التالي).
- أدخل كلمة المرور.
-
انقر فوق التحقق من الصحة. تظهر صفحة إنشاء حساب IQ من Cisco.
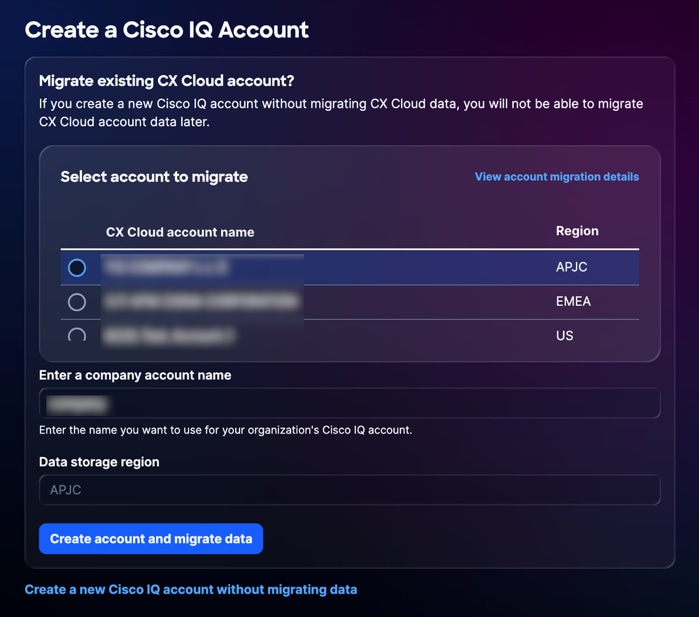 تحديد حساب CX Cloud
-
حدد حساب CX Cloud الذي تريد ترحيل البيانات منه.
-
أدخل الاسم الفريد الذي تريد إستخدامه لحساب IQ الخاص بمؤسستك.
-
انقر فوق إنشاء حساب وترحيل البيانات. تظهر صفحة حالة الترحيل.
تعرض صفحة حالة الترحيل حالة إكمال البيانات التي يتم ترحيلها إلى Cisco IQ. الحالات التالية متوفرة:
 حالة الترحيل
-
قيد التقدم: البيانات قيد الترحيل
-
مكتمل: اكتمل الترحيل
-
غير قادر على الترحيل: ترحيل البيانات غير مكتمل وتعذر IQ من Cisco على ترحيل البيانات
إذا كانت البيانات غير قادرة على الترحيل، فيجب عليك ترحيل البيانات يدويا إلى حساب شركة Cisco IQ الجديد. راجع إعدادات النظام للحصول على مزيد من المعلومات حول إضافة بيانات إضافية إلى IQ من Cisco.
-
-
بمجرد اكتمال عملية الترحيل، انقر فوق متابعة. تتم إعادة توجيهك إلى منصة تشغيل Cisco IQ.
تسجيل الدخول إلى الحسابات الموجودة
لتسجيل الدخول إلى حساب موجود:
-
انتقل إلى Cisco IQ. تظهر صفحة تسجيل الدخول من Cisco.
-
انقر فوق تسجيل الدخول باستخدام SSO.
-
أدخل بيانات اعتماد معرف CCO في حقل البريد الإلكتروني.
-
انقر فوق Next (التالي).
-
أدخل كلمة المرور.
-
انقر فوق التحقق من الصحة.
إذا كان لديك حساب واحد، فسيتم إعادة توجيهك إلى لوحة تشغيل Cisco IQ.
إذا كان لديك أكثر من حساب واحد، تتم إعادة توجيهك إلى صفحة الترحيب بك في صفحة IQ من Cisco.
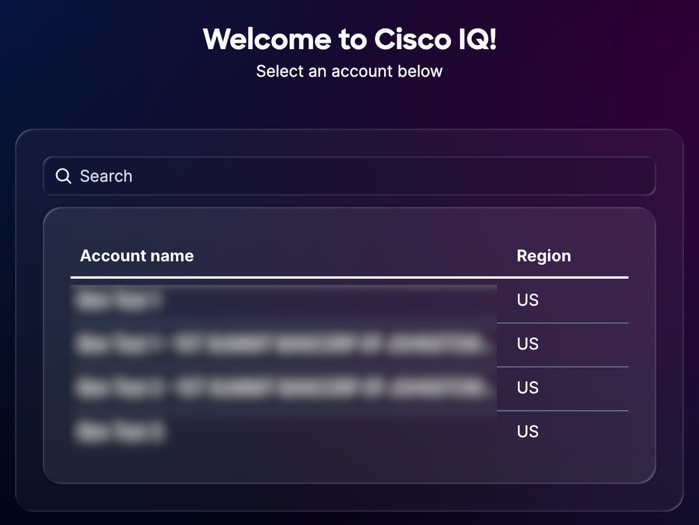 تحديد اسم الحساب
الشروع في البدء
طبقات الدعم
تحدد مستويات طبقة دعم الذكاء من Cisco الوصول والإمكانات المتاحة لك في نطاق IQ من Cisco، كما تم تصميمها لتعزيز الدعم وخبرات الخدمات الاحترافية لديك. ترتبط هذه المستويات بعقد دعم Cisco الصحيح الخاص بك وتحدد الميزات والأدوات التي يمكنك إستخدامها، من الرؤى التي تستند إلى AI واستكشاف الأخطاء وإصلاحها إلى إدارة الأصول والعقود. إن فهم مستواك يضمن أنك يمكن الاستفادة من إمكانيات IQ's من Cisco بالكامل مع الحفاظ على التوافق مع حقوقك التعاقدية. يوضح الجدول التالي ميزات IQ المتاحة من Cisco لكل مستوى.
| مستوى أساسي |
مستوى قياسي |
مستوى التوقيع |
|
| اعرف ما لديك |
أولويات المرونة في العمليات |
تسريع التفوق التشغيلي |
|
| وضوح تام للمناظر الطبيعية |
يمكنك تعقب كل أصل ومكون فرعي من Cisco باستخدام الثقة الديناميكية العالية باستخدام الميزات التالية.
|
أستخدم الميزات التالية لتحليل أداء الشبكة لتحديد مكان تخصيص الموارد، مما يساعدك على إتخاذ قرارات مدروسة حول إستثمارات البنية الأساسية.
|
|
| المرونة الاستباقية |
اكتساب إمكانية الرؤية في الإعلامات الهامة التي تساعدك على تحديد المخاطر المحتملة ومعالجتها داخل بيئتك باستخدام الميزات التالية.
|
يعمل برنامج Cisco IQ على تحويل البيانات إلى رؤى من خلال ربط مخاطر الأصول، مما يسمح لك بتحديد المخاطر الأمنية الأكثر أهمية وترتيبها حسب الأولوية.
|
توفر الميزات التالية توصيات قابلة للتنفيذ للمساعدة في تحسين وضع الأمان وتحسين عمليات التهيئة داخل بيئتك.
|
| دقة سريعة |
قم بإدارة حالات الدعم وتتبع حالة الدقة في موقع واحد لحل المشكلات بشكل أسرع باستخدام الميزات التالية.
|
أستخدم الميزة التالية لتعقب أتجاهات الحالات ومقاييس الكفاءة لإظهار التحسين المستمر للتشغيل. يوفر IQ من Cisco مساعد حل يراعي السياق لمساعدتك على حل المشاكل النشطة والتحقيق في الأسباب الجذرية الأساسية.
|
يدعم الطراز 1 اتصال الجهاز والقياس عن بعد عبر واجهة IQ Link و Intersight و Meraki و SD-WAN Manager و WebEx Control Hub.
الإمكانات الأساسية
توفر طبقة الدعم الأساسي التحكم الأساسي من خلال الدعم الموثوق والتفاعلي، بما في ذلك الوصول إلى خبراء الدعم الفني للمنتجات واستكشاف الأخطاء وإصلاحها عبر الخدمة الذاتية وإدارة الحالات المركزية. لضمان إمكانية الرؤية الكاملة، يقوم IQ من Cisco بتوحيد بيانات تتبع الأصول ومعلومات العقد ومحفوظات الدعم، مما يوفر طريقة عرض شاملة لدورات حياة الأصول لديك ونصائح الأمان والإشعارات الميدانية. وبالإضافة إلى ذلك، يمكنك تعزيز خبرتك التقنية من خلال الوصول إلى موارد التعلم الأساسية المتاحة من خلال Cisco U.
يوضح الجدول التالي الإمكانات المتوفرة لطبقة الدعم الأساسي.
| إستطاعة |
الوصف |
| مخزون الأصول |
يوفر Asset Inventory قائمة محدثة ومشاهد غنية لمنتجات الأجهزة والطراز والأرقام التسلسلية وإصدار نظام التشغيل والموقع المثبت فيه وتفاصيل تغطية الخدمة. كما يوفر طريقة للتصفية حسب "الإشارة الأخيرة"، وهو الوقت الذي علمت فيه Cisco أن الأصل كان نشطا استنادا إلى حالات مركز المساعدة الفنية (TAC) وتجديد العقد وقياس telemetry، وما إلى ذلك. |
| تقرير نهاية العمر الافتراضي |
توفر تقارير نهاية العمر الافتراضي قائمة محدثة ومشاهد غنية للأجهزة والبرامج التي تقترب من محطات نهاية العمر الافتراضي (EOL) أو تقترب منها أو نجحت فيها، مما يتيح التخطيط لتحديث دورة الحياة والتكنولوجيا. |
| تقرير تغطية الخدمة |
توفر تقارير تغطية الخدمة قائمة حديثة ومشاهد غنية بالأصول التي تم تغطيتها والكشف عنها. |
| لوحة معلومات LDOS |
توفر لوحة معلومات LDOS نظرة مركزية على الأحداث الرئيسية ل LDOS، مما يسمح بالتخطيط المحسن للأصول والتنبؤ بالميزانية قبل وصول الأجهزة أو البرامج إلى نهاية العمر الافتراضي، مما يتيح إمكانية تقليل المخاطر التشغيلية. |
| إستشارات الأمان |
توفر "إستشارات الأمان" حلا مؤتمتا يقوم بكشف حالات التعرض، وإيلاء الأولوية لأوجه الضعف القائمة على درجة خطورة المخاطر ومدى أهميتها، كما توفر رؤى على المستوى التنفيذي للتعجيل بعملية تخفيف التهديدات الخطيرة، ومن ثم تعزيز مرونة المؤسسات ضد التهديدات المتطورة. |
| الإعلامات الميدانية |
توفر الإشعارات الميدانية حلا مؤتمتا يقوم بكشف المشكلات المتعلقة بالمنتجات غير المتعلقة بالأمان، ويمنح الأولوية للقضايا استنادا إلى خطورة التأثير ومدى الأهمية، كما توفر رؤى على المستوى التنفيذي للتعجيل بحل المشكلات التشغيلية الهامة، ومن ثم تعزيز مرونة المؤسسات والحفاظ على الأداء الأمثل. |
| إدارة الحالات |
توفر إدارة الحالة قائمة محدثة من حالات Cisco TAC بما في ذلك عدد الحالات، والحالة، والشدة، وتصاريح مواد الإرجاع (RMAs) المرتبطة بالحالات. كما توفر القدرة على فتح حالات TAC (من خلال التشغيل المتداخل لمدير حالة الدعم (SCM) وتحديث معلومات الحالة بسرعة لتسهيل الحل. |
| أستكشاف الأخطاء وإصلاحها عبر الخدمة الذاتية 1 |
يوفر أستكشاف الأخطاء وإصلاحها من خلال الخدمة الذاتية طريقة لحل المشكلات على الفور باستخدام مساعد AI. توفر هذه الأداة التفاعلية أستكشاف الأخطاء وإصلاحها في الوقت الفعلي مع مراعاة السياق وتوصيات الخبراء مباشرة من قاعدة المعارف المعتمدة من Cisco، مما يتيح لك حل المشاكل دون الحاجة إلى فتح حالة دعم. |
يدعم الطراز 1 اتصال الجهاز والقياس عن بعد عبر واجهة IQ Link و Intersight و Meraki و SD-WAN Manager و WebEx Control Hub.
الإمكانات القياسية
تعمل طبقة الدعم القياسية على تعزيز كفاءة التشغيل لديك من خلال توفير فرز مركزي للمشكلات على مستوى الحلول ومالك مخصص للحالة يقوم بالتنسيق مع الخبراء الفنيين اللازمين. يمكنك تقليل المخاطر بشكل استباقي باستخدام الرؤى التي تعمل بتقنية AI والتي تربط بيانات الأصول بالأهمية الحيوية للشركات، مما يوفر إمكانية رؤية واضحة في عمليات تقييم المخزون والأمان والتهيئة. وبالإضافة إلى ذلك، يمكنك مواءمة خبرة فريقك مع إحتياجات شركتك المحددة من خلال مسارات التعلم المخصصة المتوفرة في وحدة Cisco.
يوضح الجدول التالي الإمكانات المتوفرة لطبقة الدعم القياسية.
| إستطاعة |
الوصف |
| رؤى نهاية العمر الافتراضي1 |
توفر رؤى نهاية العمر الافتراضي استعلامات وتلخيصا وتصورا وإعلاما ذكيا بالأحداث الرئيسية نهاية العمر الافتراضي لتمكين تحديد أولويات مخصص لدورة الحياة والتخطيط لتحديث التقنية. |
| رؤى تغطية الخدمة1 |
توفر تقنية Service Coverage Insights تصورا وتحليلا لتفاصيل تغطية الخدمة ومراحل التجديد الرئيسية، مما يتيح تحديد أولويات مخصص لتحديثات التغطية وتخطيط التجديد. |
| وضع علامات على الأصول |
يوفر وضع علامات على الأصول طريقة لتنظيم المخزون وفقا لاحتياجات الأعمال من خلال إستخدام "علامات الأصول"، مما يتيح إمكانية التنظيم المرن لأصول الأجهزة والبرامج حسب القسم أو الموقع أو المشروع كأزواج من القيم الأساسية. |
| رؤى LDOS1 |
توفر رؤى LDOS تصورا وتحليلا للأصول فيما بعد أو يقترب من المعالم الرئيسية LDOS الخاصة بها، مما يتيح تحديد أولويات مخصص لدورة الحياة والتخطيط لتحديث التكنولوجيا. |
| رؤى الأهميةللأصول |
تتيح هذه المعلومات تقييم وتحديد أدوار الأصول وأهميتها النسبية في شبكتك من أجل تحديد أولويات جهود تخفيف المخاطر وتحسين المرونة التشغيلية. |
| رؤى Security Advisory1 |
تعمل تقنية Security Advisory Insights على توفير تقنيات متطورة للاستعلام والتلخيص والتصور وإعداد التقارير حول الأصول المتأثرة باستشارات الأمان، مما يتيح تحديد الأولويات بشكل مخصص لاستجابة المخاطر ومشكلات الأمان. |
| رؤى تقوية الأمان1 |
توفر رؤى تقوية الأمان حلا مؤتمتا يقيم تكوينات الأجهزة، ويحدد فجوات تقوية الأمان استنادا إلى خطورة التأثير ومدى الأهمية، كما توفر رؤى على المستوى التنفيذي للتعجيل بتنفيذ تدابير التعزيز الحساسة. فهو يعمل على تعزيز مرونة المؤسسات وتقليل مستوى مهاجمة التهديدات المتطورة، بينما يتيح في الوقت نفسه إعطاء الأولوية بشكل مخصص لوضعية أمان محسنة من خلال الاستفسار والتلخيص والمحاكاة الافتراضية وإعداد التقارير بشكل متطور عن الأصول المعرضة للخطر. |
| رؤى إشعار ميداني1 |
وتوفر الرؤى المتعلقة بالإشعارات الميدانية إستفسارا وتلخيصا وتصورا وإبلاغا ذكيا للأصول المتأثرة بالإشعارات الميدانية، مما يتيح تحديد أولويات المخاطر حسب الأولوية، والاستجابة للمسائل المعروفة. |
| رؤى التكوين1 |
توفر رؤى التكوين حلا مؤتمتا يقوم بتقييم تكوينات الأجهزة مقابل أفضل الممارسات التي توصي بها Cisco استنادا إلى الخبرات التي أثبتت جدارتها في الميدان. يتيح الاستعلام والتلخيص والمحاكاة الافتراضية وإعداد التقارير بشكل متطور عن الأصول المتأثرة إمكانية تحديد الأولويات بشكل مخصص، فضلا عن تسريع عملية إصلاح فجوات التهيئة الحرجة، مما يعمل على تعزيز مرونة البنية الأساسية وتقليل المخاطر التشغيلية عبر الشبكة. |
| رؤى الحالة1 |
توفر رؤى الحالة استعلامات ذكية، وتلخيصها، وتصورها، وإعداد تقارير حول حالات Cisco TAC، مما يتيح مراقبة مخصصة للكفاءة التشغيلية. |
يدعم الطراز 1 اتصال الجهاز والقياس عن بعد عبر واجهة IQ Link و Intersight و Meraki و SD-WAN Manager و WebEx Control Hub.
إمكانات التوقيع
يعتمد "طبقة دعم التوقيع" على طبقة الدعم القياسية لرفع مستوى الأداء التشغيلي لديك من خلال إتفاقيات مستوى خدمة الاستعادة المحددة والوصول إلى فريق متخصص من الخبراء على دراية ببيئتك الفريدة. يركز هذا المستوى على منع حالات مقاطعة البيانات قبل أن تؤثر على العمليات الخاصة بك من خلال توفير تقوية إستباقية للأمان وإزالة منهجية للأسباب الجذرية وإجراء تحليل مستمر وفقا لمتطلبات الخبراء لأصولك. وبالإضافة إلى ذلك، يمكنك الاستفادة من مختبرات التدريب على اعتماد الوحدة المتقدمة من Cisco والممارسة الافتراضية لبناء كفاءة فنية عميقة.
يوضح الجدول التالي الإمكانات المتوفرة لطبقة دعم التوقيع.
| إستطاعة |
الوصف |
| التكوين التوصية1 |
توفر توصية التكوين توصيات قابلة للتنفيذ لمعالجة حالات عدم التكوينات المحتملة وحالات عدم الاتساق. |
| التوصيات الخاصة بتكثيف الأمان1 |
توفر توصيات تقوية الأمان حلا مؤتمتا يقدم توصيات عامة خاصة بكل فحص تقوية فاشل، ومعالجة القضايا الأمنية الأساسية بشكل واضح وموجز. |
يدعم الطراز 1 اتصال الجهاز والقياس عن بعد عبر واجهة IQ Link و Intersight و Meraki و SD-WAN Manager و WebEx Control Hub.
بدء الرحلة للمديرين
عند تسجيل الدخول إلى حساب Cisco IQ الذي تم إنشاؤه أو ترحيله حديثا لأول مرة، تعرض صفحة الترحيب رحلة بدء. تختلف الرحلة "بدء الاستخدام" وفقا لما إذا كان الحساب قد تم إنشاؤه باستخدام بيانات تم ترحيلها أم لا.
حساب جديد عن طريق الإنشاء
ترشدك رحلة الحصول على بدء الخاصة بالحسابات التي تم إنشاؤها حديثا من خلال الخطوات الأولية المطلوبة لتكوين بيئة IQ من Cisco واستكشاف IQ من Cisco.
توصيل منتجات سحابة Cisco
يعد توصيل بيانات منتج مجموعة Cisco لديك بمعرف فئة المورد (IQ) من Cisco الطريقة الأسرع للبدء في إستخدام مميزاته القوية والمخصصة. يمكنك تلقي رؤى مخصصة خلال دقائق بعد إعداد إتصالات البيانات.
لتوصيل منتجات سحابة Cisco، راجع موصلات البيانات.
إضافة عقود خدمة
تؤدي إضافة العقود إلى توحيد البيانات من العقود المرتبطة بأعضاء الفريق المختلفين، كما تتضمن الأصول غير المرتبطة بجرد بياناتك من خلال القياس عن بعد، مما يتيح إمكانية رؤية تغطية الدعم المركزي ومنع مفاجآت التجديد.
لإضافة عقود الخدمة الخاصة بك، راجع إضافة عقود الخدمة.
اتصال إرتباط IQ من Cisco
لإنشاء اتصال بأجهزة محلية، يجب تكوين إرتباط Cisco IQ. يجلب إرتباط IQ من Cisco جميع قوة Cisco IQ إلى أجهزتك المحلية التي لم تتم إدارتها بالفعل بواسطة نظام Cisco Cloud Platform. يمكن تثبيت إرتباط Cisco IQ كجهاز ظاهري (VM) في مركز البيانات لديك وارتباطه بحساب IQ من Cisco.
لتوصيل أجهزتك الداخلية، راجع إضافة مثيلات إرتباط Cisco IQ.
إدارة وصول المستخدم
تم تصميم ميزات التحكم في الوصول البسيطة IQ من Cisco لكل من الفرق الصغيرة والمؤسسات الكبيرة. يمكنك إضافة مستخدمين وتعيين أدوار المسؤول أو العرض فقط إلى المجموعات والأفراد.
لإضافة مستخدمين وتعيين أذونات، راجع المستخدمين.
أستكشاف Cisco IQ
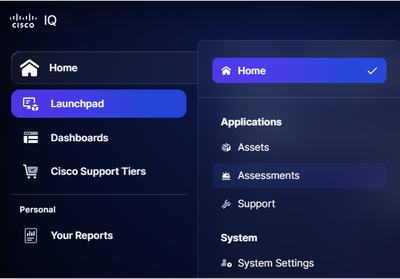
استكشف ميزات IQ وتطبيقات Cisco المتوفرة لك، بما في ذلك:
-
لوحة التشغيل: الوصول إلى التطبيقات واكتشاف الميزات الجديدة وإنشاء لوحات المعلومات
-
تطبيق الأصول: راجع تطبيق الأصول للحصول على مزيد من التفاصيل
-
تطبيق التقييمات: انظر تطبيق التقييمات للحصول على مزيد من التفاصيل
-
تطبيق الدعم: انظر تطبيق الدعم للحصول على مزيد من التفاصيل
-
مساعد AI: راجع مساعد الذكاء الاصطناعي للحصول على مزيد من التفاصيل
-
إعدادات النظام: إدارة إعدادات حسابك، ومنح المستخدمين حق الوصول، وتكوين إتصالات البيانات، وعرض النشاط والسجلات الخاصة بحسابك؛ انظر إعدادات النظام للحصول على مزيد من التفاصيل
حساب جديد عبر الترحيل
إذا تم إنشاء حساب Cisco IQ الجديد عبر الترحيل، فإن المعلومات من حسابك السابق متوفرة بالفعل. ونتيجة لذلك، تقتصر رحلة البدء الخاصة بالحسابات التي تم ترحيلها حديثا على مراجعة عملية الترحيل، كما هو مفصل أدناه.
مراجعة الترحيل
لمراجعة الترحيل:
-
تحقق من العقود التي تم ترحيلها بنجاح في الصفحة الرئيسية > إعدادات النظام > عقود الخدمة
-
تحقق من تكوين جميع إتصالات البيانات المطلوبة بشكل صحيح في المنزل > إعدادات النظام > البيانات الموصلات
-
تحقق من بيانات المستخدم التي تم ترحيلها بنجاح، وأمنح الوصول للمستخدمين الذين تم ترحيلهم عن طريق تنشيط حساباتهم في المنزل > إعدادات النظام > الهوية والوصول>المستخدمين
-
تحقق من الأصول التي تم ترحيلها بنجاح في المنزل > الأصول > المخزون
رحلة البدء الخاصة بالمستخدمين العامين
عند تسجيل الدخول إلى حساب Cisco IQ الخاص بك لأول مرة، تعرض صفحة الترحيب رحلة بدء. ترشدك هذه الرحلة خلال ميزات معدل الذكاء (IQ) من Cisco وسير العمل الشائعة.
أستكشاف Cisco IQ
استكشف ميزات IQ وتطبيقات Cisco المتوفرة لك، بما في ذلك:
-
لوحة التشغيل: الوصول إلى التطبيقات واكتشاف الميزات الجديدة وإنشاء لوحات المعلومات
-
تطبيق الأصول: راجع تطبيق الأصول للحصول على مزيد من التفاصيل
-
تطبيق التقييمات: انظر تطبيق التقييمات للحصول على مزيد من التفاصيل
-
تطبيق الدعم: انظر تطبيق الدعم للحصول على مزيد من التفاصيل
-
مساعد AI: راجع مساعد الذكاء الاصطناعي للحصول على مزيد من التفاصيل
إنشاء تقرير AI الأول الخاص بك
تعمل ميزة التحليل التي يتم تشغيلها بواسطة تقنية AI في Cisco IQ على إنشاء تقارير مستهدفة قابلة للتخصيص استنادا إلى أصول محددة يمكن تخصيصها لتلبية إحتياجات العمل الخاصة بك.
راجع تطبيق الأصول للحصول على مزيد من المعلومات حول إنشاء أول تقرير AI.
سؤال لمساعد الذكاء الاصطناعي
تتمثل الخطوة الأخيرة من رحلتك في إطلاق مساعد الذكاء الاصطناعي من أي مكان وتوجيه سؤال حول أصولك أو حالاتك أو تقييماتك.
انظر مساعد الذكاء الاصطناعي للحصول على مزيد من المعلومات حول إستخدام مساعد الذكاء الاصطناعي.
لوحات المعلومات
توفر علامة التبويب لوحات المعلومات طريقة عرض للوحات المعلومات التالية المتاحة في Cisco IQ.
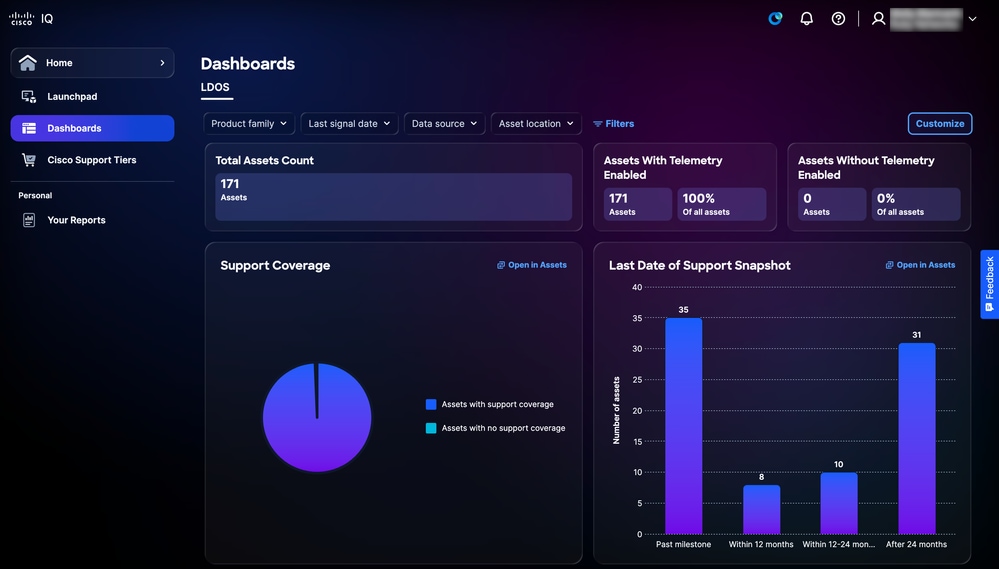
لوحة معلومات LDOS
توفر لوحة معلومات LDOS رؤى شاملة وتفصيلية حول مقاييس LDOS، مما يتيح إمكانية رؤية العملاء، ويمكن المستخدمين من إدارة المخاطر بشكل استباقي، ويدعم إتخاذ قرارات أكثر كفاءة ومعرفة.
 لوحة معلومات LDOS
طرق عرض التصفية للوحة معلومات LDOS
يمكنك تصفية عرض لوحة المعلومات باختيار مرشح من القوائم المنسدلة أو انقر فوق عوامل التصفية واختر من قائمة خيارات المرشح المتاحة.
عرض تفاصيل لوحة معلومات LDOS
عند النقر فوق فتح في الأصول، يتم إعادة توجيه الصفحة إلى صفحة المخزون. راجع المخزون للحصول على مزيد من التفاصيل.
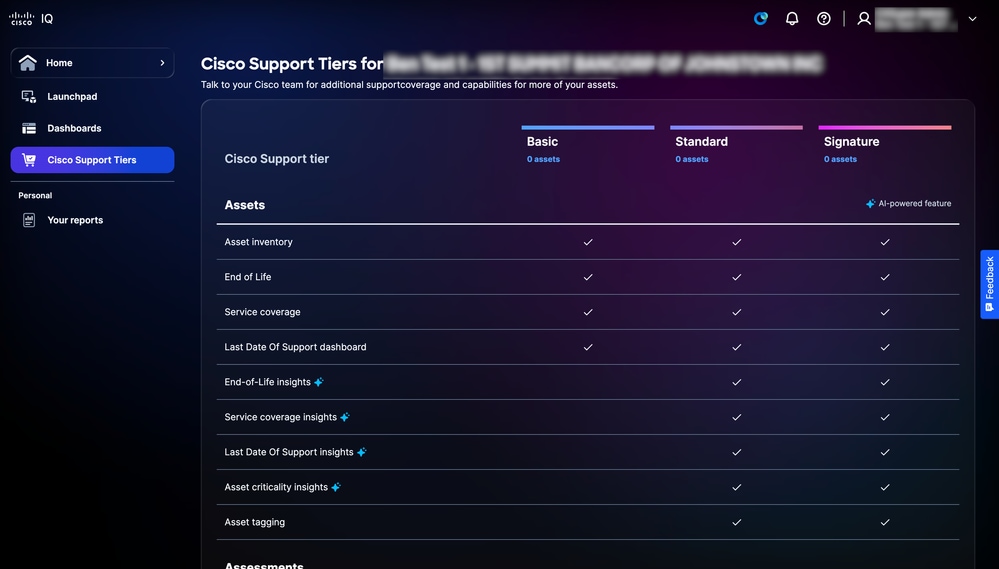
طبقات دعم Cisco
توفر صفحة طبقات الدعم من Cisco نظرة عامة على الميزات المتوفرة طبقة الدعم التي تم شراؤها وعدد الأصول المرتبطة بعقود الدعم المرتبطة، مما يمكنك من فهم إمكانات الدعم المضمنة بسهولة واتخاذ إجراء لإدارتها ومراجعتها. ارجع إلى طبقات الدعم للحصول على معلومات أكثر تفصيلا حول ميزات طبقة الدعم.
 طبقات دعم Cisco
إعدادات النظام
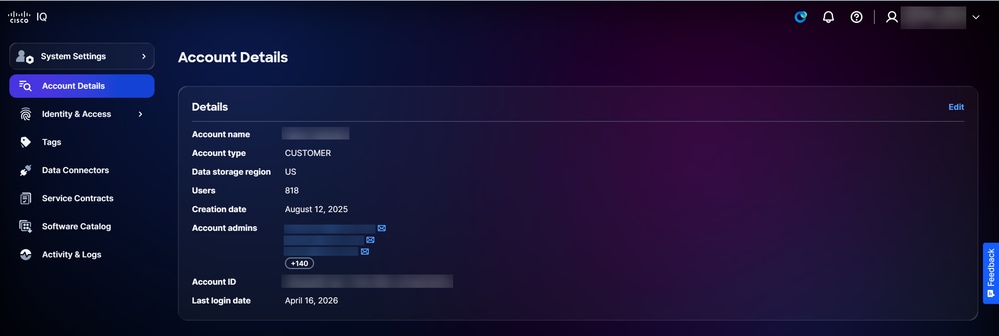
للتنقل إلى القائمة إعدادات النظام، أختر الصفحة الرئيسية > إعدادات النظام. تظهر صفحة تفاصيل الحساب.
تفاصيل الحساب
تسهل ميزة "إعدادات النظام" سهولة الإدارة والتحكم في الوصول وتخصيص البيانات، مما يضمن الرؤية الشاملة وإمكانية الوصول لمسؤولي الحسابات. عند عرض صفحة تفاصيل الحساب، يعرض قسم التفاصيل المعلومات التالية:
-
اسم الحساب
-
نوع الحساب
-
منطقة تخزين البيانات
-
المستخدمون
-
تاريخ الإنشاء
-
مسؤولو الحسابات
-
معرف الحساب
-
تاريخ آخر تسجيل دخول
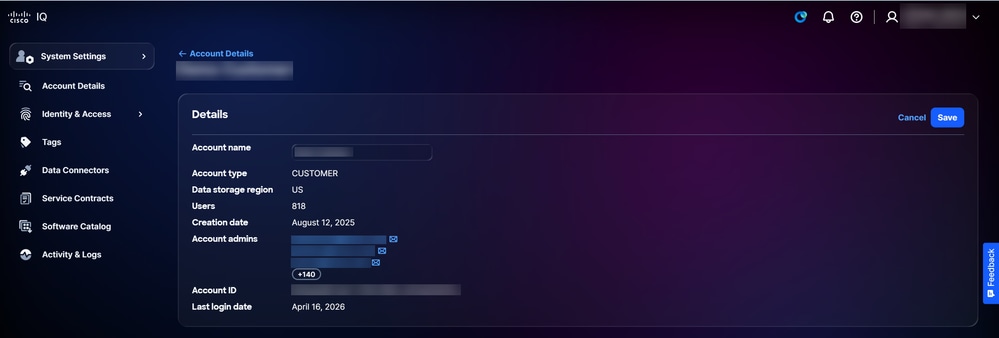
تحرير اسم الحساب
يمكن تغيير اسم الحساب فقط من صفحة تفاصيل الحساب.
لتحرير اسم حساب:
 تفاصيل الحساب
-
انقر فوق تحرير.
 تحرير اسم الحساب
-
راجع اسم الحساب.
-
انقر فوق حفظ.
المستخدمون
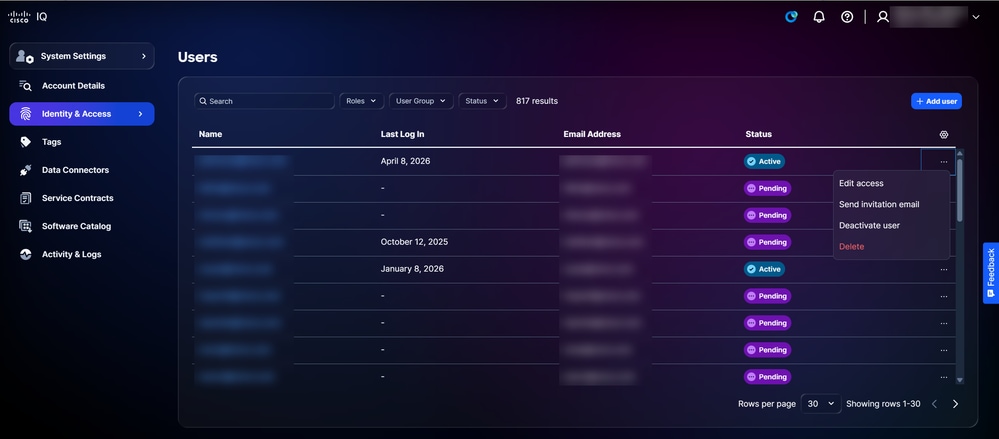
يتم إنشاء حسابات المستخدمين وتعديلها وحذفها في صفحة المستخدمين. للتنقل إلى صفحة المستخدمين، أختر إعدادات النظام > الهوية والوصول > المستخدمين. تظهر صفحة المستخدمين.
 المستخدمون
يمكنك البحث والتصفية لتضييق القائمة باستخدام الحقول الموجودة أعلى الصفحة.
إضافة مستخدمين جدد
لإضافة مستخدم جديد:
-
من صفحة المستخدمين، انقر فوق إضافة مستخدم. تظهر صفحة إضافة مستخدم.
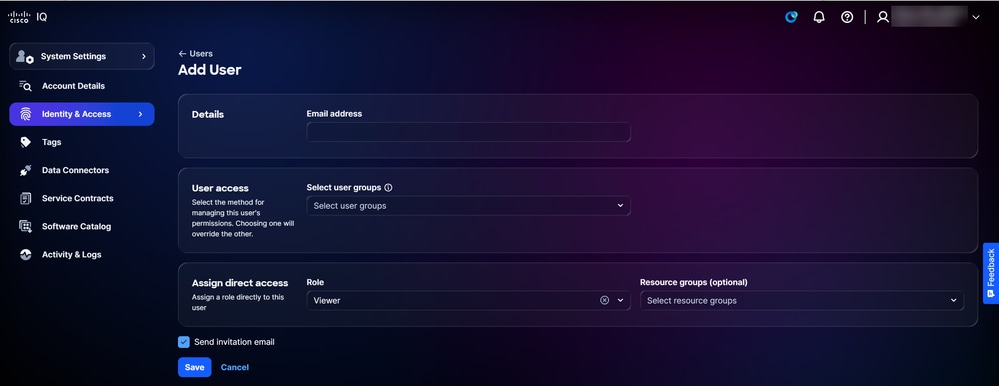 إضافة مستخدم
-
أدخل عنوان بريد إلكتروني.
-
إختياريا، أختر مجموعة (مجموعات) المستخدمين من القائمة المنسدلة تحديد مجموعات المستخدمين.
-
أختر الدور من القائمة المنسدلة.
-
تأكد من تحديد خانة الاختيار إرسال دعوة بالبريد الإلكتروني.
-
انقر فوق حفظ. يتم عرض تأكيد على صفحة المستخدمين.
يتلقى المستخدمون رسالة بريد إلكتروني بعد أن تتم دعوتهم من قبل مسؤول الحساب.
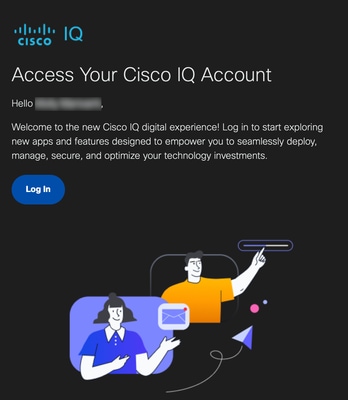 دعوة بالبريد الإلكتروني
يمكن للمستخدمين المدعوين النقر فوق تسجيل الدخول من البريد الإلكتروني لتسجيل الدخول إلى حسابهم. بعد تسجيل الدخول، تصبح حالة المستخدم نشطة.
تحرير وصول المستخدم
لتحرير مجموعات المستخدمين أو الدور أو مجموعات الموارد لحساب المستخدم:
 تحرير الوصول
-
من المستخدم المطلوب في صفحة المستخدمين، أختر أيقونة المزيد من الخيارات > تحرير الوصول. تظهر صفحة تحرير تفاصيل المستخدم.
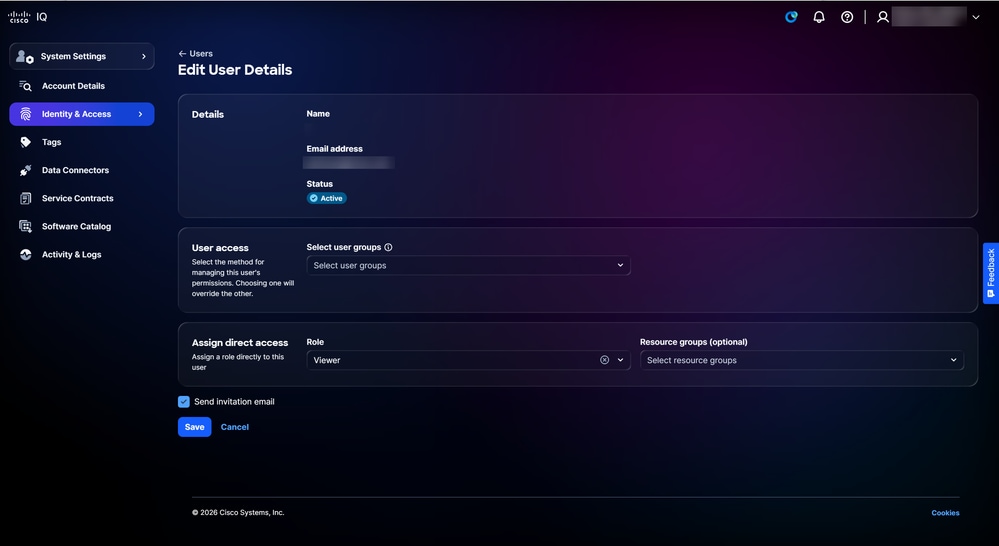 تحرير تفاصيل المستخدم
-
قم بتحرير مجموعات المستخدمين والدور ومجموعات الموارد المطلوبة.
-
انقر فوق حفظ.
إرسال رسائل البريد الإلكتروني الخاصة بالدعوة
لإرسال بريد إلكتروني يتضمن دعوة إلى حساب مستخدم موجود:
-
انتقل إلى صفحة المستخدمون.
-
من المستخدم المرغوب، أختر أيقونة المزيد من الخيارات > إرسال بريد الدعوة الإلكتروني. يتم عرض تأكيد.
تنشيط المستخدمين
لتنشيط حساب مستخدم:
-
من المستخدم المطلوب في صفحة المستخدمين، أختر أيقونة المزيد من الخيارات > تنشيط المستخدم. يتم فتح نافذة تنشيط المستخدم.
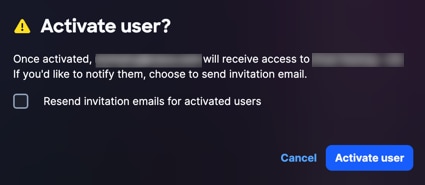 تنشيط تأكيد المستخدم
-
انقر فوق تنشيط المستخدم للتأكيد. يتم عرض تأكيد.
إلغاء تنشيط المستخدمين
لإلغاء تنشيط حساب مستخدم:
-
من المستخدم المطلوب في صفحة المستخدمين، أختر أيقونة المزيد من الخيارات > إلغاء تنشيط المستخدم. يظهر نافذة إلغاء تنشيط المستخدم.
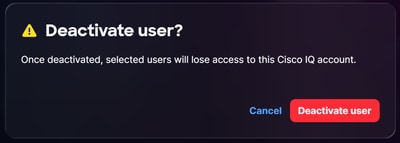 إلغاء تنشيط تأكيد المستخدم
-
انقر فوق إلغاء تنشيط المستخدم للتأكيد. يتم عرض تأكيد.
حذف المستخدمين
لحذف مستخدم:
-
من المستخدم المرغوب في صفحة المستخدمين، أختر أيقونة المزيد من الخيارات > حذف. يظهر إطار حذف المستخدم.
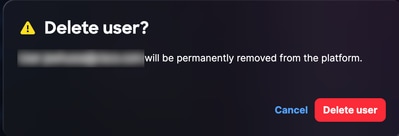 حذف تأكيد المستخدم
-
انقر فوق حذف المستخدم. تم حذف المستخدم.
مجموعات الموارد
مجموعات الموارد هي مجموعات ديناميكية تحدد الموارد استنادا إلى نوعها وسماتها. يمكنك تكوين مجموعات الموارد من تقييد وصول البيانات لدور ما إلى الموارد التي تفي بشروط المجموعة. يمكن أن تنتمي الموارد إلى مجموعات موارد متعددة. بصفتك مسؤول حساب، يمكنك إنشاء مجموعات موارد وتحريرها وحذفها.
لعرض مجموعات الموارد:
-
أختر إعدادات النظام>الهوية والوصول>مجموعات الموارد. تظهر صفحة مجموعات الموارد.
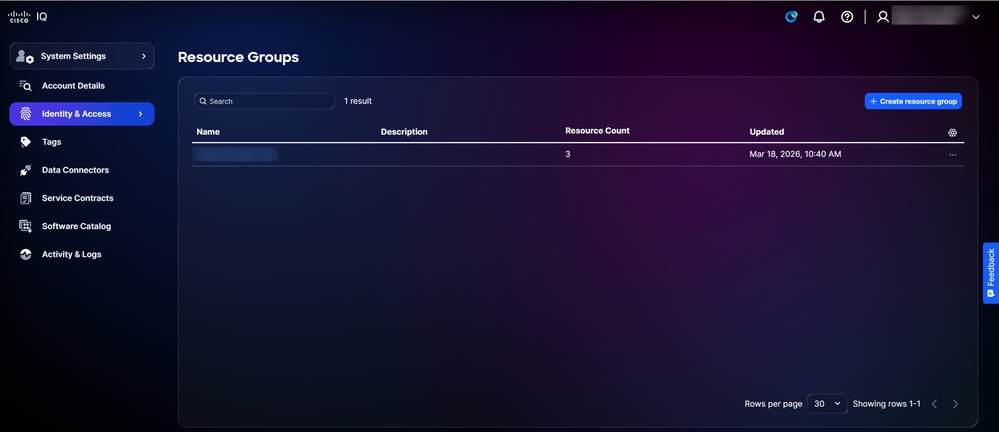 مجموعات الموارد
-
أستخدم حقلي البحث والتصفية لتضييق القائمة.
-
انقر فوق اسم مجموعة موارد لعرض تفاصيلها.
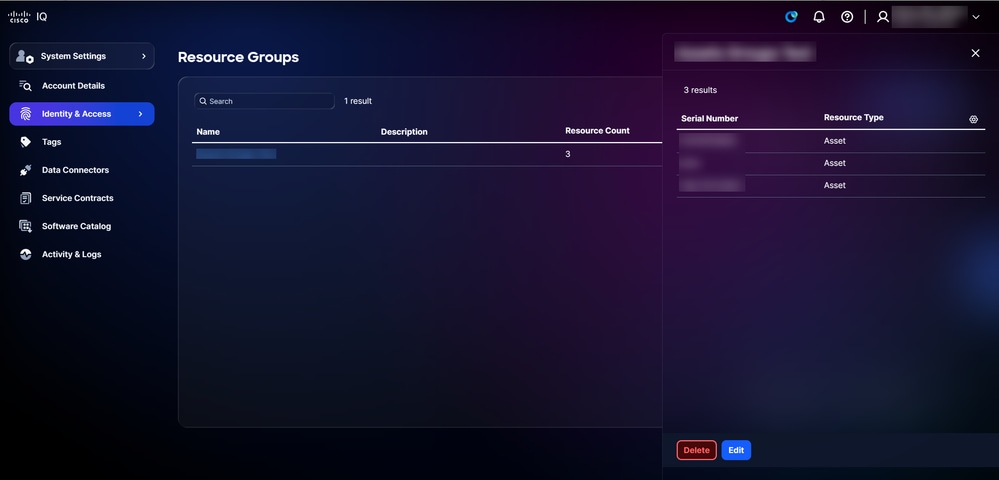 تفاصيل مجموعة الموارد
إنشاء مجموعات الموارد
لإنشاء مجموعة موارد جديدة:
-
من صفحة مجموعات الموارد، انقر فوق إنشاء مجموعة موارد. تظهر صفحة إنشاء مجموعة موارد.
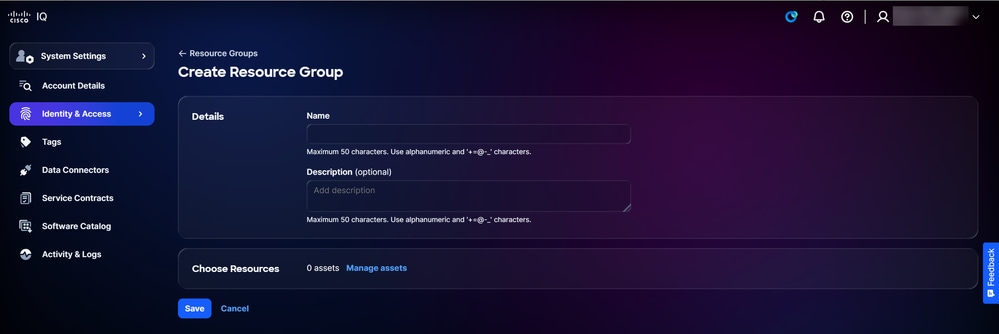 إنشاء مجموعة موارد
-
إدخال اسم لمجموعة الموارد
-
وبشكل إختياري، أدخل الوصف.
-
انقر فوق إدارة الأصول. يظهر إطار إدارة الأصول.
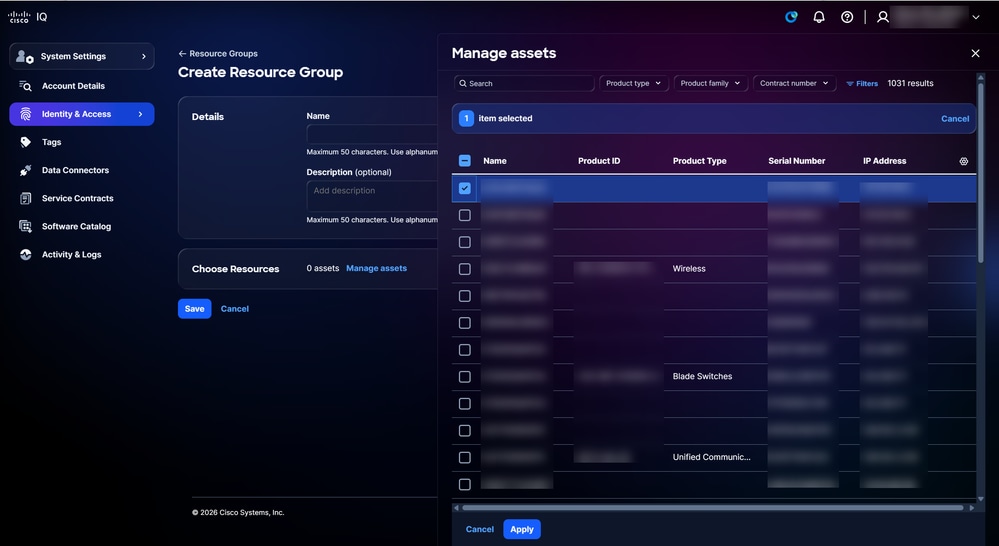 إدارة الأصول
-
حدد خانة الاختيار للأصول المطلوبة.
-
انقر فوق تطبيق.
-
انقر فوق حفظ.
تحرير مجموعات الموارد
لتحرير مجموعة موارد:
 تحرير
تحرير
-
من سجل على صفحة مجموعات الموارد، أختر أيقونة المزيد من الخيارات > تحرير. تظهر صفحة تحرير مجموعة الموارد.
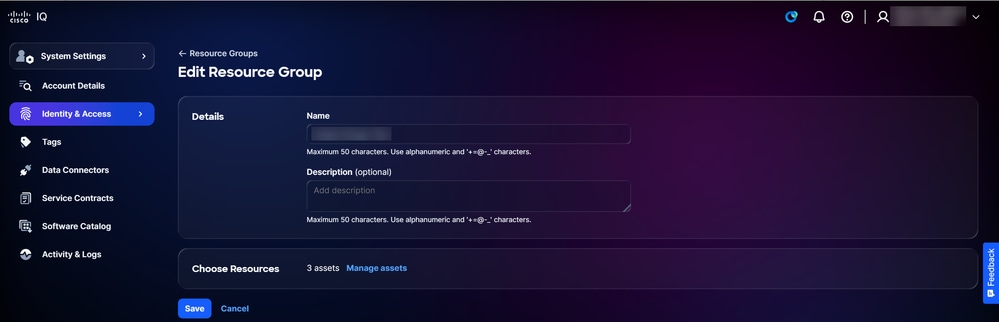 تحرير مجموعة الموارد
-
قم بتحرير سمات مجموعة الموارد، حسب الرغبة.
-
انقر فوق حفظ.
حذف مجموعات الموارد
لحذف مجموعة موارد:
-
من سجل على صفحة مجموعات الموارد، أختر أيقونة المزيد من الخيارات > حذف. يظهر الإطار حذف مجموعة الموارد.
 تأكيد حذف مجموعة الموارد
-
انقر فوق حذف مجموعة الموارد. تم حذف مجموعة الموارد.
مجموعات المستخدمين
تمكنك مجموعات المستخدمين من التحكم في المستخدمين بشكل فعال عبر الحساب عن طريق إنشاء مجموعات المستخدمين وتحريرها وحذفها.
لعرض مجموعات المستخدمين:
-
أختر إعدادات النظام>الهوية والوصول>مجموعات المستخدمين. تظهر صفحة مجموعات المستخدمين.
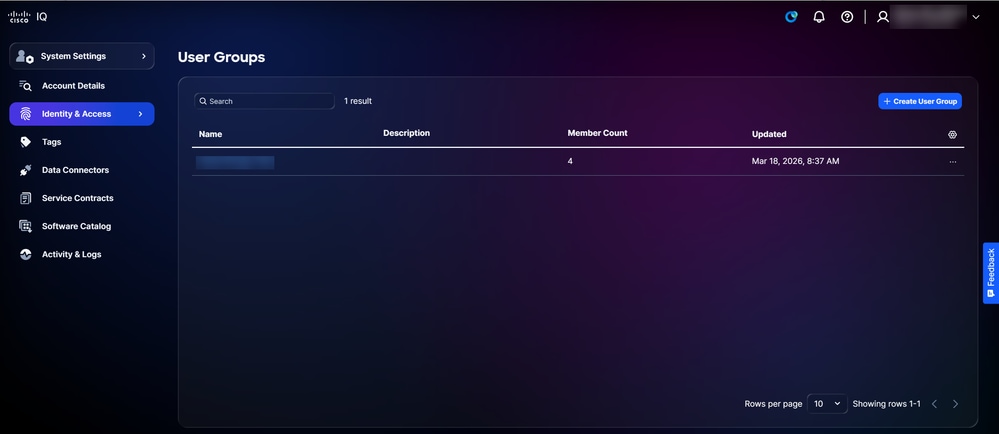 مجموعات المستخدمين
-
أستخدم حقلي البحث والتصفية لتضييق القائمة.
-
انقر فوق اسم مجموعة مستخدمين لعرض تفاصيلها.
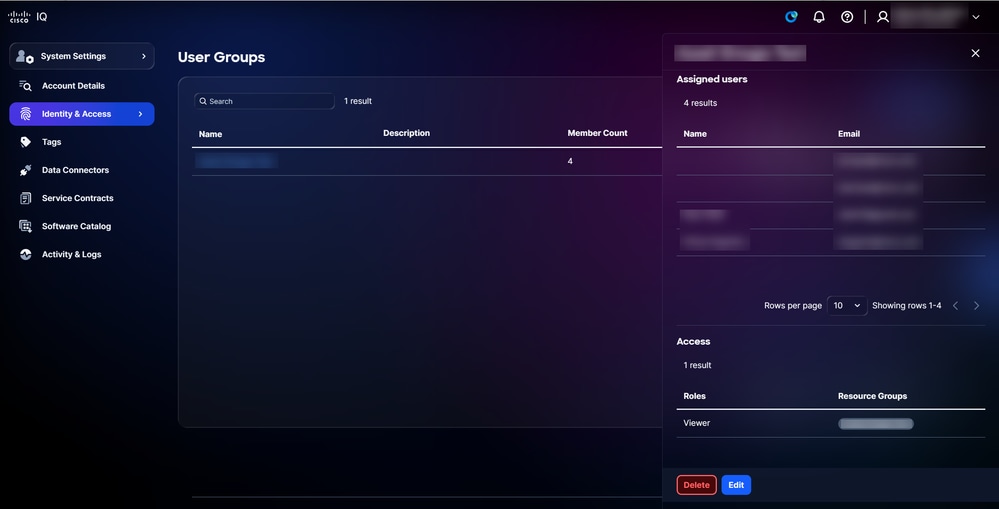 تفاصيل مجموعة المستخدمين
إنشاء مجموعات مستخدمين
لإنشاء مجموعة مستخدمين جدد:
-
انقر فوق إنشاء مجموعة مستخدمين. تظهر صفحة إنشاء مجموعة مستخدمين.
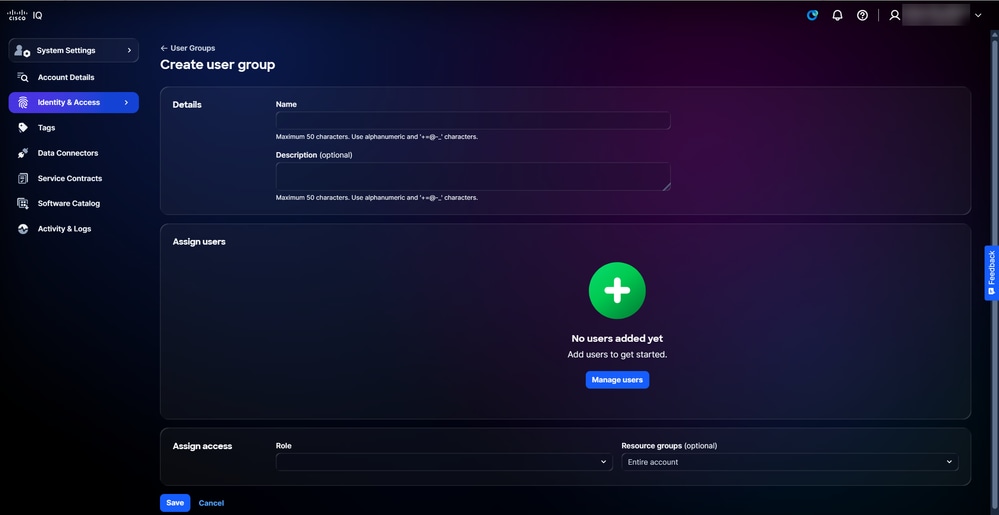 إنشاء مجموعة مستخدمين
-
أدخل اسما لمجموعة المستخدمين.
-
وبشكل إختياري، أدخل الوصف.
-
انقر فوق إدارة المستخدمين. يتم فتح الإطار إدارة المستخدمين.
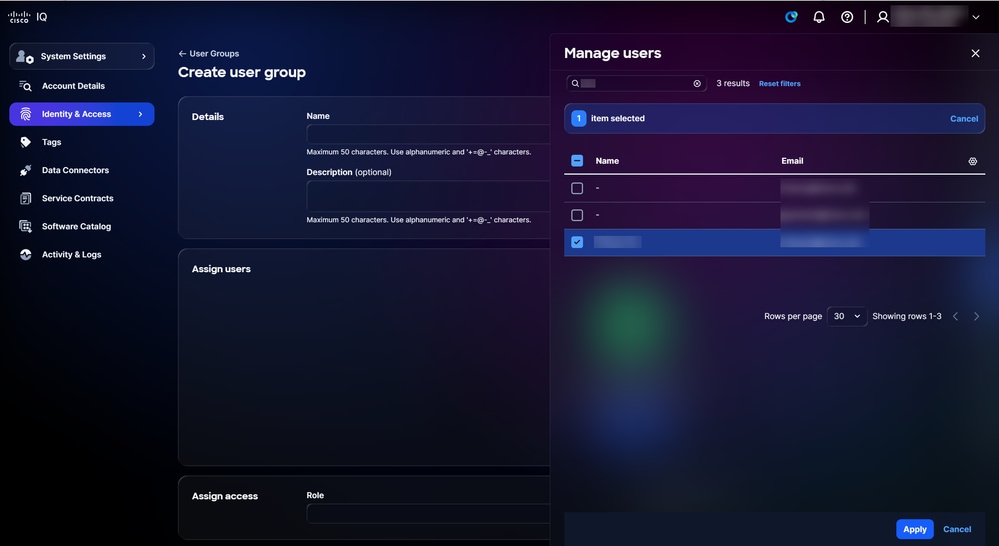 إدارة المستخدمين
-
حدد خانات الاختيار الخاصة بالمستخدمين المطلوبين.
-
انقر فوق تطبيق.
-
أختر دورا من القائمة المنسدلة.
-
إختياريا، أختر مجموعة موارد من القائمة المنسدلة.
-
انقر فوق حفظ. تظهر مجموعة المستخدمين الجديدة في جدول مجموعات المستخدمين.
تحرير مجموعات المستخدمين
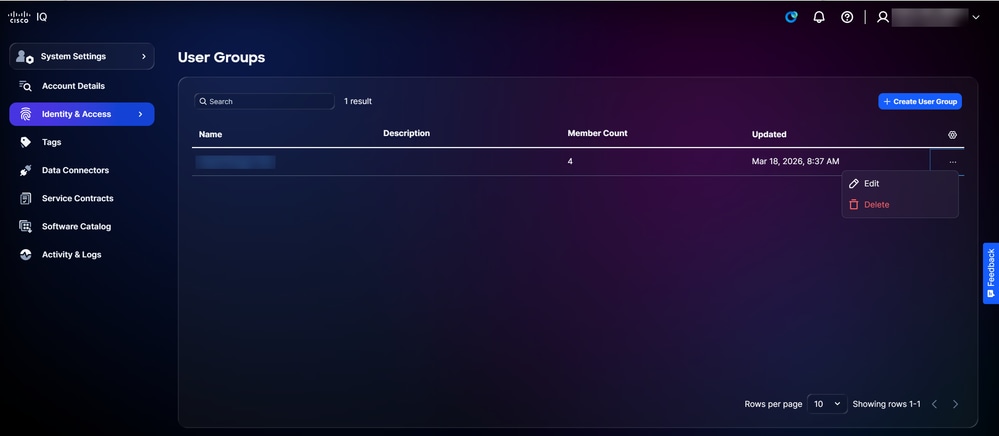
لتحرير مجموعة مستخدمين:
 تحرير
تحرير
-
من سجل على صفحة مجموعات المستخدمين، أختر أيقونة المزيد من الخيارات > تحرير. تظهر صفحة تحرير مجموعة المستخدمين.
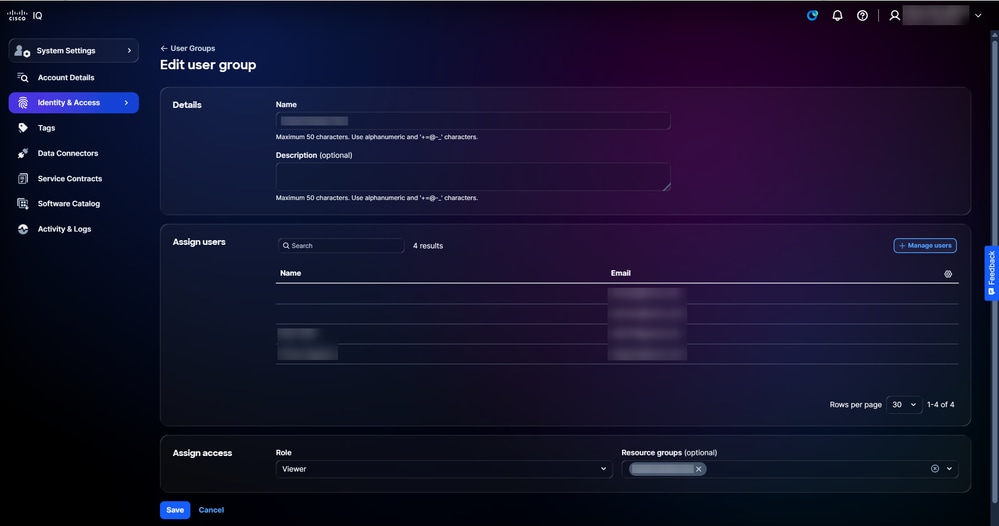 تحرير مجموعة المستخدمين
-
قم بتحرير سمات مجموعة المستخدمين حسب ما تريد.
-
انقر فوق حفظ.
حذف مجموعات المستخدمين
لحذف مجموعة مستخدمين:
-
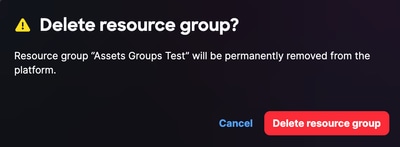
من سجل على صفحة مجموعات المستخدمين، أختر أيقونة المزيد من الخيارات > حذف. تظهر نافذة حذف مجموعة المستخدمين.
 تأكيد حذف مجموعة المستخدمين
-
انقر فوق حذف مجموعات المستخدمين. تم حذف مجموعة المستخدمين.
العلامات
علامات الأصول هي تسميات مخصصة تقوم بتعيينها على أصول المخزون في IQ من Cisco. علامة التمييز هي زوج مفاتيح:قيم- على سبيل المثال، بيئة:Prod أو تسمية:Campus- الذي تقوم بتعريفه. يمكن لمسؤولي الحسابات إنشاء علامات التمييز وحذفها، كما يمكنهم تعيين مستخدمين لمجموعة موارد، مما يمكنهم من تعيين علامات الأصول لجهاز ما. راجع مجموعات الموارد للحصول على مزيد من المعلومات حول تعيين مستخدمين إلى مجموعة موارد.
إنشاء علامات الأصول
لإنشاء علامة تمييز:
- أختر الصفحة الرئيسية > إعدادات النظام > علامات التمييز. تعرض صفحة علامات التمييز.
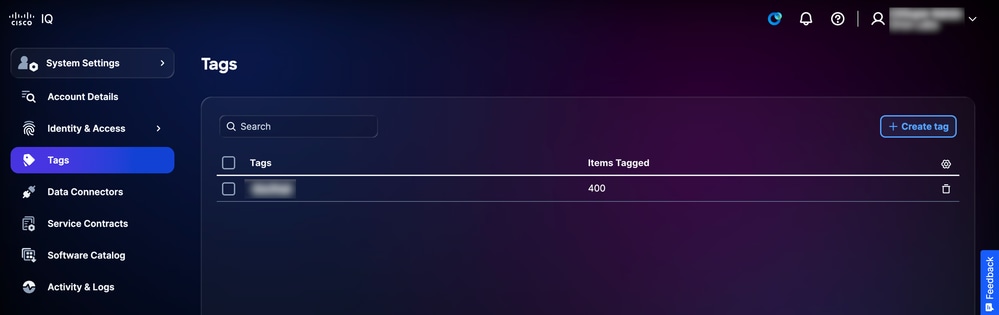 العلامات
 -
انقر على إنشاء علامة تمييز. تظهر صفحة إنشاء علامة تمييز.
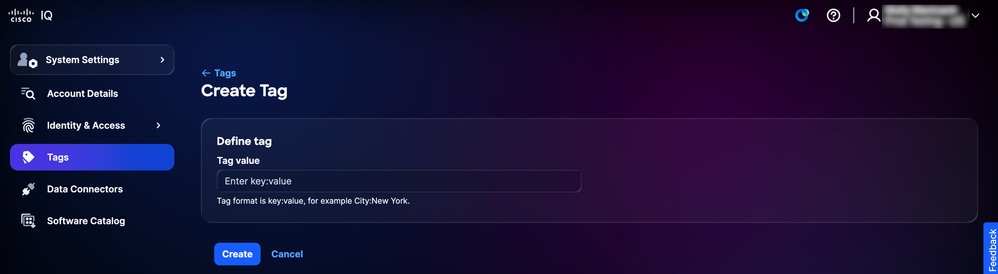 إنشاء علامة
-
أدخل قيمة علامة التمييز في حقل إدخال مفتاح:قيمة.
-
طقطقة يخلق. تظهر علامة التمييز الجديدة في قائمة علامات التمييز في صفحة علامات التمييز.
حذف علامات الأصول
لحذف علامة تمييز:
-
أختر الصفحة الرئيسية > إعدادات النظام > علامات التمييز. تعرض صفحة علامات التمييز.
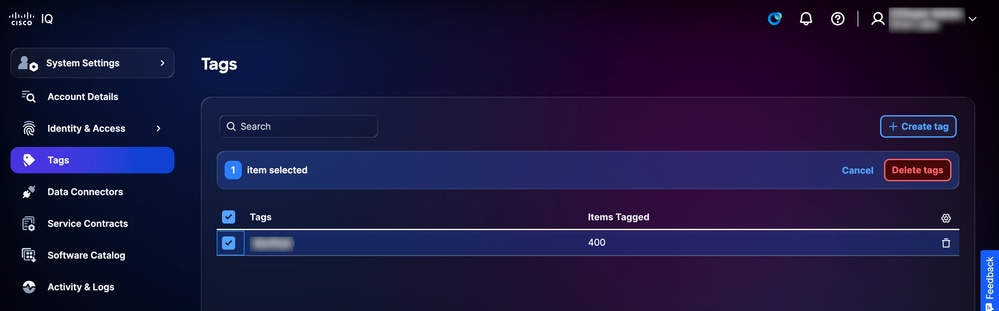 العلامات
-
حدد خانة (مربعات) الاختيار لعلامة (علامات) التمييز المراد حذفها.
-
انقر حذف علامات التمييز. يتم عرض تأكيد.
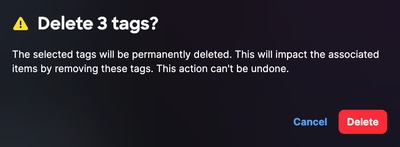 تأكيد حذف العلامة
-
انقر فوق حذف للتأكيد.
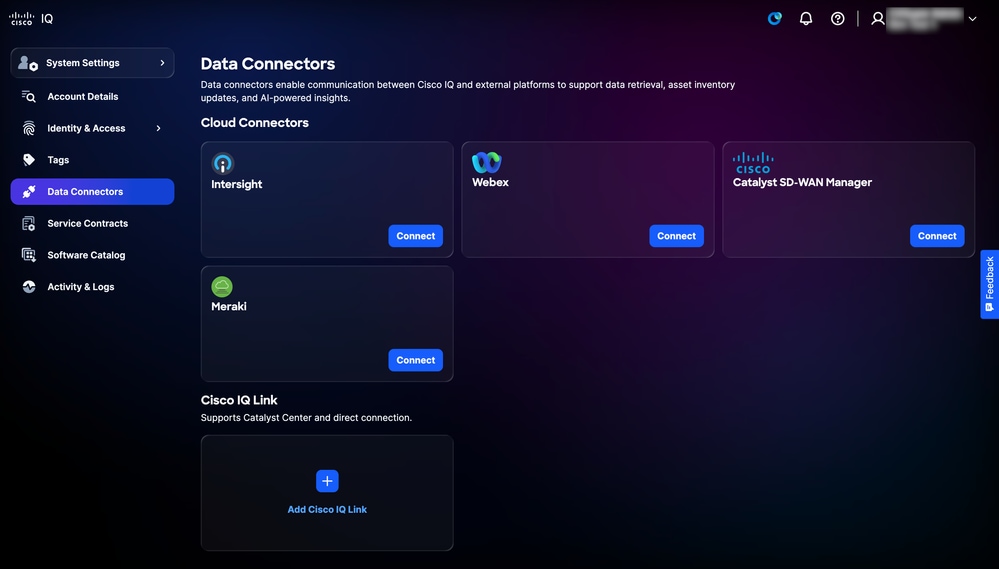
موصلات البيانات
يستخدم نظام Cisco IQ موصلات البيانات كجزء من نهج معالجة البيانات متعدد الطبقات لتوفير رؤى شاملة للشبكة. تجمع Data Connectors القياس عن بعد من الأصول الموجودة على الشبكة، مما يتيح لشركة Cisco IQ توفير رؤى ذات صلة وخبرات موثوق بها.
إضافة موصلات سحابية
يعد توصيل بيانات منتج مجموعة Cisco لديك بمعرف فئة المورد (IQ) من Cisco الطريقة الأسرع للبدء في إستخدام مميزاته القوية والمخصصة. يمكنك تلقي رؤى مخصصة في دقائق بعد إعداد إتصالات البيانات الخاصة بك لوحدات تحكم المنتج التالية: Intersight®، لوحة معلومات Meraki، برنامج SD-WAN Manager، Webex® Control Hub.
لتوصيل منتجات سحابة Cisco:
-
أختر إعدادات النظام > موصلات البيانات. تظهر صفحة موصلات البيانات.
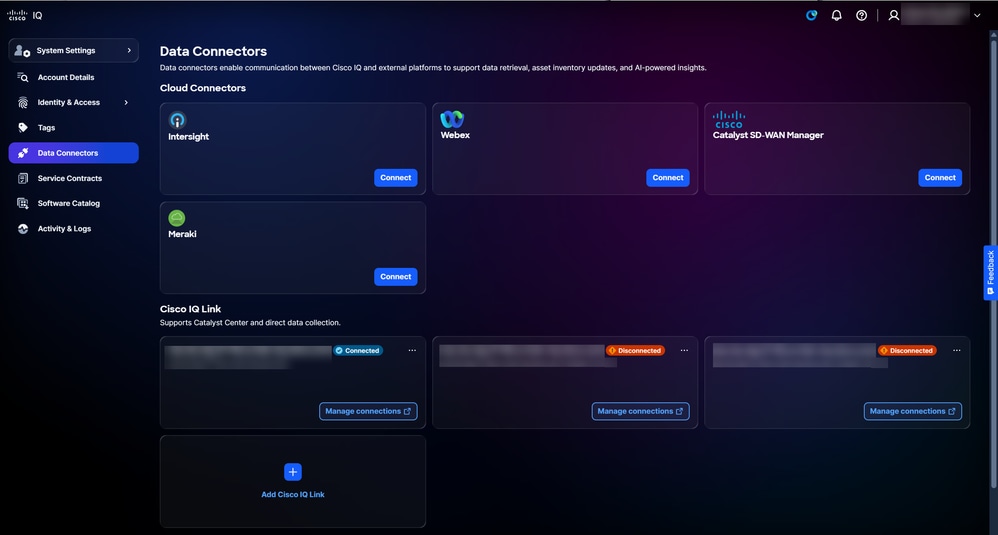 موصلات السحابة
-
انقر على توصيل للحصول على موصل السحابة المطلوب.
-
أكمل الخطوات التالية لموصل السحابة المحدد:
-
Intersight
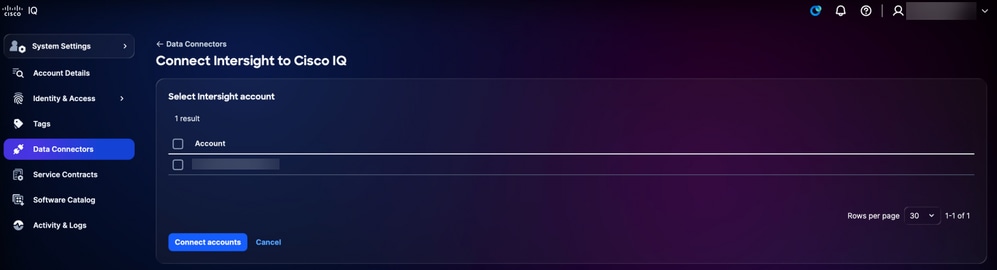 Connect Intersight
-
حدد خانة (مربعات) الاختيار الخاصة بالحساب (الحسابات) المطلوب.
-
انقر فوق توصيل الحسابات. تتم إعادة توجيهك إلى صفحة موصلات البيانات وعروض تأكيد.
-
-
Webex
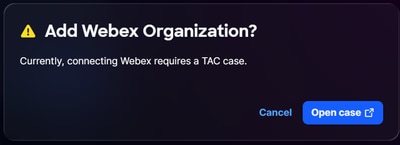 اتصال Webex
-
انقر فوق فتح الحالة من نافذة إضافة مؤسسة WebEx. تتم إعادة توجيهك إلى SCM.
-
إنشاء حالة دعم في SCM.
-
-
مدير Catalyst SD-WAN
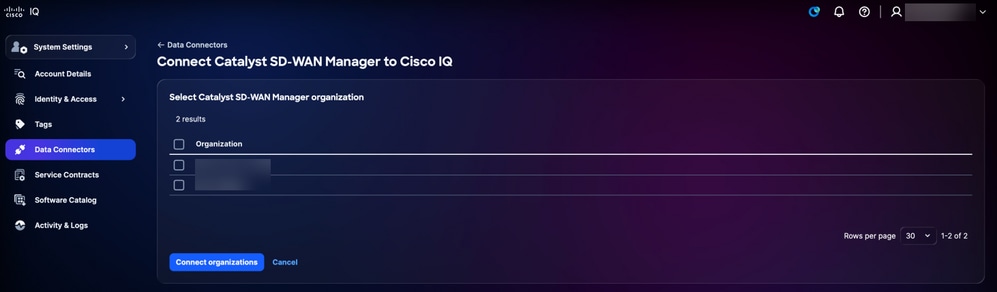 برنامج Connect Catalyst SD-WAN Manager
-
حدد خانة (مربعات) الاختيار الخاصة بالمؤسسة (المؤسسات) المطلوبة.
-
انقر فوق توصيل المؤسسات. تتم إعادة توجيهك إلى صفحة موصلات البيانات وعروض تأكيد.
-
-
Meraki
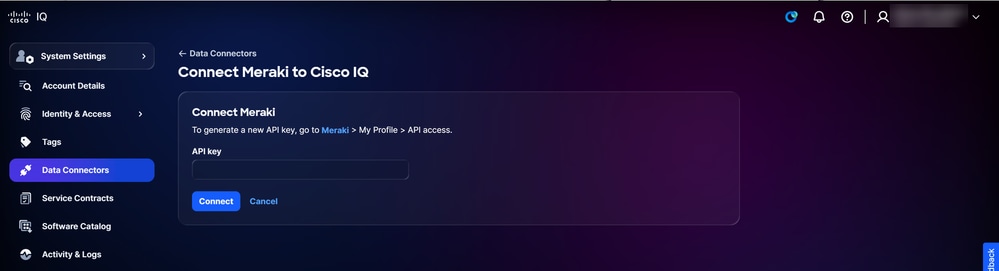 توصيل Meraki
-
اتبع التعليمات التي تظهر على الشاشة.
-
أدخل مفتاح API.
-
انقر على توصيل. تتم إعادة توجيهك إلى صفحة موصلات البيانات وعروض تأكيد.
-
-
إضافة مثيلات إرتباط Cisco IQ
يعد إرتباط IQ من Cisco مكونا محليا لذكاء Cisco تم تصميمه خصيصا ليوفر لك رؤى أكثر ثراء وذكاء، مثل دورة حياة الأجهزة والبرامج وتقارير الجرد. وهو يقوم بدمج أدوات التجميع السابقة في موصل واحد تقوم بتثبيته على جهاز افتراضي لتجميع بيانات بيانات بيانات تتبع الاستخدام التفصيلية من أجهزتك.
يتم نشر إرتباط IQ من Cisco داخل الشبكة المحلية لديك لإجراء اكتشاف تلقائي للأجهزة وتجميع بيانات تتبع الاستخدام. يدعم إرتباط IQ من Cisco الاتصال المباشر والتكامل مع مركز Catalyst. بالإضافة إلى ذلك، إذا تم إنشاء الحساب الخاص بك عبر الترحيل، فيمكنك الاستفادة من عميل CX أو CSPC للاتصال عن بعد.
لإضافة مثيلات إرتباط Cisco IQ إلى Cisco IQ:
-
انتقل إلى صفحة موصلات البيانات.
 إضافة إرتباط IQ من Cisco
-
انقر فوق إضافة إرتباط Cisco IQ.
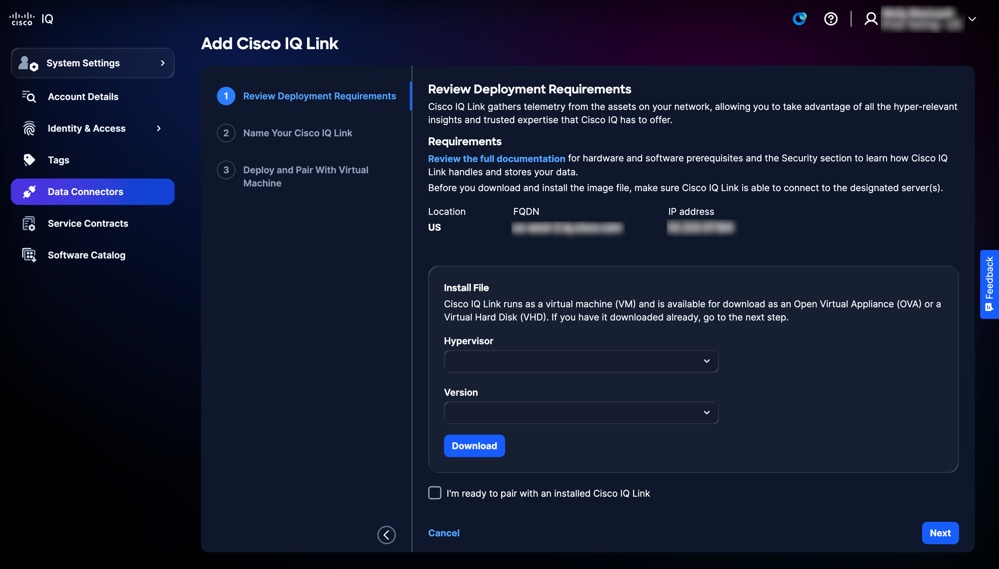 تنزيل OVA أو VHD
 -
تمتع بتنزيل جهاز العرض الظاهري المفتوح (OVA) أو محرك الأقراص الثابتة الظاهري (VHD):
-
أختر برنامج مراقبة الأجهزة الافتراضية من القائمة المنسدلة.
-
أختر الإصدار من القائمة المنسدلة.
-
انقر فوق تنزيل.
-
-
انقر فوق مراجعة الوثائق الكاملة للوصول إلى دليل بدء تشغيل إرتباط Cisco IQ. يقدم هذا المستند إرشادات شاملة خطوة بخطوة لتثبيت إرتباط Cisco IQ باستخدام الملف الذي تم تنزيله في الخطوة السابقة. وهو يغطي سير عمل النشر الكامل، بما في ذلك جميع الانتقالات الضرورية بين واجهة Cisco IQ و Cisco IQ Link لإنهاء الازدواج والتكوين.
تحرير أسماء مثيلات إرتباط IQ من Cisco
لتحرير اسم مثيل إرتباط Cisco IQ:
-
انتقل إلى مثيل إرتباط Cisco IQ المطلوب في صفحة موصلات البيانات.
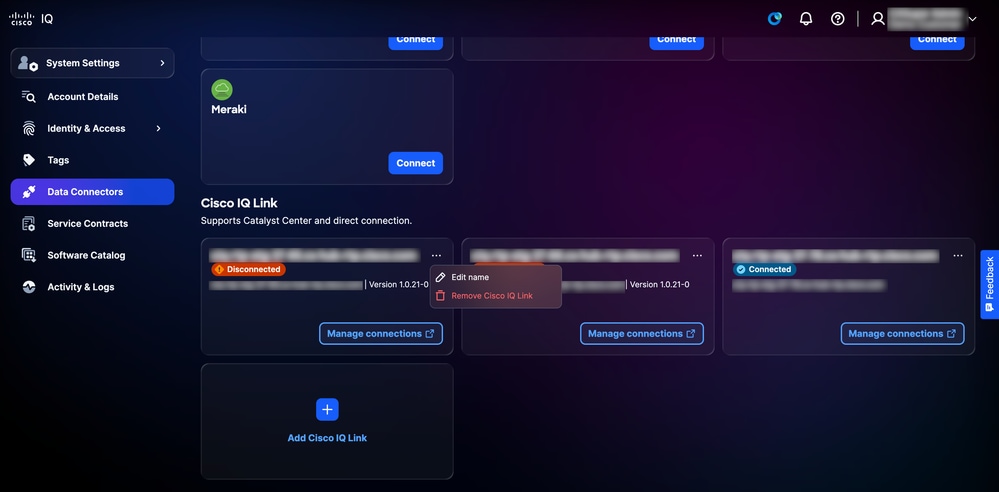 تحرير الاسم
-
أختر أيقونة المزيد من الخيارات > تحرير الاسم.
-
قم بتحرير الاسم كما تريد.
-
طقطقة تحديث.
إزالة الحسابات المتصلة من موصلات السحابة
لإزالة حساب متصل من موصل السحابة، يجب فتح حالة دعم.
لفتح حالة دعم:
-
انتقل إلى موصل السحابة المطلوب في صفحة موصلات البيانات.
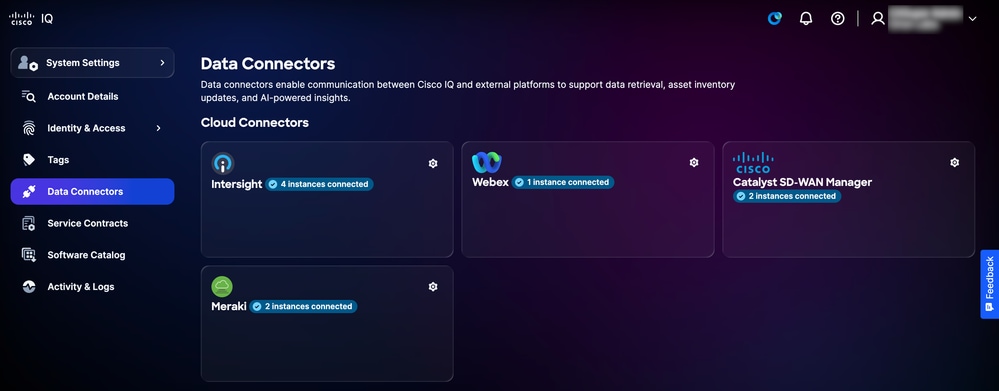 إعدادات موصلات السحابة
-
انقر على أيقونة الإعدادات. يظهر إطار الحسابات المتصلة.
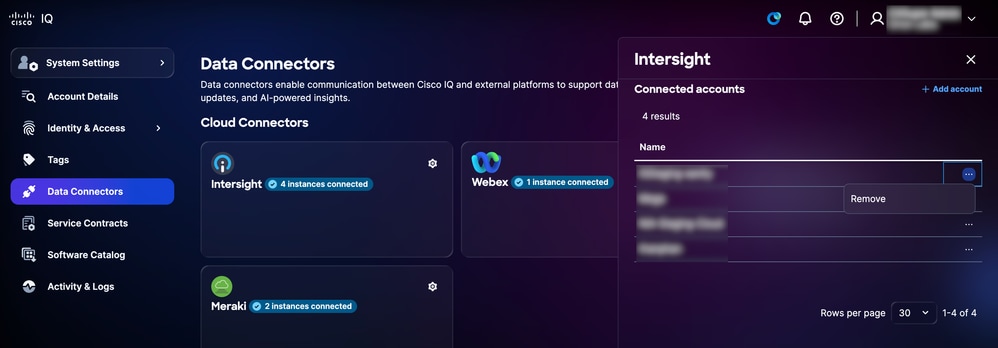 إزالة الحساب المتصل لموصل السحابة
-
من الحساب المرغوب، أختر أيقونة المزيد من الخيارات > إزالة.
-
انقر فوق فتح الحالة لفتح حالة دعم.
إزالة مثيلات إرتباط Cisco IQ
لإزالة مثيلات إرتباط Cisco IQ من موصلات البيانات لديك:
-
انتقل إلى مثيل إرتباط Cisco IQ المطلوب في صفحة موصلات البيانات.
 إزالة إرتباط IQ من Cisco
-
أختر أيقونة المزيد من الخيارات > إزالة إرتباط Cisco IQ. يتم عرض تأكيد.
-
انقر فوق إزالة للتأكيد.
إزالة أدوات التجميع القديمة
لإزالة موصل قديم متصل:
-
انتقل إلى مجمع البيانات القديم المطلوب في صفحة موصلات البيانات.
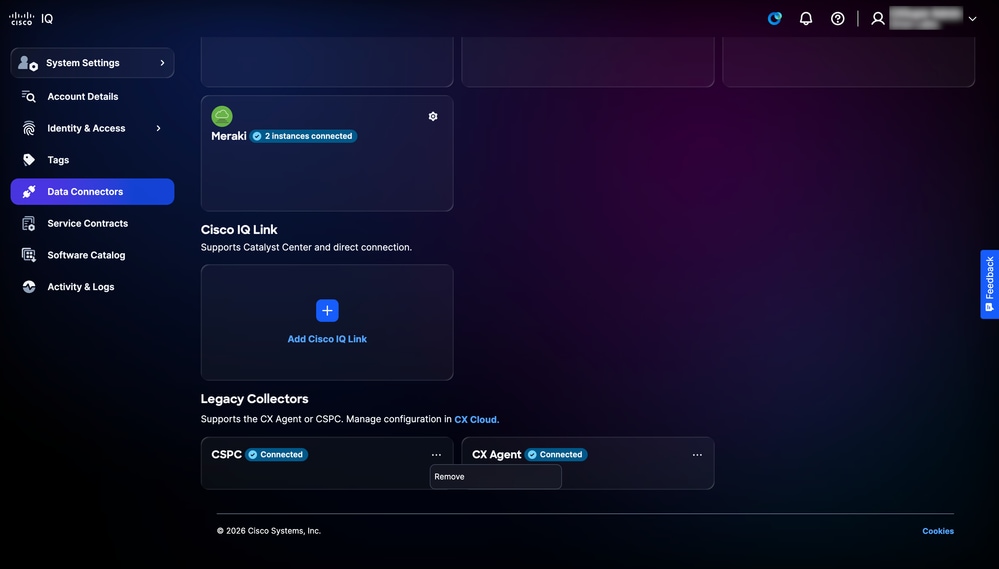 إلغاء إرتباط مجمع قديم
-
أختر أيقونة المزيد من الخيارات > إزالة. يتم عرض تأكيد.
-
انقر فوق فتح الحالة لفتح حالة دعم لإزالة مجمع البيانات القديم.
عقود الخدمات
يعمل ربط العقود على توحيد البيانات من العقود المرتبطة بأعضاء الفريق المختلفين، كما يتضمن الأجهزة غير المتصلة بقوائم الجرد الخاصة بك عبر القياس عن بعد، فضلا عن إضفاء طابع مركزي على إمكانية رؤية تغطية الدعم ومنع مفاجآت التجديد. يتطلب ربط العقود رقم العقد المستخدم لفتح حالات الدعم.
تشمل الفوائد الرئيسية لعقود الخدمة ما يلي:
-
إنشاء طريقة عرض مركزية لتغطية دعم مؤسستك
-
لوحات معلومات قابلة للتخصيص تتيح لك أن تسبق عمليات التجديد الخاصة بك قبل شهور
-
توسيع إمكانية رؤية المخزون ليشمل الأصول غير المتصلة بقياس telemetry أو جزء من البيئات التي يتم التعامل معها بواسطة هوائي
إضافة عقد أولي
لإضافة عقد من صفحة عقود الخدمة: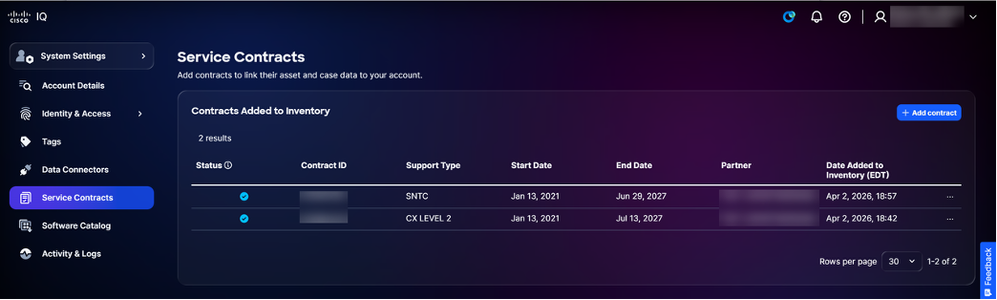 إضافة عقد
-
طقطقة يضيف عقد. تظهر صفحة إضافة عقد.
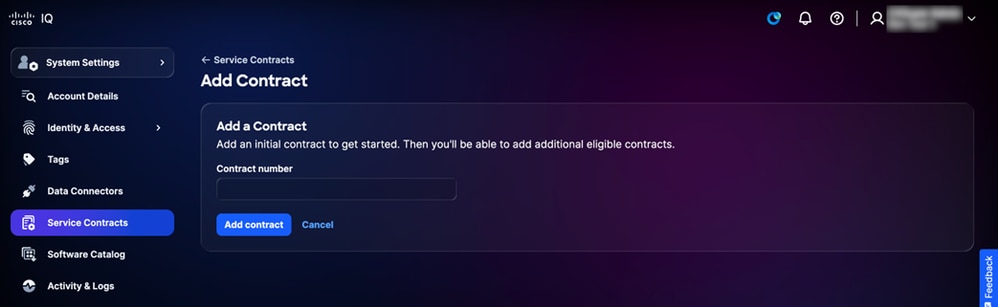 إدخال رقم العقد
 -
أدخل رقم العقد.
-
طقطقة يضيف عقد. تتم إضافة العقد إلى الحساب.
يمكنك عرض تفاصيل عقد الخدمة عن طريق الانتقال إلى تطبيق الأصول ضمن إعدادات النظام > الأصول > عقود الخدمة. لمزيد من المعلومات حول تفاصيل عقد الخدمة، راجع عقود الخدمة في تطبيق الأصول.
إضافة عقود إضافية
بعد إضافة عقد أولي، يمكنك إضافة عقود إضافية:
-
طقطقة يضيف عقد. تعرض الصفحة إضافة عقد العقود المتاحة لإضافتها إلى الحساب.
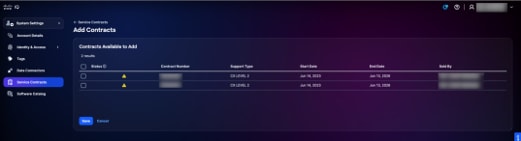 إضافة عقود إضافية
 -
حدد خانة (خانات) الاختيار للعقد (العقود) لإضافتها إلى الحساب.
-
انقر فوق حفظ. وتضاف العقود الإضافية إلى الحساب.
إزالة العقود
لإزالة عقد خدمة:
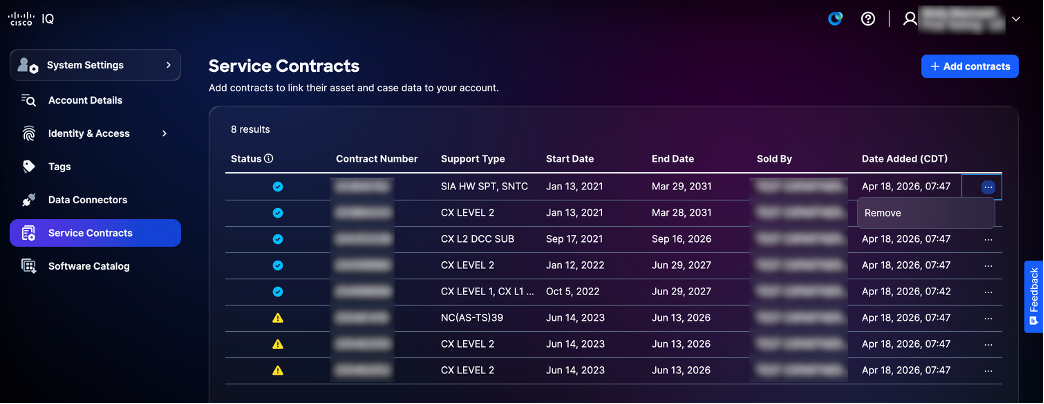 إزالة عقد الخدمة
-
أختر أيقونة المزيد من الخيارات > إزالة.
-
انقر فوق إزالة للتأكيد.
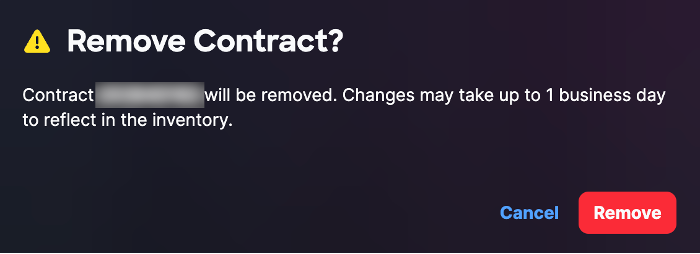 إزالة تأكيد عقد الخدمة
كتالوج البرامج
يعرض كتالوج البرامج مثيلات البرامج المتوفرة لك. فهو يتيح لك إمكانية مراقبة التحديثات وإدارتها بسلاسة تامة، مما يضمن إمكانية تتبع أحداث النظام لديك وإدارتها بكفاءة تامة.
للوصول إلى كتالوج البرامج، انتقل إلى الصفحة الرئيسية > إعدادات النظام > كتالوج البرامج. تظهر صفحة كتالوج البرامج. في هذه الصفحة، يتم عرض مثيلات البرامج المتوفرة كبطاقات توفر مجمع الارتباطات. تعرض كل بطاقة توفر لمجمع الارتباطات اسم مثيل البرنامج ووصفه والناشر وإصداره.
عرض تفاصيل مثيلات البرامج
لعرض ملاحظات الإصدار لمثيل برنامج، انقر فوق تفاصيل. يفتح نافذة مع المثيل الأخير إطلاق بطاقة. لعرض ملاحظات الإصدار السابقة، أختر إصدار من القائمة المنسدلة.
تثبيت حزم لمثيلات البرامج الجديدة
لتنزيل مثبت لإنشاء مثيل جديد:
-
من بطاقة توفر مجمع الارتباطات المطلوبة، أختر خيارات التنزيل > حزم التثبيت. يظهر إطار تثبيت الحزمة.
-
حدد أحد خيارات برامج مراقبة الأجهزة الافتراضية التالية من القائمة المنسدلة:
-
ESXi: لبرنامج VMware ESXi
-
Hyper-V: لبرنامج Hyper-V من Microsoft
-
KVM: للجهاز الظاهري (KVM) القائم على Linux Kernel
-
-
حدد إصدارا من القائمة المنسدلة.
-
انقر فوق تنزيل لحفظ الملف محليا.
-
قم بنشر الملف في مركز البيانات الخاص بك. راجع دليل بدء تشغيل إرتباط Cisco IQ للحصول على مزيد من المعلومات.
النشاط والسجلات
تقوم خدمة الأنشطة والسجلات بتوسيط تعقب جميع إجراءات المستخدم وأحداث النظام عبر معدل ذكاء (IQ) Cisco للتوافق واستكشاف الأخطاء وإصلاحها والمراقبة. إنه يلتقط سجلات تدقيق ثابتة لأحداث المصادقة، وقرارات التفويض، والوصول إلى الموارد، وتغييرات التكوين، والإجراءات الإدارية مع سياق تفصيلي بما في ذلك هوية المستخدم، والطوابع الزمنية، وعناوين IP المصدر، والموارد المتأثرة. تعمل الأنشطة والسجلات على فرض سياسات الاحتفاظ وتتيح إمكانية الاستعلام عن أحداث التدقيق وتصفيتها بشكل مرن مع دعم عمليات البحث في النطاق الزمني ومرشحات قائمة على المستخدم وتتبع الأنشطة الخاصة بالموارد.
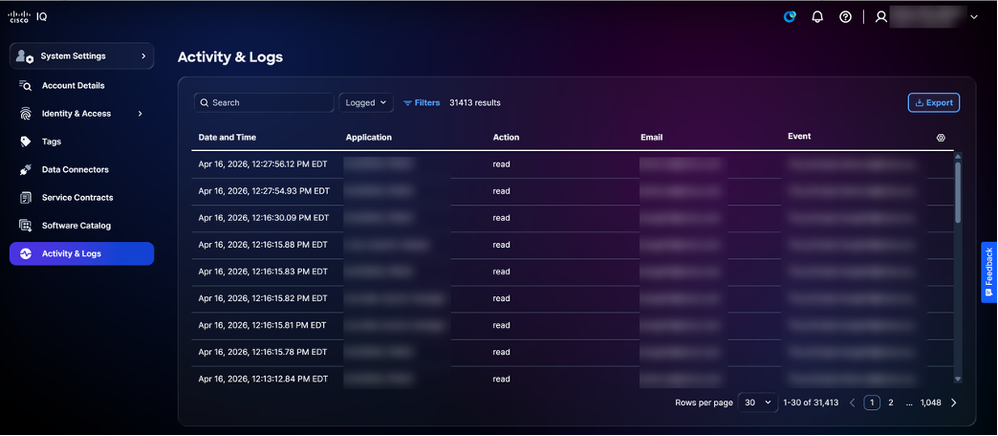 النشاط والسجلات
تطبيق الأصول
يوفر تطبيق الأصول إمكانات رؤية وإدارة شاملة لأصول Cisco ويعمل كأساس لذكاء Cisco، مما يوفر قائمة مركزية لجميع الأجهزة داخل المؤسسة. من خلال جمع المعلومات من مصادر متعددة، فإنه يعمل كمصدر وحيد للحقيقة فيما يتعلق بجرد الأجهزة. يعد الاحتفاظ بقائمة أصول كاملة ودقيقة أمرا ضروريا، حيث تعتمد التطبيقات الأخرى الموجودة داخل IQ من Cisco - مثل تطبيق "التقييمات" - على هذه البيانات لتقييم سلامة أجهزتك وأمنها.
 القائمة الرئيسية
المفاهيم الأساسية
يرتكز تطبيق الأصول على المفاهيم الأساسية التالية:
- الأصل: أي جهاز أو جهاز أو برنامج مادي تم جرده وإدارته كجزء من تقديم خدمة Cisco مع تعقب تفصيلي لهويته ووظيفته وتغطية الخدمة ودورة حياته
- آخر تاريخ للدعم (LDOS): تعقب حدث نهاية العمر الافتراضي ونهاية الدعم لمنتجات Cisco
- تغطية الخدمة: عقود الدعم النشطة والضمانات ومستويات الاستحقاق المرتبطة بقطعة معينة من الأجهزة أو البرامج
- علامة الأصل: تسمية معرفة من قبل المستخدم تم تعيينها لأصل خاص بالمؤسسة والتصفية وتدفقات العمل التشغيلية
- إشارة الجهاز: يشير إلى الوقت الذي قامت Cisco فيه بالكشف للمرة الأخيرة على جهاز (برقمه التسلسلي) بناء على بيانات تتبع الأجهزة وحالات الدعم وتجديد العقود؛ يتم البحث عن بيانات بيانات تتبع الأصول وإثرائها من خلال خط أنابيب متعدد الطبقات للبيانات
الوصول إلى تطبيق الأصول
للوصول إلى ميزات إدارة الأصول في Cisco IQ، أختر قائمة الصفحة الرئيسية > الأصول. تظهر صفحة نظرة عامة.
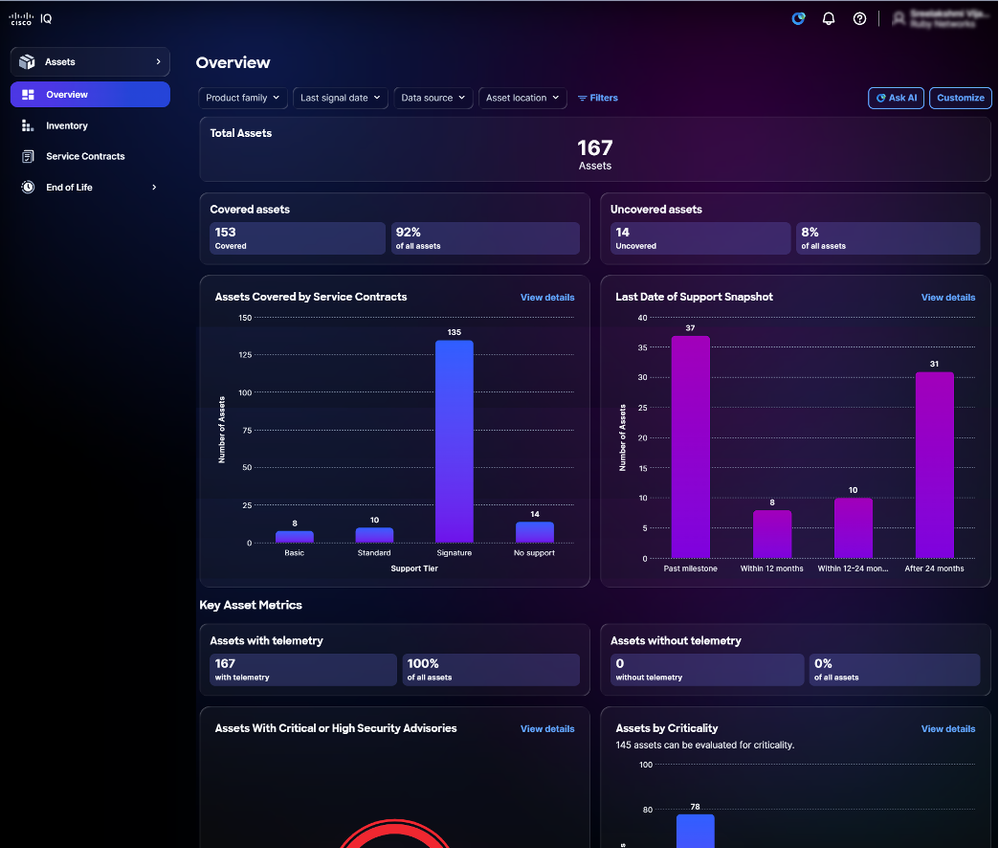
نظرة عامة على الأصول
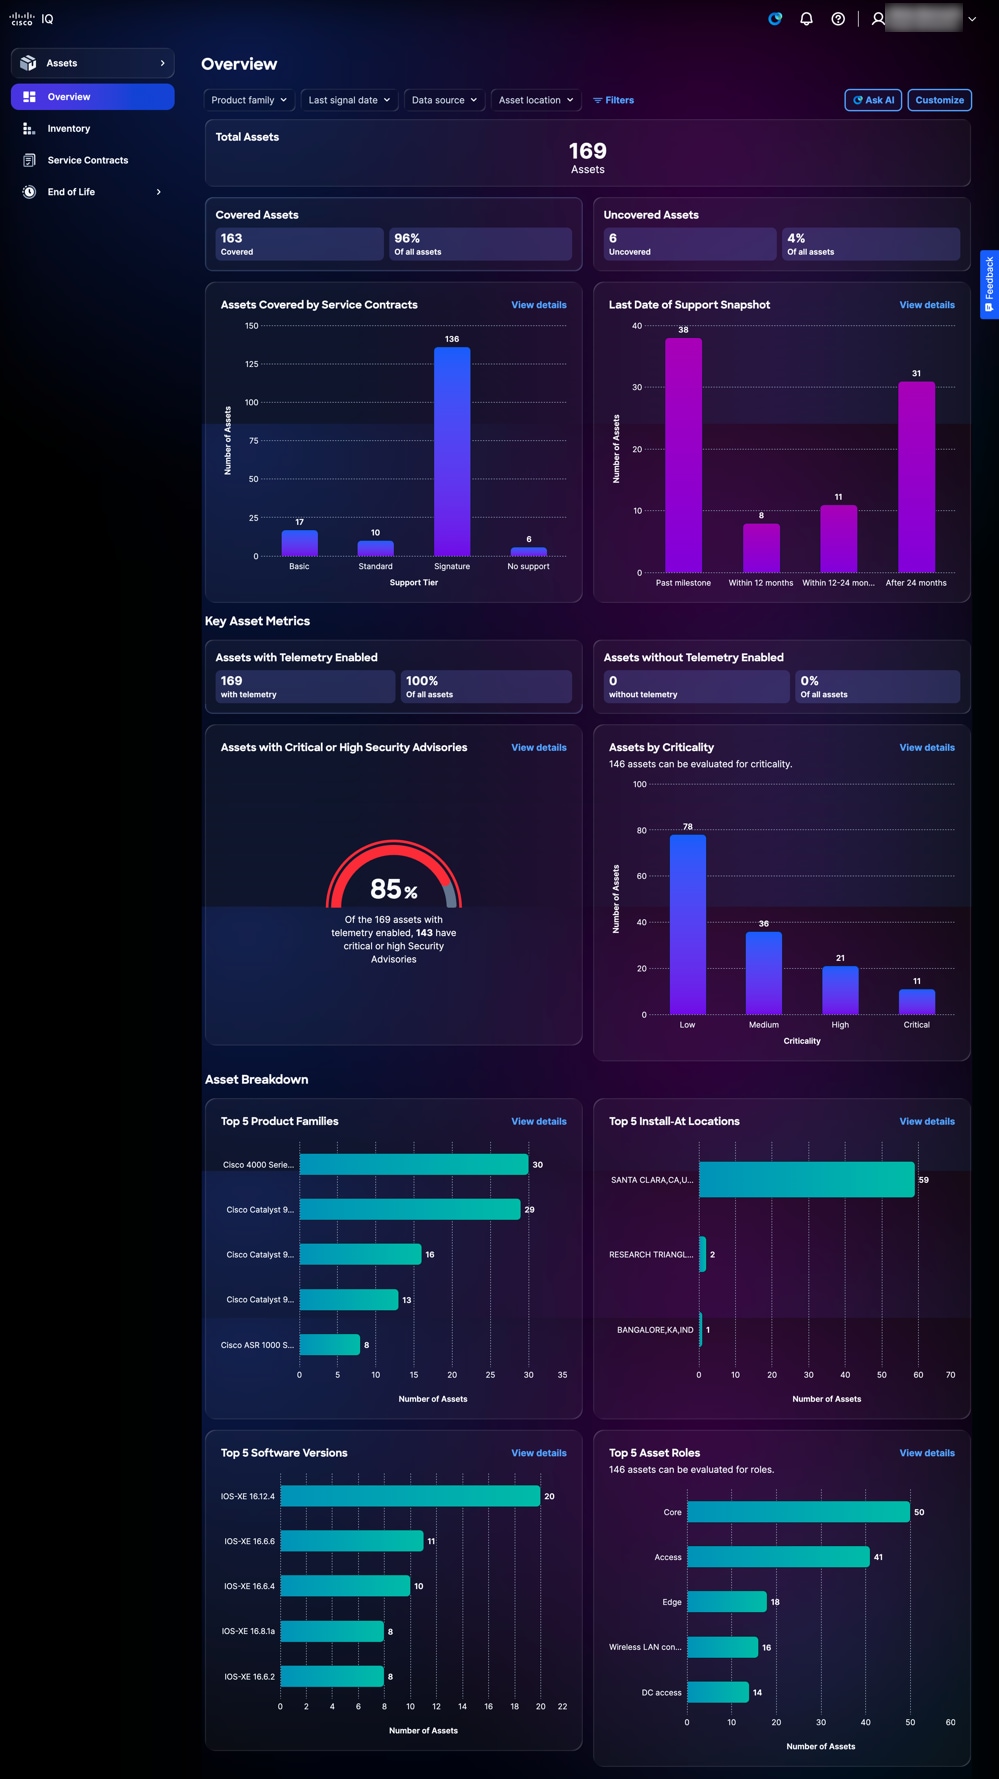
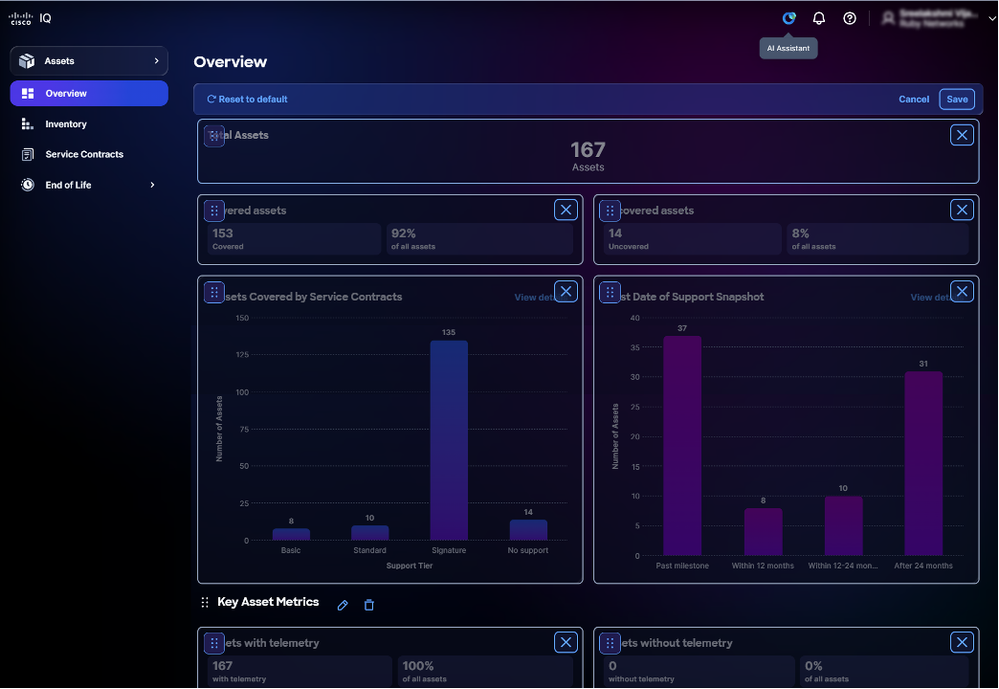
تعرض صفحة نظرة عامة لوحة معلومات تمكنك من تقييم حالة الأجهزة وصحتها بسرعة.
 نظرة عامة على الأصول
تعرض لوحة المعلومات المعلومات التالية:
-
إجمالي الأصول: العدد الإجمالي للأصول داخل حساب IQ من Cisco
-
الأصول المشمولة: العدد الإجمالي للأصول المشمولة بعقود الخدمات والنسبة المئوية لها
-
الأصول المكشوفة: العدد الإجمالي للأصول غير المشمولة بعقود الخدمات والنسبة المئوية لها
-
الأصول التي تشملها عقود الخدمات: بيان تفصيلي لعدد الأصول - المعدات أو البرمجيات - التي تغطيها عقود الخدمات، مصنفة حسب مستوى الاستحقاق
-
آخر تاريخ لقطة الدعم: بيان تفصيلي لعدد الأصول التي تجاوزت LDOS أو بلغت LDOS
-
مقاييس الأصول الأساسية: قياسات أساسية إضافية مثل حالة القياس عن بعد ونصائح الأمان الحرجة ومعلومات LDOS
-
الأصول التي تم تمكين القياس عن بعد: إجمالي عدد الأصول التي تم تمكين القياس عن بعد ونسبتها المئوية
-
الأصول بدون تمكين تتبع الاستخدام: إجمالي عدد الأصول ونسبتها المئوية دون تمكين القياس عن بعد
-
الأصول التي تتوفر بها إستشارات الأمان الهامة أو العالية: النسبة المئوية لإجمالي الأصول التي تم تمكين بيانات تتبع الاستخدام بشأنها والتي تتضمن إرشادات أمان بالغة الأهمية أو عالية
-
الأصول حسب الأهمية: تحليل الأولوية المعينة لجهاز نسبة إلى الأجهزة الأخرى في الشبكة.
-
-
تصنيف الأصول: عرض مفصل لمعلومات الأصول، مثل عائلات المنتجات، ومواقع التثبيت، وإصدارات البرامج، وأدوار الأصول
تصفية طرق العرض للأصول
يمكنك تصفية عرض لوحة المعلومات باختيار مرشح من القوائم المنسدلة أو النقر فوق عوامل التصفية واختيار خيار من قائمة عوامل التصفية المتاحة.
عرض تفاصيل الأصول
عند النقر فوق عرض التفاصيل، يتم إعادة توجيه الصفحة إلى صفحة المخزون. راجع المخزون للحصول على مزيد من المعلومات.
رؤى الأهمية الحيوية للأصول
يتضمن Cisco IQ رؤى الأهمية الحيوية للأصول، وهي قدرة جديدة في تطبيق الأصول التي تتوقع الدور الوظيفي وأهمية العمل لأجهزة الشبكة. من خلال تحليل تكوينات الجهاز والميزات الممكنة، تساعدك "رؤى الأهمية الحيوية للأصول" على تحديد الأصول التي لها أكبر تأثير على شبكتك - حتى يمكنك تحديد أولوياتها لمعالجة الأمان وترقية البرامج وتخطيط نهاية العمر الافتراضي وقرارات التغطية.
تتوفر رؤى الأهمية الحيوية للأصول في تطبيق الأصول في المجالات التالية:
-
نظرة عامة على الأصول: تصفية أعطال الملخص وعرضها حسب سمات رؤى أهمية الأصول
-
مخزون الأصول: عرض الأجهزة والبحث عنها وترتيبها وفرزها حسب الدور والأهمية
-
تفاصيل الأصول: عرض الدور والأهمية للأجهزة الفردية، مع تلميحات الأدوات المعلوماتية التي توضح كل قيمة
جرد
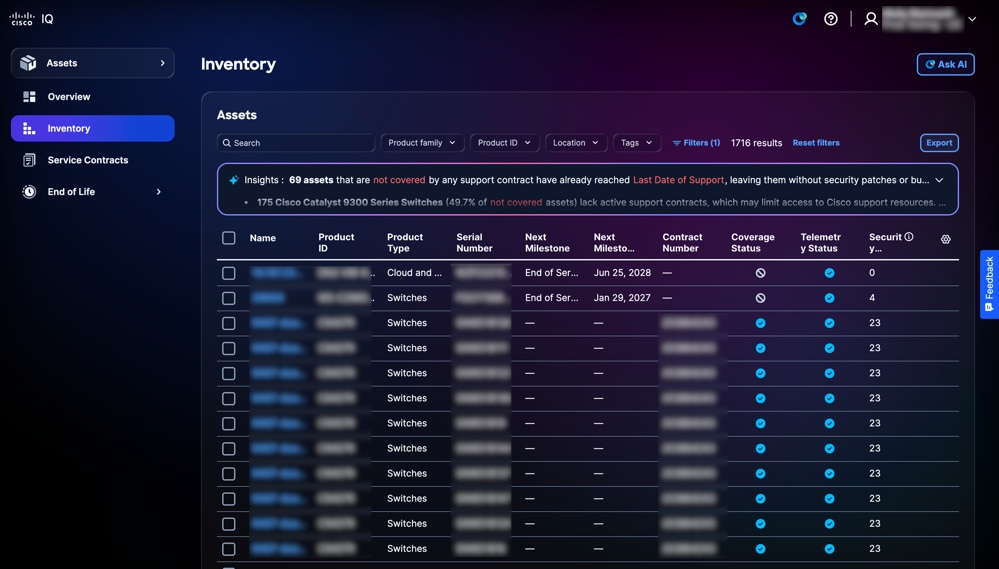
توفر صفحة المخزون قائمة بجميع أصول Cisco داخل حساب IQ من Cisco.
 جرد
جرد
البحث عن طرق العرض لتصفية مخزون الأصول
يمكنك تصفية طريقة عرض القائمة باختيار مرشح من القوائم المنسدلة أو النقر فوق عوامل التصفية واختيار خيار من قائمة عوامل التصفية المتاحة. يمكنك أيضا البحث عن الأصول عن طريق إدخال اسم الأصل في حقل البحث.
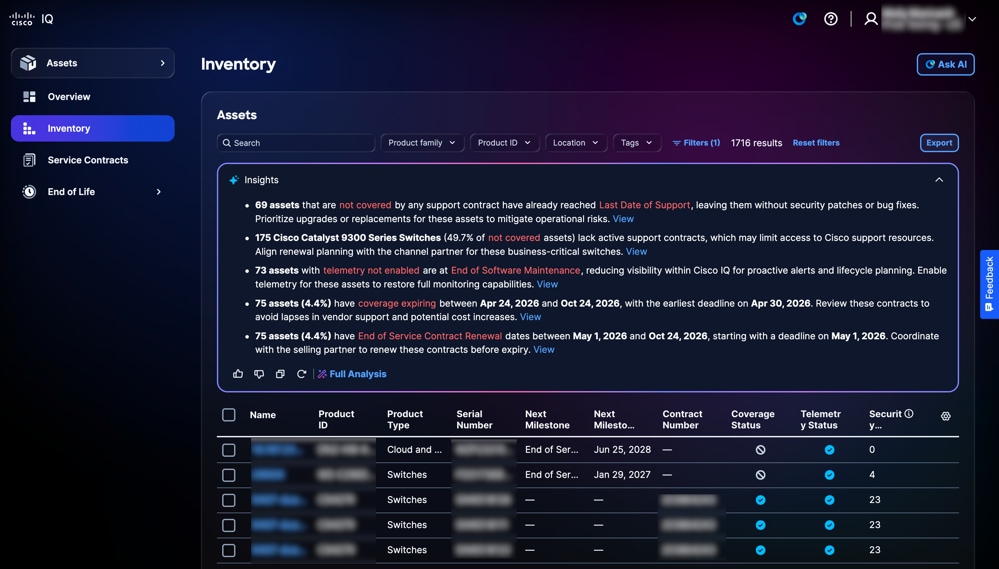
تحليل المخزون
يعرض فريق الرؤى الموجود على صفحة المخزون تحليلا قائما على الذكاء الاصطناعي يوفر ملخصا للأصول مع التركيز على تغطية الدعم، والاتصال، ومراحل التطور. انقر فوق تحليل كامل لعروض مرئية مثل الرسومات البيانية ولوحات المعلومات والمخططات التي توفر رؤى إضافية. راجع تحليل البيانات في ميزات التطبيق الشائعة للحصول على مزيد من التفاصيل.
تصدير المخزون
انقر فوق تصدير لحفظ قائمة مخزون تمت تصفيتها بتنسيق .xls أو .csv. راجع تصدير المعلومات في ميزات التطبيق الشائعة للحصول على مزيد من التفاصيل.
عرض تفاصيل الأصول
انقر فوق أحد الأصول لعرض تفاصيل الأصول. يتم عرض طريقة العرض التفصيلية للأصل بعلامات التبويب التالية:
- التفاصيل: عرض تفاصيل الأصول مثل المنتج وبيانات الإشارة والهوية والموقع والضمان ومعلومات التغطية
 تفاصيل الأصل
-
تنبيهات المنتج: عرض تنبيهات المنتجات ذات الصلة مثل إرشادات الأمان والإشعارات الميدانية
-
الأجهزة: يوفر طريقة عرض تفصيلية للجدول الزمني لنموذج نهاية العمر الافتراضي للأجهزة (على سبيل المثال، نهاية البيع، والشحن الأخير، وتاريخ آخر دعم)
-
البرنامج: يوفر طريقة عرض تفصيلية للمخطط الزمني لدورة نهاية العمر الافتراضي للبرامج
علامات الأصول
علامات الأصول هي تسميات مخصصة تقوم بتعيينها على أصول المخزون في IQ من Cisco. علامة التمييز هيkey:valueزوج - على سبيل المثال،Environment:Prodأو Label:Campus- تقوم بتعريفه. يمكنك تعيين علامات على أصول فردية أو العديد من الأصول في وقت واحد، كما يمكنك تصفية المخزون الخاص بك بواسطة علامة تمييز للبحث عن الأصول التي تهتم بها بسرعة.
إنشاء وحذف علامات الأصول
راجع العلامات في إعدادات النظام للحصول على مزيد من المعلومات حول إنشاء وحذف علامات تمييز الأصول.
تعيين علامات التمييز
يتيح تعيين علامات التمييز للأصول المحددة في طريقة عرض المخزون إمكانية تنظيم الأصول وتصنيفها من أجل تحسين التصفية وإعداد التقارير والإدارة.
لتعيين علامة لأحد الأصول:
-
انتقل إلى الأصول > المخزون.
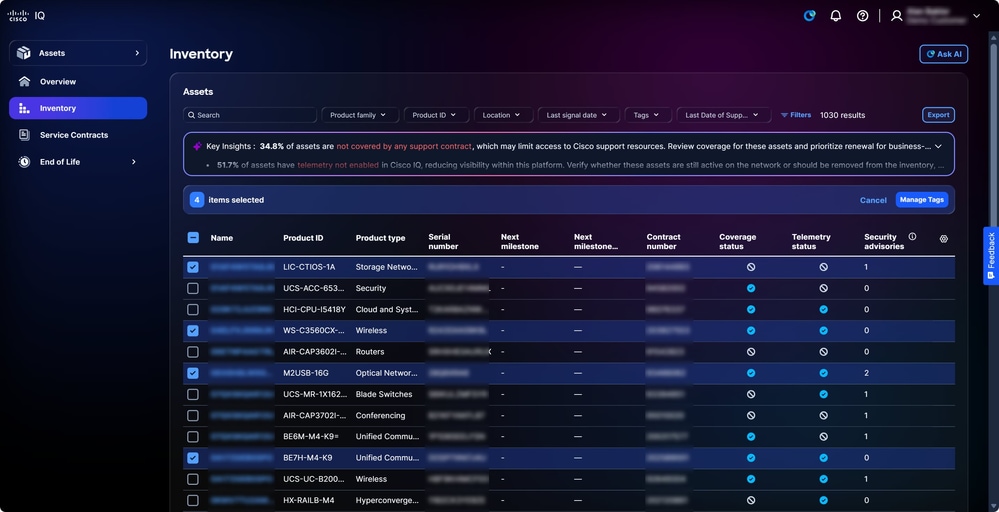 وضع علامات على الأصول
-
حدد خانات الاختيار للأصول المطلوبة.
-
انقر على إدارة علامات التمييز. تفتح نافذة إدارة علامات التمييز.
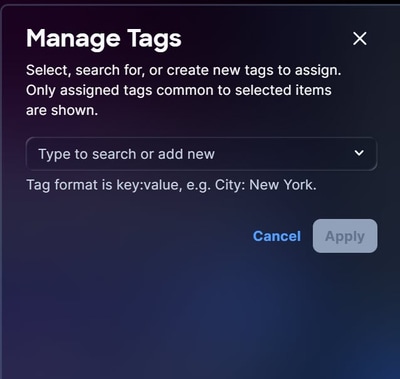 تعيين علامات التمييز
-
في حقل النص، قم بإدخال أو حدد اسم علامة التمييز من الخيارات الموجودة واضغط إدخال.
-
انقر فوق تطبيق.
إزالة علامات الأصول
لإزالة علامة من أصل واحد أو أكثر:
-
انتقل إلى الأصول > المخزون.
-
حدد خانة الاختيار بجوار أصل واحد أو أكثر.
-
انقر على إدارة العلامات. تفتح نافذة إدارة علامات التمييز.
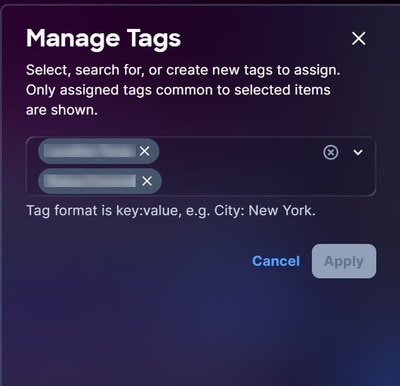 إزالة العلامات
-
انقر فوق X في أي علامة تمييز لإزالته من التحديد.
-
انقر فوق تطبيق.
إستخدام علامات الأصول كعوامل تصفية
بعد إنشاء علامة تمييز، يمكنك إستخدام علامة التمييز كمرشح.
لاستخدام علامة تمييز كمرشح:
-
انتقل إلى صفحة المخزون.
-
انقر فوق عوامل التصفية. تفتح نافذة عوامل التصفية.
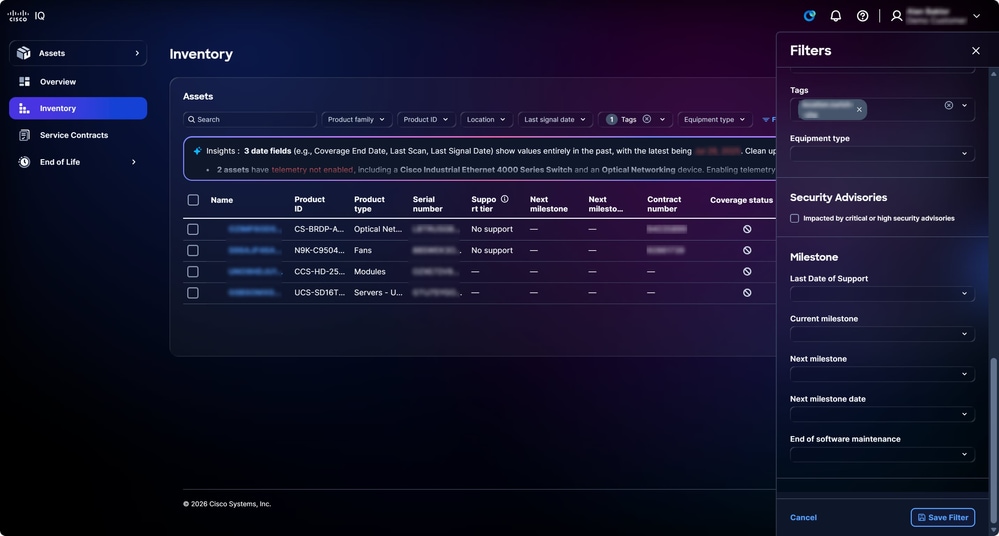 إستخدام علامة تمييز كمرشح
-
من القائمة المنسدلة علامات التمييز، حدد خانات الاختيار لعلامات التمييز المرغوب فيها. بعد تحديد العلامة، يتم تحديث طريقة العرض الموجودة في صفحة المخزون لطريقة العرض التي تمت تصفيتها.
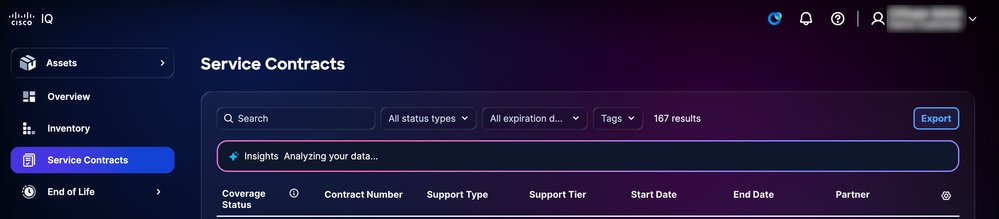
عقود الخدمات
تعمل صفحة عقود الخدمة على تبسيط عملية مراقبة العقود من خلال توفير ملخصات ومعلومات تفصيلية عن العقود، مما يدعم التخطيط الفعال للتجديد واستراتيجيات التغطية.
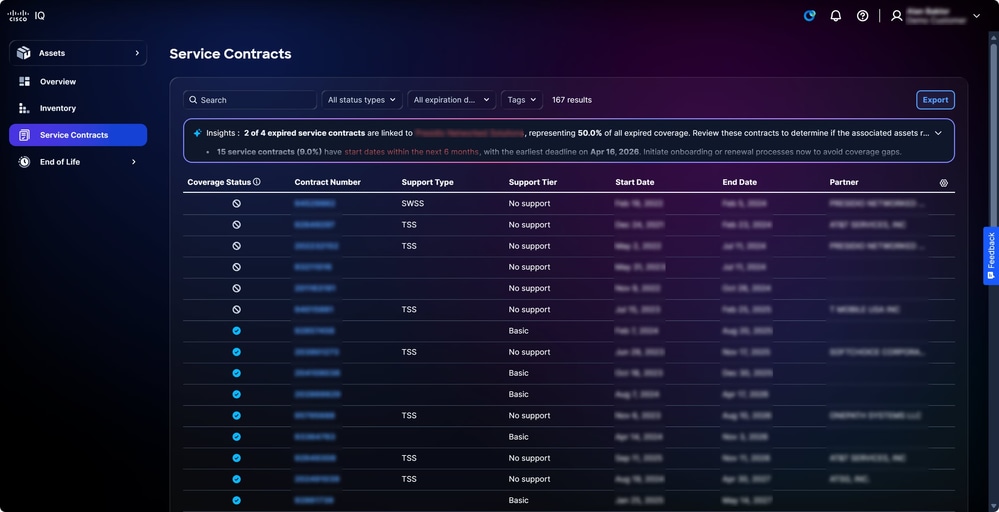 عقود الخدمات
البحث عن طرق العرض وتصفيتها لعقود الخدمة
يمكنك تصفية طريقة عرض القائمة باختيار عامل تصفية من القوائم المنسدلة. يمكنك أيضا البحث عن عقود الخدمة من خلال إدخال رقم العقد في حقل البحث.
تصدير عقود الخدمات
انقر فوق تصدير لحفظ قائمة العقود التي تمت تصفيتها بتنسيق .xls أو .csv. راجع تصدير المعلومات في ميزات التطبيق الشائعة للحصول على مزيد من التفاصيل.
نهاية الحياة
توفر صفحات نهاية العمر الافتراضي للأجهزة والبرامج معلومات نهاية العمر الافتراضي التفصيلية، كما تزود المستخدمين بالدعم اللازم لإدارة دورات تحديث المنتج بشكل استباقي ودعم التغطية. يؤدي النقر فوق أحد الأصول على صفحات نهاية العمر الافتراضي إلى إعادة توجيهك إلى الأصل ذي الصلة في صفحة المخزون.
 برنامج نهاية العمر
تحليل نهاية الحياة
تعرض لوحة الرؤى في صفحة نهاية العمر الافتراضي نظرة عامة للأصول قائمة على تقنية AI مع تحديد يوم الدعم الأخير. انقر فوق تحليل كامل لعروض مرئية مثل الرسومات البيانية ولوحات المعلومات والمخططات التي توفر رؤى إضافية. راجع تحليل البيانات في ميزات التطبيق الشائعة للحصول على مزيد من التفاصيل.
تصدير نهاية الحياة
انقر فوق تصدير لحفظ قائمة مصفاة من أصول نهاية العمر الافتراضي بتنسيق .xls أو .csv. راجع تصدير المعلومات في ميزات التطبيق الشائعة للحصول على مزيد من التفاصيل.
تطبيق التقييمات
يوفر تطبيق التقييمات إطار عمل للتقييم يمكن المستخدمين من التحقيق بشكل استباقي في المخاطر المتعلقة بالأمان والاستقرار والسعة والتوافق والشيخوخة، فضلا عن الحفاظ على أمان الشبكات واستقرارها وموثوقيتها.
المفاهيم الأساسية
ويستند تطبيق التقييمات إلى المفاهيم الأساسية التالية:
-
التقييم: تقييم منهجي لكيانات البنية التحتية مقابل معايير محددة مسبقا لقياس الأداء أو التوافق أو الأمن أو القدرة التشغيلية؛ يتم إجراء عمليات التقييم عند الطلب أو حسب الجدول الزمني أو بواسطة حدث
-
تنفيذ التقييم: عملية مثيل أو عملية تقييم واحدة؛ يقوم كل تنفيذ بإنشاء سجل تنفيذ جديد يتتبع النطاق، وآلية الإطلاق، والطابع الزمني، والبيانات الناتجة عن التقييم
-
البحث: ملاحظة موثوقة وقابلة للتنفيذ تحدد الفجوة أو المخاطر أو القضايا أو الحالة الجديرة بالملاحظة. وتمثل النتائج بيانات المستوى الأرضي أثناء التقييم
-
بصيرة: إستنتاج تحليلي على مستوى أعلى مستمد من أنماط أو أتجاهات عبر نتائج متعددة. تعمل الرؤى على تفسير ما تعنيه النتائج في سياق أوسع للأعمال أو التشغيل
-
التوصية: وصفة محددة قابلة للتنفيذ مرتبطة بالنتائج أو الرؤى؛ تقدم التوصيات توجيهات واضحة بشأن الخطوات اللازمة لمعالجة المسائل المحددة أو الاستفادة من الفرص المتاحة
-
تقرير: وثيقة منظمة تجمع النتائج، والرؤى، والتوصيات من أجل جمهور مستهدف؛ التقارير هي الإنجاز الرئيسي لإبلاغ نتائج التقييم للعملاء والمسؤولين التنفيذيين والفرق الفنية
الوصول إلى تطبيق التقييمات
 التقييمات
للوصول إلى ميزات الأمان والتقييم في Cisco IQ، أختر قائمة الصفحة الرئيسية > التقييمات. تظهر صفحة نظرة عامة على التقييمات.
نظرة عامة على التقييمات
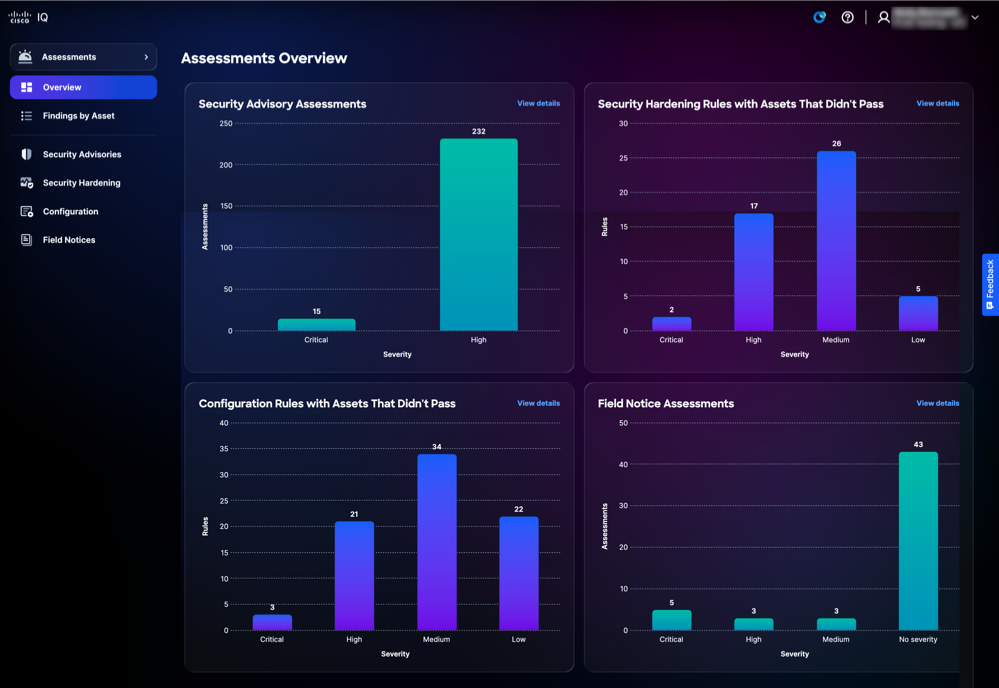
تعرض صفحة نظرة عامة على التقييمات لوحة المعلومات التالية:
 نظرة عامة على التقييمات
تعرض لوحة المعلومات المعلومات التالية:
-
التقييمات الاستشارية الأمنية: عرض تقييمات إستشارات الأمان، مصنفة حسب الخطورة العالية
-
قواعد تقوية الأمان مع الأصول التي لم تمر: يعرض الأصول التي تفشل في قواعد تقوية الأمان، ويتم تصنيفها حسب الخطورة العالية والمتوسطة والمنخفضة وذات المعلومات
-
قواعد التكوين مع الأصول التي لم تمر: عرض الأصول التي فشلت في قواعد التوافق مع التكوين، والتي تم تصنيفها حسب الخطورة الحرجة والعالية والمتوسطة والمنخفضة وبدرجة معلومات
-
تقييمات الإشعار الميداني: عرض تقييمات الإشعارات الميدانية، مصنفة حسب الخطورة، عالية، متوسطة ودون خطورة
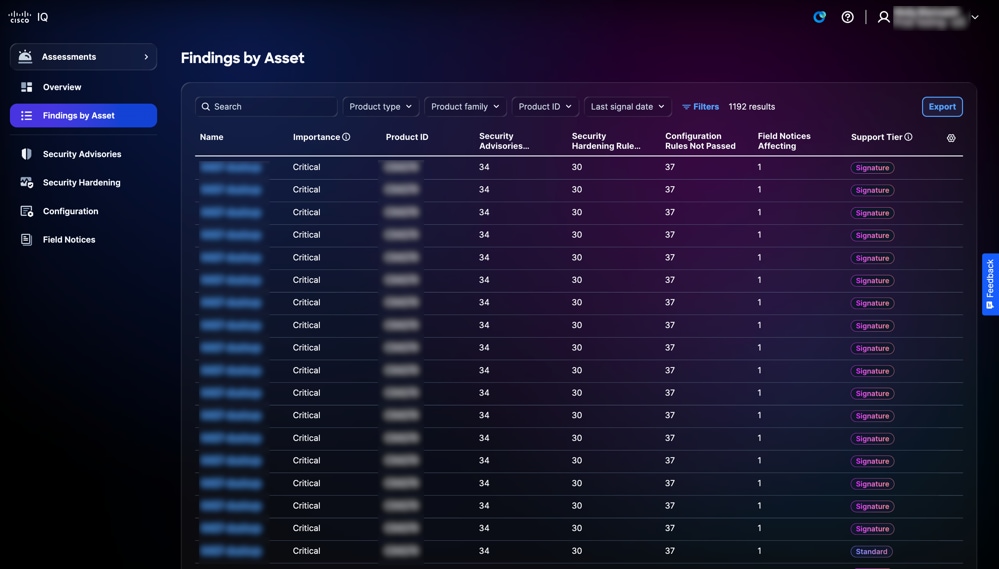
النتائج حسب الأصول
توفر لك صفحة النتائج حسب الأصول قائمة بالأصول التي تم تقييمها باستخدام تقييم واحد على الأقل من التقييمات التالية، بما في ذلك إرشادات الأمان وتقوية الأمان والتكوين والإشعارات الميدانية.
 النتائج حسب الأصول
البحث عن النتائج حسب الأصل وتصفيتها في طرق العرض
يمكنك تصفية طريقة عرض القائمة باختيار مرشح من القوائم المنسدلة أو النقر فوق عوامل التصفية واختيار خيار من قائمة عوامل التصفية المتاحة. يمكنك أيضا البحث عن النتائج حسب الأصل في حقل البحث.
تصدير النتائج حسب الأصل
لتصدير طريقة عرض "بحث حسب قائمة الأصول"، انقر فوق تصدير. راجع تصدير المعلومات للحصول على مزيد من المعلومات حول التصدير.
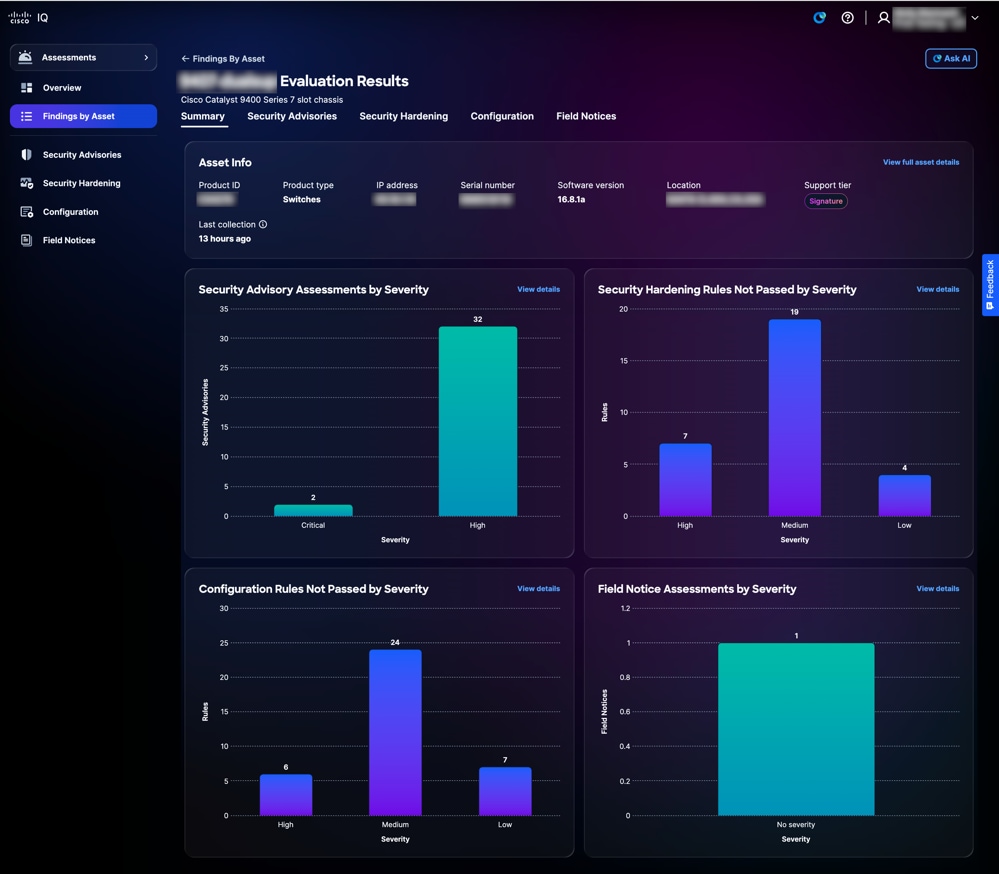
عرض النتائج حسب تفاصيل الأصول
لعرض النتائج حسب تفاصيل الأصول، انقر فوق أحد الأصول. تعرض علامات التبويب التالية تفاصيل الأصل المحدد:
-
ملخص: يوفر معلومات تفصيلية حول الأصول تتضمن عدد إرشادات الأمان وتقوية الأمان والتكوين والإعلامات الميدانية
-
إستشارات الأمان: يوفر قائمة بالتقييمات الاستشارية الأمنية ذات الصلة
-
تقوية الأمان: يوفر قائمة بالأصول التي فشلت في قواعد تقوية الأمان
-
التكوين: يوفر قائمة بالأصول التي تفشل في تكوين قواعد أفضل ممارسة
-
الإعلامات الميدانية: يوفر قائمة بتقييمات الإشعارات الميدانية ذات الصلة
 النتائج حسب تفاصيل الأصول
عند النقر فوق عرض التفاصيل على تجانب، فإن الصفحة تعيد التوجيه إلى الصفحة ذات الصلة ضمن التطبيق.
عند النقر فوق عرض تفاصيل الأصول بالكامل، يتم عرض صفحة تفاصيل الأصول.
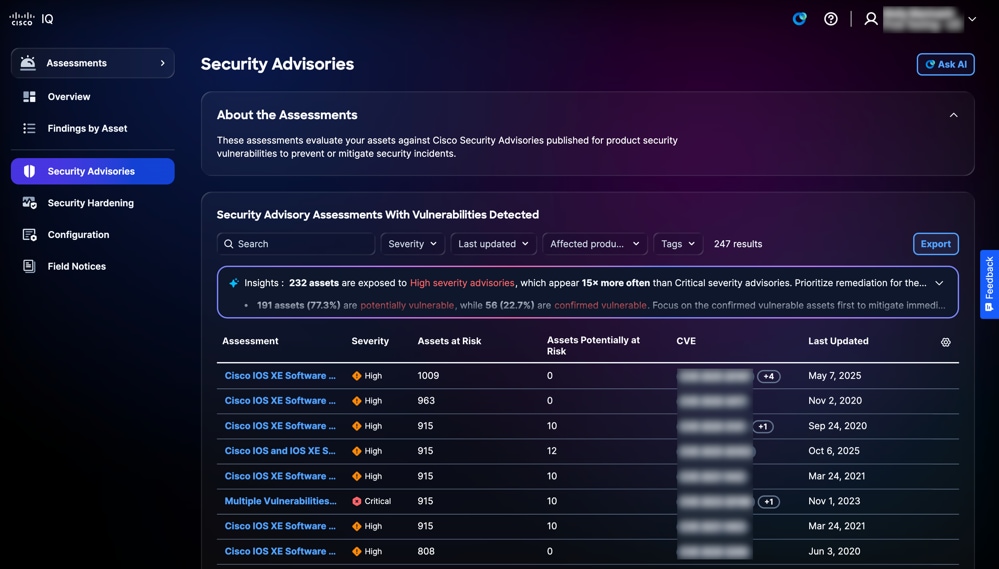
إستشارات الأمان
تحدد تقييمات الأمن الإستشارية مكامن الضعف وتحدد أولوياتها بناء على مخاطرها وخطورتها وخطورتها وأهميتها، وبالتالي تعزز قدرات المنظمة على إدارة المخاطر. توفر إستشارات الأمان رؤى محببة حول نقاط الضعف والمساعدة على الإسراع في تخفيف التهديدات الخطيرة وضمان التوافق مع أهداف التوافق والأعمال. وهذا من شأنه أن يعزز الموقف الأمني، ويحسن تخصيص الموارد، ويعزز القدرة على الصمود في مواجهة التهديدات الناشئة في مختلف أنحاء المؤسسة. يتم تحديث إستشارات الأمان تلقائيا في Cisco IQ بمجرد إصدارها.
توفر صفحة إستشارات الأمان قائمة بجميع إستشارات الأمان مع اكتشاف نقاط الضعف داخل المؤسسة. يؤدي النقر فوق أحد النصائح من قائمة التقييمات الاستشارية للأمان إلى الانتقال إلى طريقة عرض التفاصيل المقابلة.
 إستشارات الأمان
البحث في طرق عرض التصفية لنصائح الأمان
يمكنك تصفية طريقة عرض القائمة باختيار عامل تصفية من القائمة المنسدلة. يمكنك أيضا البحث عن تقييمات "إستشارات الأمان" من خلال إدخال اسم التقييم في حقل البحث.
تصدير إرشادات الأمان
لتصدير تقييمات إستشارات الأمان، انقر فوق تصدير. راجع تصدير المعلومات للحصول على مزيد من المعلومات حول التصدير.
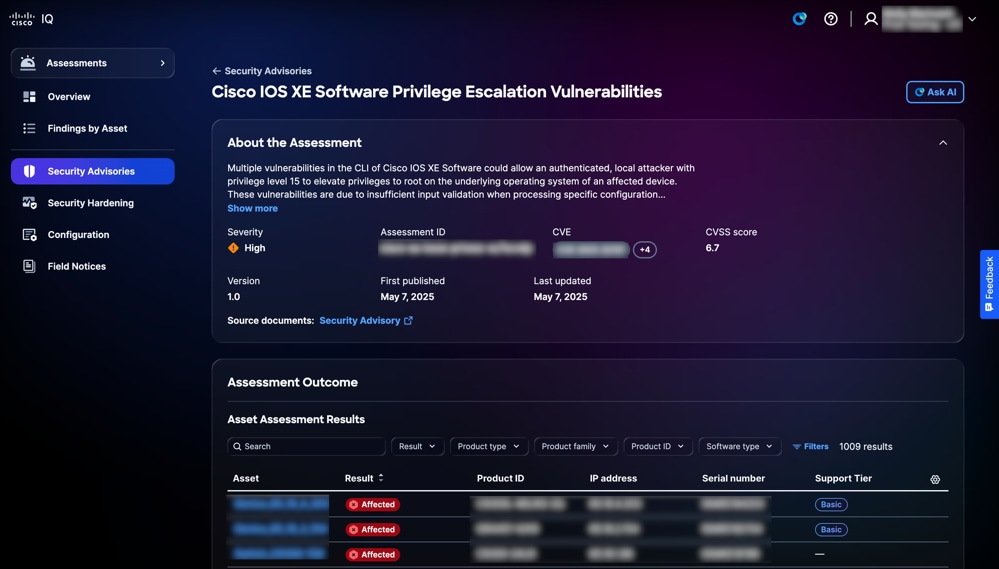
عرض تفاصيل تقييم إستشارات الأمان
لعرض تفاصيل إضافية حول التقييم، انقر فوق تقييم. توفر صفحة التفاصيل هذه معلومات مثل درجة نظام تسجيل الضعف الشائع (CVSS) ونقاط الضعف الشائعة وحالات التعرض (CVE) والخطورة وارتباط إلى "نصيحة أمان Cisco" المشار إليها.
يمكنك عرض الأنواع التالية من النتائج في جدول نتائج التقييم:
-
متأثر: يشير إلى أن الأصل أو المكون له قابلية تأثر مؤكدة يمكن أن يستغلها المهاجم، مما يتطلب إصلاحا
-
من المحتمل أن يتأثر: تشير إلى أن الأصل أو المكون يظهر علامات قد تؤدي إلى الضعف، ولكن لم يتم تأكيدها بشكل نهائي؛ قد يتطلب الأمر المزيد من التحقيق
 تفاصيل إستشارات الأمان
البحث عن نتائج تقييم الأصول وتصفيتها
يمكنك تصفية طريقة عرض القائمة باختيار مرشح من القوائم المنسدلة أو النقر فوق عوامل التصفية واختيار خيار من قائمة عوامل التصفية المتاحة. يمكنك أيضا البحث عن الأصول عن طريق إدخال اسم الأصل في حقل البحث.
عرض نتائج تقييم الأصول
لعرض تفاصيل نتيجة تقييم، انقر فوق أحد الأصول من جدول نتائج التقييم. تظهر صفحة تفاصيل نتائج تقييم الأصل.
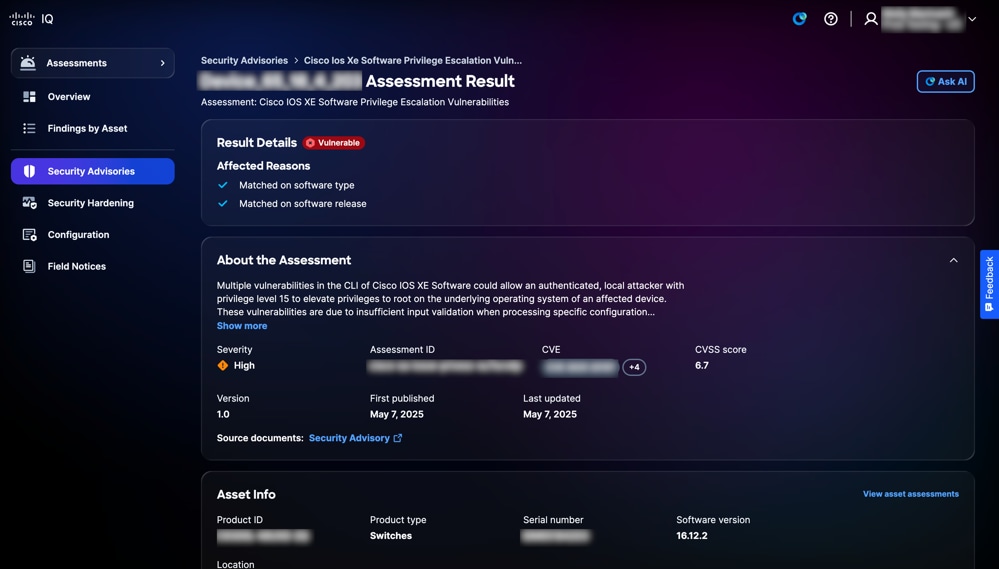 تفاصيل النتيجة
تصدير نتائج الأصول لنصائح الأمان
لتصدير نتائج الأصل، انقر فوق تصدير. راجع تصدير المعلومات للحصول على مزيد من المعلومات حول التصدير.
تقوية الأمان
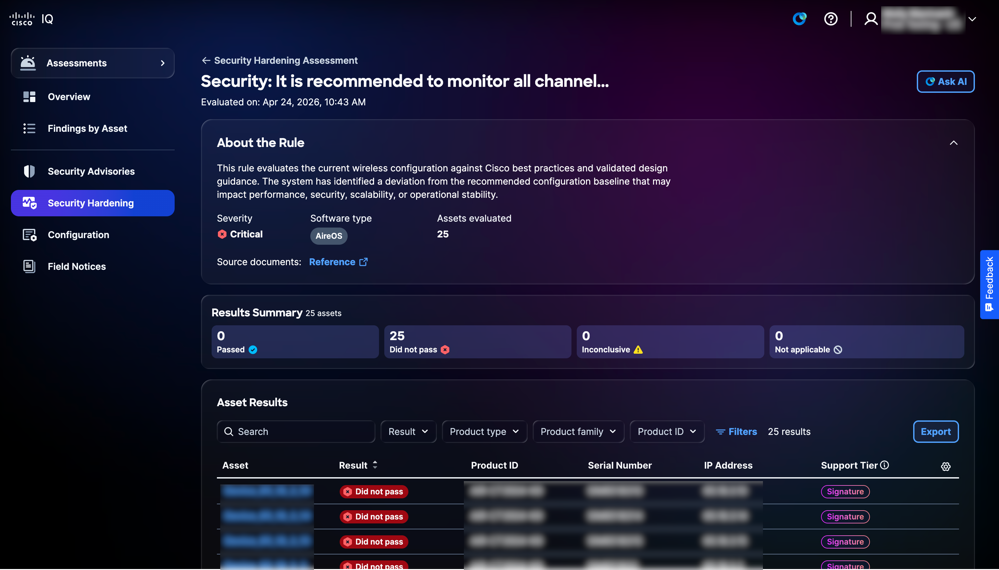
توفر ميزة تقوية الأمان إمكانية رؤية مؤتمتة وفي الوقت الفعلي تقريبا للوضع الأمني للبنية الأساسية للشبكة من خلال التقييم المستمر للموجهات والمحولات وجدران الحماية مقارنة بالمعايير القياسية في هذه الصناعة. يحدد الثغرات في التكوين ويوفر إرشادات معالجة قابلة للتنفيذ، مما يمكن المسؤولين من خفض سطح الهجوم بشكل فعال والحفاظ على التناسق المتناسق مع أفضل ممارسات الأمان الصارمة من Cisco. من خلال تركيز مراقبة التوافق وتبسيط عملية التعزيز، يقوم التطبيق بتحويل إدارة الأمان من مهمة تفاعلية إلى إستراتيجية إستباقية قائمة على البيانات، مما يضمن وجود شبكة مؤسسة تتميز بالمرونة والأمان.
عرض تقييمات تقوية الأمان
تعرض صفحة تقييم تقوية الأمان المعلومات التالية: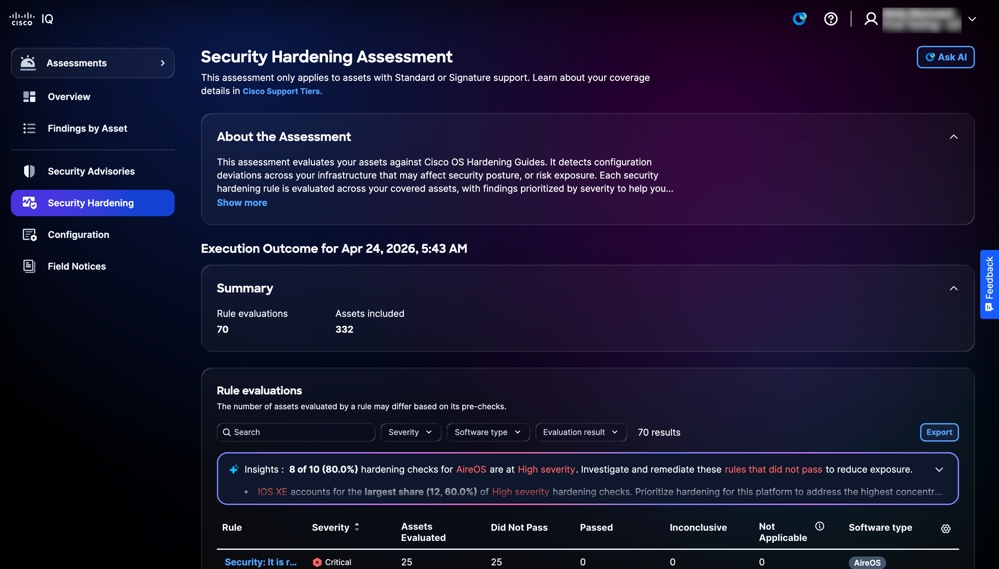 تقوية الأمان
-
حول التقييم: يوفر تفاصيل إضافية من خلال تلخيص الغرض من التقييم
-
نتيجة التنفيذ: يقدم ملخصا لنتائج تقييم الأصول، بما في ذلك العدد الإجمالي لتقييمات القاعدة والأصول المتضمنة
-
تقييمات القواعد: يوفر معلومات تفصيلية حول القاعدة، بما في ذلك الخطورة والأصول التي تم تقييمها ولم يتم تمريرها أو تمريرها أو غير حاسمة أو غير قابلة للتطبيق أو نوع البرنامج
-
الخطورة: يوفر مستوى أهمية أو تأثير تقييم القاعدة
-
الأصول التي تم تقييمها: يوفر العدد الإجمالي للأصول التي تم تقييمها وفقا لمعايير القاعدة
-
ما نجحنا: يوفر الأصول التي فشلت في الوفاء بمعايير القاعدة أثناء التقييم
-
تم المرور: يوفر الأصول التي تستوفي معايير القاعدة أثناء التقييم
- غير حاسم: يوفر الأصول التي لم يتمكن التقييم من تحديد الفشل فيها
-
غير قابل للتطبيق: الإشارة إلى الأصول أو السيناريوهات التي لا تنطبق عليها القاعدة أو لا تنطبق عليها
- نوع البرامج: يوفر نوع البرامج للأصول
-
البحث عن طرق عرض القواعد وتصفيتها
يمكنك تصفية طريقة عرض القائمة باختيار مرشح من القوائم المنسدلة أو النقر فوق عوامل التصفية واختيار خيار من قائمة عوامل التصفية المتاحة. يمكنك أيضا البحث عن قاعدة بإدخال اسم القاعدة في حقل البحث.
عرض تفاصيل تقييم القاعدة
لعرض تفاصيل إضافية حول تقييم القاعدة، انقر فوق قاعدة. يتم عرض صفحة تفاصيل تقييم القاعدة مع المعلومات التالية:
 طريقة عرض القاعدة
-
حول القاعدة: يوفر تفاصيل حول القاعدة مثل الخطورة ونوع البرنامج والإصدار والأصول التي تم تقييمها.
-
ملخص النتائج: يقدم ملخصا لنتائج الأصول المتعلقة بالقاعدة مثل تم تمريرها، لم يتم تمريرها، غير حاسمة، وغير قابلة للتطبيق
-
نتائج الأصول: يوفر قائمة بالأصول مع تفاصيل مثل الأصل والنتيجة ومعرف المنتج والرقم التسلسلي وعنوان IP وطبقة الدعم
البحث عن طرق العرض وتصفيتها لقواعد الأصول
يمكنك تصفية طريقة عرض القائمة باختيار مرشح من القوائم المنسدلة أو النقر فوق عوامل التصفية واختيار خيار من قائمة عوامل التصفية المتاحة. يمكنك أيضا البحث عن نتائج تقييم الأصول من خلال إدخال اسم الأصل في حقل البحث.
تصدير نتائج الأصل
لتصدير نتائج تقييم القواعد، انقر فوق تصدير. راجع تصدير المعلومات للحصول على مزيد من المعلومات حول التصدير.
البحث عن نتائج الأصول وتصفيتها
يمكنك تصفية طريقة عرض القائمة باختيار مرشح من القوائم المنسدلة أو النقر فوق عوامل التصفية واختيار خيار من قائمة عوامل التصفية المتاحة. يمكنك أيضا البحث عن نتائج الأصول بإدخال اسم الأصل في حقل البحث.
عرض نتائج الأصول لزيادة الأمان
لعرض تفاصيل نتيجة الأصل، انقر فوق أحد الأصول من نتائج الأصل. تعرض صفحة تفاصيل نتائج الأصل المعلومات وفقا لمستوى الاستحقاق أو الطبقة التي تتمتع بها.
 طبقة معيار تقوية الأمان
-
الطبقة القياسية
-
البحث عن التفاصيل: يوفر معلومات حول انحرافات التكوين التي تم تحديدها أثناء التقييم إلى جانب سجلات الأدلة
-
التوصيات: يوفر إرشادات لمعالجة النتائج وضمان اتساق التكوين
-
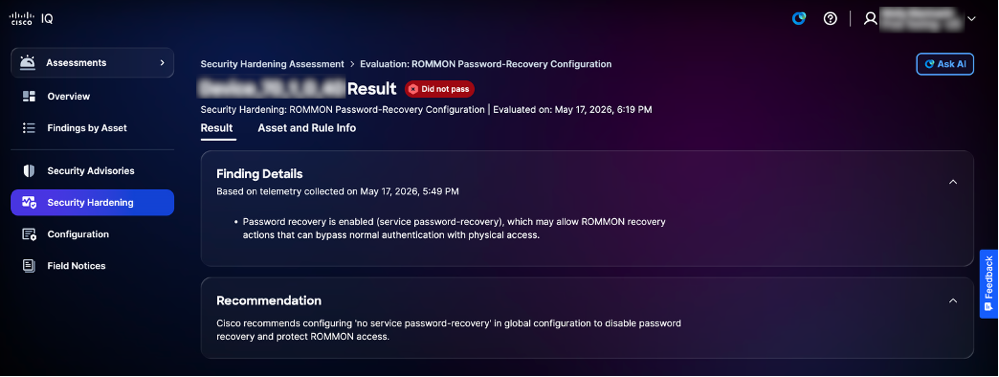
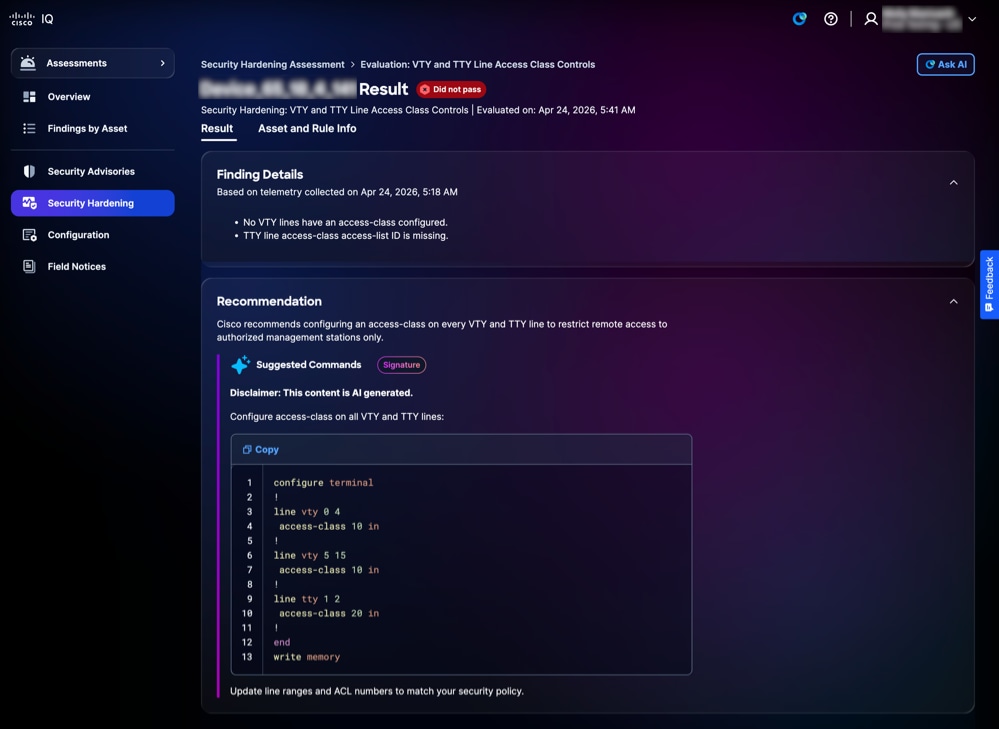 طبقة توقيع تقوية الأمان
-
طبقة التوقيع
-
البحث عن التفاصيل: يوفر معلومات حول انحرافات التكوين التي تم تحديدها أثناء التقييم إلى جانب سجلات الأدلة
-
التوصية: يوفر إرشادات على مستوى الجهاز وقابلة للتنفيذ مع تعليمة برمجية لضمان اتساق التكوين
-
عرض معلومات الأصول والقواعد لتمتين الأمان
لعرض تفاصيل أحد الأصول والقواعد الخاصة به، انقر فوق علامة التبويب معلومات الأصول والقواعد. تظهر صفحة معلومات الأصول والقاعدة.
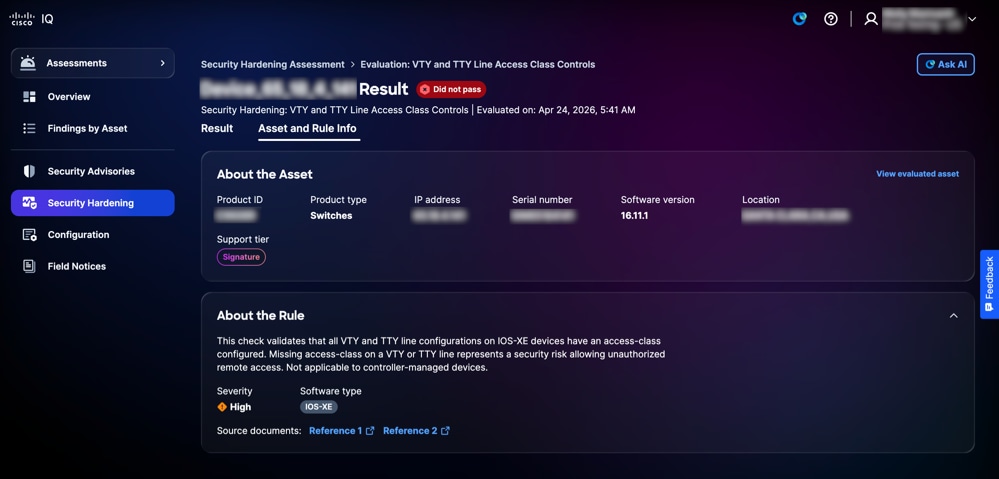 معلومات الأصل والقاعدة
-
حول الأصل: يوفر تفاصيل الأصل مثل معرف المنتج ونوع المنتج وعنوان IP والرقم التسلسلي وإصدار البرنامج والموقع وطبقة الدعم
-
حول القاعدة: يوفر تفاصيل القاعدة (بما في ذلك الخطورة ونوع البرامج) وأهمية التحقق من التعزيز المحدد
التكوين
تقيم تقييمات التكوين أصولك مقابل أفضل الممارسات الموصى بها بناء على خبرة Cisco المثبتة للكشف عن انحرافات التكوين التي قد تؤثر على التوفر أو الأمان أو الأداء عبر البنية الأساسية لديك. يتم تقييم كل قاعدة من قواعد أفضل الممارسات عبر الأصول التي تغطيها الخدمة، كما يتم ترتيب النتائج حسب أولويتها لضمان اتساق التهيئة وتعزيز المرونة وتقليل مخاطر التشغيل.
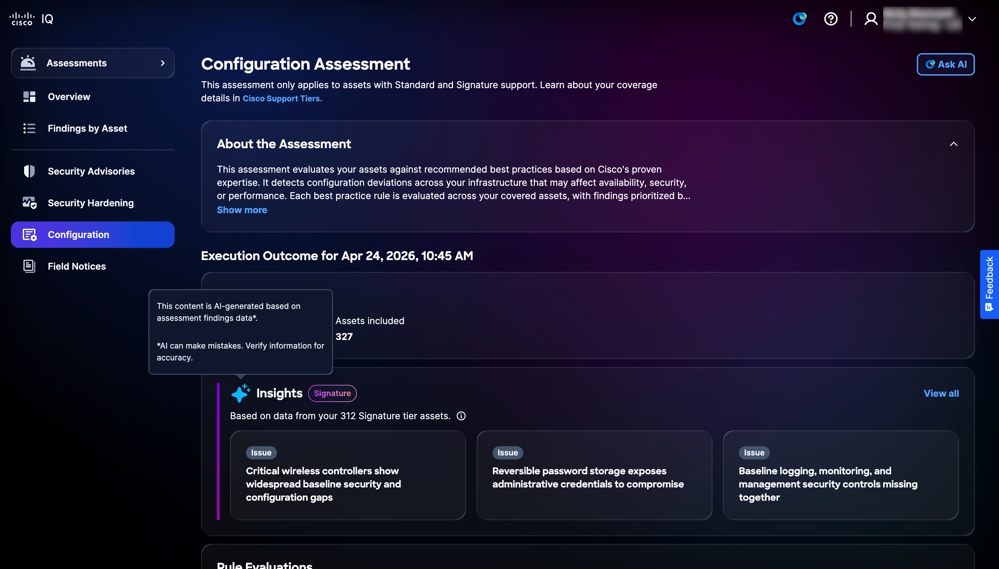
عرض تقييمات التكوين
تعرض صفحة تقييم التكوين المعلومات التالية:
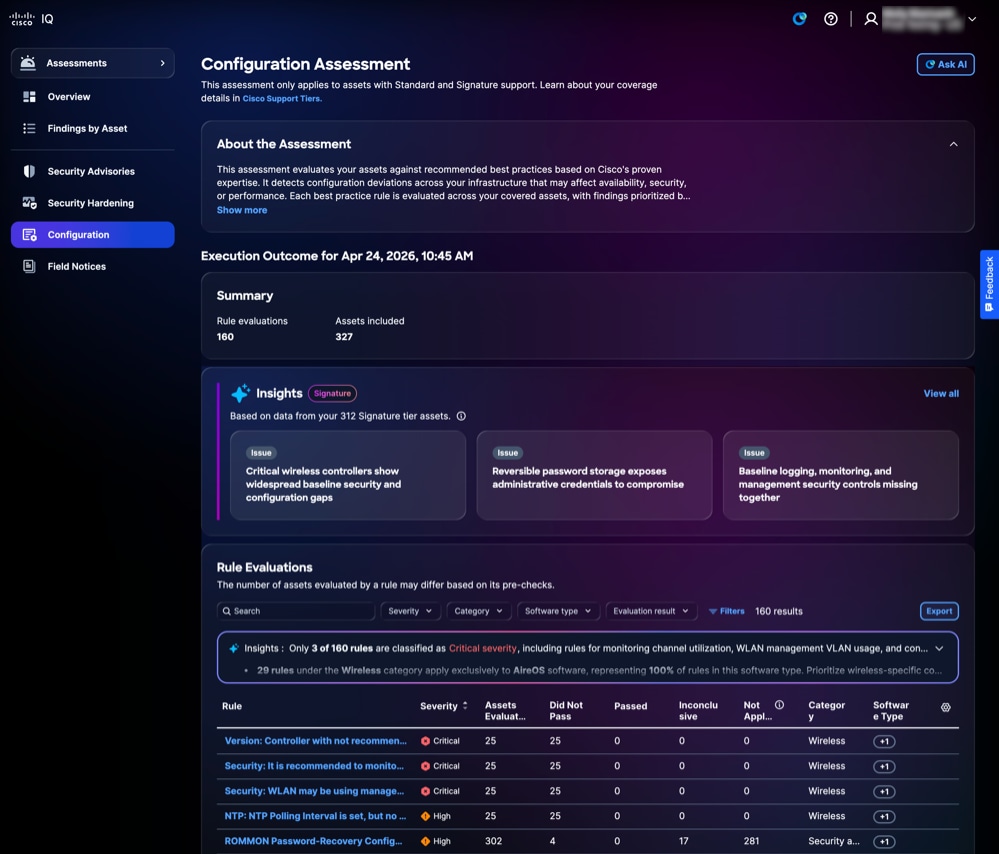 تقييم التكوين
-
حول التقييم: يوفر تفاصيل إضافية من خلال تلخيص الغرض من التقييم
-
ملخص: يوفر ملخصا لتنفيذ التكوين مثل القواعد التي تم تقييمها والأصول التي تم تقييمها
-
الرؤى: يوفر رؤى حول الثغرات التي تم تحديدها في التكوين والتي تم إنشاؤها من خلال تحليل الأنماط والترابط بين النتائج؛ يتم عرضها كبطاقات مفاتيح تم تجميعها بشكل ذكي لتمييز المجالات الأكثر أهمية التي تتطلب الانتباه
-
تقييمات القواعد: يوفر معلومات تفصيلية حول القاعدة، بما في ذلك الخطورة والأصول التي تم تقييمها ولم يتم تمريرها أو تمريرها أو عدم حسمها أو عدم تطبيقها أو الفئة أو نوع البرامج
-
الخطورة: يوفر مستوى أهمية أو تأثير تقييم القاعدة
-
الأصول التي تم تقييمها: يوفر العدد الإجمالي للأصول التي تم تقييمها وفقا لمعايير القاعدة
-
ما نجحنا: يوفر العدد الإجمالي للأصول التي لم تستوف معايير القاعدة أثناء التقييم
-
غير حاسم: يوفر العدد الإجمالي للأصول التي تعذر تشغيل التقييم لها
-
تم المرور: يوفر الأصول التي تستوفي معايير القاعدة أثناء التقييم
-
غير قابل للتطبيق: الإشارة إلى الأصول أو السيناريوهات التي لا تنطبق عليها القاعدة أو لا تنطبق عليها
-
الفئة: توفير منطقة المجال التي تنتمي إليها القاعدة
-
نوع البرامج: الإشارة إلى نوع أصول البرامج التي تنطبق عليها القاعدة
-
البحث عن طرق عرض القواعد وتصفيتها
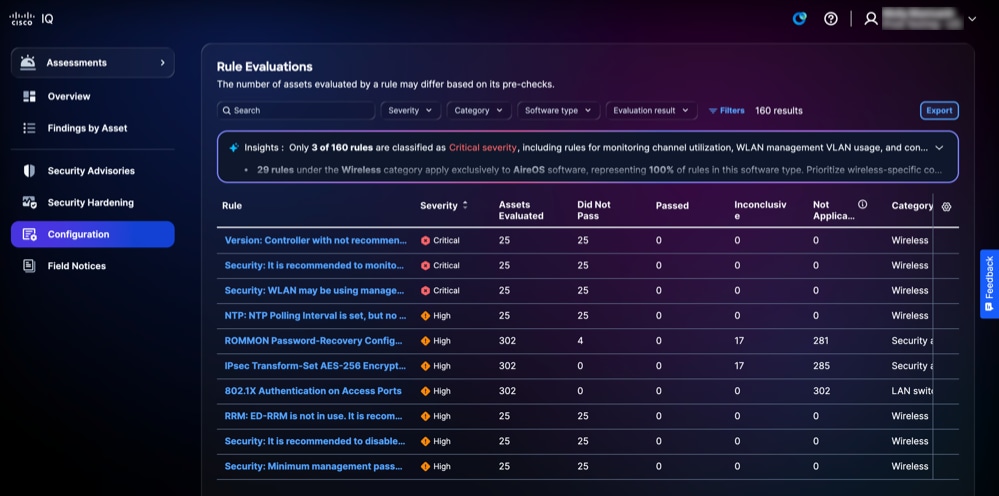 تقييمات القواعد
يمكنك تصفية طريقة عرض القائمة باختيار مرشح من القوائم المنسدلة أو النقر فوق عوامل التصفية واختيار خيار من قائمة عوامل التصفية المتاحة. يمكنك أيضا البحث عن قاعدة بإدخال اسم القاعدة في حقل البحث.
عرض تفاصيل تقييم القاعدة
لعرض تفاصيل إضافية حول تقييم القاعدة، انقر فوق أي قاعدة. يتم عرض صفحة تفاصيل تقييم القاعدة مع المعلومات التالية:
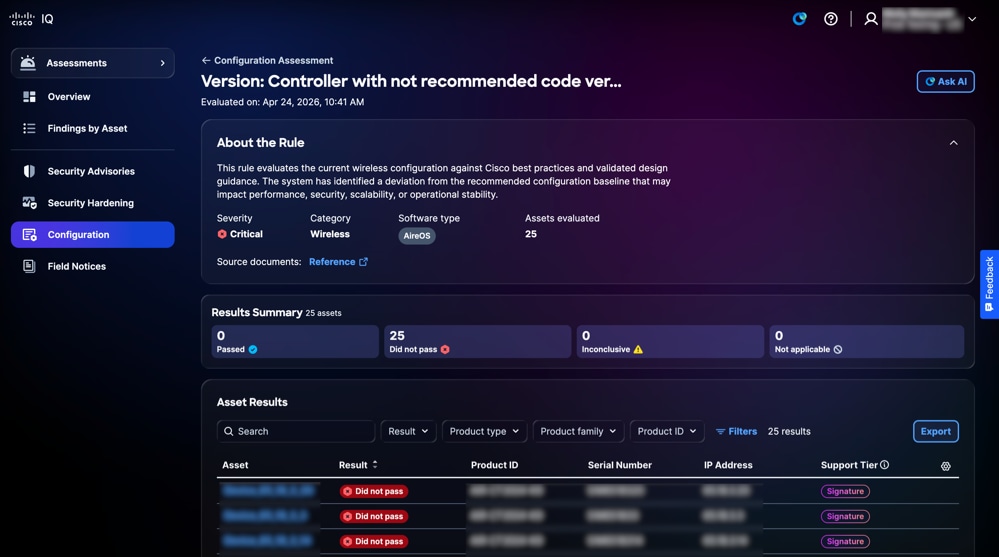 التقييم
-
حول القاعدة: يوفر تفاصيل حول قاعدة مثل الخطورة والفئة ونوع البرامج والأصول التي تم تقييمها ويتضمن إرتباطات لمستندات المصدر ذات الصلة
-
ملخص النتائج: يوفر نتائج الأصول الإجمالية من خلال عرض عدد الأصول التي تم تمريرها، ولم يتم تمريرها، وغير حاسمة، وحالات غير قابلة للتطبيق
-
نتائج الأصول: يوفر قائمة بالأصول المتأثرة بالقاعدة المحددة مع حالة النتيجة
تصدير نتائج الأصل
لتصدير نتائج الأصل للقواعد، انقر فوق تصدير. راجع تصدير المعلومات للحصول على مزيد من المعلومات حول التصدير.
البحث عن نتائج الأصول وتصفيتها
يمكنك تصفية طريقة عرض القائمة باختيار مرشح من القوائم المنسدلة أو النقر فوق عوامل التصفية واختيار خيار من قائمة عوامل التصفية المتاحة. يمكنك أيضا البحث عن نتائج الأصول بإدخال اسم الأصل في حقل البحث.
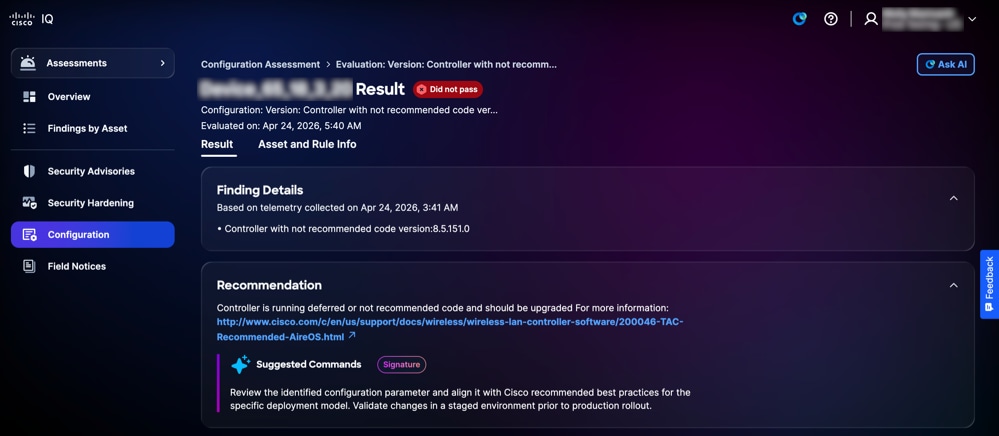
عرض نتائج الأصول لتقييمات التكوين
لعرض تفاصيل نتائج الأصول، انقر فوق أحد الأصول من نتائج الأصول.
تعرض صفحة تفاصيل نتائج الأصل المعلومات وفقا لمستوى الاستحقاق أو الطبقة التي تتمتع بها.
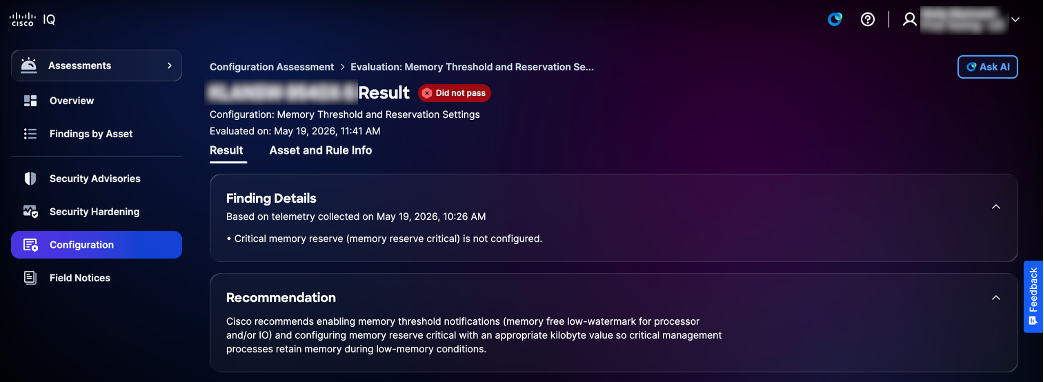 الطبقة القياسية للتكوين
-
الطبقة القياسية
-
البحث عن التفاصيل: يوفر معلومات حول انحرافات التكوين التي تم تحديدها أثناء التقييم إلى جانب سجلات الأدلة
-
التوصيات: يوفر إرشادات لمعالجة النتائج وضمان اتساق التكوين
-
 طبقة توقيع التكوين
-
طبقة التوقيع
-
البحث عن التفاصيل: يوفر معلومات حول انحرافات التكوين التي تم تحديدها أثناء التقييم إلى جانب سجلات الأدلة
-
التوصية: يوفر إرشادا على مستوى الجهاز قابلا للتنفيذ مع أجزاء التعليمات البرمجية الصغيرة لمعالجة النتائج وضمان اتساق التكوين
-
عرض معلومات الأصول والقواعد لتقييمات التكوين
لعرض تفاصيل معلومات الأصول والقاعدة، انقر فوق علامة التبويب معلومات الأصول والقواعد.
 معلومات الأصل والقاعدة
يتم عرض صفحة معلومات الأصول والقواعد بالمعلومات التالية:
- حول الأصل: يوفر تفاصيل أحد الأصول، مثل معرف المنتج ونوع المنتج وعنوان IP والرقم التسلسلي وإصدار البرنامج والموقع وطبقة الدعم
- حول القاعدة: يوفر تفاصيل قاعدة مثل الخطورة والفئة و نوع البرامج
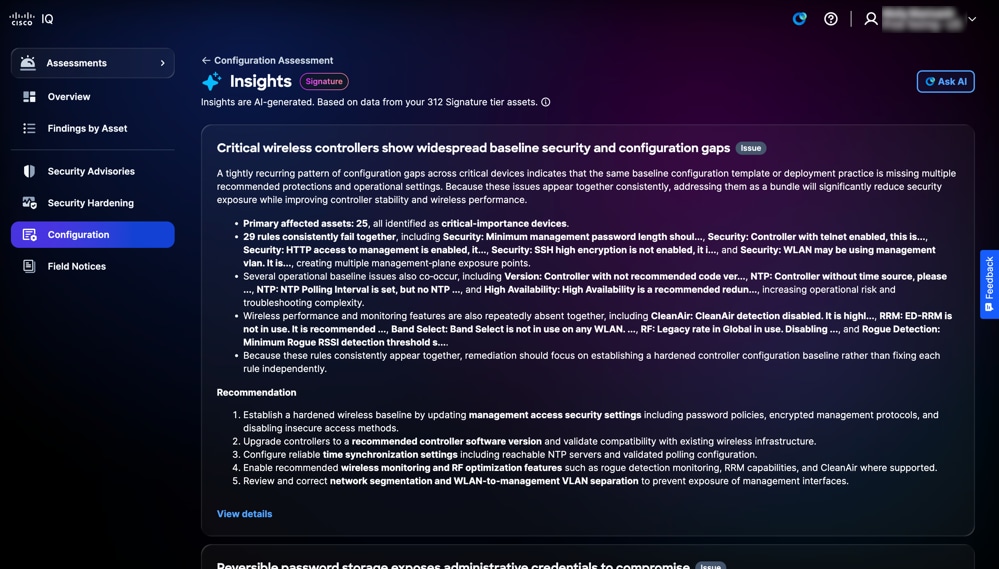
عرض الرؤى
يتم إنشاء الرؤى عبر تقنية AI وتعمل كلوحة معلومات ذكية تعمل على توليف بيانات التقييم في بطاقات المفاتيح ذات الأولوية، مما يسلط الضوء على التباينات الحرجة في التكوين عبر النتائج المتعددة. فهي تمكنك من معالجة أكثر مخاطر البنية الأساسية تأثيرا بشكل فعال من خلال التركيز على هذه المناطق الملحة. كما يبرز نقاط القوة من خلال تحديد المناطق التي تعمل فيها البنية الأساسية لديك بشكل جيد وفقا لأفضل الممارسات.
 الرؤى
الرؤى
لعرض تفاصيل الرؤى:
-
من لوحة الرؤى، انقر عرض الكل. تعرض صفحة الرؤى جميع الرؤى.
 صفحة الرؤى
-
انقر فوق عرض التفاصيل. تظهر صفحة تفاصيل الرؤى بالمعلومات التالية: يمكنك أيضا النقر فوق أي بطاقة لفتح صفحة التفاصيل.
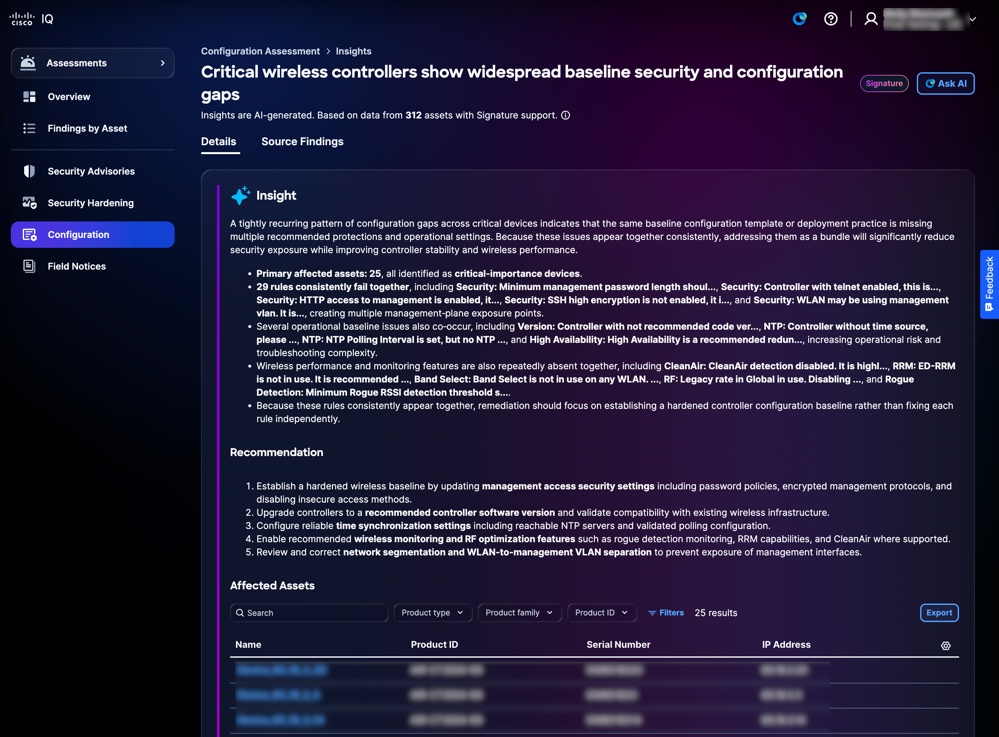 تفاصيل الرؤى
-
بصيرة: تقدم ملخصا يسلط الضوء على الأنماط المتكررة لانحرافات التكوين المحددة من خلال التحليل الشامل عبر النتائج المتعددة، وكذلك مناطق التفوق في بنيتك الأساسية حيث تتوافق التكوينات مع أفضل الممارسات
-
التوصية: يوفر خطوات قابلة للتنفيذ لإصلاح فجوات التكوين المحددة
-
الأصول المتأثرة: يوفر قائمة بالأجهزة المحددة حيث تم تعريف انحراف التكوين كما هو محدد تحت قسم رؤية المعلومات
-
-
انقر فوق نتائج المصدر. تعرض صفحة نتائج المصدر النتائج الفردية التفصيلية التي تدعم رؤيتك.
 نتائج المصدر
يمكنك تصفية طريقة عرض الجدول باختيار مرشح من القوائم المنسدلة الخطورة والنتائج.
الإعلامات الميدانية
تحدد الإعلامات الميدانية المشاكل المهمة المتعلقة بالمنتجات غير المتعلقة بالأمان وتنظم هذه المشكلات استنادا إلى مدى خطورة التأثير ومدى الأهمية، مما يعزز قدرة المنظمة على إدارة مخاطر المنتجات. توفر الإشعارات الميدانية رؤى قابلة للتنفيذ حول عيوب المنتجات، وتسرع عملية التخفيف من خلال الترقيات الموصى بها أو الحلول البديلة، وتضمن التوافق مع الأهداف التشغيلية وأهداف الأعمال. وهذا من شأنه أن يعزز موثوقية المنتجات، ويحسن تخصيص الموارد، ويعزز المرونة في مواجهة تحديات المنتجات المتطورة في المؤسسة.
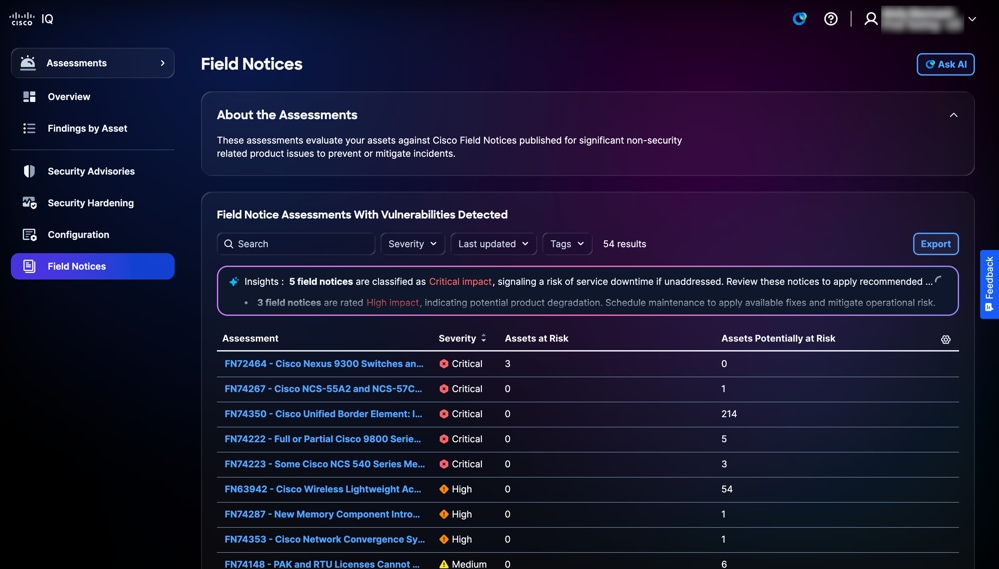 الإعلامات الميدانية
البحث عن طرق العرض وترتيبها للإشعارات الميدانية
يمكنك تصفية طريقة عرض القائمة باختيار عامل تصفية من القوائم المنسدلة. يمكنك أيضا البحث عن تقييمات الإعلامات الميدانية من خلال إدخال اسم التقييم في حقل البحث.
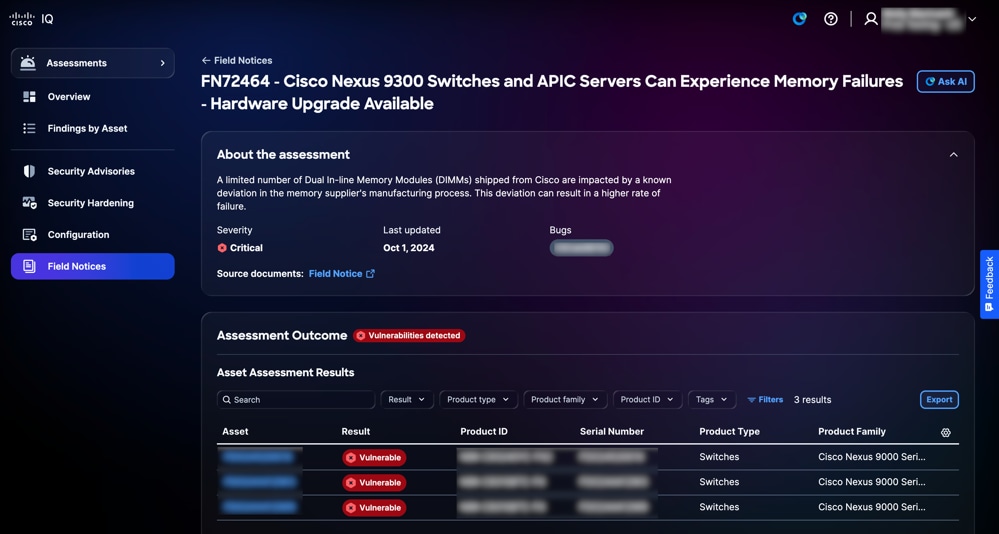
عرض التقييمات للإشعارات الميدانية
لعرض تفاصيل إضافية حول إشعار ميداني، انقر فوق تقييم. تظهر تفاصيل تقييم الأصول التالية:
-
حول التقييمات: يوفر تفاصيل إضافية من خلال تلخيص الغرض من التقييم
-
تقييمات الإشعار الميداني: يعرض قائمة بالأصول المتأثرة بالإشعار الميداني المحدد، بما في ذلك الأصول ذات نقاط الضعف المكتشفة
 عرض التقييمات للإشعارات الميدانية
البحث عن نتائج الأصول وتصفيتها للإشعارات الميدانية
يمكنك تصفية طريقة عرض القائمة باختيار مرشح من القوائم المنسدلة أو النقر فوق عوامل التصفية واختيار خيار من قائمة عوامل التصفية المتاحة. يمكنك أيضا البحث عن نتائج الأصول بإدخال اسم الأصل في حقل البحث.
تصدير نتائج أصول التقييم للإشعارات الميدانية
لتصدير نتائج أصول تقييم الإشعارات الميدانية، انقر فوق تصدير. راجع تصدير المعلومات للحصول على مزيد من المعلومات حول التصدير.
عرض نتائج أصول التقييم للإشعارات الميدانية
لعرض تفاصيل نتائج تقييم أحد الأصول، انقر فوق أحد الأصول من نتائج الأصول. يتم عرض صفحة تفاصيل نتائج تقييم الأصل.
يمكنك عرض أنواع النتائج التالية:
-
متأثر: يشير إلى الأصول التي تستوفي جميع المعايير التي تم فحصها تلقائيا للحصول على إشعار ميداني ولا تتطلب أي تحقق يدوي إضافي للتأكد من تأثرها
-
من المحتمل أن يتأثر: الإشارة إلى الأصول التي تستوفي جميع المعايير التي تم فحصها تلقائيا لإشعار ميداني لكنها تتطلب التحقق اليدوي الإضافي للتأكد مما إذا كانت قد تأثرت بالفعل
تطبيق الدعم
يقدم تطبيق الدعم نظرة مجمعة لحالات دعم العملاء. وهو يمكنك من تصفية طريقة عرض قائمة الحالات وترتيبها وتخصيصها، مما يوفر إمكانية الرؤية لكل من الحالات المفتوحة والمقفلة التي يحق لك الوصول إليها.
للوصول إلى تطبيق الدعم في Cisco IQ، أختر الصفحة الرئيسية > الدعم. تظهر صفحة نظرة عامة على الدعم.
نظرة عامة على الدعم
 نظرة عامة على الدعم
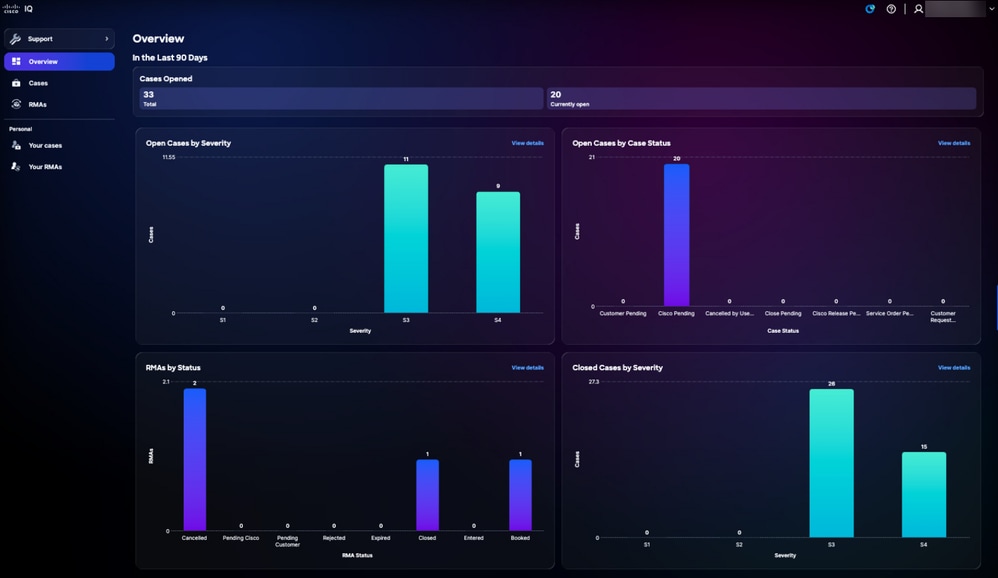
تعد صفحة نظرة عامة على الدعم لوحة معلومات تفاعلية للرسومات البيانية تتضمن المعلومات التالية:
-
فتح الحالات حسب الخطورة: جميع الحالات المفتوحة منذ آخر 90 يوما مصنفة حسب مستوى خطورة S1 خلال مستوى خطورة S4
-
الحالات المفتوحة حسب حالة الحالة: كافة الحالات المفتوحة من آخر 90 يوما مصنفة حسب حالة الحالة الخاصة بها
-
RMAs حسب الحالة: جميع الأشخاص الذين يحتاجون إلى ترخيص المواد المسترجعة منذ آخر 90 يوما يصنفون حسب وضعهم
-
الحالات المغلقة حسب الخطورة: إجمالي عدد الحالات المغلقة من آخر 90 يوما مصنفة حسب الخطورة
عرض تفاصيل الحالات
يؤدي النقر فوق عرض التفاصيل إلى إعادة توجيه الصفحة إلى صفحة حالات الحساب. يؤدي النقر فوق شريط من رسم بياني على صفحة نظرة عامة إلى إعادة توجيه الصفحة إلى صفحة حالات الحساب مع تطبيق عوامل التصفية ذات الصلة. على سبيل المثال، يؤدي النقر فوق شريط الخطورة S1 من الحالات المفتوحة بواسطة الرسم البياني الخاص بدرجة الخطورة إلى إعادة التوجيه إلى صفحة الحالات الخاصة بالحساب مع تعيين حالة الحالة على "فتح" والخطورة على "S1". راجع الحالات للحصول على مزيد من المعلومات.
الحالات
حالات الحساب
انتقل إلى صفحة الحالات بالنقر فوق حالات من اللوحة اليسرى.
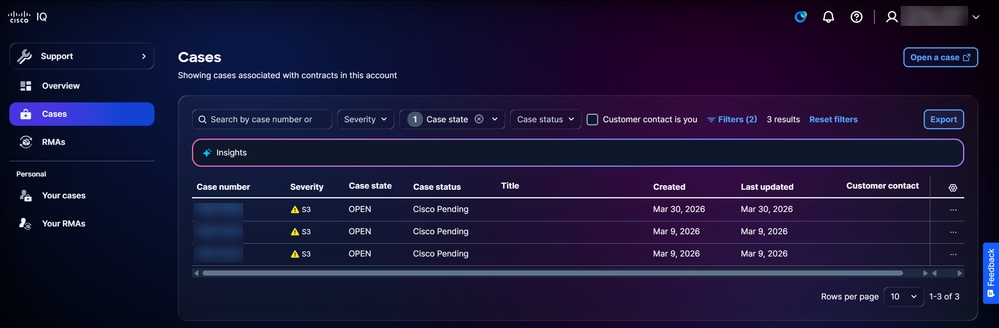 الحالات
تعرض صفحة الحالات قائمة مدمجة بجميع الحالات المرتبطة بالعقود في حساب IQ من Cisco. يمكنك تكوين الأعمدة المعروضة في القائمة عن طريق النقر فوق رمز الإعدادات، ثم تحديد خانات الاختيار الخاصة بالأعمدة المطلوبة، ثم النقر فوق تطبيق. يعرض رقم الحالة، الخطورة، حالة الحالة، حالة الحالة، العنوان، الأعمدة التي تم إنشاؤها دائما ولا يمكن إلغاء تحديدها.
الإجراءات المتاحة
يمكن تنفيذ الإجراءات التالية من صفحة الحالات:
-
فتح حالة: انقر فوق فتح حالة لعبور بدء SCM وإنشاء حالة
-
تصدير البيانات: انقر فوق تصدير لتنزيل جميع البيانات المعروضة حاليا في لوحة المعلومات كملف CSV
-
عرض تفاصيل الحالة: انقر فوق رقم الحالة أو صف جدول لفتح طريقة عرض تفاصيل الحالة (راجع طرق عرض تفاصيل الحالة للحصول على مزيد من المعلومات)
-
إغلاق حالة: أختر حالة مفتوحة أيقونة المزيد من الخيارات > حالة الإغلاق لفتح نافذة حالة الإغلاق، حيث يمكنك توفير سبب للإغلاق وإغلاق الحالة
-
إعادة فتح حالة: أخترت حالة مغلقة المزيد من الخيارات أيقونة > إعادة فتح الحالة لفتح إعادة فتح الحالة نافذة، حيث أنت يستطيع زودت سبب لإعادة فتح وفتح الحالة
تصفية طرق العرض للحالات
يمكنك تصفية طريقة عرض القائمة باختيار عامل تصفية من القوائم المنسدلة أو التحقق من جهة اتصال العميل إذا كنت تستخدم خانة الاختيار. إختياريا، انقر عوامل التصفية واختر من قائمة خيارات المرشح المتاحة. تستمر عوامل التصفية والتحديدات عبر جلسات العمل وعمليات تسجيل الدخول لتخصيص لوحة المعلومات. المرشحات الافتراضية المطبقة هي:
-
حالة الحالة: انفرجتن
-
تم الإنشاء: تم الإنشاء في غضون 90 يوما
قضاياك
انتقل إلى صفحة حالاتك بالنقر فوق حالاتك من اللوحة اليسرى.
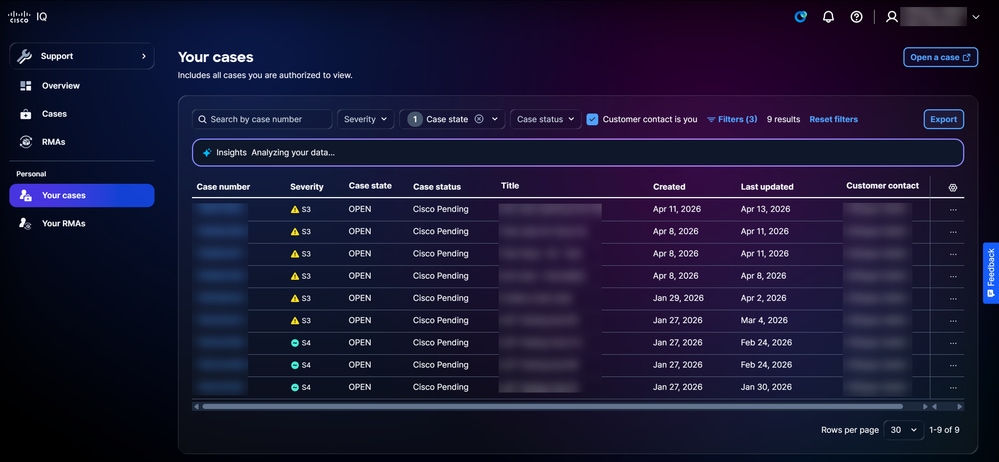 قضاياك
تعرض صفحة الحالات الخاصة بك قائمة مدمجة بالحالات التي يحق لك عرضها وإدارتها. يمكنك تكوين الأعمدة المعروضة في القائمة عن طريق النقر فوق رمز الإعدادات، ثم تحديد خانات الاختيار الخاصة بالأعمدة المطلوبة، ثم النقر فوق تطبيق. يعرض رقم الحالة، الخطورة، حالة الحالة، حالة الحالة، العنوان، الأعمدة التي تم إنشاؤها دائما ولا يمكن إلغاء تحديدها.
الإجراءات المتاحة
يمكن تنفيذ الإجراءات التالية من صفحة الحالات الخاصة بك:
-
فتح حالة: فتح حالة: انقر فوق فتح حالة لعبور تشغيل SCM وإنشاء حالة
-
تصدير البيانات: انقر فوق تصدير لتنزيل جميع البيانات المعروضة حاليا في لوحة المعلومات كملف CSV
-
عرض تفاصيل الحالة: انقر فوق رقم الحالة أو صف جدول لفتح طريقة عرض تفاصيل الحالة (راجع طرق عرض تفاصيل الحالة للحصول على مزيد من المعلومات)
-
إغلاق حالة: أختر حالة مفتوحة أيقونة المزيد من الخيارات > حالة الإغلاق لفتح نافذة حالة الإغلاق، حيث يمكنك توفير سبب للإغلاق وإغلاق الحالة
-
إعادة فتح حالة: أخترت حالة مغلقة المزيد من الخيارات أيقونة > إعادة فتح الحالة لفتح إعادة فتح الحالة نافذة، حيث أنت يستطيع زودت سبب لإعادة فتح وفتح الحالة
تصفية طرق العرض للحالات الخاصة بك
يمكنك تصفية طريقة عرض القائمة باختيار عامل تصفية من القوائم المنسدلة أو التحقق من جهة اتصال العميل إذا كنت تستخدم خانة الاختيار. إختياريا، انقر عوامل التصفية واختر من قائمة خيارات المرشح المتاحة. تستمر عوامل التصفية والتحديدات عبر جلسات العمل وعمليات تسجيل الدخول لتخصيص لوحة المعلومات. المرشحات الافتراضية المطبقة هي:
-
حالة الحالة: انفرجتن
- جهة اتصال العميل هي خانة الاختيار
-
تم الإنشاء: تم الإنشاء في غضون 90 يوما
طرق عرض تفاصيل الحالة
لعرض تفاصيل حالة، انقر فوق حالة من القائمة.
 طريقة عرض تفاصيل الحالة
يعرض عرض تفاصيل الحالة ويوفر طريقة عرض مركزية لحالة الدعم، مما يتيح لك مراجعة معلومات الحالة ومعلومات الأصول المتأثرة وتتبع تقدم TAC والوصول إلى إجراءات الحالة المتاحة. تتضمن الإجراءات المتاحة إعادة فتح حالة مقفلة من خلال النقر فوق إعادة فتح الحالة، وإغلاق حالة مفتوحة من خلال النقر فوق إغلاق الحالة، وإطلاق مساعد AI مع سياق الحالة من خلال النقر فوق طلب AI. كما يتم وصف علامات التبويب المتاحة في الأقسام أدناه.
 أيقونة النجمة
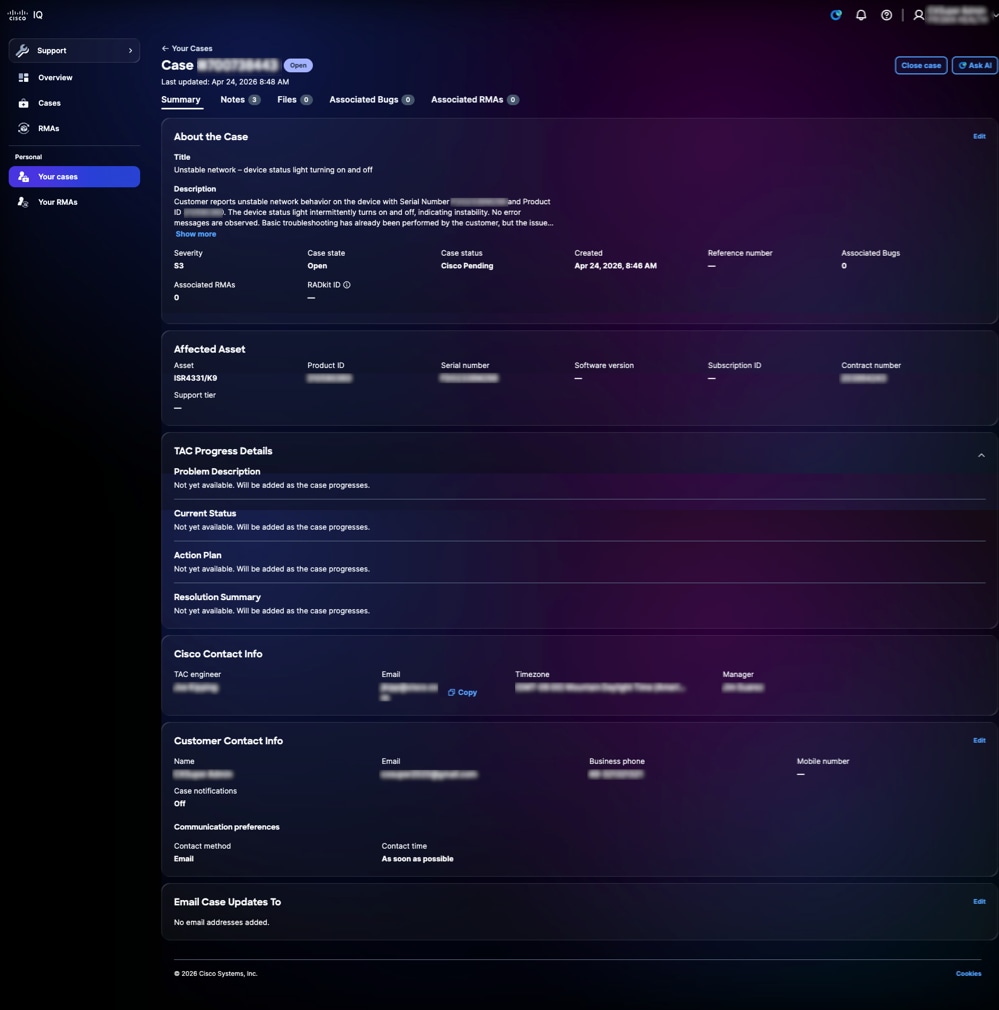
ملخص
تعرض علامة التبويب الملخص معلومات الحالة الأساسية، مما يتيح لك إمكانية فهم الحالة الحالية والسياق والتقدم الخاص بحالة دعم فردية بسرعة. يمكنك مراجعة تفاصيل الحالة والأصول المتأثرة، ومراقبة دورة حياة حالتك من خلال تفاصيل تقدم TAC، وتعديل معلومات جهة الاتصال، وتحديد عناوين البريد الإلكتروني لتلقي إخطارات تحديث الحالة. يمكن تحرير الحقول المحددة فقط.
ملاحظات
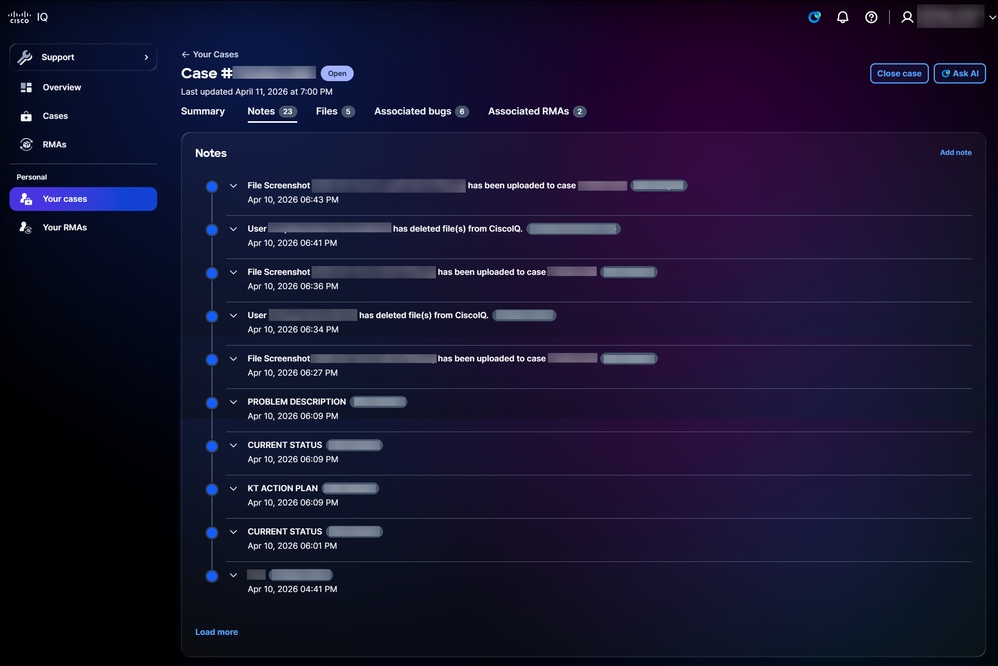 ملاحظات
يؤدي النقر فوق علامة التبويب ملاحظات إلى فتح صفحة الملاحظات. يمكنك عرض جميع الملاحظات المقترنة بحالة ما إذا كان العميل أو مهندس Cisco قد أرسلها.
لإضافة ملاحظة جديدة:
-
انقر فوق إضافة ملاحظة. يتم فتح نافذة إضافة ملاحظة.
-
أدخل عنوانا.
-
أدخل التفاصيل.
-
انقر فوق إضافة (Add).
ملفات
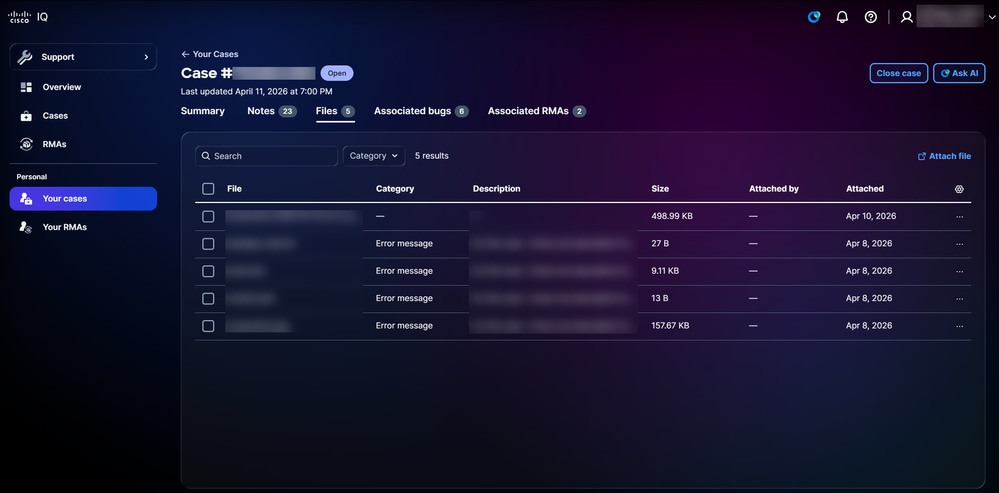 ملفات
ملفات
يؤدي النقر فوق علامة التبويب الملفات إلى فتح الصفحة الملفات. يمكنك عرض اسم، حجم، وتاريخ ملفات الحالة وكذلك إضافتهم أو حذفهم. قم بتصفية الملفات عن طريق تحديد خيار من القائمة المنسدلة الفئة. إختياريا، انقر عوامل التصفية واختر من خيارات المرشح المتاحة. يمكنك أيضا تكوين الأعمدة المعروضة في القائمة عن طريق النقر فوق رمز الإعدادات، ثم تحديد خانات الاختيار الخاصة بالأعمدة المطلوبة، ثم النقر فوق تطبيق.
لإضافة ملف، انقر فوق إرفاق الملف. تتم إعادة توجيهك إلى SCM حيث يمكنك تحميل ملف بالحالة.
لحذف ملف، حدد خانة (مربعات) الاختيار الخاصة بالملف (الملفات) المطلوب وانقر فوق حذف. يظهر الإطار حذف ملف (ملفات). انقر فوق حذف الملف (الملفات).
الأخطاء المرتبطة
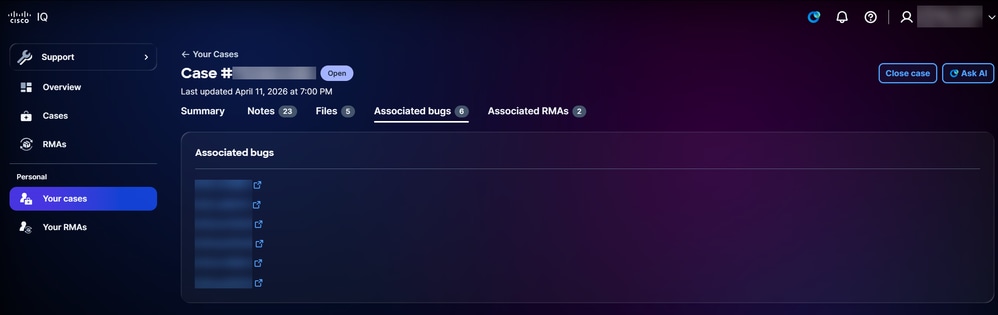 الأخطاء المرتبطة
يؤدي النقر فوق علامة التبويب الأخطاء المقترنة إلى فتح صفحة الأخطاء المقترنة. يمكنك النقر فوق معرف الخطأ لتبادل معلومات الخطأ التفصيلية في أداة البحث عن الأخطاء على Cisco.com.
RMAs المرتبطة
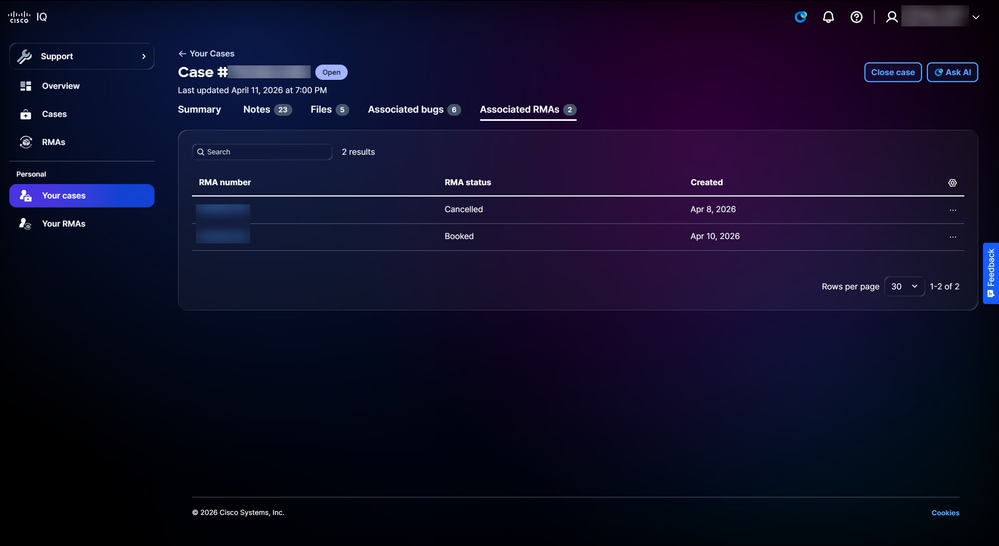 RMAs المرتبطة
يؤدي النقر فوق علامة التبويب RMA المقترنة إلى فتح صفحة RMAs المقترنة. يمكنك تكوين الأعمدة المعروضة في القائمة عن طريق النقر فوق رمز الإعدادات، ثم تحديد خانات الاختيار الخاصة بالأعمدة المطلوبة، ثم النقر فوق تطبيق. يمكن تنفيذ الإجراءات التالية من صفحة RMA المقترنة:
-
إغلاق حالة: انقر فوق إغلاق الحالة لفتح نافذة حالة الإغلاق، حيث يمكنك توفير سبب للإغلاق وإغلاق الحالة
-
عرض تفاصيل RMA: انقر فوق صف رقم RMA أو جدول لفتح عرض تفاصيل RMA (راجع طرق عرض تفاصيل RMA للحصول على مزيد من المعلومات)
-
اتصل بقدرات Cisco اللوجستية: أختر أيقونة المزيد من الخيارات لصف > اتصل ب Cisco Logistics للاتصال بفريق Cisco Logistics
آر إم إيه
RMAs للحساب
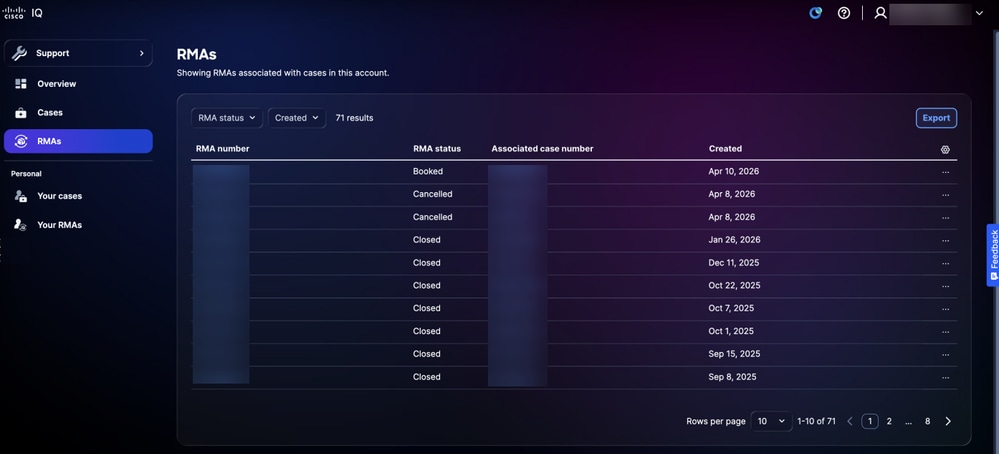 قائمة موجهات الخدمات الإدارية
انتقل إلى صفحة RMAs بالنقر فوق RMAs من اللوحة اليسرى. تعرض صفحة RMAs قائمة مدمجة بجميع مجموعات إدارة التخزين (RMA) المرتبطة بالحالات الموجودة في حساب IQ من Cisco الخاص بك. يمكنك تكوين الأعمدة المعروضة في القائمة عن طريق النقر فوق رمز الإعدادات، ثم تحديد خانات الاختيار الخاصة بالأعمدة المطلوبة، ثم النقر فوق تطبيق.
الإجراءات المتاحة
يمكن تنفيذ الإجراءات التالية من صفحة أدوات إدارة المواد المسترجعة (RMA):
-
تصدير البيانات: انقر فوق تصدير لتنزيل جميع البيانات المعروضة حاليا كملف CSV
-
عرض تفاصيل RMA: انقر فوق صف رقم RMA أو جدول لفتح عرض تفاصيل RMA (راجع طرق عرض تفاصيل RMA للحصول على مزيد من المعلومات)
-
اتصل بقدرات Cisco اللوجستية: أختر أيقونة المزيد من الخيارات لصف > اتصل ب Cisco Logistics للاتصال بفريق Cisco Logistics
تصفية طرق العرض ل RMAs للحساب
يمكنك تصفية طريقة عرض القائمة باختيار عوامل تصفية من القوائم المنسدلة.
RMA الخاص بك
انتقل إلى صفحة أدوات إدارة المواد اللاسلكية (RMA) الخاصة بك بالنقر فوق أدوات إدارة المواد (RMA) الخاصة بك من اللوحة اليسرى.
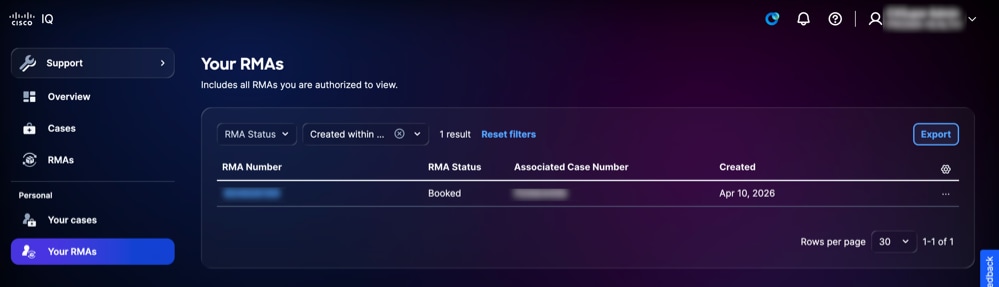 RMA الخاص بك
تعرض صفحة ترخيص المواد المسترجعة الخاصة بك قائمة موحدة من ترخيص المواد المسترجعة (RMA) لديك الاستحقاقات اللازمة لعرضها وإدارتها. يمكنك تكوين الأعمدة المعروضة في القائمة عن طريق النقر فوق رمز الإعدادات، ثم تحديد خانات الاختيار الخاصة بالأعمدة المطلوبة، ثم النقر فوق تطبيق.
الإجراءات المتاحة
يمكن تنفيذ الإجراءات التالية من صفحة RMA الخاصة بك:
-
تصدير البيانات: انقر فوق تصدير لتنزيل جميع البيانات المعروضة حاليا كملف CSV
-
عرض تفاصيل RMA: انقر فوق صف رقم RMA أو جدول لفتح عرض تفاصيل RMA (راجع طرق عرض تفاصيل RMA للحصول على مزيد من المعلومات)
-
اتصل بقدرات Cisco اللوجستية: أختر أيقونة المزيد من الخيارات لصف > اتصل ب Cisco Logistics للاتصال بفريق Cisco Logistics
تصفية طرق عرض RMA الخاصة بك
يمكنك تصفية طريقة عرض القائمة باختيار خيار من القائمة المنسدلة التي تم إنشاؤها.
طرق عرض تفاصيل RMA
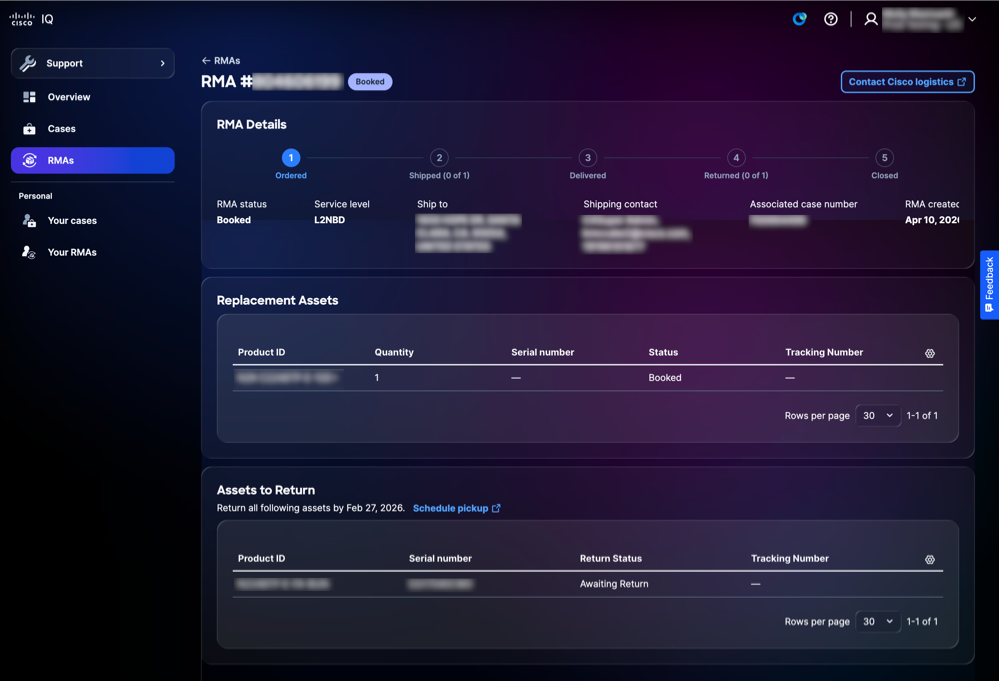 عرض تفاصيل RMA
توفر طريقة عرض تفاصيل تقنية إدارة المواد المسترجعة (RMA) طريقة عرض مركزية لخاصية إدارة المواد المسترجعة، مما يتيح لك مراجعة معلومات ترخيص المواد المسترجعة (RMA) وتتبع التقدم والوصول إلى إجراءات ترخيص المواد المسترجعة المتاحة. تتضمن الإجراءات المتاحة الاتصال بفريق اللوجستيات من Cisco، والوصول إلى أرقام التعقب، وجدولة عمليات انتقاء الأصول.
ميزات التطبيق الشائعة
تحليل البيانات
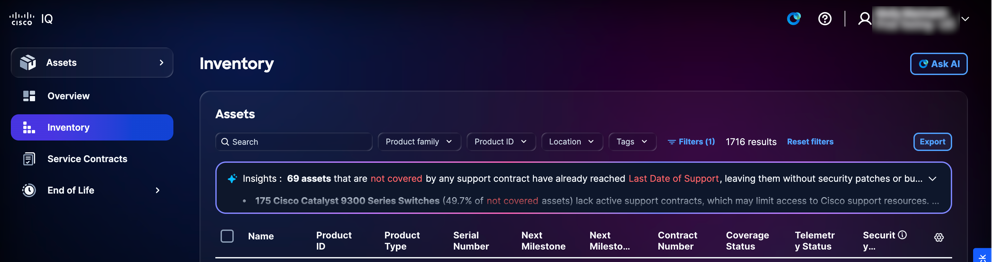
توفر لوحة الرؤى تحليلات قائمة على الذكاء الاصطناعي للبيانات الموجودة على تلك الصفحة، وتوفر رؤى قابلة للتنفيذ لتحسين أمان بيئة الشبكة وصحتها.
 لوحة الرؤى
تتوفر الخيارات التالية داخل لوحة الرؤى:
-
انقر أيقونة التوسيع لتوسيع اللوحة وعرض رؤى إضافية
-
انقر فوق أيقونة إرسال /خطوة إلى أعلى أو إرسال/كلمة مرور إلى أسفل لتوفير ملاحظات حول المعلومات التي تم إنشاؤها بواسطة AI
-
انقر فوق تحليل كامل لعرض معلومات إضافية وتحليلات أعمق ومشاهد مرئية مثل الرسومات البيانية ولوحات المعلومات والمخططات
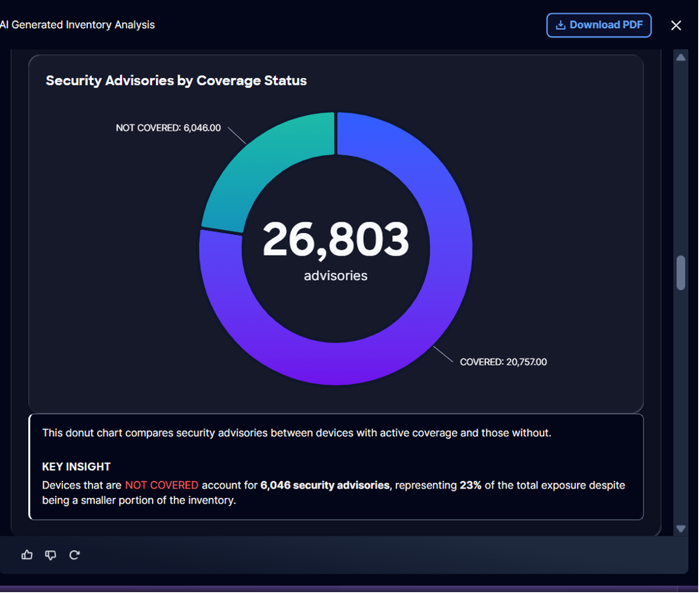 تحليل كامل
تتوفر الخيارات التالية ضمن تحليل كامل:
-
انقر تنزيل PDF لحفظ نسخة غير متصلة من التحليل، لسجلاتك أو من أجل التعاون
تصدير المعلومات
تتيح لك ميزة التصدير تصدير طرق عرض مخصصة لمعلومات الأمان والأصول بتنسيق .xls أو .csv.
لتصدير معلومات من صفحة:
-
انتقل إلى الصفحة .
 تصدير المخزون في تطبيق الأصول
-
طقطقة يصدر. عرض خيارات التصدير.
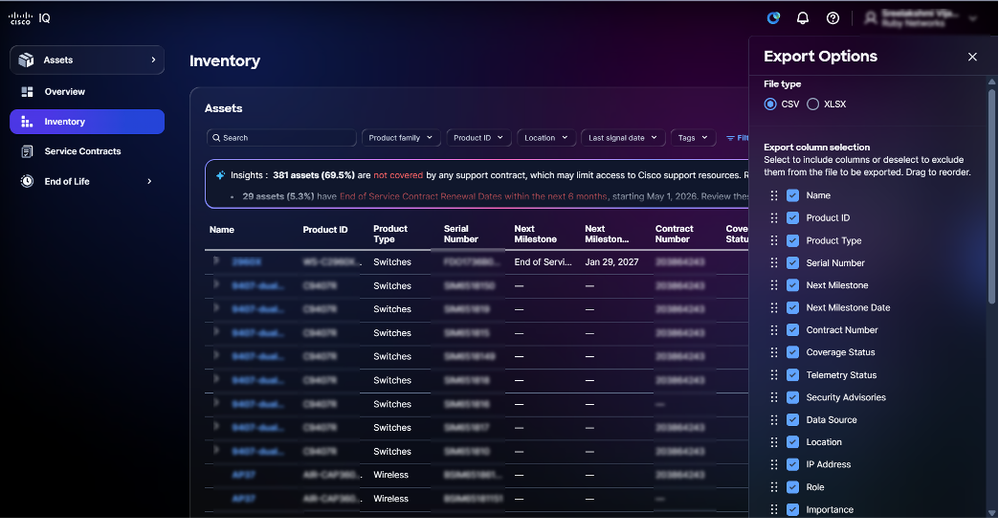 خيارات التصدير
-
حدد نوع ملف.
-
حدد خانة (مربعات) الاختيار في العمود (الأعمدة) المطلوب.
-
طقطقة يصدر. يتم تنزيل الملف إلى مجلد التنزيل المحلي الخاص بالمستعرض.
إعدادات الجدول
يمكنك تكوين إعدادات الجدول لإنشاء طرق عرض مخصصة ومحسنة لميزات تطبيق مختلفة.
 إعدادات الجدول
لتغيير الأعمدة التي تعرض في الصفحات المحددة، انقر أيقونة إعدادات الجدول. عرض إعدادات الجدول.
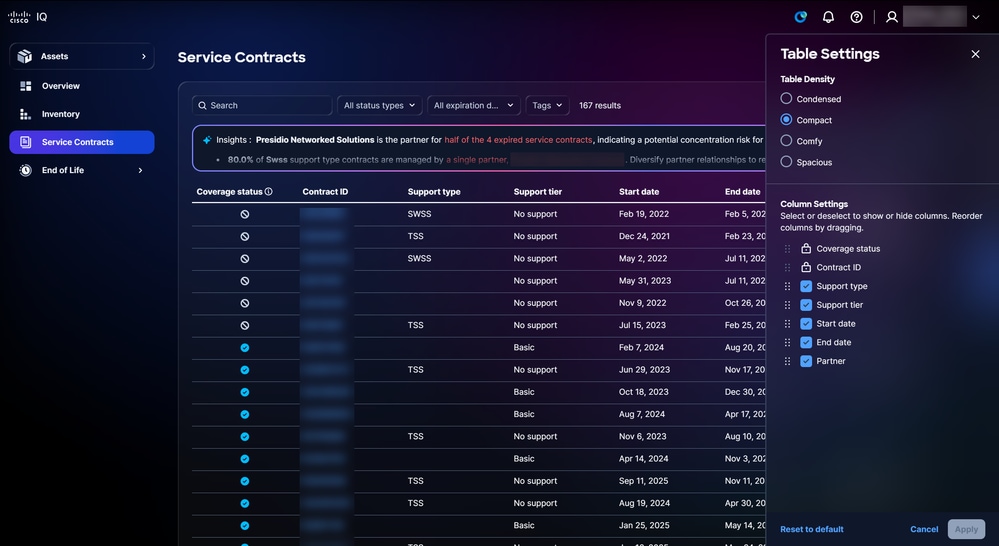 خيارات إعداد الجدول
تغيير طريقة عرض الجدول
لتغيير طريقة عرض الجدول:
-
حدد أحد خيارات كثافة الجدول التالية:
-
مكثف: يقلل العناصر المرئية والمسافات لعرض المزيد من المعلومات
-
مضغوط: يقلل المسافة البسيطة ويضيق المسافات بين عناصر واجهة المستخدم
-
العرض: يستخدم مسافات بيضاء أكبر ومسافات أكبر بين العناصر
-
واسع النطاق: تشدد على المسافات البيضاء الوفيرة وعناصر واجهة المستخدم الأكبر
-
-
انقر فوق تطبيق.
إضافة أعمدة وإزالتها
لإضافة أعمدة أو إزالتها:
-
حدد أو امسح خانة الاختيار إعدادات العمود.
-
انقر فوق تطبيق.
تغيير ترتيب الأعمدة
لتغيير ترتيب الأعمدة:
-
اسحب وألقي اسم العمود لترتيب العناصر بالترتيب المطلوب.
-
انقر فوق تطبيق.
تخصيص لوحات المعلومات
تتيح لك ميزة لوحة المعلومات المخصصة إمكانية تخصيص لوحات المعلومات القياسية من خلال مجموعة من خيارات التخصيص سهلة الاستخدام:
-
إعادة ترتيب أدوات لوحة المعلومات أو اللوحات باستخدام وظيفة السحب والإفلات
-
إزالة أي مكونات غير ذات صلة بسير العمل الخاص بك
-
يتم تخزين تخطيط لوحة المعلومات المخصص لديك بشكل آمن في ملف تعريف المستخدم الخاص بك ويتم تطبيقه تلقائيا عبر كافة الجلسات والأجهزة
-
إستعادة تخطيط لوحة المعلومات الأصلي باستخدام خيار إعادة تعيين بسيط
لتخصيص لوحة معلومات:
-
انتقل إلى لوحة المعلومات.
 تخصيص
تخصيص
-
انقر فوق تخصيص.
 تحرير لوحة المعلومات
-
قم بتغيير لوحة المعلومات كما تريد:
-
إعادة الترتيب: اسحب وألقي العروض في التخطيط المرغوب
-
إزالة: انقر أيقونة الحذف لإزالة عنصر واجهة مستخدم
-
إعادة تعيين: انقر فوق إعادة الضبط إلى الإعداد الافتراضي لإعادة ضبط لوحة المعلومات إلى تخطيطها الأصلي
-
-
انقر فوق حفظ. تظهر رسالة لوحة معلومات محفوظة.
يتم تطبيق تخطيط لوحة المعلومات تلقائيا عبر كافة الجلسات والأجهزة.
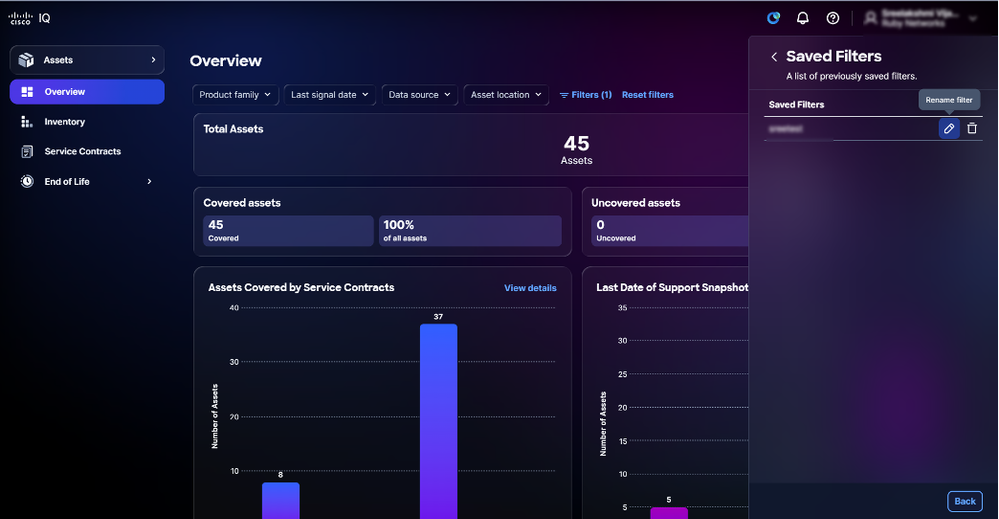
تخصيص عوامل التصفية
يمكنك حفظ تكوينات مرشح مخصص لأي طريقة عرض لوحة معلومات، مما يتيح لك إمكانية العودة بسهولة إلى إعداداتك المفضلة حسب الحاجة. يتم تخزين جميع تفضيلات التصفية بشكل آمن على أساس كل مستخدم، لكل حساب، مما يضمن تجربة مخصصة ومتسقة كل مرة تصل فيها إلى معدل ذكاء Cisco IQ.
إنشاء عامل تصفية
لإنشاء مرشح مخصص:
-
انتقل إلى لوحة المعلومات.
-
انقر فوق عوامل التصفية.
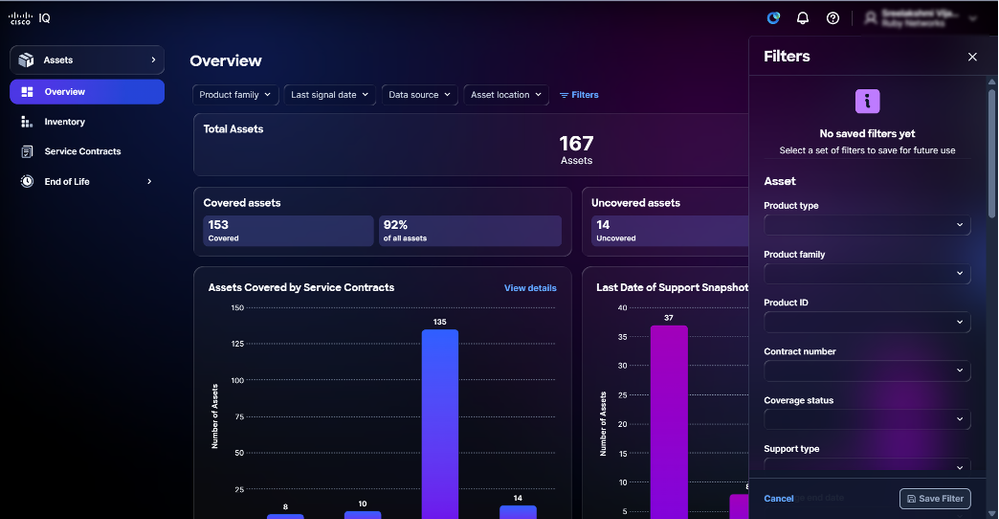 عوامل التصفية
-
أختر عوامل التصفية المطلوبة من القوائم المنسدلة.
-
انقر فوق حفظ عامل التصفية. يفتح نافذة مرشح حفظ الاسم.
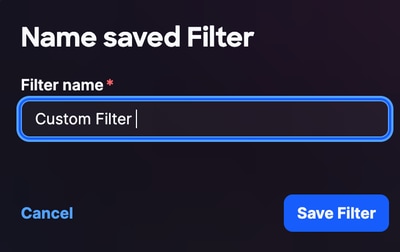 اسم عامل التصفية
-
أدخل اسم عامل التصفية.
-
انقر فوق حفظ عامل التصفية للتأكيد.
تحرير اسم مرشح
لتحرير مرشح مخصص:
-
انقر فوق عوامل التصفية.
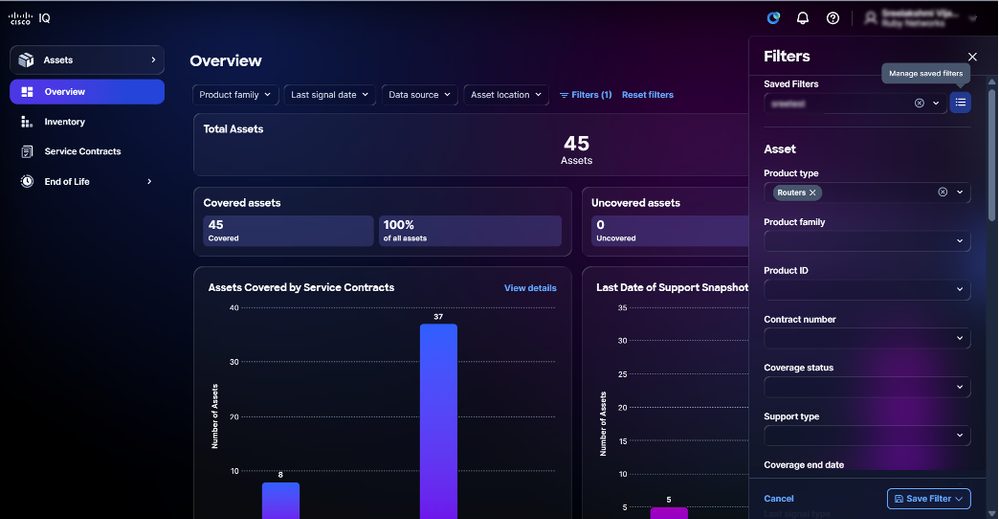 إدارة عوامل التصفية المحفوظة
-
انقر أيقونة المرشحات المحفوظة المدارة.
-
انتقل إلى عامل التصفية.
 تحرير عامل التصفية
-
انقر أيقونة تحرير. يفتح نافذة مرشح حفظ الاسم.
-
قم بتحرير اسم المرشح.
-
انقر فوق حفظ عامل التصفية للتأكيد.
حذف عامل تصفية
لحذف مرشح مخصص:
-
انقر فوق عوامل التصفية.
-
انقر أيقونة المرشحات المحفوظة المدارة
-
انتقل إلى عامل التصفية.
 حذف مرشح محفوظ
-
انقر أيقونة الحذف. تفتح نافذة حذف عامل التصفية المحفوظ.
- انقر فوق نعم، احذف للتأكيد.
مساعد AI
نظرة عامة
تم تصميم مساعد AI لتحسين فهم واستخدام Cisco IQ من خلال تحويل البيانات الأولية إلى رؤى وتوصيات وإجراءات موجهة قابلة للتنفيذ. ويندمج في الأدوات الموجودة حيث يعمل على زيادة فعالية مصادر البيانات الفردية وتوليف الذكاء عبر تدفقات بيانات متعددة لتقديم اقتراحات في الوقت الفعلي. من خلال توفير فهم سياقي يعمل على تمكين المستخدمين من إتخاذ قرارات مستنيرة واستباقية وتبسيط العمليات من أجل إشراك العملاء والنجاح، يعمل مساعد الذكاء الاصطناعي على تحسين نتائج التشغيل وتحسين تجربة مستخدم الذكاء الذكي (IQ) من Cisco.
تتضمن قدرات مساعد الذكاء الاصطناعي ما يلي:
-
معالجة فعالة لحالة الحافة: احصل على تفسيرات شفافة وعمليات إعادة توجيه واضحة، مما يضمن تجربة دعم تتسم بالسلاسة التامة، فضلا عن زيادة رضا المستخدم
-
إمكانية الدفق: عرض الاستجابات عند إنشائها
-
البيانات السياقية المحسنة: يوفر السياق الديناميكي تفاعلات سلسة عبر التطبيقات والصفحات والجلسات
-
دعم إدارة الحالات: إنشاء الحالات المعروضة في طريقة عرض قائمة الحالات وعرضها وإدارتها
-
إدارة مخزون الأصول: تعقب أصول المنظمة أو مواردها وإدارتها وإنشائها
-
الأهمية الحيوية للأصول: إعطاء الأولوية للأصول لأنشطة تخفيف المخاطر بناء على دورها وأهميتها داخل الشبكة
-
تقييم وإدارة المخاطر: تقييم وإدارة المخاطر المحتملة المرتبطة بأصول المؤسسة
-
تقوية الأمان: مقارنة تكوينات تشغيل أجهزة العميل للأجهزة المدعومة بإرشادات تقوية Cisco و CyberSecurity و Infrastructure Security Agency (CISA) ذات الصلة
-
التكوين: تقييم عمليات التهيئة التي تقوم بتشغيل أجهزة العملاء مقابل أفضل الممارسات الموصى بها والتعرف على انحرافات التكوين وتقديم توصيات قابلة للتنفيذ
الوصول إلى مساعد الذكاء الاصطناعي
لاستخدام مساعد الذكاء الاصطناعي:
 أيقونة مساعد AI
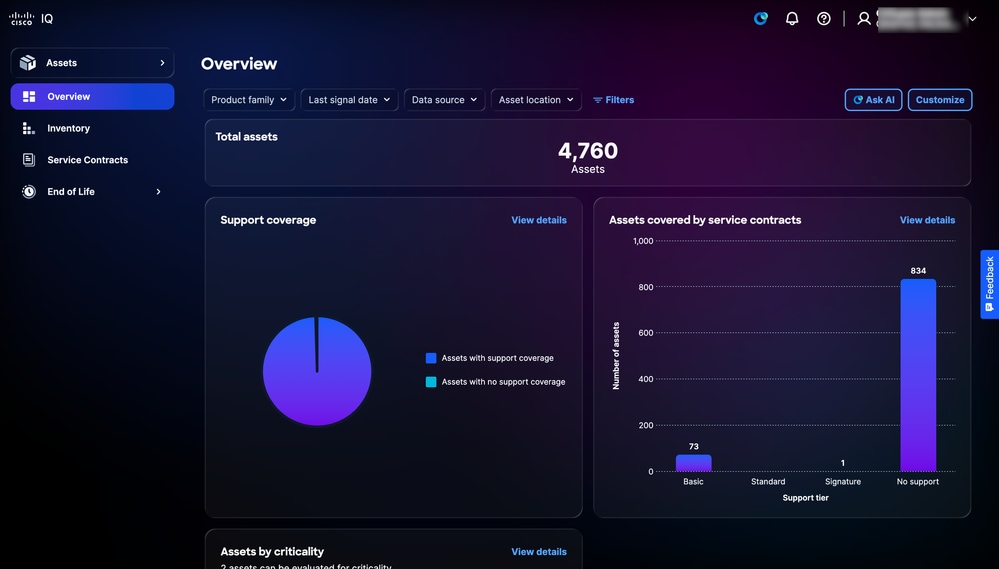 اسأل AI
-
ابدأ تشغيل مساعد AI بالنقر فوق رمز مساعد AI أو النقر فوق طلب AI.
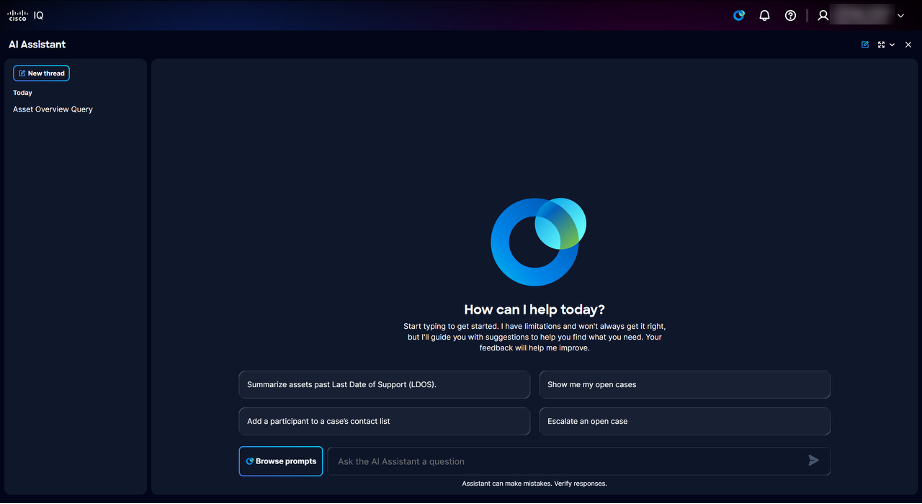 الصفحة المنتقل إليها
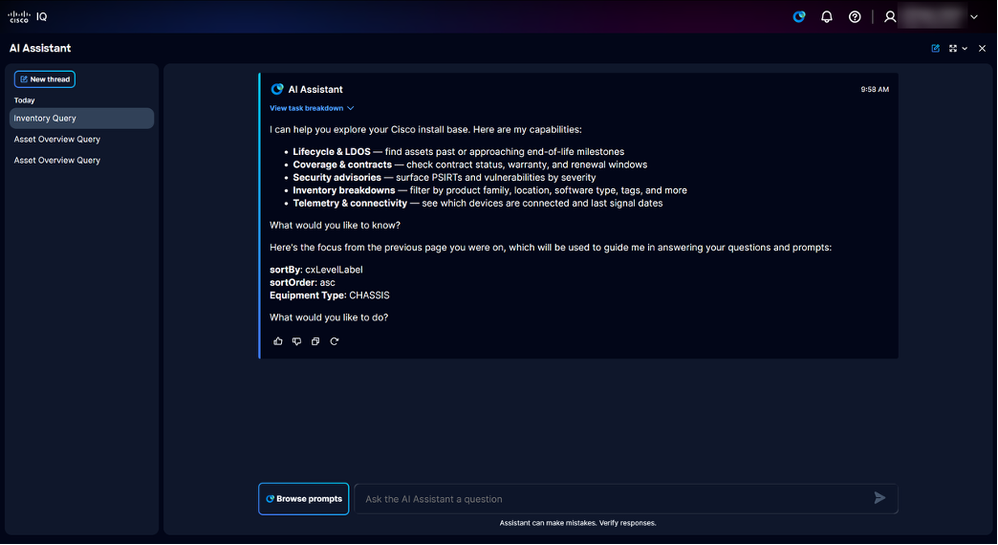 الصفحة المنتقل إليها مع سياق التطبيق
يعرض مساعد AI الخيارات المتاحة التالية:
-
مؤشرات الترابط السابقة: توفر محفوظات المطالبات لمدة 30 يوما
-
إستعراض المطالبات: فتح مكتبة المطالبات؛ راجع الملحق أ: مطالبات مساعد AI للحصول على قائمة بكافة الأسئلة المتوفرة في مكتبة المطالبة
-
اسأل مساعد الذكاء الاصطناعي عن مجال أسئلة: حقل نصي لطرح سؤال على مساعد الذكاء الاصطناعي؛ أستخدم جملا وصفية كاملة للحصول على استجابات أفضل
-
-
أختر مطالبة باستخدام إحدى الطرق التالية:
-
ابحث عن موجهات الأوامر من خلال إدخال كلمة واحدة (1) أو أكثر من الكلمات الأساسية في حقل سؤال Ask Assistant (مساعد الذكاء الاصطناعي) وانقر فوق موجه الأمر
-
أدخل سؤال ذي شكل حر باستخدام جمل وصفية وكاملة في حقل سؤال Ask Assistant (مساعد الذكاء الاصطناعي)
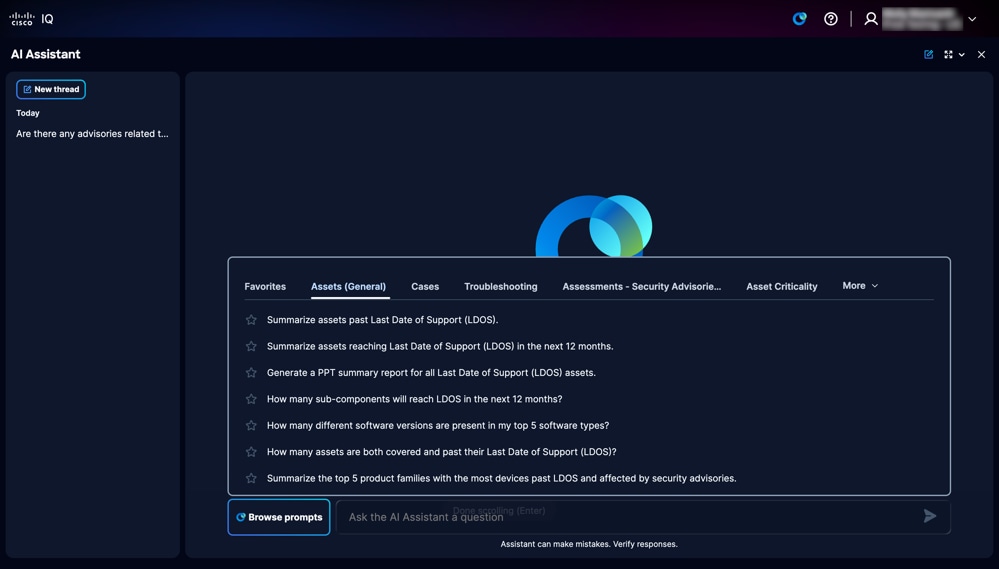 مكتبة المطالبة
-
انقر فوق إستعراض المطالبات لفتح مكتبة المطالبات واختر أي من علامات تبويب فئة المطالبات التالية:
-
الأصول (العامة): مطالبات تتعلق بدورة حياة الأصول، بما في ذلك استعلامات المخزون العام واستعلامات المخزون العامة
- الحالات: المطالبة بدعم إجراءات إدارة الحالة مثل عرض الحالات وتحديثها وتخطيطها وإغلاقها، مما يوفر التعقب الفعال والاتصال بمهندس دعم Cisco
-
أستكشاف الأخطاء وإصلاحها: مطالبة بالمساعدة في رسائل الخطأ syslog أو أسئلة التكوين
- التقييمات - إستشارات الأمان: مطالبات تتعلق بتقييم الوضع الإجمالي لأمان الشبكة، وتحديد نقاط الضعف الحرجة، وسرد الأصول المحددة التي تأثرت بتهديدات الأمان عالية الخطورة أو نقاط الضعف في التكوين
-
الأهمية الحيوية للأصول: مطالبات تتعلق بترتيب أولويات الأصول لأنشطة تخفيف المخاطر استنادا إلى دورها وأهميتها داخل الشبكة
-
التقييمات - التكوين: مطالبات تتعلق بتلخيص نتائج تقييم التكوين، وتحديد انحرافات التكوين مقابل أفضل الممارسات الموصى بها، وإنشاء توصيات قابلة للتنفيذ
-
التقييمات - تقوية الأمان: مطالبات تتعلق بتحديد تكوينات خط الأساس للأمان الموصى بها وأفضل الممارسات لتمتين الأجهزة والإجراءات بالتفصيل لتأمين البنية الأساسية لشبكة Cisco
-
-
-
انقر فوق مطالبة. يولد الجواب.
البيانات السياقية المحسنة لمساعد AI
يضمن مساعد AI أن السياق ديناميكي، مما يتيح تفاعلات سلسة عبر التطبيقات والصفحات والجلسات. وهذا يضمن أن كل إستجابة تعزز البيانات السياقية لتوفير استجابات ذات صلة عالية ومصممة خصيصا لسؤالك.
تلخيص LDOS وتحديد الأولويات
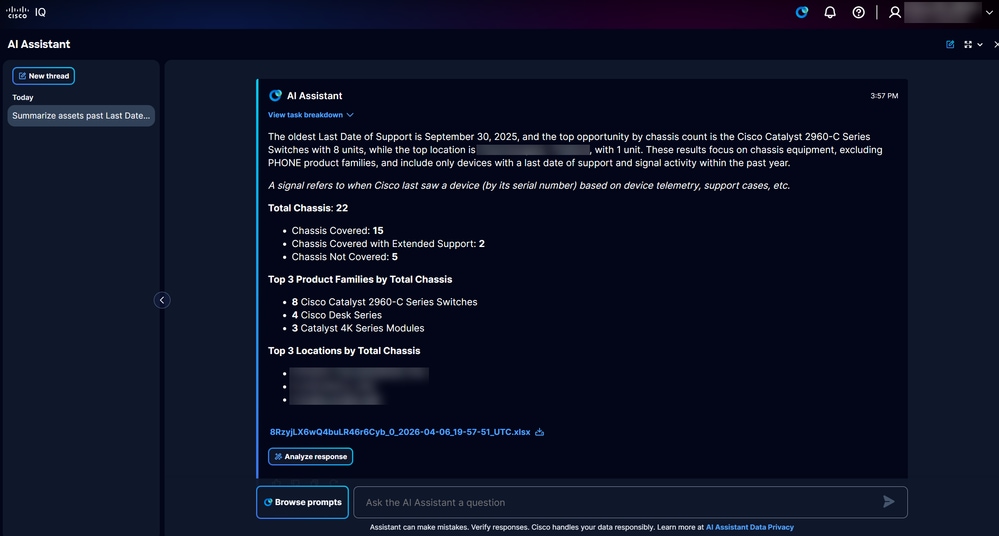 تقرير LDOS
تتيح لك ميزة تلخيص LDOS وترتيب الأولويات إمكانية تحديد المخاطر المقترنة بأصول الشبكة ومعالجتها بسرعة فائقة. تصنف هذه الميزة الأصول حسب أدوار الشبكة المتوقعة وحالة الثغرات الأمنية، مما يتيح معالجة الثغرات وتحسين جودة الخدمة بشكل عام.
الفوائد الرئيسية
تتضمن الميزات الرئيسية لميزة تلخيص LDOS وتحديد الأولويات ما يلي:
-
طريقة عرض المخاطر ذات الأولوية
-
تحليل الأثر التشغيلي
-
رؤى قابلة للتنفيذ
كجزء من هذه الميزة، يمكنك عرض مجموعة محدودة من الأسئلة المحددة مسبقا (والتي تحمل علامة "*") في واجهة المستخدم أو عند عرض رؤى LDOS.
التقارير
إنشاء تقرير LDOS
وتقدم التقارير التي تصدر عن شعبة خدمات الرقابة الداخلية وتتم مراقبتها ملخصات للأصول التي تقترب من أو تتجاوزها. تلقي التقارير الضوء أيضا على خيارات التحديث فضلا عن تحديد إرشادات الأمان ونقاط الضعف لمساعدتك على فهم بيئة المخاطر على الشبكة لديك بسرعة.
تحليل الاستجابة
 تحليل الاستجابة
عند النقر فوق تحليل الاستجابة، تتلقى ملخصا مدفوعا بمؤشر AI يلخص البيانات ويولد مرئيات مختلفة مثل الرسوم البيانية ولوحات المعلومات والمخططات، مما يوفر معلومات متبصرة.
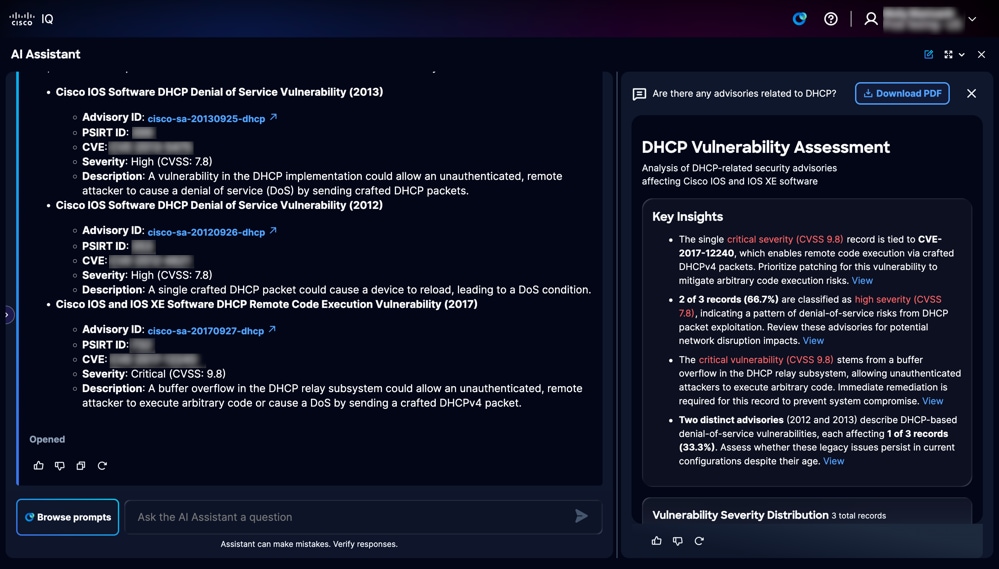 ملخص AI
يحتوي الملخص الذي تقوده AI على زر تنزيل PDF لتنزيل التقرير بتنسيق PDF.
مصادر البيانات لتلخيص LDOS وإنشاء التقرير
يتم الاستفادة من مصادر البيانات الأساسية التالية من خلال ميزة تلخيص LDOS وترتيب الأولويات:
-
تثبيت الأصول والعقود الأساسية
-
أصول وعقود القياس عن بعد
-
بيانات إشارة CX
-
المرحلة الرئيسية ل EOL لأصول الأجهزة والبرامج
أستكشاف الأخطاء وإصلاحها باستخدام مساعد AI
يخولك IQ من Cisco إمكانية حل مشاكل الجهاز بشكل مستقل باستخدام مساعد AI. نظرا لاعتماده على أدوات أستكشاف الأخطاء وإصلاحها المعتمدة من Cisco وقاعدة معارف أثبتت جدارتها، يوفر هذا المساعد الحدسي التفاعلي توصيات سياقية في الوقت الفعلي.
تم تصميمه لسيناريوهات أستكشاف الأخطاء وإصلاحها يوميا، كما يساعد مهندسي الشبكة على التحقيق في مشاكل منتجات Cisco ومراجعة الأعراض وتحديد الخطوات التالية القابلة للتنفيذ. وهو يفسر التفاصيل التقنية مثل رسائل الخطأ، syslogs، عيوب البرامج، وإرشادات الإصدار، والأسئلة المتعلقة بالتكوين. من خلال معالجة التحديات على الفور، يمكنك الحفاظ على الأداء الأمثل وتوفير الوقت عن طريق حل المشكلات دون الحاجة إلى فتح حالة دعم.
أفضل الممارسات
عند إستخدام مساعد الذكاء الاصطناعي لاستكشاف الأخطاء وإصلاحها، أستخدم أفضل الممارسات التالية:
- أن تكون محددة قدر الإمكان؛ قم بتضمين النظام الأساسي وعائلة المنتجات وإصدار البرامج في رسالتك الأولى
-
الصق نص الخطأ، التنبيه، أو syslog بدلا من إعادة صياغته
-
وصف ما تغير قبل بدء المشكلة، مثل ترقية أو تحديث تكوين أو تغيير مخطط
-
شارك التأثير بوضوح، مثل ما إذا كانت المشكلة تؤثر على جهاز واحد (1)، موقع واحد (1)، أو مستخدمين متعددين
الحالات
تتيح ميزة "إدارة الحالات" للمستخدمين إمكانية إدارة حالات الدعم الخاصة بهم من خلال الخدمة الذاتية، مما يضمن إستعادة تطبيقات وخدمات الشركات على الفور. تساعدك هذه الميزة على إدارة الحالات وتنظيم تجربة الدعم بكفاءة. راجع تطبيق الدعم للحصول على مزيد من المعلومات حول إدارة الحالة.
باستخدام "إدارة الحالات"، يمكن للمستخدمين عرض حالات الدعم وتعقبها بسرعة في مكان واحد. فهي تساعدك على التحقق من حالة الحالة ومراجعة التحديثات ومتابعة التقدم المحرز والبقاء على دراية بالخطوات التالية، مما يجعل من السهل إدارة المشكلات والحصول على الدعم بشكل أسرع.
الملحق أ: مطالبات مساعد AI
يقدم هذا الملحق نظرة عامة مفصلة على المطالبات المتاحة في مساعد الذكاء الاصطناعي، مرتبة في قوائم تعداد نقطي حسب مواضيع الأسئلة.
تتوفر المطالبات التالية ضمن علامة التبويب الأصول (العامة):
- تلخيص الأصول بعد آخر تاريخ دعم (LDOS).
- تلخيص الأصول التي تصل إلى آخر تاريخ للدعم (LDOS) خلال ال 12 شهرا التالية.
- إنشاء تقرير ملخص PPT لكافة أصول تاريخ الدعم الأخير (LDOS).
- ما هو عدد المكونات الفرعية التي ستصل إلى LDOS في الأشهر ال 12 القادمة؟
- ما هو عدد إصدارات البرامج المختلفة الموجودة في أفضل 5 أنواع من البرامج لدي؟
- كم عدد الأصول التي تمت تغطيتها وما بعد آخر تاريخ دعم لها (LDOS)؟
- تلخيص أفضل 5 عائلات منتجات مع معظم الأجهزة التي تتجاوز رفض الخدمة (LDOs) وتتأثر بنصائح الأمان.
- قم بتلخيص البطاقات والوحدات النمطية القديمة لرفض الخدمة (LDOs) وتأثرت بنصائح الأمان.
- ما هو عدد المكونات الفرعية التي تصل إلى المرحلة الرئيسية لنهاية العمر قبل الهيكل الأصلي الخاص بها؟
تتوفر المطالبات التالية ضمن علامة التبويب الحالات:
- أرني القضايا المفتوحة الخاصة بي
- إغلاق حالة الدعم هذه
- إظهار حالة RMA
- إظهار حالة الخطأ
- أعطني معلومات حديثة عن الحالة
- قم بالتحديث الأخير وأي عناصر إجراءات معلقة للحالة
- إغلاق حالة مفتوحة
- إضافة مشارك إلى قائمة جهات اتصال الحالة
- إنشاء اتصال فضائي من Webex حول حالة
- ربطني بالمهندس الذي يعالج القضية
- رفع مستوى خطورة حالة مفتوحة
- تصعيد حالة مفتوحة
- طلب مهندس جديد لحالة
- إعادة وضع قائمة الانتظار في حالة مفتوحة
- إضافة ملاحظة إلى حالة
تتوفر المطالبات التالية ضمن علامة التبويب أستكشاف الأخطاء وإصلاحها:
- لماذا توقفت واجهة المستخدم الرسومية (GUI) عبر الويب على وحدة التحكم Cisco Catalyst 9800-40 التي تشغل IOS XE 16.12.07 عن العمل بعد ترقية برنامج رغم عدم وجود نقاط وصول متصلة؟
- على Cisco Nexus N9K-C92348GC-X، فشلت ترقية الصورة مع رمز الخطأ 0x404F0003 عند الترقية مباشرة من NX-OS 9.3(2) إلى 10.3(7)M. ما الذي تسبب في الفشل وما مسار الترقية الوسيط الذي يجب اتباعه؟
- ماذا تعني رسالة syslog ٪ROUTING-BGP-5-ADJCHANGE على ASR9K التي تشغل IOS-XR، وما هي الأسباب الشائعة وخطوات أستكشاف الأخطاء وإصلاحها؟
- كيف يمكنني إستبدال SNMPv2 ب مصادقة SNMPv3 على Cisco NCS5500 التي تشغل IOS-XR كجزء من توصيات تقوية البنية الأساسية المرنة من Cisco؟
- كيف يمكنني دفع تكوين شهادة SDN والقياس عن بعد من Catalyst Center 2.3.7.7 إلى وحدة التحكم في الشبكة المحلية اللاسلكية Cisco Catalyst 9800-40 WLC التي تشغل IOS XE 17.12.5 لاستعادة بيانات الصحة/القياس عن بعد، وأي المنافذ يجب أن تكون قابلة للوصول؟
تتوفر المطالبات التالية بموجب التقييمات - علامة التبويب إرشادات الأمان:
- هل هناك أي نصائح متعلقة ب DHCP؟
- هل هناك نصيحة أمنية للتحقق من وجود نقاط ضعف لتصعيد امتيازات WebUI تتعلق بالإعصار الملحي؟
- قبل تمكين HTTP، هل يمكنك التحقق من وجود إرشادات أمان أو نقاط ضعف معروفة متعلقة بتمكين HTTP؟
- ما هو عدد إستشارات الأمان المعرضة للخطر في شبكتي؟
- ما هو عدد الأجهزة المعرضة لاستشارات الأمان؟
تتوفر المطالبات التالية بموجب علامة التبويب الأهمية الحيوية للأصول:
- ما هي أهم مقوماتي حسب الدور والأهمية؟
- كم عدد الأجهزة الأساسية التي تتأثر باستشارات الأمان؟
- تلخيص الأجهزة الهامة والعالية الأهمية مع انتهاء صلاحية التغطية في غضون 12 شهرا القادمة
- ترتيب أولويات أصول LDOS للتحديث استنادا إلى الدور والأهمية.
- منح الأولوية للأصول المكشوفة أو التي سيتم الكشف عنها قريبا لتجديدها على أساس الدور والأهمية.
- إعطاء الأولوية للعقود المنتهية الصلاحية للتجديد استنادا إلى دور وأهمية تلك الأصول المشمولة.
- إعطاء الأولوية لمواطن الضعف التي تعاني منها PSIRT استنادا إلى خطورة الأصول المتأثرة ودورها وأهميتها.
تتوفر المطالبات التالية بموجب التقييمات - علامة التبويب تكوين:
- هل يمكنك تقديم ملخص لتقييم التكوين الأخير الخاص بي؟
- ما هو عدد قواعد أفضل ممارسات التكوين التي تم تقييمها، وما هو العدد الذي نتج عنه على الأقل أحد الأصول التي لم يتم تمريرها؟
- ما هي أكثر انحرافات التكوين شيوعا عبر شبكتي؟
- كم من الأصول تم تقييمها، وما هي النسبة المئوية التي لم يتم تمريرها؟
- ما هي الفئات التي تحتوي على أكثر الانحرافات عن أفضل ممارسات التكوين؟
- إظهار تحليل انحرافات قواعد أفضل ممارسات التكوين حسب الخطورة والفئة ونوع البرامج
- ما هي عائلات منتجات Cisco التي تحتوي على معظم الانحرافات من أفضل ممارسات التكوين؟
- ما هي انحرافات التكوين التي تمثل أكبر مخاطر على الشبكة، وما هي الإجراءات التصحيحية الموصى بها؟
- ما هي الأصول التي تحتوي على الحد الأقصى من انحرافات التكوين الحرجة والعالية الخطورة؟ اية إجراءات تصحيحية يوصى بها؟
- إظهار تحليل انحرافات التكوين الحرجة والعالية الخطورة حسب خطورة الأصول
- ما هي انحرافات التكوين التي تمثل أكبر مخاطر على الشبكة، وما هي الإجراءات التصحيحية الموصى بها؟
تتوفر المطالبات التالية بموجب التقييمات - علامة التبويب تقوية الأمان:
- ما هي أفضل ممارسات تقوية أمان Cisco لأجهزة الشبكة؟
- كيف يمكنني تقوية أجهزة Cisco IOS XE؟
- سرد خطوات تقوية الأمان الأساسية للموجهات والمحولات.
- ما هي إعدادات تقوية الخط الأساسي الموصى بها لأجهزة Cisco؟
- كم عدد الأصول التي تنتهك أفضل ممارسات تقوية الأمن؟
محفوظات المراجعة
| المراجعة | تاريخ النشر | التعليقات |
|---|---|---|
2.0 |
May 22, 2026
|
تتضمن التغييرات تحديثات الصور والمحتوى للمحاذاة مع واجهة المستخدم المحدثة والتحديثات لسير العمل الموجودة مثل إزالة أدوات التجميع القديمة وعقود الخدمة. |
1.0 |
April 23, 2026
|
الإصدار الأولي |