Cisco Aironet Access Point Software Configuration Guide for VxWorks
Security Setup

Table Of Contents

Security Setup

Security Overview

Levels of Security

Encrypting Radio Signals with WEP

Additional WEP Security Features

Network Authentication Types

Network-EAP

MAC address

Open

Shared key

Combining MAC-Based, EAP, and Open Authentication

Protecting the Access Point Configuration with User Manager

Setting Up WEP

Using SNMP to Set Up WEP

Enabling Additional WEP Security Features

Enabling Message Integrity Check (MIC)

Enabling Temporal Key Integrity Protocol (TKIP)

Enabling Broadcast WEP Key Rotation

Setting Up Open or Shared Key Authentication

Setting Up EAP Authentication

Enabling EAP on the Access Point

Enabling EAP in Cisco Secure ACS

Setting a Session-Based WEP Key Timeout

Setting Up a Repeater Access Point as a LEAP Client

Setting Up MAC-Based Authentication

Enabling MAC-Based Authentication on the Access Point

Authenticating Client Devices Using MAC Addresses or EAP

Enabling MAC-Based Authentication in Cisco Secure ACS

Summary of Settings for Authentication Types

RADIUS Attributes Sent by the Access Point

Setting Up Backup Authentication Servers

Setting Up Administrator Authorization

Creating a List of Authorized Management System Users

Setting Up Centralized Administrator Authentication

System Flow Notes

Authorization Parameters


Security Setup


This chapter describes how to set up your access point's security features. This chapter contains the following sections:

Security Overview

Setting Up WEP

Enabling Additional WEP Security Features

Setting Up Open or Shared Key Authentication

Setting Up EAP Authentication

Setting Up MAC-Based Authentication

Summary of Settings for Authentication Types

RADIUS Attributes Sent by the Access Point

Setting Up Backup Authentication Servers

Setting Up Administrator Authorization

Setting Up Centralized Administrator Authentication

Security Overview

This section describes the types of security features you can enable on the access point. The security features protect wireless communication between the access point and other wireless devices, control access to your network, and prevent unauthorized entry to the access point management system.

Levels of Security

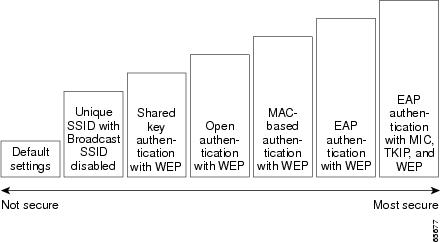
Security is vital for any wireless network, and you should enable all the security features available on your network. Figure 8-1 shows possible levels of security on Cisco Aironet wireless networking equipment, from no security on the left to highest security on the right. The highest level of security, EAP authentication, interacts with a Remote Authentication Dial-In User Service (RADIUS) server on your network to provide authentication service for wireless client devices.

Figure 8-1 Wireless LAN Security Levels

If you don't enable any security features on your access point, anyone with a wireless networking device is able to join your network. If you enable open or shared-key authentication with WEP encryption, your network is safe from casual outsiders but vulnerable to intruders who use a hacking algorithm to calculate the WEP key. If you enable server-based EAP authentication with Message Integrity Check (MIC), Temporal Key Integrity Protocol (TKIP, also known as key hashing), and broadcast key rotation, your network is safe from all but the most sophisticated attacks against wireless security.

Encrypting Radio Signals with WEP

Just as anyone within range of a radio station can tune to the station's frequency and listen to the signal, any wireless networking device within range of an access point can receive the access point's radio transmissions. Because WEP (Wired Equivalent Privacy) is the first line of defense against intruders, Cisco recommends that you use full encryption on your wireless network.

WEP encryption scrambles the communication between the access point and client devices to keep the communication private. Both the access point and client devices use the same WEP key to encrypt and unencrypt radio signals. WEP keys encrypt both unicast and multicast messages. Unicast messages are addressed to just one device on the network. Multicast messages are addressed to multiple devices on the network.

Extensible Authentication Protocol (EAP) authentication provides dynamic WEP keys to wireless users. Dynamic WEP keys are more secure than static, or unchanging, WEP keys. If an intruder passively receives enough packets encrypted by the same WEP key, the intruder can perform a calculation to learn the key and use it to join your network. Because they change frequently, dynamic WEP keys prevent intruders from performing the calculation and learning the key.

Additional WEP Security Features

Three additional security features defend your wireless network's WEP keys:

Message Integrity Check (MIC)—MIC prevents attacks on encrypted packets called bit-flip attacks. During a bit-flip attack, an intruder intercepts an encrypted message, alters it slightly, and retransmits it, and the receiver accepts the retransmitted message as legitimate. The MIC, implemented on both the access point and all associated client devices, adds a few bytes to each packet to make the packets tamper-proof. See the "Enabling Message Integrity Check (MIC)" section for instructions on enabling MIC.

TKIP (Temporal Key Integrity Protocol, also known as WEP key hashing)—This feature defends against an attack on WEP in which the intruder uses the unencrypted initialization vector (IV) in encrypted packets to calculate the WEP key. TKIP removes the predictability that an intruder relies on to determine the WEP key by exploiting IVs. See the "Enabling Temporal Key Integrity Protocol (TKIP)" section for instructions on enabling TKIP.

Broadcast key rotation—EAP authentication provides dynamic unicast WEP keys for client devices but uses static broadcast, or multicast, keys. When you enable broadcast WEP key rotation, the access point provides a dynamic broadcast WEP key and changes it at the interval you select. Broadcast key rotation is an excellent alternative to TKIP if your wireless LAN supports wireless client devices that are not Cisco devices or that cannot be upgraded to the latest firmware for Cisco client devices. See the "Enabling Broadcast WEP Key Rotation" section for instructions on enabling broadcast key rotation.

Network Authentication Types

Before a wireless client device can communicate on your network through the access point, it must authenticate to the access point and to your network. The access point uses four authentication mechanisms or types and can use more than one at the same time.

Network-EAP

This authentication type provides the highest level of security for your wireless network. By using the Extensible Authentication Protocol (EAP) to interact with an EAP-compatible RADIUS server, the access point helps a wireless client device and the RADIUS server to perform mutual authentication and derive a dynamic unicast WEP key. The RADIUS server sends the WEP key to the access point, which uses it for all unicast data signals that it sends to or receives from the client. The access point also encrypts its broadcast WEP key (entered in the access point's WEP key slot 1) with the client's unicast key and sends it to the client.

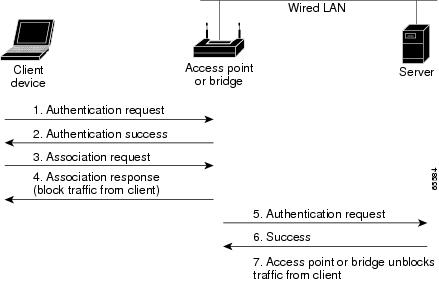
When you enable EAP on your access points and client devices, authentication to the network occurs in the steps shown in Figure 8-2:

Figure 8-2 Sequence for EAP Authentication

In steps 1 through 9 in Figure 8-2, a wireless client device and a RADIUS server on the wired LAN use 802.1X and EAP to perform a mutual authentication through the access point. The RADIUS server sends an authentication challenge to the client. The client uses a one-way encryption of the user-supplied password to generate a response to the challenge and sends that response to the RADIUS server. Using information from its user database, the RADIUS server creates its own response and compares that to the response from the client. When the RADIUS server authenticates the client, the process repeats in reverse, and the client authenticates the RADIUS server.

When mutual authentication is complete, the RADIUS server and the client determine a WEP key that is unique to the client and provides the client with the appropriate level of network access, thereby approximating the level of security in a wired switched segment to an individual desktop. The client loads this key and prepares to use it for the logon session.

During the logon session, the RADIUS server encrypts and sends the WEP key, called a session key, over the wired LAN to the access point. The access point encrypts its broadcast key with the session key and sends the encrypted broadcast key to the client, which uses the session key to decrypt it. The client and access point activate WEP and use the session and broadcast WEP keys for all communications during the remainder of the session.

There is more than one type of EAP authentication, but the access point behaves the same way for each type: it relays authentication messages from the wireless client device to the RADIUS server and from the RADIUS server to the wireless client device. See the "Setting Up EAP Authentication" section for instructions on setting up EAP on the access point.


Note If you use EAP authentication, you can select open or shared key authentication, but you don't have to. EAP authentication controls authentication both to your access point and to your network.


MAC address

The access point relays the wireless client device's MAC address to a RADIUS server on your network, and the server checks the address against a list of allowed MAC addresses. If you don't have a RADIUS server on your network, you can create the list of allowed MAC addresses on the access point's Address Filters page. Devices with MAC addresses not on the list are not allowed to authenticate. Intruders can create counterfeit MAC addresses, so MAC-based authentication is less secure than EAP authentication. However, MAC-based authentication provides an alternate authentication method for client devices that do not have EAP capability. See the "Setting Up MAC-Based Authentication" section for instructions on enabling MAC-based authentication.

Figure 8-3 shows the authentication sequence for MAC-based authentication.

Figure 8-3 Sequence for MAC-Based Authentication

Open

Allows any device to authenticate and then attempt to communicate with the access point. Using open authentication, any wireless device can authenticate with the access point, but the device can only communicate if its WEP keys match the access point's. Devices not using WEP do not attempt to authenticate with an access point that is using WEP. Open authentication does not rely on a RADIUS server on your network.

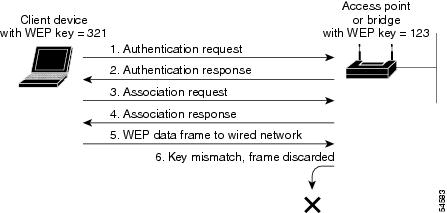
Figure 8-4 shows the authentication sequence between a device trying to authenticate and an access point using open authentication. In this example, the device's WEP key does not match the access point's key, so it can authenticate but not pass data.

Figure 8-4 Sequence for Open Authentication

Shared key

Cisco provides shared key authentication to comply with the IEEE 802.11b standard. However, because of shared key's security flaws, we recommend that you avoid using it.

During shared key authentication, the access point sends an unencrypted challenge text string to any device attempting to communicate with the access point. The device requesting authentication encrypts the challenge text and sends it back to the access point. If the challenge text is encrypted correctly, the access point allows the requesting device to authenticate. Both the unencrypted challenge and the encrypted challenge can be monitored, however, which leaves the access point open to attack from an intruder who calculates the WEP key by comparing the unencrypted and encrypted text strings. Because of this weakness, shared key authentication can be less secure than open authentication. Like open authentication, shared key authentication does not rely on a RADIUS server on your network.

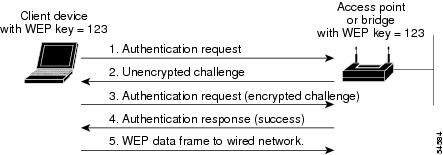
Figure 8-5 shows the authentication sequence between a device trying to authenticate and an access point using shared key authentication. In this example the device's WEP key matches the access point's key, so it can authenticate and communicate.

Figure 8-5 Sequence for Shared Key Authentication

Combining MAC-Based, EAP, and Open Authentication

You can set up the access point to authenticate client devices using a combination of MAC-based and EAP authentication. When you enable this feature, client devices that associate to the access point using 802.11 open authentication first attempt MAC authentication; if MAC authentication succeeds, the client device joins the network. If MAC authentication fails, the access point waits for the client device to attempt EAP authentication. See the "Authenticating Client Devices Using MAC Addresses or EAP" section for more information on this feature.

Protecting the Access Point Configuration with User Manager

The access point's user manager feature prevents unauthorized entry to the access point management system. You create a list of administrators authorized to view and adjust the access point settings; unauthorized users are locked out. See the "Setting Up Administrator Authorization" section for instructions on using the user manager.
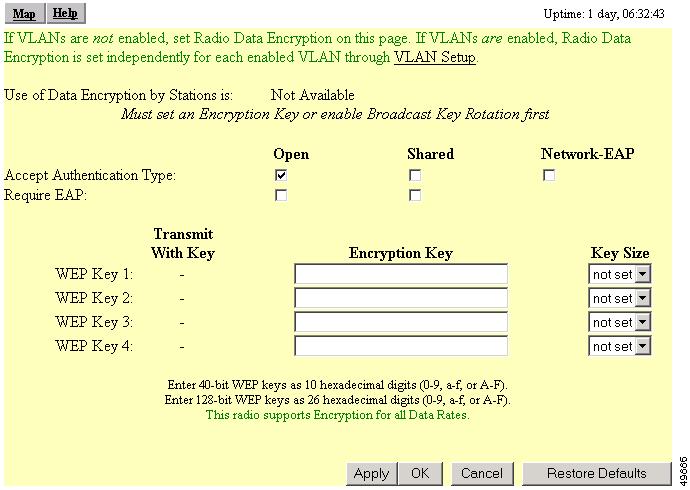
Setting Up WEP

Use the AP Radio Data Encryption page to set up WEP. You also use the AP Radio Data Encryption page to select an authentication type for the access point. Figure 8-6 shows the AP Radio Data Encryption page.

Figure 8-6 AP Radio Data Encryption Page

Follow this link path to reach the AP Radio Data Encryption page:

1. On the Summary Status page, click Setup.

2. On the Setup page, click Security.

3. On the Security Setup page, click Radio Data Encryption (WEP).


Note Use this page to configure the radio unless you have enabled VLANs. If VLANs are enabled, you must set the radio data encryption for each enabled VLAN through the VLAN Setup page.


Follow these steps to set up WEP keys and enable WEP:


Step 1 Follow the link path to the AP Radio Data Encryption page.

Step 2 Before you can enable WEP, you must enter a WEP key in at least one of the Encryption Key fields.


Note If you enable broadcast key rotation and EAP authentication to provide client devices with dynamic WEP keys, you can enable WEP without entering the keys.


For 40-bit encryption, enter 10 hexadecimal digits; for 128-bit encryption, enter 26 hexadecimal digits. Hexadecimal digits include the numbers 0 through 9 and the letters A through F. Your 40-bit WEP keys can contain any combination of 10 of these characters; your 128-bit WEP keys can contain any combination of 26 of these characters. The letters are not case-sensitive.

You can enter up to four WEP keys. The characters you type for a key's contents appear only when you type them. After you click Apply or OK, you cannot view the key's contents.


Note If you enable EAP authentication, you must select key 1 as the transmit key. The access point uses the WEP key you enter in key slot 1 to encrypt multicast data signals it sends to EAP-enabled client devices. If you enable broadcast key rotation, however, you can select key 1 or key 2 as the transmit key or you can enable WEP without entering any keys.


Step 3 Use the Key Size pull-down menu to select 40-bit or 128-bit encryption for each key. The not set option clears the key. You can disable WEP altogether by selecting not set for each key or by selecting No Encryption in Step 5.

Step 4 Select one of the keys as the transmit key. If you select Network-EAP as the authentication type, select key 1 as the transmit key.


Note Client devices that do not use EAP to authenticate to the access point must contain the access point's transmit key in the same key slot in the client devices' WEP key lists. However, the key does not have to be selected as the transmit key in the client devices' WEP key lists.


Table 8-1 shows an example WEP key setup that would work for the access point and an associated device:

Table 8-1 WEP Key Setup Example

Key Slot
Access Point
Associated Device
Transmit?
Key Contents
Transmit?
Key Contents

1

x

12345678901234567890abcdef

-

12345678901234567890abcdef

2

-

09876543210987654321fedcba

x

09876543210987654321fedcba

3

-

not set

-

not set

4

-

not set

-

FEDCBA09876543211234567890

Because the access point's WEP key 1 is selected as the transmit key, WEP key 1 on the other device must contain the same contents. WEP key 4 on the other device is set, but because it is not selected as the transmit key, WEP key 4 on the access point does not need to be set at all.


Note If you enable MIC but you use static WEP (you do not enable any type of EAP authentication), both the access point and any devices with which it communicates must use the same WEP key for transmitting data. For example, if the MIC-enabled access point uses the key in slot 1 as the transmit key, a client device associated to the access point must use the same key in its slot 1, and the key in the client's slot 1 must be selected as the transmit key.


The characters you type for the key contents appear only when you type them. After you click Apply or OK, you cannot view the key contents. Select Not set from the Key Size pull-down menu to clear a key.

Step 5 Select Optional or Full Encryption from the pull-down menu labeled Use of Data Encryption by Stations is.


Note You must set a WEP key before enabling WEP. The options in the Use of Data Encryption by Stations is pull-down menu do not appear until you set a key.


The three settings in the pull-down menu include:

No Encryption (default)—The access point communicates only with client devices that are not using WEP. Use this option to disable WEP.

Optional—Client devices can communicate with the access point either with or without WEP.


Note If you select Optional, Cisco Aironet client devices associating to the access point must be configured to allow association to mixed cells. See the Cisco Aironet Wireless LAN Adapters Software Configuration Guide for instructions on configuring Cisco Aironet client devices.


Full Encryption—Client devices must use WEP when communicating with the access point. Devices not using WEP are not allowed to communicate.


Note You must select Full Encryption to enable Message Integrity Check (MIC). See the "Enabling Message Integrity Check (MIC)" section for instructions on setting up MIC.


Step 6 Click OK. You return automatically to the Security Setup page.


Using SNMP to Set Up WEP

You can use SNMP to set the WEP level on the access point. Consult the "Using SNMP" section for details on using SNMP.

Access points use the following SNMP variables to set the WEP level:

dot11ExcludeUnencrypted.2

awcDot11AllowEncrypted.2

Table 8-2 lists the SNMP variable settings and the corresponding WEP levels.

Table 8-2 SNMP Variable Settings and Corresponding WEP Levels

SNMP Variable
WEP Full
WEP Off
WEP Optional

dot11ExcludeUnencrypted.2

true

false

false

awcDot11AllowEncrypted.2

true

false

true


Note Access points do not use the SNMP variable dot11PrivacyInvoked, so it is always set to disabled.


Enabling Additional WEP Security Features

You can enable three advanced security features to protect against sophisticated attacks on your wireless network's WEP keys. This section describes how to set up and enable these features:

Enabling Message Integrity Check (MIC)

Enabling Temporal Key Integrity Protocol (TKIP)

Enabling Broadcast WEP Key Rotation

Enabling Message Integrity Check (MIC)

MIC prevents attacks on encrypted packets called bit-flip attacks. During a bit-flip attack, an intruder intercepts an encrypted message, alters it slightly, and retransmits it, and the receiver accepts the retransmitted message as legitimate. The MIC, implemented on both the access point and all associated client devices, adds a few bytes to each packet to make the packets tamper-proof.


Note You must set up and enable WEP with full encryption before MIC takes effect.


Note To use MIC, the Use Aironet Extensions setting on the AP Radio Advanced page must be set to yes (the default setting).


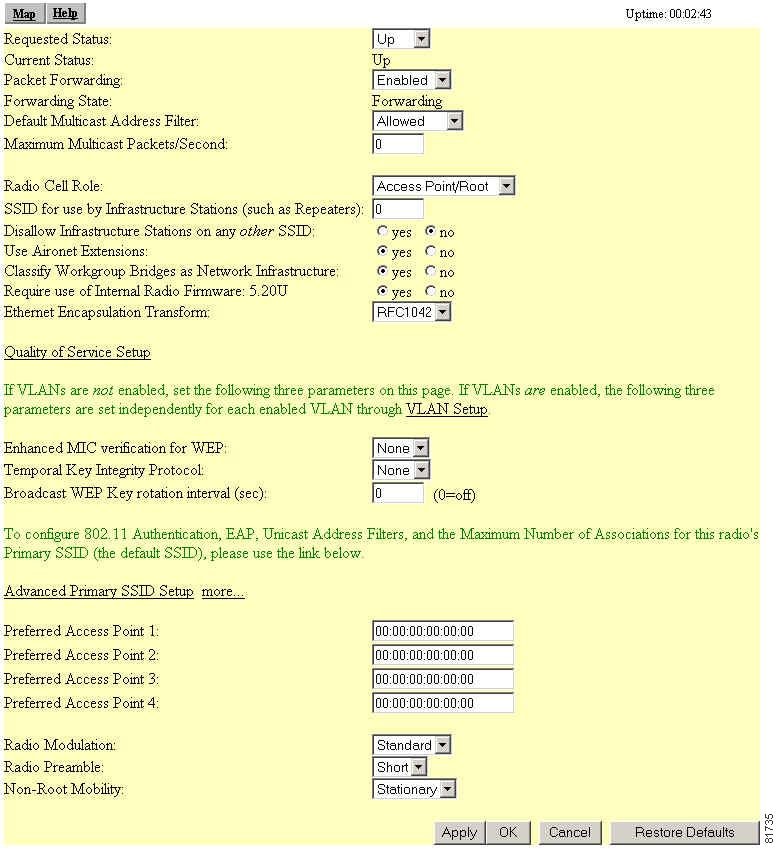
Use the AP Radio Advanced page to enable MIC. Figure 8-7 shows the AP Radio Advanced page.

Figure 8-7 AP Radio Advanced Page

Follow this link path to browse to the AP Radio Advanced page:

1. On the Summary Status page, click Setup.

2. On the Setup page, click Advanced in the AP Radio row under Network Ports.

Follow these steps to enable MIC:


Step 1 Follow the steps in the "Setting Up WEP" section to set up and enable WEP. You must set up and enable WEP with full encryption before MIC becomes active. If WEP is off or if you set it to optional, MIC is not enabled.


Note If you enable MIC but you use static WEP (you do not enable any type of EAP authentication), both the access point and any devices with which it communicates must use the same WEP key for transmitting data. For example, if the MIC-enabled access point uses the key in slot 1 as the transmit key, a client device associated to the access point must use the same key in its slot 1, and the key in the client's slot 1 must be selected as the transmit key.


Step 2 Browse to the AP Radio Advanced page.

Step 3 Select MMH from the Enhanced MIC verification for WEP pull-down menu.

Step 4 Make sure yes is selected for the Use Aironet Extensions setting. MIC does not work if Use Aironet Extensions is set to no.

Step 5 Click OK. MIC is enabled, and only client devices with MIC capability can communicate with the access point.


Enabling Temporal Key Integrity Protocol (TKIP)

Temporal Key Integrity Protocol (TKIP), also known as WEP key hashing, defends against an attack on WEP in which the intruder uses an unencrypted segment called the initialization vector (IV) in encrypted packets to calculate the WEP key. TKIP removes the predictability that an intruder relies on to determine the WEP key by exploiting IVs. TKIP protects both unicast and broadcast WEP keys.


Note When you enable TKIP, all WEP-enabled client devices associated to the access point must support WEP key hashing. WEP-enabled devices that do not support key hashing cannot communicate with the access point.


Note To use TKIP, the Use Aironet Extensions setting on the AP Radio Advanced page must be set to yes (the default setting).


Tip When you enable TKIP, you do not need to enable broadcast key rotation. Key hashing prevents intruders from calculating the static broadcast key, so you do not need to rotate the broadcast key.


Follow these steps to enable TKIP:


Step 1 Follow the steps in the "Setting Up WEP" section to set up and enable WEP. Select either optional or full encryption for the WEP level.

Step 2 Follow this link path to browse to the AP Radio Advanced page:

a. On the Summary Status page, click Setup.

b. On the Setup page, click Advanced in the AP Radio row under Network Ports.

Step 3 Select Cisco from the Temporal Key Integrity Protocol pull-down menu.

Step 4 Make sure yes is selected for the Use Aironet Extensions setting. Key hashing does not work if Use Aironet Extensions is set to no.

Step 5 Click OK. TKIP is enabled.


Enabling Broadcast WEP Key Rotation

EAP authentication provides dynamic unicast WEP keys for client devices but uses static multicast keys. With broadcast, or multicast, WEP key rotation enabled, the access point provides a dynamic broadcast WEP key and changes it at the interval you select. Broadcast key rotation is an excellent alternative to TKIP if your wireless LAN supports wireless client devices that are not Cisco devices or that cannot be upgraded to the latest firmware for Cisco client devices.


Note When you enable broadcast key rotation, only wireless client devices using LEAP, EAP-TLS, or PEAP authentication can use the access point. Client devices using static WEP (with open, shared key, or EAP-MD5 authentication) cannot use the access point when you enable broadcast key rotation.


Tip Broadcast key rotation and TKIP (WEP key hashing) provide similar protection. If you enable TKIP, you might not need to enable key rotation.


When broadcast key rotation is enabled, you can configure the WEP keys so that the unicast key is overwritten when the keys are rotated. If no keys are set when broadcast key rotation is enabled, key 0 becomes the transmit key by default. This means that key 0 and key 1 are rotated as the broadcast keys and key 3 is used as the unicast key. This configuration poses no problem.

A key can also be explicitly set as the transmit key, meaning that the transmit key and transmit key index +1 are rotated as the broadcast keys. Setting key 0 or 1 works satisfactorily. But if you set key 2 or 3 as the transmit key then the unicast key, which is generated following LEAP authentication and set as key 3, is overwritten as the broadcast keys are rotated.

Therefore, you should specify only key 0 or 1 as the transmit key.

Follow these steps to enable broadcast key rotation:


Step 1 Follow the steps in the "Setting Up WEP" section to set up and enable WEP.

Step 2 Follow this link path to browse to the AP Radio Advanced page:

a. On the Summary Status page, click Setup.

b. On the Setup page, click Advanced in the AP Radio row under Network Ports.

Step 3 On the AP Radio Advanced page, enter the rotation interval in seconds in the Broadcast WEP Key rotation interval entry field. If you enter 900, for example, the access point sends a new broadcast WEP key to all associated client devices every 15 minutes. To disable broadcast WEP key rotation, enter 0.


Note You must set the rotation interval on every access point using broadcast key rotation. You cannot enter the rotation interval on your RADIUS server.


Tip Use a short rotation interval if the traffic on your wireless network contains numerous broadcast or multicast packets.


Step 4 Click OK. Broadcast key rotation is enabled.


Setting Up Open or Shared Key Authentication

Cisco recommends Open authentication as preferable to Shared Key authentication. The challenge queries and responses used in Shared Key leave the access point particularly vulnerable to intruders.

Use the AP Radio Data Encryption page to select Open or Shared Key authentication. Figure 8-6 shows the AP Radio Data Encryption page.

Follow these steps to select Open or Shared Key authentication:


Step 1 Follow the instructions in the "Setting Up WEP" section to set up and enable WEP.

You must enable WEP to use shared key authentication, but you do not have to enable WEP to use open authentication. However, Cisco strongly recommends that you enable WEP on all wireless networks.

Step 2 Select Open (default) or Shared Key to set the authentications the access point recognizes. You can select all three authentication types.

Step 3 If you want to force all client devices to perform EAP authentication before joining the network, select the Require EAP check box under Open or Shared. Selecting the Require EAP check box also allows client devices using various types of EAP authentication, including EAP-TLS and EAP-MD5, to authenticate through the access point. To allow LEAP-enabled client devices to authenticate through the access point, you should also select Network-EAP. See the "Setting Up EAP Authentication" section for details on the Require EAP and Network-EAP settings.

Step 4 Click OK. You return automatically to the Security Setup page.


Setting Up EAP Authentication

During EAP authentication, the access point relays authentication messages between the RADIUS server on your network and the authenticating client device. This section provides instructions for:

Enabling EAP on the Access Point

Enabling EAP in Cisco Secure ACS

Setting Up a Repeater Access Point as a LEAP Client

Enabling EAP on the Access Point

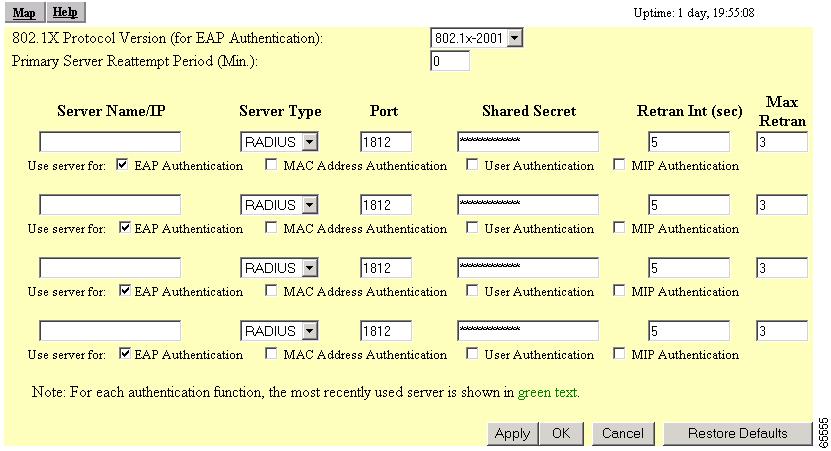
You use the Authenticator Configuration page and the AP Radio Data Encryption page to set up and enable EAP authentication. Figure 8-6 shows the AP Radio Data Encryption page. Figure 8-8 shows the Authenticator Configuration page.

Figure 8-8 Authenticator Configuration Page

Follow this link path to reach the Authenticator Configuration page:

1. On the Summary Status page, click Setup.

2. On the Setup page, click Security.

3. On the Security Setup page, click Authentication Server.

Follow these steps to enable EAP on the access point:


Step 1 Follow the link path to the Authenticator Configuration page.

You can configure up to four servers for authentication services, so you can set up backup authenticators. If you set up more than one server for the same service, the server first in the list is the primary server for that service, and the others are used in list order when the previous server times out.


Note You can use the same server for both EAP authentication and MAC-address authentication.


Step 2 Use the 802.1X Protocol Version (for EAP authentication) pull-down menu to select the draft of the 802.1X protocol the access point's radio will use. EAP operates only when the radio firmware on client devices complies with the same 802.1X Protocol draft as the management firmware on the access point. If the radio firmware on the client devices that will associate with the access point is 4.16, for example, you should select Draft 8. Menu options include:

Draft 7—No radio firmware versions compliant with Draft 7 have LEAP capability, so do not select this setting.

Draft 8—Select this option if LEAP-enabled client devices that associate with this access point use radio firmware versions 4.13, 4.16, or 4.23.

802.1x-2001 (formerly Draft 10)—Select this option if client devices that associate with this access point use Microsoft Windows XP authentication or if LEAP-enabled client devices that associate with this access point use radio firmware version 4.25 or later.

Table 8-3 lists the radio firmware versions for Cisco Aironet products and the drafts with which they comply.

Table 8-3 802.1X Protocol Drafts and Compliant Client Firmware 

Firmware Version
Draft 7
Draft 8
802.1x-2001

PC/PCI cards 4.13

x

PC/PCI cards 4.16

x

PC/PCI cards 4.23

x

PC/PCI cards 4.25 and later

x

WGB34x/352 8.58

x

WGB34x/352 8.61 or later

x

AP34x/35x 11.05 and earlier

x

AP34x/35x 11.06 and later1

x

x

BR352 11.06 and later1

x

x

1 The default draft setting in access point and bridge firmware version 11.06 and later is 802.1x-2001.


Note Draft standard 8 is the default setting in firmware version 11.05 and earlier, and it might remain in effect when you upgrade the firmware to version 11.06 or later. Check the setting on the Authenticator Configuration page in the management system to make sure the best draft standard for your network is selected.


Step 3 Enter the name or IP address of the RADIUS server in the Server Name/IP entry field.

Step 4 Select the server type (RADIUS or TCAS) in the Server Type field.

Step 5 Enter the port number your RADIUS server uses for authentication. The default setting, 1812, is the port setting for Cisco's RADIUS server, the Cisco Secure Access Control Server (ACS), and for many other RADIUS servers. Check your server's product documentation to find the correct port setting.

Step 6 Enter the shared secret used by your RADIUS server in the Shared Secret entry field. The shared secret on the access point must match the shared secret on the RADIUS server. The shared secret can contain up to 64 alphanumeric characters.

Step 7 Enter the number of seconds the access point should wait before authentication fails. If the server does not respond within this time, the access point tries to contact the next authentication server in the list if one is specified. Other backup servers are used in list order when the previous server times out.

Step 8 Enter the number of times the access point should attempt to contact the primary server before giving up in the Max Retran field.

Step 9 Select EAP Authentication under the server. The EAP Authentication check box designates the server as an authenticator for any EAP type, including LEAP, PEAP, EAP-TLS, EAP-SIM, and EAP-MD5.

Step 10 Click OK. You return automatically to the Security Setup page ().

Step 11 On the Security Setup page, click Radio Data Encryption (WEP) to browse to the AP Radio Data Encryption page (Figure 8-6).

Step 12 Select Network-EAP for the Authentication Type setting to allow EAP-enabled client devices to authenticate through the access point.

a. For LEAP authentication only, select Network-EAP and deselect the Open and Shared check boxes.

b. To allow LEAP and Static WEP authentication, select Network-EP and the Open and Shared check boxes.

c. For other authentication types (EAP-TLS, MD5) select Require EAP and the Open and Shared check box, as appropriate.


Note When you select Require EAP, you block client devices that are not using EAP from authenticating through the access point.


Table 8-4 lists the access point settings that provide authentication for various client devices.

Table 8-4 Access Point EAP Settings for Various Client Configurations

Access Point Configuration
Client Devices Allowed to Authenticate

Network-EAP authentication

Client devices with LEAP enabled

Repeater access points with LEAP enabled

Open authentication with Require EAP check box selected

Client devices with EAP enabled

Cisco Aironet devices with EAP-TLS or EAP-MD5 enabled through Windows XP

Note Selecting Require EAP on the access point blocks non-EAP client devices from using the access point.


Step 13 Check that a WEP key has been entered in key slot 1. If a WEP key has been set up in slot 1, skip to Step 17. If no WEP key has been set up, proceed to Step 14.


Note You can use EAP without enabling WEP, but packets sent between the access point and the client device will not be encrypted. To maintain secure communications, use WEP at all times.


Step 14 Enter a WEP key in slot 1 of the Encryption Key fields. The access point uses this key for multicast data signals (signals sent from the access point to several client devices at once). This key does not need to be set on client devices.

Step 15 Select 128-bit encryption from the Key Size pull-down menu.

Step 16 If the key in slot 1 is the only WEP key set up, select it as the transmit key.

Step 17 Click OK. You return automatically to the Security Setup page.


Enabling EAP in Cisco Secure ACS

Cisco Secure Access Control Server for Windows NT/2000 Servers (Cisco Secure ACS) is network security software that helps authenticate users by controlling access to a network access server (NAS) device, such as an access server, PIX Firewall, router, or wireless access point or bridge.

Cisco Secure ACS operates as a Windows NT or Windows 2000 service and controls the authentication, authorization, and accounting (AAA) of users accessing networks. Cisco Secure ACS operates with Windows NT 4.0 Server and Windows 2000 Server.


Note You must use ACS version 2.6 or later to set up the access point in ACS.


Follow these steps to include the access point as a Network Access Server (NAS) in Cisco Secure ACS:


Step 1 On the ACS main menu, click Network Configuration.

Step 2 Click Add New Access Server.

Step 3 In the Network Access Server Hostname entry field, type the name you want to assign to the access point as an access server.


Note This field does not appear if you are configuring an existing NAS.


Step 4 In the Network Access Server IP address box, type the access point's IP address.

Step 5 In the Key box, type the shared secret that the TACACS+ or RADIUS NAS and Cisco Secure ACS use to encrypt the data. For correct operation, the identical key (case sensitive) must be configured on the access point's Authenticator Configuration page and in Cisco Secure ACS.

Step 6 From the Authenticate Using drop-down menu, select RADIUS (Cisco Aironet).

Step 7 To save your changes and apply them immediately, click the Submit + Restart button.


Tip To save your changes and apply them later, click Submit. When you are ready to implement the changes, select System Configuration > Service Control and click Restart.


Note Restarting the service clears the Logged-in User Report, refreshes the Max Sessions counter, and temporarily interrupts all Cisco Secure ACS services.


Setting a Session-Based WEP Key Timeout

You can set a timeout value for the session-based WEP key. When the timeout value elapses, the server issues a new dynamic WEP key for authenticated client devices.


Note If you enable TKIP on the access point, you do not need to set up a session-based WEP key timeout. You can use both TKIP and a session key timeout, but these features provide redundant protection.


You should consider several factors when determining the best session key timeout value for your wireless network. Consult Product Bulletin 1515: Cisco Wireless LAN Security Bulletin for guidelines on selecting timeout values. Use this URL to browse to Product Bulletin 1515:

http://www.cisco.com/warp/public/cc/pd/witc/ao350ap/prodlit/1515_pp.htm

Follow these steps to set a timeout value for session-based WEP keys:


Step 1 On the ACS main menu, click Group Setup.

Step 2 In the Group drop-down menu, select the group for which you want to modify the WEP key/session timeout. The Default group is usually the group you need to modify.

Step 3 Click Edit Settings.

Step 4 Scroll down to the IETF RADIUS Attributes settings.

Step 5 Select the check box for [027] Session-Timeout and enter the number of seconds for your timeout value in the [027] Session-Timeout entry field.

Step 6 Click Submit + Restart. The timeout value is enabled.


Setting Up a Repeater Access Point as a LEAP Client

If you configure your access point as a repeater (an access point not connected to the wired LAN), you can set up the repeater access point to authenticate to your network like other wireless client devices. After you provide a network username and password for the repeater access point, it authenticates to your network using LEAP, Cisco's wireless authentication method, and receives and uses dynamic WEP keys.

See the "Setting Up a Repeater Access Point" section for instructions on setting up a repeater access point.

Follow these steps to enable LEAP authentication on a repeater access point:


Step 1 Set up a username and password on your network just as you would for a new user. The repeater access point will use this username and password to authenticate.

Step 2 Follow this link path to browse to the AP Radio Identification page:

a. On the Summary Status page, click Setup.

b. On the Setup page, click Identification in the AP Radio row under Network Ports.

Figure 8-9 shows the AP Radio Identification page.

Figure 8-9 AP Radio Identification Page

Step 3 Enter the network username you set up for the access point in Step 1 in the LEAP User Name entry field.

Step 4 Enter the network password you set up for the access point in Step 1 in the LEAP Password entry field.

Step 5 Click OK.

Step 6 Follow the steps in the "Enabling EAP on the Access Point" section to enable Network-EAP on the repeater access point.

The next time the repeater reboots, it performs LEAP authentication and associates to the root access point.


Note If the repeater access point fails to authenticate because the root access point or the RADIUS server is not set up correctly, you must reboot the repeater access point after correcting the problem. The repeater access point does not attempt to reauthenticate until it reboots.


Setting Up MAC-Based Authentication

MAC-based authentication allows only client devices with specified MAC addresses to associate and pass data through the access point. Client devices with MAC addresses not in a list of allowed MAC addresses are not allowed to associate with the access point.You can create a list of allowed MAC addresses in the access point management system or on a server used for MAC-based authentication.

This section provides instructions for:

Enabling MAC-Based Authentication on the Access Point

Authenticating Client Devices Using MAC Addresses or EAP

Enabling MAC-Based Authentication in Cisco Secure ACS

Enabling MAC-Based Authentication on the Access Point

Follow these steps to set up and enable MAC-based authentication on the access point:


Step 1 Follow this link path to reach the Address Filters page:

a. On the Summary Status page, click Setup.

b. On the Setup page, click Address Filters under Associations.

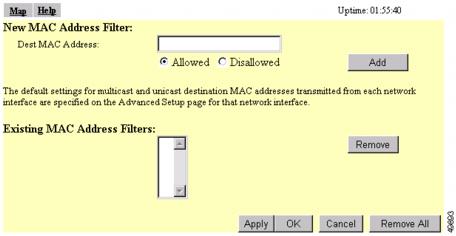
Figure 8-10 shows the Address Filters page.

Figure 8-10 Address Filters Page


Note Step 2 and Step 3 describe entering MAC addresses in the access point management system. If you will enter MAC addresses only in a list used by the authentication server, skip to Step 4.


Step 2 Type a MAC address in the Dest MAC Address field. You can type the address with colons separating the character pairs (00:40:96:12:34:56, for example) or without any intervening characters (004096123456, for example).

Make sure the Allowed option is selected under the Dest MAC Address field.

Step 3 Click Add. The MAC address appears in the Existing MAC Address Filters list. The MAC address remains in the management system until you remove it. To remove the MAC address from the list, select it and click Remove.


Note Be sure to enter your own MAC address in the list of allowed addresses.


Step 4 If you plan to create a MAC address list that will be checked by the authentication server, select Yes for the option called Lookup MAC Address on Authentication Server if not in Existing Filter List. With this option enabled, the access point checks the authentication server's MAC address list when a client device attempts to authenticate.

Step 5 Click Apply to save the list of MAC addresses in the access point management system.

Step 6 Click the Authentication Server link to go to the Authenticator Configuration page. Figure 8-11 shows the Authenticator Configuration page.

Figure 8-11 Authenticator Configuration Page

You can configure up to four servers for authentication services, so you can set up backup authenticators. If you set up more than one server for the same service, the server first in the list is the primary server for that service, and the others are used in list order when the previous server times out.

Step 7 Enter the name or IP address of the authentication server in the Server Name/IP entry field.

Step 8 Enter the port number the server uses for authentication. The default setting, 1812, is the port setting for Cisco's RADIUS server, the Cisco Secure Access Control Server (ACS), and for many other RADIUS servers. Check your server's product documentation to find the correct port setting.

Step 9 Enter the shared secret used by the server in the Shared Secret entry field. The shared secret on the bridge must match the shared secret on the server.

Step 10 Enter the number of seconds the access point should try contacting the primary authentication server in the Timeout entry field. If the primary authentication server does not respond within this time, the access point tries to contact the backup authentication server if one is specified.

Step 11 Enter the number of times the access point should try contacting the server before giving up.

Step 12 Select MAC Address Authentication under the server. If you set up a backup authentication server, select MAC Address Authentication under the backup server, also.

Step 13 Click OK. You return automatically to the Setup page.

Step 14 Create a list of allowed MAC addresses for your authentication server. Enter the MAC addresses of all allowed clients as users in the server's database. The "Enabling MAC-Based Authentication in Cisco Secure ACS" section describes how to create a list of MAC addresses for your RADIUS server.


Note Be sure to include your own MAC address in the authentication server's list to avoid loosing your connection to the access point.


Step 15 Click SSIDs (Int or Mod) in the Associations section of the Setup page. The Service Set Summary Status page appearss. Figure 8-12 shows the Service Set Summary Status page.

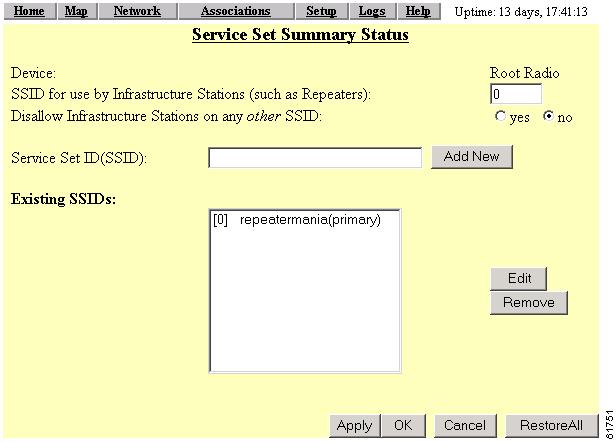
Figure 8-12 Service Set Summary Status Page

Step 16 Highlight the SSID to which the filter is associated and click Edit. The AP Radio Internal SSID page appears.

Step 17 Select Disallowed from the pull-down menu for Default Unicast Address Filter for each authentication type requiring MAC-based authentication.

For example, if the access point is configured for both open and Network-EAP authentication, you could set Default Unicast Address Filter under Open to Disallowed but leave Default Unicast Address Filter under Network-EAP set to Allowed. This configuration forces client devices using open authentication to authenticate using MAC addresses but does not force LEAP-enabled client devices to authenticate using MAC addresses. To force all client devices to authenticate using MAC addresses, select Disallowed for all the enabled authentication types.

When you set Default Unicast Address Filter to disallowed, the access point discards all unicast traffic except packets sent to the MAC addresses listed as allowed on the authentication server or on the access point's Address Filters page.


Note Client devices associated to the access point are not immediately affected when you set Default Unicast Address Filter to disallowed.


Step 18 Click OK. You return automatically to the Setup page. Client devices that associate with the access point will not be allowed to authenticate unless their MAC addresses are included in the list of allowed addresses.


Authenticating Client Devices Using MAC Addresses or EAP

You can set up the access point to authenticate client devices using a combination of MAC-based and EAP authentication. When you enable this feature, client devices that associate to the access point using 802.11 open authentication first attempt MAC authentication. If MAC authentication succeeds, the client device joins the network; if the client is also using EAP authentication, it attempts to authenticate using EAP. If MAC authentication fails, the access point waits for the client device to attempt EAP authentication.

Follow these steps to combine MAC-based and EAP authentication for client devices using 802.11 open authentication:


Step 1 Follow the steps in the "Setting Up EAP Authentication" section to set up EAP. You must select Require EAP under Open authentication on the AP Radio Data Encryption page to force client devices to perform EAP authentication if they fail MAC authentication. If you do not select Require EAP, client devices that fail MAC authentication might be able to join the network without performing EAP authentication.

Step 2 Follow the steps in the "Setting Up MAC-Based Authentication" section to set up MAC-based authentication.

Step 3 Follow this link path to reach the Address Filters page:

a. On the Summary Status page, click Setup.

b. On the Setup page, click Address Filters under Associations.

Step 4 Select yes for the option called Is MAC Authentication alone sufficient for a client to be fully authenticated?

Step 5 Click Apply. When you enable this feature, the access point follows these steps to authenticate all clients that associate using 802.11 open authentication:

a. When a client device sends an authentication request to the access point, the access point sends a MAC authentication request in the RADIUS Access Request Packet to the RADIUS server using the client's user ID and password as the MAC address of the client.

b. If the authentication succeeds, the client joins the network. If the client is also using EAP authentication, it attempts to authenticate using EAP.

c. If MAC authentication fails for the client, the access point allows the client to attempt to authenticate using EAP authentication. The client cannot join the network until EAP authentication succeeds.


Enabling MAC-Based Authentication in Cisco Secure ACS

Cisco Secure Access Control Server for Windows NT/2000 Servers (Cisco Secure ACS) can authenticate MAC addresses sent from the access point. The access point works with ACS to authenticate MAC addresses using Secure Password Authentication Protocol (Secure PAP). You enter a list of approved MAC addresses into the ACS as users, using the client devices' MAC addresses as both the username and password. The authentication server's list of allowed MAC addresses can reside on the authentication server or at any network location to which the server has access.

Follow these steps to create a list of allowed MAC addresses in Cisco Secure ACS:


Step 1 On the ACS main menu, click User Setup.

Step 2 When the User text box appears, enter the MAC address you want to add to the list.


Note The access point sends MAC address queries to the server using lower-case characters. If your server allows case-sensitive usernames and passwords, you must enter MAC addresses in the server's database using lower-case characters.


Step 3 When the User Setup screen appears, enter the MAC address in the Cisco Secure PAP Password and Confirm Password entry fields.

Step 4 Enter the MAC address in the CHAP/MS-CHAP/ARAP Password and Confirm Password entry fields.

Step 5 Select the Separate (CHAP/MS-CHAP/ARAP) check box.

Step 6 Click Submit. Repeat these steps for each MAC address you want to add to the list of allowed MAC addresses.

MAC addresses that you enter in the authentication server's list appear in the access point's address filter list when the client device is associated to the access point. MAC addresses in the server's list disappear from the access point's list when the client devices disassociate or when the access point is reset.


Note Be sure to include your own MAC address in the authentication server's list to avoid loosing your connection to the access point.


Summary of Settings for Authentication Types

Table 8-5 lists the access point settings required to enable each authentication type and combinations of authentication types.

Table 8-5 Settings for Authentication Types 

Authentication Types
Required Settings

LEAP

On the Authenticator Configuration page (shown in Figure 8-13):

Select an 802.1X protocol draft that matches the protocol draft used by client devices that associate with the access point.

Enter the name or IP address, type, port, shared secret, and timeout value for your RADIUS server.

Select the EAP check box under the server.

On the AP Radio Data Encryption page (shown in Figure 8-6):

Select the Network-EAP check box.

Enter a WEP key in key slot 1 and select 128-bit from the key size menu.

LEAP and static WEP under 802.11 Open

Enter all the settings for LEAP authentication.

On the AP Radio Data Encryption page (shown in Figure 8-6):

Select the Open check box.

EAP-TLS and EAP-MD5

On the Authenticator Configuration page (shown in Figure 8-13):

Select an 802.1X protocol draft that matches the protocol draft used by client devices that associate with the access point.

Enter the name or IP address, type, port, shared secret, and timeout value for your RADIUS server.

Select the EAP check box under the server.

On the AP Radio Data Encryption page (shown in Figure 8-6):

Select the Open and Network-EAP check boxes.

Select the Require EAP check box under Open.

Note Selecting Require EAP blocks non-EAP client devices from using the access point.

Enter a WEP key in key slot 1 and select 128-bit from the key size pull-down menu.

EAP-TLS, EAP-MD5, and static WEP under 802.11 Open

The access point does not support this combination of authentication types. When you select Require EAP on the Authenticator Configuration page to authenticate clients using EAP-TLS and EAP-MD5, non-EAP client devices are blocked from using the access point. However, the access point can serve client devices using 802.11 open authentication if the access point is set up for MAC-based authentication and EAP authentication. See the "Authenticating Client Devices Using MAC Addresses or EAP" section for instructions on setting up this combination of authentications.

MAC-based

On the Address Filters page (shown in Figure 8-10):

Select yes for the "Look up MAC address on authentication server if not in existing filter list" setting.

On the Authenticator Configuration page (shown in Figure 8-13):

Select an 802.1X protocol draft that matches the protocol draft used by client devices that associate with the access point.

Enter the name or IP address, type, port, shared secret, and timeout value for your RADIUS server.

Select the MAC Address Authentication check box under the server.

Note You can use the same server for both EAP authentication and MAC-based authentication.

On the AP Radio Advanced page (shown in Figure 8-12):

Select Disallowed from the pull-down menu for Default Unicast Address Filter for each authentication type requiring MAC-based authentication.

MAC-based and EAP-TLS and EAP-MD5

Enter the settings for the EAP authentication types you need to support; select Require EAP on the AP Radio Data Encryption page under Open.

Enter the settings for MAC-based authentication.

On the Address Filters page (shown in Figure 8-10):

Select yes for the setting called "Is MAC Authentication alone sufficient for a client to be fully authenticated?"

MAC-based and LEAP

Enter the settings for LEAP.

Enter the settings for MAC-based authentication.


RADIUS Attributes Sent by the Access Point

Tables 8-6 through 8-10 identify the attributes sent by an access point to a wireless client in access-request, access-accept, and accounting-request packets.

Table 8-6 Attributes Sent in Access-Request Packets

Attribute ID
Description

1

User-Name

4

NAS-IP-Address

5

NAS-Port

6

Service-Type

12

Framed-MTU

30

Called-Station-ID (MAC address)

31

Calling-Station-ID (MAC address)

32

NAS-Identifier

61

NAS-Port-Type

79

EAP-Message1

80

Message-Authenticator1

VSA (attribute 26)

SSID

1 RFC2869


Table 8-7 Attributes Honored in Access-Accept Packets

Attribute ID
Description

27

Session-Timeout

64

Tunnel-Type1

65

Tunnel-Medium-Type1

79

EAP-Message (for 802.1x authentication)

80

Message-Authenticator (for 802.1x authentication)

81

Tunnel-Private-Group-ID1

VSA (attribute 26)

LEAP session-key

VSA (attribute 26)

SSID

1 RFC2868


Table 8-8 Attributes Sent in Accounting-Request (start) Packets

Attribute ID
Description

1

User-Name

4

NAS-IP-Address

5

NAS-Port

31

Calling-Station-ID (MAC address)

32

NAS-Identifier

41

Acct-Delay-Time

44

Acct-Session-Id

45

Acct-Authentic

VSA (attribute 26)

SSID

VSA (attribute 26)

nas-location

VSA (attribute 26)

vlan-id

VSA (attribute 26)

auth-algo-type


Table 8-9 Attributes Sent in Accounting-Request (update) Packets

Attribute ID
Description

1

User-Name

4

NAS-IP-Address

5

NAS-Port

41

Acct-Delay-Time

42

Acct-Input-Octets

43

Acct-Output-Octets

44

Acct-Session-Id

45

Acct-Authentic

46

Acct-Session-Time

47

Acct-Input-Packets

48

Acct-Output-Packets


Table 8-10 Attributes Sent in Accounting-Request (stop) Packets

Attribute ID
Description

1

User-Name

4

NAS-IP-Address

5

NAS-Port

41

Acct-Delay-Time

42

Acct-Input-Octets

43

Acct-Output-Octets

44

Acct-Session-Id

45

Acct-Authentic

46

Acct-Session-Time

47

Acct-Input-Packets

48

Acct-Output-Packets

49

Acct-Terminate-Cause


Setting Up Backup Authentication Servers

You can configure up to four servers for authentication services on the Authenticator Configuration page, so you can set up backup authenticators. If you set up more than one server for the same service, the server first in the list is the primary server for that service, and the other servers are used in list order when the previous server times out. If a backup server responds after the primary server fails, the access point continues to use the backup server for new transactions.

Follow these steps to set up a backup authentication server:


Step 1 Complete the steps in the "Setting Up EAP Authentication" section or the "Setting Up MAC-Based Authentication" section to set up your primary authentication server.

Step 2 On the Authenticator Configuration page, enter information about your backup server in one of the entry field groups under the completed entry fields for your primary server:

a. Enter the name or IP address of the backup server in the Server Name/IP entry field.

b. Enter the port number the server uses for authentication. The default setting, 1812, is the port setting for Cisco's RADIUS server, the Cisco Secure Access Control Server (ACS), and for many other RADIUS servers. Check your server's product documentation to find the correct port setting.

c. Enter the shared secret used by the server in the Shared Secret entry field. The shared secret on the bridge must match the shared secret on the server.

d. Enter the number of seconds the access point should wait before authentication fails.

e. Enter the number of times the access point should attempt to contact the server before giving up.

Step 3 Select the same authentication methods as those selected on the primary server.

Step 4 Click OK. You return automatically to the Setup page. Figure 8-13 shows a primary authentication server and a backup server configured on the Authenticator Configuration page.

Figure 8-13 Authenticator Configuration Page with Primary and Backup Servers


Setting Up Administrator Authorization

Administrator authorization protects the access point management system from unauthorized access. Use the access point's user management pages to define a list of users who are authorized to view and change the access point management system. Use the Security Setup page to reach the user management pages. Figure 8-14 shows the Security Setup page.


Note Creating a list of users authorized to view and change the access point management system does not affect the ability of client devices to associate with the access point.


Figure 8-14 Security Setup Page

Follow this link path to reach the Security Setup page:

1. On the Summary Status page, click Setup.

2. On the Setup page, click Security.

Creating a List of Authorized Management System Users

Follow these steps to create a list of users authorized to view and change the access point management system:


Step 1 Follow the link path to the Security Setup page.

Step 2 On the Security Setup page, click User Information. Figure 8-15 shows the User Information page.

Figure 8-15 User Information Page

Step 3 Click Add New User. The User Management window appears. Figure 8-16 shows the User Management window.

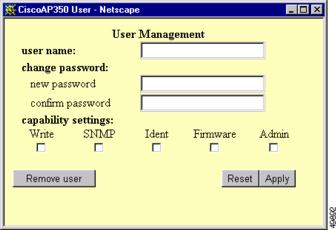
Figure 8-16 User Management Window

Step 4 Enter a username and password for the new user.

Step 5 Select the capabilities you want to assign to the new user. Capabilities include:

Write—The user can change system settings. When you assign Write capability to a user, the user also automatically receives Admin capability.

SNMP—Designates the username as an SNMP community name. SNMP management stations can use this SNMP community name to perform SNMP operations. The User Manager does not have to be enabled for SNMP communities to operate correctly.


Note Selecting the SNMP check box does not grant SNMP write capability to the user; it only designates the username as an SNMP community name. SNMP operations performed under the username are restricted according to the username's other assigned capabilities.


Ident—The user can change the access point's identity settings (IP address and SSID). When you assign Ident capability to a user, the user also automatically receives Write and Admin capabilities.

Firmware—The user can update the access point's firmware. When you assign Firmware capability to a user, the user also automatically receives Write and Admin capabilities.

Admin—The user can view most system screens. To allow the user to view all system screens and make changes to the system, select Write capability.

Step 6 Click Apply. The User Management window disappears, and the new user appears in the user list on the User Information page.

Step 7 Click the browser's Back button to return to the Security Setup page. On the Security Setup page, click User Manager. The User Manager Setup page appears. Figure 8-17 shows the User Manager Setup page.

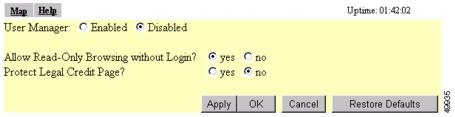
Figure 8-17 User Manager Setup Page

Step 8 Select User Manager: Enabled to restrict use of the access point management system to users in the user list.


Note You must define a full administrator user—a user with write, identity, and firmware capabilities—before you can enable the user manager.


Use the other settings on the User Manager Setup page to add more restrictions for the management system:

Allow Read-Only Browsing without Login—Select yes to allow any user to view the access point's basic screens. Select no to restrict access to all of the access point's screens to only the users in the user list.

Protect Legal Credit Page—Select yes to restrict access to the Legal Credits page to users in the user list. Select no to allow any user to view the Legal Credits page.

Step 9 Click OK. You return automatically to the Security Setup page.


Setting Up Centralized Administrator Authentication

The Centralized Administrator Authentication feature on the access point allows the use of an AAA server (RADIUS or TACACS) services to authenticate users when the User Manager function is enabled on the access point. The AAA server verifies the user login and passes back the appropriate privileges for the user (or administrator) when a login attempt is successful.


Note You must have at least one user configured on the access point before you can enable the user manager feature.


Follow these steps to set up Centralized Administrator Authentication on the access point.


Step 1 From Services section of the Setup page, click Security. The Security Setup page appears.

Step 2 Click User Information. The User Information page appears.

Step 3 Click Add New User. The User Management window appears.

Step 4 Add a new user with full administrative capabilities (all capability settings checked).

Step 5 Click Apply. You are returned to the User Information page.

Step 6 Click Back. You are returned to the Security Setup page.

Step 7 Click User Manager. The User Manager Setup page appears.

Step 8 Enable User Manager and click OK. You are returned to the Security Setup page.

Step 9 Click Authentication Server. The Authenticator Configuration page appears. See Figure 8-18.

Figure 8-18 Authenticator Configuration page

Step 10 Configure the server as follows:

a. Assign an IP address or name in the Server Name/IP field.

b. Select the server type your network is using, either RADIUS or TACACS.

c. Assign a port number for the server.


Note The default port settings are 1812 for RADIUS servers and 49 for TACACS servers. Check your server's product documentation for the correct port setting.


d. Enter the shared secret used by your RADIUS or TACACS server in the Shared Secret entry field. The shared secret can contain up to 64 alphanumeric characters.

e. Enter the number of seconds the access point should wait before it attempts to contact the server after a failed attempt.

f. Enter the number of times the access point should attempt to contact the server before authentication fails in the Max Retran field.

g. Select User Authentication in the Use server for line.

h. Click Apply or OK to save your settings.

Step 11 Configure other servers as required.


System Flow Notes

The following notes help to identify and describe the flow between the access point and its authentication server.

The authentication server is initialized to listen for socket requests on the pre-determined UDP or TCP ports specified on the Authenticator Configuration page (UDP 1812 for RADIUS servers or TCP 49 for TACACS+ servers).

The authentication server must be pre-configured with valid user names and passwords along and the shared secret key the server uses for secure authentication between it and the access point.

No remote server authentication is possible with a new access point unless it has been configured by the user.

The access point requires the following parameters to access the remote authentication servers, which were described in the procedure above:

Remote server authentication—accomplished by configuring or not configuring the authentication server to send requests

IP address of the authentication server(s)

Secret key to be shared with the authentication server(s)

Selection of RADIUS or TACACS+ server indication

Default UDP or TCP port ID used for authentication

Timeout value while waiting for a server response

The administrator attempts to log in to the access point using any HTML capable browser on a wireless or wired network. The access point receives the authentication request and checks the local database of users to verify that the request is accompanied by a valid user name and password.

If the user is not found on the local list, or if local authentication fails (User found, but incorrect password), the access point determines if a remote authentication server has been configured to handle authentication requests. If it has, the access point sends an authentication request to the the first remote authentication server and waits for the server to reply or timeout. This asynchronous request is sent to either a TACACS+ or RADIUS server using a client interface and protocol appropriate for the target server. The password for the administrator requesting authentication is encrypted using an MD5 hash function and sent to the server. The password is never sent to the server in clear text.

If the server does not respond, a timeout occurs, prompting the access point to check for the an additional configured authentication server. If it finds a server, the access point sends an authentication request to that server. Additional servers are attempted until one of the following events occur:

A configured server responds accepting or rejecting the request.

A final timeout occurs on the last configured server.

When the authentication server responds to a successful request, the authorization parameters (described in the Authorization Parameters section below) are extracted and processed to a local database cache entry. This entry is kept in the cache for five minutes and is used to authenticate the user for subsequent authentication requests.

The cache speeds up the administrative configuration process by not forcing the subsequent requests to require a transaction with an authentication server within the five minute time period. The following applies:

If the user is accessed using an authentication request within the 5 minute period, the cache timer resets to 5 minutes.

If the user entry is not accessed within 5 minutes, the next access causes a new server request to be sent to the authentication server so the user and new privileges are cached again.

If the response is a rejection, a reject response is issued just as if the local database entry was not found. the administrator is also rejected in the case where they exist on the the authentication server but do not have administrative capabilities configured.

Authorization Parameters

The following authentication server attribute value (AV) pair is returned to the access point for an administrator login request:

This is RADIUS attribute #26, Cisco Vendor ID #9, type #1 --- string.

Cisco:Avpair = "aironet:admin-capability=write+snmp+ident+firmware+admin"

Any combination of capabilities are returned with this attribute, for example:

Cisco:Avpair = "aironet:admin-capability=ident+admin"

Cisco:Avpair = "aironet:admin-capability=admin"

The following is an example of a Livingston RADIUS server users file entry:

User password = "aironet"

Service-Type = Outbound

cisco-avpair = "aironet:admin-capability-ident+admin"

The following is an example of a TACACS+ server users file entry:

Service - Aironet

Protocol - Shell

cisco-avpair = "aironet:admin-capability=ident+admin"

See the "Creating a List of Authorized Management System Users" section or click Help on the Authenticator Configuration page for an explanation of the attributes returned by the server.