-
Cisco Aironet Access Point Software Configuration Guide for VxWorks
-
Preface
-
Overview
-
Using the Management Interfaces
-
Configuring the Radio and Basic Settings
-
Configuring VLANs
-
Configuring Filters and Quality of Service
-
Configuring Proxy Mobile IP
-
Configuring Other Settings
-
Security Setup
-
Network Management
-
Managing Firmware and Configurations
-
Management System Setup
-
Special Configurations
-
Diagnostics and Troubleshooting
-
Appendix A - Protocol Filter Lists
-
Appendix B - Channels, Power Levels, and Antenna Gains
-
Appendix C - Event Log Messages
-
Index
-
 Feedback
Table Of Contents
Using the Management Interfaces
Using the Web-Browser Interface
Using the Web-Browser Interface for the First Time
Using the Management Pages in the Web-Browser Interface
Navigating Using the Map Windows
Using the Command-Line Interface
Preparing to Use a Terminal Emulator
Setting Up the Terminal Emulator
Changing Settings with the CLI
Applying Changes to the Configuration
Using the Management Interfaces
This chapter describes the interfaces you can use to configure the access point. You can use a web-browser interface, a command-line interface through a terminal emulator or a Telnet session, or a Simple Network Management Protocol (SNMP) application. The access point's management system web pages are organized the same way for the web browser and command-line interfaces. The examples in this manual show the web-browser interface.
This chapter contains the following sections:
•
Using the Web-Browser Interface
•
Using the Web-Browser Interface
The web-browser interface contains management pages that you use to change access point settings, upgrade and distribute firmware, and monitor and configure other wireless devices on the network.
Note
Using the Web-Browser Interface for the First Time
Use the access point's IP address to browse to the management system. See the Quick Start Guide: Cisco Aironet 350 Series Access Points for instructions on assigning an IP address to the access point.
Follow these steps to begin using the web-browser interface:
Step 1
Step 2
If the access point has not been configured, the Express Setup page appears. If the access point has been configured, the Summary Status page appears.
Using the Management Pages in the Web-Browser Interface
The system management pages use consistent techniques to present and save configuration information. Navigation buttons appear at the top of the page, and configuration action buttons appear at the bottom. You use the navigation buttons to display other management pages, and you use the configuration action buttons to save or cancel changes to the configuration.
Note
Table 2-1 lists the page links and buttons that appear on most management pages.
Navigating Using the Map Windows
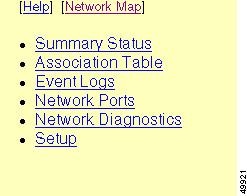
The Map window appears when you click Map at the top of any management page. You can use the Map window to jump quickly to any system management page, or to a map of your entire wireless network.
Note
To display the sub-pages for each main page, click the bullet next to a main page link (Microsoft Internet Explorer), or click expand next to a main page link (Netscape Communicator). In Figure 2-1, the sub-pages for the Network Ports page are expanded.
Figure 2-1 Map Window with Network Ports Pages Expanded
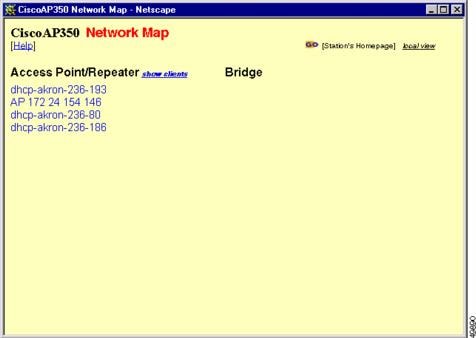
The Network Map window appears when you click Network Map in the Map window. You use the Network Map window to open a new browser window displaying information for any device on your wireless network. Figure 2-2 shows the Network Map window.
Figure 2-2 The Network Map Window
Click the name of a wireless device to open a new browser window displaying a Station page listing the access point's local information for that device. Click Go beside the device name to open a new browser window displaying that device's home page, if available. Some devices, such as PC Card clients, might not have home pages.
Click show clients to display all the wireless client devices on your network. The client names appear under the access point or bridge with which they are associated. If clients are displayed, click hide clients to display only non-client devices.
Using the Command-Line Interface
You can use a command-line interface (CLI) to configure your access point through a terminal emulation program or a Telnet session instead of through your browser. This section provides instructions for Microsoft's HyperTerminal and for Telnet; other programs are similar.
Preparing to Use a Terminal Emulator
To use a terminal emulator to open the CLI, you need to:
1.
2.
Use the Console/Telnet Setup page to adjust the console and Telnet connection settings. See the "Console and Telnet Setup" section for details on the Console/Telnet Setup page.
Connecting the Serial Cable
Connect a nine-pin, male-to-female, straight-through serial cable to the COM port on a computer and to the RS-232 serial port on the access point. Figure 2-3 shows the serial port on an access point with a plastic case, and Figure 2-4 shows the location of the serial port on an access point with a metal case.
Figure 2-3 Connecting the Serial Cable on Access Point with Plastic Case
Figure 2-4 Connecting the Serial Cable on Access Point with Metal Case
Setting Up the Terminal Emulator
Follow these steps to set up the terminal emulator:
Step 1
Step 2
•
•
•
•
•
Step 3
Changing Settings with the CLI
The CLI pages use consistent techniques to present and save configuration information. Table 2-2 lists the functions that appear on most CLI pages.
You can also enter diagnostic commands in the CLI. See the "Using Command-Line Diagnostics" section for information about the CLI diagnostic commands.
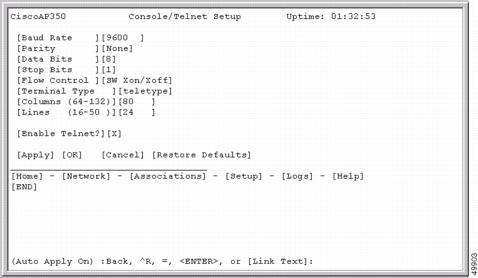
Figure 2-5 shows a CLI page example.
Figure 2-5 CLI Page Example
Selecting Pages and Settings
When you type names and settings that appear in brackets you jump to that page or setting. HyperTerminal jumps to the page or setting as soon as it recognizes a unique name, so you only need to type the first few characters in the page or setting name. To jump from the home page to the Setup page, for example, you only need to type se.
Applying Changes to the Configuration
The CLI's auto-apply feature is on by default, so changes you make to any page are applied automatically when you move to another management page. To apply changes and stay on the current page, type apply and press Enter.
Using a Telnet Session
Follow these steps to browse to the CLI pages with Telnet:
Step 1
If Telnet is not listed in your Accessories menu, select Start > Run, type Telnet in the entry field, and press Enter.
Step 2
Note
Step 3
Note
Using SNMP
You use an SNMP management application to configure the access point with SNMP. Follow these steps to configure the access point with SNMP:
Step 1
Step 2
Step 3
Step 4
a.
b.
Use the SNMP Setup page to enter detailed SNMP settings, such as the SNMP trap destination. See the "SNMP Setup" section for details on the SNMP Setup page.
Supported MIBs
The Cisco Software Center contains a list of supported MIBs for the Cisco Aironet 350 Series.
Follow these steps to download these MIBs:
Step 1
Step 2
Step 3