-
Cisco MDS 9000 Family Configuration Guide, Release 2.x
-
New and Changed Information
-
Index
-
Preface
- Part 1 - Getting Started
- Part 2 - Cisco MDS SAN-OS Installation and Switch Management
- Part 3 - Switch Configuration
-
Part 4 - Fabric Configuration
-
Configuring and Managing VSANs
-
Creating Dynamic VSANs
-
Configuring Inter-VSAN Routing
-
Configuring Zones
-
Distributing Device Alias Services
-
Configuring Fibre Channel Routing Services and Protocols
-
Managing FLOGI, Name Server, FDMI, and RSCN Databases
-
Discovering SCSI Targets
-
Configuring FICON
-
Advanced Features and Concepts
-
- Part 5 - Security
- Part 6 - IP Services
- Part 7 - Intelligent Storage Services
- Part 8 - Network and Switch Monitoring
- Part 9 - Traffic Management
- Part 10 - Troubleshooting
-
 Feedback
Table Of Contents
Configuring SANTap
The Storage Services Module (SSM) supports Intelligent Storage Services in Cisco MDS SAN-OS Release 2.1(1a) and later that include SANTap.
This chapter includes the following sections:
•
Displaying SANTap Information
About SANTap
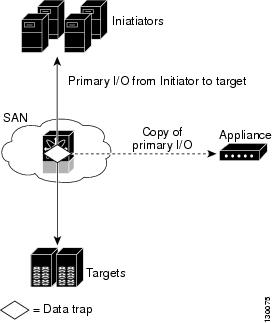
The SANTap feature allows third party data storage applications, such as long distance replication and continuous backup, to be integrated into the SAN. The protocol-based interface that is offered by SANTap allows easy and rapid integration of the data storage service application because it delivers a loose coupling between the application and an SSM, thereby reducing the effort needed to integrate applications with the core services being offered by the SSM. See Figure 40-1.
Figure 40-1 Integrating Third-Party Storage Applications in a SAN
SANTap operates in three modes:
•
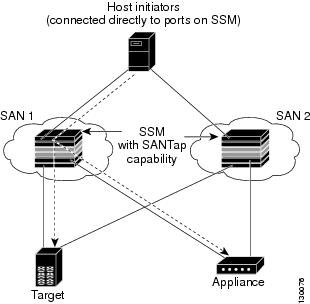
Transparent mode eliminates the need for any reconfiguration of either the host or target when introducing SANTap based applications. This mode of operation requires that either the host initiator or target be directly connected to an SSM. See Figure 40-2.
Figure 40-2 SANTap Transparent Mode Example
•
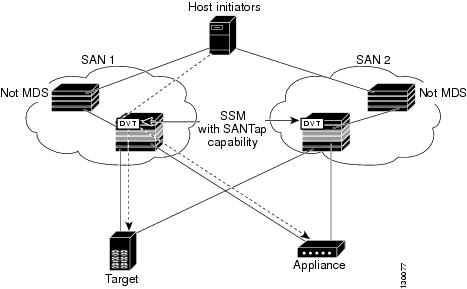
Proxy mode-1 assigns Cisco-specific WWNs to the virtual initiators (VIs) and digital virtual targets (DVTs). The benefit of this mode is that it eliminates the requirement of transparent mode that a host initiator or a target be connected directly to an SSM. In proxy mode-1, the SSM can be anywhere in the SAN. However, this mode requires reconfiguration of legacy applications. See Figure 40-3.
Figure 40-3 SANTap Proxy Mode-1 Example
•
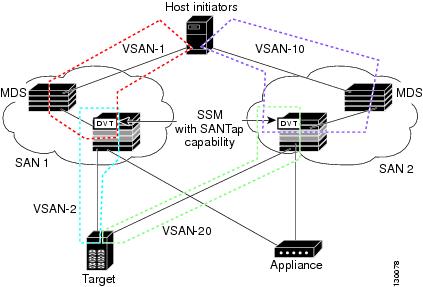
Proxy mode-2 includes the benefits of transparent mode and proxy mode-1 but does not have the limitations of those modes. However, it does require that the administrator partition the SAN using VSANs. The host initiator and the DVT are in one VSAN while the VI and the target are in another VSAN. See Figure 40-4.
Figure 40-4 SANTap Proxy Mode-2 Example
Enabling SANTap
SANTap can be enabled on an entire SSM or it can be enabled on a group of four ports on an SSM. Enabling SANTap on interfaces has the following restrictions:
•
•
•
To enable the SANTap feature, follow these steps:
Note
Displaying SANTap Information
Use the show santap module command to display information about SANTap (see Example 40-1 to Example 40-8).
Example 40-1 Displays SANTap Control Virtual Terminal Information
switch# show santap module 2 cvtCVT Information :cvt pwwn = 25:3c:00:05:30:00:22:25cvt nwwn = 25:3d:00:05:30:00:22:25cvt id = 1cvt xmap_id = 2cvt vsan = 10Example 40-2 Displays SANTap Data Virtual Terminal Information
switch# show santap module 2 dvtDVT Information :dvt pwwn = 22:00:00:20:37:88:20:efdvt nwwn = 20:00:00:20:37:88:20:efdvt id = 3dvt mode = 3dvt vsan = 3dvt fp_port = 0dvt if_index = 0x1080000dvt name = MYDVTExample 40-3 Displays SANTap Data Virtual Terminal LUN Information
switch# show santap module 2 dvtlunDVT LUN Information :dvt pwwn = 22:00:00:20:37:88:20:efdvt lun = 0x0xmap id = 8dvt id = 3dvt mode = 0dvt vsan = 3tgt pwwn = 22:00:00:20:37:88:20:eftgt lun = 0x0tgt vsan = 1Example 40-4 Displays SANTap Session Information
switch# show santap module 2 sessionSession Information :session id = 1host pwwn = 21:00:00:e0:8b:07:61:aadvt pwwn = 22:00:00:20:37:88:20:efdvt lun = 0x0tgt pwwn = 00:00:00:00:00:00:00:00tgt lun = 0x0adt pwwn = 77:77:77:77:77:77:77:77adt lun = 0x0num ranges = 0dvt id = 0vdisk id = 0session state = 0mrl requested = 1pwl requested = 1iol requested = 0Example 40-5 Displays SANTap Appliance Virtual Terminal Information
switch# show santap module 2 avtAVT Information :avt pwwn = 2a:4b:00:05:30:00:22:25avt nwwn = 2a:60:00:05:30:00:22:25avt id = 12avt vsan = 4avt if_index = 0x1080000hi pwwn = 21:00:00:e0:8b:07:61:aatgt pwwn = 22:00:00:20:37:88:20:eftgt vsan = 1Example 40-6 Displays SANTap Appliance Virtual Terminal LUN Information
switch# show santap module 2 avtlunAVT LUN Information :avt pwwn = 2a:4b:00:05:30:00:22:25avt lun = 0x0xmap id = 16avt id = 12tgt lun = 0x0Example 40-7 Displays SANTap Remote Virtual Terminal Information
switch# show santap mod 2 rvtRVT Information :rvt pwwn = 2a:61:00:05:30:00:22:25rvt nwwn = 2a:62:00:05:30:00:22:25rvt id = 17rvt vsan = 4rvt if_index = 0x1080000Example 40-8 Displays SANTap Remote Virtual Terminal LUN Information
switch# show santap mod 2 rvtlunRVT LUN Information :rvt pwwn = 2a:61:00:05:30:00:22:25rvt lun = 0x0xmap id = 22rvt id = 17app pwwn = 22:00:00:20:37:39:b1:00app lun = 0x0app vsan = 1Default Settings
Table 40-1 lists the default settings for Intelligent Storage Services parameters.
Table 40-1 Default Intelligent Storage Services Parameters
SANTap feature
Disabled