-
Cisco MDS 9000 Family Configuration Guide, Release 2.x
-
New and Changed Information
-
Index
-
Preface
- Part 1 - Getting Started
- Part 2 - Cisco MDS SAN-OS Installation and Switch Management
- Part 3 - Switch Configuration
-
Part 4 - Fabric Configuration
-
Configuring and Managing VSANs
-
Creating Dynamic VSANs
-
Configuring Inter-VSAN Routing
-
Configuring Zones
-
Distributing Device Alias Services
-
Configuring Fibre Channel Routing Services and Protocols
-
Managing FLOGI, Name Server, FDMI, and RSCN Databases
-
Discovering SCSI Targets
-
Configuring FICON
-
Advanced Features and Concepts
-
- Part 5 - Security
- Part 6 - IP Services
- Part 7 - Intelligent Storage Services
- Part 8 - Network and Switch Monitoring
- Part 9 - Traffic Management
- Part 10 - Troubleshooting
-
 Feedback
Table Of Contents
Configuring RADIUS and TACACS+
Remote Authentication Guidelines
AAA Service Configuration Options
Setting the RADIUS Server Address
Setting the Global Preshared Key
Setting the RADIUS Server Timeout Interval
Setting Iterations of the RADIUS Server
Defining Vendor-Specific Attributes
Specifying SNMPv3 on AAA Servers
Displaying RADIUS Server Details
Setting the TACACS+ Server Address
Defining Custom Attributes for Roles
Displaying TACACS+ Server Details
Distributing AAA Server Configuration
Enabling the RADIUS Server Distribution
Starting a Distribution Session on a Switch
Displaying the Configuration to Be Distributed
Discarding the Distribution Session
Merge Guidelines for RADIUS and TACACS+ Configurations
Authentication and Authorization Process
Configuring Accounting Services
Displaying Accounting Configuration
Configuring RADIUS and TACACS+
The authentication, authorization, and accounting (AAA) mechanism verifies the identity of, grants access to, and tracks the actions of users managing a switch. All Cisco MDS 9000 Family switches use Remote Access Dial-In User Service (RADIUS) and Terminal Access Controller Access Control System Plus (TACACS+) protocols to provide solutions using remote AAA servers.
Based on the user ID and password combination provided, switches perform local authentication or authorization using the local database or remote authentication or authorization using AAA server(s). A preshared secret key provides security for communication between the switch and AAA servers. This secret key can be configured for all AAA server or for only a specific AAA server. This security mechanism provides a central management capability for AAA servers.
This chapter includes the following sections:
•
Distributing AAA Server Configuration
•
•
•
Switch Management Security
Management security in any switch in the Cisco MDS 9000 Family provides security to all management access methods including the command-line interface (CLI) or Simple Network Management Protocol (SNMP).
CLI Security Options
You can access the CLI using the console (serial connection), Telnet, or Secure Shell (SSH). For each management path (console or Telnet and SSH), you can configure one or more of the following security control options: local, remote (RADIUS or TACACS+), or none.
•
–
–
•
These security mechanisms can also be configured for the following scenarios:
•
•
SNMP Security Options
The SNMP agent supports security features for SNMPv1,SNMPv 2c, and SNMPv3. Normal SNMP security mechanisms apply to all applications that use SNMP (for example, Cisco MDS 9000 Fabric Manager).
CLI security options also apply to the Cisco MDS Fabric Manager and Device Manager.
See Chapter 27, "Configuring SNMP".
Refer to the Cisco MDS 9000 Family Fabric Manager Configuration Guide for information on the Cisco MDS Fabric or Device Managers.
Switch AAA Functionalities
Using the CLI or an SNMP application, you can configure authentication, authorization, and accounting (AAA) switch functionalities on any switch in the Cisco MDS 9000 Family.
Authentication
Authentication is the process of verifying the identity of the person managing the switch. This identity verification is based on the user ID and password combination provided by the person trying to manage the switch. Cisco MDS 9000 Family switches allow you to perform local authentication (using the local lookup database) or remote authentication (using one or more RADIUS or TACACS+ servers).
Note
Authorization
By default, two roles exist in all Cisco MDS switches:
•
•
If you use a SAN Volume Controller (SVC) setup, two more default roles exist in all Cisco MDS switches:
•
•
Note
These four default roles cannot be changed or deleted. You can create additional roles and configure the following options:
•
•
Note
Accounting
The accounting feature tracks and maintains a log of every management session used to access the switch. This information can be used to generate reports for troubleshooting and auditing purposes. Accounting logs can be stored locally or sent to remote AAA servers.
Remote AAA Services
Remote AAA services provided through RADIUS and TACACS+ protocols have the following advantages over AAA servers:
•
•
•
•
•
Remote Authentication Guidelines
When you prefer using remote AAA servers, follow these guidelines:
•
•
•
•
Server Groups
You can specify remote AAA servers for authentication, authorization, and accounting using server groups. A server group is a set of remote AAA servers implementing the same AAA protocol. The purpose of a server group is to provide for fail-over servers in case a remote AAA server fails to respond. If the first remote server in the group fails to respond, the next remote server in the group is tried until one of the servers sends a response. If all the AAA servers in the server group fails to respond, then that server group option is considered a failure. If required, you can specify multiple server groups. If the Cisco MDS switch encounters errors from the servers in the first group, it tries the servers in the next server group.
AAA Service Configuration Options
AAA configuration in Cisco MDS 9000 Family switches is service based. You can have separate AAA configurations for the following services
•
•
•
•
•
In general, server group, local, and none are the three options that can be specified for any service in an AAA configuration. Each option is tried in the order specified. If all the methods fail, local is tried.
Caution
Note
Table 28-1 provides the related CLI command for each AAA service configuration option.
.
Error-Enabled Status
When you log in, the login is processed by rolling over to local user database if the remote AAA servers do not respond. In such cases, the following message is displayed on the user's terminal—if you have enabled the error-enabled feature:
Remote AAA servers unreachable; local authentication done.To enable this message display, use the aaa authentication login error-enable command.
To disable this message display, use the no aaa authentication login error-enable command.
To view the current display status, use the show aaa authentication login error-enable command (see Example 28-6).
Example 28-1 Displays AAA Authentication Login Information
switch# show aaa authentication login error-enableenabledConfiguring RADIUS
Cisco MDS 9000 Family switches can use the RADIUS protocol to communicate with remote AAA servers. You can configure multiple RADIUS servers and server groups and set timeout and retry counts.
This section defines the RADIUS operation, identifies its network environments, and describes its configuration possibilities.
RADIUS is a distributed client/server protocol that secures networks against unauthorized access. In the Cisco implementation, RADIUS clients run on Cisco MDS 9000 Family switches and send authentication requests to a central RADIUS server that contains all user authentication and network service access information.
Setting the RADIUS Server Address
You can add up to 64 RADIUS servers. RADIUS keys are always stored in encrypted form in persistent storage. The running configuration also displays encrypted keys.
To specify the host RADIUS server address and the options, follow these steps:
Setting the Global Preshared Key
You need to configure the RADIUS preshared key to authenticate the switch to the RADIUS server. The length of the key is restricted to 64 characters and can include any printable ASCII characters (white spaces are not allowed). You can configure a global key to be used for all RADIUS server configurations on the switch.
You can override this global key assignment by explicitly using the key option in the radius-server host command.
To set the RADIUS preshared key, follow these steps:
Setting the RADIUS Server Timeout Interval
To specify the time between retransmissions to the RADIUS servers, follow these steps:
Setting Iterations of the RADIUS Server
By default, a switch retries a RADIUS server only once. This number can be configured. The maximum is five retries per server.
You can revert the retry number to its default by issuing the no radius-server retransmit command.
To specify the number of times that RADIUS servers should try to authenticate a user, follow these steps:
Defining Vendor-Specific Attributes
The Internet Engineering Task Force (IETF) draft standard specifies a method for communicating vendor-specific attributes (VSAs) between the network access server and the RADIUS server. The IETF uses attribute 26. VSAs allow vendors to support their own extended attributes that are not suitable for general use. The Cisco RADIUS implementation supports one vendor-specific option using the format recommended in the specification. The Cisco vendor ID is 9, and the supported option is vendor type 1, which is named cisco-avpair. The value is a string with the following format:
protocol : attribute sep value *Where protocol is a Cisco attribute for a particular type of authorization, and sep is = for mandatory attributes, and * is for optional attributes.
When you use RADIUS servers to authenticate yourself to a Cisco MDS 9000 Family switch, the RADIUS protocol directs the RADIUS server to return user attributes, such as authorization information, along with authentication results. This authorization information is specified through VSAs.
VSA Format
The following VSA protocol options are supported by the Cisco SAN-OS software:
•
•
The following attributes are supported by the Cisco SAN-OS software:
•
shell:roles="network-admin vsan-admin"
shell:roles*"network-admin vsan-admin"
When an VSA is specified as shell:roles*"network-admin vsan-admin", this VSA is flagged as an optional attribute, and other Cisco devices ignore this attribute.
•
Specifying SNMPv3 on AAA Servers
The vendor/custom attribute cisco-av-pair can be used to specify user's role mapping using the format:
shell:roles="roleA roleB ..."If the roll option in the cisco-av-pair attribute is not set, the default user role is network-operator.
The VSA format optionally specifies your SNMPv3 authentication and privacy protocol attributes also as follows:
shell:roles="roleA roleB..." snmpv3:auth=SHA priv=AES-128The SNMPv3 authentication protocol options are SHA and MD5. The privacy protocol options are AES-128 and DES. If these options are not specified in the cisco-av-pair attribute on the ACS server, MD5 and DES are used by default.
Displaying RADIUS Server Details
Use the show radius-server command to display configured RADIUS parameters (see Example 28-2).
Example 28-2 Displays Configured RADIUS Information
switch# show radius-serverGlobal RADIUS shared secret:*******retransmission count:5timeout value:10following RADIUS servers are configured:myradius.cisco.users.com:available for authentication on port:1812available for accounting on port:1813172.22.91.37:available for authentication on port:1812available for accounting on port:1813RADIUS shared secret:******10.10.0.0:available for authentication on port:1812available for accounting on port:1813RADIUS shared secret:******Example 28-3 Displays Configured RADIUS Server-Group Order
switch# show radius-server groupstotal number of groups:4following RADIUS server groups are configured:group radius:server: all configured radius serversgroup Group1:server: Server3 on auth-port 1812, acct-port 1813server: Server5 on auth-port 1812, acct-port 1813group Group5:Configuring TACACS+
A Cisco MDS switch uses the Terminal Access Controller Access Control System Plus (TACACS+) protocol to communicate with remote AAA servers. You can configure multiple TACACS+ servers and set timeout values.
About TACACS+
TACACS+ is a client/server protocol that uses TCP (TCP port 49) for transport requirements. All switches in the Cisco MDS 9000 Family provide centralized authentication using the TACACS+ protocol. The addition of TACACS+ support in Cisco SAN-OS 1.3 enables the following advantages over RADIUS authentication:
•
•
•
Enabling TACACS+
By default, the TACACS+ feature is disabled in all switches in the Cisco MDS 9000 Family. You must explicitly enable the TACACS+ feature to access the configuration and verification commands for fabric authentication. When you disable this feature, all related configurations are automatically discarded.
To enable TACACS+ for a Cisco MDS switch, follow these steps:
Setting the TACACS+ Server Address
If a secret key is not configured for a configured server, a warning message is issued if a global key is not configured. If a server key is not configured, the global key (if configured) is used for that server (see the "Setting the Global Secret Key" section).
Note
To configure the TACACS+ server option, follow these steps:
Setting the Global Secret Key
You can configure global values for the secret key for all TACACS+ servers.
Note
Note
To set the secret key for TACACS+ servers, follow these steps:
Setting the Timeout Value
You can configure global timeout values for all TACACS+ servers.
Note
To set the global timeout value for TACACS+ servers, follow these steps:
Defining Custom Attributes for Roles
Cisco MDS 9000 Family switches use the TACACS+ custom attribute for service shells to configure roles to which a user belongs. TACACS+ attributes are specified in name=value format. The attribute name for this custom attribute is cisco-av-pair. The following example illustrates how to specify roles using this attribute:
cisco-av-pair=shell:roles="network-admin vsan-admin"You can also configure optional custom attributes to avoid conflicts with non-MDS Cisco switches using the same AAA servers.
cisco-av-pair*shell:roles="network-admin vsan-admin"Additional custom attribute shell:roles are also supported:
shell:roles="network-admin vsan-admin"or
shell:roles*"network-admin vsan-admin"
Note
Supported TACACS+ Servers
The Cisco SAN-OS software currently supports the following parameters for the listed TACACS+ servers:
•
cisco-av-pair=shell:roles="network-admin"•
shell:roles="network-admin"shell:roles*"network-admin"cisco-av-pair*shell:roles="network-admin"cisco-av-pair*shell:roles*"network-admin"cisco-av-pair=shell:roles*"network-admin"•
cisco-av-pair*shell:roles="network-admin"cisco-av-pair=shell:roles*"network-admin"Displaying TACACS+ Server Details
Use the show tacacs+ commands to display configurations for the TACACS+ protocol configuration in all switches in the Cisco MDS 9000 Family (see Examples 28-4 to 28-8).
Example 28-4 Displays Configured TACACS+ Server Information
switch# show tacacs-serverGlobal TACACS+ shared secret:***********timeout value:30total number of servers:3following TACACS+ servers are configured:171.71.58.91:available on port:2cisco.com:available on port:49171.71.22.95:available on port:49TACACS+ shared secret:*****Example 28-5 Displays AAA Authentication Information
switch# show aaa authenticationdefault: group TacServer local noneconsole: localiscsi: localdhchap: localExample 28-6 Displays AAA Authentication Login Information
switch# show aaa authentication login error-enableenabledExample 28-7 Displays Configured TACACS+ Server Groups
switch# show tacacs-server groupstotal number of groups:2following TACACS+ server groups are configured:group TacServer:server 171.71.58.91 on port 2group TacacsServer1:server ServerA on port 49server ServerB on port 49:Example 28-8 Displays All AAA Server Groups
switch# show aaa groupsradiusTacServerConfiguring Server Groups
You can specify one or more remote AAA servers to authenticate users using server groups. All members of a group must belong to the same protocol, either RADIUS or TACACS+. The servers are tried in the same order in which you configure them.
You can configure these server groups at any time but they only take effect when you apply them to a AAA service. You configure AAA policies for CLI users or Fabric Manager or Device Manager users.
To specify the TACACS+ server order within a group, follow these steps:
To verify the configured server group order, use the show tacacs-server groups command:
switch# show tacacs-server groupstotal number of groups:2following TACACS+ server groups are configured:group TacServer:server 171.71.58.91 on port 2group TacacsServer1:server ServerA on port 49server ServerB on port 49:Distributing AAA Server Configuration
Configuration for RADIUS and TACACS+ AAA on a MDS switch can be distributed using the Cisco Fabric Services (CFS). The distribution is disabled by default (see Chapter 5, "Using the CFS Infrastructure").
After enabling the distribution, the first server or global configuration starts an implicit session. All server configuration commands entered thereafter are stored in a temporary database and applied to all switches in the fabric (including the originating one) when you explicitly commit the database. The various server and global parameters are distributed, except the server and global keys. These keys are unique secrets to a switch and should not be shared with other switches.
Note
Enabling the RADIUS Server Distribution
Only switches where distribution is enabled can participate in the distribution activity.
To enable RADIUS server distribution, follow these steps:
To enable TACACS+ server distribution, follow these steps:
Starting a Distribution Session on a Switch
A distribution session starts the moment you begin a RADIUS/TACACS+ server or global configuration. For example, the following tasks start an implicit session:
•
•
Note
To specify the global timeout and start an implicit session for RADIUS servers, follow these steps:
To specify the global timeout and start an implicit session for TACACS+ servers, follow these steps:
Displaying the Session Status
Once the implicit distribution session has started, you can check the session status using the show radius distribution status command.
switch# show radius distribution statusdistribution : enabledsession ongoing: yessession owner: adminsession db: existsmerge protocol status: merge activation donelast operation: enablelast operation status: successOnce the implicit distribution session has started, you can check the session status using the show tacacs+ distribution status command.
switch# show tacacs+ distribution statusdistribution : enabledsession ongoing: yessession owner: adminsession db: existsmerge protocol status: merge activation donelast operation: enablelast operation status: successDisplaying the Configuration to Be Distributed
To display the RADIUS global and/or server configuration stored in the temporary buffer, use the show radius pending command.
switch(config)# show radius pending-diff+radius-server host testhost1 authentication accounting+radius-server host testhost2 authentication accountingTo display the TACACS+ global and/or server configuration stored in the temporary buffer, use the show tacacs+ pending command.
switch(config)# show tacacs+ pending-diff+tacacs-server host testhost3+tacacs-server host testhost4Committing the Distribution
The RADIUS or TACACS+ global and/or server configuration stored in the temporary buffer can be applied to the running configuration across all switches in the fabric (including the originating switch).
To commit RADIUS configuration changes, follow these steps:
Step 1
switch# config t
Enters configuration mode.
Step 2
switch(config)# radius commit
Commits the RADIUS configuration changes to the running configuration.
To commit TACACS+ configuration changes, follow these steps:
Step 1
switch# config t
Enters configuration mode.
Step 2
switch(config)# tacacs+ commit
Commits the TACACS+ configuration changes to the running configuration.
Discarding the Distribution Session
Discarding the distribution of a session-in-progress causes the configuration in the temporary buffer to be dropped. The distribution is no applied.
To discard the RADIUS session-in-progress distribution, follow these steps:
Step 1
switch# config t
Enters configuration mode.
Step 2
switch(config)# radius abort
Discard the RADIUS configuration changes to the running configuration.
To discard the TACACS+ session-in-progress distribution, follow these steps:
Step 1
switch# config t
Enters configuration mode.
Step 2
switch(config)# tacacs+ abort
Discard the TACACS+ configuration changes to the running configuration.
Clearing Sessions
To clear the ongoing CFS distribution session (if any) and to unlock the fabric for the RADIUS feature, issue the clear radius session command from any switch in the fabric.
switch# clear radius sessionTo clear the ongoing CFS distribution session (if any) and to unlock the fabric for the TACACS+ feature, issue the clear tacacs+ session command from any switch in the fabric.
switch# clear tacacs+ sessionMerge Guidelines for RADIUS and TACACS+ Configurations
The RADIUS and TACACS+ server and global configuration are merged when two fabrics merge. The merged configuration is applied to CFS distribution-enabled switches.
When merging the fabric, be aware of the following conditions:
•
•
•
•
Caution
Use the show radius distribution status command to view the status of the RADIUS fabric merge (see Example 28-9).
Example 28-9 Displays the RADIUS Fabric Merge Status
switch# show radius distribution statusdistribution : enabledsession ongoing: nosession db: does not existmerge protocol status: merge response receivedmerge error: conflict: server dmtest2 has auth-port 1812 on this switch and 1999on remotelast operation: enablelast operation status: successUse the show tacacs+ distribution status command to view the status of the TACACS+ fabric merge (see Example 28-10).
Example 28-10 Displays the TACACS+ Fabric Merge Status
switch# show tacacs+ distribution statusdistribution : enabledsession ongoing: nosession db: does not existmerge protocol status: merge activation donelast operation: enablelast operation status: successLocal AAA Services
The system maintains the user name and password locally and stores the password information in encrypted form. You are authenticated based on the locally stored user information.
Use the username command to configure local users and their roles (see the "Creating or Updating Users" section on page 26-11).
Use the show accounting log command to view the local accounting log (see Example 28-11).
Example 28-11 Displays the Accounting Log Information
switch# show accounting logSat Jan 24 03:22:06 1981:stop:snmp_349154526_171.71.58.69:admin:Sat Jan 24 03:22:06 1981:start:snmp_349154526_171.71.58.69:admin:Sat Jan 24 03:22:06 1981:update:snmp_349154526_171.71.58.69:admin:Added member [WWN: 21:00:00:20:37:a6:be:00 ID: 2] to zone test-27 on VSAN 1...Sat Jan 24 23:59:56 1981:stop:/dev/pts/0_349228792:root:shell terminatedSun Jan 25 00:00:06 1981:start:/dev/pts/1_349228806:admin:Disabling AAA Authentication
You can turn off password verification using the none option. If you configure this option, users can login without giving a valid password. But the user should at least exist locally on the Cisco MDS 9000 Family switch.
Caution
Use the none option in the aaa authentication login command to disable password verification.
A user created using the username command will exist locally on the Cisco MDS 9000 Family switch.
Displaying AAA Authentication
The show aaa authentication command displays the configured authentication methods (see Example 28-12).
Example 28-12 Example 16-8 Displays Authentication Information
switch# show aaa authenticationNo AAA Authenticationdefault: group TacServer local noneconsole: local noneiscsi: localdhchap: localAuthentication and Authorization Process
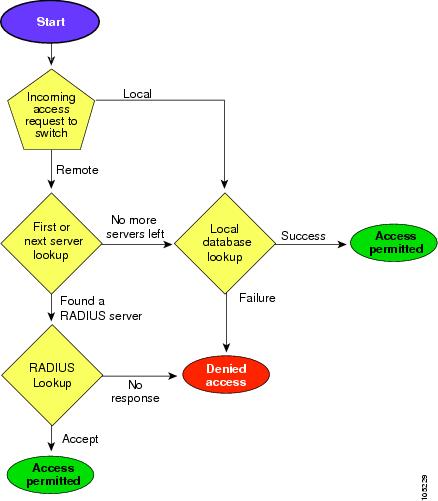
Authentication is the process of verifying the identity of the person managing the switch. This identity verification is based on the user ID and password combination provided by the person trying to manage the switch. The Cisco MDS 9000 Family switches allow you to perform local authentication (using the lookup database) or remote authentication (using one or more RADIUS servers or TACACS+ servers).
Figure 28-1 shows a flow chart of the process. The following steps explain the authorization and authentication process.
Step 1
Step 2
•
•
•
Step 3
•
•
•
Step 4
Figure 28-1 Switch Authorization and Authentication Flow
Note
No more servers left = no response from any server within this server group.
Tip
Configuring Accounting Services
Accounting refers to the log information that is kept for each management session in a switch. This information may be used to generate reports for troubleshooting and auditing purposes. Accounting can be implemented locally or remotely (using RADIUS). The default maximum size of the accounting log is 250,000 bytes and cannot be changed.
Tip
Note
Displaying Accounting Configuration
The show accounting command displays configured accounting information. See Examples 28-13 to 28-15. To specify the size of the local accounting log to be displayed, use the show accounting log command. By default about 250KB of accounting log is displayed.
Example 28-13 Displays Two Samples of Configured Accounting Parameters
switch# show accounting configshow aaa accountingdefault: localswitch# show aaa accountingdefault: group rad1Example 28-14 Displays 60,000 Bytes of the Accounting Log
switch# show accounting log 60000Fri Jan 16 15:28:21 1981:stop:snmp_348506901_64.104.131.208:admin:Fri Jan 16 21:17:04 1981:start:/dev/pts/0_348527824:admin:Fri Jan 16 21:35:45 1981:update:/dev/pts/0_348527824:admin:updated RADIUS parameters for group:Group1Fri Jan 16 21:35:51 1981:update:/dev/pts/0_348527824:admin:updated RADIUS parameters for group:Group1Fri Jan 16 21:35:51 1981:update:/dev/pts/0_348527824:admin:updated RADIUS parameters for group:Group5Fri Jan 16 21:35:55 1981:update:/dev/pts/0_348527824:admin:updated RADIUS parameters for group:Group5Fri Jan 16 21:35:55 1981:update:/dev/pts/0_348527824:admin:updated RADIUS parameters for group:Group3Fri Jan 16 21:58:17 1981:start:snmp_348530297_171.71.150.105:admin:...Example 28-15 Displays the Entire Log File.
switch# show accounting logFri Jan 16 15:28:21 1981:stop:snmp_348506901_64.104.131.208:admin:Fri Jan 16 21:17:04 1981:start:/dev/pts/0_348527824:admin:Fri Jan 16 21:35:45 1981:update:/dev/pts/0_348527824:admin:updated RADIUS parameters for group:Group1Fri Jan 16 21:35:51 1981:update:/dev/pts/0_348527824:admin:updated RADIUS parameters for group:Group1Fri Jan 16 21:35:51 1981:update:/dev/pts/0_348527824:admin:updated RADIUS parameters for group:Group5Fri Jan 16 21:35:55 1981:update:/dev/pts/0_348527824:admin:updated RADIUS parameters for group:Group5Fri Jan 16 21:35:55 1981:update:/dev/pts/0_348527824:admin:updated RADIUS parameters for group:Group3Fri Jan 16 21:58:17 1981:start:snmp_348530297_171.71.150.105:admin:Fri Jan 16 21:58:17 1981:stop:snmp_348530297_171.71.150.105:admin:Fri Jan 16 21:58:18 1981:start:snmp_348530298_171.71.150.105:admin:Fri Jan 16 21:58:18 1981:stop:snmp_348530298_171.71.150.105:admin:...Fri Jan 16 23:37:02 1981:update:/dev/pts/0_348527824:admin:updated RADIUS parameters for group:Group3Fri Jan 16 23:37:26 1981:update:/dev/pts/0_348527824:admin:updated TACACS+ parameters for group:TacacsServer1Fri Jan 16 23:45:19 1981:update:/dev/pts/0_348527824:admin:updated TACACS+ parameters for group:TacacsServer1Fri Jan 16 23:45:19 1981:update:/dev/pts/0_348527824:admin:updated RADIUS parameters for group:Group1...Fri Jan 16 23:53:51 1981:update:/dev/pts/0_348527824:admin:updated RADIUS parameters for server:Server3Fri Jan 16 23:54:00 1981:update:/dev/pts/0_348527824:admin:updated RADIUS parameters for server:Server5Fri Jan 16 23:54:22 1981:update:/dev/pts/0_348527824:admin:updated TACACS+ parameters for server:ServerAFri Jan 16 23:54:25 1981:update:/dev/pts/0_348527824:admin:updated TACACS+ parameters for server:ServerBFri Jan 16 23:55:03 1981:update:/dev/pts/0_348527824:admin:updated RADIUS parameters for group:Group1...Sat Jan 17 00:01:41 1981:start:snmp_348537701_171.71.58.100:admin:Sat Jan 17 00:01:41 1981:stop:snmp_348537701_171.71.58.100:admin:Sat Jan 17 00:01:42 1981:start:snmp_348537702_171.71.58.100:admin:Sat Jan 17 00:01:42 1981:stop:snmp_348537702_171.71.58.100:admin:...Clearing Accounting Logs
To clear out the contents of the current log, use the clear accounting log command.
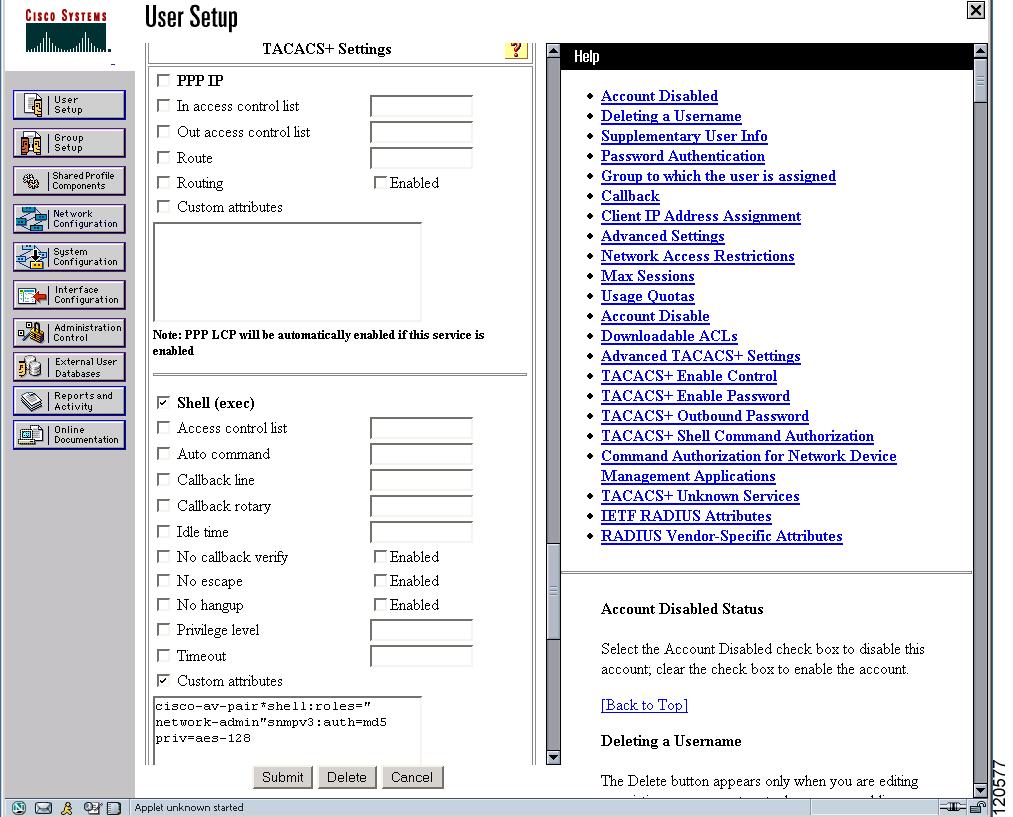
switch# clear accounting logConfiguring Cisco ACS Servers
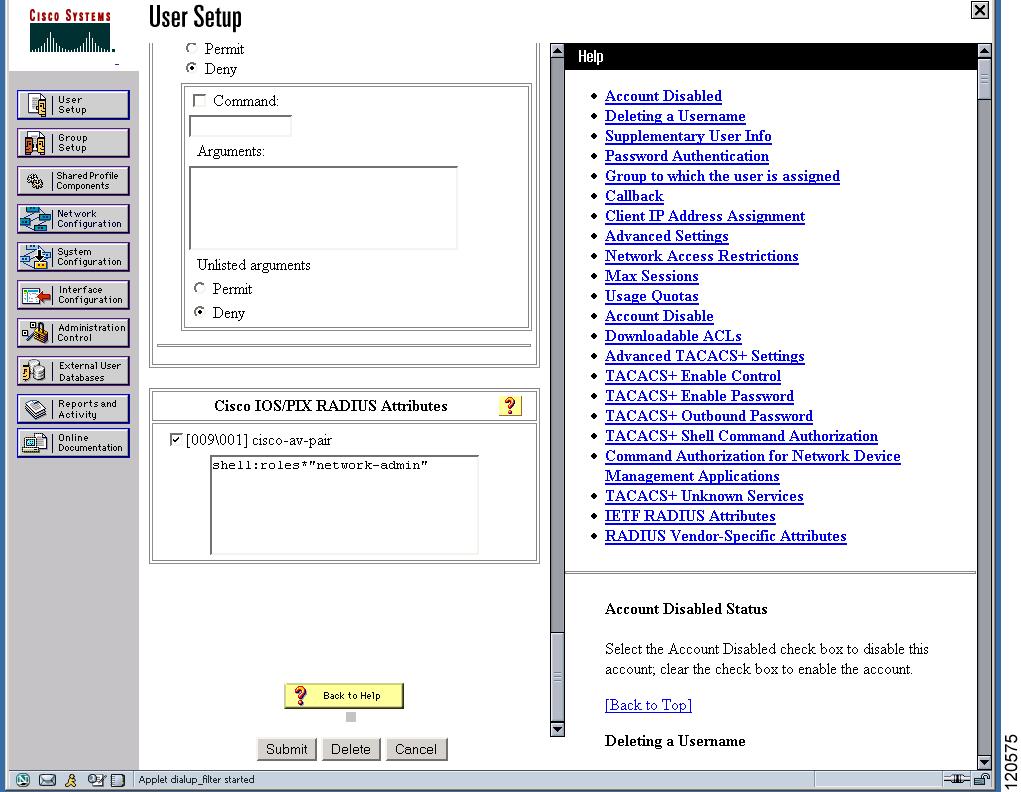
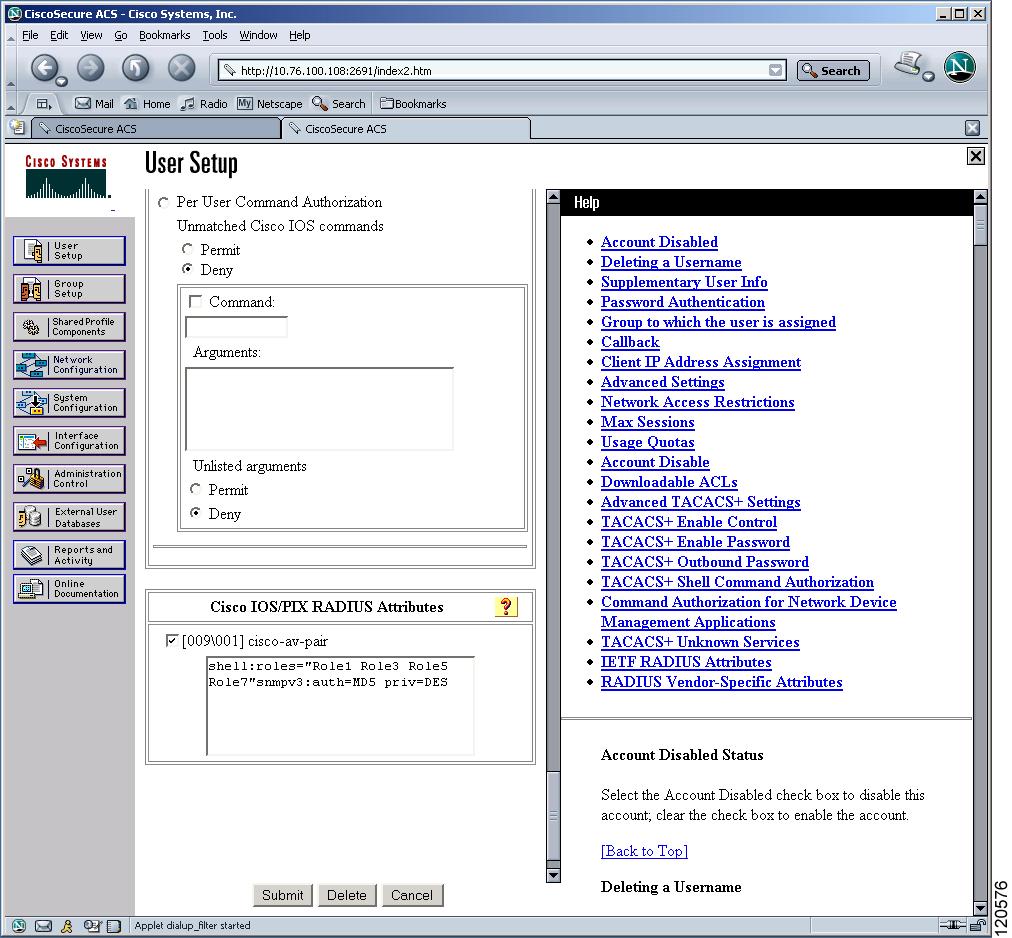
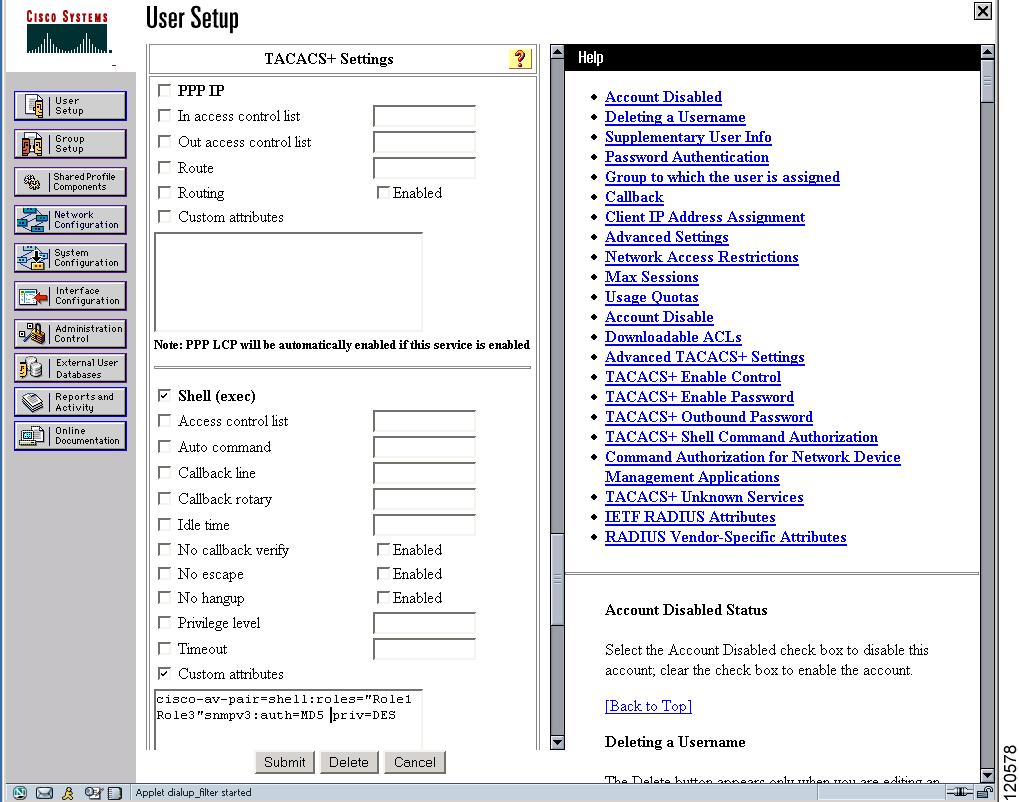
The Cisco Access Control Server (ACS) uses TACACS+ and RADIUS protocols to provide AAA services that ensure a secure environment.When using the AAA server, user management is normally done using Cisco ACS. Figure 28-2, Figure 28-3, Figure 28-4, and Figure 28-5 display ACS server user setup configurations for network-admin roles and multiple roles using either TACACS+ or RADIUS.
Caution
Figure 28-2 Configuring the network-admin Role When Using RADIUS
Figure 28-3 Configuring Multiple Roles with SNMPv3 Attributes When Using RADIUS
Figure 28-4 Configuring the network-admin Role with SNMPv3 Attributes When Using TACACS+
Figure 28-5 Configuring Multiple Roles with SNMPv3 Attributes When Using TACACS+
Default Settings
Table 28-2 lists the default settings for all switch security features in any switch.