-
Installation and Upgrade Guide for Cisco Unified MeetingPlace Audio Server Release 5.4
-
Index
-
Preface
-
Preparing to Install the Cisco Unified MeetingPlace 8100 Series Hardware
-
Installing the Cisco Unified MeetingPlace 8100 Series Hardware
-
Connecting and Setting Up Your Laptop Computer
-
Upgrading the Cisco Unified MeetingPlace Audio Server Software
-
Testing the Cisco Unified MeetingPlace Audio Server System Installation and Upgrade
-
Maintaining the Cisco Unified MeetingPlace Audio Server System
-
Troubleshooting the Cisco Unified MeetingPlace Audio Server System Installation
-
Appendix: Cisco Unified MeetingPlace Audio Server Software Upgrade Reference
-
 Feedback
Table Of Contents
Connecting and Setting Up Your Laptop Computer
Connecting Your Laptop to Cisco Unified MeetingPlace
Logging Your HyperTerminal Session
Connecting and Setting Up Your Laptop Computer
This chapter explains how to connect your laptop to the Cisco Unified MeetingPlace system and how to set up your laptop so that you can use HyperTerminal.
This chapter contains the following sections:
•
Connecting Your Laptop to Cisco Unified MeetingPlace
•
•
•
Connecting Your Laptop to Cisco Unified MeetingPlace
Before using the Cisco Unified MeetingPlace Audio Server system, connect your laptop to the Cisco Unified MeetingPlace system.
To Connect Your Laptop to Cisco Unified MeetingPlace
Step 1
Caution
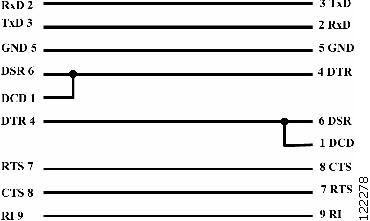
Figure 3-1 Null Modem Cable Pinouts
Step 2
Step 3
About Configuring Your Laptop
You can access the Command Line Interface (CLI) command screen by running terminal emulation software, such as ProComm, Windows Terminal, or HyperTerminal. Configure your laptop COM port with the parameters listed in Table 3-1.
Table 3-1 Laptop COM Port Parameters
Baud Rate
19200
Data Length
8 bits
Parity
None
Stop Bits
1
No phone number or area code is needed for direct connections to a COM port. Depending on the configuration of the laptop, the direct connection (9-pin connector) may be any of the COM ports, but it most likely is COM 1.
Set up the terminal emulation software to emulate a VT100 terminal. If your laptop is connected to a Cisco Unified MeetingPlace Audio Server and the operating system is running, the login prompt appears. It is sometimes necessary to press Enter once or twice.
The default username is admin, and the default password is cisco.
Note
Setting Up HyperTerminal
This section explains how to set up HyperTerminal to telnet to the Cisco Unified MeetingPlace system. There are several ways to telnet to the Cisco Unified MeetingPlace system. HyperTerminal is available on all operating systems. These instructions are for the Microsoft Windows 2000 operating system. If you are not using this version, the HyperTerminal instructions may vary.
To Set Up HyperTerminal
Step 1
Step 2
Step 3
Step 4
198.207.208.241Step 5
Step 6
If the Cisco Unified MeetingPlace Audio Server is not powered on yet, you will not see the login prompt.
Note
Logging Your HyperTerminal Session
Generate a log of your HyperTerminal session so that you can refer to it later. This example describes logging a session by using HyperTerminal. If you are not using HyperTerminal, the instructions may vary.
To Log Your HyperTerminal Session
Step 1
Step 2
Step 3
Step 4
Setting Up Dial-Up Networking
This section explains how to set up dial-up networking on a Microsoft Windows 2000 operating system to connect to the Cisco Unified MeetingPlace Audio Server system by using a modem.
To Set Up Dial-Up Networking
Step 1
Step 2
Step 3
Step 4
Step 5
(If you have more than one dial-up device on your computer, you may not see this dialog box at this time. Instead you may see a dialog box asking you to choose a dial-up device. Choose the dial-up device that you want to use and press Next. The Network Connection Wizard dialog box appears.)
Step 6
Step 7
Step 8
Step 9
Step 10
Step 11
Step 12
Step 13
Step 14
Step 15
Step 16
Step 17
Step 18
Step 19
Step 20
Step 21
Testing the Modem Connection
To Test the Modem Connection
Step 1
Step 2
Step 3
Step 4