Feedback
Table Of Contents
Overview of the Cisco Wireless IP Phone 7920
Main Screen and Display Indicators
Shortcut Keys for Phone Functions
Setting the LEAP Username and Password
Setting the Username or Password
Overview of the Cisco Wireless IP Phone 7920
The Cisco Wireless IP Phone 7920 provides the following features:
•
Wireless access to your corporate phone extension and phone services
•
•
•
•
•
•
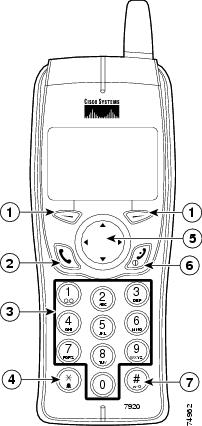
Figure 2-1 shows the Cisco Wireless IP Phone 7920. The callout table describes the functions of the keys on the phone.
Figure 2-1 Cisco Wireless IP Phone 7920
or

Left and right softkeys—Activates the item in the label above the softkey.
Answer/Send (green) key—Answers a call or dials a number.
Number keys (0-9)—Use these to enter numbers and characters.
Number keys (2-9)—Use these to activate Speed Dial hot keys.

Asterisk (*) key—Toggles between ring and vibrate mode.
Toggles between upper and lower case. See the "Entering and Editing Text" section.

Arrow key—Moves from one function to another. This guide uses these directional arrows
,
,
, or
.

Power/End (red) key—Turns the phone on or off, silences a ringing call, or ends a connected call. See the "Answering and Ending Calls" section.

Pound (#) key—Toggles between locking and unlocking the keypad.
Allows you to access special characters when you are entering text.
Powering On the Phone
To turn the phone on, press and hold the
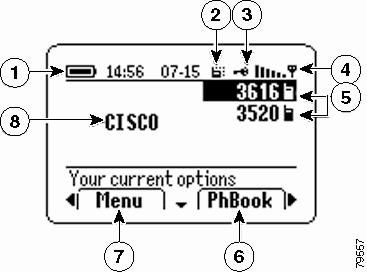
After connecting to the network, the phone displays the main screen, as shown in Figure 2-2. The phone is in standby mode and is ready to place or receive calls. The signal icon in the upper right corner shows the strength of the signal between the access point and your phone. Your phone must have an adequate signal before you can place or receive calls. The icon displays six vertical bars for a strong signal. If the icon displays fewer than three bars, the signal is weak.
Tips
•
•
Main Screen and Display Indicators
Figure 2-2 shows the icons that display in the main screen in standby mode.
Figure 2-2 Main Screen
Shortcut Keys for Phone Functions
The phone keypad provides the following shortcuts to frequently used functions.
Tips
•
•
Related Topics
•
Document Conventions
To simplify the instructions for using phone features and for changing phone settings, this guide uses the following conventions and terms.
Using
When you must press the softkey for a menu, feature, or action label, this guide states: Press (softkey label).
Example: Press PhBook
Using the
To move left or right between menu tabs or softkey labels, this guide states: Use
Example: Use
Using the
To move up or down between menu options or list items, this guide states: Scroll to (item name).
Example: Scroll to Speed Dial
Using the "Select" softkey
When you must press the "Select" softkey to use a menu option or item that you have highlighted, this guide states: Select (item name).
Example: Select Speed Dial
Using menus and options
To advance through several menu options, the guide states: Choose Menu > (menu option) > (menu option)
Example: Choose Menu > Directory > Phone Book > Speed Dial
Using the Phone Menus
The phone menus provide access to phone features and settings. When you press Menu, the name of the first menu displays on your phone screen with a set of overlapping tabs for the other phone menus.
To access a specific menu, press
To choose a menu option, such as Speed Dial in the Directory menu, scroll to Speed Dial and press Select.
This table lists reference information for the phone menus.
Directory
Messages
Call History
"Viewing and Placing Calls from the Call History Menu" section.
Profiles
Services
This menu is not available.
Phone Settings
"Customizing Phone Settings and Viewing Phone Status" section.
Network Config
"Setting the LEAP Username and Password" section.
Your system administrator can provide you with information about network configuration settings.
Setting the LEAP Username and Password
When powering on your phone for the first time, you might need to set your LEAP user name and password. Your administrator can provide LEAP information.
You must access the Network Configuration menu and navigate to the 802.11b Configuration options. Use the following steps to set your username and password.
Setting the Username or Password
1.
2.
3.
4.
5.
Note
6.
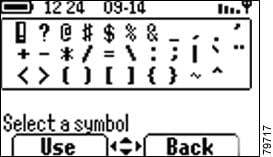
Entering and Editing Text
You can enter characters, numbers, and special characters for passwords and phone book entries. When you press a numeric key on the keypad, each press moves to another character choice.
Press the numeric key once to enter the first character. Press it twice to enter the second character or press it three times to enter the third character.
Press the numeric key four times to enter the number.
Press Clear once to delete the last character or number in the string.
Press and hold Clear to delete the entire text or number string.
Press
or
appears on the right corner of the screen to indicate the case.
Press
Press
Press Back as needed to return to the menu option or main screen.
Figure 2-3 Symbol Table


 icon displays at the top of the Main screen.
 icon appears at the top. The phone does not ring in vibrating mode.