Feedback
Table Of Contents
Using the Phone Book and Speed Dial Features
Adding or Changing Entries in the Phone Book
Configuring Speed Dial Hot Keys
Using the Phone Book and Speed Dial Features
Your Cisco Wireless IP Phone 7920 comes with a personal phone book feature. You can use the Directory menu to view phone book entries, to add or edit phone book entries, and to set up speed-dial numbers. You can access entries in your phone book by pressing the PhBook softkey.
Using the Phone Book
Press PhBook. The phone displays entry names.
If there are no phone book entries, "Empty" displays.
Scroll to the desired phone book entry and press Detail. The phone book entry item displays the name with the list of associated phone numbers.
Press PhBook and scroll to an entry.
Press
to dial the number. The phone dials the first number in the phone book entry.
Press PhBook and scroll to an entry. Press Detail and scroll to the desired phone number.
Press
Press PhBook and scroll to an entry. Press Detail and scroll to the item in the entry to edit. See Figure 5-1.
Press Edit and follow the instructions in the "Entering and Editing Text" section.
When you have edited the entry, press OK, then press Save.
Adding or Changing Entries in the Phone Book
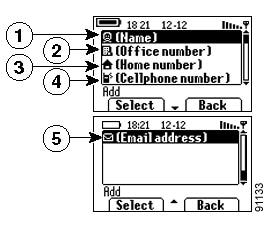
You can add a new phone book entry or change an existing entry by using the Directory menu. You must enter the phone number for each phone book entry exactly as you would dial the number. You can add the information as shown in Figure 5-1.
Figure 5-1 Phone Book Entry
Contact person's name
Office phone number entry
Home phone number entry
Cellular phone number entry
E-mail address entry
Press Menu and select Directory, then scroll to and select Names to see the entries.
Scroll to a phone book entry and press Detail.
Choose Menu > Directory > Add. The screen displays as shown in Figure 5-1.
Scroll to the entry item and press Select. Enter the name or phone number by following instructions in the "Entering and Editing Text" section.
When you have finished the entry, press OK, then press Save.
Press
or
to switch to Back and press the softkey twice to return to the Directory menu.
Choose Menu > Directory > Names, then scroll to an entry. Press Detail and scroll to the item to edit, such as Home number.
Edit the item by following instructions in "Entering and Editing Text" section.
When you have finished, press OK, then press Save.
Press
Choose Menu > Directory > Names, then scroll to an entry. Press
Press Erase and press OK to confirm that you want to erase the phone record.
Press
Tip
When adding external phone numbers, enter your external access number, such as 9, and the entire telephone number, including 1 and the area code.
Configuring Speed Dial Hot Keys
On the Cisco Wireless IP Phone 7920 keypad, the numeric keys (2-9) are hot keys that access speed-dial numbers.You can assign phone numbers to eight Speed Dial hot keys. The number 1 key is reserved for accessing the voice messaging system.
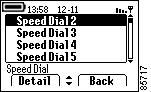
Press Menu and select Directory. Scroll to and select Speed Dial. The Speed Dial hot keys display as shown in Figure 5-2.
Check marks appear when the Speed Dial number hot keys already have assigned phone numbers.
Choose Menu > Directory > Speed Dial. Scroll to the Speed Dial number hot key and press Detail. See Figure 5-2.
Figure 5-2 Speed Dial Menu
Choose Menu >Directory > Speed Dial. Scroll to an available Speed Dial number hot key and press Detail.
Press Edit to enter the information. See the "Entering and Editing Text" section. Press OK to save the speed-dial number, then Back to exit the menu.
Choose Menu > Directory > Speed Dial. Scroll to a Speed Dial number and press Detail.
Press Edit to change or clear an existing phone number. To confirm the change, press OK, then Back to exit the menu.
Log in to your IP Phone User Options web page and choose your Cisco 7920 device. Choose Add/Update Your Speed Dials... from the main menu.
You can set up or change speed-dial numbers by entering the phone number and name on this web page.
Refer to Customizing Your Cisco IP Phone on the Web for more information.
Tips
•
Your screen displays the first few names for speed-dial numbers set up on the User Options web page.To make a call from your speed dial list, scroll to the name and press
•
•