Feedback
Table Of Contents
Creating User Accounts for CLI Access
Creating User Accounts for SNMP Access
Creating an MDS 9000 Switch User Role
Configuring TACACS+ with Cisco Secure ACS
Authentication and Authorization with TACACS+
Configuring TACACS+ on the Cisco MDS 9000 Switch
Configuring the Cisco MDS 9000 Switch
Providing Access Without a Password
Account Management
This chapter provides recipes for managing users and their accounts. It includes the following sections:
•
Creating User Accounts for CLI Access
•
•
•
•
Creating User Accounts for CLI Access
In MDS firmware versions prior to Release 2.0, a separate account was required for both SNMP (Simple Network Management Protocol) and CLI (command-line interface) access. After Release 2.0, a single username grants access to both CLI and SNMP.
Tip
•
•
To access the Cisco MDS 9000 switch via console, SSH, or Telnet, create a username with CLI access. To create a user with CLI access, follow these steps:
Step 1
switch# config terminalStep 2
switch(config)# username user1 password admin123 role network-adminAt this point the user (user1) can access the switch using the password admin123 via console, SSH or Telnet.
Creating User Accounts for SNMP Access
To access the Cisco MDS 9000 switch using SNMP, create a user with SNMP access. To create a user with SNMP access, follow these steps:
Step 1
switch# config terminalStep 2
switch(config)# snmp-server user user1 network-admin auth md5 admin123At this point, the user (user1) can access the switch using the password admin123 via an SNMP based product such as Cisco's MDS 9000 Family Fabric Manager or Device Manager.
Tip
•
Creating an MDS 9000 Switch User Role
The Cisco MDS 9000 switch comes with two predefined roles:
•
•
Tip
•
•
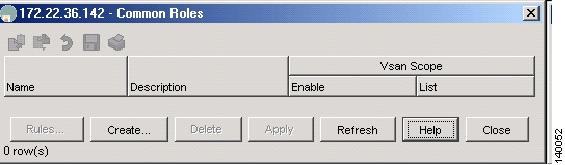
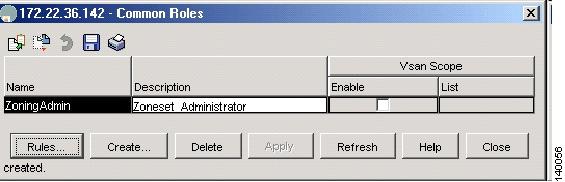
The following example shows how to create a role that provides the ability to only modify the zoning configuration on the switch.
Step 1
Figure 1-1 Common Roles
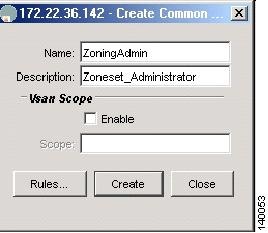
Step 2
You see the Create Common Roles dialog box. (See Figure 1-2.)
Figure 1-2 Create Common Roles
Step 3
Step 4
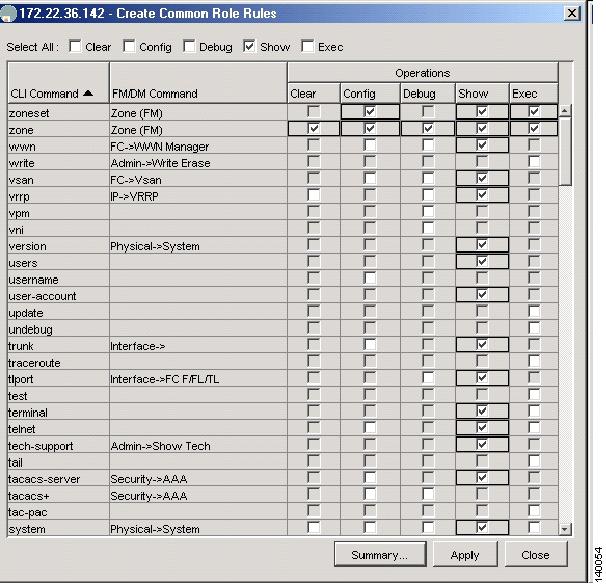
Step 5
You see the Create Common Role Rules dialog box. (See Figure 1-3.)
Figure 1-3 Create Rules
Step 6
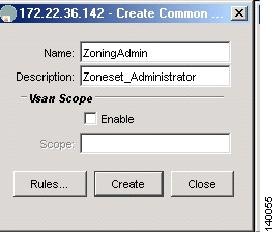
Step 7
Figure 1-4 Create Common Roles
Step 8
Figure 1-5 Display Roles
At this point, any user who is assigned to the role of ZoningAdmin can make zoning changes, or use the copy running-configuration startup-configuration command.
Step 9
switch# config terminalswitch(config)#role name ZoningAdminswitch(config-role)# description Zoneset_Administratorswitch(config-role)# rule 1 permit showswitch(config-role)# rule 2 permit config feature zonesetswitch(config-role)# rule 3 permit exec feature zonesetswitch(config-role)# rule 4 permit clear feature zoneswitch(config-role)# rule 5 permit config feature zoneswitch(config-role)# rule 6 permit debug feature zoneswitch(config-role)# rule 7 permit exec feature zoneswitch(config-role)# rule 8 permit exec feature copyStep 10
switch# config terminalswitch(config)# username zoning_user password admin123 role ZoningAdmin
Configuring TACACS+ with Cisco Secure ACS
Cisco Secure ACS can enhance Cisco MDS 9000 switch management security, and provide centralized authentication, authorization, and accounting for users.
Tip
Authentication and Authorization with TACACS+
Configuring a Cisco MDS 9000 switch to use TACACS+ allows centralized account management of the switch. Centralized management means that an admin does not have to create and maintain usernames and passwords on individual switches. The Cisco Secure ACS server provides the authentication to a switch login as well as assigns the role to which the user is a member. A shared secret key provides encryption and authentication between the TACACS client (MDS 9500) and the TACACS+ server (Cisco Secure ACS).
In this procedure:
•
•
•
Configuring Secure ACS Server
Prior to configuring the Cisco MDS 9000 switch, you must configure the Cisco Secure ACS server. To configure Secure ACS to allow the modification of advanced TACACS+ settings, follow these steps:
Step 1
a.
b.
c.
d.
Figure 1-6 Secure ACS Configure Display
Step 2
a.
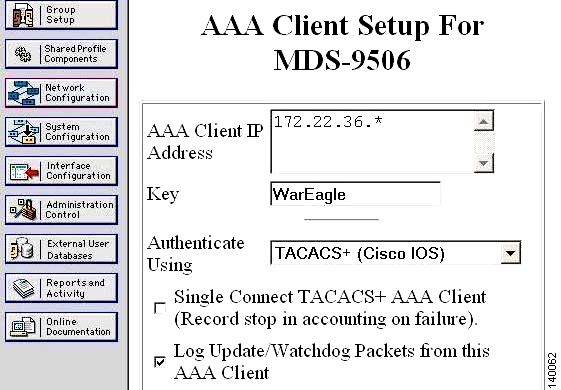
b.
Figure 1-7 Secure ACS Client Setup
Step 3
Groups provide an easy way to assign the same role to multiple users without having to modify the attributes of each user individually. (See Figure 1-8.)
Figure 1-8 Secure ACS: Group Setup
Step 4
Tip
Step 5
Step 6
Step 7
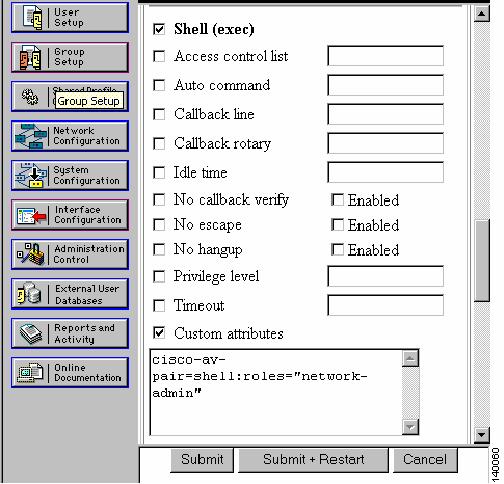
Step 8
Figure 1-9 Secure ACS Adding MDS Role
Step 9
Step 10
Step 11
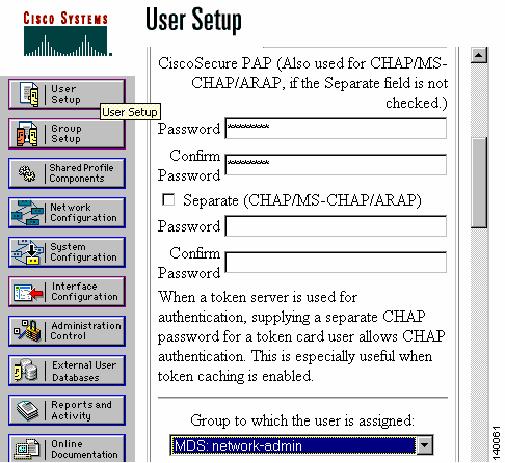
Step 12
Figure 1-10 Secure ACS Creating TACACS+ User
The Secure ACS server configuration is complete. You should now configure the Cisco MDS 9000 switch itself, using either the CLI or the SNMP.
Configuring TACACS+ on the Cisco MDS 9000 Switch
To configure TACACS+ on the switch, follow these steps:
Step 1
ca-9506# conf tEnter configuration commands, one per line. End with CNTL/Z.ca-9506(config)# tacacs+ enableStep 2
ca-9506(config)# tacacs-server host 172.22.36.10 key WarEagleStep 3
ca-9506(config)# aaa group server tacacs+ tacacs-group1ca-9506(config-tacacs+)# server 172.22.36.10Step 4
ca-9506(config)# aaa authentication login default group tacacs-group1The following show commands display the configuration:
ca-9506# show tacacs-servertimeout value:5total number of servers:1following TACACS+ servers are configured:172.22.36.10:available on port:49TACACS+ shared secret:********ca-9506# show aaa authenticationdefault: group tacacs-group1console: localiscsi: localdhchap: localca-9506# show user-accountuser:adminthis user account has no expiry dateroles:network-adminuser:sethexpires on Fri Jun 18 23:59:59 2004roles:network-adminaccount created through REMOTE authenticationLocal login not possible
Note
Accounting with TACACS+
Cisco Secure ACS server can be leveraged to provide a command history that captures which users performed which actions. This information is similar to the CLI show accounting log command. However, by placing logging on a remote system, the logs can be independently examined and are available in case the Cisco MDS 9000 switch is inaccessible. This configuration will build upon the configuration defined in Authentication and Authorization with TACACS+.
Configuring the Cisco MDS 9000 Switch
To configure the Cisco MDS 9000 switch to leverage a TACACS+ server for accounting, follow these steps:
Step 1
switch# conf tswitch(config)# aaa accounting default group tacacs-group1 localStep 2
Configuring Cisco Secure ACS
Because this procedure builds on the configuration defined in Authentication and Authorization with TACACS+, only small modifications need to be made.
To configure the Secure ACS server to monitor for Update/Watchdog packets, modify the client configuration by following these steps:
Step 1
Step 2
Step 3
Figure 1-11 Enabling Accounting on the Secure ACS Server
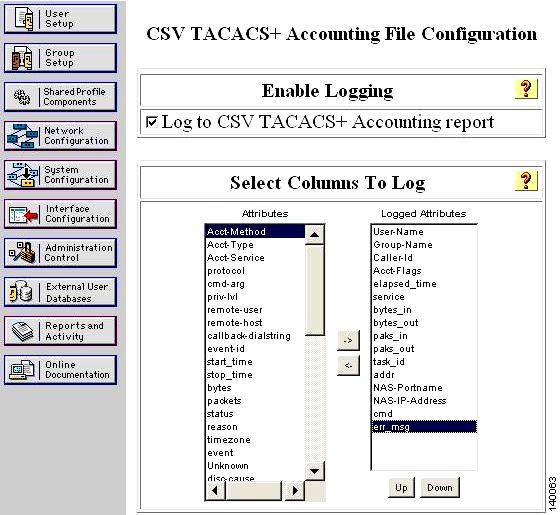
To configure the Secure ACS to display commands, follow these steps:
Step 1
Step 2
Step 3
Step 4
Step 5
Step 6
Figure 1-12 Add MDS Command Logging to Report
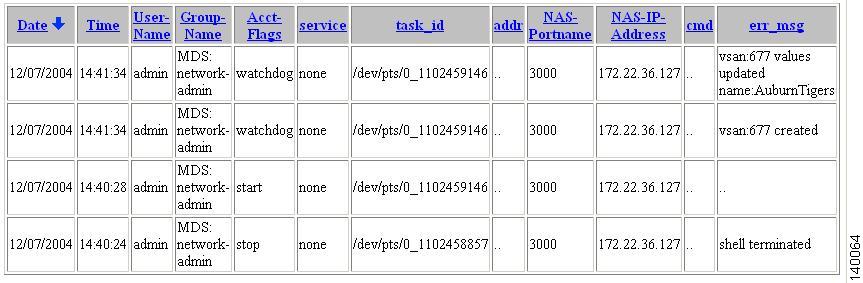
Step 7
Step 8
Step 9
Figure 1-13 Secure ACS Accounting Log
Providing Access Without a Password
In some instances, you may need to access the Cisco MDS 9000 switch without using a password, by using automated scripts or agents. Providing a null password or hard coding the password into the script or agent may be considered a weak security practice; however, leveraging the private/public key infrastructure associated with SSH maintains a solid and secure environment.
The procedure includes creating the appropriate key on a host and then adding it to a new user. Because SSH leverages a private/public key exchange, the Cisco MDS 9000 switch knows only the public key, while the host knows both the public and private keys.
Tip
Warning
To set up a read-only (network-operator) based account that only allows access if the user comes from a host that knows both the public and private keys, follow these steps:
Step 1
$ /usr/bin/ssh-keygen -t rsa1Generating public/private rsa1 key pair.Enter file in which to save the key (/users/testuser/.ssh/identity):/users/setmason/.ssh/identity already exists.Overwrite (y/n)? yEnter passphrase (empty for no passphrase):Enter same passphrase again:Your identification has been saved in /users/testuser/.ssh/identity.Your public key has been saved in /users/testuser/.ssh/identity.pub.The key fingerprint is:c2:4d:6d:26:21:9d:79:9b:c3:86:dc:a5:07:d2:62:d4 testuser@hostOn the host, the file /users/testuser/.ssh/identity.pub is the SSH public key that is encrypted using the rsa1 algorithm. The contents of this file are used in the creation of the Cisco MDS 9000 switch user. In this example, the file looks like this:
$ cat /users/testuser/.ssh/identity.pub1024 35 139198677264732164858153476357747926024656548233745027006381178621992083524037906211714241 450436547019604214530354070873624269283640613058470615170649963414635036859628344005142227 886318134122126153182906740418449098047827961768214148936752631482459130056603268404256522 191410368204629699075809390037814979061 testuser@hostStep 2
172.22.36.11# conf tEnter configuration commands, one per line. End with CNTL/Z.172.22.36.11(config)# ssh key rsa1generating rsa1 key(1024 bits).....generated rsa1 keyca-9506(config)# ssh key dsagenerating dsa key(1024 bits).....generated dsa keyca-9506(config)# ssh key rsagenerating rsa key(1024 bits).....generated rsa keyStep 3
172.22.36.11(config)# ssh server enableStep 4
172.22.36.11# conf tEnter configuration commands, one per line. End with CNTL/Z.172.22.36.11(config)# username testuser role network-operatorwarning: password for user:setmason not set. S/he cannot login currently172.22.36.11(config)# username testuser sshkey 1024 35 139198677264732164858153476357747926024656548233745027006381178621992083524037906211714241 450436547019604214530354070873624269283640613058470615170649963414635036859628344005142227 886318134122126153182906740418449098047827961768214148936752631482459130056603268404256522 191410368204629699075809390037814979061 testuser@host172.22.36.11(config)# endStep 5
172.22.36.11# show user-account testuseruser: testuserthis user account has no expiry dateroles:network-operatorno password set. Local login not allowedRemote login through RADIUS/TACACS+ is possiblessh public key: 1024 35 139198677264732164858153476357747926024656548233745027006381178621992083524037906211714241450436547019604214530354070873624269283640613058470615170649963414635036859628344005142227886318134122126153182906740418449098047827961768214148936752631482459130056603268404256522191410368204629699075809390037814979061 testuser@hostStep 6
$ ssh testuser@172.22.36.11Warning: Remote host denied X11 forwarding.Cisco Storage Area Networking Operating System (SAN-OS) SoftwareTAC support: http://www.cisco.com/tacCopyright (c) 2002-2004, Cisco Systems, Inc. All rights reserved.The copyrights to certain works contained herein are owned byother third parties and are used and distributed under license.Some parts of this software are covered under the GNU PublicLicense. A copy of the license is available athttp://www.gnu.org/licenses/gpl.html.172.22.36.11#If the same user tries logging in from another host that does not have both the private key file (/users/testuser/.ssh/identity) and the public key file (/users/testuser/.ssh/identity), the user will be denied access to the Cisco MDS 9000 switch. The fact that the public key has testuser@host at the end, does not tie it to a specific host, but allows an admin to determine which host it was generated from.
Tip
Step 7
#!/bin/sh#######################################################/usr/local/bin/backup_mds_config.sh# This is used for a cron entry. No arguments are# allowed in cron.Absolute paths to commands must# be specified to ssh for it to work properly# ssh key exchange must be separately configured# for the account "USER"## Adjust the variables for your host and switch######################################################DIR=/mds_configDATE=`date "+%m%d%y_%H%M%S"`SWITCH_NAME=beat_bamaFILE=$SWITCH_NAME"_run_cfg_"$DATEUSER=cwilliamsCOMMAND1="copy running-config startup-config'COMMAND2="show startup-config"#Copy running to startup-config/usr/local/bin/ssh -l $USER $SWITCH_NAME $COMMAND1#Backup MDS config to local file/usr/local/bin/ssh -l $USER $SWITCH_NAME $COMMAND2 > $DIR/$FILEThe cron job that executes the script must be run by the user specified in the script. Configure the crontab for the user:
#Backup MDS config:00 11 29 4 * /usr/local/bin/backup_mds_config.sh > /tmp/mds_log1