
-
Cisco WebEx Meetings Server User Guide Release 2.0
-
Overview of Cisco WebEx Meetings
-
Signing In to WebEx Assistant
-
Selecting Audio and Meet Now Options
-
Joining a Meeting
-
Starting or Scheduling a Meeting
-
Scheduling WebEx Meetings with Microsoft Outlook
-
Managing Your Meeting
-
Managing Meeting Recordings
-
Sending and Receiving Video
-
Sharing Files and Whiteboards
-
Polling Attendees
-
Transferring and Downloading Files During a Meeting
-
Managing and Taking Notes
-
Accessibility
-
Troubleshooting
-
 Feedback
Contents
- Managing Your Meeting
- The Meeting Window
- A Quick Tour of the Meeting Window
- Working with Panels
- Interacting With Other Participants
- Managing Panels
- Restoring the Panel Layout
- Accessing Panel Options
- Resizing the Content Viewer and Panels Area
- Accessing Panels from the Meeting Controls Panel
- Viewing Panel Alerts
- Working With Invitees
- Reminding Invitees to Join Your Meeting
- Inviting People by Email or Phone During a Meeting
- Changing Presenters
- Making a Participant the Presenter When You Are in the Meeting Window
- Making a Participant the Presenter When You Are Sharing
- Transferring the Host Role
- Reclaiming the Host Role
- Obtaining Information About a Meeting in Progress
- Editing a Message or Greeting During a Meeting
- Restricting Access to a Meeting
- Removing a Participant From a Meeting
- Ending a Meeting
Managing Your Meeting
As host, your responsibilities include overall management of the meeting. The meeting window provides a forum for you to manage all aspects of the meeting and enable participants to chat, send video, share information and interact with each other through documents, presentations, whiteboards, applications, and more.
- The Meeting Window
- Working With Invitees
- Changing Presenters
- Transferring the Host Role
- Reclaiming the Host Role
- Obtaining Information About a Meeting in Progress
- Editing a Message or Greeting During a Meeting
- Restricting Access to a Meeting
- Removing a Participant From a Meeting
- Ending a Meeting
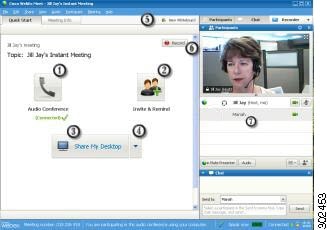
The Meeting Window
A Quick Tour of the Meeting Window
The meeting window provides a forum for you to share information and interact with participants using documents, presentations, whiteboards, applications, and more.
You share or view content using the tools in the meeting window. You can use panels to chat, take notes, and perform other tasks.
When you start or join a meeting, your meeting window opens with the Quick Start area on the left and a panel area on the right. Nearly everything you want to accomplish in a meeting can be done from these areas:
Working with Panels
When your meeting window opens, the area on the right displays some default panels. Other panels are available from an icon tray at the top of the panels area.
Windows
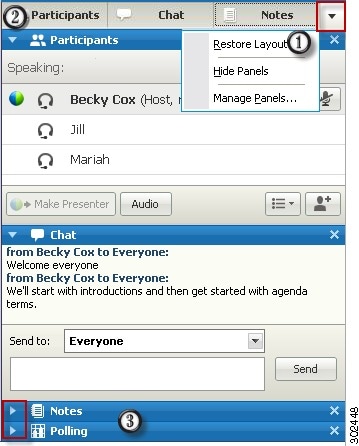
1
Select the down arrow on the icon tray to display the Panels menu.
2
Select an icon from the icon tray to open or close a panel.
3
Select the arrow on the title bar to expand or collapse a panel.
Tip To access panel options, right-click in the panel title bar.
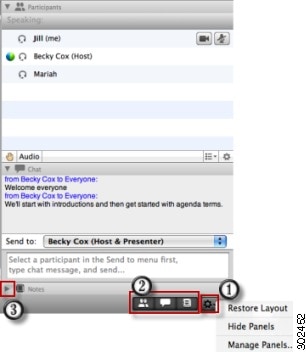
Mac
Interacting With Other Participants
After you start or join a meeting, the meeting window opens and on the right side, you can see all participants who are in the meeting. As other people join, you will see their names appear in the list.
You can interact with other participants in the meeting in different ways, depending on your role:
NoteManaging Panels
ProcedureYou can determine which panels are displayed in the meeting window, and in which order they will be displayed.
Accessing Panel Options
Each panel provides a menu of commands related to the panel. For example, Expand Panel and Close Panel are two common commands for all the panels.
Depending on what operating system you are using, access the commands for a panel by following these steps:
- Windows—Right-click the panel title bar to see a menu of commands related to the panel.
- Mac—Select ctrl and then click to see a menu of commands related to the panel.
Resizing the Content Viewer and Panels Area
When you are sharing a document or presentation, you can control the size of the content viewer by making the panel area narrower or wider. Simply click the dividing line between the content viewer and the panels and do the following:
- Drag the line to the left to make the area devoted to the panels wider.
- Drag the line to the right to make the content viewer larger.
NoteThis feature is unavailable when you are sharing your desktop, an application, or a web browser.
Accessing Panels from the Meeting Controls Panel
While you are sharing a document in full-screen view, or sharing an application, desktop, or web browser, you can access panels from the Meeting Controls panel:

1
Displays icons for working with attendees
2
Displays a maximum of 4 panel icons. You can open any remaining panels from the menu that appears when you select the down arrow.
Stops sharing and returns to the meeting window.
Provides access to meeting controls and panels that are not usually displayed on the Meeting Controls panel, such as Polling and Notes.
Displays the Participants panel.
Displays the Chat panel.
Displays the Annotation Tools panel.
Displays the Recorder panel.
Viewing Panel Alerts
You will see an orange alert if a panel is collapsed or closed and requires your attention.
Some reasons for seeing alerts:
- A participant arrives or leaves a meeting
- A participant starts or stops sending video
- A Raise Hand indicator appears in the Participants list
- The note taker publishes notes
- A participant sends a chat message
- A poll opens or closes
- Poll answers are received
The panel remains in the alert status until you open and view the change.
Working With Invitees
Reminding Invitees to Join Your Meeting
ProcedureIf you see that some invitees have not yet joined after the meeting starts, complete this task to send an email reminder.
Inviting People by Email or Phone During a Meeting
ProcedureAfter you start your meeting, you may find that you forgot to invite a stakeholder or someone else who should be in the meeting.
Step 1 Select Invite & Remind on the Quick Start page. The Invite and Remind dialog box appears.
Step 2 Invite someone to the meeting by one of the following methods:
Changing Presenters
Depending on your site settings, a participant can become the presenter in the following ways:
- Making a Participant the Presenter When You Are in the Meeting Window
- Making a Participant the Presenter When You Are Sharing
Making a Participant the Presenter When You Are in the Meeting Window
During a meeting, you can make any meeting participant the presenter—also referred to as "passing the ball". Any presenter can also pass the ball to make another participant the presenter.
There are numerous ways to make someone the presenter depending on how you are viewing participants. Here are a couple of quick ways to make someone else the presenter.
TipUse the docked tray at the top of your screen to change presenters when you are sharing.
The participant becomes the presenter with all associated rights and privileges for sharing information.
Making a Participant the Presenter When You Are Sharing
ProcedureWhen you are sharing your desktop, an application, or files in full screen mode, the docked tray at the top of your screen provides an easy way to change presenters. Complete the following task to make someone else the presenter using the docked tray.
Transferring the Host Role
As a meeting host, you can transfer the host role—and thus control of the meeting—to a participant at any time. This option can be useful if you need to leave a meeting for any reason.
Before You BeginProcedureIf you plan to reclaim the host role later, write down the host key that appears on the Meeting Info tab in the meeting window.
Step 1 In the Participants list, right-click the name of the person to whom you want to transfer the host role. Step 2 Select Change Role To > Host. A confirmation message appears in which you can verify that you want to transfer control of the meeting to the participant whom you selected.
Step 3 Select OK. The word (host) appears to the right of the participant's name in the Participants list.
Reclaiming the Host Role
If a participant has control of a meeting, you can take it back by reclaiming the host role.
TipIf you leave a meeting—whether intentionally or inadvertently—and then log back in, the system automatically restores your host role once you rejoin.
Before You BeginProcedureYou will require the host key to complete this task. If you did not write it down before transferring the host role to another participant, you can ask the current host to send it to you in a private chat message. The host key appears on the current host's Meeting Info tab in the content viewer.
Obtaining Information About a Meeting in Progress
In the meeting window, choose Meeting > Information.
The Meeting Information window displays general information about the meeting, including the following:
Editing a Message or Greeting During a Meeting
ProcedureWhen scheduling a meeting, you can create a message or greeting to welcome your meeting participants and provide important information or special instructions. Optionally, you can specify that your message appears for participants as soon as they join the meeting. The following task describes how to edit your message during a meeting.
Step 1 In the meeting window, choose Meeting > Welcome Message. The Create an Attendee Greeting page appears.
Step 2 Check Display this message when attendees join. The message or greeting automatically appears once the participant joins the meeting.
Step 3 Edit the message in the Message box. A message or greeting can contain a maximum of 255 characters.
Step 4 Select OK.
Note Participants can view the message or greeting at any time by choosing Meeting > Welcome Message.
Restricting Access to a Meeting
ProcedureOnce a host starts a meeting, the host can restrict access to it at any time. This option prevents anyone from joining the meeting, including invitees who have not yet joined.
Related Information
Removing a Participant From a Meeting
Procedure
Step 1 In the meeting window, open the Participants panel. Step 2 Select the name of the participant whom you want to remove from the meeting. Step 3 Navigate to the top menu bar and choose Participant > Expel. A confirmation message appears in which you can verify that you want to remove the participant from the meeting.
Step 4 Select Yes. The participant is removed from the meeting.
Tip To prevent an expelled participant from rejoining a meeting, restrict access to the meeting.
Related Information
Ending a Meeting
ProcedureOnce you end a meeting, the meeting window closes for all participants. If the meeting includes an integrated voice conference, the audio also ends.
Step 1 In the meeting window, choose File > End Meeting. A confirmation message appears, in which you can verify that you want to end the meeting.
Step 2 (Optional)If there is any meeting information that you have not yet saved, you can save it now—including shared files, chat messages, poll questionnaires, poll results, or notes. Step 3 Select Yes. The meeting window closes.
Tip Alternatively, as the meeting host, you can leave a meeting without ending it. Before you leave a meeting, first transfer the host role to another participant.


