Cisco Compute Hyperconverged with Nutanix GPT-in-a-Box 2.0
Available Languages
Bias-Free Language
The documentation set for this product strives to use bias-free language. For the purposes of this documentation set, bias-free is defined as language that does not imply discrimination based on age, disability, gender, racial identity, ethnic identity, sexual orientation, socioeconomic status, and intersectionality. Exceptions may be present in the documentation due to language that is hardcoded in the user interfaces of the product software, language used based on RFP documentation, or language that is used by a referenced third-party product. Learn more about how Cisco is using Inclusive Language.
- US/Canada 800-553-2447
- Worldwide Support Phone Numbers
- All Tools
 Feedback
 Feedback
In partnership with:
![]()
About the Cisco Validated Design Program
The Cisco Validated Design (CVD) program consists of systems and solutions designed, tested, and documented to facilitate faster, more reliable, and more predictable customer deployments. For more information, go to: http://www.cisco.com/go/designzone
Executive Summary
Cisco Validated Designs (CVDs) consist of systems and solutions that are designed, tested, and documented to facilitate and improve customer deployments. These designs incorporate a wide range of technologies and products into a portfolio of solutions that have been developed to address the business needs of our customers.
Generative Artificial Intelligence (Generative AI) stands as a transformative force across every industry, driving innovation in multiple use cases. Despite opportunities, integrating generative AI into enterprise settings poses unique challenges. Leveraging internal data effectively is critical for on-premises AI solutions. Building the right infrastructure with appropriate computational resources is critical. Visibility and monitoring of the entire stack is important from the operations point of view.
The Cisco Compute Hyperconverged with Nutanix GPT-in-a-Box 2.0 solution takes the complexity out of adopting generative AI by providing prescriptive steps for deploying the underlying infrastructure for Nutanix GPT-in-a- Box 2.0. This solution combines Cisco® servers and SaaS operations with Nutanix software, utilizing the most popular Large Language Models (LLMs) to produce a fully validated AI-ready platform that can simplify and jumpstart your AI initiatives from the data center to the edge.
This document explains the Cisco Validated Design and Deployment for GPT-in-a-Box 2.0 on Cisco Compute Hyperconverged with Nutanix to deploy on-premises Generative AI applications. This solution outlines the design that supports the deployment of an innovative, flexible, and secure generative pretrained transformer (GPT) solution for Generative AI to privately run and manage organization’s choice of AI large language models (LLMs) and applications leveraging it.
Solution Overview
This chapter contains the following:
● Audience
Generative AI is reshaping industries, from dynamic marketing content to interactive virtual assistants and chatbots. However, quick provisioning of models, management, and monitoring of secure LLM end points across several teams within an organization remains a challenge. It is critical to effectively import and deploy certified LLM models and use the internal data of the organization in these applications. A robust infrastructure, observability across the stack, optimized model deployment and serving, high availability, and scaling are some of the other challenges which IT Administrators are facing today.
The solution highlights how enterprises can design and deploy Generative Pretrained Transformer (GPT) solution for Generative AI to privately run and manage organization’s choice of AI large language models (LLMs) and applications leveraging it. The solution effectively focusses to import, generate secure LLM end points and monitor the inference end points provisioned across the organization.
The hardware and software components are integrated so that customers can deploy the solution quickly and economically while eliminating many of the risks associated with researching, designing, building, and deploying similar solutions from the ground up.
This document explains the Cisco Validated Design and Deployment details for GPT-in-a-Box 2.0 solution on Cisco Compute Hyperconverged with Nutanix. The solution presented in this document will address design, reference architecture, and deployment and validates Nutanix Enterprise AI stack providing ease of importing models and generating secure inference end points through NAI dashboard.
This Cisco Validated Design is just one example of a supported GPT configuration. You can design and build a GPT solution in many ways, and you can deviate from this specific configuration while still following CVD best practices.
GPT-in-a-Box 2.0 provides several new features through the latest offerings from Nutanix Cloud Platform and validated on the industry’s first hyperconverged solution using a modular server architecture:
● An enterprise Grade inference endpoint provided by Nutanix Enterprise AI which provides an easy way to deploy your choice of LLMs (large language models) from leading LLM providers and create and manage secure APIs to connect your GenAI applications.
● An enterprise-grade Kubernetes solution Nutanix Kubernetes Platform Integrating seamlessly with Nutanix's hyperconverged infrastructure, NKP is ideal for businesses aiming to accelerate application modernization while maintaining operational consistency and scalability.
● Validated on Cisco Compute Hyperconverged X-Series System combines the operational simplicity of the Nutanix Cloud Platform with the flexibility and efficiency of the award-winning Cisco UCS X-Series Modular System, enabling organizations to easily deploy, scale, and upgrade hyperconverged clusters with a more sustainable, future-ready solution.
● The solution supports Cisco UCS X-Series Direct to address all your edge, retail, and small and remote-office use cases.
The intended audience of this document includes IT decision makers like CTOs and CIOs, IT architects and customers who are working on or interested in design, deployment, and life cycle management of generative AI systems and applications.
GPT-in-a-Box 2.0 on is a new turnkey solution that includes everything needed to build AI-ready infrastructure. AI applications can be easily deployed on top of GPT-in-a-Box 2.0.
Cisco Compute Hyperconverged with Nutanix GPT-in-a-Box 2.0 solution is a reference architecture that combines:
● Nutanix GPT-in-a-Box 2.0 software-defined solution
● Cisco Compute Hyperconverged X-Series modular system
● Cisco UCS X210c M7 All-NVMe server with Cisco UCS X440p PCIE node configured with 2x NVIDIA L40S GPU configured and managed through Cisco Intersight
● Nutanix Prism Central for deploying and managing solution software components
● A range of the Nutanix certified large language models which can be easily imported through Hugging Face or Nvidia NGC Catalog
GPT-in-a-Box 2.0 solution software component includes:
● Uses NKP as Kubernetes Platform and Nutanix Unified Storage (NUS)
● Leverages Nutanix Enterprise AI
● Integrates with Nutanix Unified Storage
Some highlights of the solution include the following:
● AI-ready platform to enable customers to quickly design, size, and deploy an on-premises AI solution
● Quickly deploy off-the-shelf AI applications or empower developers to build their own
● A single-cloud operating model using Nutanix Cloud Platform hyperconverged infrastructure with graphic processing units (GPUs)
● Nutanix Unified Storage (NUS) for total data management, security, privacy, and resilience
● Generate secure inference end points with imported LLM models deployed on GPU pods
● Support for popular AI/ML frameworks
● LLM freedom of choice through custom imports enabled though Nutanix Enterprise AI
Generative AI: Concepts and Components
This chapter contains the following:
● What is Generative AI Inferencing?
This chapter explains various concepts of Generative AI, including model development workflow, inferencing challenges and use cases.
Generative AI is a powerful branch of artificial intelligence that holds immense potential for addressing various challenges faced by enterprises. With generative AI, users and applications can quickly generate new content based on a variety of inputs; inputs and outputs to these models can include text, images, sounds, animation, 3D models, or other types of data. Due to the versatility of generative AI models, applications leveraging them can perform multiple tasks based on available data and inputs, increasing functionality beyond just text and image generation or chat-based Q&A.
How Does Generative AI Compare to Traditional AI?
Generative AI can create new content, chat responses, designs, synthetic data, and more. Traditional AI, on the other hand, is focused on detecting patterns, making decisions, honing analytics, classifying data, and detecting fraud.
As more organizations recognize the value of using AI to create new content, they’re now exploring large language models (LLMs) and other generator models. Since pretrained LLMs are available, known as foundation models, adopting generative AI requires less upfront training compared with traditional AI models. This results in significant cost and time savings when developing, running, and maintaining AI applications in production.
While 2023 has been the year of Generative AI with the introduction of ChatGPT and models like Stable Diffusion, the technology has been in development for some time. NVIDIA and other companies have been researching and innovating in this space for years, which has helped lead us to where we are today. Examples include StyleGAN (2018), which creates realistic images of people, and GauGAN (2019), which allows you to create fingerpaint-style images that instantly become realistic landscapes. NVIDIA has released an app based on this research called Canvas, and these technologies have been used broadly by ecosystem partners.
What is Generative AI Inferencing?
Generative AI inferencing refers to the process of using a trained generative AI model (large language models and non-large language models) to generate new data or content based on input or contextual cues. During inferencing, the model applies its learned knowledge to produce outputs that are not direct repetitions of the training data but are rather novel creations generated by the model.
The inferencing process is crucial for leveraging the generative capabilities of the models in practical applications. It allows users to obtain novel outputs by providing inputs or guiding the model's behavior based on specific requirements or constraints. The generated content can be used for various creative purposes, prototyping, or as a tool for exploration in different domains.
The term "inferencing" in the context of generative AI is associated with generating content like:
● Text Generation
◦ Storytelling: Generative models can create fictional stories, narratives, or even entire chapters of books.
◦ Poetry and Prose: AI models can generate poetic verses, prose, or creative writing.
◦ Dialogues: Conversational agents powered by generative models can produce human-like dialogues.
● Image Generation
◦ Artistic Creations: Generative Adversarial Networks (GANs) can generate visually appealing and artistic images.
◦ Style Transfer: Models can transform images into different artistic styles.
◦ Face Synthesis: GANs can create realistic faces of non-existent individuals.
● Music Composition
◦ Melody Generation: AI models can compose original melodies and music.
◦ Genre-specific Music: Generative models can create music in specific genres, mimicking different styles.
● Code Generation
◦ Source Code: AI models can generate code snippets or even entire programs based on a given task or description.
● Language Translation
◦ Multilingual Text: Models like OpenAI's GPT can generate text in multiple languages.
◦ Translation: AI models can translate text from one language to another while preserving context.
● Content Summarization
◦ Text Summaries: Generative models can summarize large blocks of text into concise and coherent summaries.
● Content Completion
◦ Sentence Completion: AI models can complete sentences or paragraphs in a way that fits the context.
◦ Text Expansion: Generative models can expand on given ideas or concepts.
● Product Descriptions
◦ E-commerce Descriptions: AI models can generate product descriptions for e-commerce websites.
● Scientific Writing
◦ Research Abstracts: Models can generate abstracts or summaries of scientific research papers.
● Conversational Agents
◦ Chatbot Responses: AI-powered chatbots can generate responses in natural language during conversations.
Generative AI is a broad category that includes models designed to generate new and original content. This content can be in various forms, such as images, text, audio, or even video. Large language models are a specific subset of generative AI designed to understand and generate human language. They are primarily focused on natural language processing tasks.
Large language models (LLMs) are a class of natural language processing models which uses deep learning methodologies to comprehend and generate human language. These models are trained in vast amounts of textual data to learn the patterns, structures, and nuances of language.
One of the notable examples of LLMs is the GPT (Generative Pre-trained Transformer) series developed by OpenAI.
Key features of large language models include:
● Scale: LLMs are characterized by their large number of parameters, often ranging from tens of millions to billions. The scale of these models allows them to capture complex linguistic patterns and generate diverse and contextually relevant text.
● Pre-training: LLMs are typically pre-trained on a massive corpus of text data before being fine-tuned for specific tasks. During pre-training, the model learns to predict the next word in a sentence or fill in missing words, which helps it acquire a broad understanding of language.
● Transformer Architecture: LLMs, including GPT, are built on the Transformer architecture, which enables efficient processing of sequential data. Transformers use self-attention mechanisms to capture relationships between words in a sentence, facilitating better context understanding.
● Transfer Learning: LLMs leverage transfer learning, where the knowledge gained during pre-training on a general language understanding task is transferred to specific tasks with minimal additional training. This approach allows these models to excel in a variety of natural language processing (NLP) applications.
● Fine-tuning: After pre-training, LLMs can be fine-tuned for specific tasks, such as text classification, language translation, summarization, and more. This fine-tuning process adapts the model to the nuances of the target application.
● Diverse Applications: Large Language Models find applications in a wide range of tasks, including but not limited to natural language understanding, text generation, sentiment analysis, machine translation, question answering, and chatbot development.
The development of Large Language Models has significantly advanced the field of natural language processing, enabling the creation of sophisticated AI systems capable of understanding, and generating human-like text across various domains. However, ethical considerations, biases in training data, and potential misuse are important considerations associated with the deployment of these models.
Model Parameters
Model parameters are the internal variables or weights that the model learns during the training process. Weights are the coefficients that scale the input features in a neural network. In the context of LLMs, these weights determine the strength of connections between neurons in different layers. For example, in a transformer model, weights are associated with the attention mechanisms and transformations applied to input sequences.
LLMs often consist of multiple layers, each with its set of weights and biases. In transformer architectures, these layers may include self-attention mechanisms and feedforward neural networks. The parameters of each layer capture different aspects of the input data.
The total number of parameters in an LLM is a critical factor in its capacity to capture complex language patterns and nuances.
Typical Generative AI workflow starts with aligning to business objectives while maintaining a concise and accurate technical focus in every stage.
Business Strategy and Use Case Definition: Define generative AI objectives aligning with business goals.
● Key Tasks
◦ Identify use cases.
◦ Clearly define the generative task, whether it's image generation, text generation, style transfer, etc.
◦ Establish goals and success metrics.
Data Preparation and Curation: Ensure high-quality, well-managed dataset availability.
● Key Tasks
◦ Gather a diverse and representative dataset for training the generative model.
◦ Data cleansing and labeling.
◦ Data aggregation and preprocessing.
◦ Increase the diversity of the training data through techniques like rotation, scaling, or flipping.
◦ Anonymization or synthetic data generation if required.
◦ Leveraging MLOps platforms for efficient data management.
Model Training: Utilize accelerated infrastructure for efficient training.
● Key Tasks
◦ Training from scratch or selecting pretrained models.
◦ Allocating heavy computational resources.
◦ Optimizing performance with validated, high-performance infrastructure.
Model Customization: Fine-tuning, prompt learning (including prompt tuning and P-tuning), transfer learning, reinforcement learning.
● Key Tasks
◦ Adapt pretrained models to specific business needs.
◦ Implement customization methods based on requirements.
Inferencing: Deploy and operate trained models for ongoing generation.
● Key Tasks
◦ Scale computing resources (scaling up or out) based on demand.
◦ Iterate on inferencing based on new data and customization opportunities.
◦ Continuous monitoring of inferencing performance.
◦ Identification and optimization of opportunities for further customization and fine-tuning.
This workflow emphasizes technical aspects, highlighting the importance of infrastructure efficiency, model customization techniques, and ongoing optimization in the inferencing phase.
Technology Overview
This chapter contains the following:
● Cisco Compute Hyperconverged X9508 Chassis
● Cisco Compute Hyperconverged with Nutanix
As applications and data become more distributed from core data center and edge locations to public clouds, a centralized management platform is essential. IT agility will be a struggle without a consolidated view of the infrastructure resources and centralized operations. Cisco Intersight provides a cloud-hosted, management and analytics platform for all Cisco Compute for Hyperconverged, Cisco UCS, and other supported third-party infrastructure deployed across the globe. It provides an efficient way of deploying, managing, and upgrading infrastructure in the data center, ROBO, edge, and co-location environments.
Cisco Intersight provides:
● No Impact Transition: Embedded connector allows you to start consuming benefits without forklift upgrade.
● SaaS/Subscription Model: SaaS model provides centralized, cloud-scale management and operations across hundreds of sites around the globe without the administrative overhead of managing the platform.
● Enhanced Support Experience: A hosted platform allows Cisco to address issues platform-wide with the experience extending into TAC supported platforms.
● Unified Management: Single pane of glass, consistent operations model, and experience for managing all systems and solutions.
● Programmability: End to end programmability with native API, SDK’s and popular DevOps toolsets will enable you to deploy and manage the infrastructure quickly and easily.
● Single point of automation: Automation using Ansible, Terraform, and other tools can be done through Intersight for all systems it manages.
● Recommendation Engine: Our approach of visibility, insight and action powered by machine intelligence and analytics provide real-time recommendations with agility and scale. Embedded recommendation platform with insights sourced from across Cisco install base and tailored to each customer.
For more information, go to the Cisco Intersight product page on cisco.com.
Cisco Intersight Virtual Appliance and Private Virtual Appliance
In addition to the SaaS deployment model running on Intersight.com, you can deploy on-premises options separately. The Cisco Intersight virtual appliance and Cisco Intersight private virtual appliance are available for organizations that have additional data locality or security requirements for managing systems. The Cisco Intersight virtual appliance delivers the management features of the Cisco Intersight platform in an easy-to-deploy VMware Open Virtualization Appliance (OVA), Microsoft Hyper-V Server or a Nutanix AHV virtual machine, which allows you to control the system details that leave your premises. The Cisco Intersight private virtual appliance is provided in a form factor designed specifically for users who operate in disconnected (air gap) environments. The private virtual appliance requires no connection to public networks or to Cisco network.
Licensing Requirements
The Cisco Intersight platform uses a subscription-based license with two different tiers. You can purchase a subscription duration of 1, 3, or 5 years and choose the required Cisco UCS server volume tier for the selected subscription duration. You can purchase any of the following higher-tier Cisco Intersight licenses using the Cisco ordering tool:
● Cisco Intersight Essentials: Essentials includes all the functions of the Base license plus additional features, including Cisco UCS Central software and Cisco Integrated Management Controller (IMC) supervisor entitlement, policy-based configuration with server profiles, firmware management, and evaluation of compatibility with the Cisco Hardware Compatibility List (HCL).
● Cisco Intersight Advantage: Advantage offers all the features and functions of the Base and Essentials tiers. It also includes storage widgets and cross-domain inventory correlation across compute, storage, and virtual environments (VMware ESXi). OS installation for supported Cisco UCS platforms is also included.
Servers in the Cisco Intersight Managed Mode require at least the Essentials license. For more information about the features provided in the various licensing tiers, go to: https://www.intersight.com/help/saas/getting_started/licensing_requirements/lic_intro
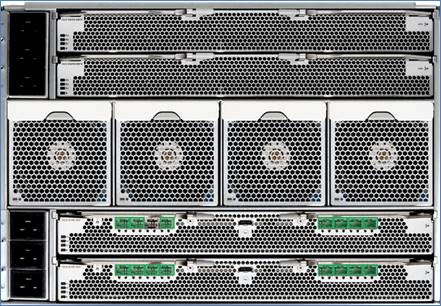
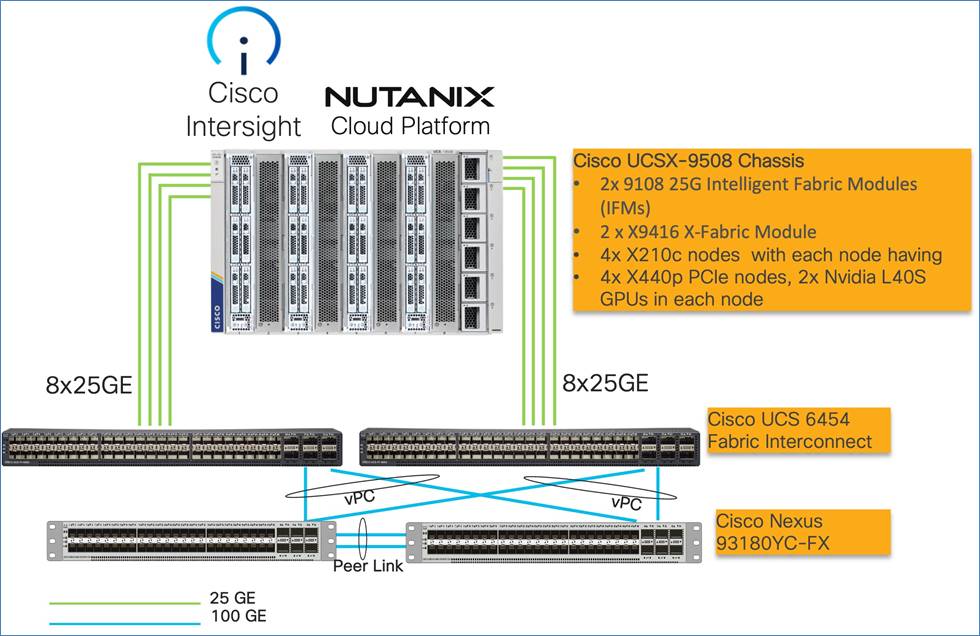
Cisco Compute Hyperconverged X9508 Chassis
Cisco and Nutanix have partnered to introduce the industry’s first hyperconverged solution using a modular server architecture. The Cisco Compute Hyperconverged X-Series System combines the operational simplicity of the Nutanix Cloud Platform with the flexibility and efficiency of the award-winning Cisco UCS X-Series Modular System, enabling organizations to easily deploy, scale, and upgrade hyperconverged clusters with a more sustainable, future-ready solution. There is also support for Cisco UCS X-Series Direct to address all your edge, retail, and small and remote-office use cases.
The Cisco Compute Hyperconverged X-Series System with Nutanix combines the operational simplicity of Nutanix Cloud Platform (NCP) with the efficiency, flexibility, and sustainability of the Cisco UCS X-Series Modular System. The X-Series system comprises modular components that can be assembled into systems through the Cisco Intersight cloud-operations platform.
The Cisco Compute Hyperconverged X-Series System is engineered to be adaptable and future-ready. With a midplane-free design, the system achieves I/O connectivity, using frontloading, vertically oriented compute and accelerator nodes that intersect with horizontally oriented I/O connectivity modules in the rear of the chassis. In the front of the chassis, Cisco Compute Hyperconverged X210c M7 All NVMe Nodes with Intel® Xeon® Scalable Processors offer compute density and storage capacity in a single form factor and the Cisco UCS X440p PCIe Node supports adding GPUs with PCIe Gen 4.0 with the Cisco UCS X9416 X-Fabric Module.
In the rear of the chassis, a unified Ethernet fabric is supplied with Cisco UCS 9108 100G Intelligent Fabric Modules and the Cisco UCS X9416 X-Fabric Module, part of the Cisco UCS X-Fabric Technology, supply PCIe Gen 4 industry-standard protocols for GPU accelerators. Interconnections can be easily updated with new modules supporting faster Ethernet, PCIe Gen 5, and CXL.
Cisco Compute Hyperconverged X-Series Direct is a self-contained system with a pair of integrated fabric interconnects and can be used if you do not want top-of-rack fabric interconnects and need to support edge, retail, and small or remote-office use cases.
The X-Series system was designed with sustainability in mind and is equipped with power-delivery and cooling innovations designed to reduce material waste and energy consumption.
Features and Benefits
● 7-Rack-Unit (7RU) chassis has 8x front-facing flexible slots. These can house a combination of hyperconverged nodes, compute nodes, and a pool of future I/O resources that may include GPU accelerators, disk storage, and nonvolatile memory.
◦ 2x 9108 25G Intelligent Fabric Modules (IFMs) at the top of the chassis that connect the chassis to upstream 6400 Series Fabric Interconnects or 6500 Series fabric interconnects. Each IFM features:
◦ Up to 100 Gbps of unified fabric connectivity per compute node.
◦ 8x 25-Gbps SFP28 uplink ports / 8x 100-Gbps SFP28 uplink ports. The unified fabric carries management traffic to the Cisco Intersight cloud-operations platform, Fibre Channel over Ethernet (FCoE) traffic, and production Ethernet traffic to the fabric interconnects.
● At the bottom are slots ready to house future I/O modules that can flexibly connect the compute modules with I/O devices. The connectivity is named Cisco UCS X-Fabric technology because the “X” is a variable that can evolve with new technology developments.
● Six 2800W Power Supply Units (PSUs) provide 54 V power to the chassis with N, N+1, and N+N redundancy. A higher voltage allows efficient power delivery with less copper and reduced power loss.
● Efficient, 4x100mm, dual counter-rotating fans deliver industry-leading airflow and power efficiency. Optimized thermal algorithms enable different cooling modes to best support the network environment. Cooling is modular so that future enhancements can potentially handle open-or closed-loop liquid cooling to support even higher-power processors.
|
|
|

Benefits
Since we first delivered the Cisco Unified Computing System™ (Cisco UCS) in 2009, our goal has been to simplify the data center. We pulled management out of servers and into the network. We simplified multiple networks into a single unified fabric. And we eliminated network layers in favor of a flat topology wrapped into a single unified system. With the Cisco Compute Hyperconverged X-Series System, we take that simplicity to the next level:
● Simplified operations with a solution that combines the operational simplicity of hyperconverged software with the efficiency and flexibility of a modular system.
● Increased agility and response to the dynamic needs of your business with a solution that is inherently easy to scale and includes support for future generations of processors, storage, accelerators, networking technologies, and SaaS innovations.
● Improved sustainability with a solution that is engineered to be more energy efficient and can be easily upgraded and reused, lowering the consumption of power and raw materials when compared to traditional rack servers.
Cisco UCS X210c M7 All-NVMe/All-Flash Servers
The Cisco Compute Hyperconverged X210c M7 All NVMe Node delivers performance, flexibility, and optimization for deployments in data centers, in the cloud, and at remote sites. This enterprise-class server offers market-leading performance, versatility, and density without compromise for workloads. Up to eight hyperconverged nodes can reside in the 7-Rack-Unit (7RU) Cisco Compute Hyperconverged X9508 Chassis, offering one of the highest densities of compute, I/O, and storage per rack unit in the industry.
For more information, see the Cisco Compute Hyperconverged X210c M7 All NVMe Node Data Sheet.

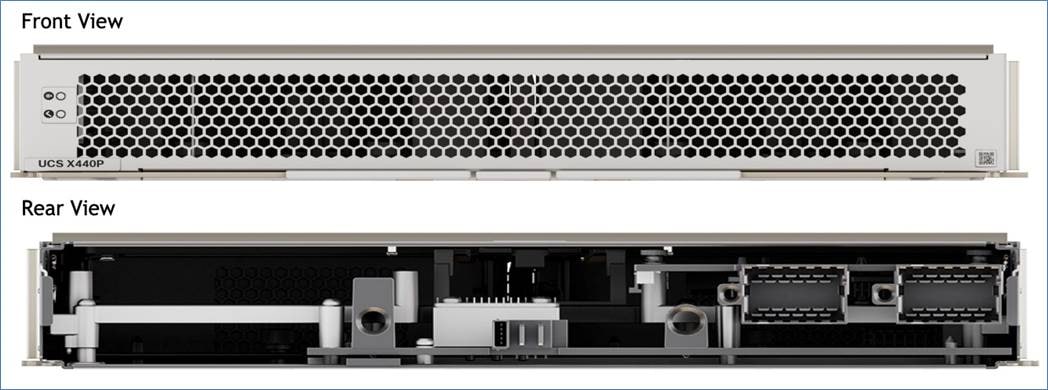
Cisco UCS X440p PCIe Node
The Cisco UCS X440p PCIe Node is the first PCIe resource node to integrate into the Cisco UCS X-Series Modular System. The Cisco UCS X9508 Chassis has eight node slots, up to four of which can be X440p PCIe nodes when paired with a Cisco UCS X210c M6 Compute Node. The Cisco UCS X440p PCIe Node supports two x16 full-height, full-length dual slot PCIe cards, or four x8 full-height, full-length single slot PCIe cards and requires both Cisco UCS 9416 X-Fabric modules for PCIe connectivity. This provides up to 16 GPUs per chassis to accelerate your applications with the Cisco UCS X440p Nodes. If your application needs even more GPU acceleration, up to two additional GPUs can be added on each Cisco UCS X210c compute node.
Cisco UCS X440p supports the following GPU options:
● NVIDIA H100 NVL, 400W, 94GB, 2-slot FHFL GPU
● NVIDIA H100: 350W, 80GB, 2-slot FHFL GPU
● NVIDIA L40S: 350W, 48GB, 2-slot FHFL GPU
● NVIDIA L4 Tensor Core, 70W, 24GB
● NVIDIA A16 PCIE 250W 4X16GB
For more information, see the Cisco Compute Hyperconverged 440p PCIe Node.
Cisco Compute Hyperconverged with Nutanix
Cisco and Nutanix have come together to offer the industry’s most simple, comprehensive HCI solution. The Cisco Compute Hyperconverged with Nutanix solution combines the Cisco Unified Computing System (UCS) innovative server, networking, and SaaS management with Nutanix’s leading HCI foundation, offering a fully integrated and validated system with flexible deployment options and a unified, enhanced support model backed by two world-class organizations.
The solution offers the following key benefits:
● Complete simplicity: The solution offers both SaaS and on-premises management options and includes day-0 through day-N operations, including server profiles for compute, storage, and networking customized for Nutanix to help simplify and accelerate cluster deployment and deliver better performance and resiliency. This also includes preinstalled software configured with a choice of hypervisor for a faster, easier start. Cisco and Nutanix combined and complementary cloud operating models provide control, visibility, and consistency across highly distributed IT environments, including fully integrated cluster installation, expansion, and end-to-end software and firmware upgrades. To simplify the buying experience, the complete solution can be ordered and delivered from Cisco.
● Complete flexibility: The Cisco Compute Hyperconverged with Nutanix solution addresses modern applications and use cases, offering multiple choices in UCS server deployment options, the latest accelerator and drive technologies, and SaaS innovations from two industry powerhouses, including integrations with the leading public cloud providers. Additionally, the solution incorporates Cisco's best-in-class networking technology, including Cisco ACI integrations, to enhance performance and resiliency for data-intensive workloads in hybrid cloud environments.
● Complete resiliency: The joint solution utilizes only enterprise-grade components and offers augmented system protection with a collaborative support model and proactive, automated resilience and security capabilities. This includes integrated support systems and case notes for faster triage. Any time log files are uploaded, or case notes are generated, that information is shared between Cisco TAC and Nutanix support, enabling enhanced collaboration among support teams to resolve issues faster and provide an improved customer experience.
● Our policy-based approach minimizes human error and configuration drift, resulting in consistent, reliable cluster deployments.
● It also enforces overall security posture through centralized authorizations, preventing tampering of configurations.

This solution provides a reference architecture for GPT-In-Box in the enterprises using NVIDIA L40S GPUs.
NVIDIA L40S GPU
The NVIDIA L40S GPU is the most powerful universal GPU for the data center, delivering end-to-end acceleration for the next generation of AI-enabled applications—from gen AI, LLM inference, small-model training and fine-tuning to 3D graphics, rendering, and video applications.
The L40S GPU is optimized for 24/7 enterprise data center operations and designed, built, tested, and supported by NVIDIA to ensure maximum performance, durability, and uptime. The L40S GPU meets the latest data center standards, is Network Equipment-Building System (NEBS) Level 3 ready, and features secure boot with root of trust technology, providing an additional layer of security for data centers.
Table 1. NVIDIA L40S Tensor Core GPU Specifications
|
|
L40S PCIe GPU |
| GPU Architecture |
NVIDIA Ada Lovelace Architecture |
| GPU Memory |
48GB GDDR6 with ECC |
| GPU Memory Bandwidth |
864GB/s |
| Interconnect Interface |
PCIe Gen4 x16: 64GB/s bidirectional |
| NVIDIA Ada Lovelace Architecture-Based CUDA® Cores |
18,176 |
| NVIDIA Third-Generation RT Cores |
142 |
| NVIDIA Fourth-Generation Tensor Cores |
568 |
| RT Core Performance TFLOPS |
209 |
| FP32 TFLOPS |
91.6 |
| TF32 Tensor Core TFLOPS |
183 | 366 |
| BFLOAT16 Tensor Core TFLOPS |
362.05 | 733 |
| FP16 Tensor Core |
362.05 | 733 |
| FP8 Tensor Core |
733 | 1,466 |
| Peak INT8 Tensor TOPS |
733 | 1,466 |
| Peak INT4 Tensor TOPS |
733 | 1,466 |
| Form Factor |
4.4" (H) x 10.5" (L), dual slot |
| Display Ports |
4x DisplayPort 1.4a |
| Max Power Consumption |
350W |
| Power Connector |
16-pin |
| Thermal |
Passive |
| Virtual GPU (vGPU) Software Support Yes |
Yes |
| NVENC | NVDEC |
3x | 3x (includes AV1 encode and decode) |
| Secure Boot With Root of Trust |
Yes |
| NEBS Ready |
Level 3 |
| MIG Support |
No |
| NVIDIA® NVLink® Support |
No |
This chapter contains the following:
● Nutanix Files and Objects Design
● Backup and Disaster Recovery
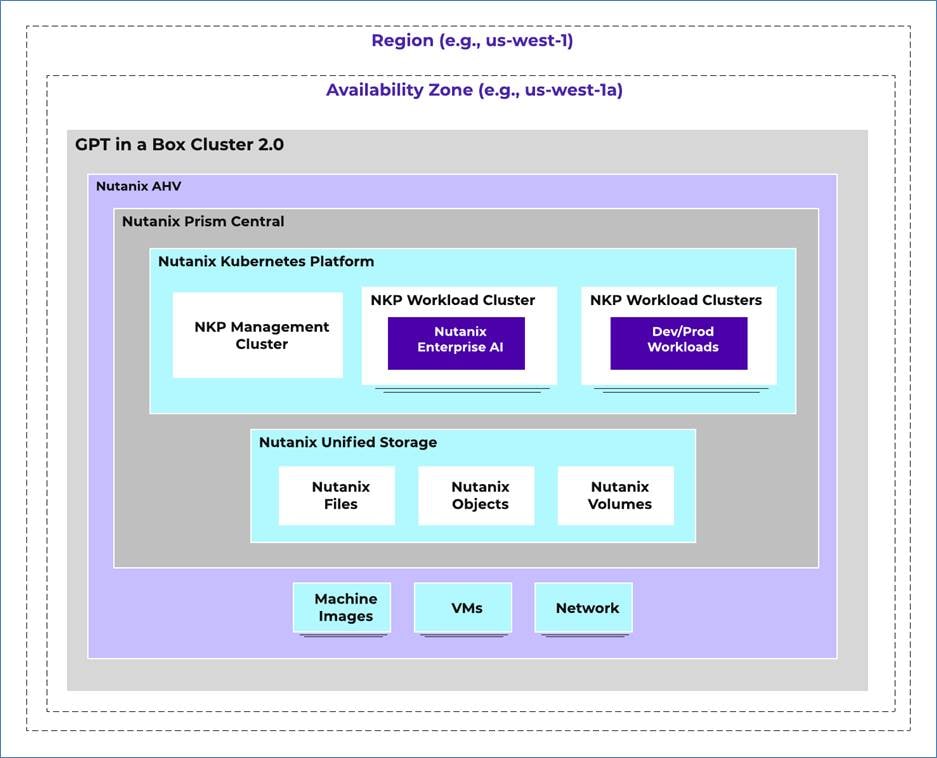
This solution provides a foundational reference architecture for AI-ready platform to enable you to quickly design, size, and deploy an on-premises AI solution. The key design components configured in this solution are elaborated in Figure 5.

This design includes the following hardware and software components:
● Single availability zones (AZs) in a single region in an on-premises Cisco Compute Hyperconverged (CCHC) with Nutanix cluster.
◦ The CCHC with Nutanix (AHV) cluster deployed on Cisco X-Series chassis with 4x X210C All NVMe compute node each paired with UCS X440p PCIe node each equipped with 2x NVIDIA L40S: 350W, 48GB GPUs.
● The CCHC with Nutanix cluster hosts the following key Nutanix services:
◦ Nutanix Unified Storage (NUS).
◦ Nutanix Kubernetes Platform designed to simplify deployment, scaling, and management of containerized applications across hybrid and multicloud environments, integrating seamlessly with Nutanix's hyperconverged infrastructure.
◦ An enterprise Grade inference endpoint provided by Nutanix Enterprise AI which provides an easy way to deploy your choice of LLMs (large language models) from leading LLM providers and create and manage secure APIs to connect your GenAI applications.
Note: Nutanix Prism Central was hosted on same Nutanix AHV Cluster. Prism Central can be deployed either on the existing cluster or on a separate AHV based Nutanix cluster.
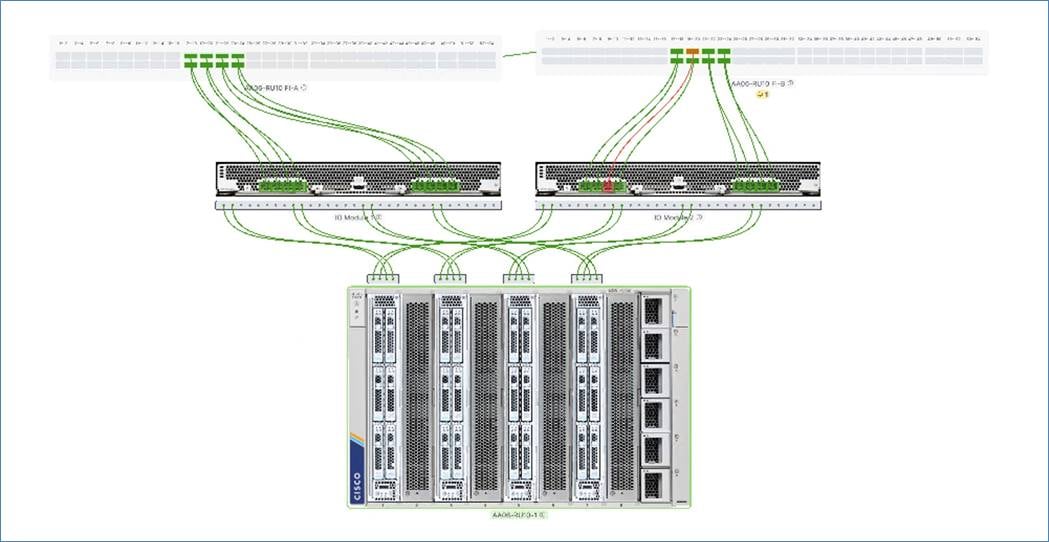
The deployment architecture for Cisco Compute Hyperconverged with Nutanix GPT-in-a-Box 2.0 is detailed in the figure below. The entire Day 0 deployment is managed through workflow defined in Nutanix Foundation Central.
CCHC with Nutanix cluster for GPT-in-a-box 2.0 is managed through Prism Central deployed on the same Nutanix AHV cluster. Prism Central can also be deployed on a separate AHV based Nutanix Cluster.
The Cisco UCS X-Series system is connected to a pair of Cisco UCS 6536 Fabric Interconnect managed through Cisco Intersight.
Each X210c M7 All-NVMe server is configured with:
● 2x Intel I6442Y processor (2.6GHz/225W 24C/60MB).
● 1 TB DDR5 memory (32x 32GB DDR5-4800 RDIMM).
● 2x 240GB M.2 card managed through M.2 RAID controller.
● 6x 3.8 TB NVMe.
● 1x Cisco VIC 15420 enabling up to 50 Gbps of unified fabric connectivity to each of the chassis Intelligent Fabric Modules (IFMs) for 100 Gbps connectivity per server.
● 2x NVIDIA L40S: 350W, 48GB GPUs.
Go to the Bill of Materials (BoM) section for the complete specifications of the infrastructure deployed to validate this solution.
Figure 6 illustrates the hardware deployment architecture for Cisco Compute Hyperconverged with Nutanix GPT-in-a-Box.
The solution features a single Nutanix cluster that hosts the following services, among others:
● Nutanix management components, including Prism Central
● NUS to provide NFS storage and S3-compatible storage capabilities
● NKP cluster
● Nutanix Enterprise AI
Software Revisions
Table 2 lists the software revisions for various components of the solution.
| Device |
Image Bundle |
Comments |
| Cisco UCS 6536 Fabric Interconnect |
4.3(4.240066) |
Cisco UCS GA release for infrastructure including FIs and Server Firmware |
| Cisco Compute Hyperconverged X210c M7 All NVMe Node |
5.2(2.240074) |
4x Cisco Compute Hyperconverged X210c M7 All NVMe Node |
| NVIDIA L40S: 350W, 48GB GPUs |
lcm_nvidia_aie_20230302.102001_550.127.06 |
Download from the Nutanix Portal |
| Nutanix AOS/AHV Cluster on UCS Managed X-Series modular system |
6.10 |
|
| Prism Central hosted on separate Nutanix AHV cluster |
2024.3 |
|
| Nutanix Kubernetes Platform (NKP) |
2.13 |
|
| Files enabled through Nutanix marketplace and hosted on GPT-in-a-Box 2.0 cluster |
5.0.03 |
|
| Nutanix Enterprise AI |
|
|
Cisco Compute Hyperconverged with Nutanix GPT-in-a-Box 2.0 utilizes 100GbE end-to-end network.
Figure 8 illustrates the network design used in this solution.
The key aspects of network design are as follows:
● Each of the 2x Cisco UCS Intelligent Fabric Module (IFM) are connected to 8x 25G on Cisco UCS Fabric Interconnects.
● Each node is equipped with 1x Cisco UCS VIC 15420 2x 50G mLOM.
● The network ports in the hypervisor are configured in Active-Passive Mode. These are configured automatically during automated cluster installation.
● The deployment in Intersight Managed Mode and does not support bond mode 4 (LACP).
● Fabric Interconnect ports are separate from 100G Uplink ports and can be connected via the core LAN or through dedicated management network switch.
VLAN Configuration
Table 3 lists the VLANs configured for this solution.
| VLAN ID |
Name |
Usage |
IP Subnet used in this deployment |
| 2 |
Native-VLAN |
Use VLAN 2 as native VLAN instead of default VLAN (1). |
|
| 1080 |
OOB-MGMT-VLAN |
Out-of-band management VLAN to connect management ports for various devices. |
10.108.0.0/24; GW: 10.108.0.254 |
| 1081 |
NTNX-VLAN |
VLAN utilized for Nutanix Cluster Management, Files & Objects Services, and Nutanix Kubernetes deployment. |
10.108.1.0/24; GW: 10.108.1.254 |
| 1082 |
NTNX-AI-VLAN |
VLAN utilized, Files & Objects Services, and Nutanix Kubernetes deployment. |
10.108.2.0/24; GW: 10.108.2.254 |
|
|
|
|
|
Table 4 lists the IP Address Assignment for this solution.
| Type |
VLAN |
IP Address Range |
DNS Entries |
Comments |
| UCS Management |
1080 |
10.108.0.110-120 |
|
UCS Management and Out of Band Server Management |
| Nutanix Cluster |
1081 |
10.108.1.71-80 |
|
Nutanix Nodes AHV, CVM, iSCSI Data Service and Cluster VIP |
| Prism Central |
1082 |
10.108.2.51 VIP 10.208.2.60 |
pc2024.nai.rtp4.local |
Prism Central hosted on a separate AHV Nutanix Cluster |
| File Server (PE managed) |
1082 |
10.108.2.94 |
fileserver002.nai.rtp4.local |
Hosted on GPT-in-a-Box 2.0 cluster |
| IPAM for File services |
1082 |
10.108.1.95-101 |
|
Configured on Prism Central |
| IPAM for Nutanix Kubernetes Services |
1082 |
10.102.2.61-75 |
IPAM for Nutanix Kubernetes Services |
1082 |
The design incorporates a single GPU-enabled Nutanix cluster dedicated to GPT-in-a-Box 2.0 workloads that offers access to large language models (LLMs). Supporting management applications like Prism Central and file and object storage are hosted on this cluster.
Size the Nutanix GPT-in-a-Box 2.0 cluster Controller VM (CVM) with 16 vCPU and 64 GB of memory.
This design uses one region with a single AZ that hosts the GPT-in-a-Box 2.0 cluster. This solution doesn't use any replication targets to protect the workloads because the focus is to host the GPT workloads in a single cluster.
Table 5. Cluster Design Decisions
| Design Option |
Validated Selection |
| Cluster size |
Ensure the full redundancy of all components in the datacenter. |
| CPU |
Use at least 24 cores and a high clock rate. |
| Minimum cluster size |
Use at least 4 nodes. |
| Cluster expansion |
Expand in increments of 1. |
| Maximum cluster size |
Use at most 16 nodes. |
| Networking |
Use 100 GbE networking. |
| Cluster replication factor |
Use storage replication factor 2. |
| Cluster high availability configuration |
Guarantee high availability. |
| VM high availability |
Enable high availability reservation on the clusters. |
Cluster Resilience
VM high availability ensures that VMs restart on another AHV host in the AHV cluster when a host becomes unavailable, either because the original AHV host has a complete failure or becomes network partitioned or because of an AHV host management process failure. When the AHV host where a VM is running becomes unavailable, the VM turns off; therefore, from the perspective of the VM operating system, VM high availability involves a full VM start cycle.
Table 6. High Availability Configuration
| Feature |
Description |
Setting |
| High availability reservation |
Guarantee compute failover capacity within cluster for application |
Enabled |
| Rebuild capacity reservation |
Guarantee storage rebuild capacity within cluster |
Enabled |
Cisco Compute Hyperconverged with Nutanix GPT-in-a-Box 2.0 utilizes a distributed, shared-nothing architecture for storage.
Figure 10 illustrates the storage design used in this solution.
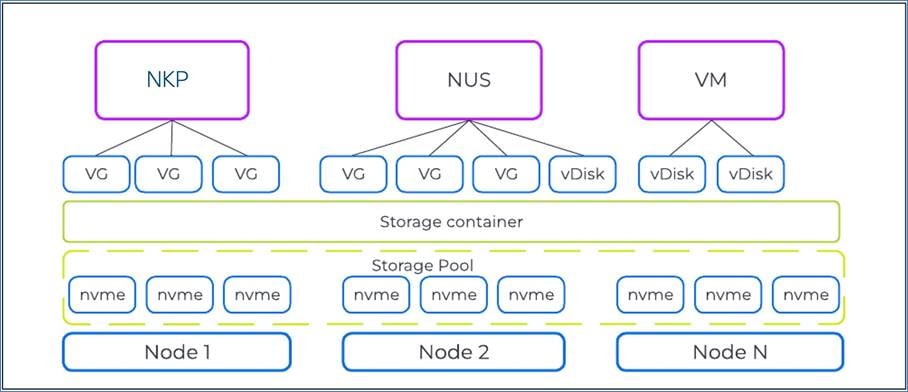
When creating the Nutanix AHV cluster, the following storage containers are automatically created:
● NutanixManagementShare: Used for Nutanix features like Files and Objects and other internal storage needs; doesn't store workload vDisks
● SelfServiceContainer: Used by the NCM Self-Service Portal to provision VMs
● Default-Container-XXXX: Used by VMs to store vDisks for user VMs and applications
In addition to the automatically created storage containers, the following additional storage containers are created during the Nutanix Files and Objects deployment:
● NTNX_<fileserver_name>_ctr: Provides storage for the file server instances, which provide NFS storage for the application tier
● objectsd<uniqueidentifier>: Data container for Nutanix Objects
● objectsm<uniqueidentifier>: Metadata container for Nutanix Objects
The Default-Container stores VMs and their vDisks. The additional containers for Nutanix Files and Objects are created throughout the deployment process of the respective components.
Note: To increase the effective capacity of the cluster, the design enables inline compression on all storage containers. It doesn't use additional functionalities such as deduplication or erasure coding. Replication factor 2 protects against the loss of a single component in case of failure or maintenance.
Data Reduction and Resilience Options
To increase the effective capacity of the cluster, the design enables inline compression on all storage containers. It doesn't use additional functionalities such as deduplication or erasure coding. Replication factor 2 protects against the loss of a single component in case of failure or maintenance.
Table 7. Data Reduction Settings
| Container |
Compression |
Deduplication |
Erasure Coding |
Replication Factor |
| Default-Container-XXXX |
On |
Off |
Off |
2 |
| NutanixManagementShare |
On |
Off |
Off |
2 |
| SelfServiceContainer |
On |
Off |
Off |
2 |
| NTNX_files_ctr |
On |
Off |
Off |
2 |
| objects containers |
On |
Off |
Off |
2 |
Table 8 lists the information about the storage decisions made for this design.
Table 8. Storage Design Decisions
| Design Option |
Validated Selection |
| Sizing a cluster |
Use an all-flash cluster to provide low-latency, high-throughput storage to support the application's active data set. |
| Node type vendors |
Don't mix node types from different vendors in the same cluster. |
| Node and disk types |
Use similar node types that have similar disks. Don't mix nodes that contain NVMe SSDs in the same cluster with hybrid SSD or HDD nodes. |
| Sizing for node redundancy for storage and compute |
Size all clusters for n + 1 failover capacity. |
| Fault tolerance and replication factor settings |
Configure the cluster for fault tolerance 1 and configure the container for replication factor 2. |
| Inline compression |
Enable inline compression. |
| Deduplication |
Don't enable deduplication. |
| Erasure coding |
Don't enable erasure coding. |
| Availability domain for cluster |
Use node awareness. |
| Storage containers in cluster |
The cluster has the following storage containers: NutanixManagementShare, SelfServiceContainer, Default-Container, NTNX_files_ctr, and the two objects storage containers. |
| Reserve rebuild capacity |
Enable reserve rebuild capacity. |
Nutanix Files and Objects Design
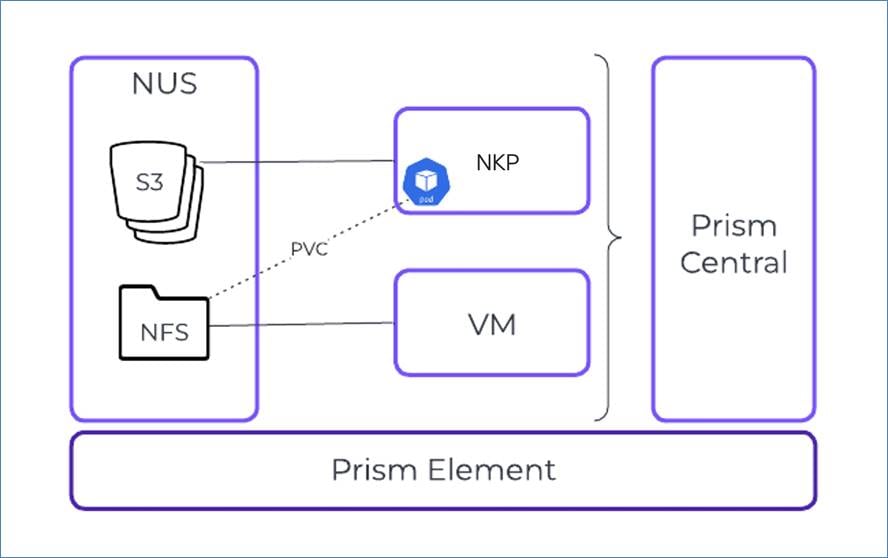
Cisco Compute Hyperconverged with Nutanix GPT-in-a-Box 2.0 utilizes Nutanix Files providing high-performance, shared storage to applications using the NFS protocol. Nutanix Files temporarily stores the LLMs and makes them available across VMs and Kubernetes services.
Nutanix Objects provides S3-compatible storage capabilities to the application and enables users to upload new data models.
Nutanix Files and Objects run on the same Nutanix cluster as the GPT-in-a-Box 2.0 workloads.
Note: In the existing GPT-in-a-Box 2.0 solution, Prism Element should be utilized to deploy Nutanix Files instance.
Note: If you plan to expand the environment, you can also run Nutanix Files or Nutanix Objects in a dedicated cluster.
Figure 11 illustrates the Nutanix Files and Objects design. The VM displayed in Figure 11 is an end user or jump host used to mount the NFS share and store the LLMs.
Nutanix Files and Objects have the following network requirements:
● For maximum performance, the storage network for Nutanix Files uses the same subnet as the CVMs.
● To maximize security, the client network connects to a separate subnet.
● The GPT-in-a-Box 2.0 cluster that provides a single file server instance requires three storage network IP addresses and four client network IP addresses for its three file server VMs (FSVMs).
Nutanix Objects runs as a containerized service on a Kubernetes microservices platform, which provides benefits such as increased velocity of new features. Several of the required storage IP addresses are for functions related to the underlying microservices platform. You must also manage these networks. Nutanix Objects, with three worker nodes, requires seven storage network IP addresses and two client network IP addresses.
Each cluster provisioned by NKP has minimum IP address requirements. A Kubernetes cluster in a production-level layout with three worker nodes requires one static IP address and eight or more IPAM addresses.
The client network provides all IP addresses. You might need additional IPAM addresses for additional worker nodes.
For more information, go to: Nutanix Files, Nutanix Objects, and Nutanix Kubernetes Engine Network Design.
Table 9 lists information about the Nutanix Files and Objects decisions made for this design.
Table 9. GPT-in-a-Box 2.0 Files Design Decisions
| Design Option |
Validated Selection |
| FSVM cluster size |
Use 3 FSVMs. |
| vCPU and memory for FSVM |
Use 12 vCPU and 64 GB of memory for each FSVM. |
| Storage networking |
Keep the storage network in the same subnet as the CVMs and AHV. |
| Client networking |
Use a separate subnet to provide client access to storage. |
| Fault tolerance and replication factor settings |
Configure the cluster for fault tolerance 1 and configure the container for replication factor 2. |
| Storage containers |
Use a separate storage container to host NUS files. |
| Erasure coding |
Don't enable erasure coding. |
| Compression |
Enable compression. |
| Deduplication |
Don't enable deduplication. |
| Shares to create |
Create 1 share |
| Protocols for shares |
Use NFS for shares. |
For more information, go to: Nutanix Files and Nutanix Objects Design Decisions.
Table 10. GPT-in-a-Box 2.0 Objects Design Decisions
| Design Option |
Validated Selection |
| Nutanix Objects cluster size |
Use 3 worker nodes and 2 load balancer nodes. |
| Worker node size |
Use 10 vCPU and 32 GB of memory for each worker node. |
| Load balancer node size |
Use 2 vCPU and 4 GB of memory for each load balancer node. |
| Storage networking |
Keep the storage network in the same subnet as the CVMs and AHV. |
| Client networking |
Use a separate subnet to provide client access to storage. |
| Fault tolerance and replication factor settings |
Configure the cluster for fault tolerance 1 and configure the container for replication factor 2. |
| Storage containers |
Use a separate storage container to host NUS Objects. |
| Erasure coding |
Don't enable erasure coding. |
| Compression |
Enable compression. |
| Deduplication |
Don't enable deduplication. |
| Buckets to create |
Create 3 buckets: milvus (vector database), documents (for end-user access), and backup (backup target). |
Management components such as Cisco Intersight (cloud managed) Prism Central, Active Directory, DNS, and NTP are critical services that must be highly available. Prism Central is the global control plane for Nutanix, responsible for VM management, application orchestration, micro segmentation, and other monitoring and analytics functions.
This solution utilizes two key management plane:
● Cisco Intersight (cloud managed) supports the entire Cisco UCS X-Series modular system. It enables server, fabric, and storage provisioning as well as device discovery, inventory, configuration, diagnostics, monitoring, fault detection, auditing, and statistics collection.
● Prism Central was deployed as single VM on a separate Nutanix AHV cluster. Prism Central manages the following:
◦ Nutanix Files and Objects
◦ VMs
◦ RBAC
◦ Monitoring, observability, and auditing for the core Nutanix Services
● Nutanix Kubernetes Platform is managed through commander dashboard
● Nutanix Enterprise AI is managed through NAI dashboard
DNS Management
Name resolution and SSL certificate management are critical to deploying and managing Kubernetes clusters. In this solution, DNS root domain is hosted locally on a windows DNS server. Subdomains map the DNS and route the traffic to the Kubernetes clusters.
Note: In the existing deployment, local DNS with self-signed certificates were utilized.
Monitoring
Monitoring in the solution falls into two categories: event monitoring and performance monitoring. Each category addresses different needs and issues.
In a highly available environment, you must monitor events to maintain high service levels. When faults occur, the system must raise alerts on time so that administrators can take remediation actions as soon as possible. This solution configures the Nutanix platform's built-in ability to generate alerts in case of failure.
In addition to keeping the platform healthy, maintaining a healthy level of resource usage is also essential to the delivery of a high-performing environment. Performance monitoring continuously captures and stores metrics that are essential when you need to troubleshoot application performance. A comprehensive monitoring approach tracks the following areas:
● Application and database metrics
● Operating system metrics
● Hyperconverged platform metrics
● Network environment metrics
● Physical environment metrics
By tracking a variety of metrics in these areas, the Nutanix platform can also provide capacity monitoring across the stack. Most enterprise environments inevitably grow, so you need to understand resource usage and the rate of expansion to anticipate changing capacity demands and avoid any business impact caused by a lack of resources.
Monitor the Conceptual Design
In this design, Prism Central performs event monitoring for the Nutanix core infrastructure. This NVD uses syslog for log collection; for more information, see the Security and Compliance section. SMTP-based email alerts serve as the channel for notifications in this design. To cover situations where Prism Central might be unavailable, each Nutanix cluster in this NVD sends out notifications using SMTP as well. The individual Nutanix clusters send alerts to a different receiving mailbox that's only monitored when Prism Central isn't available.
Prism Element transmits the data to Prism Central using an API. Prism Central then transmits the log to Nutanix Pulse (using the Secure Sockets Layer) and the syslog server using the User Datagram Protocol (UDP). All components (PC, NUS and NKP) send the alerts to the monitoring system using SMTP.
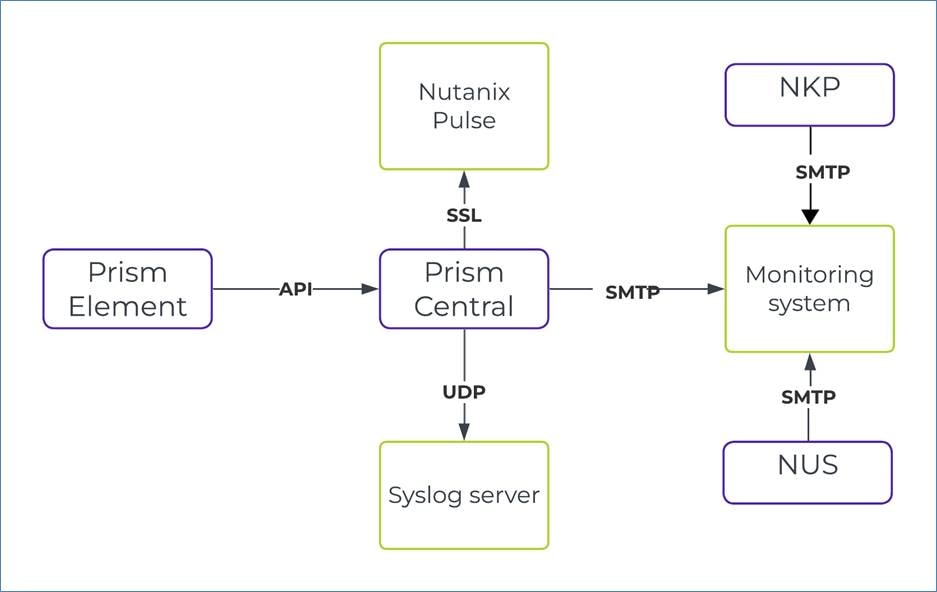
Prism Central monitors cluster performance in key areas such as CPU, memory, network, and storage usage, and captures these metrics by default. When a Prism Central instance manages a cluster, Prism Central transmits all Nutanix Pulse data, so it doesn't originate from individual clusters. When you enable Nutanix Pulse, it detects known issues affecting cluster stability and automatically opens support cases.
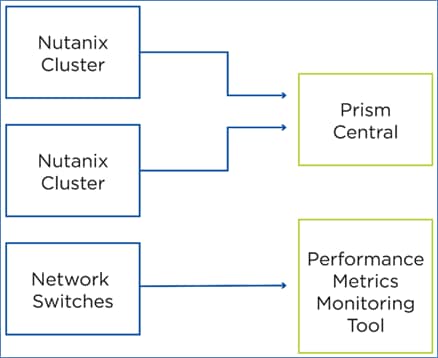
The network switches that connect the cluster also play an important role in cluster performance. A separate monitoring tool that's compatible with the deployed switches can capture switch performance metrics. For example, an SNMP-based tool can regularly poll counters from the switches.
Table 11 lists the descriptions of the monitoring design decisions.
Table 11. Monitoring Design Decisions
| Design Option |
Validated Selection |
| Platform performance monitoring |
Prism Central monitors Nutanix platform performance. |
| Network switch performance monitoring |
A separate tool that performs SNMP polling to the switches monitors network switch performance. |
| SMTP alerting |
Use SMTP alerting; use an enterprise SMTP service as the primary SMTP gateway for Prism Element and Prism Central. |
| SMTP alerting source email address |
Configure the source email address to be clustername@<yourdomain>.com to uniquely identify the source of email messages. For Prism Central, use the Prism Central host name in place of cluster name. |
| SMTP alerting Prism Central recipient email address |
Configure the Prism Central recipient email address to be primaryalerts@<yourdomain>.com. |
| SMTP alerting Prism Element recipient email address |
Configure the Prism Element recipient email address to be secondaryalerts@<yourdomain>.com. |
| NCC reports |
Configure daily NCC reports to run at 6:00 AM local time and send them by email to the primary alerting mailbox. |
| Nutanix Pulse |
Configure Nutanix Pulse to monitor the Nutanix cluster and send telemetry data to Nutanix. |
Nutanix recommends a defense-in-depth strategy for layering security throughout any enterprise datacenter solution. This design section focuses on validating the layers that Nutanix can directly oversee at the control and data-plane levels.
Security Domains
Isolate Nutanix cluster management and out-of-band interfaces from the rest of the network using firewalls and only allow direct access to them from the management security domain. In addition, Nutanix recommends separating out-of-band management and cluster management interfaces onto a dedicated VLAN away from the application traffic.
Syslog
For each control plane endpoint (Prism Central), system-level internal logging goes to a centralized third-party syslog server that runs in the existing customer landscape. The system is configured to send logs for all available modules when they reach the syslog Error severity level.
This design assumes that the centralized syslog servers are highly available and redundant, so you can inspect the log files in case the primary log system is unavailable.
Certificates
SSL endpoints serve all Nutanix control plane web pages. In the deployment and validation, self-signed certificates are utilized. The existing solution can replace the default self-signed certificates with certificates signed by an internal certificate authority from a Microsoft public key infrastructure (PKI). Any client endpoints that interact with the control plane should have the trusted certificate authority chain preloaded to prevent browser security errors.
Note: Certificate management is an ongoing activity, and certificates need to be rotated periodically. This solution signs all certificates for one year of validity.
Note: In the existing deployment, local DNS with self-signed certificates were utilized
Table 12. Security Design Decisions
| Design Option |
Validated Selection |
| Data-at-rest encryption (DaRE) |
Don't use DaRE. |
| SSL endpoints |
Sign control plane SSL endpoints with an internal trusted certificate authority (Microsoft PKI). |
| Certificates |
Provision certificates with a yearly expiration date and rotate accordingly. |
| Authentication |
Use Active Directory LDAPS authentication. |
| Control plane endpoint administration |
Use a common administrative Active Directory group for all control plane endpoints. |
| Cluster lockdown mode |
Don't enable cluster lockdown mode (allow password-driven SSH). |
| Non-default hardening options |
Enable AIDE and hourly SCMA. |
| System-level internal logging |
Enable error-level logging to an external syslog server for all available modules. |
| Syslog delivery |
Use UDP transport for syslog delivery. |
Table 13. Security Configuration References
| Design Option |
Validated Selection |
| Active Directory |
AD-admin-group:ntnx-ctrl-admins |
| Syslog Server |
infra-az[1..2]-syslog:6514 (udp) |
This conceptual design outlines a robust, highly available Kubernetes environment on the Nutanix platform, using Nutanix Kubernetes Platform (NKP) and integrating with essential Kubernetes tools (many of which come pre-canned with NKP) and practices for efficient and secure operations.
Table 14. GPT-in-a-Box 2.0 Cluster with NKP License Design Decisions
| License Type |
Reason |
| NKP Ultimate |
Application Catalogs & Gitops with built in FluxCD to push out workloads to multiple clusters. Workspaces & Projects provide isolation (in terms of access); cluster profile definition (in terms of Applications that will be deployed to it); and segregation (in terms of cluster-wide and namespace specific workloads). |
In this design, a single NKP Ultimate Management Cluster is used to manage and push out workloads and configuration to multiple Workload Clusters via NKP Application Catalogs Apps and NKP Continuous Delivery (CD) mechanism. The NKP Management cluster is used for management only. NAI and its supporting components run on one NKP workload cluster with GPU node pools. GenAI Apps and supporting components run on another workload cluster(s). The data resides locally within these clusters or in a S3 bucket (Nutanix Objects) or NFS share (Nutanix Files). All production Kubernetes clusters are set up as production-level clusters using multiple control plane and worker nodes distributed across different physical hosts to ensure high availability.
When a NKP cluster is built, the following preconfigured Cloud Native tools are deployed automatically for NKP's internal use:
Note: Although these are for internal use, they can also be used by workloads running on the cluster.
● Certificate Management - Cert-Manager
● Ingress Controller - Traffic
● Authentication - Dex
● CD - FluxCD
● Kubernetes Dashboard
● Policy Admission Webhook - Gatekeeper
● Cost Management - Kubecost
Table 15. GPT-in-a-Box 2.0 Cluster with NKP Workspace & Projects Design Decisions
| Workspaces & Projects |
Reason |
| Workspaces |
Two workspaces are created as there are two category of clusters (such as NAI Cluster and GenAI Cluster(s)), which require different kind of resources (NAI cluster requires GPUs and GenAI does not). Also, these run different kind of workloads and would most likely be managed by two different teams. |
| Projects |
A Project is created for each GenAI Application in the GenAI Workspace (which creates a namespace in the associated cluster(s)), as this allows multiple Application teams to share clusters. The Project Continuous Delivery mechanism makes deploying apps easy across all clusters associated with the project. |
The following NKP workspaces are created and the NKP workload cluster(s) are deployed to:
● NAI Workspace: One NAI Workload Cluster deployed to this workspace
● GenAI Workspace: One or more GenAI Workload Clusters deployed to this workspace
The Common NKP Workspace Applications explicitly enabled from the NKP Application catalog in both Workspaces (NAI and GenAI) are:
● Logging - Logging Operator, Grafana Logging, Grafana Loki, Fluent Bit
● Monitoring - Prometheus Monitoring, Prometheus Adapter
● Backup & Recovery - Velero with Nutanix Objects as the S3 Compatible Object Store used for storage
● Object Store - Rook Ceph, Rook Ceph Cluster
The NKP Workspace Applications explicitly enabled only on the NAI Workspace are:
● Istio Service Mesh
● NVIDIA GPU Operator
● Knative
● Nutanix Enterprise AI
The GenAI App Project is created in the GenAI Workspace and used to deploy the GenAI app leveraging its Continuous Delivery (CD) mechanism. The cluster(s) in the GenAI Workspace is/are explicitly attached to this project.
Note: Additional projects can be added to this workspace to allow more than one App team to share cluster(s) in the GenAI Workspace.
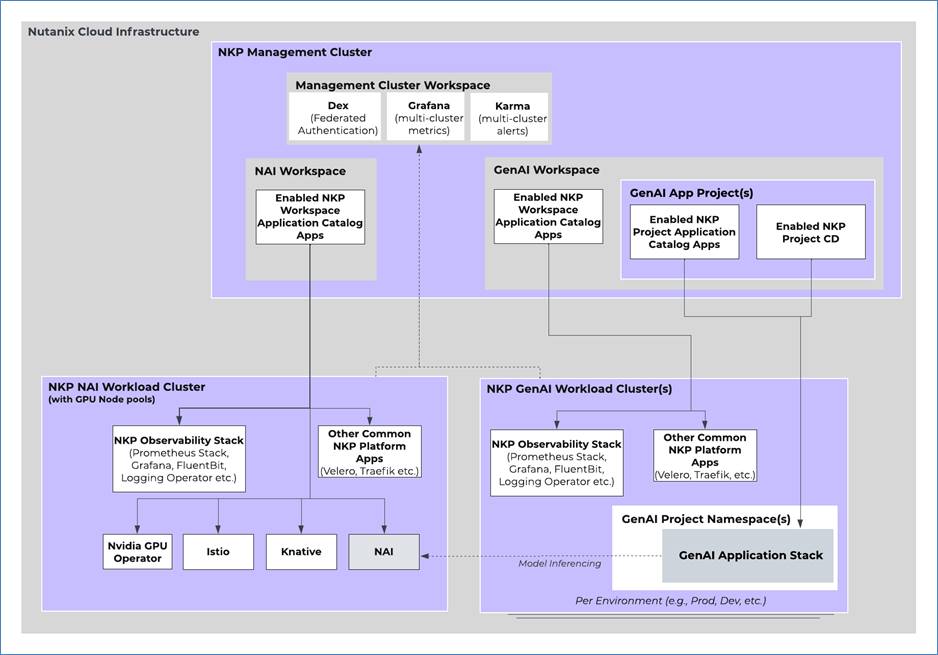
Table 16. GPT-in-a-Box 2.0 Cluster with NKP Scalability Design Decisions
| Design Option |
Validated Selection |
| NKP cluster type |
Use a NKP Ultimate License. |
| Control plane size |
Size the control plane with 4 CPU and 16 GB of memory, and 80 GB of storage. |
| Initial Workload size |
Start with 4 worker nodes with 8 CPU, 32 GB of memory, and 100 GB of storage. |
| GPU pool size (NAI cluster only) |
Use 2 worker nodes with 12 CPU, 40 GB of memory, and 100 GB of storage. |
The workloads are divided into NKP Management, GPT-in-a-Box 2.0 NAI, and Production/Development environments. Since there is only a single NKP management cluster, it is named <custom-prefix>-nkp-mgmt. Nutanix Enterprise AI is running in a dedicated cluster in the NAI workspace <custom-prefix>-nai. The following naming convention is used for workload clusters: <custom-prefix>-<cluster_type>-<environment_id>-wl-<app_id>-<optional_app_index_number>.
Note: NKP cluster names use a maximum of 63 characters and have the same restriction as any kubernetes resource (such as the Cluster name must be valid DNS-1035 label). Which means it can only contain lowercase alphanumeric characters and hyphens and must start and end with an alphanumeric character.
In this design, the NKP Management or Workload cluster's worker nodes can be scaled to accommodate different workload sizes. Nutanix recommends scaling out. The total number of workers in the GPU node pools is constrained by the number of physically installed GPUs.
All GPUs are licensed to run NAI, but this design will keep some GPU in spare for dev/experimental workloads:
● NKP Management Cluster:
◦ cvd-nkp-mgmt
● GPT-in-a-Box 2.0 NAI Environment
◦ cvd-nai (2 GPU nodes with 2 L40s)
● Prod-Environment:
◦ cvd-nai-wl-01
Kubernetes Resilience
NKP clusters are production-level clusters that provide a resilient control plane by running multiple nodes for the control plane and etcd. To ensure high availability, Kubernetes deployments use multiple replica pods and implement pod anti-affinity rules. This approach helps maintain service availability, even in the event of a worker node update or failure.
Kubernetes services and ingress controllers perform the essential service of load balancing by evenly distributing network traffic across all available pods, enhancing service reliability and system performance.
Kubernetes Networking
Each deployed cluster uses a base configuration for networking:
● kube-vip: Load-balancing service
● nginx-ingress: Ingress service for L4 and L7 network traffic
● cert-manager: Service that creates valid SSL certificates for TLS application services
● Local DNS with self-signed certificate
Kubernetes Monitoring
NKP comes with a fully integrated Observability stack out-of-the-box. The logging stack is disabled by default and needs to be enabled explicitly.
The Monitoring stack uses:
● Prometheus for metric collection and alert generation. It uses Prometheus Operator and allows modifying the configuration using CRDs such as PrometheusRules, ServiceMonitors, and so on.
● Prometheus Adapter for serving Kubernetes metric API
● AlertManager for alerting
● Grafana for visualization of metrics with a rich set of pre-created custom dashboards
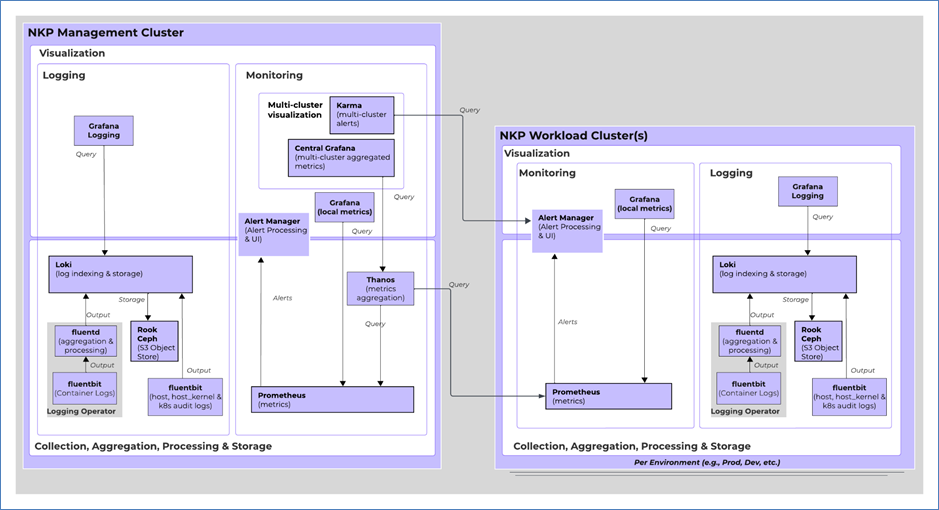
Additionally, for centralized monitoring, the NKP Management cluster runs Thanos for metric aggregation from all attached clusters. A centralized Grafana instance hosts dashboards to convert these metrics to meaningful information. Similarly, Karma provides a multi-cluster dashboard for Alerts.
The Logging stack uses:
● Fluentbit for host, host_kernel, audit log collection
● Logging-Operator for container log collection and forwarding
● Loki for log indexing and storage (these are stored by default in a locally deployed rook-ceph Object Store)
● Grafana Logging for logs and audit dashboard visualization.
All clusters run their local logging and monitoring stack. A Thanos instance running on the management cluster aggregates metrics from all Prometheus instances across NKP clusters. The management cluster runs an instance of Karma, which pulls alerts from workload clusters and shows them in its dashboard.
Kubernetes and application-level monitoring is based on the core infrastructure monitoring concept. The observability stack uses OpenTelemetry to collect and move the following data between the Kubernetes clusters:
● Kubelet metrics
● Host metrics
● Kubernetes cluster metrics
● Kubernetes events
● Pod logs
● Prometheus metrics from service monitors
● Application-specific data from instrumentalization
Kubernetes Backup
The default storage class installed by NKP during deployment provides persistent storage for the management and workload clusters. The persistent volumes and application data in the clusters can be protected by a Velero backup schedule and stored in a S3 bucket provided by Nutanix Objects. A bucket in the local Nutanix Object store can be configured as the Backup Storage Location and replicated to an external location.
This reference design presents a robust architecture for running LLM applications around the Kubernetes-based Nutanix AI inference endpoint, using NKP as the orchestration platform. It provides a comprehensive, scalable, and efficient framework tailored for building RAG pipeline applications. This framework capitalizes on the latest LLM technologies and supporting tools, ensuring ease of development, deployment, and monitoring.
Large Language Model Logical Design
At the core of this architecture are the LLM inference endpoints, which are provided through the Nutanix Enterprise AI platform. This essential component plays a critical role in deploying and managing machine learning models, particularly for addressing real-time inference requirements. The integration with the Nutanix GPT-in-a-Box 2.0 Design guarantees scalability, reliable accessibility, and consistent performance.
The modular architecture enables independent scaling and updating of each component, providing flexibility for system optimization. Its compatibility with the RAG framework allows the LLM to query and retrieve data from the Milvus vector database, significantly improving the accuracy and relevance of generated outputs.
The data ingestion process is designed for versatility, supporting both batch processing and event-driven workflows using Kafka. This dual approach allows the system to handle large-scale periodic batch uploads as well as continuous real-time data streams seamlessly. Event processing is implemented using serverless functions built on Knative, which are triggered by Nutanix Objects event notifications relayed through Kafka. This architecture ensures efficient, scalable, and highly responsive handling of incoming data streams. Intel AMX features are discovered automatically by embedding function to allow optimized processing of the data.
Once the domain-specific documents are ingested, the data is then vectorized using LangChain, where the embedding model encodes its data into vector representations. These vectors are then stored into Milvus, a scalable and high-performance vector database. Nutanix Objects provides the robust back-end storage necessary to meet the large-scale data demands of Milvus.
During the inference process, its integration with the RAG pipeline architecture allows the LLMs running on Nutanix Enterprise AI to dynamically query and retrieve relevant information from the Milvus vector database, significantly improving the accuracy and relevance of generated outputs. This approach enhances the system's ability to provide accurate, domain-specific answers by reducing reliance on the LLM's internal knowledge, which might be insufficient. Instead, the RAG workflow ensures that responses are informed by up-to-date and highly relevant data, improving both accuracy and contextual relevance for user queries.
In this architecture, NAI leverages NKP’s observability stack to enable seamless monitoring and logging for LLM workloads and GPU performance. Upon deploying the NVIDIA GPU Operator from the NKP catalog, NVIDIA Data Center GPU Manager (DCGM) metrics are automatically configured for Prometheus, along with default Grafana dashboards that detail GPU utilization, memory bandwidth, and thermal performance. Metrics are aggregated with Thanos and visualized in Grafana, while Fluentbit and Loki handle log collection and indexing, resulting in an advanced monitoring solution that goes beyond conventional GPU observability.
Large Language Model Research Workflow
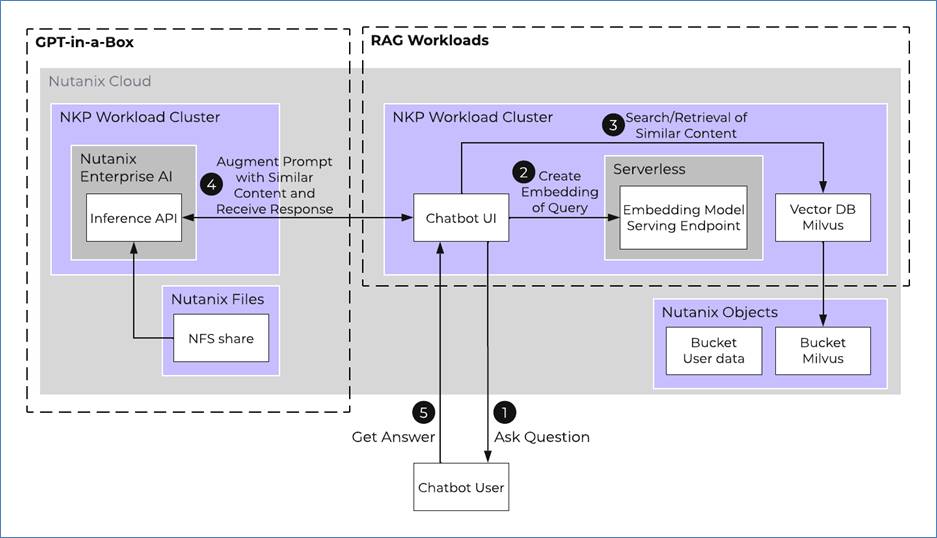
The LLM uses the following research workflow:
1. Ask a question: The interaction begins when the end user poses a question through the UI or chatbot interface.
2. Create a query embedding: The embedding model transforms the user's query into a vector representation. This process is known as vectorization.
3. Search and retrieve similar context: The vector database, which is specifically designed for similarity searches, stores the document embeddings generated by the model. It can efficiently search for and retrieve items based on these embeddings, which encapsulate the semantic meaning of the texts.
4. Send the prompt: The workflow augments the user's query with relevant contextual information retrieved from the database, then sends this enriched query as a prompt to the LLM endpoint. The LLM processes the enriched query and generates a response.
5. Get an answer: The UI or chatbot interface presents the LLM's response as the answer to the user's query.
The scope of this solution is a single standalone GPT-in-a-Box 2.0 cluster, and you must back up the application data on the S3 buckets in the Nutanix Objects store to an external environment.
The persistent volumes and application data in the clusters can be protected by a Velero backup schedule and stored in a S3 bucket provided by Nutanix Objects.
You can use the streaming replication mechanism built into Nutanix Objects to replicate the data at the bucket level to a different S3 object store outside the GPT-in-a-Box 2.0 cluster. You can also use the existing backup solution to back up the persistent application data and store it outside the GPT-in-a-Box 2.0 cluster.
Solution Deployment
This chapter contains the following:
This section details the prerequisites for installing the GPT-in-a-Box 2.0 solution and divided into the following key sections and procedures:
1. Install AHV-based CCHC with Nutanix Cluster.
2. Install the NVIDIA Grid Driver.
3. Enable and Configure Nutanix Files.
Procedure 1. Install AHV-based CCHC with Nutanix Cluster
This solution requires a minimum of four (4) Cisco Compute Hyperconverged X210c M7 All NVMe Nodes. Each of the cluster node is enabled with Intel® Xeon® Scalable Processors offering compute density and storage capacity in a single form factor and the Cisco UCS X440p PCIe Nodes supporting 2x NVIDIA L40S GPUs. For detailed specifications on the specification of server nodes, go to the Solution Design chapter.
Note: A complete install process of AHV based CCHC with Nutanix cluster is outside the scope of this document. Please refer to the Cisco Compute Hyperconverged with Nutanix IMM Field Guide for detailed installation steps. The key validation prerequisites for the Nutanix Cluster installation are detailed in this section. These validations can be verified after UCS Domain Profile deployment. The steps verify that four (4) X210c M7 All NVMe Nodes with X440P PCIe Nodes enabling 2x L40S GPUS for each compute node are discovered in Cisco Intersight.
Step 1. Ensure the Fabric Interconnect Firmware is 4.3(.240066) or above.
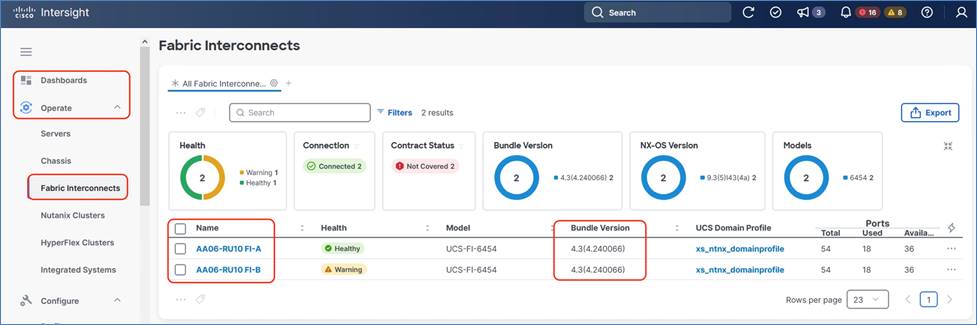
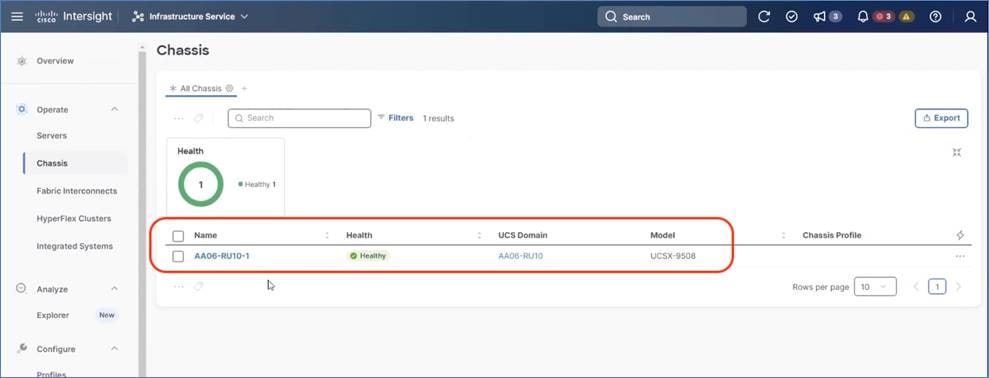
Step 2. From Intersight Dashboard, go to Operate > Chassis and ensure Domain Profile is deployed successfully.
Step 3. Go to Operate > Servers and ensure the X210C compute nodes firmware is 5.2 2.40074 or above.
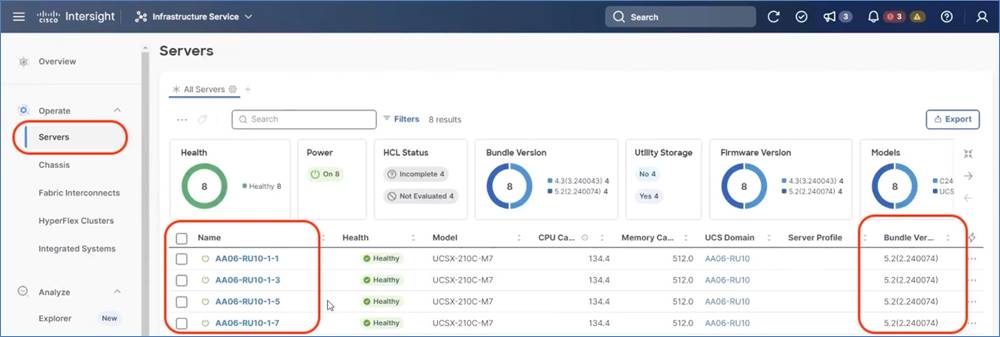
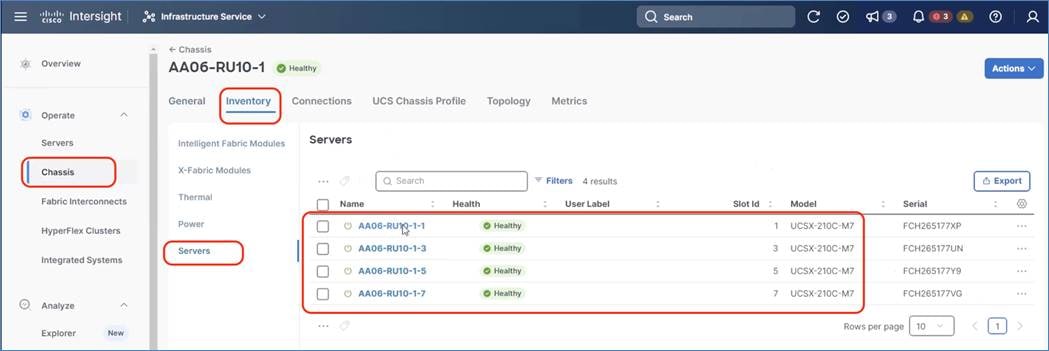
Step 4. Go to Operate > Chassis > <Chassis Name> and ensure the X210C compute nodes and X440P PCIe nodes are displayed correctly. The compute nodes are placed in Slot 1, 3, 5, 7 and PCIe nodes on Slot 2, 4, 6, 8.

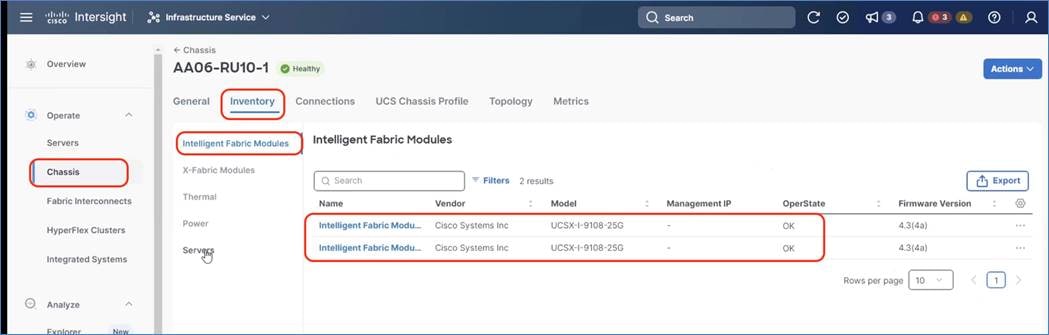
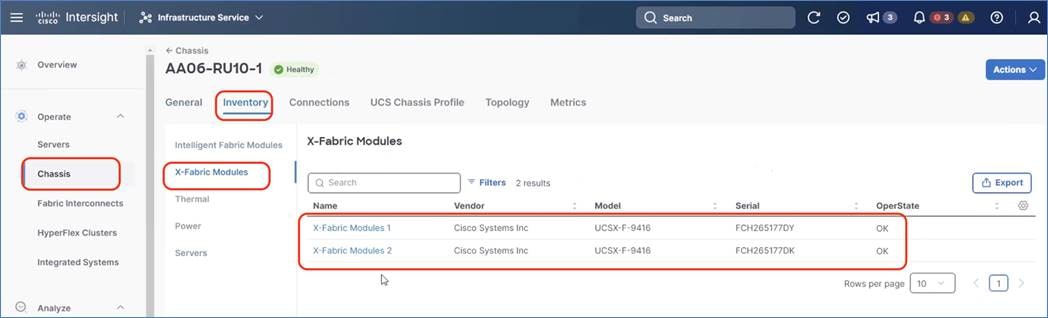
Step 5. Go to Chassis > Inventory tab and verify the IFM (Intelligent Fabric Module), X-Fabric Module, and the X210C compute nodes are displayed on the dashboard.
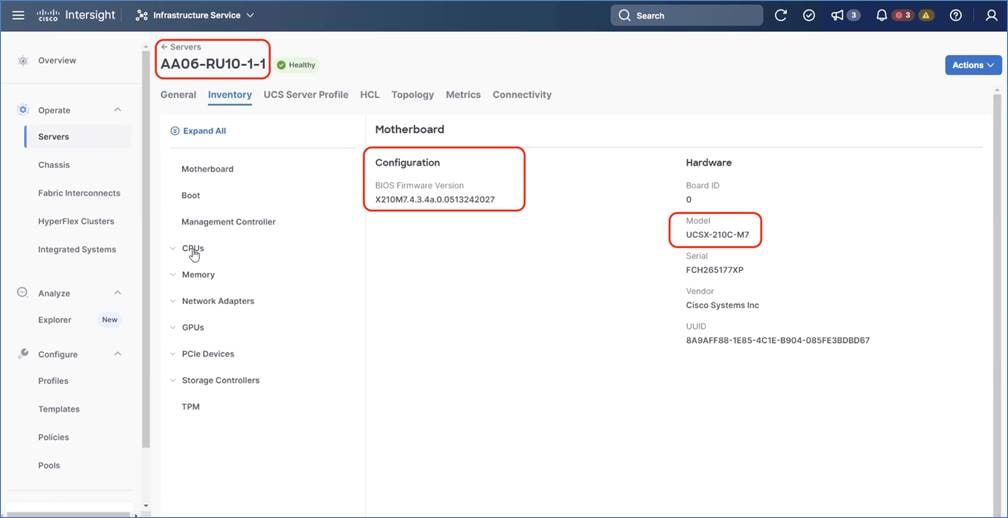
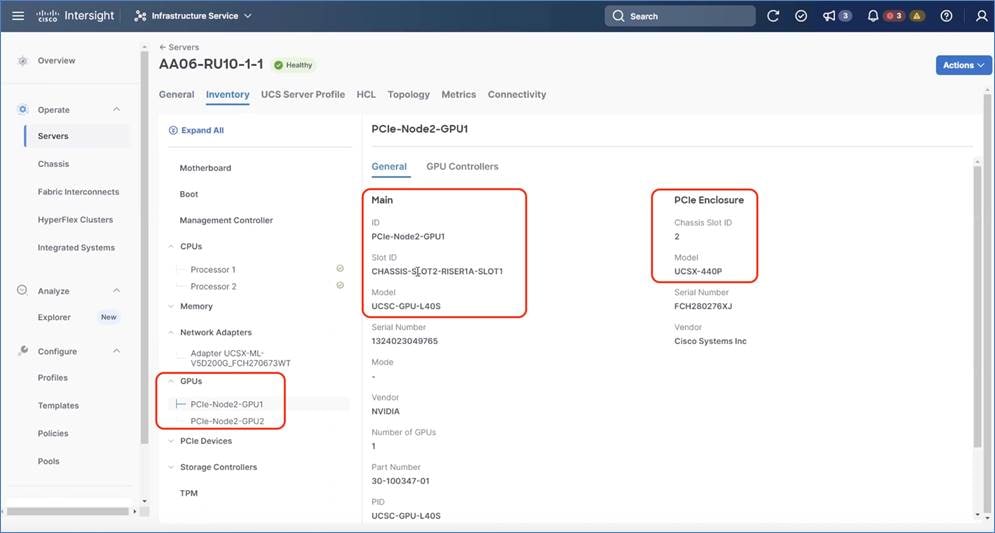
Step 6. Go to Servers and select one of the servers and view the inventory of the server. Ensure the nodes are attached to UCS X440P PCIe node which is equipped with 2x L40S or H100 GPUs.
Step 7. Install the Nutanix cluster with AOS 6.7.1. and go to the Field Guide for information to successfully install the cluster.
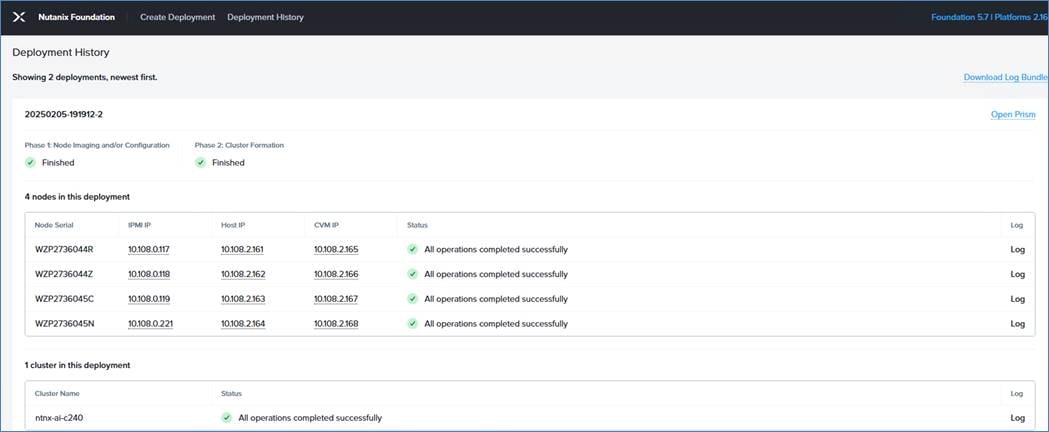
The screenshot below shows four (4) nodes:
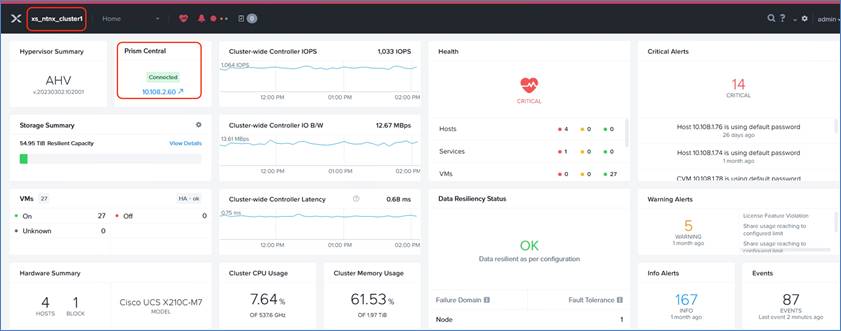
Step 8. Provision a Prism Central Instance deployed on the Nutanix cluster and register the existing cluster to Prism Central. You have a choice to either deploy Prism Central on the GPT-in-a-Box cluster or utilize an existing Prism Central Instance.
Procedure 2. Install NVIDIA Grid Driver
The following steps detail the process to deploy the NVIDIA driver on cluster nodes configured with L40S GPUs.
Step 1. Download the GPU driver as per the AOS build installed on the cluster. This can be retrieved from the Compatibility and Interoperability matrix on the Nutanix portal. The existing cluster with AOS 6.10 is compatible with NVIDIA GRID for AHV 20230302.102001.
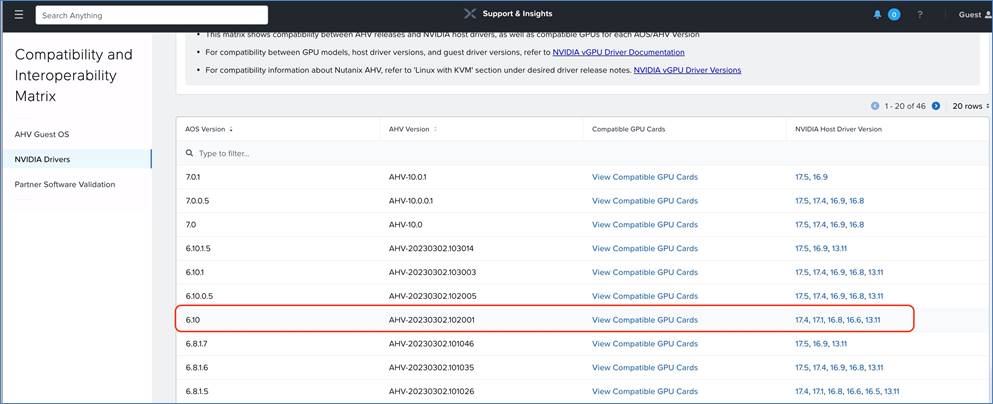
Step 2. Ensure the NVIDIA GPU is available as a pci device. Log into AHV (node Host IP) with root / nutanix/4u or the password set by the administrator.
Step 3. Execute lspci | grep -I nvidia and ensure the GPU is installed on the host.
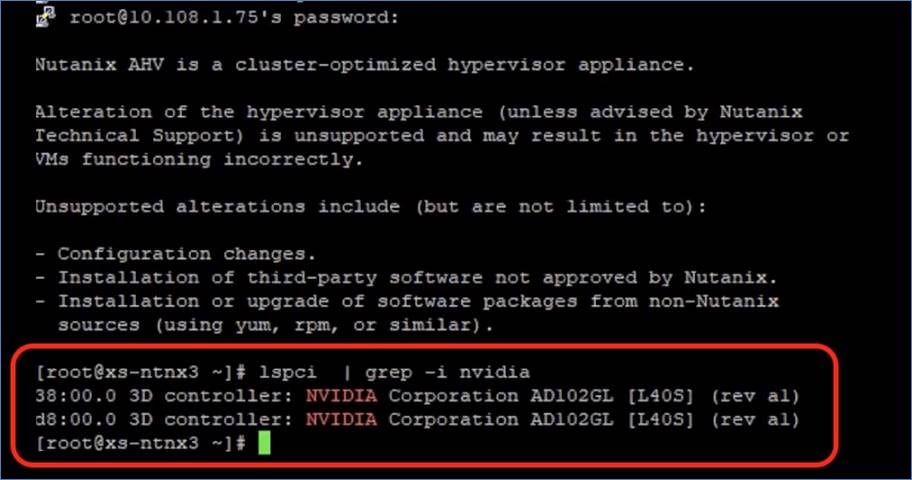
Step 4. Log into the Nutanix node CVM (Nutanix/Nutanix/4u) or with the password set by the administrator and copy the tar file to /home/Nutanix.
Step 5. Install the driver install_host_package -r lcm_nvidia_aie_20230302.102001_550.127.06.tar. This driver is installed across all nodes through the rolling restart process.
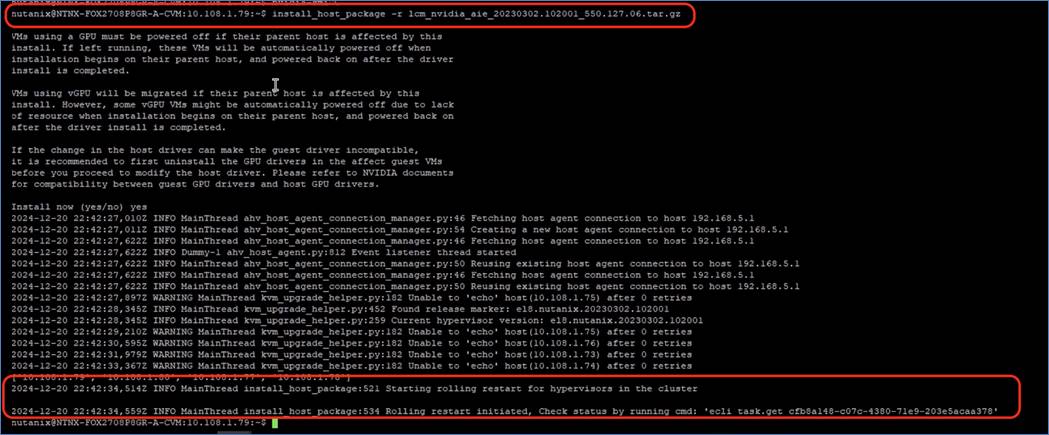
Step 6. Log into AHV (node Host IP) with root / nutanix/4u or password set by the administrator.
Step 7. Run nvidia-smi on the host and inspect the output for a table containing the driver version and detected GPU resources.
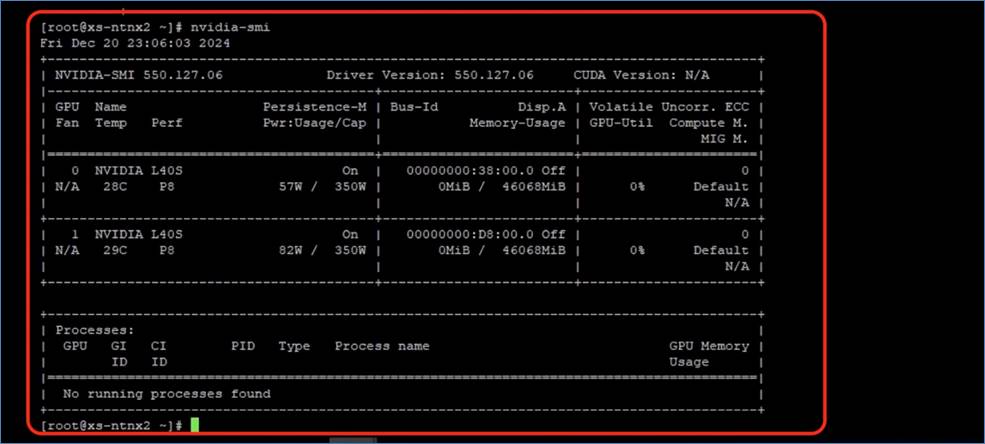
Procedure 3. Enable and Configure Nutanix Files
This procedure provides high-level steps to enable Nutanix Files from Prism Central and configure from Prism Element Nutanix Files runs on the same cluster as GPT-in-a-Box 2.0 cluster. For Nutanix Files architecture details, go to Files on the Nutanix Portal.
Note: For GPT-in-a-Box 2.0 deployment it is required to configure Nutanix Files from Prism Element.
Step 1. Prior to creating the File Server, create the IP Address Management (IPAM) network.
Step 2. Log into Prism Central and ensure the Name Server and NTP Server are updated.
Step 3. From Prism Central, go to Infrastructure, select Network & Security > Subnet.

Step 4. Enter the Name, Type=VLAN, select the Cluster (the GPT-in-a-Box 2.0 cluster), select the VLAN ID = <VLAN-ID> and Virtual Switch, enable Nutanix IP Address Management and give a range of available IPs, specify the Domain Settings, (Domain Server, Domain Search and Domain Name ). Click Create.
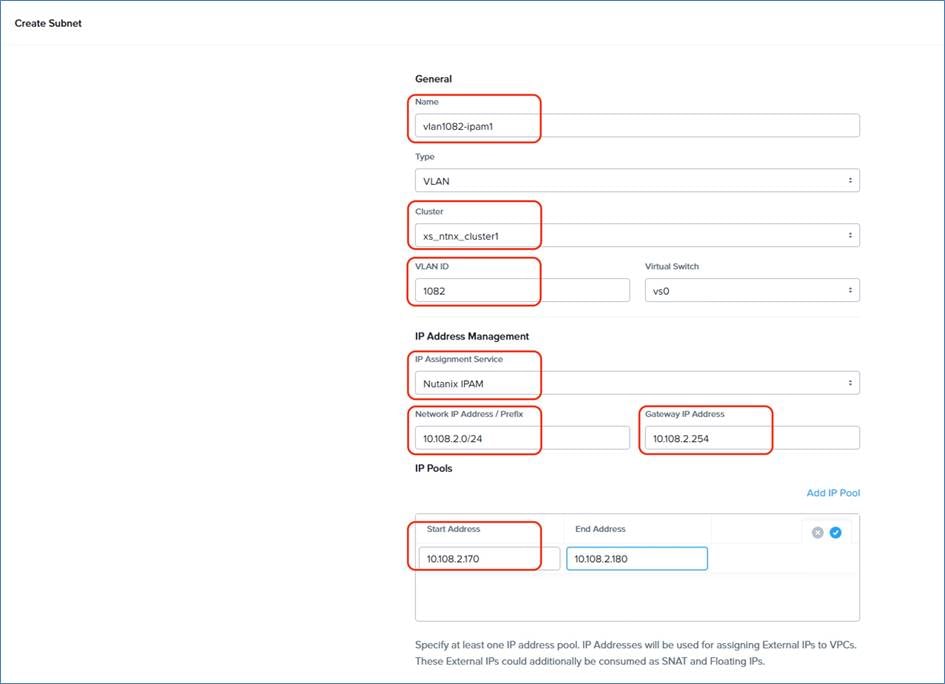

Note: IPAM would be utilized in subsequent section. As IP range cannot be edited, It is recommended to have several small ranges of IPs rather than a single large IP range.
Step 5. Go to Prism Central, click Admin Central, choose LCM, and click Perform Inventory.
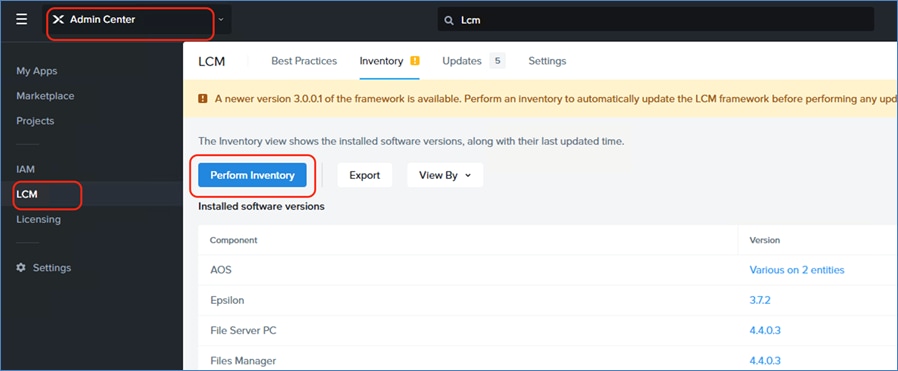
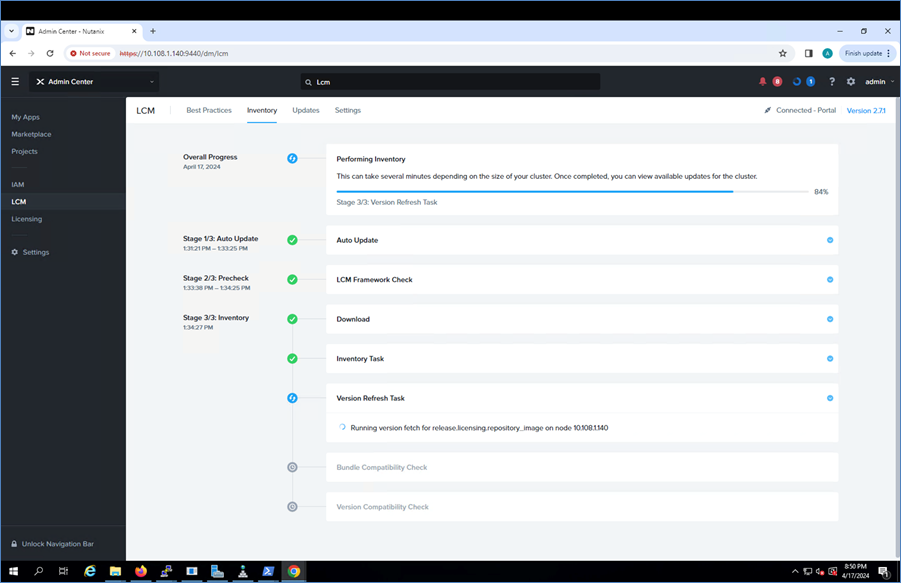
Step 6. Choose Marketplace and search for Files.
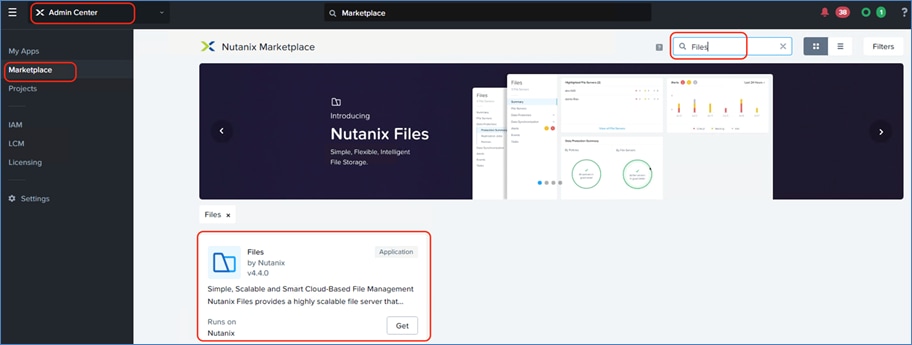
Step 7. From Files click Get. This will enable File Services.
Step 8. Log into Prism Element and click File Server. Click + File Server. Continue with selecting the latest File Server available. File Server Version 5.0.0.3 was the latest version available during the solution validation.
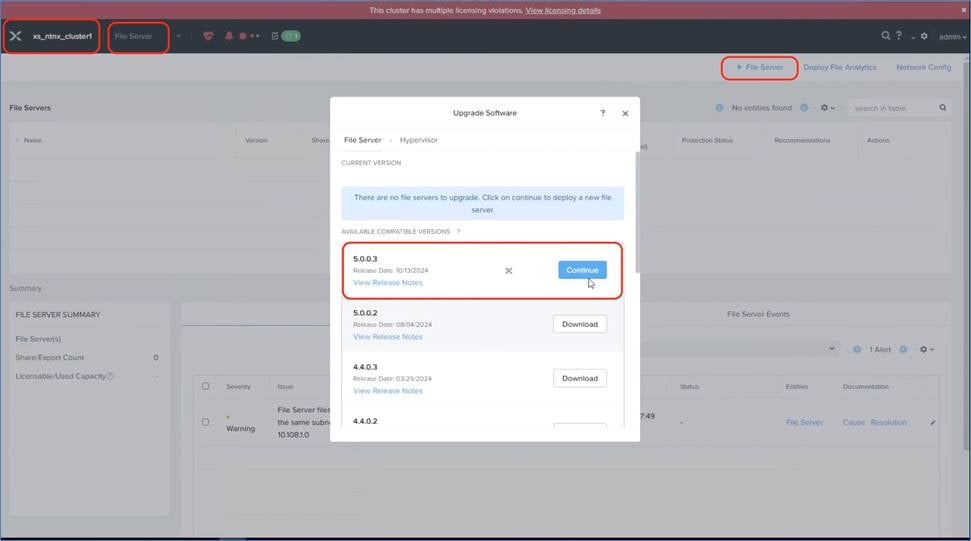
Step 9. Enter the File Server details (Name, DNS Domain, and File Server Storage - Size 5TB). Choose the IPAM created in the previous step. Ensure the DNS and NTP Server are specified as per the environment. Click Next.
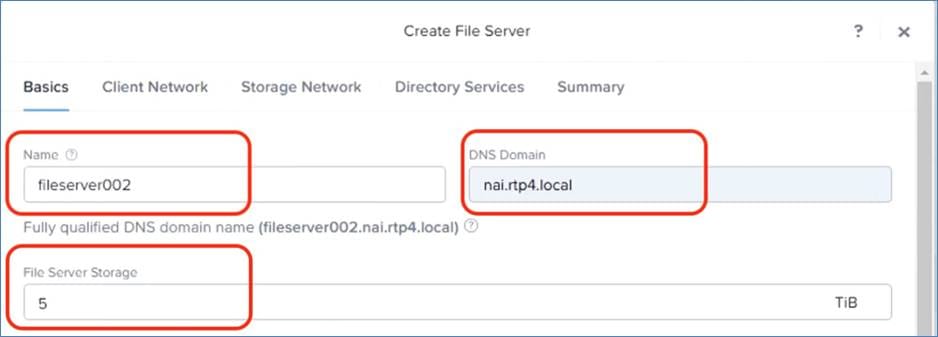
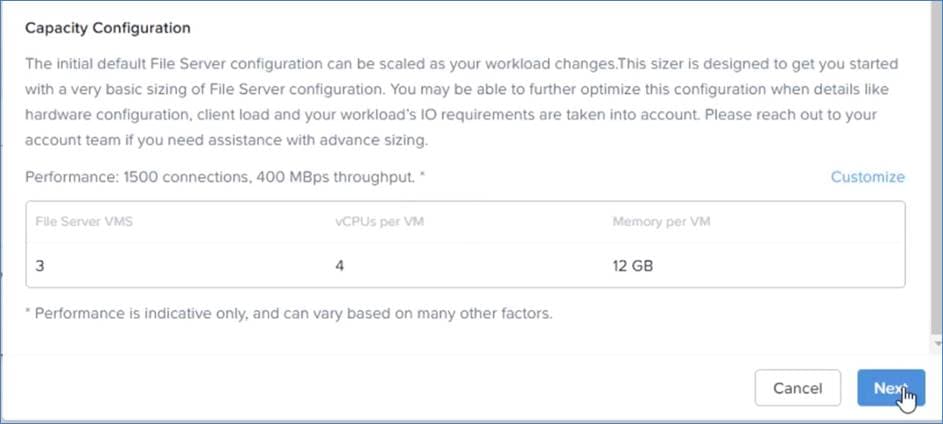
Step 10. Click Client Network. The present configuration has same the Client and Storage network through a single IPAM.
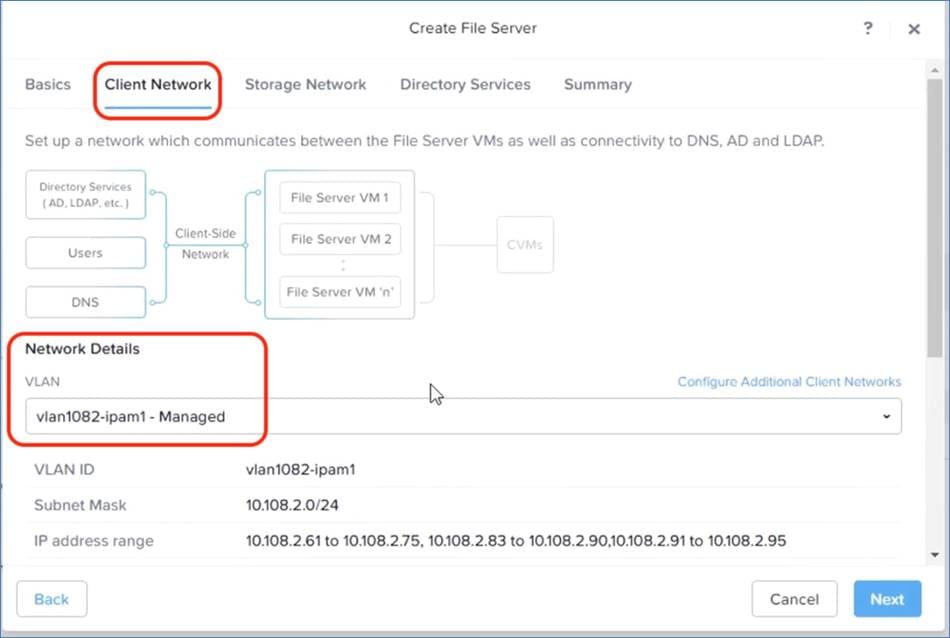
Step 11. Click Storage Network and the same IPAM.
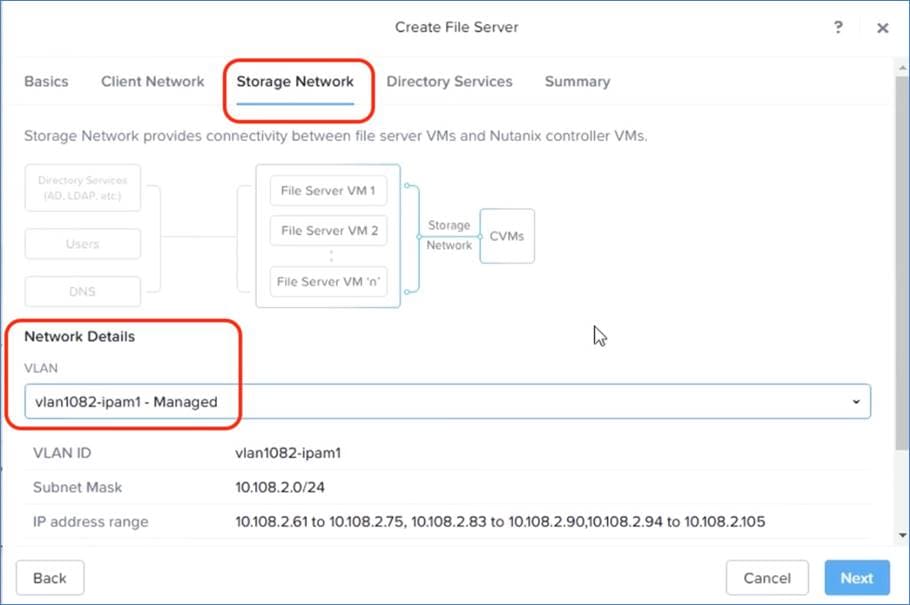
Step 12. Click Directory Services and then click Use NFS Protocol.
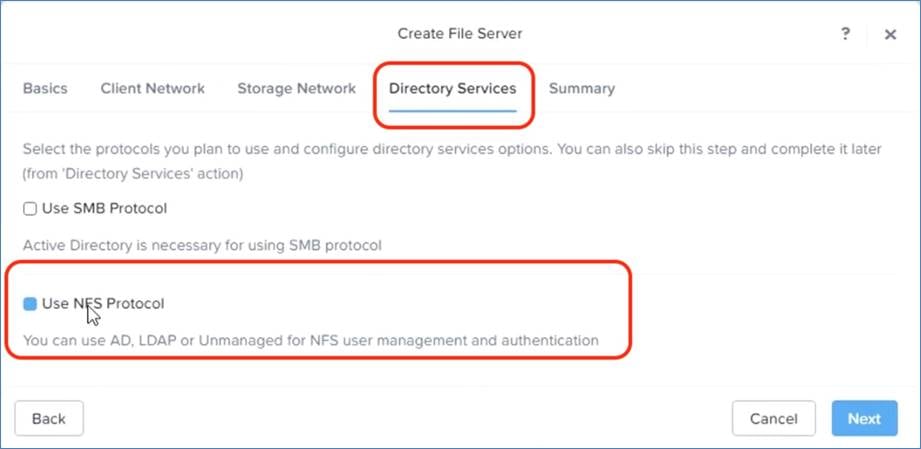
Step 13. Verify the Summary and click Create.
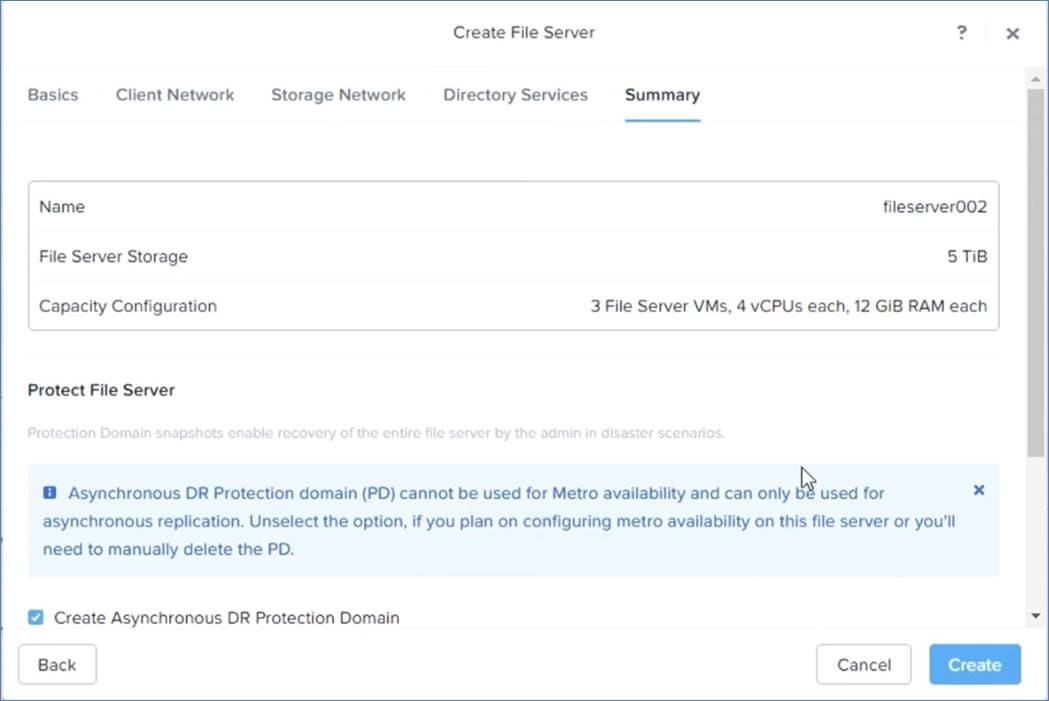
Step 14. Ensure the File Server name entries are updated in DNS.
In Prism Central, the File Server managed through Prism Element is shown below:
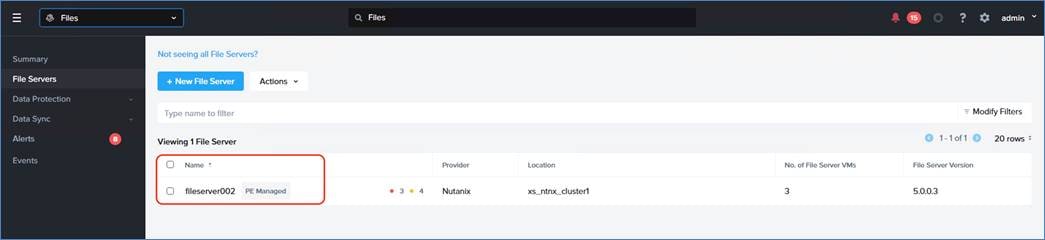
This section details the steps to configure and deploy the GPT-in-a-Box 2.0 solution.
1. Create and configure Jump Host VM.
2. Install NKP and create the Base Image.
3. Create a NKP management cluster.
4. Install and Configure the NKP workload cluster and NAI.
Procedure 1. Create and configure Jump Host VM
This procedure provides the high-level steps to configure Ubuntu jump host VM on Nutanix Cluster. This VM resides in the same Nutanix Cluster used for solution deployment. This VM would be used to deploy Nutanix Kubernetes Cluster and the entire setup for GPT-in-a-Box 2.0 solution. The detailed steps to install the Jump Host VM are here: https://nai.howntnx.win/infra/infra_jumphost_tofu/#create-jump-host-vm
Step 1. Install OpenTofu cli and visual studio code (VSCode) from your windows or Mac workstation. Reference https://nai.howntnx.win/infra/workstation/#install-opentofu.

Step 2. In VSCode, create the workspace tofu-workspace.
Step 3. In VSCode, create a jumphost-vm folder and add cloud-init.yaml with the details as shown below.
Step 4. Edit the hostname and generate the RSA public key:
#cloud-config
hostname: nai-llm-jumphost
package_update: true
package_upgrade: true
package_reboot_if_required: true
packages:
- open-iscsi
- nfs-common
runcmd:
- systemctl stop ufw && systemctl disable ufw
users:
- default
- name: ubuntu
groups: sudo
shell: /bin/bash
sudo:
- 'ALL=(ALL) NOPASSWD:ALL'
ssh-authorized-keys:
- ssh-rsa AAAAB3NzaC1yc2EAAAADAQABAAABgQDL5/7HKwfLbO/y0BSQBmU3rK+zex3Rbbysq2Zn6bB0SYDqIzb8/DzZ2kXrozvH8nlbvJC9YsZaESJPyFqeZliJae5w8wwhSUFTvY62wGiWfCogEWTuPFmuJuBL6Uc9c3VnNsnkYv3d6Zc8fr2XRZDu7DQOVrsfiz2TpmleXLWpyC+lszaVtn+naJ6UbxhDx7RXQBdWAGCrfX7DnXMmSJ8UM5VKZcexQwLIYE5HYOxETCGXwsGAK7EALDyPpMiF9BXWehD2eghIy8Gd3awGcgkgkBbHyMZupC2p8vcEM9zN+W5rXlwAwFYQ5rzIDfnz+6xwlOhOvfSnaBaU4mIWWsaNBSQQ0kZae45kT44mLGC9+6VdAbkG3DlOwRaNfbtiHx+T91Cs1QzBHHPI/XMZU5qfs7x+Gd/4yagQNj1P93qr2WqrAsO5JQYBbcf4lJki2fkSu/Xw+qhclifNwD3JprCA8JD7JorT3EylCUXBEj4PC4TkMiow1emnwhRBuasM9QM= andhiman@ANDHIMAN-M-454P
Step 5. In VSCode, within the jumphost-vm folder, create a new file jumphostvm_config.yaml and provide your Nutanix Cluster details:
endpoint: "10.108.2.60" # < Change to PC endpoint >
user: "admin" # < Change to PC admin user>
password: <PASSWORD> # < Change to PC admin pass>
cluster_name: "xs_ntnx_cluster1" # < Change to PE element cluster name >
subnet_name: "vlan1082-ipam1" # < Change to PE element subnet name >
name: "nai-llm-jumphost"
num_vcpus_per_socket: "4"
num_sockets: "2"
memory_size_mib: 16384
disk_size_mib: 307200
source_uri: "https://cloud-images.ubuntu.com/releases/24.04/release/ubuntu-24.04-server-cloudimg-amd64.img"
Step 6. In the jumphost-vm folder, create a opentofu manifest file and name it jumphostvm.tf:
terraform {
required_providers {
nutanix = {
source = "nutanix/nutanix"
version = "1.9.5"
}
}
}
locals {
config = yamldecode(file("${path.module}/jumphostvm_config.yaml"))
}
data "nutanix_cluster" "cluster" {
name = local.config.cluster_name
}
data "nutanix_subnet" "subnet" {
subnet_name = local.config.subnet_name
}
provider "nutanix" {
username = local.config.user
password = local.config.password
endpoint = local.config.endpoint
insecure = true
wait_timeout = 60
}
resource "nutanix_image" "machine-image" {
name = element(split("/", local.config.source_uri), length(split("/", local.config.source_uri)) - 1)
description = "opentofu managed image"
source_uri = local.config.source_uri
}
resource "nutanix_virtual_machine" "nai-llm-jumphost" {
name = local.config.name
cluster_uuid = data.nutanix_cluster.cluster.id
num_vcpus_per_socket = local.config.num_vcpus_per_socket
num_sockets = local.config.num_sockets
memory_size_mib = local.config.memory_size_mib
guest_customization_cloud_init_user_data = base64encode(file("${path.module}/cloud-init.yaml"))
disk_list {
data_source_reference = {
kind = "image"
uuid = nutanix_image.machine-image.id
}
disk_size_mib = local.config.disk_size_mib
}
nic_list {
subnet_uuid = data.nutanix_subnet.subnet.id
}
depends_on = [nutanix_image.machine-image]
}
output "nai-llm-jumphost-ip-address" {
value = nutanix_virtual_machine.nai-llm-jumphost.nic_list_status[0].ip_endpoint_list[0].ip
description = "IP address of the Jump Host vm"
}
Step 7. Open a new terminal in VSCode, initial and validate the tofu code:
tofu -chdir=tofu-workspace/jumphost-vm init -upgrade
tofu -chdir=tofu-workspace/jumphost-vm validate
Step 8. Apply the tofu code to the create jump VM:
tofu -chdir=tofu-workspace/jumphost-vm apply
Step 9. Get the jump VM IP details, as output:
Outputs:
nai-llm-jumphost-ip-address = "10.x.x.x"
Step 10. Execute the Terraform state list command to verify what resources have been created:
tofu state list
Step 11. Verify the jumphost-vm is accessible through VSCode > Terminal:
ANDHIMAN-M-454P:jumphost-vm andhiman$ ssh -i ~/.ssh/id_rsa ubuntu@10.108.2.70
Welcome to Ubuntu 24.04.1 LTS (GNU/Linux 6.8.0-51-generic x86_64)
Step 12. Connect to the jump host through VSCode and install utilities.
Step 13. Install devbox with defaults:
curl -fsSL https://get.jetpack.io/devbox | bash
Step 14. Setup docker on jumphost VM:
devbox init; devbox shell
task workstation:install-docker
Procedure 2. Install NKP and create the Base Image
This procedure details the process to install Nutanix Kubernetes (NKP) binaries and create Base Image for NKP. The base image for NKP is a minimal image that contains the required packages and tools to run the Kubernetes cluster. The base image is used to create the worker node VMs and the control plane VMs.
In this procedure, you will go through creating a base image for all the control plane and worker node VMs on Nutanix. Use the Ubuntu 22.04 image as the base image since you will need GPU support for AI applications.
Note: NKP base image can be Rocky Linux 9.4 image and is part of NKP Starter license. This image is maintained and supported by Nutanix. The image is updated regularly to include the latest security patches and bug fixes. Customers should not modify the base image.
Note: Using NKP Pro license also offers the choice of Ubuntu 22.04 base image for GPU based workload deployments.
Step 1. Access jumphost VM previously created.
Step 2. Download NKP binaries from Nutanix portal and install NKP. You can change the NKP binary as per the version available on the Nutanix Portal.
curl -o nkp_v2.13.0_linux_amd64.tar.gz "https://download.nutanix.com/downloads/nkp/v2.13.0/nkp_v2.13.0_linux_amd64.tar.gz?Expires=1736932784&Key-Pair-Id=APKAJTTNCWPEI42QKMSA&Signature=VCPS9eNtGLZr7rjxwfnpsdZsxqpxGvT7M-mBoJaGbpSX~DQBzkYjIWGXcAk3Y1JoPW3axYqhOB~wCZuLnaxt6qxuXlps~qH3LwbznwvQyY1s2zAcmZyj6s98OFAU8yV4ZqgpPMJGSXI4DMlTFaOzQk4BWaYaXpCLVXdOQe5EDv~SxVdZk8yLe~e9G93A3O0OuN5cWaqHudRJ-ZtnRmXmGGAmWWUw305Jg8eivn3PZvodex3gO1xwSjhuSTHcenOAvZt~sz0ZzDaSQGmCBHaQzO~0Vsx28SdnSEPP12J4kNnihvHL27fxwYeXTpFFICx2W6rkzRIgThqqSSoUVfhaKg__"
Step 3. Install NKP:
tar xvzf nkp_v2.13.0_linux_amd64.tar.gz
sudo cp nkp /usr/local/bin/
nkp version
diagnose: v0.10.1
imagebuilder: v0.20.0
kommander: v2.13.0
konvoy: v2.13.0
mindthegap: v1.16.0
nkp: v2.13.0
Step 4. Create a NKP folder in $Home directory and go to the NKP folder.
Step 5. Run the following command to generate an new RSA key pair on the jumphost VM. This SSH key pair will be used for authentication between the jumphost and NKP K8S cluster nodes.
ssh-keygen -t rsa
Step 6. Accept the default file location as ~/.ssh/id_rsa. SSH key pair is stored in the following location:
~/.ssh/id_rsa.pub
~/.ssh/id_rsa
Step 7. Create a .env file with the following details. Edit the environment variables as per your environment:
export NUTANIX_USER=_your_nutanix_username
export NUTANIX_PASSWORD=_your_nutanix_password
export NUTANIX_ENDPOINT=_your_prism_central_fqdn
export NUTANIX_CLUSTER=_your_prism_element_cluster_name
export NUTANIX_SUBNET_NAME=_your_ahv_ipam_network_name
export STORAGE_CONTAINER=_your_storage_container_nmae
export SSH_PUBLIC_KEY=_path_to_ssh_pub_key_on_jumphost_vm
Example File
export NUTANIX_USER=admin
export NUTANIX_PASSWORD=<<PASSWORD>>
export NUTANIX_ENDPOINT=10.108.2.60
export NUTANIX_CLUSTER=xs_ntnx_cluster1
export NUTANIX_SUBNET_NAME=vlan1082-ipam1
export STORAGE_CONTAINER=default-container-35494943116106
export SSH_PUBLIC_KEY=$HOME/.ssh/id_rsa.pub
Step 8. Load the environment variables and its values:
source $HOME/nkp/.env
Step 9. Create the base image and upload it to Prism Central using the following command:
nkp create image nutanix ubuntu-22.04 --endpoint ${NUTANIX_ENDPOINT} --cluster ${NUTANIX_CLUSTER} --subnet ${NUTANIX_SUBNET_NAME} –insecure
==> Builds finished. The artifacts of successful builds are:
--> nutanix.kib_image: nkp-ubuntu-22.04-1.30.5-20250115003512
--> nutanix.kib_image: nkp-ubuntu-22.04-1.30.5-20250115003512
--> nutanix.kib_image: nkp-ubuntu-22.04-1.30.5-20250115003512
Step 10. Populate the .env file with the base image:
export NKP_IMAGE=nkp-ubuntu-22.04-1.30.5-20250115003512
Procedure 3. Create a NKP management cluster
In this procedure you will go through the CLI process of creating a NKP management cluster. When the management cluster is created, you can create the GPT-in-a-Box 2.0 workload cluster from NKP commander dashboard.
Note: The name of the NKP cluster is attached to the license. Ensure you use cluster name as mentioned in the license.
Step 1. Access the jumphost VM previously created.
Step 2. Append the environment variable to $HOME/nkp/.env to create NKP bootstrap cluster. The bootstrap cluster is named cvd-nkp-mgmt:
export NKP_CLUSTER_NAME=_your_nkp_cluster_name
export CONTROLPLANE_VIP=_your_nkp_cluster_controlplane_ip
export LB_IP_RANGE=_your_range_of_two_ips
export CONTROL_PLANE_REPLICAS=_no_of_control_plane_replicas
export CONTROL_PLANE_VCPUS=_no_of_control_plane_vcpus
export CONTROL_PLANE_CORES_PER_VCPU=_no_of_control_plane_cores_per_vcpu
export CONTROL_PLANE_MEMORY_GIB=_no_of_control_plane_memory_gib
export WORKER_REPLICAS=_no_of_worker_replicas
export WORKER_VCPUS=_no_of_worker_vcpus
export WORKER_CORES_PER_VCPU=_no_of_worker_cores_per_vcpu
export WORKER_MEMORY_GIB=_no_of_worker_memory_gib
export CSI_FILESYSTEM=_preferred_filesystem_ext4/xfs
export CSI_HYPERVISOR_ATTACHED=_true/false
export DOCKER_USERNAME=_your_docker_username
export DOCKER_PASSWORD=_your_docker_password
Example environment varibales
export NKP_CLUSTER_NAME=cvd-nkp-mgmt
export CONTROLPLANE_VIP=10.108.2.76
export LB_IP_RANGE=10.108.2.77-10.108.2.78
export CONTROL_PLANE_REPLICAS=3
export CONTROL_PLANE_VCPUS=4
export CONTROL_PLANE_CORES_PER_VCPU=1
export CONTROL_PLANE_MEMORY_GIB=16
export WORKER_REPLICAS=4
export WORKER_VCPUS=8
export WORKER_CORES_PER_VCPU=1
export WORKER_MEMORY_GIB=32
export CSI_FILESYSTEM=ext4
export CSI_HYPERVISOR_ATTACHED=true
export DOCKER_USERNAME=andhiman
export DOCKER_PASSWORD=<<password>>
Step 3. Execute the .env file to load environment variables:
source ~/nkp/.env
Step 4. Create a NKP bootstrap cluster:
nkp create cluster nutanix -c ${NKP_CLUSTER_NAME} --control-plane-endpoint-ip ${CONTROLPLANE_VIP} --control-plane-prism-element-cluster ${NUTANIX_CLUSTER} --control-plane-subnets ${NUTANIX_SUBNET_NAME} --control-plane-vm-image ${NKP_IMAGE} --csi-storage-container ${STORAGE_CONTAINER} --endpoint https://${NUTANIX_ENDPOINT}:9440 --worker-prism-element-cluster ${NUTANIX_CLUSTER} --worker-subnets ${NUTANIX_SUBNET_NAME} --worker-vm-image ${NKP_IMAGE} --ssh-public-key-file ${SSH_PUBLIC_KEY} --kubernetes-service-load-balancer-ip-range ${LB_IP_RANGE} --control-plane-disk-size 150 --control-plane-memory ${CONTROL_PLANE_MEMORY_GIB} --control-plane-vcpus ${CONTROL_PLANE_VCPUS} --control-plane-cores-per-vcpu ${CONTROL_PLANE_CORES_PER_VCPU} --worker-disk-size 150 --worker-memory ${WORKER_MEMORY_GIB} --worker-vcpus ${WORKER_VCPUS} --worker-cores-per-vcpu ${WORKER_CORES_PER_VCPU} --csi-file-system ${CSI_FILESYSTEM} --csi-hypervisor-attached-volumes=${CSI_HYPERVISOR_ATTACHED} --registry-mirror-url "https://registry-1.docker.io" --registry-mirror-username ${DOCKER_USERNAME} --registry-mirror-password ${DOCKER_PASSWORD} --self-managed --insecure
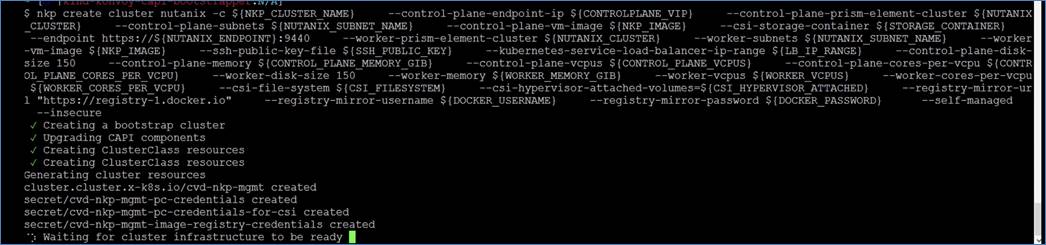
Step 5. You can monitor the cluster creation by exporting KUBECONFIG=~/cvd-nkp-mgmt-bootsrap.conf and executing the following commands:
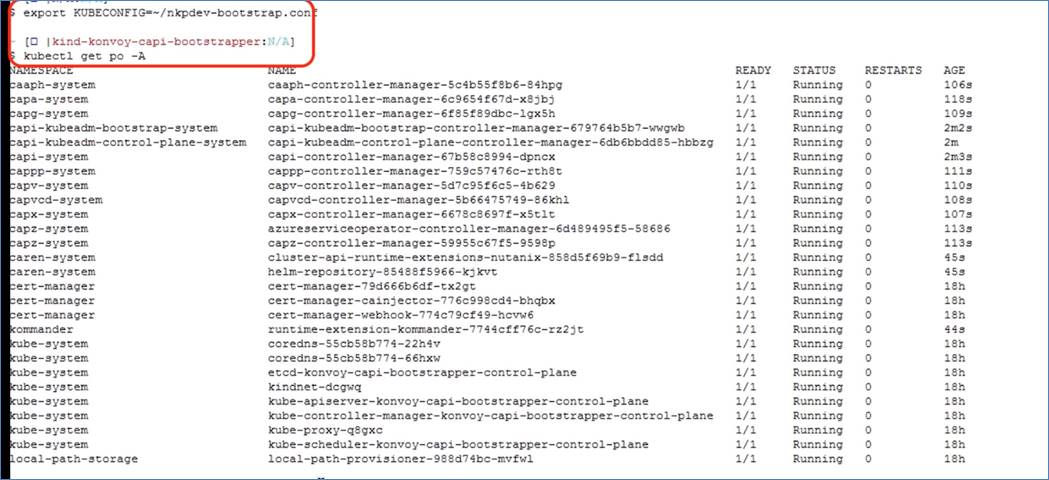
Step 6. From Prism Central you can monitor VMs created on the Nutanix Cluster:
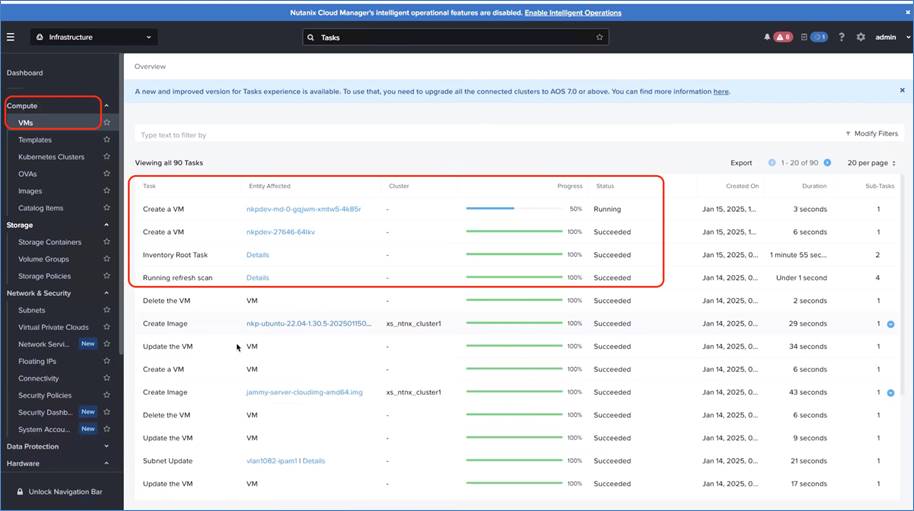
Step 7. During the creation of the cvd-nkp-mgmt cluster, verify the creation of nutanixmachines and describe the cvd-nkp-mgmt cluster:

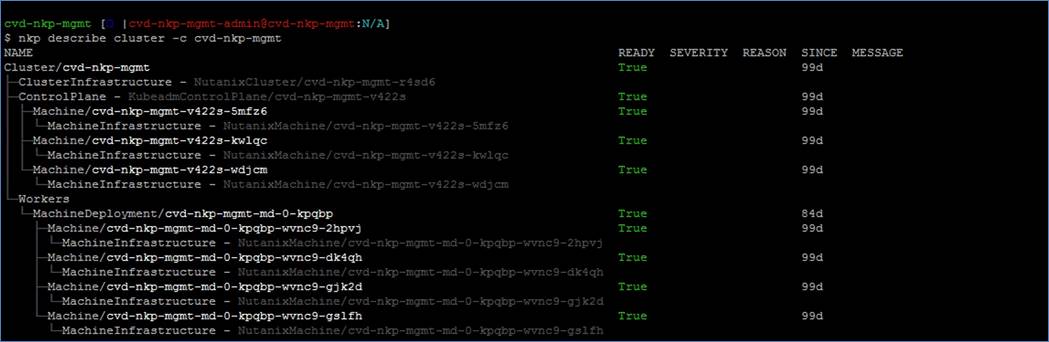
Step 8. When the core k8s cluster components are created, verify the creation of CAPI components. Ensure you export KUBECONFIG=~/cvd-nkp-mgmt.conf:
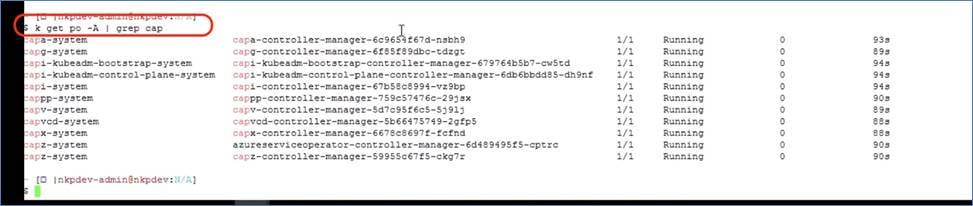
Step 9. During the creation of the cvd-nkp-mgmt cluster, verify the pods in creation state:

Step 10. During the creation of the NKP cluster, verify the created helm releases:

Step 11. Verify the successful creation of the NKP management cluster:
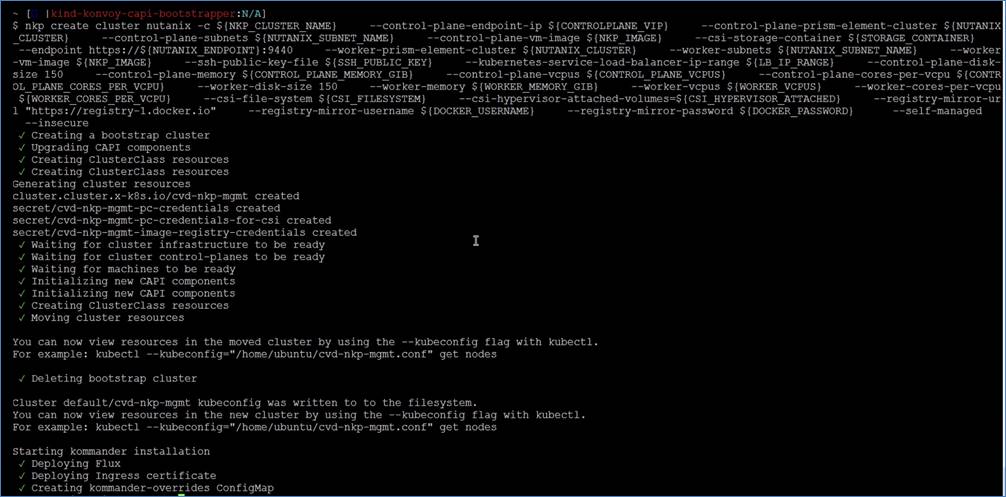
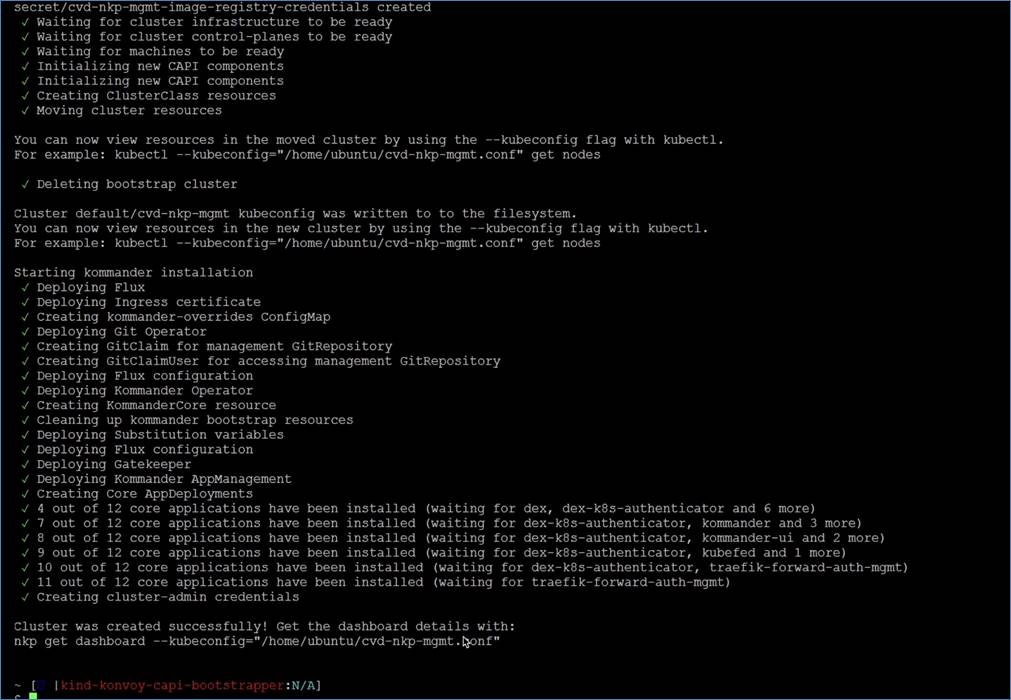
Step 12. Get the NKP Dashboard access details:
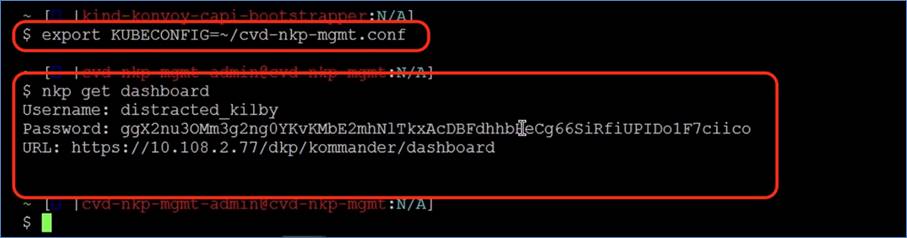
Step 13. Access the NKP Global Dashboard:
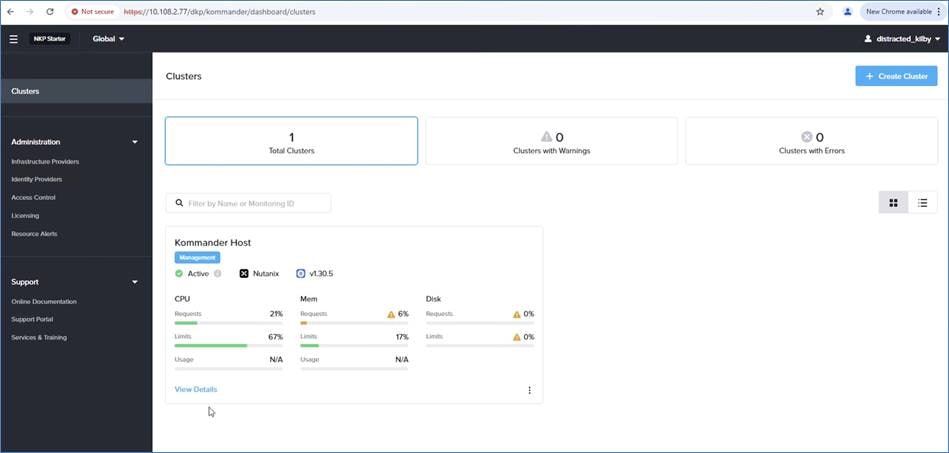
Step 14. Activate the NKP Ultimate license to continue creating the workload cluster:
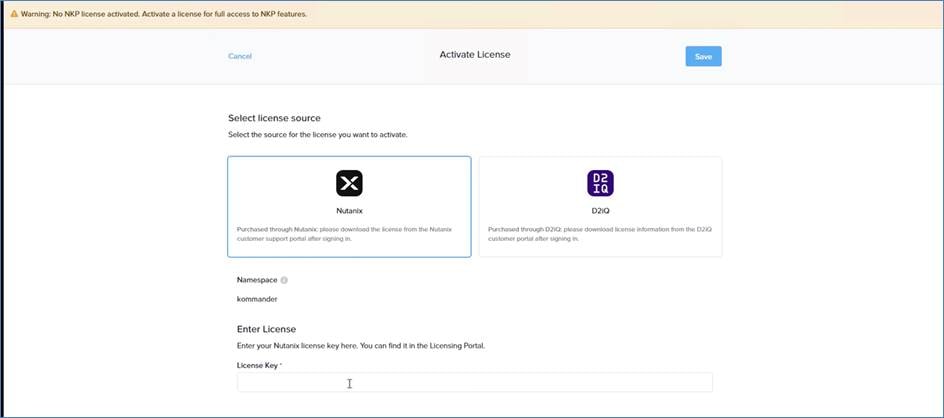
Procedure 4. Install and Configure the NKP workload cluster and NAI
This procedure provides the steps to create Nutanix Enterprise AI (NAI) and Nutanix workload cluster which enables GPU resources.
Workload clusters have a dedicated node pool specifically for GPU resources. This node pool hosts pods that require GPU capabilities, such as nodes with machine learning or data processing workload.
Note: Prior to configuring the management and workload cluster, ensure a set of 2x 10 IP Pools are configured in the IPAM (IP Address Management with DHCP).
Step 1. Connect to the jump host vm and execute source ~/nkp/.env.
Step 2. Connect to the NKP management cluster KUBECONFIG=~/cvd-nkp-mgmt.conf.
Step 3. Create the NAI workspace:
export NAI_WORKSPACE=nai
nkp create workspace ${NAI_WORKSPACE} -n ${NAI_WORKSPACE}
kubectl label workspace ${NAI_WORKSPACE} -n ${NAI_WORKSPACE} caren.nutanix.com/namespace-sync=""
Step 4. Add the Nutanix catalog to the nai workspace:
nkp create catalog nutanix-apps-catalog \
-w ${NAI_WORKSPACE} \
--branch main \
--url https://github.com/nutanix-cloud-native/nkp-nutanix-product-catalog
Step 5. Create knative-override.yaml:
cat <<EOF | kubectl apply -n ${NAI_WORKSPACE} -f -
apiVersion: v1
kind: ConfigMap
metadata:
name: knative-config-overrides
namespace: ${NAI_WORKSPACE}
data:
values.yaml: |
serving:
config:
features:
kubernetes.podspec-nodeselector: enabled
autoscaler:
enable-scale-to-zero: false
knativeIngressGateway:
spec:
selector:
istio: ingressgateway
servers:
- hosts:
- '*'
port:
name: https
number: 443
protocol: HTTPS
tls:
mode: SIMPLE
credentialName: nai-cert
- hosts:
- '*'
port:
name: http
number: 80
protocol: HTTP
tls:
httpsRedirect: true
EOF
Step 6. Create gpu-override.yaml:
cat <<EOF | kubectl apply -n ${NAI_WORKSPACE} -f -
apiVersion: v1
kind: ConfigMap
metadata:
name: gpu-operator-config-overrides
namespace: ${NAI_WORKSPACE}
data:
values.yaml: |
driver:
enabled: true
dcgmExporter:
enabled: true
serviceMonitor:
enabled: true
interval: 15s
honorLabels: false
additionalLabels:
monitoring: apps
EOF
Step 7. Create nai-override.yaml. Ensure you have the login and password to access the NAI repository:
cat <<EOF | kubectl apply -n ${NAI_WORKSPACE} -f -
apiVersion: v1
kind: ConfigMap
metadata:
name: nai-config-overrides
namespace: ${NAI_WORKSPACE}
data:
values.yaml: |
imagePullSecret:
name: nai-iep-secret
credentials:
registry: https://index.docker.io/v1/
username: ntnxsvcgpt
password: <<PASSWORD>>
email: anild1977@gmail.com
EOF
Step 8. Enable catalog apps in the workspace:
nkp create appdeployment istio --app istio-1.23.3 -w ${NAI_WORKSPACE}
nkp create appdeployment knative --app knative-1.15.5 -w ${NAI_WORKSPACE} --config-overrides knative-config-overrides
nkp create appdeployment gpu-operator –app nvidia-gpu-operator-24.9.0 -w ${NAI_WORKSPACE} --config-overrides
gpu-operator-config-overrides
nkp create appdeployment nai --app nutanix-ai-2.0.0 -w ${NAI_WORKSPACE} --config-overrides nai-config-overrides
Step 9. Go to the NKP dashboard and create a workload cluster with the following configurations:
| Design Option |
Validated Selection |
| NKP cluster type |
Use a NKP Ultimate License. |
| Control plane size |
Size the control plane with 4 CPU and 16 GB of memory, and 80 GB of storage. |
| Initial Workload size |
Start with 4 worker nodes with 8 CPU, 32 GB of memory, and 100 GB of storage. |
| GPU pool size (NAI cluster only) |
Use 2 worker nodes with 12 CPU, 40 GB of memory, and 100 GB of storage. |
The workload cluster configuration (cvd-nai-wl-01) is displayed below:
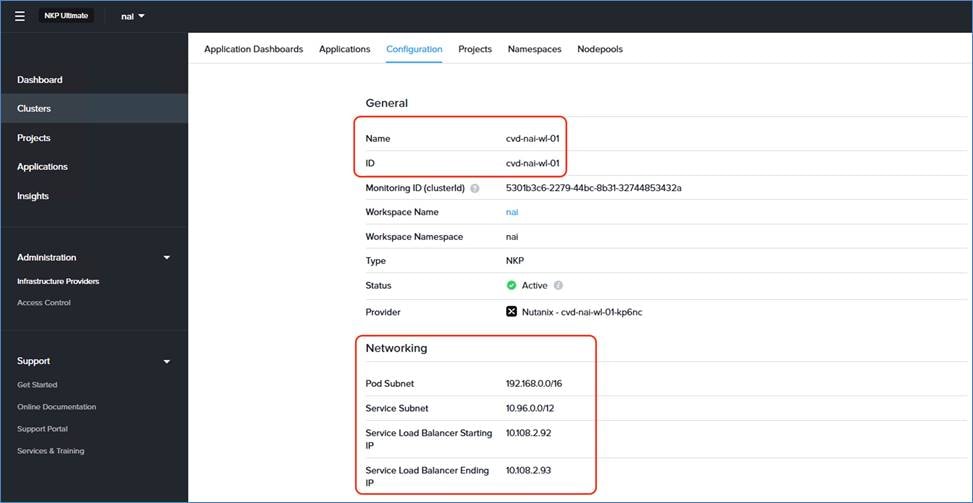
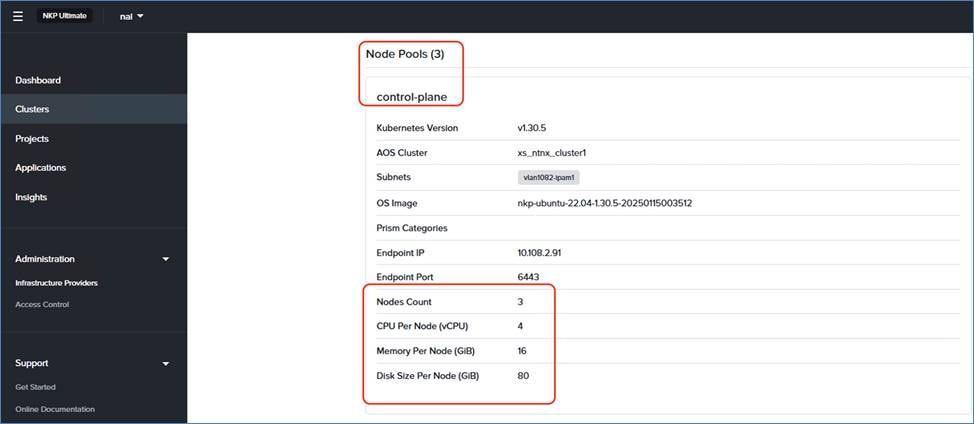
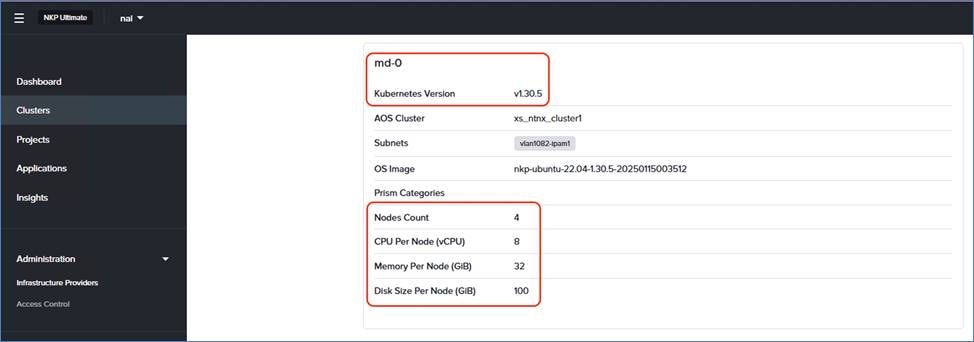
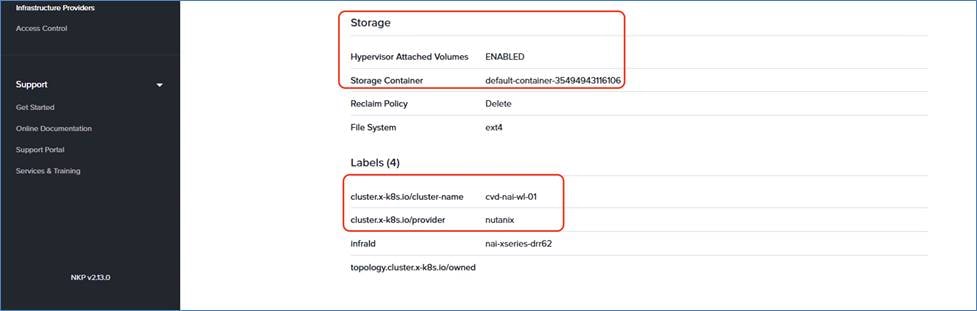
Step 10. Add the GPU node pool to the workload cluster (cvd-nai-wl-01):
source ~/nkp/.env $
export KUBECONFIG=~/cvd-nai-wl-01-kubeconfig.conf
nkp create nodepool nutanix -n ${NAI_WORKSPACE} --cluster-name cvd-nai-wl-01 --prism-element-cluster xs_ntnx_cluster1 --subnets ${NUTANIX_SUBNET_NAME} --vm-image ${NKP_IMAGE} --disk-size 500 --memory 128 --vcpus 16 --gpu-count 1 --gpu-name "Lovelace 40S" --replicas 2 gpu-pool
Below are the workload cluster details with GPU pool from the CLI.
$ export KUBECONFIG=~/cvd-nai-wl-01-kubeconfig.conf
$ kubectl get no
NAME STATUS ROLES AGE VERSION
cvd-nai-wl-01-gpu-pool-kwfrb-rx5mg-68xmk Ready <none> 81d v1.30.5
cvd-nai-wl-01-gpu-pool-kwfrb-rx5mg-nld68 Ready <none> 81d v1.30.5
cvd-nai-wl-01-md-0-jtl96-8lgnt-gxs9r Ready <none> 89d v1.30.5
cvd-nai-wl-01-md-0-jtl96-8lgnt-hcjq6 Ready <none> 89d v1.30.5
cvd-nai-wl-01-md-0-jtl96-8lgnt-vxflw Ready <none> 89d v1.30.5
cvd-nai-wl-01-md-0-jtl96-8lgnt-x9tm8 Ready <none> 89d v1.30.5
cvd-nai-wl-01-rwhxh-2bfm8 Ready control-plane 89d v1.30.5
cvd-nai-wl-01-rwhxh-g8f8s Ready control-plane 89d v1.30.5
cvd-nai-wl-01-rwhxh-ztspr Ready control-plane 89d v1.30.5
Step 11. Execute the .env file to load the environment variables and connect to the workload cluster:
source ~/nkp/.env
export KUBECONFIG=~/cvd-nai-wl-01-kubeconfig.conf
Step 12. In the exiting deployment (recommended for PoC), use the ingress IP associated with the istio ingress load balancer service to auto-generate the certificate. Execute the following snippet to auto-generate certificate:
INGRESS_HOST=$(kubectl get svc -n istio-system istio-ingressgateway -o jsonpath='{.status.loadBalancer.ingress[0].ip}')
kubectl apply -f - <<EOF
apiVersion: cert-manager.io/v1
kind: Certificate
metadata:
name: nai-selfsigned-certificate
namespace: istio-system
spec:
commonName: istio-ingressgateway.istio-system.svc
ipAddresses:
# Add more IPs to the list if required
- ${INGRESS_HOST}
# Add DNS name if one exists
#dnsNames:
#- ${DNS_NAME}
isCA: true
issuerRef:
kind: ClusterIssuer
name: selfsigned-issuer
secretName: nai-cert
EOFAdd Nutanix catalog to nai workspace
nkp create catalog nutanix-apps-catalog \
-w ${NAI_WORKSPACE} \
--branch main \
Step 13. Ensure the nai-cert is created:


Step 14. To use a certificate with a custom hostname and the corresponding certificate, use the following snippet. This is recommended for production environments.
kubectl create secret tls -n istio-system nai-cert
--cert=fullchain.crt --key=cert.key
Step 15. Apply the following patch to knative-serving:
## These will be removed in future NKP release
kubectl patch configmap config-features -n knative-serving --patch '{"data":{"kubernetes.podspec-nodeselector":"enabled"}}'
kubectl patch configmap config-autoscaler -n knative-serving --patch '{"data":{"enable-scale-to-zero":"false"}}'
kubectl patch configmap config-features -n knative-serving --patch '{"data":{"kubernetes.podspec-nodeselector":"enabled"},"metadata" :{"annotations":{"kustomize.toolkit.fluxcd.io/reconcile":"disable d"}}}'
kubectl patch configmap config-autoscaler -n knative-serving --patch '{"data":{"enable-scale-to-zero":"false"},"metadata":{"annotation s":{"kustomize.toolkit.fluxcd.io/reconcile":"disabled"}}}'

Step 16. Log into Prism Element and go to the previously created File Server (fileserver002) and create a REST API access user for NAI. This is created under FileServer > Configuration > Manage Roles.
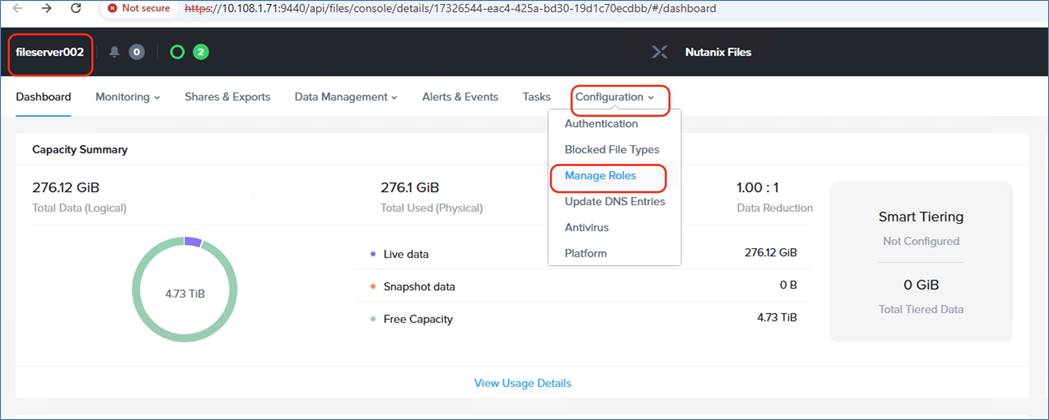
Step 17. Add a user with username= csi and password <password>.
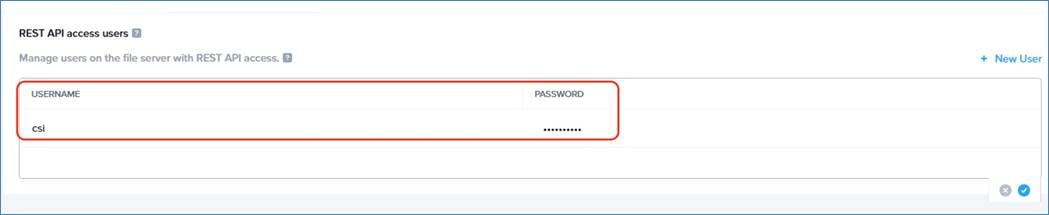
Step 18. Apply the following configuration to the create storage class and NFS volume:
export SECRET_NAME=ntnx-files-secret
export SECRET_NAMESPACE=kube-system
export SC_NAME=nai-nfs-storage
export SQUASH_TYPE=none
export PE_HOST=<PE-HOST>
export PE_USER=<PE-USER>
export PE_PASSWD=<PE-PASSWORD>
export FILES_SERVER=<FILEServer-NAME>
export FILES_FQDN=<FILEServer-FQDN>
export FILES_REST_USER=<FILEServer-ResetAPI-user>
export FILES_REST_PASSWD=< FILEServer-ResetAPI-Password>
# Create secret with PE connection details for the StorageClass
kubectl apply -f - <<EOF
apiVersion: v1
kind: Secret
metadata:
name: ${SECRET_NAME}
namespace: kube-system
stringData:
key: "${PE_HOST}:9440:${PE_USER}:${PE_PASSWD}"
files-key: "${FILES_FQDN}:${FILES_REST_USER}:${FILES_REST_PASSWD}"
EOF
# Create StorageClasss for NutanixFiles (Dynamic)
kubectl apply -f - <<EOF
apiVersion: storage.k8s.io/v1
kind: StorageClass
metadata:
name: ${SC_NAME}
provisioner: csi.nutanix.com
parameters:
csi.storage.k8s.io/node-publish-secret-name: ${SECRET_NAME}
csi.storage.k8s.io/node-publish-secret-namespace: ${SECRET_NAMESPACE}
csi.storage.k8s.io/controller-expand-secret-name: ${SECRET_NAME}
csi.storage.k8s.io/controller-expand-secret-namespace: ${SECRET_NAMESPACE}
dynamicProv: ENABLED
nfsServerName: ${FILES_SERVER}
csi.storage.k8s.io/provisioner-secret-name: ${SECRET_NAME}
csi.storage.k8s.io/provisioner-secret-namespace: ${SECRET_NAMESPACE}
storageType: NutanixFiles
squashType: ${SQUASH_TYPE}
reclaimPolicy: Delete
volumeBindingMode: Immediate
allowVolumeExpansion: true
EOF
Step 19. Identify the istio-ingressgateway IP for NAI to access the NAI dashboard:
$ kubectl get svc -A | grep -i load
anything-llm-llama7b anything-llm LoadBalancer 10.103.19.191 10.108.2.106 3001:32139/TCP 15d
istio-system istio-ingressgateway LoadBalancer 10.103.41.170 10.108.2.93 15021:30108/TCP,80:31466/TCP,443:30410/TCP 89d
nai kommander-traefik LoadBalancer 10.97.126.222 10.108.2.92 8085:31215/TCP,80:32183/TCP,443:32466/TCP 89d
Step 20. Open a web browser and go to istio-ingressgateway IP (10.1082.93). This open the Nutanix Enterprise AI (NAI) portal. Log in with admin/Nutanix.123. Update the Password in the next window.
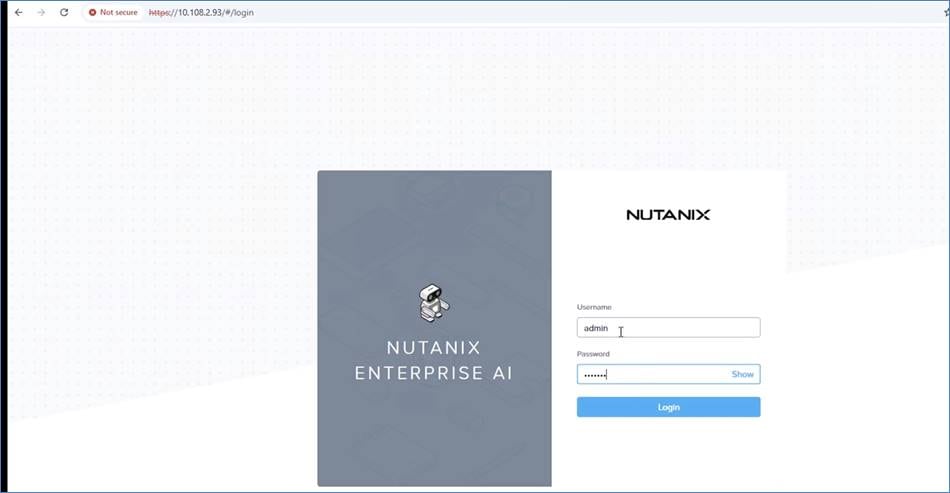
The following screenshot displays the NAI dashboard:
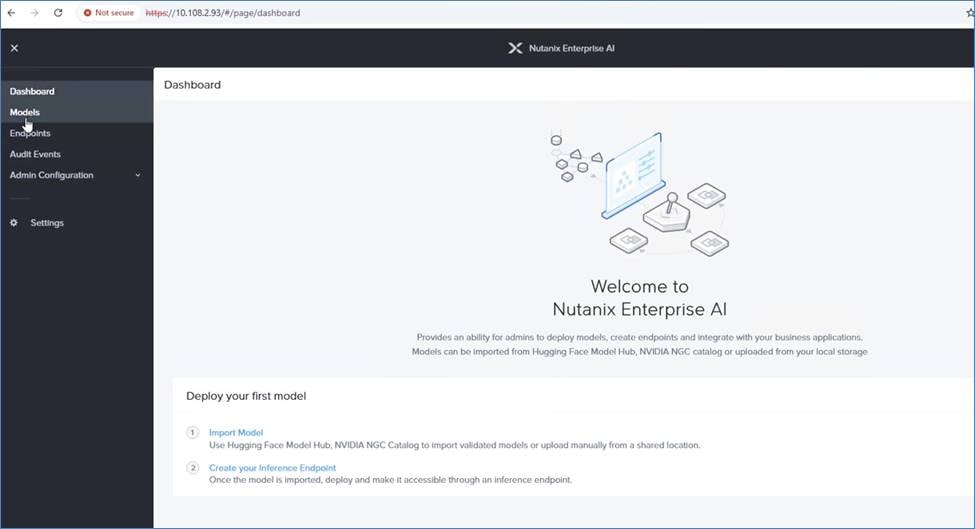
Solution Validation
This chapter contains the following:
● Validate Nutanix Enterprise AI
Nutanix Enterprise AI allows downloaded pre-validated models from Hugging Face, NVIDIA NGC Catalog. You can also download custom models.
Note: In addition to the pre-validated models, Nutanix Enterprise AI also supports importing unvalidated NVIDIA NIMs or custom LLM models. The architecture of a custom model might resemble the architecture of a listed pre-validated model. However, Nutanix does not validate these models when you import them to Nutanix Enterprise AI.
Validate Nutanix Enterprise AI
Nutanix Enterprise AI (NAI) allows you to download models and create secure inference end points which can be leveraged by different teams either to implement chatbots or Retrieval Augmented Generation (RAG) pipelines.
Procedure 1. Import Models with NAI
This procedure details the NAI workflow to import validated models either through Hugging Face or NGC. NAI also supports downloading custom models. Please refer to the Nutanix YouTube link to download custom models.
Step 1. Log into the NAI dashboard.
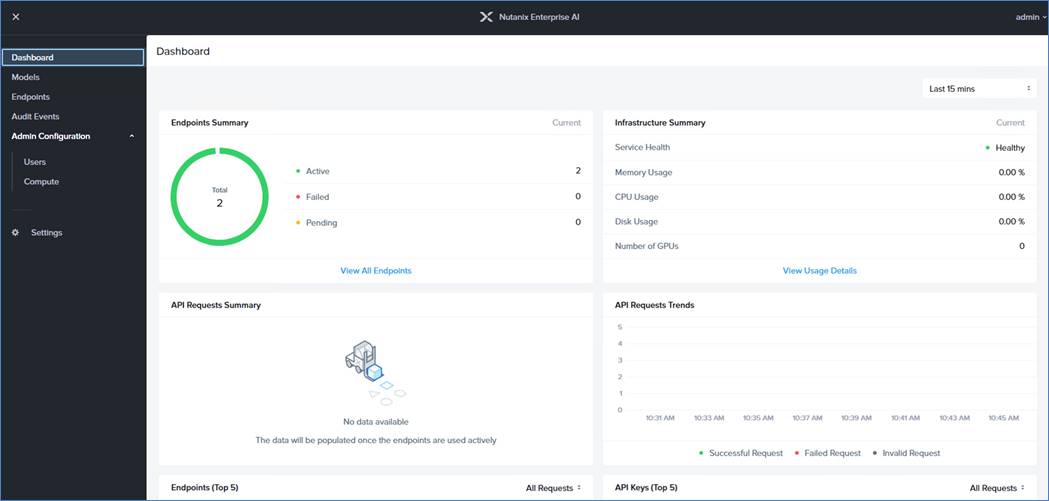
Step 2. Go to Models in the navigation pane. Click Import Models.
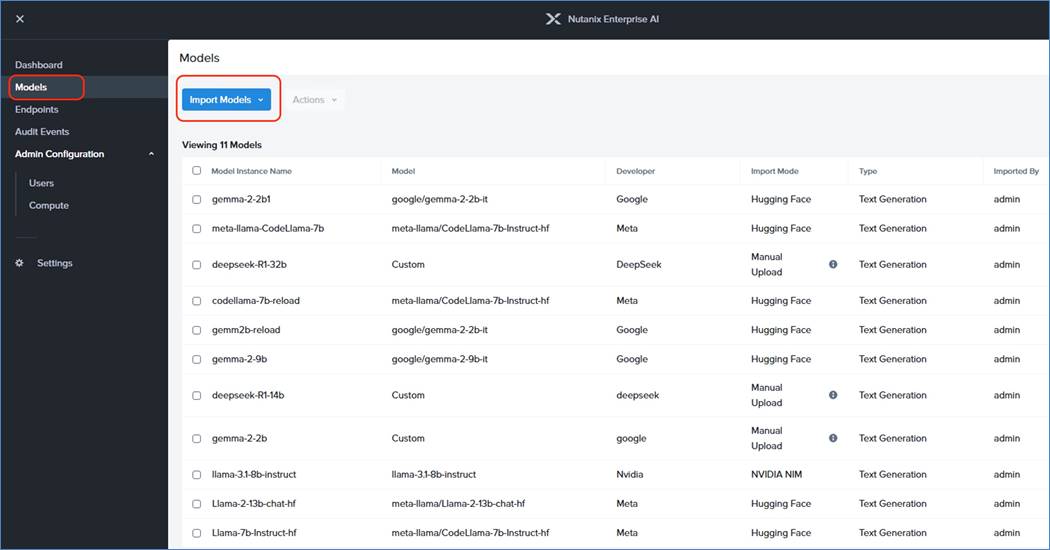
Note: Import Models provides an option to import from Hugging Face, NVIDIA NGC Catalog, and also allows you to import custom models.
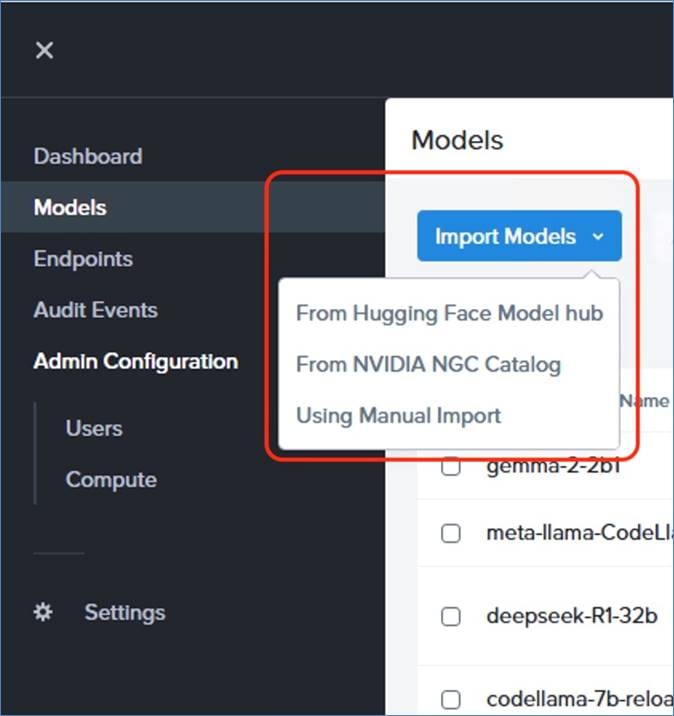
Step 3. Before you import models, you need to add the Hugging Face Model Hub token or the NVIDIA NGC key, using the Settings option in NAI.

Step 4. From the import Model, select From Hugging Face Hub. You’ll see a list of validated models which can be imported to NAI.
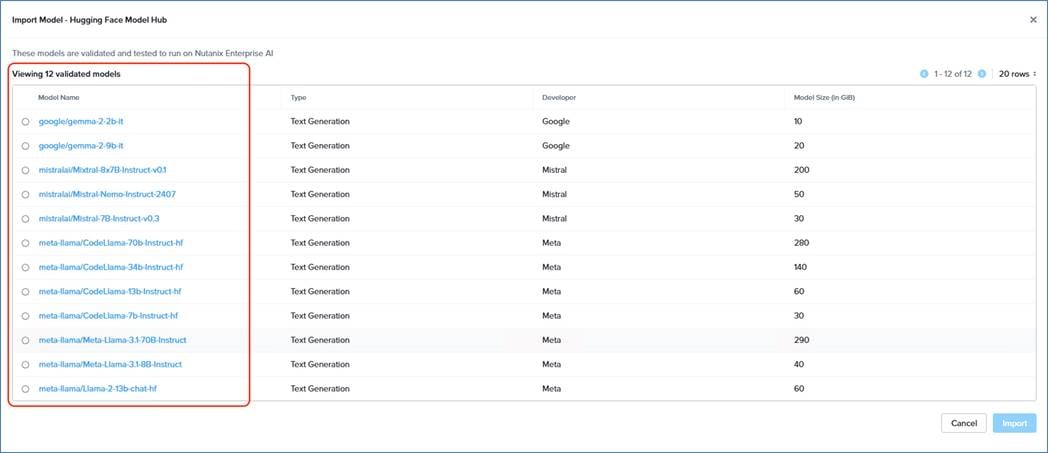
Step 5. Select a model and click Import.
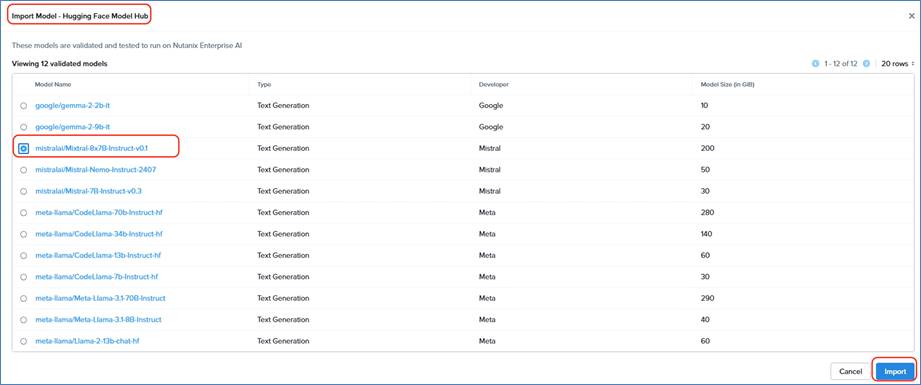
Step 6. Before importing a model, ensure on Hugging Face you have granted permission for gated model.
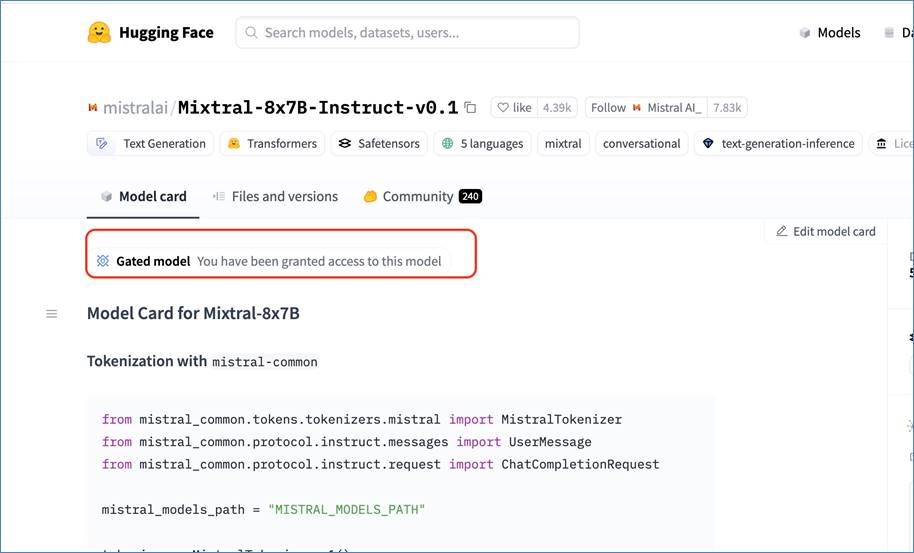
Step 7. Enter a model instance name and click Import.
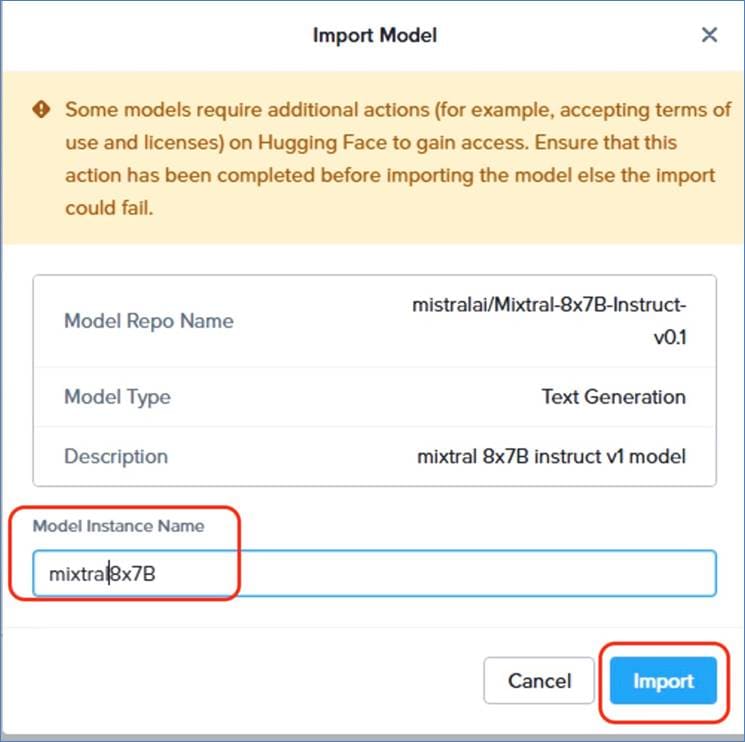
Step 8. Monitor the import model process on workload k8s cluster in nai-admin namespace. You can monitor the k8s pod created to import the model and a new persistent volume created which stores the model locally on NFS volume:
$ source ~/nkp/.env
$ export KUBECONFIG=~/cvd-nai-wl-01-kubeconfig.conf
$ kubectl get po -n nai-admin
NAME READY STATUS RESTARTS AGE
genai-perf-5cfb975966-jfnkd 1/1 Running 0 81d
llama-2-13b-chat-hf-predictor-00001-deployment-58f9df7dbd-6l2xd 2/2 Running 0 15d
meta-llama-7b-predictor-00001-deployment-85556cd96d-gn62j 2/2 Running 0 16d
nai-61a83407-6fc7-4858-8014-d9-model-job-xtgvm 1/1 Running 0 4m11s
$ kubectl get pvc -n nai-admin
NAME STATUS VOLUME CAPACITY ACCESS MODES STORAGECLASS VOLUMEATTRIBUTESCLASS AGE
genai-perf-data Bound pvc-5c822d9c-89e8-47f4-9ede-830d6d204f81 50Gi RWO nai-nfs-storage <unset> 84d
nai-07f4f0c2-77c2-45aa-b9fa-d2-pvc-claim Bound pvc-e798999e-9ca5-4769-9ebb-0a0178f7f6a3 10Gi RWX nai-nfs-storage <unset> 14d
nai-0fc9f51d-7dc7-46ea-94ae-4e-pvc-claim Bound pvc-82350161-b2eb-423b-bf42-e6473f6479c0 75Gi RWX nai-nfs-storage <unset> 78d
nai-160c5627-1c9b-4b26-9dbd-82-pvc-claim Bound pvc-12e4bb38-5c8c-44c8-baac-cc0ae1fc40dc 56Gi RWX nai-nfs-storage <unset> 86d
nai-58c15845-fa82-459c-ade2-15-pvc-claim Bound pvc-19f5fdd5-55a3-4ea5-9b38-6fe9b92ef228 45Gi RWX nai-nfs-storage <unset> 85d
nai-61a83407-6fc7-4858-8014-d9-pvc-claim Bound pvc-51d0f06f-9a19-400b-9743-a37497be63cb 187Gi RWX nai-nfs-storage <unset> 4m19s
nai-898ad30c-1ec1-4966-83b1-ca-pvc-claim Bound pvc-2031c07f-ffc9-42c6-b7e8-a2a7278f4f61 28Gi RWX nai-nfs-storage <unset> 81d
nai-aa55061f-ca05-451e-a6de-d1-pvc-claim Bound pvc-e5ed1e0c-6b48-4584-933e-0165eaa922a5 19Gi RWX nai-nfs-storage <unset> 81d
nai-b33a6da8-e86c-4a92-b26c-09-pvc-claim Bound pvc-e859a4ac-e4f5-418b-809a-8a19a7fb46ee 28Gi RWX nai-nfs-storage <unset> 87d
nai-d0704faf-7da8-41c4-94a9-15-pvc-claim Bound pvc-0f26cdd5-3b1b-42d3-b246-0964ccf410ed 12Gi RWX nai-nfs-storage <unset> 85d
nai-e779bbcc-5c2f-4809-aff6-59-pvc-claim Bound pvc-e5c1512f-4d2c-42a9-98b7-587216f77972 28Gi RWX nai-nfs-storage <unset> 16d
nai-eacd00e0-6c7e-4748-a56c-03-pvc-claim Bound pvc-4bed4d49-20fc-44b1-8139-538699ca49b3 47Gi RWX nai-nfs-storage <unset> 86d
nai-f379dd24-e315-441c-ae3a-94-pvc-claim Bound pvc-d9d01cf9-ac2c-4875-a516-9cca8da98875 10Gi RWX nai-nfs-storage <unset> 81d
When the model is imported successfully, the status of the model becomes Active:
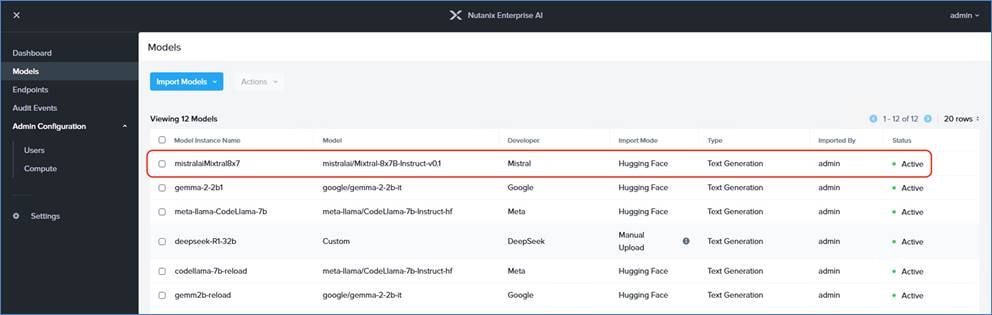
The pod on the workload cluster is deleted with the size of pvc equal to the size of the model:
$ kubectl get kubectl get po -n nai-admin
NAME READY STATUS RESTARTS AGE
genai-perf-5cfb975966-jfnkd 1/1 Running 0 81d
llama-2-13b-chat-hf-predictor-00001-deployment-58f9df7dbd-6l2xd 2/2 Running 0 15d
meta-llama-7b-predictor-00001-deployment-85556cd96d-gn62j 2/2 Running 0 16d
cvd-nai-wl-01 [⎈ |cvd-nai-wl-01-admin@cvd-nai-wl-01:N/A]
$ kubectl get pvc -n nai-admin
NAME STATUS VOLUME CAPACITY ACCESS MODES STORAGECLASS VOLUMEATTRIBUTESCLASS AGE
genai-perf-data Bound pvc-5c822d9c-89e8-47f4-9ede-830d6d204f81 50Gi RWO nai-nfs-storage <unset> 84d
nai-07f4f0c2-77c2-45aa-b9fa-d2-pvc-claim Bound pvc-e798999e-9ca5-4769-9ebb-0a0178f7f6a3 10Gi RWX nai-nfs-storage <unset> 14d
nai-0fc9f51d-7dc7-46ea-94ae-4e-pvc-claim Bound pvc-82350161-b2eb-423b-bf42-e6473f6479c0 75Gi RWX nai-nfs-storage <unset> 78d
nai-160c5627-1c9b-4b26-9dbd-82-pvc-claim Bound pvc-12e4bb38-5c8c-44c8-baac-cc0ae1fc40dc 56Gi RWX nai-nfs-storage <unset> 86d
nai-58c15845-fa82-459c-ade2-15-pvc-claim Bound pvc-19f5fdd5-55a3-4ea5-9b38-6fe9b92ef228 45Gi RWX nai-nfs-storage <unset> 85d
nai-61a83407-6fc7-4858-8014-d9-pvc-claim Bound pvc-51d0f06f-9a19-400b-9743-a37497be63cb 187Gi RWX nai-nfs-storage <unset> 16m
nai-898ad30c-1ec1-4966-83b1-ca-pvc-claim Bound pvc-2031c07f-ffc9-42c6-b7e8-a2a7278f4f61 28Gi RWX nai-nfs-storage <unset> 81d
nai-aa55061f-ca05-451e-a6de-d1-pvc-claim Bound pvc-e5ed1e0c-6b48-4584-933e-0165eaa922a5 19Gi RWX nai-nfs-storage <unset> 81d
nai-b33a6da8-e86c-4a92-b26c-09-pvc-claim Bound pvc-e859a4ac-e4f5-418b-809a-8a19a7fb46ee 28Gi RWX nai-nfs-storage <unset> 87d
nai-d0704faf-7da8-41c4-94a9-15-pvc-claim Bound pvc-0f26cdd5-3b1b-42d3-b246-0964ccf410ed 12Gi RWX nai-nfs-storage <unset> 85d
nai-e779bbcc-5c2f-4809-aff6-59-pvc-claim Bound pvc-e5c1512f-4d2c-42a9-98b7-587216f77972 28Gi RWX nai-nfs-storage <unset> 16d
nai-eacd00e0-6c7e-4748-a56c-03-pvc-claim Bound pvc-4bed4d49-20fc-44b1-8139-538699ca49b3 47Gi RWX nai-nfs-storage <unset> 86d
nai-f379dd24-e315-441c-ae3a-94-pvc-claim Bound pvc-d9d01cf9-ac2c-4875-a516-9cca8da98875 10Gi RWX nai-nfs-storage <unset> 81d
$
Procedure 2. Deploy Secure Endpoint
Step 1. From the NAI dashboard, click the Endpoints tab and click Create Endpoint.
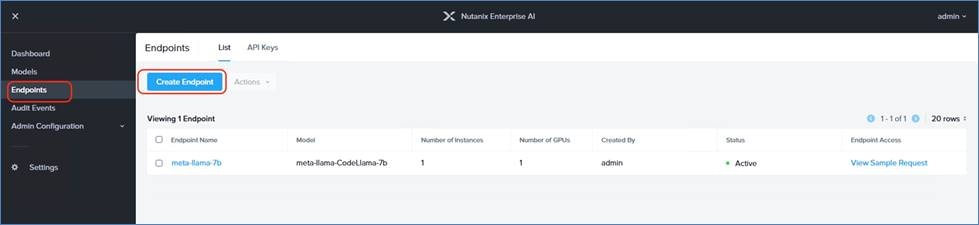
Step 2. Define the Endpoint name, select the model already imported in NAI, choose the GPUs and number of instances. Choose the Endpoint access key. You can create multiple key assignment which can be leveraged to monitor the number of request per api key to the inference Endpoint. Click Create.
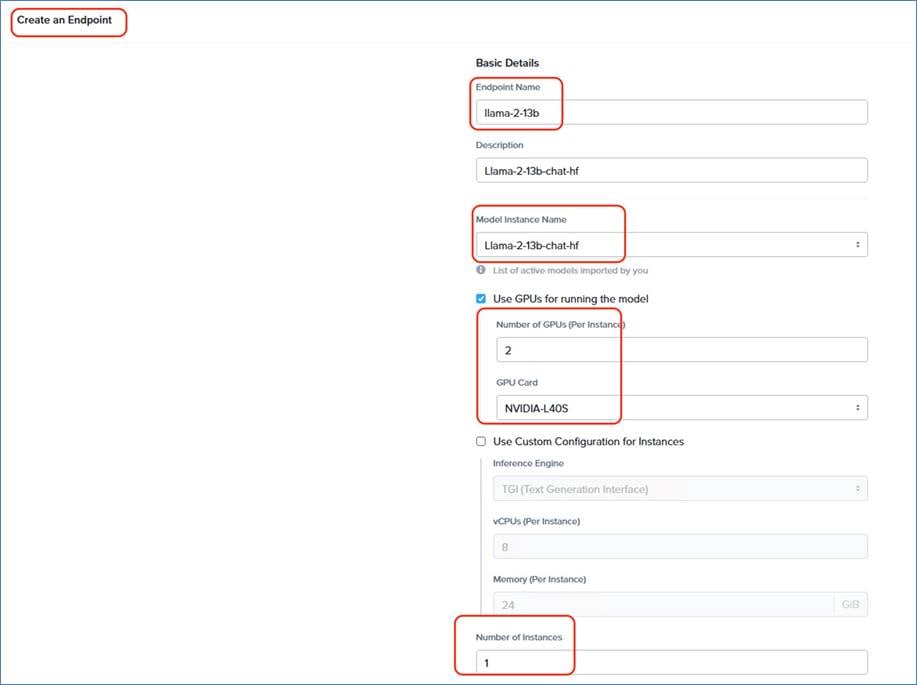
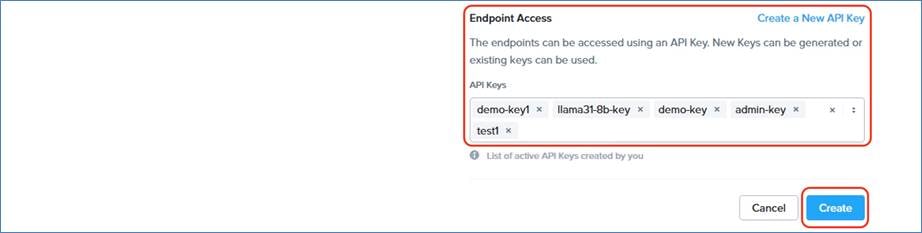
Step 3. View the container creation on the workload cluster in nai-admin name space:
$ kubectl get po -n nai-admin
NAME READY STATUS RESTARTS AGE
genai-perf-5cfb975966-jfnkd 1/1 Running 0 82d
llama-2-13b-predictor-00001-deployment-676677f7cc-4srzs 0/2 ContainerCreating 0 9s
meta-llama-7b-predictor-00001-deployment-85556cd96d-gn62j 2/2 Running 0 16d
Step 4. Monitor the inference service creation in the nai-admin namespace:
$ kubectl get isvc -n nai-admin
NAME URL READY PREV LATEST PREVROLLEDOUTREVISION LATESTREADYREVISION AGE
llama-2-13b http://llama-2-13b.nai-admin.svc.cluster.local True 100 llama-2-13b-predictor-00001 2m58s
meta-llama-7b http://meta-llama-7b.nai-admin.svc.cluster.local True 100 meta-llama-7b-predictor-00001 16d
The status for the end point creation should be marked as Active in the NAI dashboard:
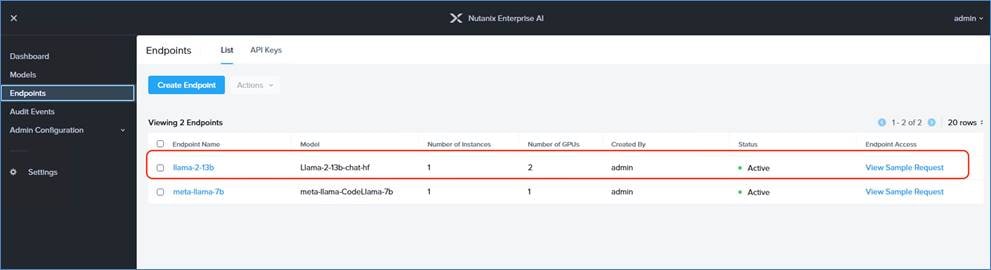
Step 5. View the sample request and test the created Endpoint:
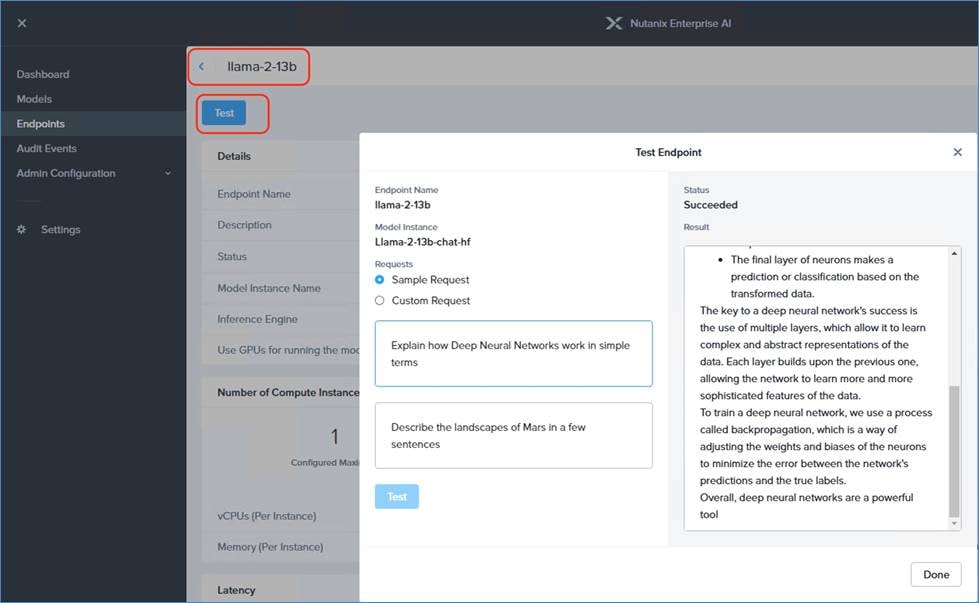
It is critical to gain complete visibility into the entire stack, including Physical infrastructure (Compute, Storage and Network), Virtualized infrastructure, NKP clusters and the Nutanix Enterprise AI. It helps to gain insight into infrastructure bottlenecks and factors that increase costs and ensures the performance for model inferencing and applications.
This section provides some ways of gaining visibility of the application stack.
Infrastructure Insights
The physical and virtual Infrastructure components can be monitored through multiple dashboards
The physical infrastructure deployed in Cisco Compute Hyperconverged for Nutanix can be monitored through Cisco Intersight.
Intersight offers a wide array of options to monitor your data center environment. The devices connected to Intersight report inventory information and alerts back to Intersight, which you can then view. For more information, see Server Inventory View, Chassis Inventory View, and Fabric Interconnects Inventory View.
The information about the connected environment is also enriched with more information by Cisco:
● Hardware Compatibility List (HCL)—Checks if your server and firmware combination is validated by Cisco
● Advisories—Lists known vulnerabilities and other information for your specific environment.
● Service Contract—Checks if your device has an active service contract with Cisco.
Additionally, Intersight collects metrics from Fabric Interconnects, Chassis, and Servers that are managed as Intersight Managed Mode (IMM) or UCMS Managed Mode (UMM) domains in Cisco Intersight. These IMM or UMM domains capture metrics for the various devices and components in a domain locally. These metrics are then aggregated and sent to Intersight in regular intervals. An example of this would be calculating the minimum, average, and maximum value. These metrics are stored in Intersight, and you can query the metrics.
For more information about Cisco Intersight monitoring metrics, see the Cisco Intersight Monitoring Overview page.
The physical infrastructure deployed in Cisco Compute Hyperconverged for Nutanix can be monitored through Cisco Intersight.
The virtual infrastructure such as VMs and File Services can be monitored through Prism Central.
Procedure 1. Cisco Intersight monitoring
Step 1. Log into Cisco Intersight. The main dashboard provides an insight into the power and energy metrics of the physical servers deployed for Nutanix Cluster.
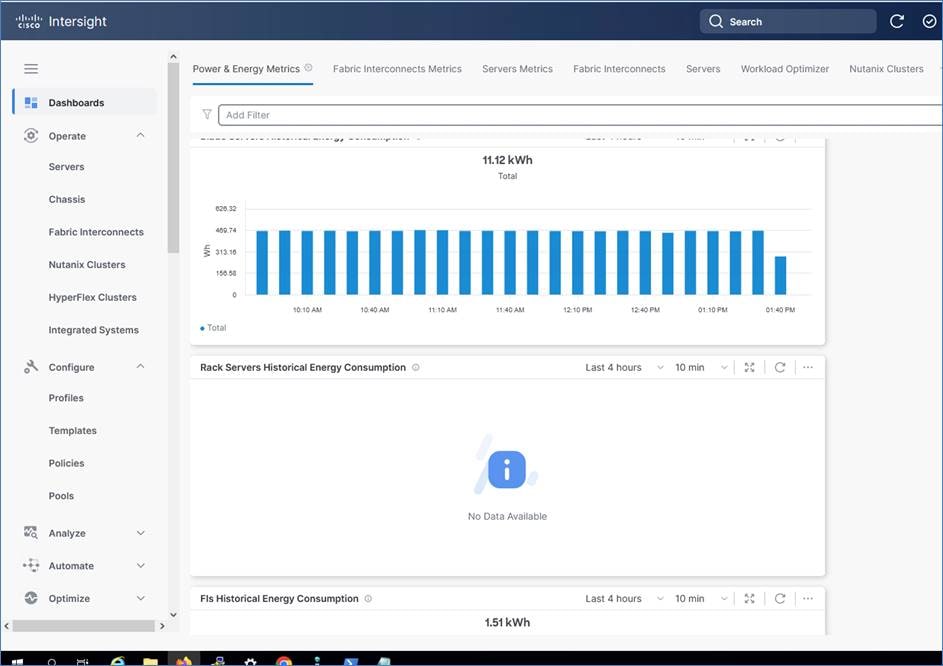
Cisco Intersight enables integration with Nutanix providing monitoring of Cisco UCS servers deployed as Nutanix Clusters.
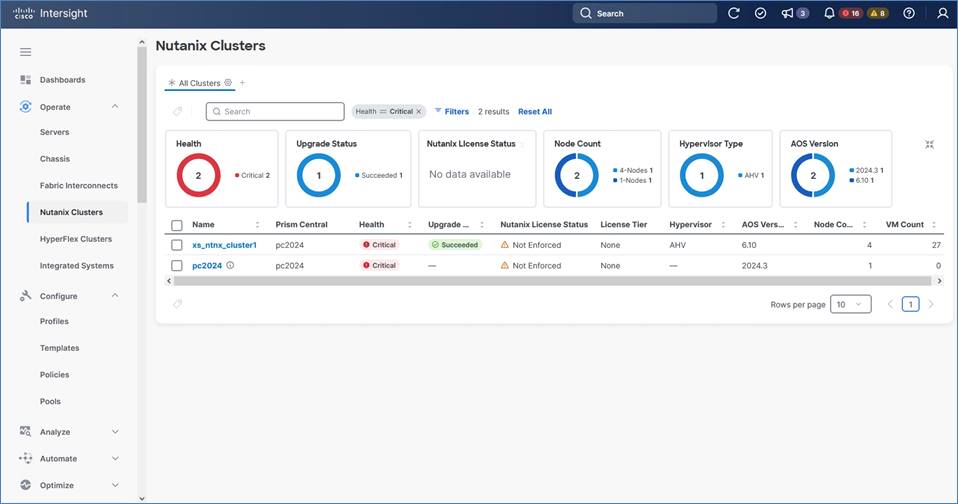
Step 2. View the Security Advisories, Field Notices, and End of Life Advisories through Cisco Intersight platform.
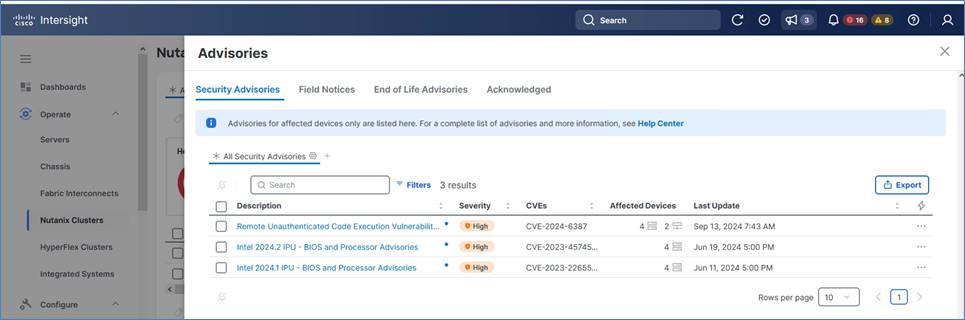
Procedure 2. Prism Central monitoring
The Prism Central dashboard provides monitoring of key metrics for Nutanix Cluster. Details of the resource utilization of Nutanix Cluster connected to Prism Central is shown below:

Step 1. Go to the File Server tab and view the resource utilization of File Server deployed for GPT-in-a-Box 2.0 solution.
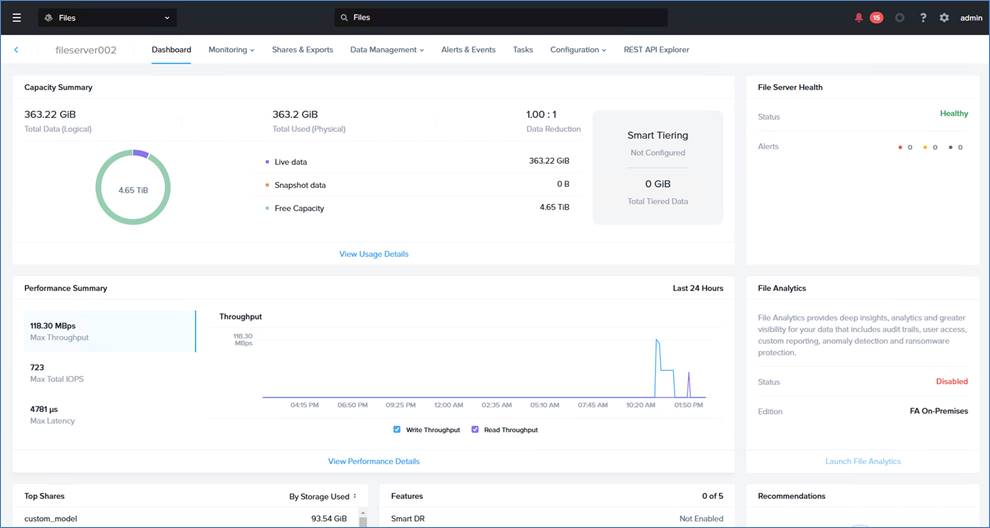
NKP Cluster Dashboard
The Nutanix Kubernetes kommander dashboard provides resource monitoring of both management and workload clusters deployed for the solution.
Procedure 1. NKP Kommander Dashboard
Step 1. Identify the NKP dashboard login details:
$ source ~/nkp/.env
$ export KUBECONFIG=~/cvd-nkp-mgmt.conf
$ nkp get dashboard
Username: distracted_kilby
Password: ggX2nu3OMm3g2ng0YKvKMbE2mhNlTkxAcDBFdhhbHeCg66SiRfiUPIDo1F7ciico
URL: https://10.108.2.77/dkp/kommander/dashboard
Step 2. Log into the NKP dashboard and view the management and workload cluster for the present solution:
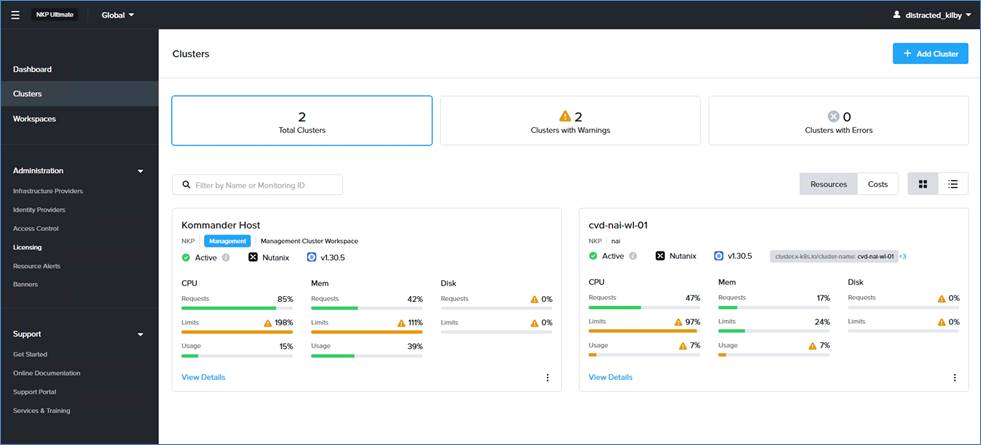
Step 3. Access the management cluster dashboard and view the services deployed and monitor the resource utilization.
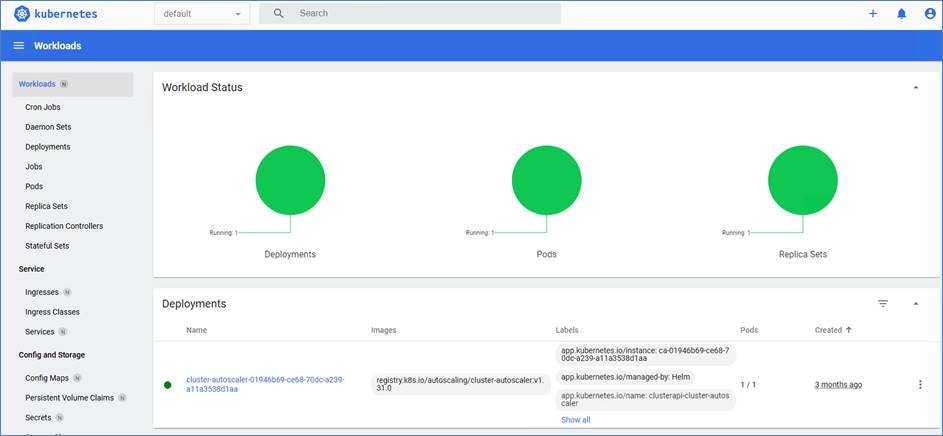
Step 4. Access the workload cluster dashboard to view the monitoring of resources deployed in the workload cluster.
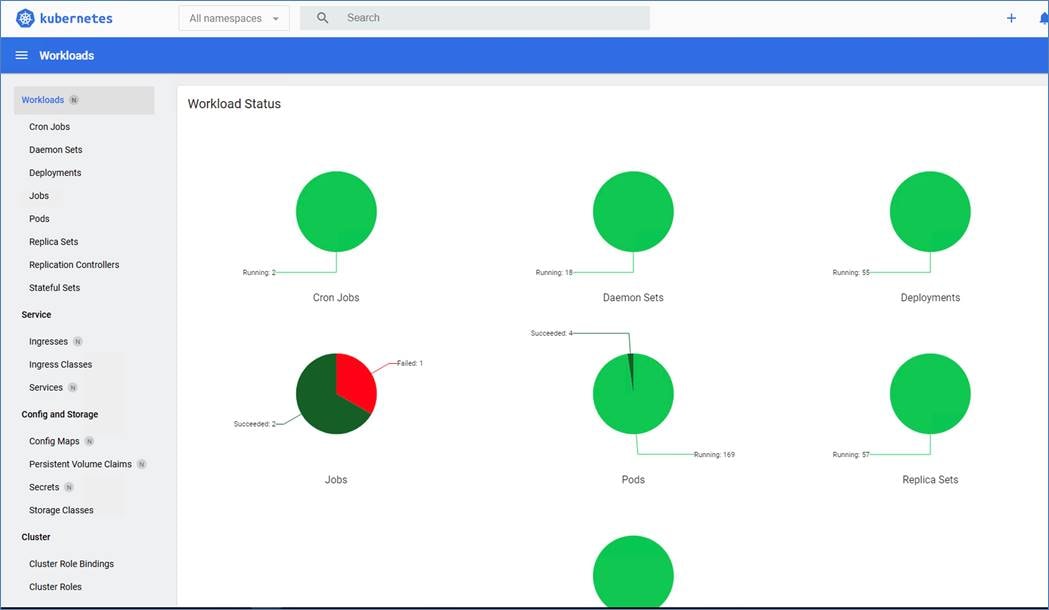
NAI Dashboard
The Nutanix Enterprise AI dashboard provides monitoring of GPU resource and details the number of request and request latency of secure end points. You can create different access keys to monitor end points per user group.
The request latency and request summary of the secure inference Endpoints deployed with NAI is shown below:
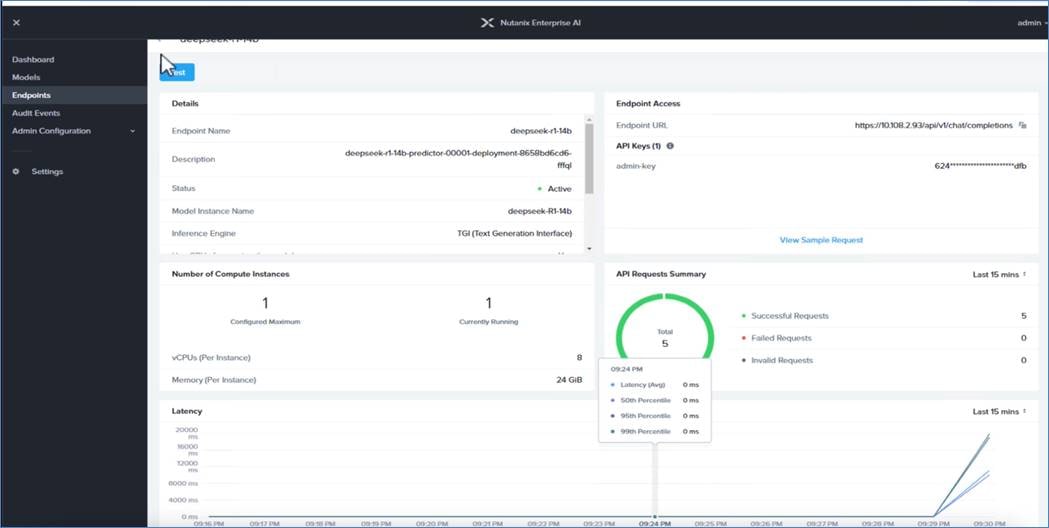
This section provides an overview and general guidance for sizing GPU memory required to deploy LLM models. Nutanix provides minimum sizing requirements to install Nutanix Enterprise AI and deploy pre-validated models. For information about the minimum requirements to successfully deploy NAI, go to: Nutanix Enterprise AI Requirements
Table 17 lists the pre-validated LLMs and the minimum number of supported GPUs required to deploy these LLMs.
Table 17. Minimum GPU requirements
| LLM Provider |
LLM Name |
GPU Models |
|||
|
|
|
NVIDIA L40S-48G |
NVIDIA A100-80G |
NVIDIA H100-80G |
NVIDIA H100 NVL-94G |
| AI21 Labs |
ai21labs/AI21-Jamba-1.5-Mini |
4 |
2 |
2 |
2 |
| |
google/gemma-2-9b-it |
1 |
1 |
1 |
1 |
| google/gemma-2-2b-it |
1 |
1 |
1 |
1 |
|
| Meta |
meta-llama/Llama-2-13b-chat-hf |
1 |
1 |
1 |
1 |
| meta-llama/Llama-3.2-3b-Instruct |
1 |
1 |
1 |
1 |
|
| meta-llama/Llama-3.2-1B-Instruct |
1 |
1 |
1 |
1 |
|
| meta-llama/Meta-Llama-3.1-8B-Instruct |
1 |
1 |
1 |
1 |
|
| meta-llama/Meta-Llama-3.1-70B-Instruct |
4 |
2 |
2 |
2 |
|
| meta-llama/CodeLlama-7b-Instruct-hf |
1 |
1 |
1 |
1 |
|
| meta-llama/CodeLlama-13b-Instruct-hf |
1 |
1 |
1 |
1 |
|
| meta-llama/CodeLlama-34b-Instruct-hf |
2 |
1 |
1 |
1 |
|
| meta-llama/CodeLlama-70b-Instruct-hf |
4 |
2 |
2 |
2 |
|
| Mistral AI |
mistralai/Mistral-7B-Instruct-v0.3 |
1 |
1 |
1 |
1 |
| mistralai/Mixtral-8x7B-Instruct-v0.1 |
4 |
2 |
2 |
2 |
|
| mistralai/Mixtral-8x22B-Instruct-v0.1 |
Not supported |
4 |
4 |
4 |
|
| mistralai/Mistral-Nemo-Instruct-2407 |
1 |
1 |
1 |
1 |
|
| NVIDIA |
llama-3.1-8b-instruct |
1 |
Not supported |
Not supported |
1 |
| llama-3.1-70b-instruct |
4 |
Not supported |
Not supported |
2 |
|
| llama-3.1-nemoguard-8b-content-safety |
1 |
1 |
1 |
1 |
|
| llama-3.2-nv-embedqa-1b-v2 |
1 |
1 |
1 |
1 |
|
| llama-3.2-nv-rerankqa-1b-v2 |
1 |
1 |
1 |
1 |
|
| llama-3.3-70b-instruct |
4 |
Not supported |
4 |
4 |
|
| mixtral-8x7b-instruct-v01 |
4 |
Not supported |
Not supported |
2 |
|
Key Terms
Some of the key terms with respect to LLM inferencing are:
● Batch Size: Batch size refers to the number of samples that are processed together in a single inference run. The batch size can significantly impact the latency and throughput of the inference process. For example, increasing the batch size can increase throughput but at the cost of increased latency.
● Precision: The size in bytes used for each parameter in the model.
● Context Size: Represents the maximum number of tokens the model process for the prompt + response. (Input Tokens Length + Output Tokens Length)
● Key and Value Cache (KV Cache): The amount of memory consumed by a single token based on the model dimensions and layers.
● Activations: When a token is being processed within the model, it is called an Activation. Full activation memory is calculated from the KV Cache size and context size.
LLM Inferencing Phases
LLMs generate text in a two-step process:
● Prefill: In the first phase, the model ingests your prompt tokens in parallel, populating the key-value (KV) cache. Prefill generates the key and value cache (KV Cache) for future decoding.
● Decoding Phase: In the second phase, we leverage our current state (stored in the KV cache) to sample and decode the next token. We pay a small price in storage to not recalculate the cache for every single new token. Without the KV cache, every successive token would take longer to sample because we would have to pass all previously seen tokens through the model.
The input sequence from the user is first tokenized in the same way the model's training data was tokenized. Then the tokens are fed to the trained model.
As the first step of model execution, the input sequence is converted into an embedding vector in the embedding layer of the trained model. This vector essentially translates the token into a high-dimensional space where similar tokens have similar vectors.
Using the token embeddings, queries, keys, and values for each token are computed through a process known as linear projection. Here, each token's embedding vector is multiplied by separate weight matrices learned during the training to produce the query, key, and value vectors.
The concept of using queries, keys, and values is directly inspired by how databases work. Each database storage has its data values indexed by keys, and users can retrieve the data by making a query and comparing if the key value matches the query. In the LLM case, the model generates the queries itself. The key values are not directly compared to the query, but the relevance of each key to the query is computed using a compatibility function to generate a weight vector.
An attention output is computed for each query as the weighted sum of the "values" using the weight vector previously computed.
This attention output goes through a prediction (or decode) layer, which assigns probabilities to each token in the entire vocabulary of the model, indicating the likelihood of that token being the next one.
One can sample from the predicted probability distribution to choose the next token probabilistically or select the token with the highest probability as the predicted next token.
Cluster Sizing
This CVD describes the design for a single GPT-in-a-Box 2.0 cluster with four or more nodes. If one of the scaling factors (such as the total number of VMs, Kubernetes applications, or GPU workloads) exceeds the maximum specified for the solution, extend the cluster with the required capacity (CPU, memory, storage, GPU). After reaching the maximum cluster size, consider building a new cluster to support the demand for further growth.
Infrastructure Considerations
The following are the key factors for sizing infrastructure for Generative AI inferencing:
● Model Specifications
◦ Model Architecture: Understand the architecture of the language model, including the number of layers, attention heads, and parameters.
◦ Token Embedding Size: Larger embedding sizes can significantly impact memory requirements.
● Hardware Acceleration
◦ Mixed Precision: Explore mixed-precision training and inference to leverage hardware capabilities efficiently.
● Memory Requirements
◦ Model Size: Large language models can have substantial memory requirements. Ensure sufficient GPU memory for both the model and input sequences.
◦ Sequence Length: Consider the maximum sequence length the model can handle and its impact on memory usage.
● Batching and Parallelization
◦ Batch Size: Experiment with batch sizes. Larger batch sizes can improve throughput but may increase memory requirements.
◦ Data Parallelism: Implement data parallelism to distribute inference across multiple devices, if necessary.
● Latency and Throughput
◦ Latency Requirements: Language models often have real-time constraints, especially in interactive applications. Minimize latency based on use case.
◦ Throughput Targets: Determine the required throughput in terms of processed tokens or sequences per second.
● Scalability
◦ Model Parallelism: Consider model parallelism if the model size exceeds available GPU memory, distributing parts of the model across multiple GPUs.
◦ Infrastructure Scaling: Design for horizontal scalability to handle increased demand.
● Redundancy and High Availability
◦ Checkpointing: Implement regular model checkpointing to recover from failures without losing training progress.
◦ Replication: Use redundant systems to ensure high availability during inference.
● Network Considerations
◦ Bandwidth: Assess the network bandwidth required for transferring large model parameters between devices.
◦ Inter-Device Communication: Optimize communication patterns between devices to minimize latency.
● Storage Requirements
◦ Model Storage: Choose storage solutions capable of efficiently loading large model parameters.
◦ Data Storage: Assess storage needs for input data and any intermediate results.
● Containerization and Orchestration
◦ Containerization: Deploy the language model within containers for easier management and consistency across different environments.
◦ Orchestration: Use container orchestration tools like Kubernetes for managing and scaling the deployment efficiently.
● Middleware and Serving Frameworks
◦ Serving Framework: Choose a serving framework optimized for deploying large language models, such as TensorFlow Serving, Triton Inference Server, or others.
◦ Middleware: Implement middleware for handling communication between clients and the deployed model, ensuring compatibility with your application's requirements.
● Monitoring and Optimization
◦ Resource Monitoring: Employ monitoring tools to track GPU utilization, memory usage, and other relevant metrics.
◦ Dynamic Optimization: Optimize parameters dynamically based on real-time performance metrics.
● Security
◦ Data Protection: Implement measures to secure input and output data, especially if it involves sensitive information.
◦ Model Security: Protect large language models from adversarial attacks and unauthorized access.
When selecting the GPU for this solution, there are several crucial factors to consider:
● Processing Power: Look for GPUs with sufficient computational power to handle the complex neural network computations required for LLM inference.
● Memory Capacity: LLM models often have large memory requirements. Ensure that the GPU has enough VRAM (Video RAM) to accommodate the model size and batch sizes.
● Tensor Cores: Tensor cores accelerate matrix operations, which are essential for LLM inference. GPUs with tensor cores (such as NVIDIA's RTX series) can significantly improve performance.
● Compatibility: Check if the GPU is compatible with the Cisco UCS and the deep learning framework you plan to use and if (e.g., TensorFlow, PyTorch).
● Power Consumption: Consider the GPU's power draw and ensure it aligns with your system's power supply capacity.
Memory Calculations for LLM Inferencing
Total Memory required is the sum of model memory size and the KV cache.
Calculations for the required total memory is provided below:
Model Memory Size = Model Parameters * Precision
KV Cache Size = 2 x Batch Size x Context Size x Number of Layers x Model Dimensions x Precision
Total Memory Requirements (GB) = Model Memory Size (GB) + KV Cache Size (GB)
For some models, model dimension data might not be available. In that case, model dimension can be calculated as:
Model Dimensions = Attention Head Size X Number of Attention Heads
Model Parameters, Precision, Number of layers, Model Dimension are specific to models, and it can be found in the Model card for the model.
Context Size and batch size are input from users.
The following is an example memory calculation for Llama 2:

For the Llama 2 model:
Total model parameters: 6.74B Parameters.
Precision: FP16. (2 Bytes)
Number of layers: 32
Model Dimension: 4096
The model memory is calculated is shown below:
Model Memory Size = Model Parameters * Precision
Model Memory Size for Llama 2 = 6,740,000,000 * 2 Bytes/Parameter
= 13,480,000,000 Bytes
= 13.48 Giga Bytes
Considering an example of maximum Input Tokens Length of 1024, Maximum Output Tokens Length of 1024, and the Batch size of 8, below are the calculations for KV Cache Size:
KV Cache Size = 2 x Batch Size x Context Size x Number of Layers x Model Dimensions x Precision
KV Cache Size = 2 x 8 x (1024+1024) x 32 x 4096 x 2 Bytes/Parameter
= 8,589,934,592 Bytes
= 8.59 Giga Bytes
Therefore, Llama2 with maximum Input Tokens Length of 1024, Maximum Output Tokens Length of 1024, and the Batch size of 8, the total memory required is as shown below:
Total Memory Requirements (GB) = Model Memory Size (GB) + KV Cache Size (GB)
= 13.48 + 8.59 Giga Bytes
= 22.07 Giga Bytes
Performance Calculations
The performance benchmark can be run on the model.
Based on the performance requirement, number of users, number of input and output tokens, latency and throughput required, you can choose the appropriate Large Language Model, Inferencing backend, GPUs, and compute infrastructure.
The performance of the model depends on the prefill and decode phases. These two phases have different impacts on the performance of the LLM. While the prefill phase effectively saturates GPU compute at small batch sizes, the decode phase results in low compute utilization as it generates one token at a time per request.
The prefill phase is compute-bound, while the decode phase is memory-bound. So, the following factors need to be considered and measured:
● Prefill Latency
● Prefill Throughput
● Decode Total Latency
● Decode Token Latency
● Decode Throughput
The performance benchmark can be run with different sizes (1,2,4,8,10,25,250, 100 and so on). Also, separate tests can be run focused on performance comparison between 2 different models.
Conclusion
This validated solution is a valuable resource for navigating the complexities of Generative AI application deployment in real-world enterprise environments leveraging Nutanix Enterprise AI to deploy your choice of LLMs (large language models) from leading LLM providers and create and manage secure APIs to connect your GenAI applications.
This Cisco Validated Design for Cisco Compute Hyperconverged with Nutanix GPT-in-a-Box 2.0 provides a foundational reference architecture for deployment of an innovative, flexible, and secure generative pretrained transformer (GPT) solution for Generative AI to privately run and manage organization’s choice of AI large language models (LLMs) and applications in which it leverages.
In combination of Cisco UCS and Nutanix, this solution intends to enable an AI inferencing turnkey solution which can be quickly deployed as an on-premises solution. The infrastructure is designed using the Cisco Intersight Managed X-Series modular system with Cisco UCS X210c M7 All-NVMe servers configured with 2x NVIDIA L40S GPUs on each Cisco UCS X440p PCIe node, which leverages Software-defined Nutanix Cloud Infrastructure supporting GPU-enabled server nodes for seamless scaling of virtualized compute, storage, networking supporting Kubernetes-orchestrated containers and Nutanix Unified Storage.
Appendix
This appendix contains the following:
● Appendix A – Bill of Materials
● Appendix B – References used in this guide
Appendix A – Bill of Materials
Table 18 list of the Bill of Materials used in this solution design and the deployment and validation described in this document.
| Line Number |
Part Number |
Description |
Qty |
| 1.0 |
HCIX-M7-MLB |
Cisco Compute Hyperconverged X-Series M7 with Nutanix MLB |
1 |
| 1.1 |
HCIX-9508-U |
Cisco Compute Hyperconverged 9508 Chassis Configured |
1 |
| 1.1.0.1 |
CON-L1NCO-HCIX9A8U |
CX LEVEL 1 8X7XNCDOS CCHC 9508 Chassis Configured |
1 |
| 1.1.1 |
HCIX210C-M7SN |
210cM7 All NVMe Hyperconverged Node w/o CPU, Memory, Storage |
4 |
| 1.1.1.0.1 |
CON-L1NCO-HCIX2M7S |
CX LEVEL 1 8X7XNCDOS CCHC 210cM7 All NVMe Compute Node w o CP |
4 |
| 1.1.2 |
HCIX-F-9416 |
HCIX 9416 X-Fabric module for 9508 chassis |
2 |
| 1.1.3 |
HCIX-PSU-2800AC |
HCIX 9508 Chassis 2800V AC Dual Voltage PSU Titanium |
6 |
| 1.1.4 |
NO-POWER-CORD |
ECO friendly green option, no power cable will be shipped |
6 |
| 1.1.5 |
HCIX-CHASSIS-SW |
Platform SW (Recommended) latest release for X9500 Chassis |
1 |
| 1.1.6 |
UCSX-9508-CAK-D |
UCS 9508 Chassis Accessory Kit |
1 |
| 1.1.7 |
UCSX-9508-ACPEM-D |
UCS 9508 Chassis Rear AC Power Expansion Module |
2 |
| 1.1.8 |
UCSX-9508-KEYAC-D |
UCS 9508 AC PSU Keying Bracket |
1 |
| 1.1.9 |
HCIX-MRX32G1RE1 |
32GB DDR5-4800 RDIMM 1Rx4 (16Gb) |
128 |
| 1.1.10 |
HCIX-X10C-PT4F |
HCI X10c Compute Pass Through Controller (Front) |
4 |
| 1.1.11 |
HCIX-ML-V5Q50G |
Cisco VIC 15420 4x 25G mLOM X-Series w/Secure Boot |
4 |
| 1.1.12 |
HCIX-V4-PCIME |
HCI PCI Mezz card for X-Fabric |
4 |
| 1.1.13 |
HCIX-NVMEG4-M3840 |
3.8TB 2.5in U.3 15mm P7450 Hg Perf Med End NVMe |
24 |
| 1.1.14 |
HCIX-M2-240G |
240GB M.2 SATA Micron G2 SSD |
8 |
| 1.1.15 |
HCIX-TPM-002C |
TPM 2.0, TCG, FIPS140-2, CC EAL4+ Certified, for servers |
4 |
| 1.1.16 |
HCIX-AOSAHV610SWK9 |
HCIX AOS AHV 6.10 SW |
4 |
| 1.1.17 |
HCIX-C-SW-LATEST |
Platform SW (Recommended) latest release X-Series Compute Node |
4 |
| 1.1.18 |
UCSX-C-M7-HS-F |
UCS X210c M7 Compute Node Front CPU Heat Sink |
4 |
| 1.1.19 |
UCSX-C-M7-HS-R |
UCS X210c M7 Compute Node Rear CPU Heat Sink |
4 |
| 1.1.20 |
UCSX-M2-HWRD-FPS |
UCSX Front panel with M.2 RAID controller for SATA drives |
4 |
| 1.1.21 |
HCIX-CPU-I6442Y |
Intel I6442Y 2.6GHz/225W 24C/60MB DDR5 4800MT/s |
8 |
| 1.1.22 |
HCIX-440P |
HCI X-Series Gen4 PCIe node |
4 |
| 1.1.23 |
HCIX-RIS-A-440P |
Riser A for 1x dual slot GPU per riser, 440P PCIe node |
8 |
| 1.1.24 |
HCIX-GPU-L40S |
NVIDIA L40S: 350W, 48GB, 2-slot FHFL GPU |
8 |
| 1.1.25 |
HCI-NV-GRID-OPTOUT |
NVIDIA GRID SW OPTOUT |
4 |
| 1.1.26 |
HCIX-S9108-100G |
HCI X-Series Direct Fabric Interconnect 9108 100G |
2 |
| 1.1.27 |
HCIX-S9108-SW |
Perpetual SW License for HCI X-Series Direct FI 9108-100G |
2 |
| 1.2 |
HCIX-FI-6454 |
Cisco Compute Hyperconverged X Fabric Interconnect 6454 |
2 |
| 1.2.0.1 |
CON-L1NCO-HCIXFI6A |
CX LEVEL 1 8X7XNCDOS Cisco Compute Hyperconverged X Fabric I |
2 |
| 1.2.1 |
N10-MGT018 |
UCS Manager v4.2 and Intersight Managed Mode v4.2 |
2 |
| 1.2.2 |
HCIX-PSU-6332-AC |
HCIX 6332/ 6454 Power Supply/100-240VAC |
4 |
| 1.2.3 |
CAB-N5K6A-NA |
Power Cord, 200/240V 6A North America |
4 |
| 1.2.4 |
UCS-ACC-6332 |
UCS 6332/ 6454 Chassis Accessory Kit |
2 |
| 1.2.5 |
UCS-FAN-6332 |
UCS 6332/ 6454 Fan Module |
8 |
| 1.3 |
DC-MGT-SAAS |
Cisco Intersight SaaS |
1 |
| 1.3.1 |
DC-MGT-IS-SAAS-AD |
Infrastructure Services SaaS/CVA - Advantage |
4 |
| 1.3.2 |
SVS-DCM-SUPT-BAS |
Basic Support for DCM |
1 |
| 1.3.3 |
DC-MGT-UCSC-1S |
UCS Central Per Server - 1 Server License |
4 |
| 1.3.4 |
DC-MGT-ADOPT-BAS |
Intersight - 3 virtual adopt session http://cs.co/requestCSS |
1 |
Appendix B – References used in this guide
GPT-in-a-Box 2.0 NVD
NAI LMM Guide
Field Guide to deploy Cisco Compute Hyperconverged with Nutanix in IMM mode
Nutanix Kubernetes Platform Guide
Cisco Compute Hyperconverged with Nutanix
Cisco Intersight
https://www.cisco.com/c/en/us/products/servers-unified-computing/intersight/index.html
Cisco UCS X210c All-NVMe/All-Flash Server
Nutanix Reference Documentation
About the Authors
Anil Dhiman, Technical Marketing Engineer, Cisco Systems, Inc.
Anil Dhiman has over 20 years of experience specializing in data center solutions on Cisco UCS servers, and performance engineering of large-scale enterprise applications. Over the past 14 years, Anil has authored several Cisco Validated Designs for enterprise solutions on Cisco data center technologies. Currently, Anil's focus is on Cisco’s portfolio of hyperconverged infrastructure and data protection solutions.
Paniraja Koppa, Technical Marketing Engineer, Cisco Systems, Inc.
Paniraja Koppa is a member of the Cisco Unified Computing System (Cisco UCS) solutions team. He has over 15 years of experience designing, implementing, and operating solutions in the data center. In his current role, he works on design and development, best practices, optimization, automation and technical content creation of compute and hybrid cloud solutions. He also worked as a technical consulting engineer in the data center virtualization space. Paniraja holds a master’s degree in computer science. He has presented several papers at international conferences and speaker at events like Cisco Live US and Europe, Open Infrastructure Summit, and other partner events. Paniraja’s current focus is on Generative AI solutions.
Wolfgang Huse, Sr. Staff Solution Architect – Cloud Native & AI, Nutanix, Inc.
Wolfgang Huse is the technical lead for Cloud Native in Solutions and Performance Engineering team at Nutanix and is based out of Germany. In this role, he and his team are primarily responsible for the development of cloud native solutions and evangelizing the benefits of adopting cloud native architectures within Nutanix Cloud Platform. Wolfgang and his team have been instrumental in building many key solution artifacts such as the various Nutanix tech notes, best practice guides and validated designs to support solutions such as RedHat OpenShift, Rancher and most recently Nutanix GPT in-a-Box. Prior to this role, he worked in sales engineering roles at Nutanix, directly providing assistance on designing and implementing complex solutions, globally.
Arvind Bhoj, Senior Solutions Architect - Cloud Native & AI, Nutanix, Inc.
Arvind is a Sr. Solutions Architect for Cloud Native Technology at Nutanix. Arvind has over 20 years of experience in the tech industry and is extremely passionate about Kubernetes and Cloud & IT infrastructure automation/integration. He has extensive experience in product engineering as well as working directly with customers in the field with large organizations across the globe to help them in their Cloud Native and Container Orchestration journey.
Jesse Gonzalez, Staff Solution Architect – Cloud Native & AI, Nutanix, Inc.
Jesse Gonzalez is a Cloud Native Solutions Architect on the Solutions and Performance Engineering team at Nutanix. With over 20+ years of experience in IT, Jesse has had the privilege of working closely with many organizations of all sizes to overcome their challenges in enabling cloud-native (and more recently Generative AI) solutions on the Nutanix platform. Prior to this role, Jesse has worked in roles within both services and sales engineering at Nutanix.
Acknowledgements
For their support and contribution to the design, validation, and creation of this Cisco Validated Design, the authors would like to thank:
● Chris O'Brien, Senior Director, Cisco Systems, Inc.
Feedback
For comments and suggestions about this guide and related guides, join the discussion on Cisco Community here: https://cs.co/en-cvds.
CVD Program
ALL DESIGNS, SPECIFICATIONS, STATEMENTS, INFORMATION, AND RECOMMENDATIONS (COLLECTIVELY, "DESIGNS") IN THIS MANUAL ARE PRESENTED "AS IS," WITH ALL FAULTS. CISCO AND ITS SUPPLIERS DISCLAIM ALL WARRANTIES, INCLUDING, WITHOUT LIMITATION, THE WARRANTY OF MERCHANTABILITY, FITNESS FOR A PARTICULAR PURPOSE AND NONINFRINGEMENT OR ARISING FROM A COURSE OF DEALING, USAGE, OR TRADE PRACTICE. IN NO EVENT SHALL CISCO OR ITS SUPPLIERS BE LIABLE FOR ANY INDIRECT, SPECIAL, CONSEQUENTIAL, OR INCIDENTAL DAMAGES, INCLUDING, WITHOUT LIMITATION, LOST PROFITS OR LOSS OR DAMAGE TO DATA ARISING OUT OF THE USE OR INABILITY TO USE THE DESIGNS, EVEN IF CISCO OR ITS SUPPLIERS HAVE BEEN ADVISED OF THE POSSIBILITY OF SUCH DAMAGES.
THE DESIGNS ARE SUBJECT TO CHANGE WITHOUT NOTICE. USERS ARE SOLELY RESPONSIBLE FOR THEIR APPLICATION OF THE DESIGNS. THE DESIGNS DO NOT CONSTITUTE THE TECHNICAL OR OTHER PROFESSIONAL ADVICE OF CISCO, ITS SUPPLIERS OR PARTNERS. USERS SHOULD CONSULT THEIR OWN TECHNICAL ADVISORS BEFORE IMPLEMENTING THE DESIGNS. RESULTS MAY VARY DEPENDING ON FACTORS NOT TESTED BY CISCO.
CCDE, CCENT, Cisco Eos, Cisco Lumin, Cisco Nexus, Cisco StadiumVision, Cisco TelePresence, Cisco WebEx, the Cisco logo, DCE, and Welcome to the Human Network are trademarks; Changing the Way We Work, Live, Play, and Learn and Cisco Store are service marks; and Access Registrar, Aironet, AsyncOS, Bringing the Meeting To You, Catalyst, CCDA, CCDP, CCIE, CCIP, CCNA, CCNP, CCSP, CCVP, Cisco, the Cisco Certified Internetwork Expert logo, Cisco IOS, Cisco Press, Cisco Systems, Cisco Systems Capital, the Cisco Systems logo, Cisco Unified Computing System (Cisco UCS), Cisco UCS B-Series Blade Servers, Cisco UCS C-Series Rack Servers, Cisco UCS S-Series Storage Servers, Cisco UCS X-Series, Cisco UCS Manager, Cisco UCS Management Software, Cisco Unified Fabric, Cisco Application Centric Infrastructure, Cisco Nexus 9000 Series, Cisco Nexus 7000 Series, Cisco Prime Data Center Network Manager, Cisco NX-OS Software, Cisco MDS Series, Cisco Unity, Collaboration Without Limitation, EtherFast, EtherSwitch, Event Center, Fast Step, Follow Me Browsing, FormShare, GigaDrive, HomeLink, Internet Quotient, IOS, iPhone, iQuick Study, LightStream, Linksys, MediaTone, MeetingPlace, MeetingPlace Chime Sound, MGX, Networkers, Networking Academy, Network Registrar, PCNow, PIX, PowerPanels, ProConnect, ScriptShare, SenderBase, SMARTnet, Spectrum Expert, StackWise, The Fastest Way to Increase Your Internet Quotient, TransPath, WebEx, and the WebEx logo are registered trade-marks of Cisco Systems, Inc. and/or its affiliates in the United States and certain other countries. (LDW_P5)
All other trademarks mentioned in this document or website are the property of their respective owners. The use of the word partner does not imply a partnership relationship between Cisco and any other company. (0809R)
