
Cellular Interfaces for SD-Routing Devices, Release 17.16.x
What’s new and changed
This table lists the features available with the current release.
| Cisco IOS XE release | Feature name | Description | Supported platforms |
|---|---|---|---|
|
Cisco IOS XE 17.16.1a |
Configure Cellular Interfaces for SD-Routing devices |
This feature introduces support to configure Cellular Interfaces for SD-Routing devices using Feature Parcels in Cisco SD-WAN Manager. |
|
Cellular Interfaces for SD-Routing devices
Enterprises generally use cellular connectivity to augment the primary WAN connection network. Industrial and Catalyst Edge platform customers now want to use cellular capabilities to connect to Cisco networks without having any dependency on configuring and managing multiple commands.
From Cisco IOS XE 17.16.1a release, customers can now configure Cellular Interfaces for SD-Routing devices using Feature Parcels in Cisco SD-WAN Manager without configuring and managing multiple commands.
Benefits
Customers easily set up their desired cellular configuration without the need to configure and manage CLI commands therefore leading to quicker deployments and easier device management.
Limitations
In Cisco IOS XE 17.16.1a release, though you can configure Tracker and Tracker Group objects for the Cellular Interface, it does not track the status of the Cellular Interface.
Workflow to set up Cellular Interfaces for SD-Routing devices
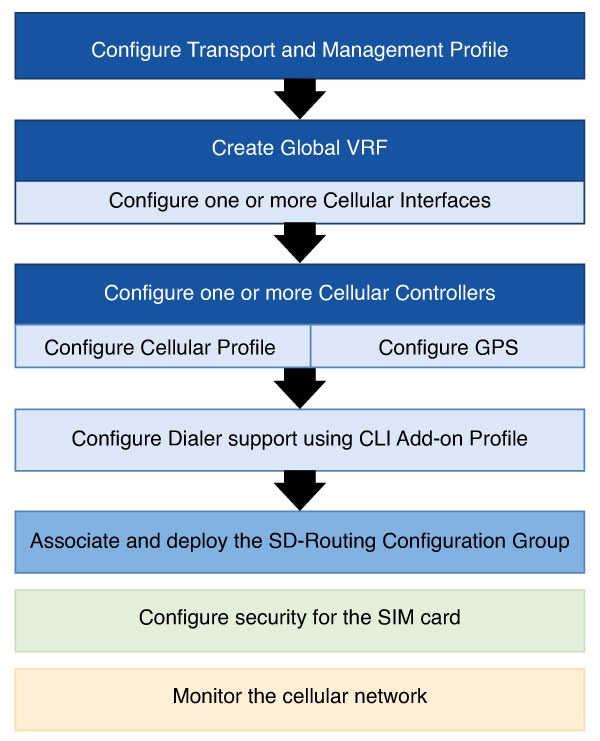
These are the different stages in configuring cellular support for SD-Routing devices:
-
Configure a Transport and Management profile that includes a Global VRF and configure one or more Cellular Interfaces.
-
Configure a Cellular Controller that hosts the Cellular Profile and GPS.
-
Configure Dialer support.
-
Associate the deploy the configuration group that contains the Transport and Management profile and the CLI Add-on Profile.
-
Configure security for the SIM to prevent unauthorised access to the cellular network.
-
Monitor the cellular network for any errors.
| Steps to configure Cellular Interfaces using Feature Parcels | To know more |
| Configure Global VRF | Configure the Global VRF in the Transport and Management Profile to set up a transport path for the cellular network. For more information, see Configure Global VRF. |
| Configure Cellular Interface | Configure a Cellular Interface to connect to a cellular network to enable LTE connectivity. For more information, see Configure Cellular Interface. |
| Configure a Cellular Controller | Configure the Cellular Controller for each LTE module. A Cellular Controller manages and controls cellular network connections acting as a central hub for managing multiple cellular devices or connections within a network. For more information, see Configure Cellular Controller. |
| Configure Cellular Profile | A Cellular Profile contains details like the Access Point Name (APN), authentication type, and preferred network bands, essentially creating a specific configuration for accessing mobile data on a cellular network depending on the user's needs or service provider. For more information, see Configure Cellular Profile. |
| Configure Cellular GPS | Configure the GPS details to determine the positioning of the device. For more information, see Configure GPS. |
| Configure Dialer support | Dialer configuration controls how data is sent and received over a dial-up connection. For more information, see Configure Dialer support |
| Associate and deploy the configuration group | Provision all the configuration to one or more devices. For more information, see Associate and deploy the configuration group |
| Configure security for the SIM card | Configure security by using the SIM lock feature and prevent unauthorised access to the network. For more information, see Configure security for the SIM card |
| Monitor the cellular network | Monitor cellular connectivity to ensure there are no errors in the network.For more information, see Monitor cellular connectivity |
Configure Cellular Interfaces for SD-Routing devices using Cisco SD-WAN Manager
This section describes the various steps involved in configuring Cellular Support using Feature Parcels in Cisco SD-WAN Manager.
Ensure that the SD-Routing device has a software version of Cisco IOS XE 17.16.1a.
Configure Global VRF
This task provides details on how to configure the Global VRF in the Transport and Management Profile to set up transport for the network.
Step 1 | On the Cisco Catalyst SD-WAN Manager, select . Select the solution type as SD Routing . | ||||||||||||||||||||||||||||||||||||||||||
Step 2 | Select a configuration group from the list that is displayed. Create a new Transport and Management profile or select an existing profile. Select the profile, click Edit. | ||||||||||||||||||||||||||||||||||||||||||
Step 3 | Select Global VRF. Click Add New to configure the Global VRF. Specify a name to identify the Global VRF. Optionally, add a description for the Global VRF.  Tip TipTo specify a value for the parameters required for configuring a Global VRF, choose Global, or Device Specific from the drop-down list.
| ||||||||||||||||||||||||||||||||||||||||||
Step 4 | Click Save. |
What's next
Configure Cellular Interface.
Configure Cellular Interface
Configure a Cellular Interface to connect to a network and enable LTE connectivity. This task covers details on how to configure the Cellular Interface.
Step 1 | On the Cisco Catalyst SD-WAN Manager, select . Select the solution type as SD Routing. | ||||||||||||||||||||||||||||||||||||
Step 2 | Select a Configuration Group from the list that is displayed. Create a new Transport and Management profile or select an existing profile. Select the profile, click Edit. | ||||||||||||||||||||||||||||||||||||
Step 3 | Select the Global VRF created as part of the steps in Configure Global VRF. Click + to add a feature. Select Cellular Interface. Select Add New. Specify a name to identify the Cellular Interface. Enter details to configure the Cellular Interface. TipTo specify a value for the parameters required for configuring a Global VRF, choose Global, or Device Specific from the drop-down list.
| ||||||||||||||||||||||||||||||||||||
Step 4 | Click Save. Repeat the process to create additional cellular interfaces. |
What's next
Configure Cellular Controller.
Configure Cellular Controller
A Cellular Controller manages and controls cellular network connections acting as a central hub for managing multiple cellular devices or connections within a network.
This task covers details on how to configure the Cellular Controller for each LTE module.
Step 1 | On the Cisco SD-WAN Manager, select . Select the solution type as SD Routing. | ||||||||||||
Step 2 | Select a configuration group created earlier. Select the Transport and Management profile created in Configure Global VRF. Select Add New Feature. Select Cellular Controller. Select Add New. Enter a name and description to identify the Cellular Controller. TipTo specify a value for the parameters required for configuring a Global VRF, choose Global, or Device Specific from the drop-down list.
| ||||||||||||
Step 3 | Click Save. Repeat the process to create additional cellular controllers. |
What's next
Configure Cellular Profile.
Configure Cellular Profile
A Cellular Profile contains details like the Access Point Name (APN), authentication type, and preferred network bands, essentially creating a specific configuration for accessing mobile data on a cellular network depending on the user's needs or service provider.
This task covers details on how to configure a Cellular Profile that contains the Access Point Name (APN) to the base station.
Step 1 | On the Cisco SD-WAN Manager, select . Select the solution type as SD Routing. | ||||||||||||||||||||
Step 2 | Select a configuration group from the list that is displayed. Select the Transport and Management profile created in Configure Global VRF click Edit. | ||||||||||||||||||||
Step 3 | Select the Cellular Controller created earlier, click +, select Cellular Profile. Select + Add New. Enter a name and description for the Cellular Profile. Specify these details: TipTo specify a value for the parameters required for configuring a Global VRF, choose Global, or Device Specific from the drop-down list.
| ||||||||||||||||||||
Step 4 | Click Save. Repeat the process to create additional cellular profiles. |
What's next
Configure GPS.
Configure GPS
This task covers details on how to configure the GPS details for the LTE module to determine the positioning of the device.
Step 1 | On the Cisco Catalyst SD-WAN Manager, select . Select the solution type as SD Routing. | ||||||||||||||
Step 2 | Select a configuration group from the list that is displayed. Select the Transport and Management profile created in Configure Global VRF, click Edit. | ||||||||||||||
Step 3 | Select the Cellular Controller created earlier, click +, select GPS. Select + Add New. Enter a name and description for the GPS profile. Specify these details:
| ||||||||||||||
Step 4 | Click Save. Repeat the process to create additional GPS profiles. |
What's next
Configure Dialer interface using CLI Add-on Profile.
Configure Dialer Interface using CLI-Add on template
A dialer interface is a virtual interface that stores and projects protocol configuration information that is common to all the LTE channels. This virtual interface controls how data is sent and received over a dial-up connection.
From release 17.17.1a, the cellular data connection is automatically configured for a single LTE interface without configuring a dialer interface.
Use these steps to optionally configure additional LTE interfaces on the device using the CLI Add-on template.
Step 1 | On the Cisco Catalyst SD-WAN Manager, select Create Configuration Group. Specify a name and description and select the CLI Configuration Group checkbox. |
Step 2 | In the Config Preview pane, enter these commands to configure additional dialer interfaces. |
Step 3 | Modify the parameters as per your requirement. Click Save and Done. |
Associate and deploy the Configuration Group to an SD-Routing device
Before you begin
Step 1 | On Cisco SD-WAN Manager, select the Configuration Group created earlier. |
Step 2 | Click + Add and select the devices from the list. Click Save to attach the configuration group to the selected devices. |
Step 3 | To provision the configuration changes, click Deploy.
|
Configure security for the SIM card
After configuring the Cellular Interface and Cellular Controller for SD-Routing devices, you may need to unlock the SIM card if a lock is set with a PIN. If you prefer, you can unlock the SIM card and remove the set PIN to make sure that the SIM automatically powers up and connects to the cellular network. If the SIM is in unlocked state, it remains unlocked even after the LTE firmware is upgraded or the device is rebooted.
Set a PIN to lock or unlock the SIM card
 Remember
The PIN that is used to lock or unlock the SIM card should be configured using the lte sim authenticate 0 slot 0/1 command in a CLI configuration group or a CLI Add-On Profile in Cisco SD-WAN Manager. This PIN is used by Cisco IOS XE software to instantiate the SIM card.
Use these commands to lock or unlock a SIM card. These commands can be executed using terminal in the Cisco SD-WAN Manager.
| Use command | To | Example |
|---|---|---|
| cellular interface lte sim change-pin current pin new pin | Change the PIN of the SIM card if it is in a unlocked state. The new PIN - a code (4 to 8 digits long) is provided by your service provider to lock or unlock the SIM card. | cellular 0/1/0 lte sim lock 1111 1234 |
| cellular slot lte sim {lock | unlock} pin | Locks or unlocks the SIM card using a PIN. When the SIM card is in a locked state, it is important that the correct PIN is entered to unlock the SIM card. |
cellular 0/1/0lte sim lock 1111 cellular 0/1/0 lte sim lock 1111 |
Monitor cellular connectivity for SD-Routing devices using Cisco SD-WAN Manager
Monitoring cellular WAN deployments offer critical insights into functioning of cellular WAN deployments. This section provides details on how to monitor cellular connectivity.
Monitor cellular connectivity using commands
Execute show sd-routing control connection history command using terminal in Cisco SD-WAN Manager to display details of control connections and to view history of control connections from cellular interfaces.
Monitor cellular connectivity using the Monitor dashboard
Step 1 | On the Cisco Catalyst SD-WAN Manager, choose . Select a device from the list. |
Step 2 | Select Cellular to view information such as:
|