配置防火墙威胁防御模块化策略框架
简介
本文档介绍防火墙威胁防御(FTD)模块化策略框架(MPF)
先决条件
要求
本文档没有特定要求。
使用的组件
本文档中的信息基于以下软件和硬件版本:
- 思科安全防火墙3130威胁防御版本10.0.0(内部版本140)
- 防火墙管理中心(FMC)版本10.0.0(内部版本140)
本文档中的信息都是基于特定实验室环境中的设备编写的。本文档中使用的所有设备最初均采用原始(默认)配置。如果您的网络处于活动状态,请确保您了解所有命令的潜在影响。
背景信息
FTD数据平面概述
FTD 是由两个主要引擎组成的统一软件映像:
- Datapath(也称为LINA)
- Snort 引擎
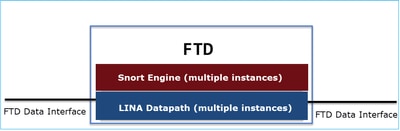
LINA数据路径和Snort引擎是FTD数据平面的主要部分。
MPF成分
MPF使用以下组件:
- class-map与相关流量匹配。
- policy-map将操作应用于类映射匹配的相关流量。
- service-policy全局应用策略映射(在所有接口上)或特定接口。
功能方向性
有关功能方向性,请参阅ASA配置指南:
与FTD相关的功能会突出显示:

配置
拓扑

默认MPF配置(10.0.0):
firewall# show run policy-map
!
!
policy-map type inspect dns preset_dns_map
 parameters
  message-length maximum client auto
  message-length maximum 512
  no tcp-inspection
policy-map type inspect ip-options UM_STATIC_IP_OPTIONS_MAP
 parameters
  eool action allow
  nop action allow
  router-alert action allow
policy-map global_policy
 class inspection_default
  inspect dns preset_dns_map
  inspect ftp
  inspect h323 h225
  inspect h323 ras
  inspect rsh
  inspect rtsp
  inspect sqlnet
  inspect skinny
  inspect sunrpc
  inspect sip
  inspect netbios
  inspect tftp
  inspect icmp
  inspect icmp error
  inspect ip-options UM_STATIC_IP_OPTIONS_MAP
 class class_snmp
  inspect snmp
 class class-default
  set connection advanced-options UM_STATIC_TCP_MAP

firewall# show run class-map
!
class-map inspection_default
 match default-inspection-traffic
class-map class_snmp
 match port udp eq 4161
!
firewall# show run service-policy
service-policy global_policy global
任务1.在FTD上全局禁用SIP检测
此任务中的要求是在FTD LINA引擎中禁用SIP检查。一个原因可能是策略要求或与SIP相关的影响中转流量的软件缺陷。
解决方案
在禁用SIP检测之前,首先确认其已应用于中转流量:
firewall# packet-tracer input INSIDE udp 172.16.1.1 5060 172.16.3.1 5060
...
Phase: 8
Type: INSPECT
Subtype: inspect-sip
Result: ALLOW
Elapsed time: 34788 ns
Config:
class-map inspection_default
 match default-inspection-traffic
policy-map global_policy
 class inspection_default
  inspect sip
service-policy global_policy global
Additional Information:
...
Result:
input-interface: INSIDE(vrfid:0)
input-status: up
input-line-status: up
output-interface: OUTSIDE1(vrfid:0)
output-status: up
output-line-status: up
Action: allow
Time Taken: 326018 ns
全局禁用SIP检测的方法有两种:
解决方案 1:从FTD CLISH CLI禁用SIP
> configure inspection sip disable
Building configuration...
Cryptochecksum: ef7528dc 7338986d 6714a3a2 4770528e

7818 bytes copied in 0.250 secs
[OK]
确认
> show running-config policy-map | include sip

>
解决方案 2:使用FlexConfig禁用SIP
在FMC上,导航到设备> FlexConfig并创建FlexConfig对象:

policy-map global_policy
 class inspection_default
  no inspect sip
应用 选择FlexConfig策略,然后选择Preview Config以对其进行预览:

最后,部署策略。
确认
firewall# show run policy-map | include sip
firewall#
注意 — 您需要从LINA连接表中清除现有的SIP连接,以便不进行SIP检测即可重新建立连接。您可以使用此命令验证现有的SIP连接:
firewall# show conn port 5060
任务2.禁用特定主机的SIP检测
在本任务中,要求禁用这些网络之间流量的SIP检测:
- 源:172.16.1.0/24
- DST:172.16.3.0/24
这样做的一个原因可能是与SIP相关的软件缺陷会影响中转流量
解决方案
使用FlexConfig。
第 1 步
导航到对象(Objects)>访问列表(Access List)>扩展(Extended),然后创建匹配相关流量的扩展访问列表。您必须使用“阻止”(Block)操作,因为目标是排除特定流量。此外,添加Allow规则以匹配其余流量:
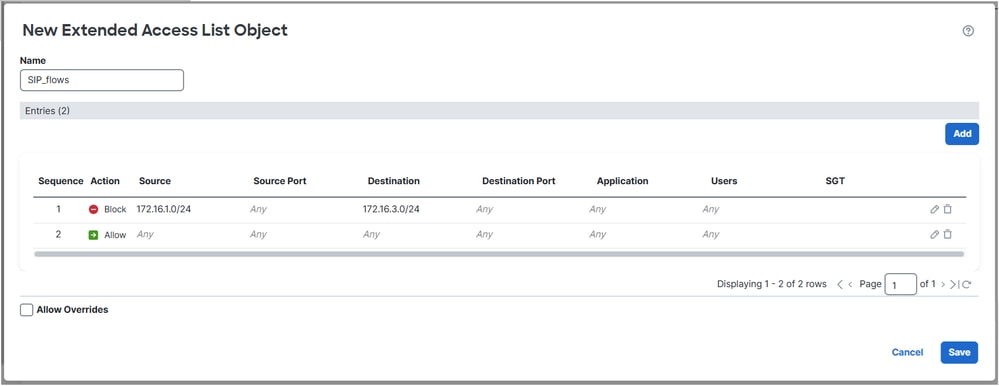

第 2 步
使用与SIP访问控制列表(ACL)匹配的类映射创建FlexConfig对象,并将其应用于global_policy:
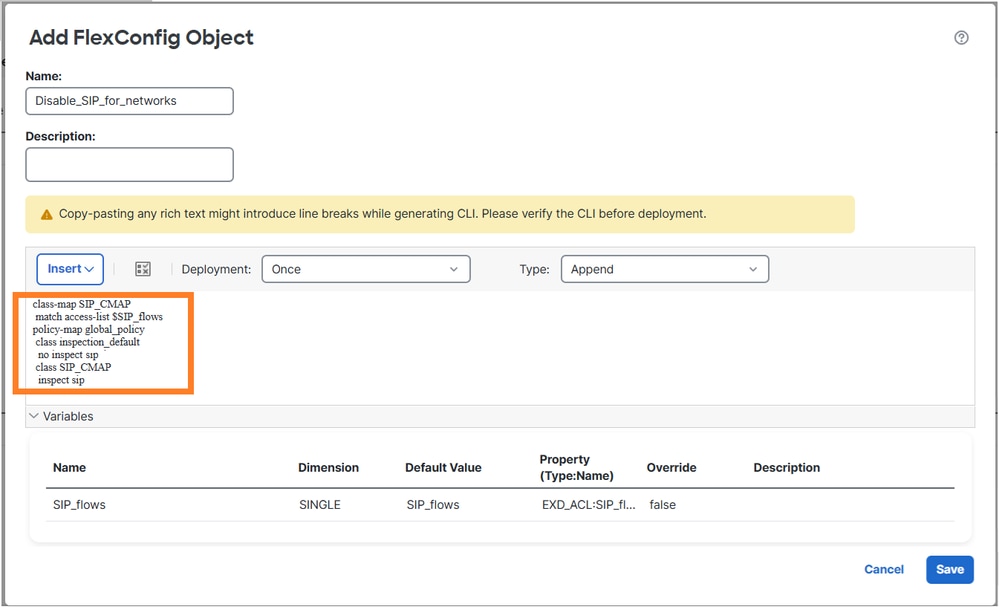
配置的FlexConfig对象:
class-map SIP_CMAP
 match access-list $SIP_flows
policy-map global_policy
 class inspection_default
  no inspect sip
 class SIP_CMAP
  inspect sip
备注
配置permit ACL时,尽量使用具体的(例如,put protocol ports),以避免任何潜在的CPU影响。本任务中的示例未指定协议端口,因此可以在生产中避免使用。
验证1
firewall# show run policy-map | begin global
policy-map global_policy
 class inspection_default
  inspect dns preset_dns_map
  inspect ftp
  inspect h323 h225
  inspect h323 ras
  inspect rsh
  inspect rtsp
  inspect sqlnet
  inspect skinny
  inspect sunrpc
  inspect netbios
  inspect tftp
  inspect icmp
  inspect icmp error
  inspect ip-options UM_STATIC_IP_OPTIONS_MAP
 class class_snmp
  inspect snmp
 class SIP_CMAP
  inspect sip
 class class-default
  set connection advanced-options UM_STATIC_TCP_MAP

firewall# show run class-map
!
class-map SIP_CMAP
 match access-list SIP_flows
class-map inspection_default
 match default-inspection-traffic
class-map class_snmp
 match port udp eq 4161

firepower# show run access-list SIP_flows
access-list SIP_flows extended deny object-group ProxySG_ExtendedACL_150323855735 172.16.1.0 255.255.255.0 172.16.3.0 255.255.255.0
access-list SIP_flows extended permit object-group ProxySG_ExtendedACL_150323855739 any any

firepower# show access-list SIP_flows
access-list SIP_flows; 4 elements; name hash: 0xb2b7de4d
access-list SIP_flows line 1 extended deny object-group ProxySG_ExtendedACL_150323855735 172.16.1.0 255.255.255.0 172.16.3.0 255.255.255.0 (hitcnt=0) 0x7202f94c
access-list SIP_flows line 1 extended deny tcp 172.16.1.0 255.255.255.0 172.16.3.0 255.255.255.0 eq sip (hitcnt=0) 0xbe390e61
access-list SIP_flows line 1 extended deny udp 172.16.1.0 255.255.255.0 172.16.3.0 255.255.255.0 eq sip (hitcnt=0) 0x107eddd0
access-list SIP_flows line 2 extended permit object-group ProxySG_ExtendedACL_150323855739 any any (hitcnt=0) 0x2075af04
access-list SIP_flows line 2 extended permit tcp any any eq sip (hitcnt=0) 0x60e34fab
access-list SIP_flows line 2 extended permit udp any any eq sip (hitcnt=0) 0xdae62994
验证2
未由SIP检测检查的流量具有deny=true:
firewall# packet-tracer input INSIDE udp 172.16.1.1 5060 172.16.3.1 5060 detail | begin INSPECT
Type: INSPECT
Subtype: inspect-sip
Result: ALLOW
Elapsed time: 37910 ns
Config:
class-map SIP_CMAP
 match access-list SIP_flows
policy-map global_policy
 class SIP_CMAP
  inspect sip
service-policy global_policy global
Additional Information:
 Forward Flow based lookup yields rule:
 in id=0x14af42cfa810, priority=70, domain=inspect-sip, deny=true
       hits=1, user_data=0x000014af4570bea0, cs_id=0x0, use_real_addr, flags=0x0, protocol=0
       src ip/id=172.16.1.0, mask=255.255.255.0, port=0, tag=any
       dst ip/id=172.16.3.0, mask=255.255.255.0, port=5060, tag=any,
       dscp=0x0, input_ifc=INSIDE(vrfid:0), output_ifc=any
...
由SIP检测检查的流量具有deny=false:
firewall# packet-tracer input INSIDE udp 172.16.2.1 5060 172.16.3.1 5060 detail | begin INSPECT
Type: INSPECT
Subtype: inspect-sip
Result: ALLOW
Elapsed time: 34788 ns
Config:
class-map SIP_CMAP
 match access-list SIP_flows
policy-map global_policy
 class SIP_CMAP
  inspect sip
service-policy global_policy global
Additional Information:
 Forward Flow based lookup yields rule:
 in id=0x14af459099d0, priority=70, domain=inspect-sip, deny=false
       hits=1, user_data=0x000014af4570bea0, cs_id=0x0, use_real_addr, flags=0x0, protocol=0
       src ip/id=0.0.0.0, mask=0.0.0.0, port=0, tag=any
       dst ip/id=0.0.0.0, mask=0.0.0.0, port=5060, tag=any,
...
验证3
当防火墙检查数据包时,“sip”检查计数器增加:
firewall# show service-policy inspect sip

Global policy:
  Service-policy: global_policy
    Class-map: inspection_default
    Class-map: class_snmp
    Class-map: SIP_CMAP
      Inspect: sip , packet 2, lock fail 0, drop 0, reset-drop 0, 5-min-pkt-rate 0 pkts/sec, v6-fail-close 0 sctp-drop-override 0
               tcp-proxy: bytes in buffer 0, bytes dropped 0
...
firewall# packet-tracer input INSIDE udp 172.16.2.1 5060 172.16.3.1 5060

firewall#show service-policy inspect sip

Global policy:
  Service-policy: global_policy
    Class-map: inspection_default
    Class-map: class_snmp
    Class-map: SIP_CMAP
      Inspect: sip , packet 3, lock fail 0, drop 0, reset-drop 0, 5-min-pkt-rate 0 pkts/sec, v6-fail-close 0 sctp-drop-override 0
               tcp-proxy: bytes in buffer 0, bytes dropped 0
...
任务3.为特定主机配置TCP状态旁路
在本任务中,要求为这些网络之间的流量启用TCP状态旁路:
- 源:172.16.2.0/24
- DST:172.16.3.0/24
通常,不建议使用TCP状态旁路,但可以将其用作处理非对称流的临时解决方法。
解决方案 1
第 1 步
创建匹配相关流量的扩展ACL:

第 2 步
编辑分配给FTD的访问控制策略(ACP),选择高级设置选项卡,然后编辑威胁防御服务策略。选择添加规则,然后选择下一步。
第 3 步
选择扩展ACL:

第 4 步
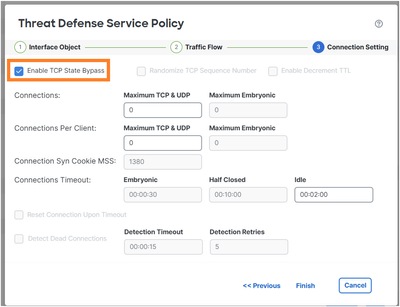
步骤 5
选择Finish、OK、Save和Deploy。
结果:
firewall# show run policy-map global_policy
!
policy-map global_policy
 class inspection_default
  inspect dns preset_dns_map
  inspect ftp
  inspect h323 h225
  inspect h323 ras
  inspect rsh
  inspect rtsp
  inspect sqlnet
  inspect skinny
  inspect sunrpc
  inspect netbios
  inspect tftp
  inspect icmp
  inspect icmp error
  inspect ip-options UM_STATIC_IP_OPTIONS_MAP
 class class_map_TCP_Bypass
  set connection random-sequence-number disable
  set connection advanced-options tcp-state-bypass
 class class_snmp
  inspect snmp
 class class-default
  set connection advanced-options UM_STATIC_TCP_MAP
注意: 在之前的FMC版本(如6.x)中,您可以使用FlexConfig配置TCP状态旁路。在较新版本中不支持此功能:

确认
firewall# packet-tracer input INSIDE tcp 172.16.2.1 1111 172.16.3.1 80 detail | begin CONN
Type: CONN-SETTINGS
Subtype:
Result: ALLOW
Elapsed time: 334 ns
Config:
class-map class_map_TCP_Bypass
 match access-list TCP_Bypass
policy-map global_policy
 class class_map_TCP_Bypass
  set connection conn-max 0 embryonic-conn-max 0 random-sequence-number disable syn-cookie-mss 1380
  set connection advanced-options tcp-state-bypass
service-policy global_policy global
Additional Information:
 Forward Flow based lookup yields rule:
 in id=0x14af45906b70, priority=7, domain=conn-set, deny=false
       hits=1, user_data=0x000014af45906df0, cs_id=0x0, use_real_addr, flags=0x0, protocol=0
       src ip/id=172.16.2.0, mask=255.255.255.0, port=0, tag=any
       dst ip/id=172.16.3.0, mask=255.255.255.0, port=0, tag=any,
       dscp=0x0, input_ifc=INSIDE(vrfid:0), output_ifc=any
...
任务4. Traceroute输出修改
前提条件
在FTD上配置静态NAT,使位于INSIDE接口后面的IP 172.16.1.1在OUTSIDE1主机上显示为198.51.100.200:
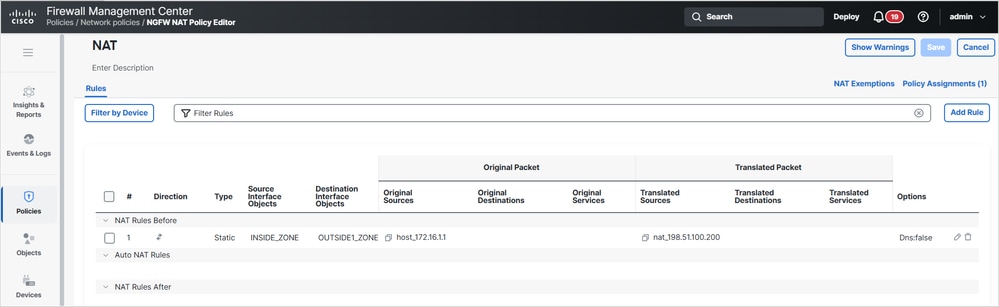
然后,从ISP1对198.51.100.200(主机172.16.1.1)运行traceroute:
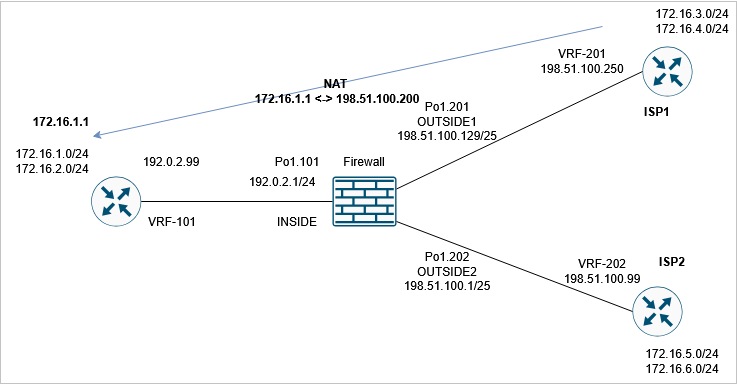
router1# traceroute vrf VRF-201 198.51.100.200
Type escape sequence to abort.
Tracing the route to 198.51.100.200
VRF info: (vrf in name/id, vrf out name/id)
  1 192.0.2.99 1 msec 1 msec *
要求
修改FTD配置,使traceroute与此输出匹配:
router1# traceroute vrf VRF-201 198.51.100.200
Type escape sequence to abort.
Tracing the route to 198.51.100.200
VRF info: (vrf in name/id, vrf out name/id)
  1 198.51.100.129 1 msec 1 msec *
  2 198.51.100.200 1 msec 2 msec *
解决方案
该解决方案包括两个配置步骤:
1.递减TTL:
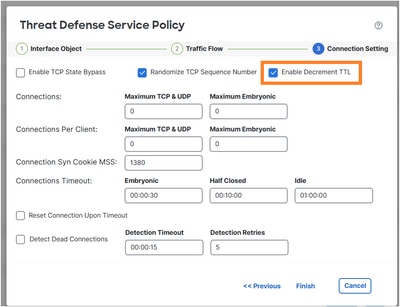
更改后,traceroute会显示防火墙跃点:
router1# traceroute vrf VRF-201 198.51.100.200
Type escape sequence to abort.
Tracing the route to 198.51.100.200
VRF info: (vrf in name/id, vrf out name/id)
 1 198.51.100.129 1 msec 1 msec *
  2 192.0.2.99 1 msec 1 msec *
2.禁用ICMP错误检测:

policy-map global_policy
 class inspection_default
   no inspect icmp error
确认
traceroute显示远程主机的转换NAT IP地址和FTD接口IP地址:
router1# traceroute vrf VRF-201 198.51.100.200
Type escape sequence to abort.
Tracing the route to 198.51.100.200
VRF info: (vrf in name/id, vrf out name/id)
  1 198.51.100.129 1 msec 1 msec *
  2 198.51.100.200 1 msec 2 msec *
任务5.设置连接超时
要求
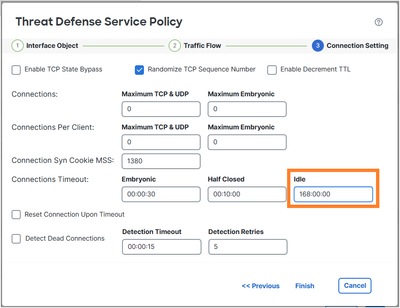
将此流的超时更改为1周:
- 协议:TCP
- 源:172.16.1.1
- DST:172.16.5.1
解决方案
要设置每个流的超时,您需要使用服务策略。
第 1 步
导航到对象>访问列表,然后创建匹配相关流量的扩展ACL:
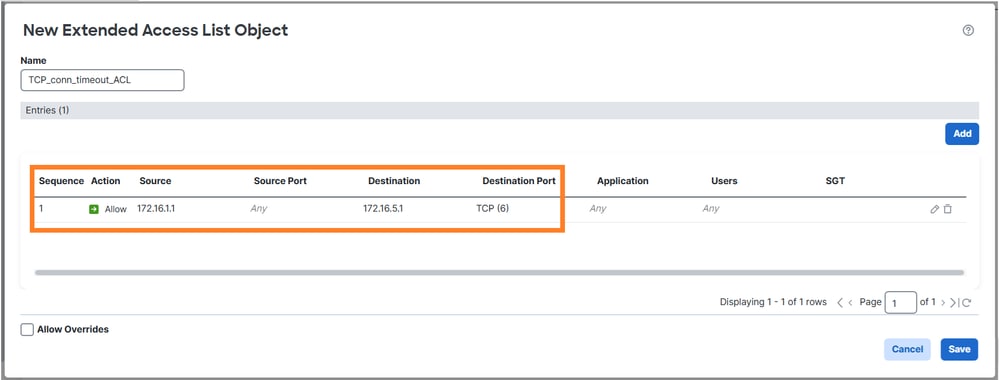
第 2 步
使用步骤1中创建的ACL配置MPF策略:
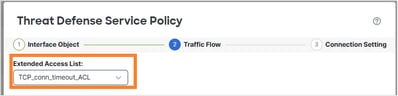
设置连接空闲超时:
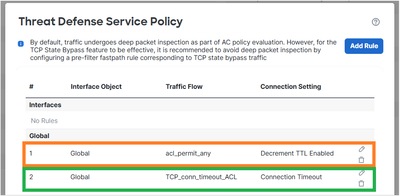
从前一任务中删除规则,因为该规则与新要求重叠:
确认
已部署的策略映射配置:
policy-map global_policy
 class inspection_default
  inspect dns preset_dns_map
  inspect ftp
  inspect h323 h225
  inspect h323 ras
  inspect rsh
  inspect rtsp
  inspect sqlnet
  inspect skinny
  inspect sunrpc
  inspect netbios
  inspect tftp
  inspect icmp
  inspect ip-options UM_STATIC_IP_OPTIONS_MAP
  inspect sip
 class class_map_TCP_conn_timeout_ACL
  set connection timeout idle 168:00:00
 class class_snmp
  inspect snmp
 class class-default
  set connection advanced-options UM_STATIC_TCP_MAP
启动从172.16.1.1到172.16.5.1的新TCP连接,并检查FTD的连接表:
firewall# show conn long address 172.16.5.1
...
TCP OUTSIDE2: 172.16.5.1/23 (172.16.5.1/23) INSIDE: 172.16.1.1/29389 (172.16.1.1/29389), flags UIoN1N7, idle 5s, uptime 7s, timeout 7D0h, bytes 349, flow id 72, Snort id 6, rule id 268439559, Rx-RingNum 27, Internal-Data0/1
Initiator: 172.16.1.1, Responder: 172.16.5.1
Connection lookup keyid: 890
任务6.通过FTD进行BGP身份验证
前提条件
通过FTD配置BGP会话。BGP会话需要使用身份验证。
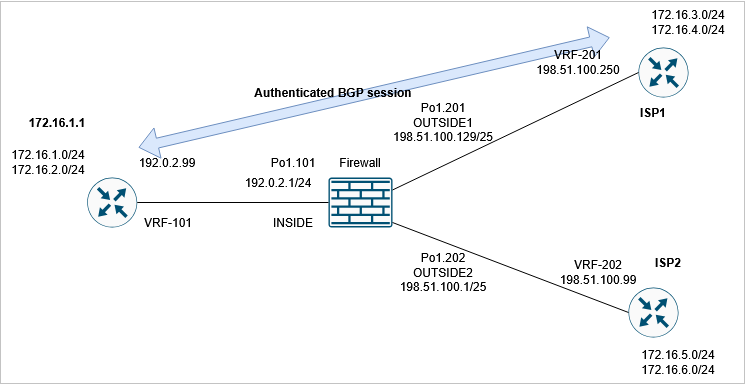
确认
使用默认FTD配置时,不会建立BGP会话。在路由器上,您可以看到:
router1#
*May 21 07:51:23.595: %TCP-6-BADAUTH: Invalid MD5 digest from 192.0.2.99(24591) to 198.51.100.250(179) tableid - 3
*May 21 07:51:25.595: %TCP-6-BADAUTH: Invalid MD5 digest from 192.0.2.99(24591) to 198.51.100.250(179) tableid - 3
*May 21 07:51:29.595: %TCP-6-BADAUTH: Invalid MD5 digest from 192.0.2.99(24591) to 198.51.100.250(179) tableid - 3
在FTD上,您看到两端均无法建立BGP TCP连接(连接标志表示仅接收TCP SYN数据包):
firewall# show conn port 179
3 in use, 16 most used
Inspect Snort:
        preserve-connection: 2 enabled, 0 in effect, 15 most enabled, 0 most in effect

TCP OUTSIDE1 198.51.100.250:41090 INSIDE 192.0.2.99:179, idle 0:00:00, bytes 0, flags aA N1
TCP OUTSIDE1 198.51.100.250:179 INSIDE 192.0.2.99:53629, idle 0:00:02, bytes 0, flags aA N1
解决方案
要允许通过FTD的身份验证BGP会话,必须满足以下两个条件:
- 必须允许TCP MD5(选项19)通过FTD。
- 必须禁用TCP序列号随机化。
默认情况下允许TCP MD5选项:

firewall# show run all tcp-map
!
tcp-map UM_STATIC_TCP_MAP
  no check-retransmission
  no checksum-verification
  exceed-mss allow
  queue-limit 0 timeout 4
  reserved-bits allow
  syn-data allow
  synack-data drop
  invalid-ack drop
  seq-past-window drop
  tcp-options range 6 7 allow
  tcp-options range 9 18 allow
  tcp-options range 20 255 allow
  tcp-options selective-ack allow
  tcp-options timestamp allow
  tcp-options window-scale allow
  tcp-options mss allow
  tcp-options md5 allow
  ttl-evasion-protection
  urgent-flag allow
  window-variation allow-connection
全局禁用TCP初始序列号(ISN)随机化:
> configure tcp-randomization disable
Building configuration...
Cryptochecksum: f8ac5587 7ccc635e bff886a1 bcab820c

8284 bytes copied in 0.260 secs
[OK]
>
或(首选方法)创建与BGP连接匹配的扩展访问列表:
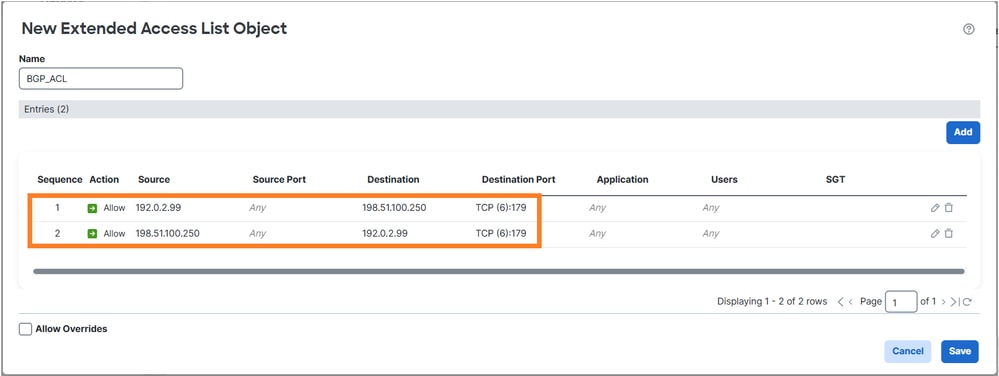
并使用威胁防御服务策略禁用TCP序列号随机化:

确认
已部署的策略映射配置:
policy-map global_policy
 class inspection_default
  inspect dns preset_dns_map
  inspect ftp
  inspect h323 h225
  inspect h323 ras
  inspect rsh
  inspect rtsp
  inspect sqlnet
  inspect skinny
  inspect sunrpc
  inspect netbios
  inspect tftp
  inspect icmp
  inspect ip-options UM_STATIC_IP_OPTIONS_MAP
  inspect sip
 class class_map_BGP_ACL
  set connection random-sequence-number disable
 class class_snmp
  inspect snmp
 class class-default
  set connection advanced-options UM_STATIC_TCP_MAP
BGP会话通过FTD建立:
firewall# show conn long port 179
...
TCP OUTSIDE1: 198.51.100.250/49863 (198.51.100.250/49863) INSIDE: 192.0.2.99/179 (192.0.2.99/179), flags UIO N1N7, idle 44s, uptime 1m40s, timeout 1h0m, bytes 274, flow id 111, Snort id 3, rule id 268439559, Rx-RingNum 29, Internal-Data0/1
  Initiator: 198.51.100.250, Responder: 192.0.2.99
  Connection lookup keyid: 83487134
任务7.死连接检测(DCD)
要求
在FTD上为发往主机172.16.3.1的TCP流量配置DCD。
解决方案
DCD文档位于:
1.导航到对象>访问列表,然后创建匹配相关流量的访问列表。
2.编辑分配给防火墙的ACP,导航到Advanced选项,然后选择Threat Defense Service策略以启用DCD:
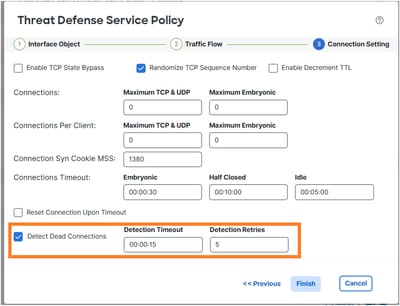
已部署的配置:
access-list DCD_ACL extended permit object-group ProxySG_ExtendedACL_81604390279 any host 172.16.3.1
!
class-map class_map_DCD_ACL
 match access-list DCD_ACL
policy-map global_policy
 class class_map_DCD_ACL
  set connection timeout dcd
运行原理
配置FTD捕获以查看后端操作:
firewall# capture CAPI interface INSIDE match tcp host 172.16.3.1 any
firewall# capture CAPO interface OUTSIDE1 match tcp host 172.16.3.1 any
通过防火墙建立TCP连接:
firewall# show conn long address 172.16.3.1 | begin 172.16.3.1
TCP OUTSIDE1: 172.16.3.1/23 (172.16.3.1/23) INSIDE: 192.0.2.99/23241 (192.0.2.99/23241), flags UIO N1N7, idle 1m18s, uptime 1m22s, timeout 5m0s, bytes 129, flow id 127, Snort id 4, rule id 268439559, Rx-RingNum 13, Internal-Data0/1
  Initiator: 192.0.2.99, Responder: 172.16.3.1
  DCD probes sent: Initiator 0, Responder 0 Connection lookup keyid: 76292550
最初,防火墙捕获中未显示DCD数据包:
firewall# show capture
capture CAPI type raw-data interface INSIDE [Capturing - 0 bytes]
  match tcp host 172.16.3.1 any
capture CAPO type raw-data interface OUTSIDE1 [Capturing - 0 bytes]
  match tcp host 172.16.3.1 any
当空闲连接达到空闲超时时,FTD会向源和目标发送伪装的TCP ACK消息:
firewall# show conn long address 172.16.3.1 | begin 172.16.3.1
TCP OUTSIDE1: 172.16.3.1/23 (172.16.3.1/23) INSIDE: 192.0.2.99/23241 (192.0.2.99/23241), flags UIO N1N7, idle 4m59s, uptime 5m3s, timeout 5m0s, bytes 129, flow id 127, Snort id 4, rule id 268439559, Rx-RingNum 13, Internal-Data0/1
  Initiator: 192.0.2.99, Responder: 172.16.3.1
  DCD probes sent: Initiator 0, Responder 0 Connection lookup keyid: 76292550

firewall# show conn long address 172.16.3.1 | begin 172.16.3.1
TCP OUTSIDE1: 172.16.3.1/23 (172.16.3.1/23) INSIDE: 192.0.2.99/23241 (192.0.2.99/23241), flags UIO N1N7, idle 0s, uptime 5m3s, timeout 15s, bytes 129, flow id 127, Snort id 4, rule id 268439559, Rx-RingNum 13, Internal-Data0/1
  Initiator: 192.0.2.99, Responder: 172.16.3.1
  DCD probes sent: Initiator 1, Responder 0 Connection lookup keyid: 76292550

firewall# show conn long address 172.16.3.1 | begin 172.16.3.1
TCP OUTSIDE1: 172.16.3.1/23 (172.16.3.1/23) INSIDE: 192.0.2.99/23241 (192.0.2.99/23241), flags UIO N1N7, idle 0s, uptime 5m4s, timeout 5m0s, bytes 129, flow id 127, Snort id 4, rule id 268439559, Rx-RingNum 13, Internal-Data0/1
  Initiator: 192.0.2.99, Responder: 172.16.3.1
  DCD probes sent: Initiator 1, Responder 1 Connection lookup keyid: 76292550
如果两个应答均会重置空闲计时器:
firewall# show capture CAPI

3 packets captured

1: 09:01:30.433952 802.1Q vlan#101 P0 172.16.3.1.23 > 192.0.2.99.23241: . ack 3271882019 win 32757
2: 09:01:30.434334 802.1Q vlan#101 P0 192.0.2.99.23241 > 172.16.3.1.23: . ack 1746306341 win 32746
3: 09:01:30.955654 802.1Q vlan#101 P0 172.16.3.1.23 > 192.0.2.99.23241: . ack 3271882019 win 32757
3 packets shown
firewall# show capture CAPO

3 packets captured

1: 09:01:30.434364 802.1Q vlan#201 P0 192.0.2.99.23241 > 172.16.3.1.23: . ack 111661490 win 32746
2: 09:01:30.955288 802.1Q vlan#201 P0 192.0.2.99.23241 > 172.16.3.1.23: . ack 111661490 win 32746
3: 09:01:30.955639 802.1Q vlan#201 P0 172.16.3.1.23 > 192.0.2.99.23241: . ack 3875469573 win 32757
3 packets shown

firewall# show conn long address 172.16.3.1 | begin 172.16.3.1
TCP OUTSIDE1: 172.16.3.1/23 (172.16.3.1/23) INSIDE: 192.0.2.99/23241 (192.0.2.99/23241), flags UIO N1N7, idle 1m29s, uptime 6m33s, timeout 5m0s, bytes 129, flow id 127, Snort id 4, rule id 268439559, Rx-RingNum 13, Internal-Data0/1
  Initiator: 192.0.2.99, Responder: 172.16.3.1
  DCD probes sent: Initiator 1, Responder 1 Connection lookup keyid: 76292550

注意:DCD在分流的连接上不起作用(“o”标志)。
相关信息
修订历史记录
| 版本 | 发布日期 | 备注 |
|---|---|---|
1.0 |
22-May-2026
|
初始版本 |

 反馈
反馈