配置Nginx反向代理,以通过VPN访问Cisco Finesse(12.6 ES03)
下载选项
非歧视性语言
此产品的文档集力求使用非歧视性语言。在本文档集中,非歧视性语言是指不隐含针对年龄、残障、性别、种族身份、族群身份、性取向、社会经济地位和交叉性的歧视的语言。由于产品软件的用户界面中使用的硬编码语言、基于 RFP 文档使用的语言或引用的第三方产品使用的语言,文档中可能无法确保完全使用非歧视性语言。 深入了解思科如何使用包容性语言。
关于此翻译
思科采用人工翻译与机器翻译相结合的方式将此文档翻译成不同语言,希望全球的用户都能通过各自的语言得到支持性的内容。 请注意:即使是最好的机器翻译,其准确度也不及专业翻译人员的水平。 Cisco Systems, Inc. 对于翻译的准确性不承担任何责任,并建议您总是参考英文原始文档(已提供链接)。
目录
简介
本文档介绍如何使用反向代理访问Cisco Finesse桌面而不连接到基于Cisco Finesse 12.6 ES03版本的Cisco Finesse、Cisco Unified Intelligence Center(CUIC)和Cisco Identity Service(IdS)的VPN。
注意:思科不支持Nginx安装和配置。有关此主题的查询可在思科社区论坛上讨论。
注意:对于无VPN的ES03部署,请参阅各个组件的自述文件以计划升级并检查兼容性限制。Cisco Finesse 12.6 ES03自述文件,CUIC / IdS 12.6 ES03自述文件
先决条件
要求
Cisco 建议您了解以下主题:
- Cisco Unified Contact Center Enterprise(UCCE)版本
- 思科Finesse
- Linux管理
- 网络管理与Linux网络管理
使用的组件
本文档中的信息基于以下软件和硬件版本:
- Finesse - 12.6 ES03
- CUIC - 12.6 ES03
- IdS - 12.6 ES03
- 适用于联系中心(CC)的UCCE/托管协作解决方案(HCS)- 11.6或更高版本
- 套装联络中心企业版(PCCE)- 12.5或更高版本
注意:由于LD/CUIC共驻留部署,PCCE/UCCE 2k部署将需要在CCE 12.6版本上
本文档中的信息都是基于特定实验室环境中的设备编写的。本文档中使用的所有设备最初均采用原始(默认)配置。如果您的网络处于活动状态,请确保您了解所有命令的潜在影响。
注意:本文档中提供的配置已通过在CentOS 8.0上部署的Nginx反向代理(OpenResty)针对示例2000用户UCCE部署进行配置、强化以及负载测试。性能配置文件参考信息在本文档中提供。
背景信息
UCCE/PCCE和HCS for UCCE解决方案支持此部署模式。
支持部署反向代理(从12.6 ES01提供),作为无需连接到VPN即可访问Cisco Finesse桌面的选项。此功能使座席可以通过Internet从任何位置灵活地访问Finesse桌面。
要启用此功能,必须在非军事区(DMZ)中部署反向代理对。
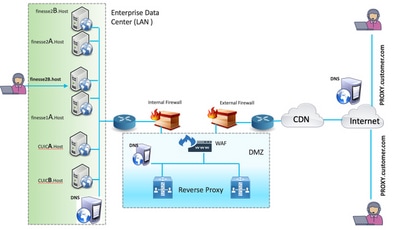
在反向代理部署中,介质访问保持不变。要连接到媒体,座席可以使用移动和远程访问解决方案上的Cisco Jabber(MRA),或者通过公共交换电话网络(PSTN)或移动终端使用UCCE的移动座席功能。下图显示了通过一对反向代理节点访问两个Finesse集群和两个CUIC节点时的网络部署情况。
支持从Internet上的代理和从LAN连接的代理进行并发访问,如下图所示。
注意:有关第三方代理选择标准的功能指南,请参阅Nginx的功能指南以支持此部署。
- UCCE 12.6功能指南 — 提供无VPN功能的功能概述、设计以及配置详细信息。
- UCCE 12.6安全指南 — 提供反向代理部署的安全配置指南。
建议您在阅读本文档之前查看功能指南和安全指南的无VPN部分。
ES03中的变化
- 新功能
- 现在通过反向代理支持Finesse管理引擎功能。
- CUIC RealTime和历史报告现在通过代理环境中的Finesse小工具支持。
- 所有请求/通信的身份验证 — 需要Lua支持
- 所有Finesse/CUIC/IM & Presence(IM&P)请求在允许进入数据中心之前在代理处进行身份验证。
- Websocket和Live data socketIO连接也受到限制,并且仅允许来自已成功向Finesse发出安全请求的客户端。
- 代理上的暴力攻击感应和日志记录,可与Fail2Ban配合使用,以阻止恶意IP地址。
- 反向代理配置的安全增强功能 — 需要Lua支持
- 反向代理和上游组件(Finesse/IdS/CUIC/Livedata)之间的双向传输层安全(TLS)身份验证。
- SeLinux设置。
- 为代理和组件服务器请求启用相互安全套接字层(SSL)信任验证。
- 增强代理配置的安全性,以防止拒绝服务(DoS)/分布式拒绝服务(DDoS)攻击 — 需要Lua支持
- 系统各个部分的增强型Nginx请求速率限制。
- IpTables的速率限制。
- 在请求上游组件服务器之前验证静态资源请求。
- 未命中上游组件服务器的较轻且可缓存的未经身份验证页面。
- 其他其他功能 — 需要Lua支持
- 从代理提供的自动感应跨源资源共享(CORS)响应,以帮助自动配置和提高性能
- 从代理提供的自动感应跨源资源共享(CORS)响应,以帮助自动配置和提高性能
- 与无VPN相关的缺陷修复
- CSCwa26057
 CSCwa26057 " /> — 在finesse桌面登录期间向座席提供的多个证书
 - CSCwa24471 - Finesse登录页不显示SSO代理FQDN名称
- CSCwa24519 :如果无法从组件解析反向代理主机名,则Web代理服务无法重新启动
- CSCwa23252 :当CA证书链的深度大于一个时,代理Finesse信任断开
- CSCwa46459 webservice中暴露的log4j零日漏洞
- CSCwa26057
基于ES01的无VPN配置的升级说明
- ES03配置需要安装具有Lua支持的Nginx。
- 证书要求
- 在Nginx ES02配置能够成功连接到上游服务器之前,Cisco Finesse、CUIC和Id需要将Nginx/OpenResty主机证书添加到Tomcat信任库并完成重新启动。
- 需要在Nginx服务器中配置Cisco Finesse、CUIC和IdS上游服务器证书,以使用基于ES03的配置。
注意:建议在安装ES03 Nginx配置之前删除现有的基于ES01的Nginx配置。
注意:ES03配置脚本还需要在Cisco Finesse、CUIC和Id中安装相应的ES03 COP。
身份验证
Finesse 12.6 ES03在代理引入身份验证。单点登录(SSO)和非SSO部署支持身份验证。
对代理接受的所有请求和协议实施身份验证,然后将这些请求和协议转发到上游组件服务器,由组件服务器实施的身份验证也在本地进行。所有身份验证都使用通用的Finesse登录凭证对请求进行身份验证。
持久连接,例如依赖于应用协议(如可扩展消息传送和在线状态协议(XMPP)进行身份验证和POST连接)的Web套接字,通过在建立套接字连接之前验证成功进行应用身份验证的IP地址在代理处进行身份验证。
非SSO身份验证
非SSO身份验证不需要任何额外配置,并且在进行所需的脚本替换后,可以使用开箱即用的Nginx配置脚本。身份验证依赖于用于登录Finesse的用户名和密码。对所有终端的访问将通过Finesse身份验证服务进行验证。
有效用户列表在代理本地缓存(每15分钟更新一次缓存),用于验证请求中的用户。通过将请求转发到已配置的Finesse URI来验证用户凭证,然后凭证哈希在本地缓存(缓存了15分钟)以在本地对新请求进行身份验证。如果用户名或密码有任何更改,则仅在15分钟后生效。
SSO身份验证
SSO身份验证要求管理员在配置文件内的Nginx服务器上配置IdS令牌加密密钥。可以使用show ids secret CLI命令从IdS服务器获取IdS令牌加密密钥。这些密钥必须配置为管理员必须在脚本中执行的其中一个备用替换的一部#Must-change,SSO身份验证才能正常工作。
请参阅SSO用户指南,了解为代理解析执行IdS而要执行的IdS SAML配置。
配置SSO身份验证后,可以使用有效令牌对访问系统中的任何终端。代理配置通过截取向IdS发出的令牌检索请求或解密有效令牌,然后将其本地缓存以进行进一步验证来验证凭证。
Websocket连接的身份验证
无法使用标准授权报头对Websocket连接进行身份验证,因为浏览器中的本地Websocket实现不支持自定义报头。应用级身份验证协议,负载中包含的身份验证信息不会阻止Websocket连接的建立,因此恶意实体仅通过创建大量连接来淹没系统,就可以呈现DOS或DDOS攻击。
为了降低这种可能性,提供的nginx反向代理配置具有特定的检查,以仅允许从那些在建立websocket连接之前成功发出经过身份验证的REST请求的IP地址接受websocket连接。这意味着尝试在发出REST请求之前创建Web套接字连接的客户端现在将获得授权失败错误,并且不是受支持的使用方案。
暴力攻击防御
Finesse 12.6 ES02身份验证脚本主动防止可用于猜测用户密码的暴力攻击。它通过在短时间内尝试一定数量的失败后阻止用于访问服务的IP地址来实现此目的。这些请求将因418客户端错误而被拒绝。可以从文件<nginx-install-directory>/logs/blocking.log和<nginx-install-directory>/logs/error.log访问受阻的IP地址的详细信息。
失败请求数、时间间隔和阻止持续时间是可配置的。配置显示在<nginx-install-directory>/conf/conf.d/maps.conf文件中。
## These two constants indicate five auth failures from a client can be allowed in thirty seconds.
## if  the threshold is crossed,client ip will be blocked.
map $host $auth_failure_threshold_for_lock {
    ## Must-change Replace below two parameters as per requirement
    default 5 ;
}

map $host $auth_failure_counting_window_secs {
    ## Must-change Replace below two parameters as per requirement
    default 30;
}

## This indicates duration of blocking a client to avoid brute force attack
map $host $ip_blocking_duration {
    ## Must-change Replace below parameter as per requirement
    default 1800;
}
日志记录
要查找被阻止的IP地址,请从目录<nginx-install-directory>/logs运行以下命令。
grep "will be blocked for" blocking.log
grep "IP is already blocked." error.log
2021/10/29 17:30:59 [emerg] 1181750#1181750: *19 [lua] block_unauthorized_users.lua:153:
_redirectAndSendError(): 10.68.218.190 will be blocked for 30 minutes for exceeding retry limit.,
client: 10.68.218.190, server: saproxy.cisco.com, request:
"GET /finesse/api/SystemInfo?nocache=1636456574482 HTTP/2.0", host: "saproxy.cisco.com:8445",
referrer: "https://saproxy.cisco.com:8445/desktop/container/?locale=en_US&"

2021/10/29 19:21:00 [error] 943068#943068: *43 [lua] block_unauthorized_users.lua:53: 10.70.235.30 ::
IP is already blocked..., client: 10.70.235.30, server: saproxy.cisco.com, request:
"GET /finesse/api/SystemInfo?nocache=1635591686497 HTTP/2.0", host: "saproxy.cisco.com:8445",
referrer: "https://saproxy.cisco.com:8445/desktop/container/?locale=en_US"
建议客户与Fail2ban或类似集成以将禁止添加到IPtable/防火墙规则。
安装和配置Fail2ban
Fail2ban扫描日志文件并禁止显示恶意迹象的IP — 密码失败过多、寻找漏洞等。通常,Fail2Ban随后用于更新防火墙规则,以在指定时间内拒绝IP地址,尽管还可以配置任何其他任意操作(例如发送电子邮件)。有关详细信息,请访问 https://www.fail2ban.org/。
Fail2ban可以配置为监控blocking.log,以识别在检测到暴力攻击时被Nginx阻止的IP地址,并在可配置的期限内禁止它们。在CentOS反向代理上安装和配置fail2ban的步骤如下:
1.使用yum安装Fail2ban。
yum update && yum install epel-release
yum install fail2ban
2.创建本地监狱。
通过管制配置,管理员可以配置各种属性,例如禁止任何受阻的IP地址访问端口、IP地址被阻断的持续时间、用于从受监控的日志文件中标识受阻的IP地址的过滤器配置等。添加自定义配置以禁止被阻止访问上游服务器的IP地址的步骤如下:
2.1.转到Fail2ban安装目录(在本例中为/etc/fail2ban)
cd /etc/fail2ban
2.2.将jail.conf复制到jail.local中,以隔离本地更改。
cp jail.conf jail.local
2.3.将这些Jail配置添加到文件jail.local的末尾,并将模板中的端口替换为实际端口。根据需要更新禁止时间配置。
# Jail configurations for HTTP connections.
[finesse-http-auth]
enabled = true
# The ports to be blocked. Add any additional ports.
port = http,https,<finesse-ports>,<cuic-ports>,<any-other-ports-to-be-blocked>
# Path to nginx blocking logs.
logpath = /usr/local/openresty/nginx/logs/blocking.log
# The filter configuration.
filter = finesseban
# Block the IP from accessing the port, once the IP is blocked by lua.
maxretry= 1
# Duration for retry set to 3 mins. Doesn't count as the maxretry is 1
findtime= 180
# Lock time is set to 3 mins. Change as per requirements.
bantime = 180
3.配置过滤器。
过滤器会告知Fail2ban在日志中查找什么来标识要禁止的主机。创建过滤器的步骤如下:
3.1.创建filter.d/finesseban.conf。
touch filter.d/finesseban.conf
3.2.将这些行添加到文件filter.d/finesseban.conf中。
[Definition]
# The regex match that would cause blocking of the host.
failregex = <HOST> will be blocked for
4.启动Fail2ban。
运行此命令以启动fail2ban。
fail2ban-client start
打开fail2ban日志文件并验证没有错误。默认情况下,fail2ban的日志会进入/var/log/fail2ban.log文件。
验证静态资源URL
可以未经身份验证方式访问的所有有效终端都会在ES03脚本中主动跟踪。
如果请求的URI无效,则主动拒绝对这些未经身份验证的路径的请求,而不将这些请求发送到上游服务器。
缓存CORS标头
当第一个选项请求成功时,响应报头access-control-allow-headers、access-control-allow-origin、access-control-allow-methods、access-control-expose-headers和access-control-allow-credentials在代理处缓存五分钟。这些报头会缓存给每个相应的上游服务器。
配置
本文档介绍将Nginx配置为反向代理,以启用Finesse VPN无访问。提供了用于验证所提供的说明的UCCE解决方案组件、代理和操作系统版本。相关说明必须根据您选择的操作系统/代理进行修改。
- 使用的Nginx版本 — OpenResty 1.19.9.1
- 用于配置的操作系统 — CentOS 8.0
注意:上述Nginx配置可以从Finesse版本12.6(1)ES3软件下载页面下载。
配置无VPN访问的解决方案组件
配置代理后,请务必使用计划的主机名以及用于使用这些命令访问解决方案的代理/服务的IP来配置解决方案组件(Finesse/CUIC/IdS)进行无VPN访问。
utils system reverse-proxy allowed-hosts add
utils system reverse-proxy config-uri <uri> add
有关这些命令的详细信息,请参阅UCCE 12.6功能指南,在使用本文档之前应参考这些命令。
在DMZ中安装OpenResty作为反向代理
本节详细介绍基于OpenResty的代理安装步骤。反向代理通常配置为网络隔离区(DMZ)中的专用设备,如前面提到的部署图所示。
- 安装您选择的操作系统和所需的硬件规格。内核和IPv4参数调整可能因所选操作系统而异,如果所选操作系统版本不同,建议用户重新验证这些方面。
- 配置两个网络接口。从Internet客户端进行公共访问需要一个接口,而与内部网络中的服务器通信则需要另一个接口。
- 安装OpenResty。
任何形式的Nginx都可以用于此目的,只要它们基于Nginx 1.19+并支持Lua:
- Nginx Plus
- Nginx开源(Nginx开源需要与基于OpenResty的Lua模块一起编译,以便使用)
- OpenResty
- GetPageSpeed额外内容
注意:提供的配置已经过OpenResty 1.19的测试,预计可以与其他发行版配合使用,但仅进行次要更新(如果有)。
OpenResty安装
- 安装OpenResty。请参阅OpenResty Linux程序包。作为OpenResty安装的一部分,Nginx将安装在此位置,并通过在~/.bashrc文件中添加OpenResty路径来将OpenResty路径添加到PATH变量。
export PATH=/usr/local/openresty/bin:$PATH
- 启动/停止Nginx。
- 要启动Nginx,请输入
openresty。 - 要停止Nginx,请输入
openresty -s stop。
- 要启动Nginx,请输入
配置Nginx
介绍基于OpenResty的Nginx安装的配置。OpenResty的默认目录为:
- <nginx-install-directory> = /usr/local/openresty/nginx
- <Openresty-install-directory> = /usr/local/openresty
- 从Finesse版本12.6(1)ES03软件下载页面(12.6-ES03-reverse-proxy-config.zip)下载并提取文件,该页面包含Nginx的反向代理配置。
- 将nginx.conf、nginx/conf.d/和nginx/html/分别从提取的反向代理配置目录复制到<nginx-install-directory>/conf、<nginx-install-directory>/conf/conf.d/和www<nginx-install-directory>/html/。
- 从<nginx-install-directory>内提取的反向代理配置目录复制nginx/lua目录。
- 将lualib的内容复制到<Openresty-install-directory>/lualib/resty。
- 通过将nginx/logrotate/saproxy文件复制到<nginx-install-directory>/logrotate/folder来配置nginx日志轮替。如果未使用Nginx默认值,请修改文件内容,使其指向正确的日志目录。
- Nginx必须使用专用非特权服务帐户运行,该帐户必须被锁定且具有无效的外壳(或适用于所选操作系统)。
- 在名为html和conf.d的解压文件夹下的文件中找到“Must-change”字符串,并用相应的条目替换指定的值。
- 确保所有必需更换件都已完成,在配置文件中使用Must-change注释进行描述。
- 确保在<nginx-install-directory>/cache下创建为CUIC和Finesse配置的缓存目录以及这些临时目录。
- <nginx-install-directory>/cache/client_temp
- <nginx-install-directory>/cache/proxy_temp
注意:提供的配置适用于2000部署示例,必须针对更大的部署进行适当扩展。
配置Nginx缓存
默认情况下,代理缓存路径存储在文件系统中。我们建议通过在tmpfs中创建缓存位置将其更改为内存驱动器,如此处所示。
- 在/home下为不同的代理缓存路径创建目录。
例如,必须为主Finesse创建这些目录。辅助Finesse和CUIC服务器应遵循相同的步骤。
mkdir -p /home/primaryFinesse/rest
mkdir -p /home/primaryFinesse/desktop
mkdir -p /home/primaryFinesse/shindig
mkdir -p /home/primaryFinesse/openfire
mkdir -p /home/primaryCUIC/cuic
mkdir -p /home/primaryCUIC/cuicdoc
mkdir -p /home/client_temp
mkdir -p /home/proxy_temp
echo "tmpfs /home/primaryFinesse/rest tmpfs size=1510M,rw,auto,noexec,nodev,nosuid,gid=root,uid=root,mode=1700 0 0" >>
/etc/fstab echo "tmpfs /home/primaryFinesse/desktop tmpfs size=20M,rw,auto,noexec,nodev,nosuid,gid=root,uid=root,mode=1700 0 0" >>
/etc/fstab echo "tmpfs /home/primaryFinesse/shindig tmpfs size=500M,rw,auto,noexec,nodev,nosuid,gid=root,uid=root,mode=1700 0 0" >>
/etc/fstab echo "tmpfs /home/primaryFinesse/openfire tmpfs size=10M,rw,auto,noexec,nodev,nosuid,gid=root,uid=root,mode=1700 0 0" >>
/etc/fstab echo "tmpfs /home/primaryCUIC/cuic tmpfs size=100M,rw,auto,noexec,nodev,nosuid,gid=root,uid=root,mode=1700 0 0" >>
/etc/fstab echo "tmpfs /home/primaryCUIC/cuicdoc tmpfs size=100M,rw,auto,noexec,nodev,nosuid,gid=root,uid=root,mode=1700 0 0" >>
/etc/fstab echo "tmpfs /home/client_temp tmpfs size=2048M,rw,auto,noexec,nodev,nosuid,gid=root,uid=root,mode=1700 0 0" >>
/etc/fstab echo "tmpfs /home/proxy_temp tmpfs size=2048M,rw,auto,noexec,nodev,nosuid,gid=root,uid=root,mode=1700 0 0" >> /etc/fstab注意:将添加到配置的每个新Finesse集群的客户端和proxy_temp缓存增加1 GB。
- 使用命令装载新的装载点
mount -av。 - 使用命令验证文件系统已装载新的装载
df -h点。 - 更改Finesse和CUIC缓存配置文件中的proxy_cache_path位置。
例如,要更改Finesse主目录的路径,请转到<nginx-install-directory>conf/conf.d/finesse/caches,并将现有缓存位置/usr/local/openresty/nginx/cache/finesse25/更改为新创建的文件系统位置 /home/primaryFinesse。
##Must-change /usr/local/openresty/nginx/cache/finesse25 location would change depending on folder extraction proxy_cache_path /home/primaryFinesse/desktop levels=1:2 use_temp_path=on keys_zone=desktop_cache_fin25:10m max_size=15m inactive=3y use_temp_path=off; proxy_cache_path /home/primaryFinesse/shindig levels=1:2 use_temp_path=on keys_zone=shindig_cache_fin25:10m max_size=500m inactive=3y use_temp_path=off; proxy_cache_path /home/primaryFinesse/openfire levels=1:2 use_temp_path=on keys_zone=openfire_cache_fin25:10m max_size=10m inactive=3y use_temp_path=off; proxy_cache_path /home/primaryFinesse/rest levels=1:2 use_temp_path=on keys_zone=rest_cache_fin25:10m max_size=1500m inactive=40m use_temp_path=off; - 对Finesse辅助服务器和CUIC服务器执行相同的步骤。
注意:确保将之前所有步骤中创建的所有tmpfs驱动器大小的总和添加到部署的最终内存大小中,因为这些驱动器是配置为类似于应用程序的磁盘并消耗最多内存空间的内存块。
配置SSL证书
使用自签名证书 — 测试部署
只有在反向代理准备好部署到生产环境之前,才应使用自签名证书。在生产部署中,仅使用证书颁发机构(CA)签名的证书。
- 为SSL文件夹内容生成Nginx证书。在生成证书之前,需要在/usr/local/openresty/nginx下创建一个名为ssl的文件夹。您需要在这些命令的帮助下生成两个证书(一个用于<reverseproxy_primary_fqdn>,另一个用于<reverseproxy_secondary_fqdn>)。
sudo openssl req -x509 -nodes -days 365 -newkey rsa:2048 -keyout /usr/local/openresty/nginx/ssl/nginx.key -out /usr/local/openresty/nginx/ssl/nginx.crt(将主机名传递为:<reverseproxy_primary_fqdn>)sudo openssl req -x509 -nodes -days 365 -newkey rsa:2048 -keyout /usr/local/openresty/nginx/ssl/nginxnode2.key -out /usr/local/openresty/nginx/ssl/nginxnode2.crt(将主机名传递为:<reverseproxy_secondary_fqdn>)- 确保证书路径为/usr/local/openresty/nginx/ssl/nginx.crt和/usr/local/openresty/nginx/ssl/nginxnode2.crt,因为已在Finesse Nginx配置文件中配置了这些路径。
- 更改私钥400(r--------)的权限。
- 在反向代理上配置防火墙/iptables,使来自防火墙的通信与已配置Nginx服务器进行侦听的端口对应。
- 在反向代理服务器上的/etc/hosts条目下添加Finesse、IdS和CUIC的IP地址和主机名。
- 请参阅解决方案功能指南,了解要在组件服务器上执行的配置,以将Nginx主机配置为反向代理。
注意:提供的配置适用于2000部署示例,必须针对更大的部署进行适当扩展。
使用CA签名证书 — 生产部署
可以使用以下步骤在反向代理上安装CA签名的证书:
- 生成证书签名请求(CSR)。
要生成CSR和私钥,请在
openssl req -new -newkey rsa:4096 -keyout nginx.key -out nginx.csr登录代理后输入。按照提示进行操作,并提供详细信息。这会生成强度为4096位的CSR(示例中为nginx.csr)和RSA私钥(示例中为nginx.key)。例如:
[root@reverseproxyhost.companyname.com ssl]# openssl req -new -newkey rsa:4096 -keyout nginx.key -out nginx.csr
Generating a RSA private key
.....+++++
...................................................................................................................................................+++++
writing new private key to 'nginx.key'
Enter PEM pass phrase:passphrase
Verifying - Enter PEM pass phrase:passphrase
-----
You are about to be asked to enter information that will be incorporated
into your certificate request.
What you are about to enter is what is called a Distinguished Name or a DN.
There are quite a few fields but you can leave some blank
For some fields there will be a default value,
If you enter '.', the field will be left blank.
-----
Country Name (2 letter code) [XX]:US
State or Province Name (full name) []:CA
Locality Name (eg, city) [Default City]:Orange County
Organization Name (eg, company) [Default Company Ltd]:CompanyName
Organizational Unit Name (eg, section) []:BusinessUnit
Common Name (eg, your name or your server's hostname) []:reverseproxyhostname.companydomain.com
Email Address []:john.doe@comapnydomain.com
Please enter the following 'extra' attributes
to be sent with your certificate request
A challenge password []:challengePWD
An optional company name []:CompanyName
记下PEM口令,因为它将用于解密部署期间的私钥。 - 从CA获取签名证书。
将CSR发送到证书颁发机构并获取签名证书。
注意:如果从CA收到的证书不是包含所有相应证书的证书链,请将所有相关证书组合成一个证书链文件。
- 部署证书和密钥。
使用命令解密之前作为第一步的一部分生成的
openssl rsa -in nginx.key -out nginx_decrypted.key密钥。将CA签名证书和解密的密钥放在反向代理计算机中的文件夹/usr/local/openresty/nginx/ssl中。在配置文件/usr/local/openresty/nginx/conf/conf.d/ssl/ssl.conf的Nginx配置中更新/添加与证书相关的SSL配置。ssl_certificate /usr/local/openresty/nginx/ssl/ca_signed_cert.crt; ssl_certificate_key /usr/local/openresty/nginx/ssl/nginx_decrypted.key; - 配置证书的权限。
chmod 400 /usr/local/openresty/nginx/ssl/ca_signed_cert.crt输入chmod 400 /usr/local/openresty/nginx/ssl/nginx_decrypted.key,以便证书具有只读权限且仅限所有者使用。 - 重新加载Nginx。
使用自定义Diffie-Hellman参数
使用以下命令创建自定义Diffie-Hellman参数:
    openssl dhparam -out /usr/local/openresty/nginx/ssl/dhparam.pem 2048

    chmod 400 /usr/local/openresty/nginx/ssl/dhparam.pem
更改服务器配置,以使用文件/usr/local/openresty/nginx/conf/conf.d/ssl/ssl.conf中的新参数:ssl_dhparam /usr/local/openresty/nginx/ssl/dhparam.pem;
确保已启用OCSP装订 — 证书吊销检查
注意:要启用此功能,服务器应使用CA签名的证书,并且服务器应有权访问签署证书的CA。
在file/usr/local/openresty/nginx/conf/conf.d/ssl/ssl.conf中添加/更新此配置:ssl_stapling on;
ssl_stapling_verify on;
Nginx配置
必须修改默认Nginx配置文件(/usr/local/openresty/nginx/conf/nginx.conf)以包含这些条目以实施安全性并提供性能。此内容应该用于修改Nginx安装创建的默认配置文件。
# Increasing number of worker processes will not increase the processing the request. The number of worker process will be same as number of cores
# in system CPU. Nginx provides "auto" option to automate this, which will spawn one worker for each CPU core.
worker_processes  auto;

# Process id file location
pid /usr/local/openresty/nginx/logs/nginx.pid;

# Binds each worker process to a separate CPU
worker_cpu_affinity auto;

#Defines the scheduling priority for worker processes. This should be calculated by "nice" command. In our proxy set up the value is 0
worker_priority 0;


error_log  /usr/local/openresty/nginx/logs/error.log info;

#user root root;

# current limit on the maximum number of open files by worker processes, keeping 10 times of worker_connections

worker_rlimit_nofile 102400;

events {
    multi_accept on;


    # Sets the maximum number of simultaneous connections that can be opened by a worker process.
    # This should not be more the current limit on the maximum number of open files i.e. hard limit of the maximum number of open files for the user (ulimit -Hn)
    # The appropriate setting depends on the size of the server and the nature of the traffic, and can be discovered through testing.
    worker_connections  10240;
    #debug_connection 10.78.95.21
}


http {

    include       mime.types;


    default_type  text/plain;


    ## Must-change Change with DNS resolver ip in deployment
    resolver 192.168.1.3;


    ## Must-change change lua package path to load lua libraries
    lua_package_path  "/usr/local/openresty/lualib/resty/?.lua;/usr/local/openresty/nginx/lua/?.lua;;"


    ## Must-change change proxy_temp folder as per cache directory configurations
    proxy_temp_path /usr/local/openresty/nginx/cache/proxy_temp 1 2 ;
    ## Must-change change client_temp folder as per cache directory configurations
    client_body_temp_path /usr/local/openresty/nginx/cache/client_temp 1 2 ;


    lua_shared_dict userlist 50m;
    lua_shared_dict credentialsstore 100m;
    lua_shared_dict userscount 100k;
    lua_shared_dict clientstorage 100m;
    lua_shared_dict blockingresources 100m;
    lua_shared_dict tokencache_saproxy 10M;
    lua_shared_dict tokencache_saproxy125 10M;
    lua_shared_dict ipstore 10m;
    lua_shared_dict desktopurllist 10m;
    lua_shared_dict desktopurlcount 100k;
    lua_shared_dict thirdpartygadgeturllist 10m;
    lua_shared_dict thirdpartygadgeturlcount 100k;
    lua_shared_dict corsheadersstore 100k;


    init_worker_by_lua_block {
        local UsersListManager = require('users_list_manager')
        local UnauthenticatedDesktopResourcesManager = require("unauthenticated_desktopresources_manager")
        local UnauthenticatedResourcesManager = require("unauthenticated_thirdpartyresources_manager")
        --  Must-change Replace saproxy.cisco.com with reverseproxy fqdn

        if  ngx.worker.id() == 0 then
            UsersListManager.getUserList("saproxy.cisco.com", "https://saproxy.cisco.com:8445/finesse/api/Users")
            UnauthenticatedDesktopResourcesManager.getDesktopResources("saproxy.cisco.com", "https://saproxy.cisco.com:8445/desktop/api/urls?type=desktop")
            UnauthenticatedResourcesManager.getThirdPartyGadgetResources("saproxy.cisco.com", "https://saproxy.cisco.com:8445/desktop/api/urls?type=3rdParty")
        end
    }

    include conf.d/*.conf;

    sendfile        on;

    tcp_nopush     on;

    server_names_hash_bucket_size 512;
配置反向代理端口
默认情况下,Nginx配置在端口8445上侦听Finesse请求。一次只能从反向代理启用一个端口以支持Finesse请求,例如8445。如果需要支持端口443,请编辑<nginx-install-directory>conf/conf.d/finesse.conf文件,以便在443上启用侦听并在8445上禁用侦听。
配置反向代理和上游组件之间的双向TLS身份验证
可以在CCBU上游组件CUIC/Finesse/IdS/Livedata上通过新的CVOS CLI选项(即
utils system reverse-proxy client-auth enable/disable/status。
默认情况下,这是禁用的,必须由管理员通过独立在每个上游服务器上执行CLI来显式启用。启用此选项后,上游主机上运行的思科Web代理服务将在TLS握手中对来自作为CLI实用程序一部分添加的受信任反向代理主机的连接的客户端证书进行身份验证utils system reverse-proxy allowed-hosts add <proxy-host>。
下面是代理配置文件(即ssl.conf和ssl2.conf)中相同内容的配置块
#Must-change /usr/local/openresty/nginx/ssl/nginx.crt change this location accordingly
proxy_ssl_certificate /usr/local/openresty/nginx/ssl/nginx.crt;
#Must-change /usr/local/openresty/nginx/ssl/nginx.key change this location accordingly
proxy_ssl_certificate_key /usr/local/openresty/nginx/ssl/nginx.key;
用于出站流量的SSL证书(代理到上游)可以与为入站流量配置的ssl证书(用于组件服务器块的SSL连接器)相同。 如果将自签名证书用作proxy_ssl_certificate,那么必须将其上传到上游组件(Finesse/IdS/CUIC/Livedata)后,tomcat trust store才能成功进行身份验证。
通过反向代理验证上游服务器证书是可选的,默认情况下是禁用的。如果您希望在反向代理和上游主机之间实现完整的TLS相互身份验证,则需要从ssl.conf和ssl2.conf文件中取消注释以下配置。#Enforce upstream server certificate validation at proxy ->
#this is not mandated as per CIS buit definitely adds to security.
#It requires the administrator to upload all upstream server certificates to the proxy certificate store
#Must-Change Uncomment below lines IF need to enforce upstream server certificate validation at proxy
#proxy_ssl_verify on;
#proxy_ssl_trusted_certificate /usr/local/openresty/nginx/ssl/finesse25.crt;
proxy_ssl_trusted_certificate: This file should contain the all upstream certificate enteries concatenated together
配置双向TLS身份验证的注意事项:
- 在CCBU组件上启用此功能后,在TLS握手期间,还将向LAN客户端请求客户端证书。如果客户端计算机上安装了任何客户端/个人证书,浏览器可能会选择向最终用户显示弹出窗口,要求为客户端身份验证选择适当的证书。尽管最终用户选择或按取消哪个证书并不重要,但弹出请求将成功,因为客户端证书身份验证不会对LAN客户端实施,但体验会有所改变。请参阅CDET CSCwa26057 了解更多信息。
- 如果代理主机被添加到Allowed-list,Web代理服务无法解析该列表,则上游组件的Web代理服务无法启动。确保通过DNS查找从上游组件解析添加到允许列表的反向代理主机。
清除缓存
可以使用命令清除反向代理缓 存。
标准准则
本节简要介绍将Nginx设置为代理服务器时需要遵循的标准准则。
这些指南源自Internet Security中心。有关每个指南的详细信息,请参阅同一指南。
- 始终建议使用最新的稳定OpenResty和OpenSSL版本。
- 建议将Nginx安装在单独的磁盘安装中。
- Nginx进程ID必须由根用户拥有(或适用于所选操作系统),且必须具有644(rw-------)或更严格的权限。
- Nginx必须阻止未知主机的请求。确保每个服务器块都包含显式定义的server_name指令。为了进行验证,请在nginx.conf和nginx/conf.d目录中搜索所有服务器块,并验证所有服务器块是否包含server_name。
- Nginx只能侦听授权端口。搜索nginx.conf和nginx/conf.d目录中的所有服务器块,并检查侦听指令,以便仅验证已授权的端口是否打开进行侦听。
- 由于Cisco Finesse不支持HTTP,因此建议同时阻止代理服务器HTTP端口。
- Nginx SSL协议必须为TLS 1.2。必须删除对传统SSL协议的支持。它还必须禁用弱的SSL密码。
- 建议将Nginx错误和访问日志发送到远程系统日志服务器。
- 建议安装用作Web应用防火墙的mod_security模块。有关详细信息,请参阅ModSecurity手册。请注意,Nginx负载尚未在mod_security模块内进行验证。
配置映射文件
Finesse桌面的反向代理部署需要映射文件来配置外部可见的主机名/端口组合列表以及它们与实际服务器名称和端口(由Finesse、IdS和CUIC服务器使用)的映射。在内部服务器上配置的此映射文件是允许通过Internet连接的客户端重定向到Internet上使用的所需主机和端口的关键配置。
映射文件必须部署在组件服务器可访问的Web服务器上,并且需要配置其URI才能使部署正常工作。建议使用网络中可用的专用Web服务器配置映射文件。如果此类服务器不可用,则可以使用反向代理,这将要求从网络内部访问代理,并且存在将信息暴露给外部客户端的风险,外部客户端可以对DMZ进行未经授权的访问。下一部分将详细介绍如何实现此目标。
有关在所有组件服务器上配置映射文件URI的确切步骤以及如何创建映射文件数据的更多详细信息,请参阅功能指南。
使用反向代理作为映射文件服务器
仅当反向代理也用作代理映射文件主机时,才需要这些步骤。
- 在Finesse/CUIC和IdS主机使用的域控制器中配置反向代理主机名,以便可以解析其IP地址。
- 在cmplatform的tomcat-trust下的两个节点上上传生成的Nginx签名证书,然后重新启动服务器。
- 更新<NGINX_HOME>/html/proxymap.txt中的Must-change值。
- 使用命令重新加载Nginx
nginx -s reload配置。 - 使用命令验证配置文件是否可从其他网络主机访
curl问。
CentOS 8内核强化
如果选择的操作系统是CentOS 8,则建议使用这些sysctl配置进行内核强化/调整,以用于使用专用服务器托管代理的安装。
## Configurations for kernel hardening - CentOS8. The file path is /etc/sysctl.conf
## Note that the commented configurations denote that CentOS 8's default value matches
## the recommended/tested value, and are not security related configurations.

# Avoid a smurf attack
net.ipv4.icmp_echo_ignore_broadcasts = 1

# Turn on protection for bad icmp error messages
net.ipv4.icmp_ignore_bogus_error_responses = 1

# Turn on syncookies for SYN flood attack protection
net.ipv4.tcp_syncookies = 1

# Turn on and log spoofed, source routed, and redirect packets
net.ipv4.conf.all.log_martians = 1
net.ipv4.conf.default.log_martians = 1

# Turn off routing
net.ipv4.ip_forward = 0
net.ipv4.conf.all.forwarding = 0
net.ipv6.conf.all.forwarding = 0

net.ipv4.conf.all.mc_forwarding = 0
net.ipv6.conf.all.mc_forwarding = 0

# Block routed packets
net.ipv4.conf.all.accept_source_route = 0
net.ipv4.conf.default.accept_source_route = 0
net.ipv6.conf.all.accept_source_route = 0
net.ipv6.conf.default.accept_source_route = 0

# Block ICMP redirects
net.ipv4.conf.all.accept_redirects = 0
net.ipv4.conf.default.accept_redirects = 0
net.ipv6.conf.all.accept_redirects = 0
net.ipv6.conf.default.accept_redirects = 0
net.ipv4.conf.all.secure_redirects = 0
net.ipv4.conf.default.secure_redirects = 0
net.ipv4.conf.all.send_redirects = 0
net.ipv4.conf.default.send_redirects = 0

# Filter routing packets with inward-outward path mismatch(reverse path filtering)
net.ipv4.conf.all.rp_filter = 1
net.ipv4.conf.default.rp_filter = 1

# Router solicitations & advertisements related.
net.ipv6.conf.default.router_solicitations = 0
net.ipv6.conf.default.accept_ra_rtr_pref = 0
net.ipv6.conf.default.accept_ra_pinfo = 0
net.ipv6.conf.default.accept_ra_defrtr = 0
net.ipv6.conf.default.autoconf = 0
net.ipv6.conf.default.dad_transmits = 0
net.ipv6.conf.default.max_addresses = 1
net.ipv6.conf.all.accept_ra = 0
net.ipv6.conf.default.accept_ra = 0

# Backlog - increased from default 1000 to 5000.
net.core.netdev_max_backlog = 5000

# Setting syn/syn-ack retries to zero, so that they don't stay in the queue.
net.ipv4.tcp_syn_retries = 0
net.ipv4.tcp_synack_retries = 0

# Max tcp listen backlog. Setting it to 511 to match nginx config
net.core.somaxconn = 511

# Reduce the duration of connections held in TIME_WAIT(seconds)
net.ipv4.tcp_fin_timeout = 6

# Maximum resources allotted
# fs.file-max = 2019273
# kernel.pid_max = 4194304
# net.ipv4.ip_local_port_range = 32768 60999

# TCP window size tuning
# net.ipv4.tcp_window_scaling = 1
# net.core.rmem_default = 212992
# net.core.rmem_max = 212992
# net.ipv4.tcp_rmem = 4096 87380 6291456
# net.ipv4.udp_rmem_min = 4096
# net.core.wmem_default = 212992
# net.core.wmem_max = 212992
# net.ipv4.tcp_wmem = 4096 16384 4194304
# net.ipv4.udp_wmem_min = 4096
# vm.lowmem_reserve_ratio = 256 256 32 0 0
# net.ipv4.tcp_mem = 236373 315167 472746

# Randomize virtual address space
kernel.randomize_va_space = 2

# Congestion control
# net.core.default_qdisc = fq_codel
# net.ipv4.tcp_congestion_control = cubic

# Disable SysReq
kernel.sysrq = 0

# Controls the maximum size of a message, in bytes
kernel.msgmnb = 65536

# Controls the default maximum size of a message queue
kernel.msgmax = 65536

# Controls the eagerness of the kernel to swap.
vm.swappiness = 1
在您执行建议的更改后,建议重新启动。
IPtables强化
IPtables是一种应用程序,允许系统管理员配置Linux内核防火墙提供的IPv4和IPv6表、链和规则。
这些IPtables规则配置为通过限制Linux内核防火墙中的访问来保护代理应用免受暴力攻击。
配置中的注释指示使用规则对哪些服务进行速率限制。
注意:如果管理员使用不同的端口或使用相同的端口扩展对多台服务器的访问,则必须根据这些数字相应地确定这些端口的大小。
## Configuration for iptables service
## The file path is /etc/sysconfig/iptables
## Make a note for must-change values to be replaced.
## Restart of the iptable service is required after applying following rules

*filter
:INPUT ACCEPT [0:0]
:FORWARD ACCEPT [0:0]
:OUTPUT ACCEPT [0:0]

# Ensure loopback traffic is configured
-A INPUT -i lo -j ACCEPT
-A OUTPUT -o lo -j ACCEPT
-A INPUT -s 127.0.0.0/8 -j DROP

# Ensure ping openeded only for the particular source and blocked for rest
# Must-Change: Replace the x.x.x.x with valid ip address
-A INPUT -p ICMP --icmp-type 8 -s x.x.x.x -j ACCEPT

# Ensure outbound and established connections are configured
-A INPUT -p tcp -m state --state RELATED,ESTABLISHED -j ACCEPT
-A OUTPUT -p tcp -m state --state NEW,RELATED,ESTABLISHED -j ACCEPT

# Block ssh for external interface
# Must-Change: Replace the ens224 with valid ethernet interface
-A INPUT -p tcp -i ens224 --dport 22 -j DROP
# Open inbound ssh(tcp port 22) connections
-A INPUT -p tcp -m state --state NEW -m tcp --dport 22 -j ACCEPT


# Configuration for finesse 8445 port
-A INPUT -p tcp -m tcp --dport 8445 --tcp-flags SYN SYN -m connlimit --connlimit-above 10 --connlimit-mask 32 --connlimit-saddr -m limit --limit 1/min --limit-burst 1 -j LOG --log-prefix " Connections to 8445 exceeded connlimit "
-A INPUT -p tcp -m tcp --dport 8445 --tcp-flags SYN SYN -m connlimit --connlimit-above 10 --connlimit-mask 32 --connlimit-saddr -j DROP
 -A INPUT -p tcp -m tcp --dport 8445 --tcp-flags SYN SYN -m hashlimit --hashlimit-upto 6/sec --hashlimit-burst 8 --hashlimit-mode srcip,dstport --hashlimit-name TCP_8445_DOS -j ACCEPT
-A INPUT -p tcp -m tcp --dport 8445 --tcp-flags SYN SYN -m limit --limit 1/min --limit-burst 1 -j LOG --log-prefix " Exceeded 8445 hashlimit "
-A INPUT -p tcp -m tcp --dport 8445 --tcp-flags SYN SYN -j DROP

# Configuration for IdS 8553 port
-A INPUT -p tcp -m tcp --dport 8553 --tcp-flags SYN SYN -m connlimit --connlimit-above 6 --connlimit-mask 32 --connlimit-saddr -m limit --limit 1/min --limit-burst 1 -j LOG --log-prefix " IdS connection limit exceeded"
-A INPUT -p tcp -m tcp --dport 8553 --tcp-flags SYN SYN -m connlimit --connlimit-above 6 --connlimit-mask 32 --connlimit-saddr -j DROP
-A INPUT -p tcp -m tcp --dport 8553 --tcp-flags SYN SYN -m hashlimit --hashlimit-upto 2/sec --hashlimit-burst 4 --hashlimit-mode srcip,dstport --hashlimit-name TCP_8553_DOS -j ACCEPT
-A INPUT -p tcp -m tcp --dport 8553 --tcp-flags SYN SYN -m limit --limit 1/min --limit-burst 1 -j LOG --log-prefix " Exceeded 8553 hashlimit "
-A INPUT -p tcp -m tcp --dport 8553 --tcp-flags SYN SYN -j DROP

# Configuration for IdP 443 port
-A INPUT -p tcp -m tcp --dport 443 --tcp-flags SYN SYN -m connlimit --connlimit-above 8 --connlimit-mask 32 --connlimit-saddr -m limit --limit 1/min --limit-burst 1 -j LOG --log-prefix " IdP connection limit exceeded"
-A INPUT -p tcp -m tcp --dport 443 --tcp-flags SYN SYN -m connlimit --connlimit-above 8 --connlimit-mask 32 --connlimit-saddr -j DROP
-A INPUT -p tcp -m tcp --dport 443 --tcp-flags SYN SYN -m hashlimit --hashlimit-upto 4/sec --hashlimit-burst 6 --hashlimit-mode srcip,dstport --hashlimit-name TCP_443_DOS -j ACCEPT
-A INPUT -p tcp -m tcp --dport 443 --tcp-flags SYN SYN -m limit --limit 1/min --limit-burst 1 -j LOG --log-prefix " Exceeded 443 hashlimit "
-A INPUT -p tcp -m tcp --dport 443 --tcp-flags SYN SYN -j DROP


# Must-Change: A2A file transfer has not been considered for below IMNP configuration.
# For A2A for support, these configuration must be recalculated to cater different file transfer scenarios.

# Configuration for IMNP 5280 port
-A INPUT -p tcp -m tcp --dport 5280 --tcp-flags SYN SYN -m connlimit --connlimit-above 30 --connlimit-mask 32 --connlimit-saddr -m limit --limit 1/min --limit-burst 1 -j LOG --log-prefix " IMNP connection limit exceeded"
-A INPUT -p tcp -m tcp --dport 5280 --tcp-flags SYN SYN -m connlimit --connlimit-above 30 --connlimit-mask 32 --connlimit-saddr -j DROP
-A INPUT -p tcp -m tcp --dport 5280 --tcp-flags SYN SYN -m hashlimit --hashlimit-upto 20/sec --hashlimit-burst 25 --hashlimit-mode srcip,dstport --hashlimit-name TCP_5280_DOS -j ACCEPT
-A INPUT -p tcp -m tcp --dport 5280 --tcp-flags SYN SYN -m limit --limit 1/min --limit-burst 1 -j LOG --log-prefix " Exceeded 5280 hashlimit "
-A INPUT -p tcp -m tcp --dport 5280 --tcp-flags SYN SYN -j DROP

# Configuration for IMNP 15280 port
-A INPUT -p tcp -m tcp --dport 15280 --tcp-flags SYN SYN -m connlimit --connlimit-above 30 --connlimit-mask 32 --connlimit-saddr -m limit --limit 1/min --limit-burst 1 -j LOG --log-prefix " IMNP connection limit exceeded"
-A INPUT -p tcp -m tcp --dport 15280 --tcp-flags SYN SYN -m connlimit --connlimit-above 30 --connlimit-mask 32 --connlimit-saddr -j DROP
-A INPUT -p tcp -m tcp --dport 15280 --tcp-flags SYN SYN -m hashlimit --hashlimit-upto 20/sec --hashlimit-burst 25 --hashlimit-mode srcip,dstport --hashlimit-name TCP_15280_DOS -j ACCEPT
-A INPUT -p tcp -m tcp --dport 15280 --tcp-flags SYN SYN -m limit --limit 1/min --limit-burst 1 -j LOG --log-prefix " Exceeded 15280 hashlimit "
-A INPUT -p tcp -m tcp --dport 15280 --tcp-flags SYN SYN -j DROP


# Configuration for IMNP 25280 port
-A INPUT -p tcp -m tcp --dport 25280 --tcp-flags SYN SYN -m connlimit --connlimit-above 30 --connlimit-mask 32 --connlimit-saddr -m limit --limit 1/min --limit-burst 1 -j LOG --log-prefix " IMNP connection limit exceeded"
-A INPUT -p tcp -m tcp --dport 25280 --tcp-flags SYN SYN -m connlimit --connlimit-above 30 --connlimit-mask 32 --connlimit-saddr -j DROP
-A INPUT -p tcp -m tcp --dport 25280 --tcp-flags SYN SYN -m hashlimit --hashlimit-upto 20/sec --hashlimit-burst 25 --hashlimit-mode srcip,dstport --hashlimit-name TCP_25280_DOS -j ACCEPT
-A INPUT -p tcp -m tcp --dport 25280 --tcp-flags SYN SYN -m limit --limit 1/min --limit-burst 1 -j LOG --log-prefix " Exceeded 25280 hashlimit "
-A INPUT -p tcp -m tcp --dport 25280 --tcp-flags SYN SYN -j DROP


# Configuration for CUIC 8444 port
-A INPUT -p tcp -m tcp --dport 8444 --tcp-flags SYN SYN -m connlimit --connlimit-above 6 --connlimit-mask 32 --connlimit-saddr -m limit --limit 1/min --limit-burst 1 -j LOG --log-prefix " CUIC connection limit exceeded"
-A INPUT -p tcp -m tcp --dport 8444 --tcp-flags SYN SYN -m connlimit --connlimit-above 6 --connlimit-mask 32 --connlimit-saddr -j DROP
-A INPUT -p tcp -m tcp --dport 8444 --tcp-flags SYN SYN -m hashlimit --hashlimit-upto 2/sec --hashlimit-burst 4 --hashlimit-mode srcip,dstport --hashlimit-name TCP_8444_DOS -j ACCEPT
-A INPUT -p tcp -m tcp --dport 8444 --tcp-flags SYN SYN -m limit --limit 1/min --limit-burst 1 -j LOG --log-prefix " Exceeded 8444 hashlimit "
-A INPUT -p tcp -m tcp --dport 8444 --tcp-flags SYN SYN -j DROP

# Configuration for CUIC 8447 port
-A INPUT -p tcp -m tcp --dport 8447 --tcp-flags SYN SYN -m connlimit --connlimit-above 6 --connlimit-mask 32 --connlimit-saddr -m limit --limit 1/min --limit-burst 1 -j LOG --log-prefix " CUIC connection limit exceeded"
-A INPUT -p tcp -m tcp --dport 8447 --tcp-flags SYN SYN -m connlimit --connlimit-above 6 --connlimit-mask 32 --connlimit-saddr -j DROP
-A INPUT -p tcp -m tcp --dport 8447 --tcp-flags SYN SYN -m hashlimit --hashlimit-upto 2/sec --hashlimit-burst 4 --hashlimit-mode srcip,dstport --hashlimit-name  TCP_8447_DOS -j ACCEPT
-A INPUT -p tcp -m tcp --dport 8447 --tcp-flags SYN SYN -m limit --limit 1/min --limit-burst 1 -j LOG --log-prefix " Exceeded 8447 hashlimit "
-A INPUT -p tcp -m tcp --dport 8447 --tcp-flags SYN SYN -j DROP

# Configuration for LiveData 12005  port
-A INPUT -p tcp -m tcp --dport 12005 --tcp-flags SYN SYN -m connlimit --connlimit-above 10 --connlimit-mask 32 --connlimit-saddr -m limit --limit 1/min --limit-burst 1 -j LOG --log-prefix " LD connection limit exceeded"
-A INPUT -p tcp -m tcp --dport 12005 --tcp-flags SYN SYN -m connlimit --connlimit-above 10 --connlimit-mask 32 --connlimit-saddr -j DROP
-A INPUT -p tcp -m tcp --dport 12005 --tcp-flags SYN SYN -m hashlimit --hashlimit-upto 6/sec --hashlimit-burst 8 --hashlimit-mode srcip,dstport --hashlimit-name TCP_12005_DOS -j ACCEPT
-A INPUT -p tcp -m tcp --dport 12005 --tcp-flags SYN SYN -m limit --limit 1/min --limit-burst 1 -j LOG --log-prefix " Exceeded 12005 hashlimit "
-A INPUT -p tcp -m tcp --dport 12005 --tcp-flags SYN SYN -j DROP

# Configuration for LiveData 12008  port
-A INPUT -p tcp -m tcp --dport 12008 --tcp-flags SYN SYN -m connlimit --connlimit-above 10 --connlimit-mask 32 --connlimit-saddr -m limit --limit 1/min --limit-burst 1 -j LOG --log-prefix " LD connection limit exceeded"
-A INPUT -p tcp -m tcp --dport 12008 --tcp-flags SYN SYN -m connlimit --connlimit-above 10 --connlimit-mask 32 --connlimit-saddr -j DROP
-A INPUT -p tcp -m tcp --dport 12008 --tcp-flags SYN SYN -m hashlimit --hashlimit-upto 6/sec --hashlimit-burst 8 --hashlimit-mode srcip,dstport --hashlimit-name  TCP_12008_DOS -j ACCEPT
-A INPUT -p tcp -m tcp --dport 12008 --tcp-flags SYN SYN -m limit --limit 1/min --limit-burst 1 -j LOG --log-prefix " Exceeded 12008 hashlimit "
-A INPUT -p tcp -m tcp --dport 12008 --tcp-flags SYN SYN -j DROP

# Block all other ports
-A INPUT -j REJECT --reject-with icmp-host-prohibited
-A FORWARD -j REJECT --reject-with icmp-host-prohibited

COMMIT
可以通过手动编辑/etc/sysconfig/iptables直接应用这些规则,也可以将配置保存到iptables.conf等文件中并执行cat iptables.conf >>/etc/sysconfig/iptables来应用规则。
应用规则后,需要重新启动IPtables服务。输入systemctl restart iptables以重新启动IPtables服务。
限制客户端连接
除了以前的IPtables配置之外,建议安装知道使用代理的客户端的地址范围,以使用此知识保护代理访问规则。在保护来自恶意网络僵尸网络的代理方面,这可以带来巨大的回报,这些僵尸网络通常创建于在网络安全规则较为宽松的国家/地区的IP地址范围内。因此,如果确定访问模式,强烈建议将IP地址范围限制为国家/地区或基于ISP的IP范围。
阻止客户端连接
当确定攻击来自IP地址或IP地址范围时,知道如何阻止特定地址范围也很有用。在这种情况下,可以使用iptable规则阻止来自这些IP地址的请求。
阻止不同的IP地址
要阻止多个不同的IP地址,请在每个IP地址的IPTables配置文件中添加一行。
例如,要阻止地址192.0.2.3和192.0.2.4,请输入:
iptables -A INPUT -s 192.0.2.3 -j DROP iptables -A INPUT -s 192.0.2.4 - j DROP.
阻止IP地址范围
阻止一个范围内的多个IP地址,并将一行添加到IP范围的IPTables配置文件。
例如,要阻止地址从192.0.2.3到192.0.2.35,请输入:
iptables -A INPUT -m iprange --src-range 192.0.2.3-192.0.2.35 -j DROP.
阻止子网中的所有IP地址
通过使用无类域间路由标记表示IP地址范围,将一行添加到IPTables配置文件,以阻止整个子网的所有IP地址。例如,要阻止所有C类地址,请输入:
iptables -A INPUT -s 192.0.0.0/16 -j DROP.
SELinux
SELinux是一个集成到Linux操作系统中的平台安全框架。安装并添加SELinux策略以运行OpenResty的过程,后面提供了反向代理。
- 使用命令停止进
openresty -s stop程。 - 使用命令配置并启动/stop nginx
systemctl服务器,以便在启动期间自动启动OpenResty进程。以root用户身份输入这些命令。- 去/usr/lib/systemd/system。
- 打开文件openresty.service。
- 根据PIDFile位置更新文件的内容。
[Unit]
Description=The OpenResty Application Platform
After=syslog.target network-online.target remote-fs.target nss-lookup.target
Wants=network-online.target

[Service]
Type=forking
PIDFile=/usr/local/openresty/nginx/logs/nginx.pid
ExecStartPre=/usr/local/openresty/nginx/sbin/nginx -t
ExecStart=/usr/local/openresty/nginx/sbin/nginx
ExecReload=/bin/kill -s HUP $MAINPID
ExecStop=/bin/kill -s QUIT $MAINPID
PrivateTmp=true

[Install]
WantedBy=multi-user.target
- 以root用户身份输
sudo systemctl enable openresty入。 - 使用命令启动/停止OpenResty服
systemctl start openresty / systemctl stop openresty务,并确保进程以root用户身份启动/停止。
- 安装Sellinux
- 默认情况下,只有一些SELinux软件包将安装在CentOs中。
-
需要安装policycoreutils-devel包及其依赖项才能生成SELinux策略。
-
输入此命令以安装policycoreutils-devel
yum install policycoreutils-devel
- 确保安装软件包后,命令可
sepolicy以运行。usage: sepolicy [-h] [-P POLICY] {booleans,communicate,generate,gui,interface,manpage,network,transition} ... SELinux Policy Inspection Tool
-
创建新的Linux用户并使用SElinux用户映射
-
输入
semanage login -l以查看Linux用户和SELinux用户之间的映射。[root@loadproxy-cisco-com ~]# semanage login -l Login Name SELinux User MLS/MCS Range Service __default__ unconfined_u s0-s0:c0.c1023 * * root unconfined_u s0-s0:c0.c1023 *
-
以root用户身份,创建映射到SELinux user_u用户的新Linux用户(nginx用户)。
useradd -Z user_u nginxuser
[root@loadproxy-cisco-com ~]# passwd nginxuser
Changing password for user nginxuser.
New password:
Retype new password:
passwd: all authentication tokens updated successfully.
-
要查看nginxuser和user_u之间的映射,请以root身份输入以下命令:
[root@loadproxy-cisco-com ~]# semanage login -l

Login Name           SELinux User         MLS/MCS Range        Service

__default__          unconfined_u         s0-s0:c0.c1023       *
nginxuser            user_u               s0                   *
root                 unconfined_u         s0-s0:c0.c1023       *
-
SELinux __default__ login默认映射到SELinux uncontained_u用户。需要使用以下命令将user_u设置为默认限制:
semanage login -m -s user_u -r s0 __default__
要检查命令是否正常工作,请输
semanage login -l入。它应生成以下输出:
-
修改nginx.conf并更改nginxuser的所有权。
- 在
chown -R nginxuser:nginxuser<Openresty-install-directory>目录中输入*。 -
修改nginx.conf文件,以将nginxuser作为运行工作进程的用户。
........

user nginxuser nginxuser;

..........
- 在
-
为Nginx编写SELinux策略
- 不是使用命令为Nginx生成新的默认自定
sepolicy generate --init /usr/bin/nginx义策略,而是首选从现有策略开始。 - 从提供的URL下载的nginx.fc文件(文件上下文文件)和nginx.te(类型实施文件)文件已修改为适合反向代理使用。
- 此修改后的版本可以用作参考,因为它已针对特定使用案例进行了修复。
- 从文件软件下载页面下载文件selinux-nginx-rhel-master-modified.tar。
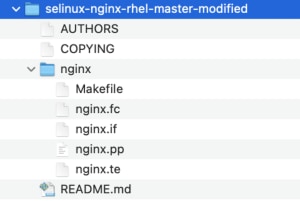
- 解压缩.tar文件,并导航到该文件中的nginx目录。
- 打开.fc文件并验证nginx安装程序、缓存和pid文件所需的文件路径。
- 使用命令编译配
make置。 - 将生成nginx.pp文件。
- 使用命令加载策
semodule略。semodule -i nginx.pp
- 转到/root并创建名为touch /.autorelabel的空文件。
- 重新启动系统。
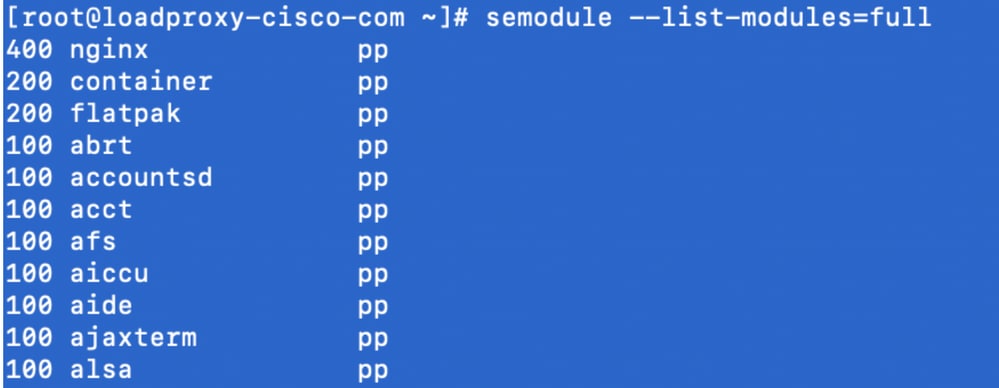
- 输入此命令以验证策略是否已成功加载。
semodule --list-modules=full
- Nginx应运行无任何违规。(违规将位于/var/log/messages和/var/log/audit/audit.log中)。
- 输入此命令以检查Nginx的状态。
ps -aefZ | grep nginx

- 现在,Finesse代理/supervisor桌面应该可以访问。
验证
使用本部分可确认配置能否正常运行。
Finesse
- 请求https://<reverseproxy:port>/finesse/api/SystemInfo。并检查它们是否可访问。
- 选中<primaryNode>和<secondaryNode>中的<host>值均为有效的反向代理主机名。它不应是Finesse主机名。
CUIC和实时数据
- 如果在响应中看到Finesse主机名而不是反向代理主机名,则按照Finesse 12.6 UCCE功能指南中“Finesse 12.6 Finesse Desktop无VPN访问”一节“填充网络转换数据”所述,在Finesse服务器中正确添加验证代理映射配置和允许的主机。
- 如果LiveData小工具在Finesse Desktop中正确加载,则CUIC和LiveData代理配置正确。
- 为了验证CUIC和LiveData配置,请从DMZ向这些URL发出HTTP请求,并查看是否可访问这些URL。
- https://<reverseproxy:cuic_port>/cuic/rest/about
- https://<reverseproxy:ldweb_port>/livedata/security
- https://<reverseproxy:ldsocketio_port>/security
IDS
要验证IdS配置,请执行以下步骤:
- 从LAN登录到IdSAdmin接口,其地址为https://<ids_LAN_host:ids_port>:8553/idsadmin,因为管理接口未通过反向代理公开。
- 选择Settings > IdS Trust。
- 验证代理群集发布服务器节点是否列在“下载SP元数据”页面上,然后单击下一步。
- 验证是否正确显示IDP代理(如果已在上传IDP元数据页面上配置),然后点击下一步。
- 从“测试SSO”页面通过所有代理群集节点启动测试SSO,并验证所有操作是否成功。这需要客户端计算机连接到反向代理节点。
性能
使用nmon工具对顶级等效性能捕获的数据分析可从Finesse版本12.6(1)ES03软件下载页面(load_result.zip)获得。 该数据表示使用SSO登录和CUIC LD报告在示例的2000 UCCE部署上用于桌面和Supervisor操作的代理的状态,该默认布局为2000个用户配置了8小时。它可用于推导在类似硬件上使用Nginx的安装的计算、磁盘和网络要求。
故障排除
SSO
- 桌面重定向不通过代理
- 检查主机名是否按照各种配置(如proxymap.txt、server_filter文件等)中的实际vm主机名进行了正确配置。
- 确保在CCE资产中添加了具有正确机箱主机名的Id,因为从CCE Web管理员注册SSO时,相同的信息会推送到组件。
- 未进行SSO登录
- 确保已为代理主机建立IdS-IDP信任。
- 确保已为代理主机建立IdS-IDP信任。
SELinux
- 如果默认情况下未启动Nginx或Finesse代理桌面不可访问,请使用以下命令将SELinux设置为permissive模式:
setenforce 0
- 尝试使用命令重新启动
systemctl restart nginxNginx。 - 违规将位于/var/log/messages和/var/log/audit/audit.log中。
- 需要使用允许规则重新生成.te文件,以便使用以下任一命令解决这些违规问题:
cat /var/log/audit/audit.log | audit2allow -m nginx1 > nginx1.te. # this will create nginx1.te file
                or
ausearch -c 'nginx' --raw | audit2allow -M  my-nginx  # this will create my-nginx.te file
- 使用新生成的允许规则更新selinux-nginx-rhel-master-modified/nginx目录中存在的原始nginx.te文件。
- 使用命令进行同样的
make编译。 - 将重新生成nginx.pp文件。
- 通过semmodule命令加载策略。
semodule -i nginx.pp
- 使用以下命令使SELinux执行模式:
setenforce
- 重新启动系统。
- 重复此过程,直到修复所需的违规。
修订历史记录
| 版本 | 发布日期 | 备注 |
|---|---|---|
5.0 |
24-Dec-2021 |
已更正OpenResty的步骤。已修改SSL证书生成和应用步骤。已使用ES03链接更新文档。 |
4.0 |
10-Dec-2021 |
ES03更新。 |
3.0 |
10-Nov-2021 |
已更新解决方案指南和身份验证说明。 |
2.0 |
09-Nov-2021 |
首次公开发布 |
1.0 |
09-Nov-2021 |
初始版本 |
 反馈
反馈