Cisco IP Phone 7821/7841/ 7861 アドミニストレーション ガイド for Cisco Unified Communications Manager 10.0(SIP)
偏向のない言語
この製品のマニュアルセットは、偏向のない言語を使用するように配慮されています。このマニュアルセットでの偏向のない言語とは、年齢、障害、性別、人種的アイデンティティ、民族的アイデンティティ、性的指向、社会経済的地位、およびインターセクショナリティに基づく差別を意味しない言語として定義されています。製品ソフトウェアのユーザーインターフェイスにハードコードされている言語、RFP のドキュメントに基づいて使用されている言語、または参照されているサードパーティ製品で使用されている言語によりドキュメントに例外が存在する場合があります。シスコのインクルーシブランゲージに対する取り組みの詳細は、こちらをご覧ください。
翻訳について
このドキュメントは、米国シスコ発行ドキュメントの参考和訳です。リンク情報につきましては、日本語版掲載時点で、英語版にアップデートがあり、リンク先のページが移動/変更されている場合がありますことをご了承ください。あくまでも参考和訳となりますので、正式な内容については米国サイトのドキュメントを参照ください。
- Updated:
- 2017年8月30日
章のタイトル: 壁面取り付け
目次
ロックできない壁面取り付けコンポーネント
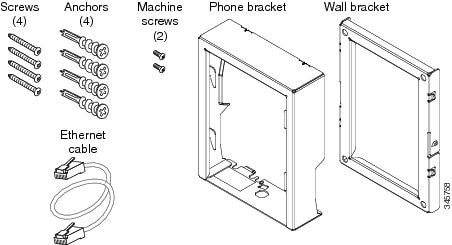
パッケージには、次の項目が含まれています。
ここでは ADA のロックできない壁面取り付けキットの設置および取り外しの方法について説明します。

ロックできない壁面取り付けキットの設置
壁面取り付けキットはコンクリート、れんが、または同様の硬い表面を含むほとんどの表面に配置できます。 コンクリート、れんが、または同様の硬い表面にキットを取り付けるには、壁の表面に合ったネジとアンカーを用意する必要があります。
ブラケットの取り付けには、次の工具が必要です。
現在、目的の位置に電話用のイーサネット ジャックが存在しない場合は、イーサネット ジャックも設置します。 このジャックには、イーサネット接続のために適切に配線されている必要があります。 通常の電話ジャックは使用できません。
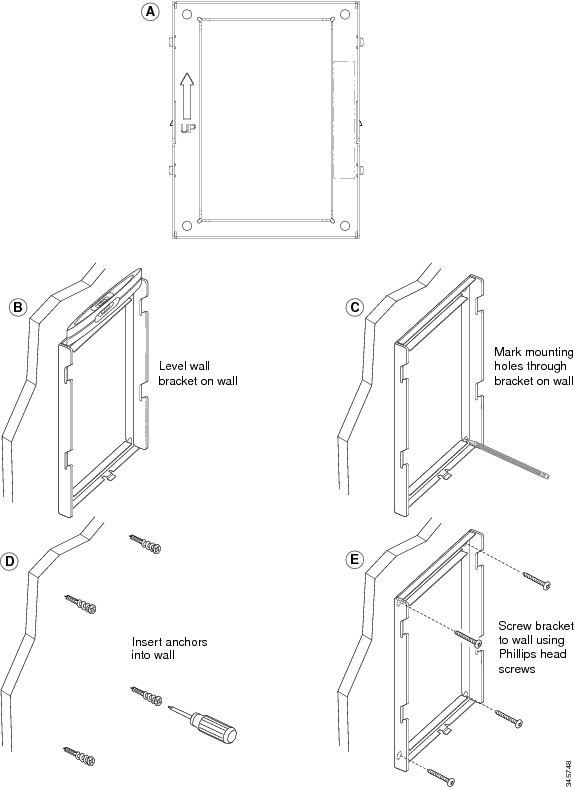
| ステップ 1 |
取り付け位置に、壁面用ブラケットを取り付けます。 ブラケットをイーサネット ジャックにかぶせて取り付けることも、近くのジャックまでイーサネット ネットワーク ケーブルを配線することもできます。
|
||
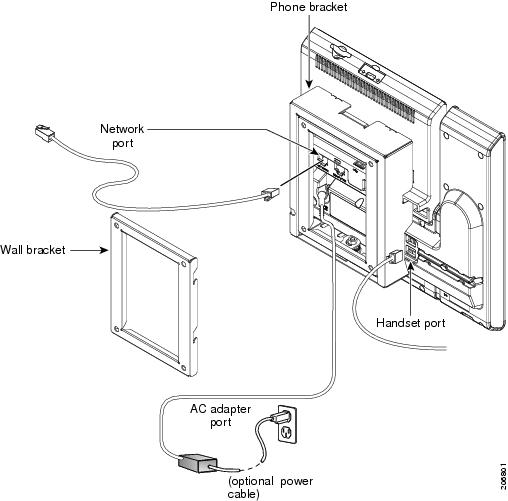
| ステップ 2 | IP Phone に電話機用ブラケットを装着します。 | ||
| ステップ 3 |
ケーブルを電話機に接続します。
|
||
| ステップ 4 |
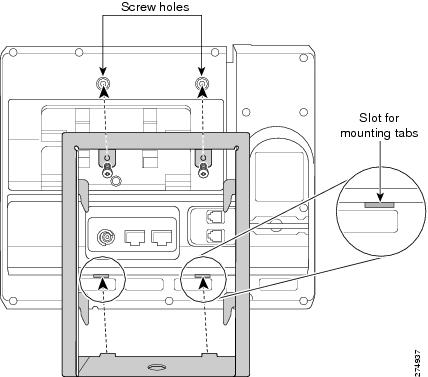
電話機用ブラケットの上部にあるタブを壁面ブラケットのスロットに挿入して、電話機を壁面ブラケットに装着します。 ケーブルの終端がブラケットの外に出る場合は、ブラケット下部のケーブル差し込み口を使用して、ブラケット背面の壁に終端がない電源コードやその他のケーブルを配置します。 電話機用ブラケットと壁面用ブラケットの開口部によって、複数の円形の開口部ができ、1 つの開口部に 1 本のケーブルを通すことができるようになっています。 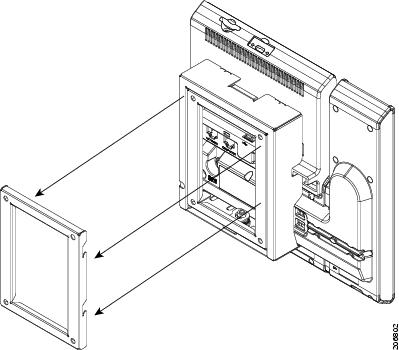
|
||
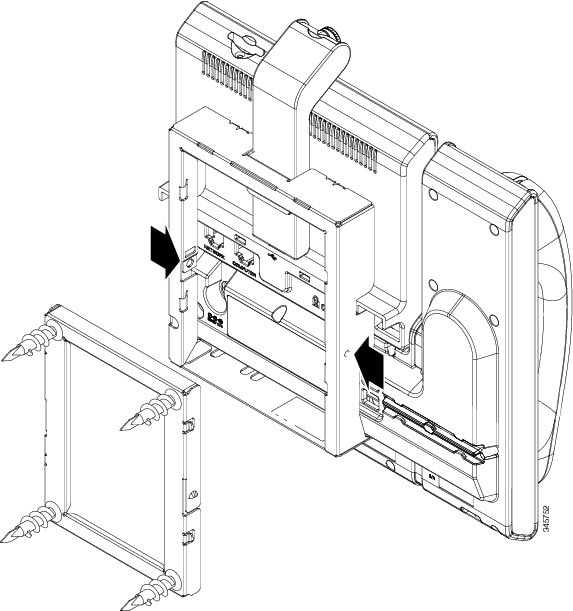
| ステップ 5 | 電話機を壁面ブラケットにしっかりと押し付け、下にスライドします。 カチッという音がしてブラケットのタブが位置に収まります。 | ||
| ステップ 6 | 受話器受け台の調整に進みます。 |
ロックできない壁面に設置した電話機の取り外し
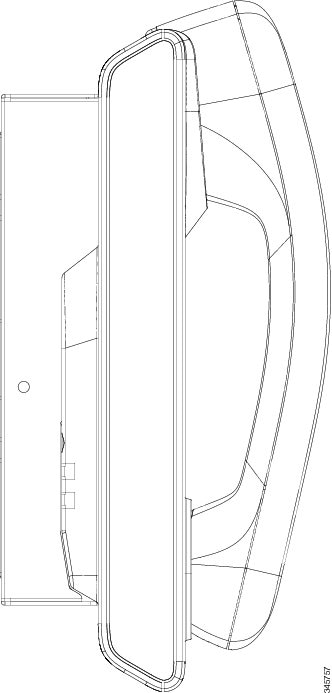
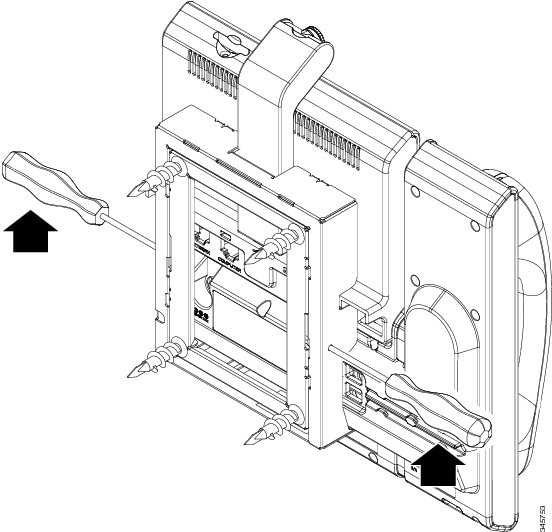
電話機のマウント プレートには、壁面用ブラケットにプレートをロックするための 2 個のタブが付いています。 次の図は、タブの位置と形状を示します。
壁面用ブラケットから電話とマウント プレートを取り外すには、これらのタブを外す必要があります。
ドライバまたは金属棒が 2 個必要です。
| ステップ 1 | 電話マウント プレートにある左右の穴にドライバーを 1 インチほど差し込みます。 (2.5 cm) |
| ステップ 2 |
ドライバーのハンドルを持ち上げ、タブに下方向の圧力をかけます。
|
| ステップ 3 | タブをしっかりと押し込んで外すと同時に電話機を持ち上げ、壁面用ブラケットから電話機を取り外します。 |
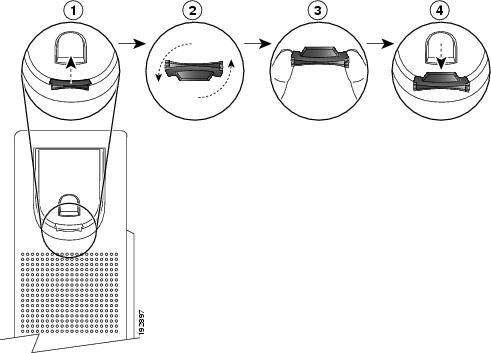
受話器受け台の調整
電話機が壁に取り付けられている場合は、受話器が受け台から滑り落ちないように受話器の受け台を調整する必要があります。
ロックできない壁面取り付けコンポーネント
ロックできない壁面取り付けキットの設置
壁面取り付けキットはコンクリート、れんが、または同様の硬い表面を含むほとんどの表面に配置できます。 コンクリート、れんが、または同様の硬い表面にキットを取り付けるには、壁の表面に合ったネジとアンカーを用意する必要があります。
はじめる前に手順ブラケットの取り付けには、次の工具が必要です。
現在、目的の位置に電話用のイーサネット ジャックが存在しない場合は、イーサネット ジャックも設置します。 このジャックには、イーサネット接続のために適切に配線されている必要があります。 通常の電話ジャックは使用できません。
ステップ 1 取り付け位置に、壁面用ブラケットを取り付けます。 ブラケットをイーサネット ジャックにかぶせて取り付けることも、近くのジャックまでイーサネット ネットワーク ケーブルを配線することもできます。
(注) ジャックを電話機の背面に配置する場合は、イーサネット ジャックを壁にぴったり付けるか、埋め込む必要があります。
ステップ 2 IP Phone に電話機用ブラケットを装着します。 ステップ 3 ケーブルを電話機に接続します。 ステップ 4 電話機用ブラケットの上部にあるタブを壁面ブラケットのスロットに挿入して、電話機を壁面ブラケットに装着します。 ケーブルの終端がブラケットの外に出る場合は、ブラケット下部のケーブル差し込み口を使用して、ブラケット背面の壁に終端がない電源コードやその他のケーブルを配置します。 電話機用ブラケットと壁面用ブラケットの開口部によって、複数の円形の開口部ができ、1 つの開口部に 1 本のケーブルを通すことができるようになっています。
ステップ 5 電話機を壁面ブラケットにしっかりと押し付け、下にスライドします。 カチッという音がしてブラケットのタブが位置に収まります。 ステップ 6 受話器受け台の調整に進みます。
ロックできない壁面に設置した電話機の取り外し
 フィードバック