Cisco Identity Services Engine リリース 2.3 管理者ガイド
偏向のない言語
この製品のマニュアルセットは、偏向のない言語を使用するように配慮されています。このマニュアルセットでの偏向のない言語とは、年齢、障害、性別、人種的アイデンティティ、民族的アイデンティティ、性的指向、社会経済的地位、およびインターセクショナリティに基づく差別を意味しない言語として定義されています。製品ソフトウェアのユーザーインターフェイスにハードコードされている言語、RFP のドキュメントに基づいて使用されている言語、または参照されているサードパーティ製品で使用されている言語によりドキュメントに例外が存在する場合があります。シスコのインクルーシブランゲージに対する取り組みの詳細は、こちらをご覧ください。
翻訳について
このドキュメントは、米国シスコ発行ドキュメントの参考和訳です。リンク情報につきましては、日本語版掲載時点で、英語版にアップデートがあり、リンク先のページが移動/変更されている場合がありますことをご了承ください。あくまでも参考和訳となりますので、正式な内容については米国サイトのドキュメントを参照ください。
- Updated:
- 2017年11月9日木曜日
章のタイトル: ユーザおよび外部 ID ソースの管理
- Cisco ISE ユーザ
- 内部 ID ソースと外部 ID ソース
- 証明書認証プロファイル
- 外部 ID ソースとしての Active Directory
- Active Directory でサポートされる認証プロトコルおよび機能
- 許可ポリシーで使用する Active Directory 属性およびグループの取得
- 証明書ベース認証の Active Directory 証明書の取得
- Active Directory ユーザ認証プロセス フロー
- Active Directory マルチドメイン フォレストのサポート
- Active Directory と Cisco ISE の統合の前提条件
- 外部 ID ソースとしての Active Directory の設定
- Active Directory の複数参加設定のサポート
- ID 書き換え
- ID 解決の設定
- Active Directory 認証のためのユーザのテスト
- Active Directory の設定の削除
- ノードの Active Directory の参加の表示
- Active Directory の問題の診断
- Active Directory デバッグ ログの有効化
- トラブルシューティング用の Active Directory ログ ファイルの入手
- Active Directory のアラームおよびレポート
- Active Directory の高度な調整
- Active Directory が構成された Cisco ISE をセットアップするための補足情報
- 初期セットアップと設定
- PassiveID ワーク センター ダッシュボード
- プローブおよびプロバイダーとしての Active Directory
- その他の パッシブ ID サービス プロバイダー
- Active Directory エージェント
- API プロバイダー
- SPAN
- syslog プロバイダー
- syslog クライアントの設定
- syslog メッセージ構造のカスタマイズ(テンプレート)
- syslog 事前定義メッセージ テンプレートの使用
- syslog ASA VPN 事前定義テンプレート
- syslog Bluecat 事前定義テンプレート
- syslog F5 VPN 事前定義テンプレート
- syslog Infoblox 事前定義テンプレート
- syslog Linux DHCPd3 事前定義テンプレート
- syslog MS DHCP 事前定義テンプレート
- syslog SafeConnect NAC 事前定義テンプレート
- syslog Aerohive 事前定義テンプレート
- syslog Blue Coat 事前定義テンプレート:Main Proxy、Proxy SG、Squid Web Proxy
- syslog ISE および ACS 事前定義テンプレート
- syslog Lucent QIP 事前定義テンプレート
- RADIUS トークン サーバでサポートされる認証プロトコル
- 通信に RADIUS トークン サーバで使用されるポート
- RADIUS 共有秘密
- RADIUS トークン サーバでのフェールオーバー
- RADIUS トークン サーバの設定可能なパスワード プロンプト
- RADIUS トークン サーバのユーザ認証
- RADIUS トークン サーバのユーザ属性キャッシュ
- ID 順序での RADIUS ID ソース
- RADIUS サーバがすべてのエラーに対して同じメッセージを返す
- Safeword サーバでサポートされる特別なユーザ名の形式
- RADIUS トークン サーバでの認証要求と応答
- RADIUS トークン サーバの追加
- RADIUS トークン サーバの削除
ユーザおよび外部 ID ソースの管理
Cisco ISE ユーザ
この章では、ユーザという用語はネットワークに定期的にアクセスする従業員と請負業者に加え、スポンサーおよびゲスト ユーザを意味します。スポンサーは、スポンサー ポータルからゲスト ユーザ アカウントを作成および管理する組織の従業員または請負業者となります。ゲスト ユーザは、一定期間組織のネットワーク リソースへのアクセスを必要とする外部ビジターです。
Cisco ISE ネットワーク上のリソースとサービスにアクセスするすべてのユーザのアカウントを作成する必要があります。従業員、請負業者、およびスポンサー ユーザは、管理者ポータルから作成されます。
- ユーザ ID
- ユーザ グループ
- ユーザ ID グループ
- ユーザ ロール
- ユーザ アカウントのカスタム属性およびパスワード ポリシー
- ユーザおよび管理者用の自動パスワードの生成
- ユーザの追加
- Cisco ISE ユーザ データのエクスポート
- Cisco ISE 内部ユーザのインポート
- ユーザ ID グループの作成
- ユーザ ID グループのエクスポート
- ユーザ ID グループのインポート
- 外部 ID ソースを使用した許可ポリシーの作成
- 最大同時セッション数の設定
- アカウント無効化ポリシー
- 個別のユーザ アカウントの無効化
- グローバルにユーザ アカウントを無効にする
ユーザ ID
ユーザ ID は、ユーザに関する情報を保持するコンテナに似ており、ユーザのネットワーク アクセス クレデンシャルを形成します。各ユーザの ID はデータにより定義され、ユーザ名、電子メール アドレス、パスワード、アカウントの説明、関連付けられている管理者グループ、ユーザ グループ、ロールなどが含まれます。
ユーザ グループ
ユーザ グループは、特定の一連の Cisco ISE サービスおよび機能へのアクセスを許可する共通の権限セットを共有する個々のユーザの集合です。
ユーザ ID グループ
ユーザのグループ ID は、同じグループに属している特定のユーザ グループを識別および説明する要素で構成されています。グループ名は、このグループのメンバーが持っている機能ロールの説明です。グループは、そのグループに属しているユーザのリストです。
デフォルト ユーザ ID グループ
ユーザ ロール
ユーザ ロールは、ユーザが Cisco ISE ネットワークで実行できるタスクやアクセスできるサービスを決定する権限セットです。ユーザ ロールは、ユーザ グループに関連付けられています(ネットワーク アクセス ユーザなど)。
ユーザ アカウントのカスタム属性およびパスワード ポリシー
Cisco ISE では、ユーザ属性に基づいてユーザのネットワーク アクセスを制限することができます。Cisco ISE では、一連の事前定義されたユーザ属性が用意されており、カスタム属性を作成することもできます。両方のタイプの属性が認証ポリシーを定義する条件で使用できます。パスワードが指定された基準を満たすように、ユーザ アカウントのパスワード ポリシーも定義できます。
カスタム ユーザ属性
[ユーザのカスタム属性(User Custom Attributes)] ページ([管理(Administration)] > [ID の管理(Identity Management)] > [設定(Settings )] > [ユーザのカスタム属性(User Custom Attributes)])で、追加のユーザ アカウント属性を設定できます。このページに事前定義済みユーザ属性のリストを表示することもできます。事前定義済みユーザ属性を編集することはできません。
新しいカスタム属性を追加するには、[ユーザのカスタム属性(User Custom Attributes)] ペインに必要な詳細を入力します。[ユーザのカスタム属性(User Custom Attributes)] ページに追加するカスタム属性とデフォルト値が、ネットワーク アクセス ユーザ([管理(Administration)] > [ID の管理(Identity Management)] > [ID(Identities)] > [ユーザ(Users)] > [追加(Add)] / [編集(Edit)])または管理者ユーザ([管理(Administration)] > [システム(System)] > [管理者アクセス(Admin Access)] > [管理者(Administrators)] > [管理者ユーザ(Admin Users)] > [追加(Add)]/[編集(Edit)])の追加または編集時に表示されます。これらのデフォルト値は、ネットワーク アクセスまたは管理者ユーザの追加または編集時に変更できます。
ユーザが [ユーザのカスタム属性(User Custom Attributes)] ページで、カスタム属性に対し次のデータ型を選択できます。
-
[文字列(String)]:文字列の最大長(文字列属性値の最大許容長)を指定できます。
-
[整数(Integer)]:最小値と最大値を設定できます(最小、最大の許容可能な整数値を指定します)。
-
[列挙(Enum)]:各パラメータに次の値を指定できます。 デフォルト パラメータを指定することもできます。ネットワーク アクセスまたは管理者ユーザの追加または編集時に、[表示(Display)] フィールドに追加する値が表示されます。
-
浮動小数点数(Float)
-
パスワード(Password):最大文字列の長さを指定できます。
-
[Long 型(Long)]:最小値と最大値を設定できます。
-
[IP]:デフォルトの IPv4 または IPv6 アドレスを指定できます。
-
[ブール型(Boolean)]:True または False をデフォルト値として設定できます。
-
[日付(Date)]:カレンダーから日付を選択し、デフォルト値として設定できます。日付は yyyy-mm-dd 形式で表示されます。
ネットワーク アクセスまたは管理者ユーザの追加または編集時、これを必須属性とする場合は、[必須(Mandatory)] チェック ボックスをオンにします。カスタム属性のデフォルト値を設定することもできます。
カスタム属性は、認証ポリシーで使用できます。カスタム属性に設定するデータ型と許容範囲は、ポリシー条件のカスタム属性の値に適用されます。
ユーザ認証の設定
[ユーザ認証設定(User Authentication Settings Password Policy)] ページで、ユーザ アカウント パスワードが満たす必要がある基準を定義できます。 を選択します。
次の表に、[ パスワード ポリシー(User Password Policy)] ページのフィールドを示します。
ユーザおよび管理者用の自動パスワードの生成
Cisco ISE では、ユーザおよび管理者の作成ページで Cisco ISE パスワード ポリシーに従うインスタント パスワードを生成するための [パスワードの生成(Generate Password)] オプションが導入されています。これにより、ユーザまたは管理者は設定する安全なパスワードを考えるために時間を費やすことなく、Cisco ISE によって生成されたパスワードを使用することができます。
ユーザの追加
Cisco ISE では、Cisco ISE ユーザの属性を表示、作成、編集、複製、削除、ステータス変更、インポート、エクスポート、または検索できます。
Cisco ISE 内部データベースを使用する場合、Cisco ISE ネットワークのリソースまたはサービスへのアクセスを必要とするすべての新規ユーザのアカウントを作成する必要があります。
Cisco ISE ユーザ データのエクスポート
Cisco ISE 内部データベースからユーザ データをエクスポートしなければならない場合があります。Cisco ISE では、パスワード保護された csv ファイル形式でユーザ データをエクスポートすることができます。
Cisco ISE 内部ユーザのインポート
新しい内部アカウントを作成するために、CSV ファイルを使用して新しいユーザ データを ISE にインポートできます。ユーザ アカウントをインポートできるページから、テンプレート CSV ファイルをダウンロードできます。 でユーザをインポートできます。スポンサーはスポンサー ポータルでユーザをインポートできます。ゲスト アカウントのインポート方法については、『Sponsor Portal Guide』で説明しています。スポンサー ゲスト アカウントで使用される情報タイプの設定については、スポンサー アカウント作成のためのアカウント コンテンツの設定を参照してください。
 (注) | CSV ファイルにカスタム属性が含まれている場合、カスタム属性に設定するデータ タイプと許容範囲は、インポート時にカスタム属性の値に適用されます。 |
(注) | すべてのネットワーク アクセス ユーザを一度に削除しないことを推奨します。一度に削除すると、特に非常に大規模なデータベースを使用している場合は、CPU スパイクとサービスのクラッシュにつながる場合があるためです。 |
ユーザ ID グループの作成
ユーザ ID グループのエクスポート
Cisco ISE では、ローカルに設定されたユーザ ID グループを csv ファイル形式でエクスポートすることができます。
ユーザ ID グループのインポート
外部 ID ソースを使用した許可ポリシーの作成
次に、外部 ID ソースを使用して許可ポリシーを作成する手順を示します。
| ステップ 1 | を選択して、[標準(Standard)] ポリシーで新しい許可ポリシー ルールを作成します。
ポリシー セットをイネーブルにした場合は、 を選択し、このポータルに使用するポリシー セットを選択して、[承認ポリシー(Authorization Policy)] を展開し、新しいルールを追加します。 |
| ステップ 2 | [条件(Conditions)] には、ポータルの検証に使用するエンドポイント ID グループを選択します。
外部 ID ソース(たとえば、RSA SecurID)を内部ユーザ グループとともに使用する場合は、次の構文を使用して条件を作成する必要があります。 InternalUser:IdentityGroup EQUALS User Identity Groups:Group_Name グループ名の前に「User Identity Groups:」を引用符なしで追加します。 |
| ステップ 3 | [権限(Permissions)] には、作成したポータル許可プロファイルを選択します。 |
最大同時セッション数の設定
最適なパフォーマンスを得るために、同時ユーザ セッション数を制限できます。ユーザ レベルまたはグループ レベルで制限を設定できます。最大ユーザ セッションの設定に応じて、セッション カウントはユーザに適用されます。
ISE ノードごとに各ユーザの同時セッションの最大数を設定できます。この制限を超えるセッションは拒否されます。
セッションの最大数がユーザ レベルとグループ レベルの両方で設定されている場合、小さい方の値が優先されます。たとえば、ユーザの最大セッション値が 10 に設定されていて、ユーザが属するグループの最大セッション値が 5 に設定されている場合、ユーザは最大で 5 つのセッションのみを持つことができます。
最大セッション数を 1 に設定しており、ユーザが接続する WLC でサポートされているバージョンの WLC が稼働していない場合、ユーザに対し、切断してから再接続するよう指示するエラーが表示されます。「Cisco Identity Services Engine Network Component Compatibility」を参照してください。 http://www.cisco.com/c/en/us/td/docs/security/ise/2-2/compatibility/ise_sdt.html
グループの最大同時セッション数
ID グループの最大同時セッション数を設定できます。
グループ内の少人数のユーザによってすべてのセッションが使用される場合があります。他のユーザからの新しいセッションの作成要求は、セッション数がすでに最大設定値に達しているため、拒否されます。Cisco ISE では、グループ内の各ユーザに最大セッション制限を設定できます。特定の ID グループに所属する各ユーザは、同じグループの他のユーザが開いているセッション数に関係なく、制限以上はセッションを開くことができません。特定のユーザのセッション制限を計算する場合は、ユーザ 1 人あたりのグローバル セッション制限、ユーザが所属する ID グループあたりのセッション制限、グループ内のユーザ 1 人あたりのセッション制限のいずれかの最小設定値が優先されます。
ID グループの同時セッションの最大数を設定するには、次の手順に従います。
カウンタの時間制限の設定
同時ユーザ セッションのタイムアウトを設定できます。
[RADIUS ライブ ログ(RADIUS Live Logs)] ページでセッション カウントをリセットできます。[ID(Identity)]、[ID グループ(Identity Group)]、[サーバ(Server)] 列に表示される [アクション(Actions)] アイコンをクリックして、セッション カウントをリセットします。セッションをリセットすると、セッションはカウンタから削除されます(これにより、新しいセッションが許可されます)。ユーザのセッションがカウンタから削除されても、ユーザの接続は切断されません。
アカウント無効化ポリシー
Cisco ISE は、Cisco Secure ACS と同等の機能を実現するために、ユーザおよび管理者のアカウント無効化ポリシーを導入しています。ユーザまたは管理者の認証または問い合わせ時に、Cisco ISE は [管理(Administration)] > [ID の管理(Identity Management)] > [設定(Settings)] >[ユーザ認証設定(User Authentication Settings)] ページでグローバル アカウント無効化ポリシー設定を確認し、その設定に基づいて認証または結果を返します。
Cisco ISE は、次の 3 つのポリシーを確認します。
-
指定した日付(yyyy-mm-dd)を超えたらユーザ アカウントを無効にする(Disable user accounts that exceed a specified date (yyyy-mm-dd)):設定された日付にユーザ アカウントを無効にします。ただし、[管理(Administration)] > [ID の管理(Identity Management)] > [ID(Identities)] > [ユーザ(Users)] > [アカウント無効化ポリシー(Account Disable Policy)] で設定された個々のネットワーク アクセス ユーザのアカウント無効化ポリシー設定はグローバル設定よりも優先されます。
-
アカウント作成時または最後の有効化から n 日後にユーザ アカウントを無効にする(Disable user account after n days of account creation or last enable):アカウントの作成またはアカウントが有効になった最後の日から指定した日数後にユーザ アカウントを無効にします。[管理(Administration)] > [ID の管理(Identity Management)] > [ID(Identities)] > [ユーザ(Users)] > [ステータス(Status)] でユーザのステータスを確認できます。
-
非アクティブになってから n 日後にアカウントを無効にする(Disable accounts after n days of inactivity):設定した連続日数、認証されなかった管理者およびユーザ アカウントを無効化します。
Cisco Secure ACS から Cisco ISE に移行する際、Cisco Secure ACS ではネットワーク アクセス ユーザ用に指定したアカウント無効化ポリシーの設定は Cisco ISE に移行されます。
個別のユーザ アカウントの無効化
Cisco ISE では、アカウントの無効日が管理者ユーザによって指定された日付を超えた場合は、各個人ユーザのユーザ アカウントを無効にすることができます。
| ステップ 1 | [管理(Administration)] > [ID の管理(Identity Management)] > [ID(Identities)] > [ユーザ(Users)] の順に選択します。 | ||
| ステップ 2 | [追加(Add)] をクリックして新しいユーザを作成するか、既存のユーザの横のチェックボックスをオンにして [編集(Edit)] をクリックして既存のユーザの詳細を編集します。 | ||
| ステップ 3 | [日付を超えたらアカウントを無効化する(Disable account if the date exceeds)] チェックボックスをオンにして、日付を選択します。
このオプションによって、ユーザ レベルで設定した日付を超えたときに、ユーザ アカウントをディセーブルにすることができます。必要に応じて、異なるユーザに異なる失効日を設定できます。このオプションは、個々のユーザのグローバル コンフィギュレーションを無効にします。日付には、現在のシステム日付または将来の日付を設定できます。
| ||
| ステップ 4 | [送信(Submit)] をクリックして、個々のユーザのアカウント無効化ポリシーを設定します。 |
グローバルにユーザ アカウントを無効にする
Cisco ISE では、特定の日付、アカウントの作成または最終アクセス日からの日数、およびアカウントの非アクティブの日数の後に、ユーザ アカウントを無効にすることができます。
| ステップ 1 | [管理(Administration)] > [ID の管理(Identity Management)] > [設定(Settings)] > [ユーザ認証設定(User Authentication Settings)] > [アカウント無効化ポリシー(Account Disable Policy)] を選択します。 |
| ステップ 2 | 次のいずれかの操作を実行します。
|
| ステップ 3 | [送信(Submit)] をクリックし、グローバル アカウント無効化ポリシーを設定します。 |
内部 ID ソースと外部 ID ソース
ID ソースには、Cisco ISE がユーザ認証時にクレデンシャルを検証するために使用するユーザ情報が含まれます。このユーザ情報は、ユーザに関連付けられたグループ情報およびその他の属性を取得して許可ポリシーで使用するためにも使用されます。これらは、レコード形式でユーザ情報を保存するデータベースです。ID ソースに対してユーザ情報の追加、編集、および削除を行うことができます。
Cisco ISE では内部 ID ソースと外部 ID ソースがサポートされます。どちらのソースも、スポンサーユーザ認証およびゲストユーザ認証の認証ソースとして使用できます。
内部 ID ソース
Cisco ISE には、ユーザ情報を保存するために使用できる内部ユーザ データベースがあります。内部ユーザ データベースのユーザは、内部ユーザと呼ばれます。Cisco ISE には、Cisco ISE に接続するすべてのデバイスおよびエンドポイントに関する情報を格納する内部エンドポイント データベースもあります。
外部 ID ソース
Cisco ISE では、ユーザ情報を含む外部 ID ソースを設定することができます。Cisco ISE は外部 ID ソースに接続して、認証用のユーザ情報を取得します。外部 ID ソースには、Cisco ISE サーバおよび証明書認証プロファイルの証明書情報も含まれます。Cisco ISE は外部 ID ソースとの通信に認証プロトコルを使用します。次の表に、認証プロトコルおよびサポートされる外部 ID ソースを示します。
内部ユーザのポリシーを設定する際は、次の点に注意してください。
-
内部 ID ストアに対して内部ユーザを認証するための認証ポリシーを設定します。
-
次のオプションを選択して、内部ユーザ グループの許可ポリシーを設定します。 Identitygroup.Name EQUALS User Identity Groups: Group_Name
|
外部 ID ソースの作成
Cisco ISE では、Active Directory、LDAP、RADIUS トークン、RSA SecurID サーバなどの外部 ID ソースに接続して、認証/許可のユーザ情報を取得できます。外部 ID ソースには、証明書ベースの認証に必要な証明書認証プロファイルも含まれています。
(注) | 認証済みユーザ ID を受信して共有できるようにするパッシブ ID サービスを使用するには、その他の パッシブ ID サービス プロバイダーを参照してください。 |
| ステップ 1 | を選択します。 |
| ステップ 2 | 次のオプションのいずれかを選択します。
|
外部 ID ストア パスワードに対する内部ユーザの認証
Cisco ISE では、外部 ID ストア パスワードに対して内部ユーザを認証できます。Cisco ISE では、[管理(Administration)] > [ID の管理(Identity Management)] > [ID(Identities)] > [ユーザ(Users)] ページから、内部ユーザのパスワード ID ストアを選択するオプションが提供されます。管理者は、Cisco ISE の外部 ID ソースのリストから ID ストアを選択することができ、[ユーザ(Users)] ページでユーザを追加するか、または編集します。内部ユーザのデフォルトのパスワード ID ストアは内部 ID ストアです。Cisco Secure ACS ユーザは、Cisco Secure ACS から Cisco ISE への移行中および移行後、同じパスワード ID ストアを維持します。Cisco ISE の旧バージョンから Cisco ISE 2.1 にアップグレードすると、Cisco ISE 2.1 では、すべての内部ユーザのデフォルトの ID ストアとして内部 ID ストアが設定されます。
Cisco ISE はパスワード タイプに対し次の外部 ID ストアをサポートします。
証明書認証プロファイル
プロファイルごとに、プリンシパル ユーザ名として使用する証明書フィールドと、証明書のバイナリ比較を行うかどうかを指定する必要があります。
証明書認証プロファイルの追加
Extensible Authentication Protocol-Transport Layer Security(EAP-TLS)証明書ベースの認証方式を使用する場合は、証明書認証プロファイルを作成する必要があります。従来のユーザ名とパスワードの方法で認証する代わりに、Cisco ISE はクライアントから受信した証明書をサーバ内の証明書と比較してユーザの信頼性を確認します。
| ステップ 1 | > を選択します。 |
| ステップ 2 | 証明書認証プロファイルの名前と説明(任意)を入力します。 |
| ステップ 3 | ドロップダウン リストから ID ストアを選択します。
基本証明書のチェックは ID ソースを必要としません。証明書にバイナリ比較チェックが必要な場合は、ID ソースを選択する必要があります。ID ソースとして Active Directory を選択した場合は、サブジェクト名、一般名、およびサブジェクト代替名(すべての値)を使用してユーザを検索できます。 |
| ステップ 4 | [証明書属性(Certificate Attribute)] または [証明書の任意のサブジェクトまたは代替名属性(Any Subject or Alternative Name Attributes in the Certificate)] から ID の使用を選択します。これは、ログで検索のために使用されます。
[証明書の任意のサブジェクトまたは代替名属性(Any Subject or Alternative Name Attributes in the Certificate)] を選択すると、Active Directory UPN がログ用のユーザ名として使用され、証明書のすべてのサブジェクト名および代替名がユーザの検索に試行されます。このオプションは、ID ソースとして Active Directory を選択した場合にのみ使用できます。 |
| ステップ 5 | クライアント証明書を ID ストアの証明書と照合する場合に選択します。この場合、ID ソース(LDAP または Active Directory)を選択する必要があります。[Active Directory] を選択した場合は、ID のあいまいさを解決するためにのみ証明書を照合することを選択できます。
|
| ステップ 6 | [送信(Submit)] をクリックして、証明書認証プロファイルを追加するか、変更を保存します。 |
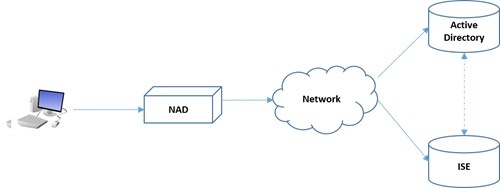
外部 ID ソースとしての Active Directory
Cisco ISE は、ユーザ、マシン、グループ、属性などのリソースにアクセスするために、Microsoft Active Directory を外部 ID ソースとして使用します。Active Directory でのユーザとマシンの認証では、Active Directory にリストされているユーザとデバイスに対してのみネットワーク アクセスを許可します。
| ISE コミュニティ リソース ISE Administrative Portal Access with AD Credentials Configuration Example |
- Active Directory でサポートされる認証プロトコルおよび機能
- 許可ポリシーで使用する Active Directory 属性およびグループの取得
- 証明書ベース認証の Active Directory 証明書の取得
- Active Directory ユーザ認証プロセス フロー
- Active Directory マルチドメイン フォレストのサポート
- Active Directory と Cisco ISE の統合の前提条件
- 外部 ID ソースとしての Active Directory の設定
- Active Directory の複数参加設定のサポート
- ID 書き換え
- ID 解決の設定
- Active Directory 認証のためのユーザのテスト
- Active Directory の設定の削除
- ノードの Active Directory の参加の表示
- Active Directory の問題の診断
- Active Directory デバッグ ログの有効化
- トラブルシューティング用の Active Directory ログ ファイルの入手
- Active Directory のアラームおよびレポート
- Active Directory の高度な調整
- Active Directory が構成された Cisco ISE をセットアップするための補足情報
Active Directory でサポートされる認証プロトコルおよび機能
Active Directory は、一部のプロトコルを使用したユーザとマシンの認証、Active Directory ユーザ パスワードの変更などの機能をサポートしています。次の表に、Active Directory でサポートされる認証プロトコルおよびそれぞれの機能を示します。
|
MS-CHAPv2 および EAP-GTC の内部方式で EAP-FAST と PEAP を使用するパスワード変更機能を備えたユーザとマシンの認証 |
|
|
ユーザおよびマシン認証 |
|
|
Microsoft Challenge Handshake Authentication Protocol Version 1(MS-CHAPv1) |
|
|
Microsoft Challenge Handshake Authentication Protocol version 2(MS-CHAPv2) |
|
|
Extensible Authentication Protocol-Generic Token Card(EAP-GTC) |
|
|
Extensible Authentication Protocol-Transport Layer Security(EAP-TLS) |
|
|
Extensible Authentication Protocol- Flexible Authentication via Secure Tunneling-Transport Layer Security(EAP-FAST-TLS) |
|
|
Protected Extensible Authentication Protocol-Transport Layer Security(PEAP-TLS) |
|
許可ポリシーで使用する Active Directory 属性およびグループの取得
Cisco ISE は、許可ポリシー ルールで使用するために Active Directory からユーザまたはマシンの属性およびグループを取得します。これらの属性は Cisco ISE ポリシーで使用され、ユーザまたはマシンの承認レベルを決定します。Cisco ISE は、認証が成功した後にユーザおよびマシンの Active Directory 属性を取得します。認証とは別に、許可のために属性を取得することもできます。
Cisco ISE は、外部 ID ストア内のグループを使用してユーザまたはコンピュータに権限を割り当てることがあります(たとえば、ユーザをスポンサー グループにマップします)。Active Directory のグループ メンバーシップの次の制限事項に注意してください。
-
ポリシー ルールの条件は、次のいずれかを参照します。ユーザまたはコンピュータのプライマリ グループ、ユーザまたはコンピュータが直接メンバーであるグループ、または間接的(ネストされた)グループ。
-
ユーザまたはコンピュータのアカウント ドメイン外のドメイン ローカル グループはサポートされません。
(注) | Active Directory 属性の値 msRadiusFramedIPAddress を IP アドレスとして使用できます。この IP アドレスは、許可プロファイルのネットワーク アクセス サーバ(NAS)に送信できます。msRADIUSFramedIPAddress 属性は IPv4 アドレスだけをサポートします。ユーザ認証では、ユーザに対し取得された msRadiusFramedIPAddress 属性値が IP アドレス形式に変換されます。 |
属性およびグループは、参加ポイントごとに取得され、管理されます。これらは許可ポリシーで使用されます(まず参加ポイントを選択し、次に属性を選択します)。許可範囲ごとに属性またはグループを定義することはできませんが、認証ポリシーに範囲を使用できます。認証ポリシーで範囲を使用する場合、ユーザは 1 つの参加ポイントで認証されますが、ユーザのアカウント ドメインへの信頼できるパスがある別の参加ポイント経由で属性またはグループを取得することができます。認証ドメインを使用して、1 つの範囲内にある 2 つの参加ポイントで認証ドメインが重複しないようにすることができます。
(注) | 使用可能な Active Directory グループの最大数については、Microsoft の制限を参照してください。 http://technet.microsoft.com/en-us/library/active-directory-maximum-limits-scalability(v=WS.10).aspx |
ルールに、/、!、@、\、#、$、%、^、&、*、(, )、_、+、または ~ のような特殊文字を使用した Active Directory グループ名が含まれる場合、許可ポリシーは失敗します。
ブール属性のサポート
Cisco ISE は、Active Directory および LDAP ID ストアからのブール属性の取得をサポートしています。
Active Directory または LDAP のディレクトリ属性を設定する際に、ブール属性を設定できます。これらの属性は、Active Directory または LDAP による認証時に取得されます。
ブール属性は、ポリシー ルール条件の設定に使用できます。
ブール属性値は、文字列型として Active Directory または LDAP サーバから取得されます。Cisco ISE は、次のブール属性値をサポートしています。
|
ブール属性 |
サポートされる値 |
|---|---|
|
はい(True) |
t、T、true、TRUE、True、1 |
|
いいえ(False) |
f、F、false、FALSE、False、0 |
(注) | 属性置換はブール属性ではサポートされません。 |
文字列型としてブール属性(たとえば、msTSAllowLogon)を設定すると、Active Directory または LDAP サーバの属性のブール値は Cisco ISE の文字列属性に設定されます。属性タイプをブール型に変更したり、ブール型として属性を手動で追加できます。
証明書ベース認証の Active Directory 証明書の取得
Cisco ISE では、EAP-TLS プロトコルを使用するユーザまたはマシン認証のための証明書取得がサポートされています。Active Directory 上のユーザまたはマシン レコードには、バイナリ データ型の証明書属性が含まれています。この証明書属性に 1 つ以上の証明書を含めることができます。Cisco ISE ではこの属性は userCertificate として識別され、この属性に対して他の名前を設定することはできません。Cisco ISE はこの証明書を取得し、バイナリ比較の実行に使用します。
証明書認証プロファイルは、証明書の取得に使用する Active Directory のユーザを検索するためにユーザ名を取得するフィールド(たとえば、サブジェクト代替名(SAN)または一般名)を決定します。Cisco ISE は、証明書を取得した後、この証明書とクライアント証明書とのバイナリ比較を実行します。複数の証明書が受信された場合、Cisco ISE は、いずれかが一致するかどうかをチェックするために証明書を比較します。一致が見つかった場合、ユーザまたはマシン認証に合格します。
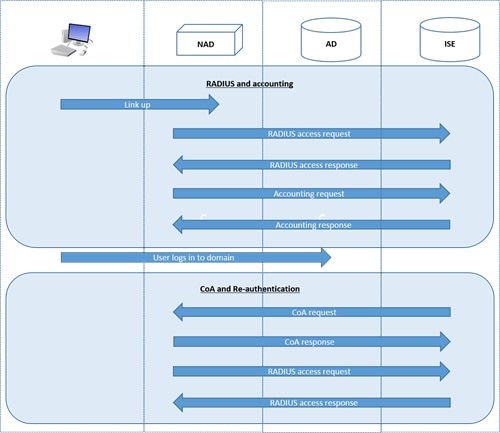
Active Directory ユーザ認証プロセス フロー
Active Directory マルチドメイン フォレストのサポート
Cisco ISE では、マルチドメイン フォレストの Active Directory がサポートされます。各フォレスト内で、Cisco ISE は単一のドメインに接続しますが、Cisco ISE が接続されているドメインと他のドメイン間に信頼関係が確立されている場合は、Active Directory フォレストの他のドメインからリソースにアクセスできます。
Active Directory サービスをサポートする Windows サーバ オペレーティング システムのリストについては、『Release Notes for Cisco Identity Services Engine』を参照してください。
(注) | Cisco ISE は、ネットワーク アドレス トランスレータの背後にあり、ネットワーク アドレス変換(NAT)アドレスを持つ Microsoft Active Directory サーバをサポートしません。 |
Active Directory と Cisco ISE の統合の前提条件
ここでは、Cisco ISE と統合する Active Directory を設定するために必要な手動での作業手順を説明します。ただしほとんどの場合、Cisco ISE が Active Directory を自動的に設定するようにできます。次に、Cisco ISE と Active Directory を統合するための前提条件を示します。
-
ISE でのスーパー管理者またはシステム管理者の権限があることを確認します。
-
Cisco ISE サーバと Active Directory 間の時間を同期するために Network Time Protocol(NTP)サーバ設定を使用します。Cisco ISE CLI で NTP を設定できます。
Cisco ISE は、双方向信頼がなく、相互の信頼がゼロである複数の Active Directory ドメインと接続できます。特定の参加ポイントから他のドメインを照会する場合は、参加ポイントと、アクセスする必要があるユーザ情報およびマシン情報があるその他のドメインの間に信頼関係が確立されていることを確認します。信頼関係が確立されていない場合は、信頼できないドメインへの別の参加ポイントを作成する必要があります。信頼関係の確立の詳細については、Microsoft Active Directory のドキュメントを参照してください。
-
Cisco ISE の参加先ドメインでは、少なくとも 1 つのグローバル カタログ サーバが動作し、Cisco ISE からアクセス可能である必要があります。
さまざまな操作の実行に必要な Active Directory アカウント権限
| 参加操作 | 脱退処理 | Cisco ISE マシン アカウント |
|---|---|---|
|
参加操作の実行に使用されるアカウントには、次のアクセス許可が必要です。
参加操作を実行するために、ドメイン管理者である必要はありません。 |
脱退操作の実行に使用するアカウントには、次の権限が必要です。 強制脱退(パスワードなしの脱退)を実行する場合、ドメインからマシン アカウントは削除されません。 |
Active Directory 接続との通信のために新規に作成された Cisco ISE マシン アカウントには、次の権限が必要です。
Active Directory でマシン アカウントを事前に作成できます。SAM の名前が Cisco ISE アプライアンスのホスト名と一致する場合は、参加操作中に検索して再利用する必要があります。 複数の参加操作を実行すると、参加ごとに複数のマシン アカウントが Cisco ISE 内で保持されます。 |
(注) | 参加操作または脱退操作に使用するクレデンシャルは Cisco ISE に保存されません。新規に作成された Cisco ISE マシン アカウントのクレデンシャルのみが保存されます。これによって、エンドポイント プローブも実行できるようになります。 |
通信用に開放するネットワーク ポート
|
プロトコル |
ポート(リモート ローカル) |
ターゲット(Target) |
認証 |
注記(Notes) |
|---|---|---|---|---|
|
DNS(TCP/UDP) |
49152 以上の乱数 |
DNS サーバ/AD ドメイン コントローラ |
なし |
— |
|
MSRPC |
445 |
ドメイン コントローラ |
あり |
— |
|
Kerberos(TCP/UDP) |
88 |
ドメイン コントローラ |
あり(Kerberos) |
MS AD/KDC |
|
LDAP(TCP/UDP) |
389 |
ドメイン コントローラ |
あり |
— |
|
LDAP(GC) |
3268 |
グローバル カタログ サーバ |
あり |
— |
|
NTP |
123 |
NTP サーバ/ドメイン コントローラ |
なし |
— |
|
IPC |
80 |
展開内の他の ISE ノード |
あり(RBAC クレデンシャルを使用) |
— |
DNS サーバ
DNS サーバを設定する場合は、次の処理を実行します。
-
権威 DNS サーバが推奨されます。Cisco ISE では再帰 DNS サーバはサポートされていません。DNS 再帰はパフォーマンスに重大な悪影響を及ぼす可能性があります。
-
すべての DNS サーバで、追加サイト情報の有無に関係なく、DC、GC、および KDC の SRV クエリに回答できるようにする必要があります。
-
パフォーマンスを向上するために、SRV 応答にサーバ IP アドレスを追加することを推奨します。
-
パブリック インターネットでクエリを実行する DNS サーバを使用しないでください。不明な名前を解決する必要がある場合に、遅延やネットワーク情報の漏洩を引き起こす可能性があります。
外部 ID ソースとしての Active Directory の設定
Easy Connect や PassiveID ワーク センター などの機能を設定する際に、Active Directory を外部 ID ソースとして設定します。これらの機能の詳細については、Easy ConnectとPassiveID ワーク センターを参照してください。
外部 ID ソースとして Active Directory を設定する前に、次のことを確認します。
-
Microsoft Active Directory サーバがネットワーク アドレス トランスレータの背後にないこと、およびネットワーク アドレス変換(NAT)アドレスを持たないこと。
-
参加操作用の Microsoft Active Directory アカウントが有効であり、[次回ログイン時にパスワードを変更(Change Password on Next Login)] を使用して設定されていないこと。
-
ISE のスーパー管理者またはシステム管理者の権限があること。
(注) | Cisco ISE が Active Directory に接続されているときに操作に関する問題がある場合は、 で AD コネクタ操作レポートを参照してください。 |
外部 ID ソースとして Active Directory を設定するには、次のタスクを実行する必要があります。
- Active Directory 参加ポイントの追加および参加ポイントへの Cisco ISE ノードの参加
- ドメイン コントローラの追加
- WMI の設定
- Active Directory ドメインの脱退
- 認証ドメインの設定
- Active Directory ユーザ グループの設定
- Active Directory ユーザとマシンの属性の設定
- パスワード変更、マシン認証、およびマシン アクセス制限の設定の変更
- マシン アクセス制限(MAR)キャッシュの維持
- カスタム スキーマの設定
Active Directory 参加ポイントの追加および参加ポイントへの Cisco ISE ノードの参加
Cisco ISE ノードが、NTP サーバ、DNS サーバ、ドメイン コントローラ、グローバル カタログ サーバが配置されているネットワークと通信できることを確認します。ドメイン診断ツールを実行して、これらのパラメータをチェックできます。
Active Directory と、パッシブ ID ワーク センターのエージェント、syslog、SPAN、およびエンドポイントの各プローブを使用するには、参加ポイントを作成する必要があります。
| ステップ 1 | を選択します。 | ||||
| ステップ 2 | プローブおよびプロバイダーとしての Active Directory | ||||
| ステップ 3 | [追加(Add)] をクリックして、Active Directory 参加ポイント名設定のドメイン名と ID ストア名を入力します。 | ||||
| ステップ 4 | [送信(Submit)] をクリックします。
新しく作成された参加ポイントをドメインに参加させるかどうかを確認するポップアップ ウィンドウが表示されます。すぐに参加させる場合は [はい(Yes)] をクリックします。 [いいえ(No)] をクリックした場合、設定を保存すると、Active Directory ドメインの設定が(プライマリおよびセカンダリのポリシー サービス ノードに)グローバルに保存されますが、いずれの Cisco ISE ノードもまだドメインに参加しません。 | ||||
| ステップ 5 | 作成した新しい Active Directory 参加ポイントの横にあるチェックボックスをオンにして [編集(Edit)] をクリックするか、または左側のナビゲーション ペインから新しい Active Directory 参加ポイントをクリックします。展開の参加/脱退テーブルに、すべての Cisco ISE ノード、ノードのロール、およびそのステータスが表示されます。 | ||||
| ステップ 6 | 関連する Cisco ISE ノードの横にあるチェックボックスをオンにし、[参加(Join)] をクリックして Active Directory ドメインに Cisco ISE ノードを参加させます。
設定を保存した場合も、これを明示的に実行する必要があります。1 回の操作で複数の Cisco ISE ノードをドメインに参加させるには、使用するアカウントのユーザ名とパスワードがすべての参加操作で同じである必要があります。各 Cisco ISE ノードを追加するために異なるユーザ名とパスワードが必要な場合は、Cisco ISE ノードごとに参加操作を個別に実行する必要があります。 | ||||
| ステップ 7 | 表示される [ドメインへの参加(Join Domain)] ダイアログボックスで Active Directory のユーザ名とパスワードを入力します。 [クレデンシャルの保存(Store Credentials)] を選択することを強く推奨します。これにより、管理者のユーザ名とパスワードが保存され、モニタ対象として設定されているすべてのドメイン コントローラ(DC)に使用されます。
参加操作に使用するユーザは、ドメイン自体に存在する必要があります。ユーザが異なるドメインまたはサブドメインに存在する場合、ユーザ名は jdoe@acme.com のように、UPN 表記で表記する必要があります。 | ||||
| ステップ 8 | (任意)
[組織ユニットの指定(Specify Organizational Unit)] チェックボックスをオンにします。
このチェックボックスは、Cisco ISE ノードのマシン アカウントを CN=Computers,DC=someDomain,DC=someTLD 以外の特定の組織ユニットに配置する場合に、オンにする必要があります。Cisco ISE は、指定された組織ユニットの下にマシン アカウントを作成するか、またはマシン アカウントがすでにある場合は、この場所に移動します。組織ユニットが指定されない場合、Cisco ISE はデフォルトの場所を使用します。値は完全識別名(DN)形式で指定する必要があります。構文は、Microsoft のガイドラインに準拠する必要があります。特別な予約文字(/'+,;=<> など)、改行、スペース、およびキャリッジ リターンは、バックスラッシュ(\)によってエスケープする必要があります。たとえば、OU=Cisco ISE\,US,OU=IT Servers,OU=Servers\ や Workstations,DC=someDomain,DC=someTLD のようにします。マシン アカウントがすでに作成されている場合、このチェックボックスをオンにする必要はありません。Active Directory ドメインに参加したマシン アカウントのロケーションを後で変更することもできます。 | ||||
| ステップ 9 | [OK] をクリックします。
Active Directory ドメインに参加する複数のノードを選択できます。 参加操作に失敗した場合、失敗メッセージが表示されます。各ノードの失敗メッセージをクリックして、そのノードの詳細なログを表示します。
|
次の作業
ドメイン コントローラの追加
| ステップ 1 | を選択し、左側のパネルから [Active Directory] を選択します。 | ||
| ステップ 2 | 作成した Active Directory 参加ポイントの隣にあるチェックボックスをオンにし、[編集(Edit)] をクリックします。展開の参加/脱退テーブルが、すべての Cisco ISE ノード、ノードのロール、およびそのステータスとともに表示されます。詳細については、表 2を参照してください。 | ||
| ステップ 3 |
| ||
| ステップ 4 | モニタ対象として参加ポイントに追加するドメイン コントローラの隣にあるチェックボックスをオンにし、[OK] をクリックします。 ドメイン コントローラが [PassiveID] タブの [ドメイン コントローラ(Domain Controllers)] リストに表示されます。 | ||
| ステップ 5 | ドメイン コントローラを設定します。
|
WMI の設定
| ステップ 1 | を選択します。 |
| ステップ 2 | 作成した Active Directory 参加ポイントの隣にあるチェックボックスをオンにし、[編集(Edit)] をクリックします。展開の参加/脱退テーブルが、すべての Cisco ISE ノード、ノードのロール、およびそのステータスとともに表示されます。詳細については、表 2を参照してください。 |
| ステップ 3 | [パッシブ ID(Passive ID)] タブに移動し、該当するドメイン コントローラの隣にあるチェックボックスをオンにし、[WMI の設定(Config WMI)] をクリックして、選択したドメイン コントローラが ISE により自動的に設定されるようにします。 Active Directory とドメイン コントローラを手動で設定する場合、または設定の問題のトラブルシューティングを行う場合は、Active Directory と Cisco ISE の統合の前提条件を参照してください。 |
Active Directory ドメインの脱退
この Active Directory ドメインまたはこの参加ポイントからユーザとマシンを認証する必要がない場合は、Active Directory ドメインを脱退できます。
コマンドライン インターフェイスから Cisco ISE アプリケーション設定をリセットする場合、またはバックアップやアップグレードの後に設定を復元する場合、脱退操作が実行され、Cisco ISE ノードがすでに参加している場合は、Active Directory ドメインから切断されます。ただし、Cisco ISE ノードのアカウントは、Active Directory ドメインから削除されません。脱退操作では Active Directory ドメインからノード アカウントも削除されるため、脱退操作は管理者ポータルから Active Directory クレデンシャルを使用して実行することを推奨します。これは、Cisco ISE ホスト名を変更する場合にも推奨されます。
Active Directory ドメインを脱退したが、認証の ID ソースとして(直接または ID ソース順序の一部として)Active Directory を使用している場合、認証が失敗する可能性があります。
| ステップ 1 | を選択します。 | ||
| ステップ 2 | 作成した Active Directory 参加ポイントの隣にあるチェックボックスをオンにし、[編集(Edit)] をクリックします。展開の参加/脱退テーブルが、すべての Cisco ISE ノード、ノードのロール、およびそのステータスとともに表示されます。 | ||
| ステップ 3 | Cisco ISE ノードの隣にあるチェックボックスをオンにして [脱退(Leave)] をクリックします。 | ||
| ステップ 4 | Active Directory のユーザ名とパスワードを入力し、[OK] をクリックしてドメインを脱退し、Cisco ISE データベースからマシン アカウントを削除します。
Active Directory クレデンシャルを入力すると、Cisco ISE ノードは Active Directory ドメインを脱退し、Active Directory データベースから Cisco ISE マシン アカウントが削除されます。
| ||
| ステップ 5 | Active Directory クレデンシャルがない場合は、[使用可能なクレデンシャルなし(No Credentials Available)] チェックボックスをオンにして、[OK] をクリックします。
[クレデンシャルなしでドメインを脱退(Leave domain without credentials)] チェックボックスをオンにすると、プライマリ Cisco ISE ノードが Active Directory ドメインから脱退します。参加時に Active Directory で作成されたマシン アカウントは、Active Directory 管理者が手動で削除する必要があります。 |
認証ドメインの設定
Cisco ISE が参加しているドメインは、信頼関係を持つ他のドメインに対して可視性があります。デフォルトでは、Cisco ISE はこれらすべての信頼ドメインに対する認証を許可するように設定されます。認証ドメインのサブセットに対して、Active Directory 展開との相互作用を制限できます。ドメイン認証を設定することにより、接続ポイントごとに特定のドメインを選択して、選択されたドメインに対してのみ認証が実行されるようにできます。認証ドメインでは、接続ポイントから信頼されたすべてのドメインではなく、選択されたドメインのユーザのみを認証するように Cisco ISE に指示するため、セキュリティが向上します。また、認証ドメインでは検索範囲(着信したユーザ名または ID に一致するアカウントの検索)が制限されるため、認証要求処理のパフォーマンスと遅延が改善されます。このことは、着信したユーザ名または ID にドメイン マークアップ(プレフィクスまたはサフィックス)が含まれていない場合に特に重要です。これらの理由から、認証ドメインを設定することをベスト プラクティスとして強く推奨します。
| ステップ 1 | を選択します。 |
| ステップ 2 | [認証ドメイン(Authentication Domains)] タブをクリックします。
表に、信頼ドメインのリストが表示されます。デフォルトでは、Cisco ISE はすべての信頼ドメインに対する認証を許可します。 |
| ステップ 3 | 指定したドメインのみを許可するには、[認証にすべての Active Directory ドメインを使用する(Use all Active Directory domains for authentication)] チェックボックスをオフにします。 |
| ステップ 4 | 認証を許可するドメインの隣にあるチェックボックスをオンにし、[選択対象の有効化(Enable Selected)] をクリックします。[認証(Authenticate)] カラムで、このドメインのステータスが [はい(Yes)] に変わります。
また、選択したドメインを無効にすることもできます。 |
| ステップ 5 | [使用できないドメインを表示(Show Unusable Domains)] をクリックして、使用できないドメインのリストを表示します。使用できないドメインは、単方向の信頼や選択的な認証などの理由により、Cisco ISE が認証に使用できないドメインです。 |
次の作業
Active Directory ユーザ グループを設定します。
Active Directory ユーザ グループの設定
Active Directory ユーザ グループを許可ポリシーで使用できるようにするため、Active Directory ユーザ グループを作成する必要があります。内部的には、Cisco ISE はグループ名のあいまいさの問題を解決し、グループ マッピングを向上させるためにセキュリティ ID(SID)を使用します。SID により、グループ割り当てが正確に一致します。
| ステップ 1 | を選択します。 | ||
| ステップ 2 | [グループ(Groups)] タブをクリックします。 | ||
| ステップ 3 | 次のいずれかを実行します。 ユーザ インターフェイス ログインのグループ名に二重引用符(")を使用しないでください。 | ||
| ステップ 4 | グループを手動で選択する場合は、フィルタを使用してグループを検索できます。たとえば、admin* をフィルタ基準として入力し、[グループの取得(Retrieve Groups)] をクリックすると、admin で始まるユーザ グループが表示されます。アスタリスク(*)ワイルドカード文字を入力して、結果をフィルタリングすることもできます。一度に取得できるのは 500 グループのみです。 | ||
| ステップ 5 | 許可ポリシーで使用可能にするグループの隣にあるチェックボックスをオンにし、[OK] をクリックします。 | ||
| ステップ 6 | グループを手動で追加する場合は、新しいグループの名前と SID を入力します。 | ||
| ステップ 7 | [OK] をクリックします。 | ||
| ステップ 8 | [保存(Save)] をクリックします。
|
次の作業
Active Directory ユーザとマシンの属性の設定
| ステップ 1 | > [Active Directory] を選択します。 | ||
| ステップ 2 | [属性(Attributes)] タブをクリックします。 | ||
| ステップ 3 | を選択して属性を手動で追加するか、 を選択してディレクトリから属性のリストを選択します。
Cisco ISE では、属性タイプ IP を手動で追加するときに、ユーザ認証に IPv4 または IPv6 アドレスを使用して AD を設定できます。 | ||
| ステップ 4 | ディレクトリからの属性の追加を選択した場合、ユーザの名前を [サンプル ユーザ(Sample User)] フィールドまたは [マシン アカウント(Machine Account)] フィールドに入力し、[属性の取得(Retrieve Attributes)] をクリックしてユーザの属性のリストを取得します。たとえば、管理者属性のリストを取得するには administrator を入力します。アスタリスク(*)ワイルドカード文字を入力して、結果をフィルタリングすることもできます。
| ||
| ステップ 5 | 選択する Active Directory の属性の隣にあるチェックボックスをオンにし、[OK] をクリックします。 | ||
| ステップ 6 | 属性を手動で追加する場合は、新しい属性の名前を入力します。 | ||
| ステップ 7 | [保存(Save)] をクリックします。 |
パスワード変更、マシン認証、およびマシン アクセス制限の設定の変更
Active Directory ドメインに Cisco ISE を参加させる必要があります。詳細については、Active Directory 参加ポイントの追加および参加ポイントへの Cisco ISE ノードの参加を参照してください。
| ステップ 1 | を選択します。 |
| ステップ 2 | 該当する Cisco ISE ノードの隣にあるチェックボックスをオンにして [編集(Edit)] をクリックします。 |
| ステップ 3 | [高度な設定(Advanced Settings)] タブをクリックします。 |
| ステップ 4 | 必要に応じて、パスワード変更、マシン認証、およびマシン アクセス制限(MAR)の設定を変更します。 これらのオプションはデフォルトで有効になっています。 |
| ステップ 5 | [ダイヤルイン チェックを有効にする(Enable dial-in check)] チェックボックスをオンにして、認証中またはクエリ中にユーザのダイヤルイン アクセス権をチェックします。ダイヤルイン アクセス権が拒否されている場合は、チェックの結果により認証拒否の原因になります。 |
| ステップ 6 | 認証中またはクエリ中にサーバからユーザにコールバックするようにするには、[ダイヤルイン クライアントのコールバック チェックを有効にする(Enable callback check for dial-in clients)] チェックボックスをオンにします。サーバによって使用される IP アドレスまたは電話番号は、発信者またはネットワーク管理者によって設定されます。チェックの結果は、RADIUS 応答でデバイスに返されます。 |
| ステップ 7 | プレーン テキスト認証に Kerberos を使用する場合は、[プレーン テキスト認証に Kerberos を使用(Use Kerberos for Plain Text Authentications)] チェックボックスをオンにします。デフォルトの推奨オプションは MS-RPC です。Kerberos は ISE 1.2 で使用されます。 |
マシン アクセス制限(MAR)キャッシュの維持
Cisco ISE アプリケーション サービスを手動で停止すると、Cisco ISE は MAR キャッシュ コンテンツ、calling-station-ID リスト、および対応するタイムスタンプを、ローカル ディスクのファイルに保存します。アプリケーション サービスを誤って再起動した場合、Cisco ISE はインスタンスの MAR キャッシュ エントリを保存しません。
Cisco ISE アプリケーション サービスが再起動した場合、Cisco ISE はキャッシュ エントリの存続時間に基づいて、ローカル ディスクのファイルから MAR キャッシュ エントリを読み取ります。再起動後に Cisco ISE インスタンスのアプリケーション サービスが起動すると、Cisco ISE はそのインスタンスの現在の時刻と MAR キャッシュ エントリの時刻を比較します。現在の時刻と MAR エントリの時刻の差が MAR キャッシュ エントリの存続時間よりも大きい場合は、Cisco ISE はディスクからそのエントリを取得しません。それ以外の場合、Cisco ISE は MAR キャッシュ エントリを取得し、その MAR キャッシュ エントリの存続時間を更新します。
カスタム スキーマの設定
Active Directory ドメインに Cisco ISE を参加させる必要があります。
| ステップ 1 | を選択します。 |
| ステップ 2 | 参加ポイントを選択します。 |
| ステップ 3 | [高度な設定(Advanced Settings)] タブをクリックします。 |
| ステップ 4 | [スキーマ(Schema)] セクションの [スキーマ(Schema)] ドロップダウン リストから [カスタム(Custom)] オプションを選択します。必要に応じて、ユーザ情報の属性を更新できます。これらの属性は、ユーザ情報(名、姓、電子メール、電話番号、地域など)の収集に使用されます。
事前設定された属性は、Active Directory スキーマ(組み込みのスキーマ)に使用されます。事前定義されたスキーマの属性を編集すると、Cisco ISE が自動的にカスタム スキーマを作成します。 |
Active Directory の複数参加設定のサポート
Cisco ISE では、Active Directory ドメインへの複数参加がサポートされます。Cisco ISE では、50 までの Active Directory 参加がサポートされます。Cisco ISE は、双方向信頼がなく、相互の信頼がゼロである複数の Active Directory ドメインと接続できます。Active Directory の複数ドメイン参加は、各参加の独自のグループ、属性、および許可ポリシーを持つ個別の Active Directory ドメインのセットで構成されます。
同じフォレストに複数回参加できます。つまり、必要に応じて、同じフォレスト内の複数のドメインに参加できます。
Cisco ISE は、単方向の信頼があるドメインに参加できます。このオプションで、単方向の信頼によって生じる権限の問題を回避できます。いずれかの信頼ドメインに参加できるため、両方のドメインを確認できます。
-
参加ポイント:Cisco ISE では、Active Directory ドメインへの個別参加は、参加ポイントと呼ばれます。Active Directory の参加ポイントは、Cisco ISE の ID ストアであり、認証ポリシーで使用できます。属性およびグループの関連ディクショナリがあり、許可条件で使用できます。
-
スコープ:グループ化された Active Directory の参加ポイントのサブセットは、スコープと呼ばれます。単一参加ポイントの代わりに、認証結果として認証ポリシーでスコープを使用できます。スコープは、複数の参加ポイントに対してユーザを認証するために使用されます。各参加ポイントに複数のルールを使用する代わりにスコープを使用すると、単一のルールで同じポリシーを作成することができ、Cisco ISE で要求の処理やパフォーマンスの向上にかかる時間を短縮できます。参加ポイントには、複数のスコープが含まれる場合があります。スコープは、ID ソース順序に含まれる場合があります。スコープには関連するディクショナリがないため、許可ポリシー条件にスコープを使用することはできません。
新しい Cisco ISE のインストールを実行する場合、デフォルトでスコープは存在しません。これは、ノー スコープ モードと呼ばれます。スコープを追加すると、Cisco ISE はマルチスコープ モードになります。必要に応じて、ノー スコープ モードに戻すことができます。すべての参加ポイントは [Active Directory] フォルダに移動されます。 -
Initial_Scope は、ノー スコープ モードで追加された Active Directory 参加ポイントの格納に使用される暗黙のスコープです。マルチスコープ モードを有効にすると、すべての Active Directory 参加ポイントが自動作成された Initial_Scope に移動します。Initial_Scope の名前を変更できます。
-
All_AD_Instances は組み込み型の疑似スコープで、Active Directory 設定には表示されません。これは、認証結果としてポリシーおよび ID 順序にのみ示されます。Cisco ISE で設定されたすべての Active Directory 参加ポイントを選択する場合は、このスコープを選択できます。
-
Active Directory 参加ポイントを追加する新しい範囲の作成
ID 書き換え
ID 書き換えは、外部 Active Directory システムに渡される前に ID を操作するよう Cisco ISE に指示する拡張機能です。ID を必要な形式(任意のドメイン プレフィクスやサフィックスまたはその他の追加マークアップを含むまたは除く)に変更するためのルールを作成できます。
ID 書き換えルールは、サブジェクト検索、認証クエリー、許可クエリーなどの操作のために、クライアントから受信したユーザ名またはホスト名に対して Active Directory に渡される前に適用されます。Cisco ISE は条件のトークンを照合し、最初の 1 つが一致するとポリシーの処理を停止して、結果に応じて ID 文字列を書き換えます。
書き換え時、角カッコ [ ] で囲まれている([IDENTITY] など)内容はすべて、評価側では評価されず、代わりに文字列内のその場所に一致する文字列が付加される変数です。角カッコなしはすべて、ルールの評価側と書き換え側の両方で、固定文字列として評価されます。
次に、ユーザによって入力された ID が ACME\jdoe であるとした場合の ID 書き換えの例を示します。
-
ID が ACME\[IDENTITY] と一致する場合、[IDENTITY] に書き換えます。
結果は jdoe です。このルールは、ACME プレフィクスを持つすべてのユーザ名を削除するよう Cisco ISE に指示します。
-
ID が ACME\[IDENTITY] と一致する場合、[IDENTITY]@ACME.com に書き換えます。
結果は jdoe@ACME.com です。このルールは、形式をプレフィクス表記からサフィックス表記に、または NetBIOS 形式から UPN 形式に変更するよう Cisco ISE に指示します。
-
ID が ACME\[IDENTITY] と一致する場合、ACME2\[IDENTITY] に書き換えます。
結果は ACME2\jdoe です。このルールは、特定のプレフィクスを持つすべてのユーザ名を代替プレフィクスに変更するよう Cisco ISE に指示します。
-
ID が [ACME]\jdoe.USA と一致する場合、[IDENTITY]@[ACME].com に書き換えます。
結果は jdoe\ACME.com です。このルールは、ドットの後の領域を削除するよう Cisco ISE に指示します。この場合は国名で、正しいドメインに置き換えられます。
-
ID が E=[IDENTITY] と一致する場合、[IDENTITY] に書き換えます。
結果は jdoe です。これは、ID が証明書から取得され、フィールドが電子メール アドレスで、Active Directory がサブジェクトで検索するように設定されている場合に作成可能なルールの例です。このルールは、「E=」を削除するように Cisco ISE に指示します。
-
ID が E=[EMAIL],[DN] と一致する場合、[DN] に書き換えます。
このルールは、証明書サブジェクトを、E= jdoe@acme.com、CN=jdoe、DC=acme、DC=com から単なる DN、CN=jdoe、DC=acme、DC=com に変換します。これは、ID が証明書サブジェクトから取得され、Active Directory が DN でユーザ検索するように設定されている場合に作成可能なルールの例です。このルールは、電子メール プレフィクスを削除し、DN を生成するよう Cisco ISE に指示します。
次に、ID 書き換えルールを記述する際によくある間違いを示します。
-
ID が [DOMAIN]\[IDENTITY] と一致する場合、[IDENTITY]@DOMAIN.com に書き換えます。
結果は jdoe@DOMAIN.com です。このルールは、ルールの書き換え側の角カッコ [ ] に [DOMAIN] がありません。
-
ID が DOMAIN\[IDENTITY] と一致する場合、[IDENTITY]@[DOMAIN].com に書き換えます。
この場合も、結果は jdoe@DOMAIN.com です。このルールは、ルールの評価側の角カッコ [ ] に [DOMAIN] がありません。
ID 書き換えルールは、常に、Active Directory 参加ポイントのコンテキスト内で適用されます。認証ポリシーの結果としてスコープが選択されている場合でも、書き換えルールは、各 Active Directory 参加ポイントに適用されます。EAP-TLS が使用されている場合、これらの書き換えルールは、証明書から取得される ID にも適用されます。
ID 書き換えの有効化
(注) | この設定タスクは任意です。あいまいな識別エラーなどのさまざまな理由で発生する認証失敗を減らすために実行できます。 |
Active Directory ドメインに Cisco ISE を参加させる必要があります。
| ステップ 1 | を選択します。 |
| ステップ 2 | [高度な設定(Advanced Settings)] タブをクリックします。 |
| ステップ 3 | [ID 書き換え(Identity Rewrite)] セクションで、ユーザ名を変更する書き換えルールを適用するかどうかを選択します。 |
| ステップ 4 | 一致条件および書き換え結果を入力します。表示されるデフォルト ルールを削除し、要件に応じてルールを入力できます。Cisco ISE は順番にポリシーを処理し、要求ユーザ名に一致する最初の条件が適用されます。一致トークン(角カッコ内に含まれるテキスト)を使用して、元のユーザ名の要素を結果に転送できます。いずれのルールにも一致しない場合、識別名は変更されません。[テスト開始(Launch Test)] ボタンをクリックして、書き換え処理をプレビューできます。 |
ID 解決の設定
一部のタイプの ID には、プレフィクスまたはサフィックスのようなドメイン マークアップが含まれます。たとえば、ACME\jdoe などの NetBIOS ID では、「ACME」がドメイン マークアップのプレフィクスで、同様に jdoe@acme.com などの UPN ID では、「acme.com」がドメイン マークアップのサフィックスです。ドメイン プレフィクスは、組織内の Active Directory ドメインの NetBIOS(NTLM)名に一致し、ドメイン サフィックスは、組織内の Active Directory ドメインの DNS 名または代替 UPN サフィックスに一致する必要があります。たとえば、gmail.com は Active Directory ドメインの DNS 名ではないため、jdoe@gmail.com はドメイン マークアップなしとして処理されます。
ID 解決設定では、Active Directory 展開に一致するように、セキュリティおよびパフォーマンスのバランスを調整する重要な設定を指定できます。これらの設定を使用して、ドメイン マークアップのないユーザ名およびホスト名の認証を調整できます。Cisco ISE でユーザのドメインを認識できない場合、すべての認証ドメインでユーザを検索するように設定できます。ユーザが 1 つのドメインで見つかった場合でも、Cisco ISE は ID のあいまいさがないことを確実にするために、すべての応答を待ちます。この処理は、ドメインの数、ネットワークの遅延、負荷などに応じて、時間がかかる場合があります。
ID 解決問題の回避
認証時に、ユーザおよびホストに完全修飾名(つまり、ドメイン マークアップが含まれている名前)を使用することを強く推奨します。たとえば、ユーザの UPN と NetBIOS 名、およびホストの FQDN SPN です。これは、複数の Active Directory アカウントが受信ユーザ名と一致する(たとえば、jdoe が jdoe@emea.acme.com および jdoe@amer.acme.com と一致する)など、あいまいエラーが頻繁に生じる場合に特に重要です。場合によっては、完全修飾名を使用することが、問題を解決する唯一の方法になります。また、ユーザに一意のパスワードが設定されていることを保証するだけで十分な場合もあります。したがって、一意の ID を最初から使用すると、効率が向上し、パスワード ロックアウトの問題が減少します。
ID 解決の設定
(注) | この設定タスクは任意です。あいまいな識別エラーなどのさまざまな理由で発生する認証失敗を減らすために実行できます。 |
Active Directory ドメインに Cisco ISE を参加させる必要があります。
| ステップ 1 | を選択します。 |
| ステップ 2 | [高度な設定(Advanced Settings)] タブをクリックします。 |
| ステップ 3 | [ID解決(Identity Resolution)] セクションで、ユーザ名またはマシン名の ID 解決についての次の設定を定義します。この設定によって、ユーザの検索と認証を詳細に制御できます。
最初に、マークアップなしの ID に対する設定を行います。このような場合、次のオプションのいずれかを選択できます。
Cisco ISE で認証ドメインがどのように設定されているかに基づいて選択します。特定の認証ドメインのみを選択した場合は、それらのドメインのみが検索されます(「結合されたフォレスト」と「すべてのフォレスト」のいずれを選択した場合も)。 2 番目の設定は、Cisco ISE が、[認証ドメイン(Authentication Domains)] セクションで指定された設定に準拠するために必要となるすべてのグローバル カタログ(GC)と通信できない場合に使用します。このような場合、次のオプションのいずれかを選択できます。 |
Active Directory 認証のためのユーザのテスト
Active Directory からユーザ認証を検証するには、[ユーザのテスト(Test User)] ツールを使用できます。グループおよび属性を取得して調査することもできます。単一の参加ポイントまたは範囲のテストを実行できます。
| ステップ 1 | を選択します。 |
| ステップ 2 | 次のいずれかのオプションを選択します。 |
| ステップ 3 | Active Directory のユーザ(またはホスト)のユーザ名とパスワードを入力します。 |
| ステップ 4 | 認証タイプを選択します。ステップ 3 のパスワード入力は、ルックアップ オプションを選択する場合には必要ありません。 |
| ステップ 5 | すべての参加ポイントに対してこのテストを実行する場合は、このテストを実行する Cisco ISE ノードを選択します。 |
| ステップ 6 | Active Directory からグループおよび属性を取得するには、[グループを取得(Retrieve Groups)] および [属性の取得(Retrieve Attributes)] チェック ボックスにチェックを付けます。 |
| ステップ 7 | [テスト(Test)] をクリックします。 テスト操作の結果と手順が表示されます。手順で失敗の原因を特定し、トラブルシューティングできます。 また、Active Directory がそれぞれの処理手順(認証、参照、グループおよび属性の取得)を実行するのに要する時間(ミリ秒単位)を表示することもできます。操作にかかる時間がしきい値を超えると、Cisco ISE に警告メッセージが表示されます。 |
Active Directory の設定の削除
Active Directory を外部 ID ソースとして使用しない場合は、Active Directory の設定を削除する必要があります。別の Active Directory ドメインに参加する場合は、設定を削除しないでください。現在参加しているドメインから脱退し、新しいドメインに参加できます。
ノードの Active Directory の参加の表示
特定の Cisco ISE ノードのすべての Active Directory 参加ポイントのステータスまたはすべての Cisco ISE ノードのすべての参加ポイントのリストを表示するには、[Active Directory] ページの [ノード ビュー(Node View)] ボタンを使用できます。
| ステップ 1 | を選択します。 |
| ステップ 2 | [ノード ビュー(Node View)] をクリックします。 |
| ステップ 3 | [ISE Node(ISE ノード)] ドロップダウン リストからノードを選択します。 テーブルに、Active Directory のステータスがノード別に一覧されます。展開に複数の参加ポイントと複数の Cisco ISE ノードがある場合、このテーブルが更新されるまでに数分かかる場合があります。 |
| ステップ 4 | その Active Directory 参加ポイントのページに移動し、その他の特定のアクションを実行するには、参加ポイントの [名前(Name)] リンクをクリックします。 |
| ステップ 5 | [診断ツール(Diagnostic Tools)] ページに移動して特定の問題のトラブルシューティングを行うには、[診断概要(Diagnostic Summary)] 列のリンクをクリックします。診断ツールでは、ノードごとに各参加ポイントの最新の診断結果が表示されます。 |
Active Directory の問題の診断
診断ツールは、各 Cisco ISE ノードで実行されるサービスです。診断ツールを使用して、Active Directory 展開を自動的にテストおよび診断したり、Cisco ISE によって Active Directory が使用される場合に機能やパフォーマンスの障害の原因となる可能性がある問題を検出するための一連のテストを実行したりすることができます。
Cisco ISE が Active Directory に参加できない、または Active Directory に対して認証できない理由は、複数あります。このツールは、Cisco ISE を Active Directory に接続するための前提条件が正しく設定されていることを確認するのに役立ちます。また、ネットワーク、ファイアウォール設定、クロック同期、ユーザ認証などの問題の検出に役立ちます。このツールは、手順をステップごとに説明したガイドとして機能し、必要に応じて、中間の各レイヤの問題の修正を支援します。
| ステップ 1 | を選択します。 |
| ステップ 2 | [拡張ツール(Advanced Tools)] ドロップダウン リストをクリックし、[診断ツール(Diagnostic Tools)] を選択します。 |
| ステップ 3 | 診断を実行する Cisco ISE ノードを選択します。
Cisco ISE ノードを選択しない場合は、すべてのノードでテストが実行されます。 |
| ステップ 4 | 特定の Active Directory 参加ポイントを選択します。
Active Directory 参加ポイントを選択しない場合は、すべての参加ポイントでテストが実行されます。 |
| ステップ 5 | [ノードに対するすべてのテストを実行(Run All Tests on Node)] をクリックして、テストを開始します。 |
| ステップ 6 | 警告ステータスまたは失敗ステータスのテストの詳細を確認するには、[テストの詳細の表示(View Test Details)] をクリックします。 このテーブルを使用して、特定のテストの再実行、実行中のテストの停止、特定のテストのレポートの表示を行うことができます。 |
Active Directory デバッグ ログの有効化
Active Directory デバッグ ログはデフォルトでは記録されません。展開でポリシー サービス ペルソナを担当する Cisco ISE ノードでこのオプションを有効にする必要があります。Active Directory のデバッグ ログを有効にすると、ISE のパフォーマンスに影響する場合があります。
| ステップ 1 | を選択します。 |
| ステップ 2 | Active Directory のデバッグ情報を取得する Cisco ISE ポリシー サービス ノードの隣のオプション ボタンをクリックし、[編集(Edit)] をクリックします。 |
| ステップ 3 | [Active Directory] オプション ボタンをクリックし、[編集(Edit)] をクリックします。 |
| ステップ 4 | [Active Directory] の隣にあるドロップダウン リストから [DEBUG] を選択します。これにはエラー、警告、および verbose ログが含まれます。完全なログを取得するには、[TRACE] を選択します。 |
| ステップ 5 | [保存(Save)] をクリックします。 |
トラブルシューティング用の Active Directory ログ ファイルの入手
可能性がある問題をトラブルシューティングするには、Active Directory のデバッグ ログをダウンロードし、表示します。
Active Directory のデバッグ ロギングを有効にする必要があります。
Active Directory のアラームおよびレポート
アラーム
Cisco ISE は、Active Directory に関連するアクティビティをモニタリングし、トラブルシューティングを実行するためのさまざまなアラームおよびレポートを提供します。
-
構成済みネーム サーバが使用不可(Configured nameserver not available)
-
参加しているドメインが使用不可(Joined domain is unavailable)
-
認証ドメインが使用不可(Authentication domain is unavailable)
-
Active Directory フォレストが使用不可(Active Directory forest is unavailable)
-
AD コネクタを再起動する必要があります(AD Connector had to be restarted)
-
AD:ISE アカウント パスワードの更新に失敗(AD: ISE account password update failed)
-
AD:マシン TGT のリフレッシュに失敗(AD: Machine TGT refresh failed)
レポート
Active Directory の高度な調整
高度な調整機能により、シスコのサポート担当者の管理下で、サポート操作に使用されるノード固有の設定が可能となり、システムのさらに深いレベルでパラメータを調整できるようになります。これらの設定は、通常の管理フローを対象としていません。ガイダンスに従って使用する必要があります。
Active Directory が構成された Cisco ISE をセットアップするための補足情報
Active Directory が構成された Cisco ISE を設定するには、グループ ポリシーを設定し、マシン認証のサプリカントを設定する必要があります。
- Active Directory のグループ ポリシーの設定
- Active Directory に対する EAP-TLS マシン認証のための Odyssey 5.X サプリカントの設定
- マシン認証のための AnyConnect エージェント
Active Directory のグループ ポリシーの設定
グループ ポリシー管理エディタにアクセスする方法の詳細については、Microsoft Active Directory のマニュアルを参照してください。
| ステップ 1 | 次の図に示すように、グループ ポリシー管理エディタを開きます。
 |
| ステップ 2 | 新しいポリシーを作成し、その説明的な名前を入力するか、既存のドメイン ポリシーに追加します。 例:次の例では、ポリシー名に Wired Autoconfiguration を使用しています。 |
| ステップ 3 | 次の図に示すように、[このポリシー設定を定義する(Define this policy setting)] チェックボックスをオンにして、サービス起動モードの [自動(Automatic)] オプション ボタンをクリックします。
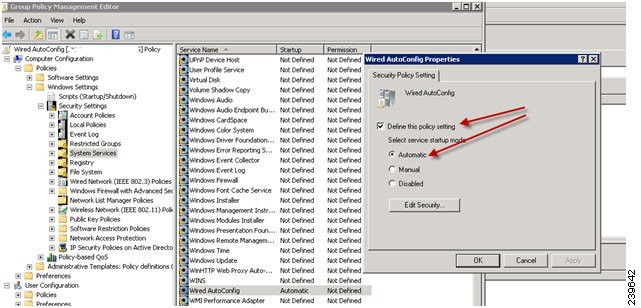 |
| ステップ 4 | 目的の組織ユニットまたはドメイン Active Directory レベルでポリシーを適用します。
コンピュータは再起動したときにポリシーを受信し、このサービスが有効になります。 |
Active Directory に対する EAP-TLS マシン認証のための Odyssey 5.X サプリカントの設定
Active Directory に対する EAP-TLS マシン認証に Odyssey 5.x サプリカントを使用している場合は、サプリカントで次の設定を行う必要があります。
マシン認証のための AnyConnect エージェント
Active Directory でEasy Connect および パッシブ ID サービスをサポートするための要件
Easy Connect および パッシブ ID サービス では、Active Directory ドメイン コントローラによって生成される Active Directory ログイン監査イベントを利用して、ユーザ ログイン情報を収集します。ISE ユーザが接続を行い、ユーザ ログイン情報を取得することができるように、Active Directory サーバを適切に設定する必要があります。ここでは、Easy Connect および パッシブ ID サービス をサポートするように Active Directory ドメイン コントローラを設定する方法(Active Directory 側からの設定)について説明します。
Easy Connect および パッシブ ID サービス の使用をサポートするように Active Directory ドメイン コントローラを設定するには(Active Directory 側からの設定)、次の手順に従います。
-
ISE から Active Directory の参加ポイントとドメイン コントローラを設定します。Active Directory 参加ポイントの追加および参加ポイントへの Cisco ISE ノードの参加およびドメイン コントローラの追加を参照してください。
-
ドメイン コントローラごとに WMI を設定します。WMI の設定を参照してください。
-
Active Directory で次の操作を実行します。
-
(オプション)Active Directory で ISE により実行された自動設定のトラブルシューティングを行うには、次の操作を実行します。
- パッシブ ID サービス の Active Directory の設定
- Windows 監査ポリシーの設定
- AD ユーザがドメイン管理グループに属しているときの権限の設定
- AD ユーザがドメイン管理グループの一部ではない場合に必要な権限
- ドメイン コントローラで DCOM を使用するための権限
- WMI ルート/CIMv2 名前空間にアクセスするための権限の設定
- AD ドメイン コントローラのセキュリティ イベント ログへのアクセス権の付与
パッシブ ID サービス の Active Directory の設定
ISE Easy Connect および パッシブ ID サービス では、ユーザ ログイン情報を取集するため、Active Directory ドメイン コントローラにより生成される Active Directory ログイン監査イベントが使用されます。ISE は Active Directory に接続し、ユーザ ログイン情報を取得します。
次の手順は、Active Directory ドメイン コントローラから実行する必要があります。
| ステップ 1 | 該当する Microsoft のパッチが Active Directory ドメイン コントローラにインストールされていることを確認します。 | |||||||||||||||||||||
| ステップ 2 | Active Directory がユーザ ログイン イベントを Windows セキュリティ ログに記録するのを確認します。
「監査ポリシー」(「グループ ポリシーの管理」設定の一部)が、正常なログインによって、Windows セキュリティ ログに必要なイベントが生成されるように設定されていることを確認します(これはデフォルトの Windows 設定ですが、この設定が適切であることを明示的に確認する必要があります)。「Windows 監査ポリシーの設定」を参照してください。 | |||||||||||||||||||||
| ステップ 3 | ISE が Active Directory に接続するための十分な権限を持つ Active Directory ユーザを設定する必要があります。次の手順では、管理ドメイン グループのユーザ、または管理ドメイン グループではないユーザに対して権限を定義する方法を示します。 | |||||||||||||||||||||
| ステップ 4 | ISE によって使用される Active Directory ユーザは、NT Lan Manager(NTLM)v1 または v2 のいずれかによって認証を受けることができます。ISE と Active Directory ドメイン コントローラ間の正常な認証済み接続を確実に行うために、Active Directory NTLM の設定が ISE NTLM の設定と合っていることを確認する必要があります。次の表に、すべての Microsoft NTLM オプションと、サポート対象の ISE NTLM アクションを示します。ISE が NTLMv2 に設定される場合、記載されている 6 つのオプションがすべてサポートされます。NTLMv1 をサポートするように ISE が設定されている場合、最初の 5 つのオプションだけがサポートされます。
 | |||||||||||||||||||||
| ステップ 5 | Active Directory ドメイン コントローラで dllhost.exe へのトラフィックを許可するファイアウォール ルールを作成していることを確認します。
ファイアウォールをオフにするか、または次のポートへの特定の IP(ISE IP アドレス)のアクセスを許可することができます。
数値の大きいポートは動的に割り当てられ、手動で設定できます。ターゲットとして %SystemRoot%\System32\dllhost.exe を追加することを推奨します。このプログラムは、ポートを動的に管理します。 すべてのファイアウォール ルールを、特定の IP アドレス(ISE IP)に割り当てることができます。 |
Windows 監査ポリシーの設定
監査ポリシー(グループ ポリシー管理設定の一部)が正常なログインを許可していることを確認します。これには、AD ドメイン コントローラ マシンの Windows セキュリティ ログに必要なイベントを生成する必要があります。これはデフォルトの Windows 設定ですが、この設定が正しいことを確認する必要があります。
| ステップ 1 | を選択します。 |
| ステップ 2 | [Domains] で関連するドメインに移動し、ナビゲーション ツリーを展開します。 |
| ステップ 3 | [Default Domain Controller Policy] を選択し、右クリックして、[編集] を選択します。
グループ ポリシー管理エディターが表示されます。 |
| ステップ 4 | の順に選択します。
|
| ステップ 5 | [監査ポリシー] の項目設定が変更されている場合は、gpupdate /force を実行して新しい設定を強制的に有効にする必要があります。 |
AD ユーザがドメイン管理グループに属しているときの権限の設定
Windows 2008 R2、Windows 2012 および Windows 2012 R2 の場合、ドメイン管理グループは、デフォルトで Windows オペレーティング システムの特定のレジストリ キーを完全に制御することができません。Active Directory の管理者は、Active Directory ユーザに次のレジストリ キーに対する完全制御権限を提供する必要があります。
-
HKEY_CLASSES_ROOT\CLSID\{76A64158-CB41-11D1-8B02-00600806D9B6}
-
HKLM\Software\Classes\Wow6432Node\CLSID\{76A64158-CB41-11D1-8B02-00600806D9B6}
次の Active Directory のバージョンでは、レジストリ変更は必要ありません。
完全な制御を許可するには、次に示すように、まず Active Directory 管理者がキーの所有権を取得する必要があります。
AD ユーザがドメイン管理グループの一部ではない場合に必要な権限
Windows 2012 R2 の場合は、Active Directory ユーザに次のレジストリ キーに対する完全制御権限を提供します。
-
HKEY_CLASSES_ROOT\CLSID\{76A64158-CB41-11D1-8B02-00600806D9B6}
-
HKLM\Software\Classes\Wow6432Node\CLSID\{76A64158-CB41-11D1-8B02-00600806D9B6}
Active Directory ユーザがドメイン管理グループの一部ではなく、ドメイン ユーザ グループの一部である場合は、次の権限も必要です。
-
ISE がドメイン コントローラに接続できるようにするレジストリ キーを追加します(下記を参照)
- ドメイン コントローラで DCOM を使用するための権限
- WMI ルート/CIMv2 名前空間にアクセスするための権限の設定
これらの権限は、次の Active Directory のバージョンでのみ必要となります。
ISE がドメイン コントローラに接続できるようにするレジストリ キーを追加する
ISE がドメイン ユーザとして接続し、ログイン認証イベントを取得できるようにするには、ドメイン コントローラに一部のレジストリ キーを手動で追加する必要があります。エージェントはドメイン コントローラまたはドメイン内のマシンでは必要ありません。
次のレジストリのスクリプトは追加するキーを示しています。これをコピーしてテキスト ファイルに貼り付け、.reg の拡張子でファイルを保存し、ファイルをダブルクリックすることでレジストリの変更を行うことができます。レジストリ キーを追加するには、ルート キーのオーナーである必要があります。
Windows Registry Editor Version 5.00

[HKEY_CLASSES_ROOT\CLSID\{76A64158-CB41-11D1-8B02-00600806D9B6}]
"AppID"="{76A64158-CB41-11D1-8B02-00600806D9B6}"

[HKEY_CLASSES_ROOT\AppID\{76A64158-CB41-11D1-8B02-00600806D9B6}]
"DllSurrogate"="  "

[HKEY_CLASSES_ROOT\Wow6432Node\AppID\{76A64158-CB41-11D1-8B02-00600806D9B6}]
"DllSurrogate"="  "
キー DllSurrogate の値には、2 つのスペースが含まれていることを確認します。
上記のスクリプトに示すように、ファイルの末尾の空の行を含む、空の行を保持してください。
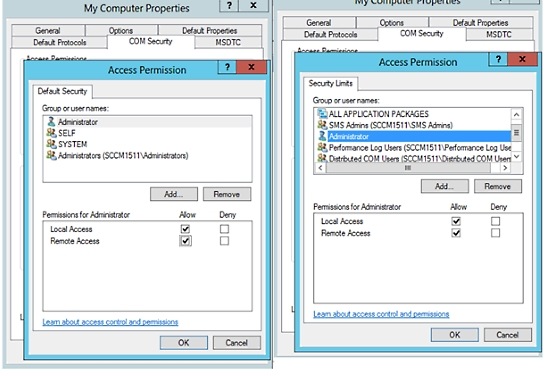
ドメイン コントローラで DCOM を使用するための権限
ISE パッシブ ID サービスに使用される Active Directory ユーザは、ドメイン コントローラで DCOM(リモート COM)を使用する権限がなければなりません。dcomcnfg コマンド ライン ツールを使用して権限を設定できます。
| ステップ 1 | コマンド ラインから dcomcnfg ツールを実行します。 |
| ステップ 2 | [コンポーネントサービス(Component Services)] を展開します。 |
| ステップ 3 | を展開します。 |
| ステップ 4 | メニュー バーで [アクション(Action)] を選択して、[プロパティ(properties)] をクリックし、[COMセキュリティ(COM Security)] をクリックします。 |
| ステップ 5 | アクセスおよび起動の両方に対して ISE が使用するアカウントに許可権限があることを確認します。Active Directory ユーザは、4 つのオプション([アクセス権限(Access Permissions)] および [起動およびアクティベーションの権限(Launch and Activation Permissions)] の両方に対する [制限の編集(Edit Limits)] と [デフォルトの編集(Edit Default)])のすべてに追加される必要があります。 |
| ステップ 6 | [アクセス権限(Access Permissions)] および [起動およびアクティベーションの権限(Launch and Activation Permissions)] の両方に対してローカルおよびリモート アクセスをすべて許可します。
 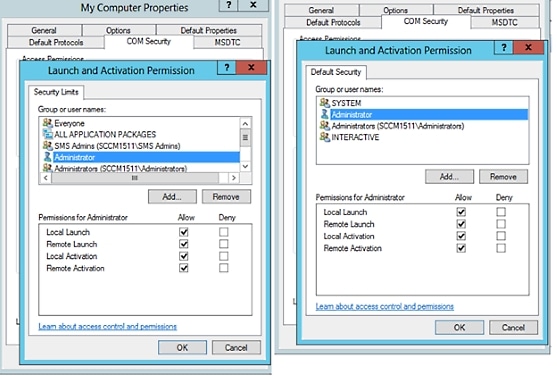 |
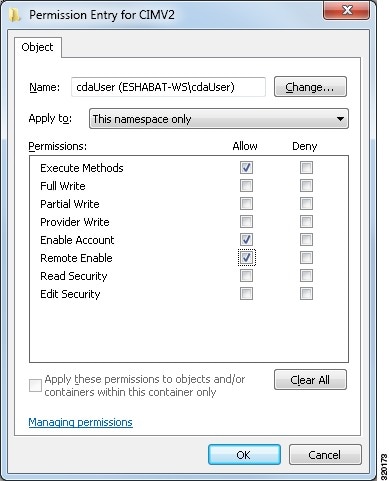
WMI ルート/CIMv2 名前空間にアクセスするための権限の設定
デフォルトでは、Active Directory ユーザには実行メソッドおよびリモート イネーブルのための権限がありません。wmimgmt.msc MMC コンソールを使用してアクセス権を付与できます。
AD ドメイン コントローラのセキュリティ イベント ログへのアクセス権の付与
Windows 2008 以降では、ISE ID マッピング ユーザを Event Log Reader と呼ばれるグループに追加することで、AD ドメイン コントローラのログへのアクセス権を付与できます。
Windows のすべての旧バージョンでは、次に示すようにレジストリ キーを編集する必要があります。
| ステップ 1 | セキュリティ イベント ログへのアクセス権を委任するには、アカウントの SID を検索します。 |
| ステップ 2 | すべての SID アカウントを表示するには、次の図に示すように、コマンド ラインから次のコマンドを使用します。
wmic useraccount get name,sid 特定のユーザ名とドメインに対して、次のコマンドを使用することもできます。 wmic useraccount where name=“iseUser” get domain,name,sid 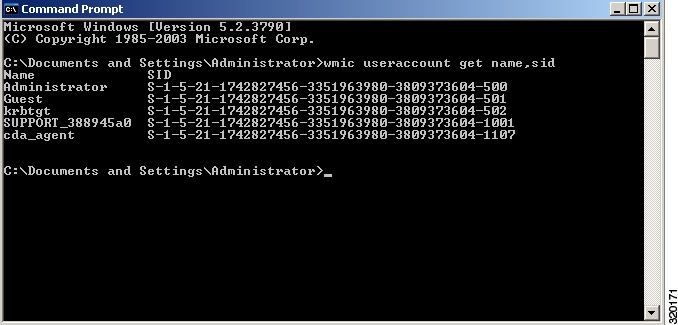 |
| ステップ 3 | SID を見つけ、レジストリ エディタを開き、次の場所を参照します。
HKEY_LOCAL_MACHINE/SYSTEM/CurrentControlSet/Services/Eventlog |
| ステップ 4 | [セキュ
リティ(Security)] をクリックし、[CustomDS] をダブルクリックします。図 2 ~ 7 を参照してください。
たとえば、ise_agent アカウント(SID:S-1-5-21-1742827456-3351963980-3809373604-1107)への読み取りアクセスを許可するには、「(A;;0x1;;;S-1-5-21-1742827456-3351963980-3809373604-1107)」と入力します。 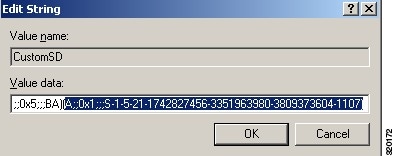 |
| ステップ 5 | ドメイン コントローラ上で WMI サービスを再起動します。次の 2 とおりの方法で WMI サービスを再起動できます。 |
Easy Connect
Easy Connect により、セキュアな方法で有線接続されたエンドポイントからネットワークにユーザを簡単に接続し、Cisco ISE ではなく Active Directory ドメイン コントローラからユーザを認証することで、それらのユーザをモニタすることができます。Easy Connect により、ISE は Active Directory ドメイン コントローラからユーザ認証情報を収集します。Easy Connect は MS WMI インターフェイスを使用して Windows システム(Active Directory)に接続し、Windows イベント メッセージからのログにクエリを行うため、現在は Windows がインストールされているエンドポイントのみをサポートしています。Easy Connect は MAB を使用した有線接続をサポートし、これは 802.1X よりもずっと設定が容易です。802.1X とは異なり、Easy Connect と MAB では、
Easy Connect は次の動作モードをサポートしています。
-
適用モード:ISE がユーザ クレデンシャルに基づいて、適用のために認証ポリシーをネットワーク デバイスにアクティブにダウンロードします。
-
可視性モード:ISE がセッション マージをパブリッシュし、情報を pxGrid に送信するために NAD デバイス センサーから受信した情報をアカウンティングします。
どちらの場合も、Active Directory(AD)で認証されたユーザは、Cisco ISE のライブ セッション ビューに表示され、サードパーティ製アプリケーションによる Cisco pxGrid インターフェイスを使用してセッション ディレクトリからクエリすることができます。既知の情報としては、ユーザ名、IP アドレス、AD DC ホスト名と AD DC NetBIOS 名があります。pxGrid の詳細については、pxGrid ノードを参照してください。
Easy Connect のセットアップが完了したら、ユーザの名前または IP アドレスに基づいて特定ユーザをフィルタリングできます。たとえば IT サービスの管理者が、そのエンドポイントの標準ユーザを支援するためにエンドポイントにログインする場合、管理者アクティビティをフィルタリングにより除外して [ライブ セッション(Live Sessions)] に表示されないようにし、そのエンドポイントの標準ユーザだけが表示されるようにできます。パッシブ ID サービスをフィルタリングするには、パッシブ ID サービスのフィルタリングを参照してください。
Easy Connect の制限
-
MAC 認証バイパス(MAB)は Easy Connect をサポートします。MAB と 802.1X の両方を同じポートで設定できますが、各サービス用に異なる ISE ポリシーが必要です。
-
現在は MAB 接続のみがサポートされています。許可ポリシーで定義されている Easy Connect 条件によって接続が許可され、権限が付与されるため、接続についての独自の認証ポリシーは不要です。
-
Easy Connect はハイ アベイラビリティ モードでサポートされます。パッシブ ID を使用して、複数のノードを定義して有効にすることができます。ISE はその後自動的に 1 つの PSN を有効にしますが、その他のノードはスタンバイ状態のままです。
-
シスコのネットワーク アクセス デバイス(NAD)のみがサポートされています。
-
IPv6 はサポートされていません。
-
ワイヤレス接続は現在サポートされていません。
-
Kerberos 認証イベントのみが追跡されるため、Easy Connect はユーザ認証のみを有効にし、マシン認証をサポートしません。
Easy Connect は ISE で設定する必要があり、Active Directory ドメイン サーバには Microsoft によって発行された指示とガイドラインに基づいた適切なパッチと設定が必要です。ISE の Active Directory ドメイン コントローラの設定については、次の項を参照してください。 Active Directory でEasy Connect および パッシブ ID サービスをサポートするための要件
Easy Connect 適用モード
Easy Connect により、ユーザは MAC アドレス バイパス(MAB)プロトコルを使用し、認証のための Active Directory(AD)にアクセスすることで、Windows オペレーティング システムを備えた有線接続されたエンドポイント(通常は PC)からセキュアなネットワークにログオンすることができます。ISE の Easy Connect は、認証されるユーザに関する情報のために Active Directory サーバからの Windows Management Instrumentation(WMI)イベントをリッスンします。AD がユーザを認証すると、ドメイン コントローラがユーザに割り当てられたユーザ名と IP アドレスを含むイベント ログを生成します。ISE が AD からログインの通知を受信し、RADIUS の認可変更(CoA)を発行します。
(注) | RADIUS サービス タイプが call-check に設定されている場合、MAC アドレス ルックアップは MAB 要求のために行われません。そのため、この要求への応答は access-accept です。これは ISE のデフォルト設定です。 |
Easy Connect 適用モードのプロセス フロー
Easy Connect 適用モードのプロセスは次のとおりです。
-
ユーザが有線接続されたエンドポイント(PC など)から NAD に接続します。
-
(MAB 用に設定された)NAD が ISE にアクセス要求を送信します。ISE がアクセスに応答し、ユーザ設定に基づいて、ユーザに AD へのアクセスを許可します。設定では、少なくとも DNS、DHCP、AD へのアクセスを許可する必要があります。
-
ユーザがドメインにログインし、セキュリティ監査イベントが ISE に送信されます。
-
ISE は RADIUS から MAC アドレスを収集し、セキュリティ監査イベントから IP アドレス、ドメイン名、ユーザに関するアカウンティング情報(ログイン情報)を収集します。
-
ISE セッション ディレクトリですべてのデータが収集されてマージされると、(ポリシー サービス ノード(PSN)で管理されている適切なポリシーに基づいて)ISE が NAD に CoA を発行し、そのポリシーに基づいて NAD によりユーザにネットワークへのアクセスが提供されます。
適用モードの設定の詳細については、Easy Connect 適用モードの設定を参照してください。
Easy Connect 可視性モード
可視性モードでは、ISE は RADIUS からのアカウンティング情報のみをモニタし(NAD のデバイス センサー機能の一部)、認証は行いません。Easy Connect は RADIUS アカウンティングと WMI イベントをリッスンし、ログとレポート(およびオプションで pxGrid)にその情報をパブリッシュします。pxGrid が設定されている場合、Active Directory を使用したユーザ ログイン中に RADIUS のアカウンティング開始とセッション終了の両方が pxGrid にパブリッシュされます。

Easy Connect 可視性モードの設定の詳細については、Easy Connect 表示モードの設定を参照してください。
Easy Connect 適用モードの設定
-
最適なパフォーマンスを得るには、WMI イベントを受け取るための専用の PSN を導入します。
-
AD ログイン イベントを受け取る、WMI ノードの Active Directory ドメイン コントローラのリストを作成します。
-
Active Directory からユーザ グループを取得するために ISE が参加する必要がある Microsoft ドメインを決定します。
-
認証ポリシーでリファレンスとして使用される Active Directory グループを決定します。
-
pxGrid を使用してネットワーク デバイスからのセッション データを他の pxGrid 対応システムと共有する場合は、導入内で pxGrid ペルソナを定義します。pxGrid の詳細については、次を参照してください。 pxGrid ノード
-
MAB が成功した後、NAD は、(概要で説明されているように)そのポートのユーザが Active Directory サーバにアクセスできるようにする、制限付きアクセス プロファイルを提供する必要があります。
| ステップ 1 |
| ||
| ステップ 2 | Easy Connect が使用する Active Directory 参加ポイントとドメイン コントローラを設定します。この操作の実行方法と詳細については、Active Directory でEasy Connect および パッシブ ID サービスをサポートするための要件を参照してください。 | ||
| ステップ 3 | 必要に応じて、さまざまなユーザのグループ用のさまざまなポリシーを作成するために(マーケティング部門従業員と管理部門従業員のための異なるポリシーなど)、AD ドメイン コントローラ グループをマッピングします。 の順に選択し、使用する Active Directory を選択して [グループ(Groups)] タブを選択し、認証ポリシーで使用する Active Directory グループを追加します。 ドメイン コントローラ用にマッピングした Active Directory グループは PassiveID ディクショナリで動的に更新され、ポリシー条件ルールを設定するときに使用することができます。 | ||
| ステップ 4 |
| ||
| ステップ 5 | ポリシー ルールを作成します。 の順に選択し、Easy Connect 用のルールを作成します。[追加(Add)] をクリックします。次に、条件を定義します。 | ||
| ステップ 6 | [送信(Submit)] をクリックします。 |
Easy Connect 表示モードの設定
-
最適なパフォーマンスを得るには、WMI イベントを受け取るための専用の PSN を導入します。
-
AD ログイン イベントを受け取る、WMI ノードの Active Directory ドメイン コントローラのリストを作成します。
-
Active Directory からユーザ グループを取得するために ISE が参加する必要がある Microsoft ドメインを決定します。
-
pxGrid を使用してネットワーク デバイスからのセッション データを他の pxGrid 対応システムと共有する場合は、導入内で pxGrid ペルソナを定義します。pxGrid の詳細については、次を参照してください。 pxGrid ノード
| ステップ 1 | Easy Connect に使用する専用ポリシー サーバ(PSN)でパッシブ ID サービスを有効にして、ISE がグループ情報とイベント情報を Active Directory から取得できるようにします。 の順に選択してノードを開き、[全般設定(General Settings)] の下で [パッシブ ID サービスの有効化(Enable Passive Identity Service)] を有効にします。 |
| ステップ 2 | Easy Connect が使用する Active Directory 参加ポイントとドメイン コントローラを設定します。この操作の実行方法と詳細については、を参照してください。 |
PassiveID ワーク センター
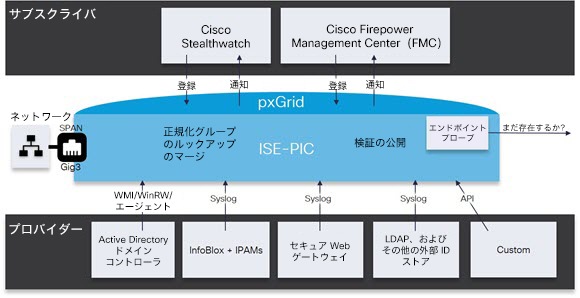
パッシブ ID コネクタ(PassiveID ワーク センター)は一元的なワンストップ インストールおよび実装を提供します。これにより、ユーザ ID 情報を受信してさまざまなセキュリティ製品(Cisco Firepower Management Center(FMC)や Stealthwatch など)のサブスクライバと共有するように、ネットワークを容易に設定できます。パッシブ ID の完全なブローカとして、PassiveID ワーク センター はさまざまなプロバイダー ソース(Active Directory ドメイン コントローラ(AD DC)など)からユーザ ID を収集し、ユーザ ログイン情報を使用中の該当する IP アドレスにマッピングし、そのマッピング情報を、設定されているサブスクライバ セキュリティ製品と共有します。
パッシブ ID について
認証、許可、およびアカウンティング(AAA)サーバを提供し、802.1X や Web 認証などのテクノロジーを使用する Cisco Identity Services Engine(ISE)で提供される標準フローは、ユーザまたはエンドポイントと直接通信し、ネットワークへのアクセスを要求し、ログイン クレデンシャルを使用して ID を検証およびアクティブに認証します。
パッシブ ID サービスはユーザを直接認証しませんが、ユーザ ID と IP アドレスをプロバイダーと呼ばれる外部認証サーバ(Active Directory など)から収集し、その情報をサブスクライバと共有します。PassiveID ワーク センター は最初に、通常はユーザ ログインとパスワードに基づいてプロバイダーからユーザ ID 情報を受信します。次に、そのユーザ ID を該当する IP アドレスと関連付けるために必要なチェックとサービスを実行し、認証済み IP アドレスをサブスクライバに送信します。
パッシブ ID コネクタ(PassiveID ワーク センター)のフロー
PassiveID ワーク センター のフローは次のとおり。
-
プロバイダーがユーザまたはエンドポイントの認証を実行します。
-
プロバイダーが認証済みユーザ情報を に送信します。
-
ISE によりユーザ情報の正規化、ルックアップ、マージ、解析、および IP アドレスへのマッピングが行われ、マッピングされた詳細情報が pxGrid に対して公開されます。
-
pxGrid サブスクライバはマッピングされたユーザの詳細情報を受信します。
- 初期セットアップと設定
- PassiveID ワーク センター ダッシュボード
- プローブおよびプロバイダーとしての Active Directory
- その他の パッシブ ID サービス プロバイダー
- Active Directory エージェント
- API プロバイダー
- SPAN
- syslog プロバイダー
- パッシブ ID サービスのフィルタリング
- エンドポイント プローブ
- サブスクライバ
- サブスクライバの pxGrid 証明書の生成
- サブスクライバの有効化
- ライブ ログからのサブスクライバ イベントの表示
- サブスクライバの設定
- PassiveID ワーク センター でのサービスのモニタリングとトラブルシューティング
初期セットアップと設定
Cisco PassiveID ワーク センター をすぐに使用できるようにするには、次のフローに従います。
-
DNS サーバを適切に設定していることを確認します。これには、ISE からのクライアント マシンの逆引きの設定も含まれます。詳細については、DNS サーバを参照してください。
パッシブ ID サービスに使用する専用ポリシー サーバ(PSN)で、パッシブ ID サービスと pxGrid サービスを有効にします。 を選択し、該当するノードを開き、[全般設定(General Settings)] の下の [パッシブ ID サービスの有効化(Enable Passive Identity Service)] と [pxGrid] をオンにします。
-
NTP サーバのクロック設定を同期します。詳細については、システム時刻と NTP サーバ設定の指定を参照してください。
-
ISE パッシブ ID セットアップで、最初のプロバイダーを設定します。詳細については、次を参照してください。 PassiveID セットアップの使用を開始する
-
1 つまたは複数のサブスクライバを設定します。詳細については、次を参照してください。 サブスクライバ
最初のプロバイダーとサブスクライバのセットアップが完了したら、追加のプロバイダーを容易に作成でき(その他の パッシブ ID サービス プロバイダーを参照)、また PassiveID ワーク センター でさまざまなプロバイダーからのパッシブ ID を管理できます。
PassiveID ワーク センター ダッシュボード
Cisco PassiveID ワーク センター ダッシュボードには、効果的なモニタリングおよびトラブルシューティングに必要不可欠な、統合され、関連付けられた概要と統計データが表示されます。ダッシュボードはリアルタイムに更新されます。特に指定がない限り、ダッシュレットには過去 24 時間のアクティビティが表示されます。 ダッシュボードにアクセスするには、 を選択し、左側のパネルで [ダッシュボード(Dashboard)] を選択します。Cisco PassiveID ワーク センター ダッシュボードはプライマリ管理ノード(PAN)でのみ表示できます。
[ホーム(Home)] ページには、PassiveID ワーク センター データのビューを表示する 2 つのデフォルト ダッシュボードがあります。
-
[メイン(Main)]:このビューには、線形の [メトリクス(Metrics)] ダッシュボード、チャート ダッシュレット、およびリスト ダッシュレットが表示されます。PassiveID ワーク センター では、ダッシュレットは設定できません。 使用可能なダッシュレットには次のものがあります。
-
[パッシブ ID メトリック(Passive Identity Metrics)]:[パッシブ ID メトリック(Passive Identity Metrics)] では、現在追跡中の固有のライブ セッションの総数、システムに設定されている ID プロバイダーの総数、ID データをアクティブに配信しているエージェントの総数、および現在設定されているサブスクライバの総数の概要が示されます。
-
[プロバイダー(Providers)]:プロバイダーはユーザ ID 情報を PassiveID ワーク センター に渡します。ISE プローブ(特定のソースからデータを収集するメカニズム)を設定します。プローブを介してプロバイダー ソースからの情報を受信します。たとえば、Active Directory(AD)プローブとエージェント プローブはいずれも ISE-PIC による AD からのデータ収集を支援しますが、syslog プローブは、syslog メッセージを読み取るパーサーからデータを収集します。
-
[サブスクライバ(Subscribers)]:サブスクライバは ISE に接続し、ユーザ ID 情報を取得します。
-
[OS タイプ(OS Types)]:表示できる唯一の OS タイプは Windows です。Windows のタイプが Windows バージョン別に表示されます。プロバイダーは OS タイプを報告しませんが、ISE はこの情報を取得するため Active Directory を照会できます。ダッシュレットに表示できるエントリの最大数は 1000 です。この数を超えるエンドポイントがある場合、または Windows 以外の OS タイプを表示する場合には、ISE にアップグレードできます。
-
[アラーム(Alarms)]:ユーザ ID 関連アラーム。
-
プローブおよびプロバイダーとしての Active Directory
Active Directory(AD)は、ユーザ ID 情報(ユーザ名、IP アドレス、ドメイン名など)の取得元である安全性が高く正確なソースです。
AD プローブ()は、WMI テクノロジーを使用して AD からユーザ ID 情報を収集しますが、その他のプローブはその他のテクノロジーや手法で AD をユーザ ID プロバイダーとして使用します。パッシブ ID サービスISE のその他のプローブとプロバイダー タイプの詳細については、その他の パッシブ ID サービス プロバイダーを参照してください。
Active Directory プローブを設定すると、次の(ソースとして Active Directory を使用する)その他のプローブも迅速に設定して有効にできます。
-
エージェント:Active Directory エージェント
-
SPAN:SPAN
-
エンドポイント プローブ:エンドポイント プローブ
また、ユーザ情報の収集時に AD ユーザ グループを使用するために Active Directory プローブを設定します。AD、エージェント、SPAN、および syslog プローブで AD ユーザ グループを使用できます。AD グループの詳細については、Active Directory ユーザ グループの設定を参照してください。
Active Directory(WMI)プローブのセットアップ
パッシブ ID サービス向けに Active Directory と WMI を設定するには、[パッシブ ID ワーク センター ウィザード(Passive ID Work Center Wizard)](PassiveID セットアップの使用を開始するを参照)を使用するか、または次の手順に従います(追加情報についてはActive Directory でEasy Connect および パッシブ ID サービスをサポートするための要件を参照)。
-
Active Directory プローブを設定します。Active Directory 参加ポイントの追加および参加ポイントへの Cisco ISE ノードの参加を参照してください。
-
AD ログイン イベントを受信する 1 つ以上の WMI 設定ノードの Active Directory ドメイン コントローラのリストを作成します。ドメイン コントローラの追加を参照してください。
-
Active Directory を ISE と統合するため Active Directory を設定します。WMI の設定を参照してください。
PassiveID セットアップの使用を開始する
-
Microsoft Active Directory サーバがネットワーク アドレス トランスレータの背後にないこと、およびネットワーク アドレス変換(NAT)アドレスを持たないことを確認します。
-
参加操作用の Microsoft Active Directory アカウントが有効であり、[次回ログイン時にパスワードを変更(Change Password on Next Login)] を使用して設定されていないことを確認します。
ISE でのスーパー管理者またはシステム管理者の権限があることを確認します。
パッシブ ID サービスに使用する専用ポリシー サーバ(PSN)で、パッシブ ID サービスと pxGrid サービスを有効にします。 を選択し、該当するノードを開き、[全般設定(General Settings)] の下の [パッシブ ID サービスの有効化(Enable Passive Identity Service)] と [pxGrid] をオンにします。
-
ISE のエントリがドメイン ネーム サーバ(DNS)にあることを確認します。ISE からのクライアント マシンの逆引き参照を適切に設定していることを確認します。詳細については、次を参照してください。 DNS サーバ
| ステップ 1 | を選択します。[パッシブ ID コネクタの概要(Passive Identity Connector Overview)] 画面で [パッシブ ID ウィザード(Passive Identity Wizard)] をクリックします。
[PassiveID セットアップ(PassiveID Setup)] が表示されます。 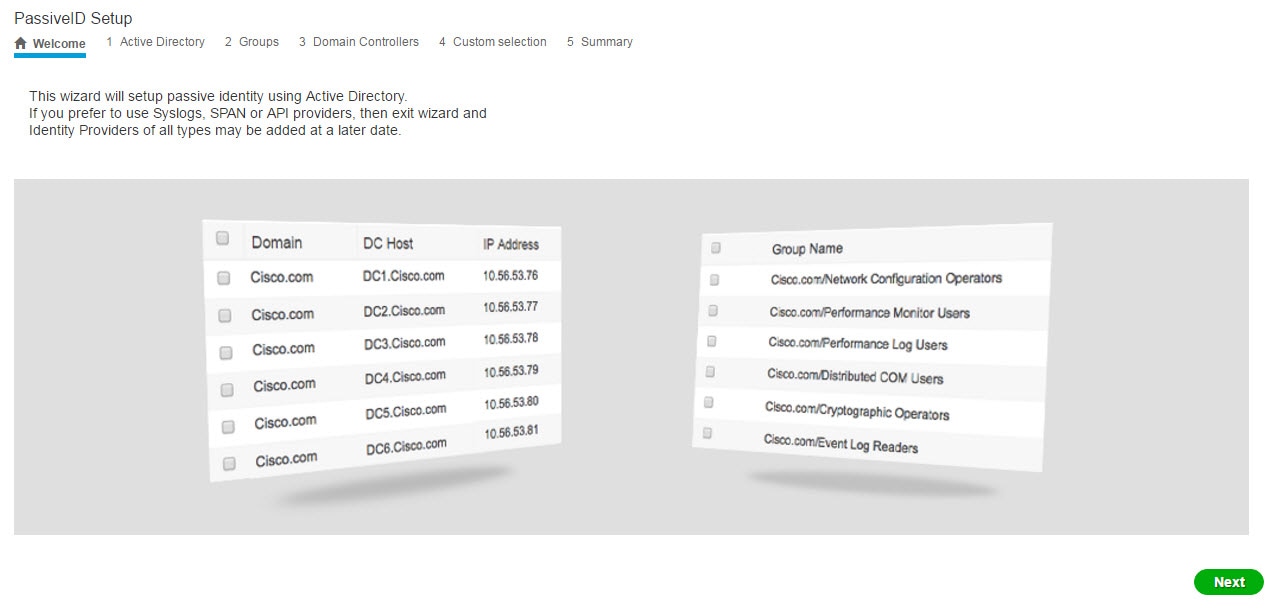 |
| ステップ 2 | [次へ(Next)] をクリックしてウィザードを開始します。 |
| ステップ 3 | [Active Directory] ステップで、設定されているこの Active Directory 参加ポイントを容易に区別できる一意の名前を [参加ポイント名(Join Point Name)] に入力し、Active Directory ドメインから、このノードが接続している Active Directory ドメインのドメイン名を入力し、Active Directory 管理者ユーザの名前とパスワードを入力します。Active Directory のこの設定とその他の設定の詳細については、Active Directory の設定を参照してください。 [クレデンシャルの保存(Store Credentials)] を選択することを強く推奨します。これにより、管理者のユーザ名とパスワードが保存され、モニタ対象として設定されているすべてのドメイン コントローラ(DC)に使用されます。 |
| ステップ 4 | [次へ(Next)] をクリックし、Active Directory グループを定義し、追加してモニタするユーザ グループをすべてオンにします。 前のステップで設定した Active Directory 参加ポイントに基づいて Active Directory ユーザ グループが自動的に表示されます。 |
| ステップ 5 | [次へ(Next)] を再度クリックして、[ドメイン コントローラ(Domain Controllers)] ステップに進みます。[ドメイン コントローラ(Domain Controllers)] ステップから、モニタ対象 DC を選択します。[カスタム(Custom)] を選択した場合は、次の画面でモニタする特定の DC を選択します。完了したら、[次へ(Next)] をクリックします。 特定の DC を選択したら、最初の Active Directory プロバイダーの作成は完了です。サマリー画面に、選択した DC とその詳細が表示されます。 |
| ステップ 6 | [終了(Exit)] をクリックして、ウィザードを終了します。 |
次の作業
最初のプロバイダーとして Active Directory の設定を完了したら、追加のプロバイダー タイプも容易に設定できます。詳細については、その他の パッシブ ID サービス プロバイダーを参照してください。さらに、定義したいずれかのプロバイダーが収集したユーザ ID 情報を受信するためのサブスクライバも設定できるようになりました。詳細については、サブスクライバを参照してください。
Active Directory プロバイダーの管理
Active Directory 参加ポイントの作成と設定が完了したら、次の作業を行い Active Directory プローブを管理します。
Active Directory の設定
Active Directory(AD)は、安全性が高く正確なソースであり、ここからユーザ情報(ユーザ名、IP アドレスなど)が取得されます。
参加ポイントを作成、編集することで Active Directory プローブを作成、管理するには、 を選択し、左側のパネルから [Active Directory] を選択します。
詳細については、Active Directory 参加ポイントの追加および参加ポイントへの Cisco ISE ノードの参加を参照してください。
| フィールド | 説明 |
|---|---|
|
[参加ポイント名(Join Point Name)] |
設定したこの参加ポイントを容易に区別できる一意の名前。 |
|
Active Directory ドメイン(Active Directory Domain) |
このノードが接続している Active Directory ドメインのドメイン名。 |
|
[ドメイン管理者(Domain Administrator)] |
管理者権限を持つ Active Directory ユーザのユーザ プリンシパル名またはユーザ アカウント名。 |
|
[パスワード(Password)] |
Active Directory で設定されているドメイン管理者のパスワード。 |
|
[組織単位の指定(Specifiy Organizational Unit)] |
管理者の組織単位の情報を入力します。 |
|
[クレデンシャルの保存(Store Credentials)] |
[クレデンシャルの保存(Store Credentials)] を選択することを強く推奨します。これにより、管理者のユーザ名とパスワードが保存され、モニタ対象として設定されているすべてのドメイン コントローラ(DC)に使用されます。 エンドポイント プローブの場合は、[クレデンシャルの保存(Store Credentials)] を選択する必要があります。 |
| フィールド | 説明 |
|---|---|
|
ISEノード(ISE Node) |
インストール環境での特定のノードの URL。 |
|
[ISE ノードのロール(ISE Node Role)] |
インストール環境でそのノードがプライマリ ノードまたはセカンダリ ノードのいずれであるかを指定します。 |
|
ステータス(Status) |
ノードが Active Directory ドメインにアクティブに参加しているかどうかを示します。 |
|
ドメイン コントローラ |
Active Directory に参加しているノードの場合、この列には Active Directory ドメインでノードが接続している特定のドメイン コントローラが示されます。 |
|
サイト |
Active Directory フォレストが ISE に参加する場合、このフィールドには、[Active Directory サイトおよびサービス(Active Directory Sites & Services)] 領域に示されるフォレスト内の特定の Active Directory サイトが示されます。 |
| フィールド | 説明 |
|---|---|
|
ドメイン(Domain) |
ドメイン コントローラが存在しているサーバの完全修飾ドメイン名。 |
|
[DC ホスト(DC Host)] |
ドメイン コントローラが存在しているホスト。 |
|
サイト |
Active Directory フォレストが ISE に参加する場合、このフィールドには、[Active Directory サイトおよびサービス(Active Directory Sites & Services)] 領域に示されるフォレスト内の特定の Active Directory サイトが示されます。 |
|
[IPアドレス(IP Address)] |
ドメイン コントローラの IP アドレス。 |
|
[モニタ方法(Monitor Using)] |
次のいずれかの方法で、ユーザ ID 情報を取得するため Active Directory ドメイン コントローラをモニタします。
|
| フィールド | 説明 |
|---|---|
|
[ホスト FQDN(Host FQDN)] |
ドメイン コントローラが存在しているサーバの完全修飾ドメイン名を入力します。 |
|
説明 |
このドメイン コントローラを容易に特定できるように、一意の説明を入力します。 |
|
ユーザ名(User Name) |
Active Directory にアクセスするための管理者のユーザ名。 |
|
[パスワード(Password)] |
Active Directory にアクセスするための管理者のパスワード。 |
|
プロトコル |
次のいずれかの方法で、ユーザ ID 情報を取得するため Active Directory ドメイン コントローラをモニタします。
|
| 説明 |
|---|
|
Active Directory グループは Active Directory から定義および管理されます。このノードに参加している Active Directory のグループは、このタブで確認できます。Active Directory の詳細については、https://msdn.microsoft.com/en-us/library/bb742437.aspxを参照してください。 |
| フィールド | 説明 |
|---|---|
|
[履歴期間(History interval)] |
すでに発生したユーザ ログインの情報を パッシブ ID サービスが読み取る期間。これは、パッシブ ID サービスの起動時または再起動時に、このサービスが使用不可であった間に生成されたイベントを確認するために必要となります。エンドポイント プローブがアクティブな場合、この期間の頻度が維持されます。 |
|
[ユーザ セッションのエージング タイム(User session aging time)] |
ユーザがログインできる時間です。パッシブ ID サービスでは、DC からの新しいユーザ ログイン イベントが識別されますが、DC はユーザがログオフする時点を報告しません。エージング タイムを使用すると、Cisco ISE で、ユーザがログインする時間間隔を決定できます。 |
|
[NTLM プロトコル設定(NTLM Protocol settings)] |
Cisco ISE と DC の間の通信プロトコルとして [NTLMv1] または [NTLMv2] を選択できます。推奨されるデフォルトは [NTLMv2] です。 |
その他の パッシブ ID サービス プロバイダー
ISE が ID 情報(パッシブ ID サービス)を、サービスをサブスクライブするコンシューマ(サブスクライバ)に提供できるようにするため、最初に ISE プローブを設定する必要があります。このプローブは ID プロバイダーに接続します。
ISE にマッピングされ、情報をアクティブに送信するプロバイダーは、[ライブ セッション(Live Sessions)] メニューから、セッション ディレクトリで確認できます。[ライブ セッション(Live Sessions)] の詳細については、RADIUS ライブ セッション を参照してください。
次の表に、ISE から使用可能なプロバイダーとプローブのすべてのタイプについて詳しく説明します。この章の残りの部分では、Active Directory 以外で使用できるすべてのタイプについて説明していますが、Active Directory で使用できるタイプについては、専用の章で詳しく説明します。詳細については、プローブおよびプロバイダーとしての Active Directoryを参照してください。
定義できるプロバイダー タイプを次に示します。
|
プロバイダー タイプ(プローブ) |
説明 |
送信元システム(プロバイダー) |
テクノロジー |
収集されるユーザ ID 情報 |
ドキュメント リンク |
|---|---|---|---|---|---|
|
Active Directory(AD) |
ユーザ情報の取得元である安全性が高く正確で最も一般的なソース。 プローブとして機能する場合、AD は WMI テクノロジーを使用して認証済みユーザ ID を送信します。 また AD 自体が、プローブではなく、その他のプローブがユーザ データを取得するソース システム(プロバイダー)として機能します。 |
Active Directory ドメイン コントローラ |
WMI |
||
|
エージェント(Agents) |
Active Directory ドメイン コントローラまたはメンバー サーバにインストールされているネイティブ 32 ビット アプリケーション。エージェント プローブは、ユーザ ID 情報に Active Directory を使用する場合の簡単で効率的なソリューションです。 |
ドメイン コントローラまたはメンバー サーバにインストールされているエージェント。 |
|
||
|
エンドポイント(Endpoint) |
設定されているその他のプローブに加えて、ユーザが接続しているかどうかを確認するため、常にバックグラウンドで実行されます。 |
WMI |
ユーザが接続しているかどうか |
||
|
SPAN |
ネットワーク トラフィックをリッスンし、Active Directory データに基づいてユーザ ID 情報を抽出するため、ネットワーク スイッチに導入されています。 |
SPAN(スイッチにインストール)と Kerberos メッセージ |
|
||
| API プロバイダー |
ISE が提供する RESTful API サービスを使用して、RESTful API クライアントと通信するようにプログラミングされている任意のシステムから、ユーザ ID 情報を収集します。 |
REST API クライアントと通信するようにプログラミングされている任意のシステム。 |
RESTful API。JSON 形式でサブスクライバに送信されるユーザ ID。 |
|
|
| Syslog |
syslog メッセージを解析し、ユーザ ID(MAC アドレスを含む)を取得します。 |
|
syslog メッセージ |
|
Active Directory エージェント
パッシブ ID サービス ワーク センターから、ネイティブ 32 ビット アプリケーション、ドメイン コントローラ(DC)エージェントを、(設定に応じて)Active Directory(AD)ドメイン コントローラ(DC)またはメンバー サーバ上の任意の場所にインストールし、設定したサブスクライバにこれらの ID を送信します。エージェント プローブは、ユーザ ID 情報に Active Directory を使用する場合の簡単で効率的なソリューションです。エージェントは個別のドメインまたは AD ドメインにインストールできます。インストールされたエージェントは、1 分ごとに ISE にステータス更新情報を提供します。
エージェントは ISE が自動的にインストールおよび設定するか、またはユーザが手動でインストールすることができます。インストールが完了すると、次のようになります。
-
エージェントとその関連ファイルはパス Program Files/Cisco/Cisco ISE PassiveID Agent にインストールされています。
-
エージェントのロギング レベルを指定する PICAgent.exe.config という設定ファイルがインストールされます。この設定ファイル内でロギング レベルを手動で変更できます。
-
CiscoISEPICAgent.log ファイルにはすべてのロギング メッセージが保存されます。
-
nodes.txt ファイルには、展開内でエージェントが通信できるすべてのノードのリストが含まれています。エージェントはリストの最初のノードと通信します。このノードと通信できない場合、エージェントはリストのノード順序に従ってノードとの通信を試行します。手動でのインストールの場合、このファイルを開き、ノード IP アドレスを入力する必要があります。(手動または自動での)インストールの完了後にこのファイルを変更するには、このファイルを手動で更新する必要があります。ファイルを開き、ノード IP アドレスを必要に応じて追加、変更、または削除します。
-
Cisco ISE PassiveID Agent サービスはマシン上で稼働します。このサービスは [Windows サービス(Windows Services)] ダイアログボックスから管理できます。
-
各エージェントは、最大 100 のドメイン コントローラをモニタできます。
エージェントをインストールできない場合、パッシブ ID サービスには Active Directory プローブを使用します。詳細については、プローブおよびプロバイダーとしての Active Directoryを参照してください。
- Active Directory(AD)エージェントの自動インストールおよび展開
- Active Directory(AD)エージェントの手動インストールおよび展開
- エージェントのアンインストール
- Active Directory(AD)エージェントの設定
Active Directory(AD)エージェントの自動インストールおよび展開
始める前に:
-
サーバ側からの関連 DNS サーバの逆引き参照を設定します。ISE の DNS サーバ設定要件の詳細については、次を参照してください。 DNS サーバ
-
エージェント用に指定されたマシンで Microsoft .NET Framework がバージョン 4.0 以上に更新されていることを確認します。.NET フレームワークの詳細については、https://www.microsoft.com/net/frameworkを参照してください。
アクティブなパッシブ ID および pxGrid サービス。詳細については、初期セットアップと設定を参照してください。
-
AD 参加ポイントを作成し、1 つ以上のドメイン コントローラを追加します。参加ポイントの作成の詳細については、プローブおよびプロバイダーとしての Active Directoryを参照してください。
AD、エージェント、SPAN、および syslog プローブで AD ユーザ グループを使用します。AD グループの詳細については、Active Directory ユーザ グループの設定を参照してください。
| ステップ 1 | 現在設定されているすべてのドメイン コントローラ(DC)エージェントを表示し、既存のエージェントを編集、削除し、新しいエージェントを設定するには、 を選択し、左側のパネルから [エージェント(Agents)] を選択します。 |
| ステップ 2 | 新しいエージェントを追加するには、テーブルの上部で [追加(Add)] をクリックします。既存のクライアントを編集または変更するには、テーブルでエージェントをオンにし、テーブル上部で [編集(Edit)] をクリックします。 |
| ステップ 3 | 新しいエージェントを作成し、この設定で指定するホストに自動的にインストールするには、[新規エージェントの展開(Deploy New Agent)] を選択します。 |
| ステップ 4 | クライアントを正しく設定するため、すべての必須フィールドに入力します。詳細については、Active Directory(AD)エージェントの設定を参照してください。 |
| ステップ 5 | [展開(Deploy)] をクリックします。 設定で指定したドメインに基づいてエージェントが自動的にホストにインストールされ、設定が保存されます。エージェントは [エージェント(Agents)] テーブルに表示されます。これで、指定したドメイン コントローラにこのエージェントを適用できます。これについては以降のステップで説明します。 |
| ステップ 6 | を選択し、左側のパネルから [Active Directory] を選択して、現在設定されているすべての参加ポイントを表示します。 |
| ステップ 7 | 作成したエージェントを有効にする参加ポイントのリンクをクリックします。 |
| ステップ 8 | 前提条件の一部として追加したドメイン コントローラを使用するため、[パッシブ ID(Passive ID)] タブを選択します。 |
| ステップ 9 | 作成したエージェントを使用してモニタするドメイン コントローラをオンにし、[編集(Edit)] をクリックします。 |
| ステップ 10 | 表示されるダイアログボックスで、必須フィールドに値が入力されていることを確認し、[プロトコル(Protocol)] ドロップダウンから [エージェント(Agent)] を選択します。表示される [エージェント(Agent)] フィールドのドロップダウンリストから、作成したエージェントを選択します。エージェントのユーザ名およびパスワードのクレデンシャルを作成している場合は、このクレデンシャルを入力して [保存(Save)] をクリックします。 ドメイン コントローラに対してエージェントが有効になり、ダイアログボックスが閉じます。 |
Active Directory(AD)エージェントの手動インストールおよび展開
始める前に:
-
サーバ側からの関連 DNS サーバの逆引き参照を設定します。ISE の DNS サーバ設定要件の詳細については、次を参照してください。 DNS サーバ
-
エージェント用に指定されたマシンで Microsoft .NET Framework がバージョン 4.0 以上に更新されていることを確認します。.NET フレームワークの詳細については、https://www.microsoft.com/net/frameworkを参照してください。
アクティブなパッシブ ID および pxGrid サービス。詳細については、初期セットアップと設定を参照してください。
-
AD 参加ポイントを作成し、1 つ以上のドメイン コントローラを追加します。参加ポイントの作成の詳細については、プローブおよびプロバイダーとしての Active Directoryを参照してください。
AD、エージェント、SPAN、および syslog プローブで AD ユーザ グループを使用します。AD グループの詳細については、Active Directory ユーザ グループの設定を参照してください。
| ステップ 1 | 現在設定されているすべてのドメイン コントローラ(DC)エージェントを表示し、既存のエージェントを編集、削除し、新しいエージェントを設定するには、 を選択し、左側のパネルから [エージェント(Agents)] を選択します。 |
| ステップ 2 | [エージェントのダウンロード(Download Agent)] をクリックし、手動でインストールするための picagent-installer.zip ファイルをダウンロードします。 このファイルは Windows の標準ダウンロード フォルダにダウンロードされます。 |
| ステップ 3 | ZIP ファイルを指定のホスト マシンに保存してインストールを実行します。 |
| ステップ 4 | ISE GUI から をもう一度選択し、左側のパネルから [エージェント(Agents)] を選択します。 |
| ステップ 5 | 新しいエージェントを設定するには、テーブルの上部で [追加(Add)] をクリックします。既存のクライアントを編集または変更するには、テーブルでエージェントをオンにし、テーブル上部で [編集(Edit)] をクリックします。 |
| ステップ 6 | すでにホスト マシンにインストールしているエージェントを設定するには、[既存のエージェントの登録(Register Existing Agent)] を選択します。 |
| ステップ 7 | クライアントを正しく設定するため、すべての必須フィールドに入力します。詳細については、Active Directory(AD)エージェントの設定を参照してください。 |
| ステップ 8 | [Save] をクリックします。 エージェント設定が保存されます。エージェントは [エージェント(Agents)] テーブルに表示されます。これで、指定したドメイン コントローラにこのエージェントを適用できます。これについては以降のステップで説明します。 |
| ステップ 9 | を選択し、左側のパネルから [Active Directory] を選択して、現在設定されているすべての参加ポイントを表示します。 |
| ステップ 10 | 作成したエージェントを有効にする参加ポイントのリンクをクリックします。 |
| ステップ 11 | 前提条件の一部として追加したドメイン コントローラを使用するため、[パッシブ ID(Passive ID)] タブを選択します。 |
| ステップ 12 | 作成したエージェントを使用してモニタするドメイン コントローラをオンにし、[編集(Edit)] をクリックします。 |
| ステップ 13 | 表示されるダイアログボックスで、必須フィールドに値が入力されていることを確認し、[プロトコル(Protocol)] ドロップダウンから [エージェント(Agent)] を選択します。表示される [エージェント(Agent)] フィールドのドロップダウンリストから、作成したエージェントを選択します。エージェントのユーザ名およびパスワードのクレデンシャルを作成している場合は、このクレデンシャルを入力して [保存(Save)] をクリックします。 ドメイン コントローラに対してエージェントが有効になり、ダイアログボックスが閉じます。 |
エージェントのアンインストール
| ステップ 1 | [Windows] ダイアログで [プログラムと機能(Programs and Features)] に移動します。 |
| ステップ 2 | インストールされているプログラムのリストで [Cisco ISE PassiveID エージェント(Cisco ISE PassiveID Agent)] を見つけて選択します。 |
| ステップ 3 | [アンインストール(Uninstall)] をクリックします。 |
Active Directory(AD)エージェントの設定
ISE が、さまざまなドメイン コントローラ(DC)からユーザ ID 情報を取得し、その情報を パッシブ ID サービス サブスクライバに配信するために、ネットワーク内の指定されたホストにエージェントを自動的にインストールすることを許可します。
エージェントを作成および管理するには、 を選択します。Active Directory(AD)エージェントの自動インストールおよび展開を参照してください。
| フィールド | 説明 |
|---|---|
|
[名前(Name)] |
設定したエージェント名。 |
|
ホスト |
エージェントがインストールされているホストの完全修飾ドメイン名。 |
|
モニタリング(Monitoring) |
指定されたエージェントがモニタするドメイン コントローラのカンマ区切りリストです。 |
| フィールド | 説明 |
|---|---|
|
[新規エージェントの展開(Deploy New Agent)] または [既存のエージェントの登録(Register Existing Agent)] |
|
|
[名前(Name)] |
エージェントを容易に把握できる名前を入力します。 |
|
説明 |
エージェントを容易に把握できる説明を入力します。 |
|
[ホスト FQDN(Host FQDN)] |
エージェントがインストールされているホスト(既存のエージェントの登録の場合)またはインストールされるホスト(自動展開の場合)の完全修飾ドメイン名です。 |
|
ユーザ名(User Name) |
エージェントをインストールするホストにアクセスするためのユーザ名を入力します。パッシブ ID サービス はこれらのクレデンシャルを使用してエージェントを自動的にインストールします。 |
|
[パスワード(Password)] |
エージェントをインストールするホストにアクセスするためのパスワードを入力します。パッシブ ID サービス はこれらのクレデンシャルを使用してエージェントを自動的にインストールします。 |
API プロバイダー
Cisco ISE の API プロバイダー機能では、カスタマイズしたプログラムまたはターミナル サーバ(TS)エージェントから組み込み ISE パッシブ ID サービス REST API サービスにユーザ ID 情報をプッシュできます。これにより、ネットワークからプログラミング可能なクライアントをカスタマイズして、任意のネットワーク アクセス制御(NAC)システムから収集されたユーザ ID をこのサービスに送信するようにできます。さらに Cisco ISE API プロバイダーにより、すべてのユーザの IP アドレスが同一であるが、各ユーザに固有のポートが割り当てられるネットワーク アプリケーション(Citrix サーバの TS-Agent など)と対話できます。
たとえば、Active Directory(AD)サーバに対して認証されたユーザの ID マッピングを提供する Citrix サーバで稼働するエージェントは、新しいユーザがログインまたはログオフするたびに、ユーザ セッションを追加または削除する REST 要求を ISE に送信できます。ISE は、クライアントから送信されたユーザ ID 情報(IP アドレス、割り当てられたポートなど)を取得し、事前に設定されているサブスクライバ(Cisco Firepower Management Center(FMC)など)に送信します。
ISE REST API フレームワークは、HTTPS プロトコルを介した REST サービスを実装し(クライアント証明書の検証は不要)、ユーザ ID 情報が JSON(JavaScript Object Notation)形式で送信されます。JSON の詳細については、http://www.json.org/ を参照してください。
ISE REST API サービスは、1 つのシステムに同時にログインしている複数のユーザを区別するため、ユーザ ID を解析し、その情報をポート範囲にマッピングします。ポートがユーザに割り当てられるたびに、API がメッセージを ISE に送信します。
REST API プロバイダーのフロー
カスタマイズしたクライアントを ISE のプロバイダーとして宣言し、そのカスタマイズしたプログラム(クライアント)が RESTful 要求を送信できるようにして、ISE からカスタマイズした クライアントへのブリッジを設定している場合、ISE REST サービスは次のように機能します。
-
ISE はクライアント認証のために認証トークンを必要とします。通信開始時と、ISE から以前のトークンの期限が切れたことが通知されるたびに、クライアント マシンのカスタマイズしたプログラムから認証トークンを求める要求が送信されます。この要求への応答としてトークンが返されます。これによりクライアントと ISE サービス間の継続的な通信が可能になります。
-
ユーザがネットワークにログインすると、クライアントはユーザ ID 情報を取得し、API Add コマンドを使用してこの情報を ISE REST サービスに送信します。
-
ISE はユーザ ID 情報を受信してマッピングします。
-
ISE はマッピングされたユーザ ID 情報をサブスクライバに送信します。
-
必要な場合は常に、カスタマイズされたマシンはユーザ情報削除要求を送信できます。このためには、Remove API コールを送信し、Add コールの送信時に応答として受信したユーザ ID を含めます。
ISE での REST API プロバイダーの操作
ISE で REST サービスをアクティブにするには、次の手順に従います。
-
クライアント側を設定します。詳細については、クライアント ユーザ マニュアルを参照してください。
-
パッシブ ID サービスと pxGrid サービスをアクティブにします。詳細については、初期セットアップと設定を参照してください。
-
DNS サーバを適切に設定していることを確認します。これには、ISE からのクライアント マシンの逆引きの設定も含まれます。 の DNS サーバ設定の要件の詳細については、次を参照してください。 DNS サーバ
-
パッシブ ID サービス の ISE REST サービスへのブリッジの設定を参照してください。
(注)
TS-Agent と連携するように API プロバイダーを設定するには、ISE からそのエージェントへのブリッジの作成時に TS-Agent 情報を追加します。その後、TS-Agent のマニュアルで API コールの送信について確認してください。
-
認証トークンを生成し、追加要求と削除要求を API サービスに送信します。。
パッシブ ID サービス の ISE REST サービスへのブリッジの設定
ISE REST API サービスが特定のクライアントから情報を受信できるようにするには、まず ISE でその特定のクライアントを定義する必要があります。異なる IP アドレスを使用して複数の REST API クライアントを定義できます。
始める前に:
パッシブ ID サービスと pxGrid サービスをアクティブにしていることを確認します。詳細については、初期セットアップと設定を参照してください。
-
DNS サーバを適切に設定していることを確認します。これには、ISE からのクライアント マシンの逆引きの設定も含まれます。ISE の DNS サーバ設定要件の詳細については、次を参照してください。 DNS サーバ
| ステップ 1 | 現在設定されているすべてのクライアントを表示し、既存のクライアントを編集、削除し、新しいクライアントを設定するには、 を選択し、左側のパネルから [API プロバイダー(API Providers)] を選択します。 [API プロバイダー(API Providers)] テーブルが表示されます。このテーブルには既存の各クライアントのステータス情報が含まれています。 |
| ステップ 2 | 新しいクライアントを追加するには、テーブルの上部で [追加(Add)] をクリックします。既存のクライアントを編集または変更するには、テーブルでクライアントをオンにし、テーブル上部で [編集(Edit)] をクリックします。 |
| ステップ 3 | クライアントを正しく設定するため、すべての必須フィールドに入力します。詳細については、API プロバイダーの設定を参照してください。 |
| ステップ 4 | [送信(Submit)] をクリックします。 クライアント設定が保存され、更新された [API プロバイダー(API Providers)] テーブルが画面に表示されます。これで、クライアントは ISE REST サービスにポストを送信できるようになりました。 |
次の作業
認証トークンとユーザ ID を ISE REST サービスに送信するように、カスタマイズしたクライアントをセットアップします。パッシブ ID REST サービスへの API コールの送信を参照してください。
パッシブ ID REST サービスへの API コールの送信
| ステップ 1 | Cisco ISE URL をブラウザのアドレス バーに入力します(たとえば https://<ise hostname or ip address>/admin/)。 |
| ステップ 2 | ISE GUI の [API プロバイダー(API Providers)] 画面で指定および設定したユーザ名とパスワードを入力します。詳細については、パッシブ ID サービス の ISE REST サービスへのブリッジの設定を参照してください。 |
| ステップ 3 | Enter キーを押します。 |
| ステップ 4 | ターゲット ノードの [URL アドレス(URL Address)] フィールドに API コールを入力します。 |
| ステップ 5 | [送信(Send)] をクリックして API コールを発行します。 |
次の作業
さまざまな API コールとそのスキーマおよび結果の詳細については、API コールを参照してください。
API プロバイダーの設定
を選択して、の新しい REST API クライアントを設定します。
(注) | 次のようにリクエスト コールを使用して完全な API 定義とオブジェクト スキーマを取得できます。
|
| フィールド | 説明 |
|---|---|
|
[名前(Name)] |
このクライアントを他のクライアントから容易に区別できる一意の名前を入力します。 |
|
説明 |
このクライアントのわかりやすい説明を入力します。 |
|
ステータス(Status) |
設定完了後すぐにクライアントが REST サービスとやりとりできるようにするには、[有効(Enabled)] を選択します。 |
|
[ホスト/IP(Host/ IP)] |
クライアント ホスト マシンの IP アドレスを入力します。DNS サーバを適切に設定していることを確認します。これには、ISE からのクライアント マシンの逆引きの設定も含まれます。 |
|
ユーザ名(User name) |
REST サービスへの送信時に使用する一意のユーザ名を作成します。 |
|
[パスワード(Password)] |
REST サービスへの送信時に使用する一意のパスワードを作成します。 |
API コール
Cisco ISE で パッシブ ID サービスのユーザ ID イベントを管理するには、次の API コールを使用します。
目的:認証トークンの生成
-
要求
POST
https://<PIC IP アドレス>:9094/api/fmi_platform/v1/identityauth/generatetoken
この要求には BasicAuth 許可ヘッダーが含まれている必要があります。ISE-PIC GUI で以前に作成した API プロバイダーのクレデンシャルを提供します。詳細については、API プロバイダーの設定を参照してください。
-
応答ヘッダー
このヘッダーには X-auth-access-token が含まれています。これは、追加の REST 要求を送信するときに使用するトークンです。
-
応答本文
HTTP 204 No Content
目的:ユーザの追加
-
要求
POST
https://<PIC IP アドレス>:9094/api/identity/v1/identity/useridentity
POST 要求のヘッダーに X-auth-access-token を追加します。(例:ヘッダー:X-auth-access-token、値:f3f25d81-3ac5-43ee-bbfb-20955643f6a7)
-
応答ヘッダー
201 Created
-
応答本文
{
"user": "<ユーザ名>",
"srcPatRange": {
"userPatStart": <ユーザ PAT 開始値>,
"userPatEnd": <ユーザ PAT 終了値>,
"patRangeStart": <PAT 範囲開始値>
},
"srcIpAddress": "<src IP アドレス>",
"agentInfo": "<エージェント名>",
"timestamp": "<ISO_8601 形式、例:“YYYY-MM-DDTHH:MM:SSZ" >",
"domain": "<ドメイン>"
}
-
注記(Notes)
-
上記の JSON で 1 つの IP ユーザ バインディングを作成するには srcPatRange を削除します。
-
応答本文には「ID」(作成されたユーザ セッション バインディングの固有識別子)が含まれています。削除するユーザを指定する DELETE 要求を送信するときに、この ID を使用してください。
-
この応答には、新たに作成されたユーザ セッション バインディングの URL であるセルフ リンクも含まれています。
-
目的:ユーザの削除
-
要求
DELETE
https://<PIC IP アドレス>:9094/api/identity/v1/identity/useridentity/<id>
<id> に、Add 応答で受信した ID を入力します。
DELETE 要求のヘッダーに X-auth-access-token を追加します。(例:ヘッダー:X-auth-access-token、値:f3f25d81-3ac5-43ee-bbfb-20955643f6a7)
-
応答ヘッダー
200 OK
-
応答本文
応答本文には、削除されたユーザ セッション バインディングの詳細が含まれています。
SPAN
SPAN は、ISE がネットワークをリッスンし、ユーザ情報を取得できるようにユーザが容易に設定できるようにする、パッシブ ID サービスです。このとき、Active Directory が ISE と直接連携するように設定する必要はありません。SPAN はネットワーク トラフィックをスニフィングし、特に Kerberos メッセージを調べ、Active Directory により保存されているユーザ ID 情報を抽出し、その情報を ISE に送信します。ISE は次にその情報を解析し、最終的にはユーザ名、IP アドレス、およびドメイン名を、ISE から既に設定しているサブスクライバに送信します。
SPAN がネットワークをリッスンし、Active Directory ユーザ情報を抽出できるようにするには、ISE と Active Directory の両方がネットワーク上の同一スイッチに接続している必要があります。これにより、SPAN は Active Directory からすべてのユーザ ID データをコピーおよびミラーリングできます。
SPAN により、ユーザ情報は次のように取得されます。
SPAN の使用
ISE がネットワーク スイッチから SPAN トラフィックを受信できるようにするには、最初にそのスイッチをリッスンするノードとノード インターフェイスを定義する必要があります。インストールされている複数の ISE ノードをリッスンするには、SPAN を設定します。ネットワークをリッスンするように設定できるインターフェイスは、ノードごとに 1 つのみです。また、リッスンするために使用するインターフェイスは SPAN 専用である必要があります。
開始する前に、パッシブ ID サービスと pxGrid サービスをアクティブにしていることを確認します。SPAN の設定に使用可能なインターフェイスのリストには、パッシブ ID が有効なノードだけが表示されます。詳細については、初期セットアップと設定を参照してください。
また、次の操作を行う必要があります。
-
ネットワークで Active Directory が設定されていることを確認します。
-
スイッチが ISE と通信できることを確認するために、Active Directory に接続しているネットワーク上のスイッチで CLI を実行します。
-
AD からネットワークをミラーリングするようにスイッチを設定します。
-
SPAN 専用の ISE ネットワーク インターフェイス カード(NIC)を設定します。この NIC は SPAN トラフィック専用で使用されます。
-
SPAN 専用の NIC が、コマンドライン インターフェイスからアクティブにされていることを確認します。
-
Kerberos トラフィックのみを SPAN ポートに送信する VACL を作成します。
| ステップ 1 | を選択し、次に左側のパネルから [SPAN] を選択して SPAN を設定します。 | ||
| ステップ 2 |
| ||
| ステップ 3 | [Save] をクリックします。 SPAN 設定が保存され、ISE-PICISE がネットワーク トラフィックをアクティブにリッスンします。 |
SPAN 設定
SPAN をクライアント ネットワークにインストールすることで、展開した各ノードから、 ISE がユーザ ID を受信することを簡単に設定できます。
| フィールド | 説明 | ||
|---|---|---|---|
|
説明 |
現在有効なノードとインターフェイスがわかる固有の説明を入力します。 |
||
|
ステータス |
設定完了後すぐにクライアントを有効にするには、[有効化(Enabled)] を選択します。 |
||
|
[インターフェイス NIC(Interface NIC)] |
ISE にインストールされている 1 つ以上のノードを選択してから、選択したノードごとに、ネットワークをリッスンして情報を得るノード インターフェイスを選択します。
|
syslog プロバイダー
syslog 機能により、 パッシブ ID サービス は syslog メッセージを配信する任意のクライアント(ID データ プロバイダー)からの syslog メッセージを解析し、MAC アドレスなどのユーザ ID 情報を送信します。syslog メッセージには、通常の syslog メッセージ(InfoBlox、Blue Coat、BlueCat、Lucent などのプロバイダーからのメッセージ)と DHCP syslog メッセージがあります。このマッピングされたユーザ ID データがサブスクライバに配信されます。
管理者が パッシブ ID および pxGrid サービスをアクティブにし、GUI から syslog クライアントを設定すると、パッシブ ID サービス はさまざまなプロバイダーから受信した syslog メッセージを使用します。管理者はプロバイダーの設定時に、接続方法(TCP または UDP)と解析に使用する syslog テンプレートを指定します。
(注) | 設定されている接続タイプが TCP であり、メッセージ ヘッダーに問題があるためにホスト名を解析できない場合、ISE はパケットで受信した IP アドレスを、ISE で設定されている syslog メッセージのプロバイダー リストのすべてのプロバイダーの IP アドレスと照合しようとします。このリストを表示するには、 を選択します。メッセージ ヘッダーを調べ、解析が正常に実行されるように、必要に応じてカスタマイズすることが推奨されます。ヘッダーのカスタマイズの詳細については、 を参照してください。 |
設定が完了したら、syslog プローブは受信した syslog メッセージを ISE パーサーに送信します。パーサーはユーザ ID 情報をマッピングし、その情報を ISE に公開します。 次に ISE が、解析およびマッピングされたユーザ ID 情報を パッシブ ID サービス サブスクライバに配信します。
(注) | DHCP syslog メッセージにはユーザ名は含まれていません。したがって、これらのメッセージはパーサーから遅れて配信されます。これにより ISE は、ユーザ ID 情報を正しく解析して配信するために、最初にローカル セッション ディレクトリに登録されているユーザ([ライブ セッション(Live Sessions)] で表示)を調べ、その後各ユーザの IP アドレスと受信した DHCP syslog メッセージに指定されている IP アドレスを照合してユーザ照合を試行します。DHCP syslog メッセージから受信したデータが、現在ログインしているユーザに一致しない場合、メッセージは解析されず、ユーザ ID は配信されません。 |
ISE からの syslog メッセージを解析してユーザ ID を取得するには、次の操作を行います。
-
ユーザ ID データの送信元 syslog クライアントを設定します:syslog クライアントの設定
-
1 つのメッセージ ヘッダーをカスタマイズします:syslog ヘッダーのカスタマイズ
-
テンプレートを作成してメッセージ本文をカスタマイズします:syslog メッセージ本文のカスタマイズ
-
解析に使用するメッセージ テンプレートとして syslog クライアントを設定する場合には、ISE で事前に定義されているメッセージ テンプレートを使用します。あるいは、これらの事前定義テンプレートに基づいてヘッダーまたは本文のテンプレートをカスタマイズします。syslog 事前定義メッセージ テンプレートの使用
syslog クライアントの設定
ISE が特定のクライアントからの syslog メッセージをリッスンできるようにするには、最初に ISE でその特定のクライアントを定義する必要があります。異なる IP アドレスを使用して複数のプロバイダーを定義できます。
開始する前に、パッシブ ID サービスと pxGrid サービスをアクティブにしていることを確認します。詳細については、初期セットアップと設定を参照してください。
| ステップ 1 | 現在設定されているすべてのクライアントを表示し、既存のクライアントを編集、削除し、新しいクライアントを設定するには、 を選択し、左側のパネルから [エージェント(Agents)] を選択します。 [syslog プロバイダー(syslog Providers)] テーブルが表示されます。このテーブルには既存の各クライアントのステータス情報が含まれています。 |
| ステップ 2 | 新しい syslog クライアントを設定するには、テーブルの上部で [追加(Add)] をクリックします。以前に設定したクライアントを編集または変更するには、テーブルでクライアントをオンにし、テーブル上部で [編集(Edit)] をクリックします。 |
| ステップ 3 | クライアントを正しく設定するため、すべての必須フィールドを入力し(詳細についてはSyslog の設定(Syslog Settings)を参照)、必要に応じてメッセージ テンプレートを作成します(詳細についてはsyslog メッセージ本文のカスタマイズを参照)。 |
| ステップ 4 | [送信(Submit)] をクリックします。 クライアント設定が保存され、更新された [syslog プロバイダー(Syslog Providers)] テーブルが画面に表示されます。 |
Syslog の設定(Syslog Settings)
特定のクライアントから syslog メッセージによってユーザ ID(MAC アドレスを含む)を受信するように ISE を設定します。異なる IP アドレスを使用して複数のプロバイダーを定義できます。
を選択し、左側のパネルから [syslog プロバイダー(Syslog Providers)] を選択し、テーブルで [追加(Add)] をクリックして、新しい syslog クライアントを作成します。
| フィールド | 説明 | ||||
|---|---|---|---|---|---|
|
[名前(Name)] |
設定したこのクライアントを容易に区別できる一意の名前を入力します。 |
||||
|
説明 |
この syslog プロバイダーのわかりやすい説明。 |
||||
|
ステータス(Status) |
設定完了後すぐにクライアントを有効にするには、[有効化(Enabled)] を選択します。 |
||||
|
ホスト |
ホスト マシンの FQDN を入力します。 |
||||
|
接続タイプ(Connection Type) |
ISE が syslog メッセージをリッスンするチャネルを指定するため、UDP または TCP を入力します。
|
||||
|
テンプレート(Template) |
テンプレートにより正確な本文メッセージ構造が指定されます。これにより、パーサーは syslog メッセージ内で解析、マッピング、配信する必要がある各情報部分を識別できます。 たとえば、テンプレートでは正確なユーザ名部分を指定できます。これにより、パーサーは受信するすべてのメッセージでユーザ名を検出できます。 このフィールドでは、syslog メッセージを認識して正しく解析するために使用される(syslog メッセージの本文の)テンプレートを指定します。 事前定義のドロップダウンリストから選択するか、または [新規(New)] をクリックして独自のカスタム テンプレートを作成します。新しいテンプレートの作成の詳細については、を参照してください。ほとんどの事前定義テンプレートでは正規表現が使用されています。カスタム テンプレートでも正規表現を使用する必要があります。
現在 ISE に含まれている事前定義 DHCP プロバイダー テンプレートを次に示します。
ISE には次の事前定義の標準 syslog プロバイダー テンプレートがあります。
テンプレートについては、を参照してください。 |
||||
|
デフォルト ドメイン(Default Domain) |
syslog メッセージで特定のユーザに対してドメインが指定されていない場合、このデフォルト ドメインが自動的にそのユーザに割り当てられます。これにより、すべてのユーザにドメインが割り当てられます。 デフォルト ドメインまたはメッセージから解析されたドメインにユーザ名が付加され、username@domain となります。したがって、ユーザとユーザグループに関する詳細情報を取得するためには、ドメインを含めます。 |
syslog メッセージ構造のカスタマイズ(テンプレート)
テンプレートは正確なメッセージ構造を指定します。これにより、パーサーは syslog メッセージ内で解析、マッピング、配信する必要がある各情報部分を識別できます。たとえば、テンプレートでは正確なユーザ名部分を指定できます。これにより、パーサーは受信するすべてのメッセージでユーザ名を検出できます。テンプレートにより、新規マッピング メッセージとマッピング削除メッセージの両方に対応する構造が決定します。
Cisco ISE では、パッシブ ID パーサーが使用する 1 つのメッセージ ヘッダーと複数の本文構造をカスタマイズできます。
パッシブ ID パーサーが、メッセージがユーザ ID マッピングを追加するためのメッセージであるかまたは削除するためのメッセージであるかを正しく識別し、ユーザの詳細情報を正しく解析できるようにするため、テンプレートには、ユーザ名、IP アドレス、MAC アドレス、およびドメインの構造を定義する正規表現が含まれている必要があります。
メッセージ テンプレートをカスタマイズするときに、事前定義オプションで使用されている正規表現とメッセージ構造を調べ、ISE-PICISE の事前定義メッセージ テンプレートに基づいてカスタマイズを行うかどうかを決定できます。事前定義テンプレートの正規表現、メッセージ構造、例などの詳細については、 を参照してください。
次の内容をカスタマイズできます。
-
1 つのメッセージ ヘッダー:syslog ヘッダーのカスタマイズ
-
複数のメッセージ本文:syslog メッセージ本文のカスタマイズ。
(注) | DHCP syslog メッセージにはユーザ名は含まれていません。したがって、これらのメッセージはパーサーから遅れて配信されます。これにより ISE-PICISE は、ユーザ ID 情報を正しく解析して配信するために、最初にローカル セッション ディレクトリに登録されているユーザ([ライブ セッション(Live Sessions)] で表示)を調べ、その後各ユーザの IP アドレスと受信した DHCP syslog メッセージに指定されている IP アドレスを照合してユーザ照合を試行します。DHCP syslog メッセージから受信したデータが、現在ログインしているユーザに一致しない場合、メッセージは解析されず、ユーザ ID は配信されません。 DHCP メッセージの詳細情報を適切に照合、解析、マッピングするために必要な遅延は、カスタマイズされたテンプレートには適用できません。したがって、DHCP メッセージ テンプレートをカスタマイズすることは推奨されません。代わりに、事前定義の DHCP テンプレートを使用してください。 |
syslog メッセージ本文のカスタマイズ
Cisco ISE では、パッシブ ID パーサーにより解析される syslog メッセージ テンプレートをカスタマイズできます(メッセージ本文のカスタマイズ)。テンプレートには、ユーザ名、IP アドレス、MAC アドレス、およびドメインの構造を定義する正規表現が含まれている必要があります。
(注) | DHCP syslog メッセージにはユーザ名は含まれていません。したがって、これらのメッセージはパーサーから遅れて配信されます。これにより ISE-PICISE は、ユーザ ID 情報を正しく解析して配信するために、最初にローカル セッション ディレクトリに登録されているユーザ([ライブ セッション(Live Sessions)] で表示)を調べ、その後各ユーザの IP アドレスと受信した DHCP syslog メッセージに指定されている IP アドレスを照合してユーザ照合を試行します。DHCP syslog メッセージから受信したデータが、現在ログインしているユーザに一致しない場合、メッセージは解析されず、ユーザ ID は配信されません。 DHCP メッセージの詳細情報を適切に照合、解析、マッピングするために必要な遅延は、カスタマイズされたテンプレートには適用できません。したがって、DHCP メッセージ テンプレートをカスタマイズすることは推奨されません。代わりに、事前定義の DHCP テンプレートを使用してください。 |
syslog クライアント設定画面から、syslog メッセージ本文テンプレートを作成および編集します。
(注) | 各自でカスタマイズしたテンプレートだけを編集できます。システムに用意されている事前定義テンプレートは変更できません。 |
| ステップ 1 | 現在設定されているすべてのクライアントを表示し、既存のクライアントを編集、削除し、新しいクライアントを設定するには、 を選択し、左側のパネルから [エージェント(Agents)] を選択します。 [syslog プロバイダー(syslog Providers)] テーブルが表示されます。このテーブルには既存の各クライアントのステータス情報が含まれています。 |
| ステップ 2 | 新しい syslog クライアントを追加するには [追加(Add)] をクリックし、すでに設定されているクライアントを更新するには [編集(Edit)] をクリックします。テンプレートを追加または編集するだけの場合、どのオプションを選択するかは関係ありません。syslog クライアントの設定と更新については、を参照してください。 |
| ステップ 3 | [syslog プロバイダー(Syslog Providers)] 画面の [テンプレート(Template)] フィールドの隣にある [新規(New)] をクリックし、新しいメッセージ テンプレートを作成します。既存のテンプレートを編集するには、ドロップダウンリストからテンプレートを選択して [編集(Edit)] をクリックします。 [syslog テンプレート(Syslog Template)] 画面が表示されます。 |
| ステップ 4 | 必須フィールドをすべて指定します。 たとえば、次のメッセージが BLUECOAT_PROXY_SG プロバイダーから届く場合があります。 2016-09-21 23:05:33 58 1.6.6.1 UserA - - PROXIED "none" http://www.espn.com/ 200 TCP_MISS GET application/json;charset=UTF-8 http site.api.espn.com 80 /apis/v2/scoreboard/header ?rand=1474499133503 - "Mozilla/5.0 (Windows NT 10.0; Win64; x64) AppleWebKit/537.36 (KHTML, like Gecko) Chrome/46.0.2486.0 Safari/537.36 Edge/13.10586" 192.168.10.24 7186 708 - "unavailable 新しいマッピング メッセージを正しく認識し、このメッセージの IP アドレスとユーザ名を解析するには、次の正規表現文字列を入力します。
値を正しく入力する方法の詳細については、syslog カスタマイズ テンプレートの設定と例を参照してください。 |
| ステップ 5 | [テスト(Test)] をクリックして、入力した文字列に基づいてメッセージが正しく解析されていることを確認します。上の例では、画面が次のように表示されます。
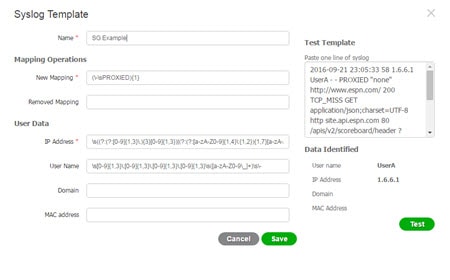 |
| ステップ 6 | [保存(Save)] をクリックします。 カスタマイズしたテンプレートが保存され、新しい syslog クライアントの設定時と既存の syslog クライアントの更新時に [テンプレート(Template)] フィールドのドロップダウンリストにこのテンプレートが表示されます。 |
syslog ヘッダーのカスタマイズ
syslog ヘッダーには、メッセージの送信元のホスト名が他の詳細情報と共に含まれています。syslog メッセージが ISE メッセージ パーサーで認識されない場合は、ホスト名の後に続く区切り文字を設定し、ISE がホスト名を認識してメッセージを正しく解析できるようにすることで、メッセージ ヘッダーをカスタマイズする必要がある場合があります。この画面のフィールドの詳細については、syslog カスタマイズ テンプレートの設定と例を参照してください。カスタマイズされたヘッダーの設定は保存され、メッセージを受信するたびにパーサーが使用するヘッダー タイプにこの設定が追加されます。
(注) | 1 つのヘッダーだけをカスタマイズできます。ヘッダーのカスタマイズ後に、[カスタム ヘッダー(Custom Header)] をクリックして保存するテンプレートを作成し、[送信(Submit)] をクリックすると、最新の設定が保存され、以前のカスタマイズ内容が上書きされます。 |
| ステップ 1 | 現在設定されているすべてのクライアントを表示し、既存のクライアントを編集、削除し、新しいクライアントを設定するには、 を選択し、左側のパネルから [エージェント(Agents)] を選択します。 [syslog プロバイダー(syslog Providers)] テーブルが表示されます。このテーブルには既存の各クライアントのステータス情報が含まれています。 | ||
| ステップ 2 | [カスタム ヘッダー(Custom Header)] をクリックして [syslog カスタム ヘッダー(Syslog Custom Header)] 画面を開きます。 | ||
| ステップ 3 | [サンプル syslog を貼り付ける(Paste sample syslog)] に、syslog メッセージのヘッダー形式の例を入力します。たとえば、メッセージの 1 つからヘッダー <181>Oct 10 15:14:08 Cisco.com をコピーして貼り付けます。 | ||
| ステップ 4 | [区切り文字(Separator)] フィールドで、単語をスペースとタブのいずれで区切るかを指定します。 | ||
| ステップ 5 | [ヘッダーのホスト名の位置(Position of hostname in header)] フィールドで、ヘッダーのどの位置がホスト名であるかを指定します。たとえば、前述のヘッダーではホスト名は 4 番目の単語です。これを指定するには 4 と入力します。
[ホスト名(Hostname)] フィールドに、最初の 3 つのフィールドに示される詳細情報に基づいてホスト名が表示されます。たとえば、[syslog の例を貼り付ける(Paste sample syslog)] でのヘッダーの例の場合は次のようになります。 <181>Oct 10 15:14:08 Cisco.com 区切り文字として [スペース(Space)] を指定し、[ヘッダーのホスト名の位置(Position of hostname in header)] には 4 を入力します。 [ホスト名(Hostname)] には自動的に Cisco.com と表示されます。これは、[syslog の例を貼り付ける(Paste sample syslog)] フィールドに貼り付けたヘッダー フレーズの 4 番目の単語です。 ホスト名が正しく表示されない場合は、[区切り文字(Separator)] フィールドと [ヘッダーのホスト名の位置(Position of hostname in header)] フィールドに入力したデータを確認してください。 この例を次のスクリーン キャプチャに示します。 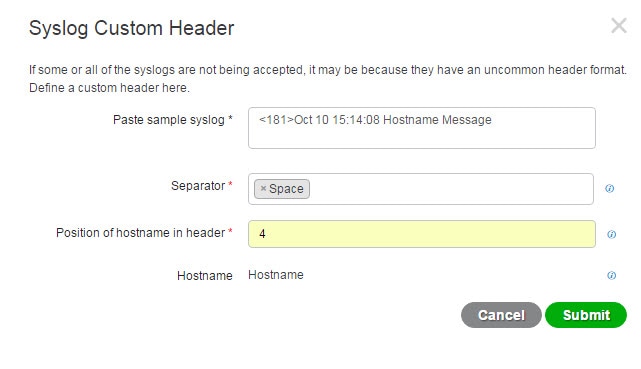 | ||
| ステップ 6 |
|
syslog カスタマイズ テンプレートの設定と例
Cisco ISE では、パッシブ ID パーサーにより解析される syslog メッセージ テンプレートをカスタマイズできます。カスタマイズされたテンプレートは、新規マッピング メッセージとマッピング削除メッセージの両方に対応する構造を決定します。パッシブ ID パーサーが、メッセージがユーザ ID マッピングを追加するためのメッセージであるかまたは削除するためのメッセージであるかを正しく識別し、ユーザの詳細情報を正しく解析できるようにするため、テンプレートには、ユーザ名、IP アドレス、MAC アドレス、およびドメインの構造を定義する正規表現が含まれている必要があります。
(注) | ほとんどの事前定義テンプレートでは正規表現が使用されます。カスタマイズ テンプレートでも正規表現を使用してください。 |
syslog ヘッダーの各部分
ホスト名の後に続く区切り文字を設定することで、syslog プローブが認識する単一ヘッダーをカスタマイズできます。
を選択し、左側のパネルから [syslog プロバイダー(Syslog Providers)] を選択し、テーブルで [カスタム ヘッダー(Custom Header)] をクリックして、カスタム syslog メッセージ ヘッダーを作成します。
| フィールド | 説明 |
|---|---|
|
[syslog の例を貼り付ける(Paste sample syslog)] |
syslog メッセージにヘッダー形式の例を入力します。たとえば、次のヘッダーをコピーして貼り付けます。 <181>Oct 10 15:14:08 Hostname Message |
|
区切り文字 |
単語をスペースまたはタブのいずれで区切るかを指定します。 |
|
[ヘッダーのホスト名の位置(Position of hostname in header)] |
ヘッダーでのホスト名の位置を指定します。たとえば、前述のヘッダーではホスト名は 4 番目の単語です。これを指定するには 4 と入力します。 |
|
ホストネーム |
最初の 3 つのフィールドに示される詳細情報に基づいて、ホスト名を表示します。たとえば、[syslog の例を貼り付ける(Paste sample syslog)] でのヘッダーの例の場合は次のようになります。 <181>Oct 10 15:14:08 Hostname Message 区切り文字として [スペース(Space)] を指定し、[ヘッダーのホスト名の位置(Position of hostname in header)] には 4 を入力します。 [ホスト名(Hostname)] には Hostname が自動的に表示されます。 ホスト名が正しく表示されない場合は、[区切り文字(Separator)] フィールドと [ヘッダーのホスト名の位置(Position of hostname in header)] フィールドに入力したデータを確認してください。 |
メッセージ本文の syslog テンプレートの各部分と説明
|
パート |
フィールド |
説明 |
|---|---|---|
|
[名前(Name)] |
このテンプレートの目的がわかる一意の名前。 |
|
|
[マッピング操作(Mapping Operations)] |
[新規マッピング(New mapping)] |
新しいユーザを追加するためにこのテンプレートで使用されるマッピングのタイプを記述する正規表現。たとえば、F5 VPN にログインした新しいユーザを示すには、このフィールドに「logged on from」と入力します。 |
|
[削除されたマッピング(Removed Mapping)] |
ユーザを削除するためにこのテンプレートで使用されるマッピングのタイプを記述する正規表現。たとえば、削除する必要がある ASA VPN のユーザを示すには、このフィールドに「session disconnect」と入力します。 |
|
|
ユーザ データ(User Data) |
[IPアドレス(IP Address)] |
キャプチャする IP アドレスを示す正規表現。 たとえば Bluecat メッセージの場合、この IP アドレス範囲内のユーザの ID をキャプチャするには、次のように入力します。 (on\s|to\s)((?:(?:25[0-5]|2[0-4][0-9]|[01]?[0-9][0-9]?)\.){3}(?:25[0-5]|2[0-4][0-9]|[01]?[0-9][0-9]?)) |
|
ユーザ名 |
キャプチャするユーザ名形式を示す正規表現。 |
|
|
ドメイン |
キャプチャするドメインを示す正規表現。 |
|
|
MAC アドレス(Mac Address) |
キャプチャする MAC アドレスの形式を示す正規表現。 |
正規表現の例
メッセージを解析するため、正規表現を使用します。ここでは、IP アドレス、ユーザ名、およびマッピング追加メッセージを解析する正規表現の例を示します。
たとえば、正規表現を使用して次のメッセージを解析します。
<174>64.103.124.28 %ASA-4-722051: Group <DfltGrpPolicy> User <galindk1> IP <74.136.197.123> IPv4 Address <172.31.18.154> IPv6 address <::> assigned to session
<174>64.103.124.28 %ASA-6-713228: Group = ukyedu, Username = galindk1, IP = 128.163.8.205, Assigned private IP address 172.31.18.231 to remote user
次の表に、正規表現の定義を示します。
|
パート |
[正規表現(Regular Expression)] |
|---|---|
|
IP アドレス |
Address <([^\s]+)>|address ([^\s]+) |
|
ユーザ名(User name) |
User <([^\s]+)>| Username = ([^\s]+) |
|
[マッピング追加メッセージ(Add mapping message)] |
(%ASA-4-722051|%ASA-6-713228) |
syslog 事前定義メッセージ テンプレートの使用
syslog メッセージには、ヘッダーとメッセージ本文を含む標準構造があります。
ここでは、メッセージの送信元に基づいてサポートされているヘッダーの内容の詳細や、サポートされている本文の構造など、Cisco ISE が提供する事前定義テンプレートについて説明します。
また、システムで事前に定義されていないソース用に、カスタマイズした本文コンテンツを使用した独自のテンプレートを作成することもできます。ここでは、カスタム テンプレートでサポートされる構造について説明します。メッセージの解析時には、システムで事前定義されているヘッダーに加え、1 つのカスタマイズ ヘッダーを設定できます。また、メッセージ本文には、服すのカスタマイズ テンプレートを設定できます。ヘッダーのカスタマイズの詳細については、 を参照してください。本文のカスタマイズの詳細については、syslog メッセージ本文のカスタマイズ を参照してください。
(注) | ほとんどの事前定義テンプレートでは正規表現が使用されています。カスタム テンプレートでも正規表現を使用する必要があります。 |
メッセージ ヘッダー
パーサーで認識されるヘッダー タイプには、すべてのクライアント マシンのすべてのメッセージ タイプ(新規および削除)について認識される 2 つのタイプがあります。これらのヘッダーは次のとおりです。
受信されたヘッダーはホスト名を検出するため解析されます。ホスト名は、IP アドレス、ホスト名、または完全 FQDN のいずれかです。次に例を示します。
-
64.103.124.28
-
位置
-
Positron.cisco.com
ヘッダーもカスタマイズできます。ヘッダーをカスタマイズするには、を参照してください。
- syslog ASA VPN 事前定義テンプレート
- syslog Bluecat 事前定義テンプレート
- syslog F5 VPN 事前定義テンプレート
- syslog Infoblox 事前定義テンプレート
- syslog Linux DHCPd3 事前定義テンプレート
- syslog MS DHCP 事前定義テンプレート
- syslog SafeConnect NAC 事前定義テンプレート
- syslog Aerohive 事前定義テンプレート
- syslog Blue Coat 事前定義テンプレート:Main Proxy、Proxy SG、Squid Web Proxy
- syslog ISE および ACS 事前定義テンプレート
- syslog Lucent QIP 事前定義テンプレート
syslog ASA VPN 事前定義テンプレート
ASA VPN でサポートされる syslog メッセージの形式とタイプについて説明します。
ヘッダー
パーサーでサポートされるヘッダーはすべてのクライアントで同一です(syslog 事前定義メッセージ テンプレートの使用を参照)。
新規マッピング本文メッセージ
次の表では、パーサーが認識するさまざまな ASA VPN 本文メッセージについて説明します。
| 本文メッセージ |
解析例 |
||
|---|---|---|---|
|
%ASA-6-109005 Authentication succeeded for user UserA from 10.100.1.1/100 to 10.10.11.11/20 on interface eth1/1 |
[UserA,10.100.1.1] |
||
|
%ASA-6-602303 IPSEC: An direction tunnel_type SA (SPI=spi) between local_IP and 10.100.1.1 (UserA) has been created. |
|||
|
%ASA-6-721016 (device) WebVPN session for client user UserA, IP 10.100.1.1 has been created. |
|||
|
%ASA-6-603104 PPTP Tunnel created, tunnel_id is number, remote_peer_ip is remote_address, ppp_virtual_interface_id is number,\ client_dynamic_ip is 10.100.1.1,ffg123 #% UserA is UserA, MPPE_key_strength is string |
|||
|
%ASA-6-603106 L2TP Tunnel created, tunnel_id is number, remote_peer_ip is remote_address, ppp_virtual_interface_id is number,\ client_dynamic_ip is 10.100.1.1, UserA is user |
|||
|
%ASA-6-113039 Group group User UserA IP 10.100.1.1 AnyConnect parent session started. |
|||
|
%ASA-6-802001 User UserA IP 10.100.1.1 OS os_name UDID number MDM action session started. |
|||
|
%ASA-6-713228: Group = ukyedu, UserA = cdbo227, IP = 128.163.8.205, Assigned private IP address 172.31.18.231 to remote user |
[UserA,172.31.18.231]
|
||
|
%ASA-4-722051: Group <DfltGrpPolicy> User <UserA> IP <74.136.197.123> IPv4 Address <172.31.18.154> IPv6 address <::> assigned to session |
[UserA,172.31.18.154]
|
マッピング削除本文メッセージ
ここではパーサーで ASA VPN のためにサポートされている マッピング削除メッセージについて説明します。
受信された本文が解析され、次のようにユーザの詳細が判明します。
[UserA,10.1.1.1]
| 本文メッセージ |
|---|
|
%ASA-4-113019 Group = group, UserA = UserA, IP = 10.1.1.1, Session disconnected.Session Type: type, Duration:\ duration, Bytes xmt: count,Bytes rcv: count, Reason: reason |
|
%ASA-4-717052 Group group name User UserA IP 10.1.1.1 Session disconnected due to periodic certificate authentication failure.Subject Name id subject name Issuer Name id issuer name\ Serial Number id serial number |
|
%ASA-6-602304 IPSEC: An direction tunnel_type SA (SPI=spi) between local_IP and 10.1.1.1 (UserA) has been deleted. |
|
%ASA-6-721018 WebVPN session for client user UserA, IP 10.1.1.1 has been deleted. |
|
%ASA-4-722049 Group group User UserA IP 10.1.1.1 Session terminated: SVC not enabled or invalid image on the ASA |
|
%ASA-4-722050 Group group User UserA IP 10.1.1.1 Session terminated: SVC not enabled for the user. |
|
%ASA-6-802002 User UserA IP 10.1.1.1 OS os_name UDID number MDM action session terminated. |
|
%ASA-3-716057 Group group User UserA IP 10.1.1.1 Session terminated, no type license available. |
|
%ASA-3-722046 Group group User UserA IP 10.1.1.1 Session terminated: unable to establish tunnel. |
|
%ASA-4-113035 Group group User UserA IP 10.1.1.1 Session terminated: AnyConnect not enabled or invalid AnyConnect image on the ASA. |
|
%ASA-4-716052 Group group-name User UserA IP 10.1.1.1 Pending session terminated. |
|
%ASA-6-721018 WebVPN session for client user UserA, IP 10.1.1.1 has been deleted. |
syslog Bluecat 事前定義テンプレート
Bluecat でサポートされる syslog メッセージの形式とタイプについて説明します。
ヘッダー
パーサーでサポートされるヘッダーはすべてのクライアントで同一です(syslog 事前定義メッセージ テンプレートの使用を参照)。
新規マッピング本文メッセージ
ここでは、Bluecat syslog で新規マッピングとしてサポートされるメッセージについて説明します。
受信された本文が解析され、次のようにユーザの詳細が判明します。
[macAddress=24:ab:81:ca:f2:72,ip=128.36.254.57]
| 本文(Body) |
|---|
| Nov 7 23:37:32 dh-campus1 dhcpd: DHCPACK on 128.36.254.57 to 24:ab:81:ca:f2:72 via 172.28.203.65 |
マッピング削除メッセージ
Bluecat のマッピング削除メッセージはありません。
syslog F5 VPN 事前定義テンプレート
F5 VPN でサポートされる syslog メッセージの形式とタイプについて説明します。
ヘッダー
パーサーでサポートされるヘッダーはすべてのクライアントで同一です(syslog 事前定義メッセージ テンプレートの使用を参照)。
新規マッピング本文メッセージ
次の表では、パーサーが認識するさまざまな F5 VPN 本文メッセージについて説明します。
受信された本文が解析され、次のようにユーザの詳細が判明します。
[user=UserA,ip=129.85.1.78]
| 本文(Body) |
|---|
| Apr 10 09:33:58 Oct 2 08:28:32 ruconnect1.rockefeller.edu security[20170]: [UserA@vendor-mstr] User UserA logged on from 129.85.1.183 to \ 129.85.1.78 Sid = a8b6c\ |
マッピング削除メッセージ
現在、F5 VPN でサポートされている削除メッセージはありません。
syslog Infoblox 事前定義テンプレート
Infoblox でサポートされる syslog メッセージの形式とタイプについて説明します。
ヘッダー
パーサーでサポートされるヘッダーはすべてのクライアントで同一です(syslog 事前定義メッセージ テンプレートの使用を参照)。
新規マッピング本文メッセージ
次の表では、パーサーが認識するさまざまな ASA VPN 本文メッセージについて説明します。
受信された本文が解析され、次のようにユーザの詳細が判明します。
[macAddress= 00:0c:29:a2:18:34,ip=10.0.10.100]
| 本文メッセージ |
|---|
|
Nov 15 11:37:26 zelbaz-lnx dhcpd[3179]: DHCPACK on 10.20.243.72 to c0:bd:d1:18:55:07 (android-df67ddcbb1271593) via eth2 relay 10.20.16.3 lease-duration 3600 |
|
Nov 15 11:38:11 zelbaz-lnx dhcpd[3179]: DHCPACK on 172.19.30.148 to 64:00:6a:7c:61:71 (DESKTOP-HUDGAAQ) via eth2 relay 172.19.30.1 lease-duration 691200 (RENEW) |
|
Nov 15 11:38:11 64.103.124.28 dhcpd[25595]: DHCPACK to 10.163.146.11 (a4:ba:db:ec:d6:a8) via eth1 |
マッピング削除メッセージ
マッピング削除では次のメッセージがサポートされています。
パーサーはさまざまな本文メッセージをマッピング削除メッセージとして認識します。これについて次の表で説明します。
受信された本文が解析され、次のようにユーザの詳細が判明します。
| 本文メッセージ |
|---|
|
07-11-2016 23:37:32 Daemon.Info 10.0.10.2 Jul 12 10:42:26 10.0.10.2 dhcpd[26083]: DHCPEXPIRE 10.0.10.100 has expired |
|
07-11-2016 23:37:32 Daemon.Info 10.0.10.2 Jul 12 10:42:26 10.0.10.2 dhcpd[26083]: DHCPRELEASE of 10.0.10.100 from 00:0c:29:a2:18:34 \ (win10) via eth1 uid 01:00:0c:29:a2:18:34 |
|
07-11-2016 23:37:32 Daemon.Info 10.0.10.2 Jul 12 10:42:26 10.0.10.2 dhcpd[25595]: RELEASE on 10.20.31.172 to c0:ce:cd:44:4f:bd |
syslog Linux DHCPd3 事前定義テンプレート
Linux DHCPd3 でサポートされる syslog メッセージの形式とタイプについて説明します。
ヘッダー
パーサーでサポートされるヘッダーはすべてのクライアントで同一です(syslog 事前定義メッセージ テンプレートの使用を参照)。
新規マッピング メッセージ
次の表では、パーサーが認識するさまざまな Linux DHCPd3 本文メッセージについて説明します。
受信された本文が解析され、次のようにユーザの詳細が判明します。
[macAddress=24:ab:81:ca:f2:72,ip=128.36.254.57]
| 本文メッセージ |
|---|
|
Nov 11 23:37:32 dhcpsrv dhcpd: DHCPACK on 10.0.10.100 to 00:0c:29:a2:18:34 (win10) via eth1 |
|
Nov 11 23:37:32 dhcpsrv dhcpd: DHCPACK on 10.0.10.100 (00:0c:29:a2:18:34) via eth1 |
マッピング削除本文メッセージ
ここではパーサーで Linux DHCPd3 のためにサポートされているマッピング削除メッセージについて説明します。
受信された本文が解析され、次のようにユーザの詳細が判明します。
[00:0c:29:a2:18:34 ,10.0.10.100]
| 本文メッセージ |
|---|
|
Nov 11 23:37:32 dhcpsrv dhcpd: DHCPEXPIRE 10.0.10.100 has expired |
|
Nov 11 23:37:32 dhcpsrv dhcpd: DHCPRELEASE of 10.0.10.100 from 00:0c:29:a2:18:34 (win10) via eth1 |
syslog MS DHCP 事前定義テンプレート
MS DHCP でサポートされる syslog メッセージの形式とタイプについて説明します。
ヘッダー
パーサーでサポートされるヘッダーはすべてのクライアントで同一です(syslog 事前定義メッセージ テンプレートの使用を参照)。
新規マッピング本文メッセージ
次の表では、パーサーが認識するさまざまな MS DHCP 本文メッセージについて説明します。
受信すると、パーサーはカンマ(,)を検索してデータを分割し、これらの形式のメッセージが次の例に示すように解析されます。
[macAddress=000C29912E5D,ip=10.0.10.123]
| 本文メッセージ |
|---|
|
Nov 11 23:37:32 10,07/21/16,16:55:22,Assign,10.0.10.123,win10.IDCSPAN.Local,000C29912E5D,,724476048,0,,,,0x4D53465420352E30,MSFT,5.0 |
マッピング削除本文メッセージ
ここではパーサーで MS DHCP のためにサポートされているマッピング削除メッセージについて説明します。
受信すると、パーサーはカンマ(,)を検索してデータを分割し、これらの形式のメッセージが次の例に示すように解析されます。
[macAddress=000C29912E5D,ip=10.0.10.123]
| 本文メッセージ |
|---|
|
Nov 11 23:37:32 12,07/21/16,16:55:18,Release,10.0.10.123,win10.IDCSPAN.Local,000C29912E5D,,3128563632,\ 0,,,,,,,,,0 |
syslog SafeConnect NAC 事前定義テンプレート
SafeConnect NAC でサポートされる syslog メッセージの形式とタイプについて説明します。
ヘッダー
パーサーでサポートされるヘッダーはすべてのクライアントで同一です(syslog 事前定義メッセージ テンプレートの使用を参照)。
新規マッピング本文メッセージ
次の表では、パーサーが認識するさまざまな SafeConnect NAC 本文メッセージについて説明します。
受信された本文が解析され、次のようにユーザの詳細が判明します。
[user=galindk1i,p=1599.11.471.86d,domain=Resnet-Macs]
| 本文メッセージ |
|---|
|
Apr 10 09:33:58 nac Safe*Connect: authenticationResult|159.91.147.186|159.91.147.186|UserA|true|Resnet-Macs|TCNJ-Chain|001b63b79018|MAC |
マッピング削除メッセージ
現在、Safe Connect でサポートされている削除メッセージはありません。
syslog Aerohive 事前定義テンプレート
Aerohive でサポートされる syslog メッセージの形式とタイプについて説明します。
ヘッダー
パーサーでサポートされるヘッダーはすべてのクライアントで同一です(syslog 事前定義メッセージ テンプレートの使用を参照)。
新規マッピング本文メッセージ
次の表では、パーサーが認識するさまざまな Aerohive 本文メッセージについて説明します。
本文で解析される詳細には、ユーザ名と IP アドレスがあります。解析に使用される正規表現の例を次に示します。
受信された本文が解析され、次のようにユーザの詳細が判明します。
[UserA,10.5.50.52]
| 本文メッセージ |
|---|
|
2013-04-01 14:06:05 info ah auth: Station 1cab:a7e6:cf7f ip 10.5.50.52 UserA UserA |
マッピング削除メッセージ
現在、Aerohive からのマッピング削除メッセージはサポートされていません。
syslog Blue Coat 事前定義テンプレート:Main Proxy、Proxy SG、Squid Web Proxy
Blue Coat の次のメッセージ タイプがサポートされています。
BlueCoat メッセージでサポートされる syslog メッセージの形式とタイプについて説明します。
ヘッダー
パーサーでサポートされるヘッダーはすべてのクライアントで同一です(syslog 事前定義メッセージ テンプレートの使用を参照)。
新規マッピング本文メッセージ
次の表では、パーサーが認識するさまざまな Blue Coat 本文メッセージについて説明します。
受信された本文が解析され、次のようにユーザの詳細が判明します。
[UserA,192.168.10.24]
| 本文メッセージ(この例は、BlueCoat プロキシ SG メッセージからの引用です) |
|---|
|
2016-09-21 23:05:33 58 1.6.6.1 UserA - - PROXIED "none" http://www.espn.com/ 200 TCP_MISS GET application/json;charset=UTF-8 http site.api.espn.com 80 /apis/v2/scoreboard/header ?rand=1474499133503 - "Mozilla/5.0 (Windows NT 10.0; Win64; x64) AppleWebKit/537.36 (KHTML, like Gecko) Chrome/46.0.2486.0 Safari/537.36 Edge/13.10586" 192.168.10.24 7186 708 - "unavailable |
次の表では、新規マッピング メッセージに使用されるクライアント別の正規表現構造について説明します。
| Client |
正規表現 |
|---|---|
|
BlueCoat メイン プロキシ |
新規マッピング (TCP_HIT|TCP_MEM){1} IP \s((?:(?:[0-9]{1,3}\.){3}[0-9]{1,3})|(?:(?:[a-zA-Z0-9]{1,4}\:{1,2}){1,7}[a-zA-Z0-9]{1,4}))\s ユーザ名(User name) \s\-\s([a-zA-Z0-9\_]+)\s\-\s |
|
BlueCoat Proxy SG |
新規マッピング (\-\sPROXIED){1} IP \s((?:(?:[0-9]{1,3}\.){3}[0-9]{1,3})|(?:(?:[a-zA-Z0-9]{1,4}\:{1,2}){1,7}[a-zA-Z0-9]{1,4}))\s[a-zA-Z0-9\_]+\s\- ユーザ名(User name) \s[0-9]{1,3}\.[0-9]{1,3}\.[0-9]{1,3}\.[0-9]{1,3}\s([a-zA-Z0-9\_]+)\s\- |
|
BlueCoat Squid Web Proxy |
新規マッピング (TCP_HIT|TCP_MEM){1} IP \s((?:(?:[0-9]{1,3}\.){3}[0-9]{1,3})|(?:(?:[a-zA-Z0-9]{1,4}\:{1,2}){1,7}[a-zA-Z0-9]{1,4}))\sTCP ユーザ名(User name) \s([a-zA-Z0-9\._]+)\s\-\/ |
マッピング削除メッセージ
Blue Coat クライアントではマッピング削除メッセージがサポートされていますが、現在利用できる例はありません。
次の表では、マッピング削除メッセージに使用されるクライアント別の既知の正規表現構造について説明します。
| クライアント |
正規表現 |
|---|---|
|
BlueCoat メイン プロキシ |
(TCP_MISS|TCP_NC_MISS){1} |
|
BlueCoat Proxy SG |
現在利用できる例はありません。 |
|
BlueCoat Squid Web Proxy |
(TCP_MISS|TCP_NC_MISS){1} |
syslog ISE および ACS 事前定義テンプレート
パーサーは ISE または ACS クライアントをリッスンするときに、次のメッセージ タイプを受信します。
-
認証成功:ユーザが ISE または ACS により認証されると、認証が成功したことを通知し、ユーザの詳細情報を記述した認証成功メッセージが発行されます。このメッセージが解析され、このメッセージのユーザの詳細とセッション ID が保存されます。
-
アカウンティング開始およびアカウンティング更新メッセージ(新規マッピング):ISE または ACS から受信したアカウンティング開始メッセージまたはアカウンティング更新メッセージは、認証成功メッセージから保存されたユーザの詳細とセッション ID を使用して解析され、ユーザがマッピングされます。
-
アカウンティング終了(マッピング削除):ISE または ACS から受信されると、システムからユーザ マッピングが削除されます。
ISE および ACS でサポートされる syslog メッセージの形式とタイプについて説明します。
認証成功メッセージ
認証成功メッセージとして次のメッセージがサポートされています。
-
ヘッダー
<181>Sep 13 10:51:41 Server logTag messageId totalFragments currentFragments message
例:<181>Sep 13 10:51:41 Positron CISE_PassiveID 0000005255 1 0 message
-
本文(Body)
Passed-Authentication 000011 1 0 2016-05-09 12:48:11.011 +03:00 0000012435 5200 NOTICE Passed-Authentication: Authentication succeeded, ConfigVersionId=104, Device IP Address=10.229.128.177, DestinationIPAddress=10.56.15.93, DestinationPort=1812, UserA=UserA, Protocol=Radius, RequestLatency=45, NetworkDeviceName=DefaultNetworkDevice, User-Name=UserA, NAS-IP-Address=1.1.1.1, Session-Timeout=90, Calling-Station-ID=, cisco-av-pair=audit-session-id=5
-
解析例
ユーザ名とセッション ID だけが解析されます。
[UserA,5]
アカウンティング開始/更新(新規マッピング)メッセージ
新規マッピング メッセージとして次のメッセージがサポートされています。
-
ヘッダー
<181>Sep 13 10:51:41 Server logTag messageId totalFragments currentFragments message
例:<181>Sep 13 10:51:41 Positron CISE_PassiveID 0000005255 1 0 message
-
本文(Body)
CISE_RADIUS_Accounting 000011 1 0 2016-05-09 12:53:52.823 +03:00 0000012451 3000 NOTICE Radius-Accounting: RADIUS Accounting start request, ConfigVersionId=104, Device IP Address=10.229.128.177, RequestLatency=12, NetworkDeviceName=DefaultNetworkDevice, User-Name=UserA, NAS-IP-Address=1.1.1.1, Framed-IP-Address=1.1.1.6, Session-Timeout=90, Calling-Station-ID=, Acct-Status-Type=Start, Acct-Session-Id=6, cisco-av-pair=audit-session-id=5
-
解析例
解析される詳細には、ユーザ名、フレーム IP アドレス、および MAC アドレス(メッセージに含まれている場合)などがあります。
[UserA,1.1.1.6]
マッピング削除メッセージ
マッピング削除では次のメッセージがサポートされています。
-
ヘッダー
<181>Sep 13 10:51:41 Server logTag messageId totalFragments currentFragments message
例:<181>Sep 13 10:51:41 Positron CISE_PassiveID 0000005255 1 0 message
-
本文(Body)
2016-05-09 12:56:27.274 +03:00 0000012482 3001 NOTICE Radius-Accounting: RADIUS Accounting stop request, ConfigVersionId=104, Device IP Address=10.229.128.177, RequestLatency=13, NetworkDeviceName=DefaultNetworkDevice, User-Name=UserA, NAS-IP-Address=1.1.1.1, Framed-IP-Address=1.1.1.6, Session-Timeout=90, Calling-Station-ID=, Acct-Status-Type=Stop, Acct-Session-Id=104, cisco-av-pair=audit-session-id=5
-
解析例
解析される詳細には、ユーザ名、フレーム IP アドレス、および MAC アドレス(メッセージに含まれている場合)などがあります。
[UserA,1.1.1.6]
syslog Lucent QIP 事前定義テンプレート
Lucent QIP でサポートされる syslog メッセージの形式とタイプについて説明します。
ヘッダー
パーサーでサポートされるヘッダーはすべてのクライアントで同一です(syslog 事前定義メッセージ テンプレートの使用を参照)。
新規マッピング本文メッセージ
次の表では、パーサーが認識するさまざまな Lucent QIP 本文メッセージについて説明します。
これらのメッセージの正規表現構造を次に示します。
DHCP_GrantLease|:DHCP_RenewLease
受信された本文が解析され、次のようにユーザの詳細が判明します。
[00:0C:29:91:2E:5D,100.0.0.1]
| 本文メッセージ |
|---|
|
DHCP:subtype=0:Single:$IGNORE_N$ DHCP_GrantLease: Host=$HOSTNAME$ P=100.0.0.1 MAC= 00:0C:29:91:2E:5D |
|
DHCP:subtype=0:Single:$IGNORE_N$ DHCP_RenewLease: Host=$HOSTNAME$ P=100.0.0.1 MAC= 00:0C:29:91:2E:5D |
マッピング削除本文メッセージ
次の表では、パーサーが認識するさまざまな Lucent QIP 本文メッセージについて説明します。
これらのメッセージの正規表現構造を次に示します。
Delete Lease:|DHCP Auto Release:
受信された本文が解析され、次のようにユーザの詳細が判明します。
[100.0.0.1]
| 本文メッセージ |
|---|
|
DHCP:subtype=0:Single:$IGNORE_N$ Delete Lease: IP=100.0.0.1 $IGNORE_N$ |
|
DHCP:subtype=0:Single:$IGNORE_N$ DHCP Auto Release: IP=100.0.0.1 $IGNORE_N$ |
パッシブ ID サービスのフィルタリング
エンドポイント プローブ
設定可能なカスタム プロバイダーの他に、パッシブ ID サービス がアクティブになると ISE でエンドポイント プローブが有効になります。エンドポイント プローブは、特定の各ユーザがまだシステムにログインしているかどうかを定期的にチェックします。
(注) | エンドポイントがバックグラウンドで実行されることを確認するには、まず最初の Active Directory 参加ポイントを設定し、[クレデンシャルの保存(Store Credentials)] を選択していることを確認します。エンドポイント プローブの設定の詳細については、を参照してください。 |
エンドポイントのステータスを手動で確認するには、[アクション(Actions)] 列から [ライブ セッション(Live Sessions)] に移動し、[アクションを表示(Show Actions)] をクリックし、次の図に示すように [現在のユーザを確認(Check current user)] を選択します。
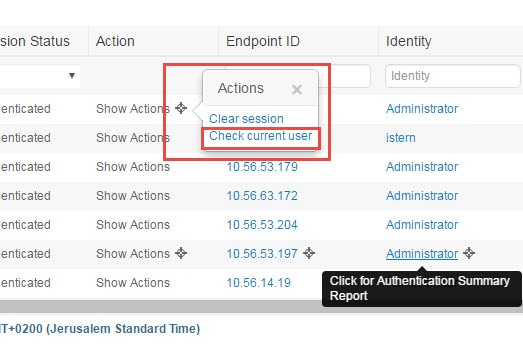
エンドポイント ユーザのステータスと手動でのチェックの実行の詳細については、RADIUS ライブ セッションを参照してください。
エンドポイント プローブはユーザが接続していることを認識します。特定のエンドポイントのセッションが最後に更新された時点から 4 時間経過している場合には、ユーザがまだログインしているかどうかを確認し、次のデータを収集します。
このチェックに基づいてプローブは次の操作を実行します。
-
ユーザがまだログインしている場合、プローブは ISE を [アクティブ ユーザ(Active User)] ステータスで更新します。
-
ユーザがログアウトしている場合、セッション状態は [終了(Terminated)] に更新され、15 分経過後にユーザはセッション ディレクトリから削除されます。
-
ユーザと通信できない場合、たとえばファイアウォールによって通信が防止されているか、エンドポイントがシャットダウンしている場合などには、ステータスが [到達不可能(Unreachable)] として更新され、サブスクライバ ポリシーによってユーザ セッションの処理方法が決定します。エンドポイントは引き続きセッション ディレクトリに残ります。
エンドポイント プローブの使用
サブネット範囲に基づいてエンドポイント プローブを作成および有効にできます。PSN ごとに 1 つのエンドポイント プローブを作成できます。エンドポイント プローブを使用するには、次のように設定していることを確認してください。
-
エンドポイントはポート 445 とのネットワーク接続が必要です。
-
ISE から 1 番目の Active Directory 参加ポイントを設定し、プロンプトが表示されたら [クレデンシャルの選択(Select Credentials)] を選択してください。参加ポイントの詳細については、プローブおよびプロバイダーとしての Active Directoryを参照してください。
(注)
エンドポイントがバックグラウンドで実行するようにするため、最初に 1 番目の Active Directory 参加ポイントを設定する必要があります。これにより、Active Directory プローブが完全に設定されていない場合でもエンドポイント プローブを実行できるようになります。
| ステップ 1 | を選択し、[エンドポイント プローブ(Endpoint Probes)] を選択します。 |
| ステップ 2 | 新しいエンドポイント プローブを作成するには、[追加(Add)] をクリックします。 |
| ステップ 3 | 必須フィールドに入力し、[ステータス(Status)] フィールドで [有効化(Enable)] を選択していることを確認してから、[送信(Submit)] をクリックします。詳細については、エンドポイント プローブ設定を参照してください。 |
エンドポイント プローブ設定
サブネット範囲に基づいて PSN ごとに 1 つのエンドポイント プローブを作成します。展開で複数の PSN を使用している場合、個別のサブネット セットに各 PSN を割り当てることができます。この場合、各プローブを異なるユーザ グループに使用します。
を選択し、次に [エンドポイント プローブ(Endpoint Probes)] を選択して、PSN に新しいエンドポイント プローブを設定します。
| フィールド | 説明 |
|---|---|
|
[名前(Name)] |
このプローブの用途を示す一意の名前を入力します。 |
|
説明 |
このプローブの用途を示す一意の説明を入力します。 |
|
[ステータス(Status)] |
このプローブをアクティブにするには [有効化(Enable)] を選択します。 |
|
ホスト名(Host Name) |
展開で使用可能な PSN のリストから、このプローブの PSN を選択します。 |
|
サブネット(Subnets) |
このプローブがチェックする必要があるエンドポイントのグループのサブネット範囲を入力します。標準のサブネット マスク範囲と、カンマで区切ったサブネット アドレスを使用します。 例:10.56.14.111/32,1.1.1.1/24,2.55.2.0/16,2.2.3.0/16,1.2.3.4/32 各範囲は一意である必要があり、相互に重複していてはなりません。たとえば、範囲 2.2.2.0/16,2.2.3.0/16 は相互に重複しているため、同一プローブに対して入力できません。 |
サブスクライバ
パッシブ ID サービス は、さまざまなプロバイダーから収集し、Cisco ISE セッション ディレクトリにより保存された認証済みユーザ ID を、Cisco Stealthwatch や Cisco Firepower Management Center(FMC)などのその他のネットワーク システムに送信するため、Cisco pxGrid サービスを使用します。
Cisco ISE に接続するサブスクライバは、pxGrid サービスの使用を登録する必要があります。サブスクライバは、クライアントになるために pxGrid SDK を介してシスコから使用可能な pxGrid クライアント ライブラリを採用する必要があります。サブスクライバは、一意の名前と証明書ベースの相互認証を使用して pxGrid にログインできます。Cisco pxGrid サブスクライバは、有効な証明書を送信すると、ISE により自動的に承認されます。
サブスクライバは設定されている pxGrid サーバのホスト名または IP アドレスのいずれかに接続できます。不必要なエラーが発生することを防ぎ、DNS クエリが適切に機能するようにするため、ホスト名を使用することが推奨されます。公開および登録するためにサブスクライバの pxGrid で作成される、情報トピックまたはチャネル機能があります。Cisco ISE では SessionDirectory と IdentityGroup だけがサポートされています。機能情報は、公開、ダイレクト クエリ、または一括ダウンロード クエリによりパブリッシャから取得でき、[機能(Capabilities)] タブの [サブスクライバ(Subscribers)] で確認できます。
サブスクライバが ISE から情報を受信できるようにするには、次の操作を行います。
-
必要に応じて、サブスクライバ側から証明書を生成します。
-
サブスクライバの pxGrid 証明書の生成 PassiveID ワーク センターから。
-
サブスクライバの有効化。サブスクライバが ISE からユーザ ID を受信できるようにするため、このステップを実行するか、または承認を自動的に有効にする必要があります。サブスクライバの設定を参照してください。
サブスクライバの詳細については、次を参照してください。
サブスクライバの pxGrid 証明書の生成
pxGrid とサブスクライバの間の相互信頼を保証するため、pxGrid サブスクライバの証明書を生成できます。これにより、ISE からサブスクライバにユーザ ID を渡すことが可能になります。次のタスクを実行するには、スーパー管理者またはシステム管理者である必要があります。
| ステップ 1 | を選択し、[証明書(Certificates)] タブに移動します。 | ||
| ステップ 2 | [処理の選択(I want to)] ドロップダウン リストから、以下のいずれかのオプションを選択します。
| ||
| ステップ 3 | (オプション)この証明書の説明を入力できます。 | ||
| ステップ 4 | この証明書のベースとなる pxGrid 証明書テンプレートを表示または編集します。証明書テンプレートには、そのテンプレートに基づいて認証局(CA)によって発行されたすべての証明書に共通のプロパティが含まれています。証明書テンプレートは、件名、サブジェクト代替名(SAN)、キー タイプ、キー サイズ、使用する必要がある SCEP RA プロファイル、証明書の有効期間、証明書がクライアントまたはサーバの認証またはその両方に使用される必要があるかどうかを指定した拡張キーの使用状況(EKU)を定義します。内部 Cisco ISE CA(ISE CA)は、証明書テンプレートを使用し、そのテンプレートに基づいて証明書を発行します。このテンプレートを編集するには、 を選択します。 | ||
| ステップ 5 | サブジェクト代替名(SAN)を指定します。複数の SAN を追加できます。次のオプションを使用できます。
| ||
| ステップ 6 | [証明書のダウンロード形式(Certificate Download Format)] ドロップダウン リストから、以下のいずれかのオプションを選択します。
| ||
| ステップ 7 | 証明書のパスワードを入力します。 | ||
| ステップ 8 | [作成(Create)] をクリックします。 |
サブスクライバの有効化
-
Cisco pxGrid クライアントからの要求を表示するには、少なくとも 1 つのノードで pxGrid ペルソナを有効にします。
-
パッシブ ID サービスを有効にします。詳細については、Easy Connectを参照してください。
ライブ ログからのサブスクライバ イベントの表示
[ライブ ログ(Live Logs)] ページにはすべてのサブスクライバ イベントが表示されます。イベント情報には、イベント タイプ、タイムスタンプ、サブスクライバ名、機能名が含まれています。
に移動し、[ライブ ログ(Live Log)] タブを選択し、イベント リストを表示します。ログを消去して、リストを再同期またはリフレッシュすることもできます。
サブスクライバの設定
次のタスクを実行するには、スーパー管理者またはシステム管理者である必要があります。
| ステップ 1 | を選択します。 |
| ステップ 2 | 必要に応じて、次のオプションを選択します。
|
| ステップ 3 | [保存(Save)] をクリックします。 |
PassiveID ワーク センター でのサービスのモニタリングとトラブルシューティング
モニタリング、トラブルシューティング、およびレポーティングの各ツールを使用して PassiveID ワーク センター を管理する方法について説明します。
LDAP
Lightweight Directory Access Protocol(LDAP)は、RFC 2251 で定義されている、TCP/IP 上で動作するディレクトリ サービスの問い合わせおよび変更のためのネットワーキング プロトコルです。LDAP は、X.500 ベースのディレクトリ サーバにアクセスするためのライトウェイト メカニズムです。
Cisco ISE は、LDAP プロトコルを使用して LDAP 外部データベース(ID ソースとも呼ばれる)と統合します。
- LDAP ディレクトリ サービス
- 複数の LDAP インスタンス
- LDAP フェールオーバー
- LDAP 接続管理
- LDAP ユーザ認証
- 許可ポリシーで使用する LDAP グループおよび属性の取得
- LDAP サーバによって返されるエラー
- LDAP ユーザ ルックアップ
- LDAP MAC アドレス ルックアップ
- LDAP ID ソースの追加
- LDAP ID ソースによるセキュア認証の有効化
LDAP ディレクトリ サービス
LDAP ディレクトリ サービスは、クライアント/サーバ モデルに基づきます。クライアントは、LDAP サーバに接続し、操作要求をサーバに送信することで、LDAP セッションを開始します。サーバは、応答を送信します。1 台以上の LDAP サーバに、LDAP ディレクトリ ツリーまたは LDAP バックエンド データベースからのデータが含まれています。
ディレクトリ サービスは、情報を保持するデータベースであるディレクトリを管理します。ディレクトリ サービスは、情報を保存するために分散モデルを使用します。その情報は、通常はディレクトリ サーバ間で複製されます。
LDAP ディレクトリは、単純なツリー階層で編成されており、数多くのサーバ間で分散できます。各サーバには、定期的に同期化されるディレクトリ全体の複製バージョンを配置できます。
ツリーのエントリには属性のセットが含まれており、各属性には名前(属性タイプまたは属性の説明)と 1 つ以上の値があります。属性はスキーマに定義されます。
各エントリには、固有識別情報、つまり識別名(DN)があります。この名前には、エントリ内の属性で構成されている相対識別名(RDN)と、それに続く親エントリの DN が含まれています。DN は完全なファイル名、RDN はフォルダ内の相対ファイル名と考えることができます。
複数の LDAP インスタンス
IP アドレスまたはポートの設定が異なる複数の LDAP インスタンスを作成することにより、異なる LDAP サーバを使用するか、または同じ LDAP サーバ上の異なるデータベースを使用して認証を行うように、Cisco ISE を設定できます。プライマリ サーバの各 IP アドレスおよびポートの設定は、セカンダリ サーバの IP アドレスおよびポートの設定とともに、Cisco ISE LDAP ID ソース インスタンスに対応する LDAP インスタンスを形成します。
Cisco ISE では、個々の LDAP インスタンスが一意の LDAP データベースに対応している必要はありません。複数の LDAP インスタンスを、同一のデータベースにアクセスするように設定できます。この方法は、LDAP データベースにユーザまたはグループのサブツリーが複数含まれている場合に役立ちます。各 LDAP インスタンスでは、ユーザとグループに対してそれぞれ単一のサブツリー ディレクトリだけをサポートするため、Cisco ISE が認証要求を送信するユーザ ディレクトリとグループ ディレクトリのサブツリーの組み合わせごとに、別々の LDAP インスタンスを設定する必要があるからです。
LDAP フェールオーバー
Cisco ISE は、プライマリ LDAP サーバとセカンダリ LDAP サーバ間でのフェールオーバーをサポートします。フェールオーバーは、LDAP サーバがダウンしているかまたは到達不可能なために Cisco ISE で LDAP サーバに接続できないことが原因で認証要求が失敗した場合に発生します。
フェールオーバー設定が指定され、Cisco ISE で接続しようとした最初の LDAP サーバが到達不可能な場合、Cisco ISE は常に 2 番目の LDAP サーバへの接続を試行します。再度、Cisco ISE で最初の LDAP サーバを使用する場合は、[フェールバック再試行の遅延(Failback Retry Delay)] テキスト ボックスに値を入力する必要があります。
(注) | Cisco ISE では、常にプライマリ LDAP サーバを使用して、認証ポリシーで使用するグループと属性を管理者ポータルから取得します。このため、プライマリ LDAP サーバはこれらの項目を設定するときにアクセス可能である必要があります。Cisco ISE では、フェールオーバーの設定に従って、実行時に認証と許可にのみセカンダリ LDAP サーバを使用します。 |
LDAP 接続管理
Cisco ISE では、複数の同時 LDAP 接続がサポートされます。接続は、最初の LDAP 認証時にオン デマンドで開かれます。最大接続数は、LDAP サーバごとに設定されます。事前に接続を開いておくと、認証時間が短縮されます。同時バインディング接続に使用する最大接続数を設定できます。開かれる接続の数は、LDAP サーバ(プライマリまたはセカンダリ)ごとに異なる場合があり、サーバごとに設定される最大管理接続数に基づいて決まります。
Cisco ISE は、Cisco ISE で設定されている LDAP サーバごとに、開いている LDAP 接続(バインディング情報を含む)のリストを保持します。認証プロセス中に、Connection Manager は開いている接続をプールから検索しようとします。開いている接続が存在しない場合、新しい接続が開かれます。
LDAP サーバが接続を閉じた場合、Connection Manager はディレクトリを検索する最初のコールでエラーをレポートし、接続を更新しようとします。認証プロセスが完了した後、Connection Manager は接続を解放します。
LDAP ユーザ認証
LDAP は、Cisco ISE ユーザ認証のための外部データベースとして使用できます。Cisco ISE ではプレーン パスワード認証がサポートされます。ユーザ認証には次の処理が含まれます。
ユーザを認証するために、Cisco ISE は LDAP サーバにバインド要求を送信します。バインド要求には、ユーザの DN およびユーザ パスワードがクリア テキストで含まれています。ユーザの DN およびパスワードが LDAP ディレクトリ内のユーザ名およびパスワードと一致した場合に、ユーザは認証されます。
Secure Sockets Layer(SSL)を使用して LDAP サーバへの接続を保護することを推奨します。
(注) | パスワード変更のオプションは、パスワードの有効期限が切れた後にアカウントの残りの猶予ログインがあるときにのみ、LDAP でサポートされます。LDAP サーバの bindResponse は LDAP_SUCCESS であり、bindResponse メッセージに残りの猶予ログインの制御フィールドが含まれる必要があります。bindResponse メッセージにさらなる制御フィールド(残りの猶予ログイン以外)が含まれる場合は、ISE に復号化エラーが発生する可能性があります。 |
許可ポリシーで使用する LDAP グループおよび属性の取得
Cisco ISE は、ディレクトリ サーバでバインド操作を実行し、サブジェクトを検索および認証することによって、LDAP ID ソースに対してサブジェクト(ユーザまたはホスト)を認証できます。認証が成功した後、Cisco ISE は要求された場合は常にサブジェクトに所属するグループおよび属性を取得できます。Cisco ISE 管理者ポータルで取得されるように属性を設定するには、 を選択します。Cisco ISE は、これらのグループおよび属性を使用してサブジェクトを許可できます。
ユーザの認証または LDAP ID ソースの問い合わせを行うために、Cisco ISE は LDAP サーバに接続し、接続プールを保持します。
LDAP グループ メンバーシップ情報の取得
ユーザ認証、ユーザ ルックアップ、および MAC アドレス ルックアップのために、Cisco ISE は LDAP データベースからグループ メンバーシップ情報を取得する必要があります。LDAP サーバは、サブジェクト(ユーザまたはホスト)とグループ間の関連付けを次の方法のいずれかで表します。
LDAP ID ソースには、グループ メンバーシップ情報の取得のために次のパラメータが含まれています。
[参照方向(Reference direction)]:このパラメータは、グループ メンバーシップを決定するときに使用する方法を指定します(グループからサブジェクトへまたはサブジェクトからグループへ)。
[グループ マップ属性(Group Map Attribute)]:このパラメータは、グループ メンバーシップ情報を含む属性を示します。
[グループ オブジェクト クラス(Group Object Class)]:このパラメータは、特定のオブジェクトがグループとして認識されることを決定します。
[グループ検索サブツリー(Group Search Subtree)]:このパラメータは、グループ検索の検索ベースを示します。
[メンバー タイプ オプション(Member Type Option)]:このパラメータは、グループ メンバー属性にメンバーが保存される方法を指定します(DN として、またはプレーン ユーザ名として)。
LDAP 属性の取得
ユーザ認証、ユーザ ルックアップ、および MAC アドレス ルックアップのために、Cisco ISE は LDAP データベースからサブジェクト属性を取得する必要があります。LDAP ID ソースのインスタンスごとに、ID ソース ディクショナリが作成されます。これらのディレクトリでは、次のデータ型の属性がサポートされています。
符号なし整数および IPv4 属性の場合、Cisco ISE は取得した文字列を対応するデータ型に変換します。変換が失敗した場合、または属性の値が取得されなかった場合、Cisco ISE ではデバッグ メッセージをロギングしますが、認証またはルックアップ プロセスは失敗しません。
変換が失敗した場合、または Cisco ISE で属性の値が取得されない場合に、Cisco ISE で使用できるデフォルトの属性値を任意で設定できます。
LDAP 証明書の取得
ユーザ ルックアップの一部として証明書取得を設定した場合、Cisco ISE は証明書属性の値を LDAP から取得する必要があります。証明書属性の値を LDAP から取得するには、LDAP ID ソースの設定時に、アクセスする属性のリストで証明書属性をあらかじめ設定しておく必要があります。
LDAP サーバによって返されるエラー
LDAP ユーザ ルックアップ
Cisco ISE は LDAP サーバを使用したユーザ ルックアップ機能をサポートしています。この機能を使用すると、認証なしで LDAP データベース内のユーザを検索し、情報を取得できます。ユーザ ルックアップ プロセスには次のアクションが含まれます。
LDAP MAC アドレス ルックアップ
Cisco ISE は MAC アドレス ルックアップ機能をサポートしています。この機能を使用すると、認証なしで LDAP データベース内の MAC アドレスを検索し、情報を取得できます。MAC アドレス ルックアップ プロセスには次のアクションが含まれます。
LDAP ID ソースの追加
LDAP スキーマの設定
| ステップ 1 | [管理(Administration)] > [ID の管理(Identity Management)] > [外部 ID ソース(External Identity Sources)] > [LDAP] を選択します。 |
| ステップ 2 | LDAP インスタンスを選択します。 |
| ステップ 3 | [全般(General)] タブをクリックします。 |
| ステップ 4 | [スキーマ(Schema)] オプションの近くにあるドロップダウン矢印をクリックします。 |
| ステップ 5 | [スキーマ(Schema)] ドロップダウン リストから必要なスキーマを選択します。[カスタム(Custom)] オプションを選択して、要件に基づいて属性を更新できます。
事前定義属性は、組み込みスキーマ(Active Directory、Sun directory Server、Novell eDirectory など)に使用されます。事前定義されたスキーマの属性を編集すると、Cisco ISE が自動的にカスタム スキーマを作成します。 |
プライマリおよびセカンダリ LDAP サーバの設定
LDAP インスタンスを作成したら、プライマリ LDAP サーバに対する接続を設定する必要があります。セカンダリ LDAP サーバの設定は、オプションです。
LDAP サーバからの属性を取得するための Cisco ISE の有効化
Cisco ISE で LDAP サーバからユーザとグループのデータを取得するには、Cisco ISE で LDAP ディレクトリの詳細を設定する必要があります。LDAP ID ソースでは、次の 3 つの検索が適用されます。
LDAP サーバからのグループ メンバーシップ詳細の取得
(注) | Active Directory の組み込みグループは、Active Directory が Cisco ISE の LDAP ID ストアとして設定されているときにはサポートされません。 |
LDAP サーバからのユーザ属性の取得
| ステップ 1 | を選択します。 |
| ステップ 2 | 編集する LDAP インスタンスの隣にあるチェックボックスをオンにし、[編集(Edit)] をクリックします。 |
| ステップ 3 | [属性(Attributes)] タブをクリックします。 |
| ステップ 4 | を選択して新しい属性を追加するか、 を選択して LDAP サーバから属性を選択します。
Cisco ISE では、属性タイプ IP を手動で追加するときに、ユーザ認証に IPv4 または IPv6 アドレスを使用して LDAP サーバを設定できます。 |
| ステップ 5 | 選択する属性の隣にあるチェックボックスをオンにし、[OK] をクリックします。 |
| ステップ 6 | 属性選択を保存するには、[送信(Submit)] をクリックします。 |
LDAP ID ソースによるセキュア認証の有効化
LDAP 設定ページで [セキュア認証(Secure Authentication)] オプションを選択すると、Cisco ISE は LDAP ID ソースとのセキュアな通信に SSL を使用します。LDAP ID ソースへのセキュアな接続は以下を使用して確立されます。
-
SSL トンネル:SSL v3 または TLS v1(LDAP サーバでサポートされる最も強力なバージョン)を使用
-
サーバ認証(LDAP サーバの認証):証明書ベース
-
クライアント認証(Cisco ISE の認証):なし(管理者のバインドは SSL トンネル内で使用されます)
-
暗号スイート:Cisco ISE でサポートされるすべての暗号スイート
最も強力な暗号化と Cisco ISE がサポートする暗号方式を備えている TLS v1 を使用することを推奨します。
Cisco ISE が LDAP ID ソースと安全に通信できるようにするには、次の手順を実行します。
| ステップ 1 | LDAP サーバにサーバ証明書を発行した CA の認証局(CA)チェーン全体を Cisco ISE にインポートします()。
完全な CA チェーンは、ルート CA 証明書および中間 CA 証明書を参照し、LDAP サーバ証明書は参照しません。 |
| ステップ 2 | LDAP ID ソースとの通信時にセキュア認証を使用するように Cisco ISE を設定します(。[接続設定(Connection Settings)] タブで [セキュア認証(Secure Authentication)] チェックボックスを必ずオンにしてください)。 |
| ステップ 3 | LDAP ID ストアでルート CA 証明書を選択します。 |
ODBC ID ソース
オープン データベース コネクティビティ(ODBC)準拠データベースは、ユーザとエンドポイントを認証する外部 ID ソースとして使用できます。ODBC ID ストアは、ID ストアの順序で、ゲストおよびスポンサーの認証に使用できます。また、BYOD フローにも使用できます。
サポートされているデータベース エンジンは次のとおりです。
ODBC 準拠データベースに対して認証するように Cisco ISE を設定しても、データベースの設定には影響を与えません。データベースを管理するには、データベースのマニュアルを参照してください。
ODBC データベースのクレデンシャル チェック
Cisco ISE は、ODBC データベースに対する 3 つの異なるタイプのクレデンシャル チェックをサポートしています。それぞれのクレデンシャル チェック タイプに適切な SQL ストアド プロシージャを設定する必要があります。ストアド プロシージャは、ODBC データベースで適切なテーブルをクエリし、ODBC データベースから出力パラメータやレコードセットを受信するために使用されます。データベースは、ODBC クエリに応答してレコードセットまたは名前付きパラメータのセットを返すことができます。
パスワードは、クリア テキストまたは暗号化形式で ODBC データベースに保存できます。Cisco ISE によって呼び出された場合は、ストアド プロシージャでパスワードをクリア テキストに復号化できます。
| クレデンシャル チェック タイプ |
ODBC 入力パラメータ |
ODBC 出力パラメータ |
クレデンシャル チェック |
認証プロトコル |
||
|---|---|---|---|---|---|---|
|
ODBC データベースのプレーン テキスト パスワード認証 |
[ユーザ名(Username)] [パスワード(Password)] |
結果 グループ アカウント情報 エラー文字列 |
ユーザ名とパスワードが一致すると、関連するユーザ情報が返されます。 |
PAP EAP-GTC(PEAP または EAP-FAST の内部メソッドとして) TACACS |
||
|
ODBC データベースから取得したプレーン テキスト パスワード |
[ユーザ名(Username)] |
結果 グループ アカウント情報 エラー文字列 [パスワード(Password)] |
ユーザ名が見つかった場合、そのパスワードと関連するユーザ情報がストアド プロシージャによって返されます。Cisco ISE は、認証方式に基づいてパスワード ハッシュを計算し、クライアントから受信したものと比較します。 |
CHAP MSCHAPv1/v2 EAP-MD5 LEAP EAP-MSCHAPv2(PEAP または EAP-FAST の内部メソッドとして) TACACS |
||
|
ルックアップ |
[ユーザ名(Username)] |
結果 グループ アカウント情報 エラー文字列
|
ユーザ名が見つかった場合、該当するユーザ情報が返されます。 |
MAB PEAP、EAP-FAST、EAP-TTLS の高速再接続 |
次の表に、ODBC データベース ストアド プロシージャと Cisco ISE 認証結果コードによって返される、結果コード間のマッピングを示します。
|
(ストアド プロシージャによって返される)結果コード |
説明 |
Cisco ISE 認証結果コード |
|---|---|---|
|
[0] |
CODE_SUCCESS |
該当なし(認証成功) |
|
1 |
CODE_UNKNOWN_USER |
UnknownUser |
|
2 |
CODE_INVALID_PASSWORD |
失敗しました(Failed) |
|
3 |
CODE_UNKNOWN_USER_OR_INVALID_PASSWORD |
UnknownUser |
|
4 |
CODE_INTERNAL_ERROR |
エラー(Error) |
|
10001 |
CODE_ACCOUNT_DISABLED |
DisabledUser |
|
10002 |
CODE_PASSWORD_EXPIRED |
NotPerformedPasswordExpired |
(注) | Cisco ISE は、このマッピングされた認証結果コードに基づいて実際の認証/ルックアップ操作を実行します。 |
ODBC データベースからグループと属性を取得するためにストアド プロシージャを使用できます。
プレーン テキスト パスワード認証用のレコードセットを返すサンプルのプロシージャ(Microsoft SQL Server 用)
CREATE PROCEDURE [dbo].[ISEAuthUserPlainReturnsRecordset]
        @username varchar(64), @password varchar(255)
AS
BEGIN
        IF EXISTS( SELECT  username
        FROM  NetworkUsers
        WHERE  username  = @username
        AND  password  = @password )
        SELECT 0,11,'give full access','No Error'
        FROM  NetworkUsers
        WHERE  username  = @username
        ELSE
        SELECT 3,0,'odbc','ODBC Authen Error'
END
プレーン テキスト パスワード取得用のレコードセットを返すサンプルのプロシージャ(Microsoft SQL Server 用)
CREATE PROCEDURE [dbo].[ISEFetchPasswordReturnsRecordset]
        @username varchar(64)
AS
BEGIN
        IF EXISTS( SELECT  username
        FROM  NetworkUsers
        WHERE  username  = @username)
        SELECT 0,11,'give full access','No Error',password
        FROM  NetworkUsers
        WHERE  username  = @username
        ELSE
        SELECT 3,0,'odbc','ODBC Authen Error'
END
ルックアップ用のレコードセットを返すサンプルのプロシージャ(Microsoft SQL Server 用)
CREATE PROCEDURE [dbo].[ISEUserLookupReturnsRecordset]
        @username varchar(64)
AS
BEGIN
        IF EXISTS( SELECT  username
        FROM  NetworkUsers
        WHERE  username  = @username)
        SELECT 0,11,'give full access','No Error'
        FROM  NetworkUsers
        WHERE  username  = @username
        ELSE
        SELECT 3,0,'odbc','ODBC Authen Error'
END
プレーン テキスト パスワード認証用のパラメータを返すサンプルのプロシージャ(Microsoft SQL Server 用)
CREATE PROCEDURE [dbo].[ISEAuthUserPlainReturnsParameters]
        @username varchar(64), @password varchar(255), @result INT OUTPUT, @group varchar(255) OUTPUT, @acctInfo varchar(255) OUTPUT, @errorString varchar(255) OUTPUT
AS
BEGIN
        IF EXISTS( SELECT  username
        FROM  NetworkUsers
        WHERE  username  = @username
        AND  password  = @password )
        SELECT @result=0, @group=11, @acctInfo='give full access', @errorString='No Error'
        FROM  NetworkUsers
        WHERE  username  = @username
        ELSE
        SELECT @result=3, @group=0, @acctInfo='odbc',  @errorString='ODBC Authen Error'
END
プレーン テキスト パスワード取得用のパラメータを返すサンプルのプロシージャ(Microsoft SQL Server 用)
CREATE PROCEDURE [dbo].[ISEFetchPasswordReturnsParameters]
        @username varchar(64), @result INT OUTPUT, @group varchar(255) OUTPUT, @acctInfo varchar(255) OUTPUT, @errorString varchar(255) OUTPUT, @password varchar(255) OUTPUT
AS
BEGIN
        IF EXISTS( SELECT  username
        FROM  NetworkUsers
        WHERE  username  = @username)
        SELECT @result=0, @group=11, @acctInfo='give full access', @errorString='No Error', @password=password
        FROM  NetworkUsers
        WHERE  username  = @username
        ELSE
        SELECT @result=3, @group=0, @acctInfo='odbc', @errorString='ODBC Authen Error'
END
ルックアップ用のパラメータを返すサンプルのプロシージャ(Microsoft SQL Server 用)
CREATE PROCEDURE [dbo].[ISEUserLookupReturnsParameters]
        @username varchar(64), @result INT OUTPUT, @group varchar(255) OUTPUT, @acctInfo varchar(255) OUTPUT, @errorString varchar(255) OUTPUT
AS
BEGIN
        IF EXISTS( SELECT  username
        FROM  NetworkUsers
        WHERE  username  = @username)
        SELECT @result=0, @group=11, @acctInfo='give full access', @errorString='No Error'
        FROM  NetworkUsers
        WHERE  username  = @username
        ELSE
        SELECT @result=3, @group=0, @acctInfo='odbc', @errorString='ODBC Authen Error'
END
Microsoft SQL Server からグループを取得するサンプルのプロシージャ
CREATE PROCEDURE [dbo].[ISEGroupsH]
        @username varchar(64), @result int output
AS
BEGIN
        if exists (select * from NetworkUsers where username = @username)
        begin
                set @result = 0
                select 'accountants', 'engineers', 'sales','test_group2'
        end
        else
                set @result = 1
END
ユーザ名が「*」の場合にすべてのユーザのすべてのグループを取得するサンプルのプロシージャ(Microsoft SQL Server 用)
ALTER PROCEDURE [dbo].[ISEGroupsH]
                @username varchar(64), @result int output
AS
BEGIN
                if @username = '*'
                begin
                                -- if username is equal to '*' then return all existing groups
                                set @result = 0
                                select 'accountants', 'engineers', 'sales','test_group1','test_group2','test_group3','test_group4'
                end
                else
                if exists (select * from NetworkUsers where username = @username)
                begin
                                set @result = 0
                                select 'accountants'
                end
                else
                                set @result = 1
END
Microsoft SQL Server から属性を取得するサンプルのプロシージャ
CREATE PROCEDURE [dbo].[ISEAttrsH]
        @username varchar(64), @result int output
AS
BEGIN
        if exists (select * from NetworkUsers where username = @username)
        begin
                set @result = 0
                                select phone as phone, username as username, department as department, floor as floor, memberOf as memberOf, isManager as isManager from NetworkUsers where username = @username
        end
        else
                set @result = 1
END
ODBC ID ソースの追加
次のタスクを実行するには、スーパー管理者またはシステム管理者である必要があります。
| ステップ 1 | [管理(Administration)] > [IDの管理(Identity Management)] > [外部IDソース(External Identity Sources)] を選択します。 |
| ステップ 2 | [ODBC] をクリックします。 |
| ステップ 3 | [追加(Add)] をクリックします。 |
| ステップ 4 | [一般(General)] タブで、ODBC ID ソースの名前と説明を入力します。 |
| ステップ 5 | [接続(Connection)] タブで、次の詳細情報を入力します。
|
| ステップ 6 | [テスト接続(Test Connection)] をクリックして ODBC データベースとの接続を確認し、設定された使用例用のストアド プロシージャの存在を確認します。 |
| ステップ 7 | [ストアドプロシージャ(Stored Procedures)] タブで、次の詳細情報を入力します。
|
| ステップ 8 | [属性(Attributes)] タブに必要な属性を追加します。属性の追加時に、属性名が認証ポリシー ルールでどのように表示されるかを指定できます。
ODBC データベースから属性を取得することもできます。ユーザ名と MAC アドレスの両方を使用して ODBC データベースから属性を取得することができます。文字列、ブール値、整数の属性がサポートされています。これらの属性は、認証ポリシーで使用できます。 |
| ステップ 9 | [グループ(Groups)] タブにユーザ グループを追加します。また、ユーザ名または MAC アドレスを指定して ODBC データベースからグループを取得することもできます。これらのグループは、認証ポリシーで使用できます。
グループおよび属性の名前を変更できます。デフォルトでは、[ISE の名前(Name in ISE)] フィールドに表示される名前は ODBC データベースのものと同じですが、この名前は変更できます。この名前が認証ポリシーで使用されます。 |
| ステップ 10 | [送信(Submit)] をクリックします。 |
RADIUS トークン ID ソース
RADIUS プロトコルをサポートし、ユーザおよびデバイスに認証、許可、アカウンティング(AAA)サービスを提供するサーバは、RADIUS サーバと呼ばれます。RADIUS ID ソースは、サブジェクトとそのクレデンシャルの集合を含み、通信に RADIUS プロトコルを使用する外部 ID ソースです。たとえば、Safeword トークン サーバは、複数のユーザおよびそのクレデンシャルをワンタイム パスワードとして含めることができる ID ソースであり、Safeword トークン サーバによって提供されるインターフェイスでは、RADIUS プロトコルを使用して問い合わせることができます。
Cisco ISE では、RADIUS RFC 2865 準拠のいずれかのサーバが外部 ID ソースとしてサポートされています。Cisco ISE では、複数の RADIUS トークン サーバ ID がサポートされています。たとえば、RSA SecurID サーバや SafeWord サーバなどです。RADIUS ID ソースは、ユーザを認証するために使用される任意の RADIUS トークン サーバと連携できます。
- RADIUS トークン サーバでサポートされる認証プロトコル
- 通信に RADIUS トークン サーバで使用されるポート
- RADIUS 共有秘密
- RADIUS トークン サーバでのフェールオーバー
- RADIUS トークン サーバの設定可能なパスワード プロンプト
- RADIUS トークン サーバのユーザ認証
- RADIUS トークン サーバのユーザ属性キャッシュ
- ID 順序での RADIUS ID ソース
- RADIUS サーバがすべてのエラーに対して同じメッセージを返す
- Safeword サーバでサポートされる特別なユーザ名の形式
- RADIUS トークン サーバでの認証要求と応答
- RADIUS トークン サーバの追加
- RADIUS トークン サーバの削除
RADIUS トークン サーバでサポートされる認証プロトコル
通信に RADIUS トークン サーバで使用されるポート
RADIUS ID トークン サーバでは、認証セッションに UDP ポートが使用されます。このポートはすべての RADIUS 通信に使用されます。Cisco ISE で RADIUS ワンタイム パスワード(OTP)メッセージを RADIUS 対応トークン サーバに送信するには、Cisco ISE と RADIUS 対応トークン サーバの間のゲートウェイ デバイスが、UDP ポートを介した通信を許可するように設定されている必要があります。UDP ポートは、管理者ポータルを介して設定できます。
RADIUS 共有秘密
Cisco ISE で RADIUS ID ソースを設定するときに、共有秘密を指定する必要があります。この共有秘密情報は、RADIUS トークン サーバ上で設定されている共有秘密情報と同一である必要があります。
RADIUS トークン サーバでのフェールオーバー
Cisco ISE では、複数の RADIUS ID ソースを設定できます。各 RADIUS ID ソースには、プライマリとセカンダリの RADIUS サーバを指定できます。Cisco ISE からプライマリ サーバに接続できない場合は、セカンダリ サーバが使用されます。
RADIUS トークン サーバの設定可能なパスワード プロンプト
RADIUS ID ソースでは、パスワード プロンプトを設定できます。パスワード プロンプトは、管理者ポータルを介して設定できます。
RADIUS トークン サーバのユーザ認証
Cisco ISE は、ユーザ クレデンシャル(ユーザ名とパスコード)を取得し、RADIUS トークン サーバに渡します。また、Cisco ISE は RADIUS トークン サーバ認証処理の結果をユーザに中継します。
RADIUS トークン サーバのユーザ属性キャッシュ
RADIUS トークン サーバでは、デフォルトではユーザ ルックアップはサポートされていません。ただし、ユーザ ルックアップは次の Cisco ISE 機能に不可欠です。
Cisco ISE では、これらの機能のユーザ ルックアップ要求を処理するために、成功した認証の結果がキャッシュされます。成功した認証すべてについて、認証されたユーザの名前と取得された属性がキャッシュされます。失敗した認証はキャッシュに書き込まれません。
キャッシュは、実行時にメモリで使用可能であり、分散展開の Cisco ISE ノード間で複製されません。管理者ポータルを介してキャッシュの存続可能時間(TTL)制限を設定できます。ID キャッシング オプションを有効にし、エージング タイムを分単位で設定する必要があります。指定した時間、キャッシュはメモリで使用可能です。
ID 順序での RADIUS ID ソース
ID ソース順序で認証順序用の RADIUS ID ソースを追加できます。ただし、属性取得順序用の RADIUS ID ソースを追加することはできません。これは、認証しないで RADIUS ID ソースを問い合わせることはできないためです。RADIUS サーバによる認証中、Cisco ISE では異なるエラーを区別できません。すべてのエラーに対して RADIUS サーバから Access-Reject メッセージが返されます。たとえば、RADIUS サーバでユーザが見つからない場合、RADIUS サーバからは User Unknown ステータスの代わりに Access-Reject メッセージが返されます。
RADIUS サーバがすべてのエラーに対して同じメッセージを返す
RADIUS サーバでユーザが見つからない場合、RADIUS サーバからは Access-Reject メッセージが返されます。Cisco ISE では、管理者ポータルを使用してこのメッセージを [認証失敗(Authentication Failed)] メッセージまたは [ユーザが見つからない(User Not Found)] メッセージとして設定するためのオプションを使用できます。ただし、このオプションを使用すると、ユーザが未知の状況だけでなく、すべての失敗状況に対して「ユーザが見つからない(User Not Found)」メッセージが返されます。
次の表は、RADIUS ID サーバで発生するさまざまな失敗状況を示しています。
Safeword サーバでサポートされる特別なユーザ名の形式
Safeword トークン サーバでは、次のユーザ名フォーマットでの認証がサポートされています。
Cisco ISE では、認証要求を受信するとすぐにユーザ名が解析され、次のユーザ名に変換されます。
Safeword トークン サーバでは、これらの両方のフォーマットがサポートされています。Cisco ISE はさまざまなトークン サーバと連携します。SafeWord サーバを設定する場合、Cisco ISE でユーザ名を解析して指定のフォーマットに変換するには、管理者ポータルで [SafeWord サーバ(SafeWord Server)] チェックボックスをオンにする必要があります。この変換は、要求が RADIUS トークン サーバに送信される前に、RADIUS トークン サーバ ID ソースで実行されます。
RADIUS トークン サーバでの認証要求と応答
Cisco ISE が RADIUS 対応トークン サーバに認証要求を転送する場合、RADIUS 認証要求には次の属性が含まれます。
RADIUS トークン サーバの追加
| ステップ 1 | を選択します。 | ||||
| ステップ 2 | [一般(General)] タブおよび [接続(Connection)] タブに値を入力します。 | ||||
| ステップ 3 | [認証(Authentication)] タブをクリックします。
このタブでは、RADIUS トークン サーバからの Access-Reject メッセージへの応答を制御できます。この応答は、クレデンシャルが無効であること、またはユーザが不明であることのいずれかを意味する場合があります。Cisco ISE は、認証失敗か、またはユーザが見つからないかのいずれかの応答を受け入れます。このタブでは、ID キャッシングを有効にし、キャッシュのエージング タイムを設定することもできます。パスワードを要求するプロンプトを設定することもできます。 | ||||
| ステップ 4 | RADIUS トークン サーバとの最初の認証の成功の後、Cisco ISE でキャッシュにパスコードを保存し、設定された期間内に発生した後続の認証に対しキャッシュされたユーザのクレデンシャルを使用する場合、[パスコード キャッシングの有効化(Enable Passcode Caching)] チェック ボックスをオンにします。
パスコードをキャッシュ内に保存する必要がある秒数を [エージング タイム(Aging Time)] フィールドに入力します。この期間内にユーザは同じパスコードで複数回の認証を行うことができます。デフォルト値は 30 秒です。有効な範囲は 1 ~ 300 秒です。
| ||||
| ステップ 5 | [許可(Authorization)] タブをクリックします。
このタブでは、Cisco ISE への Access-Accept 応答を送信中に RADIUS トークン サーバによって返されるこの属性に対して表示される名前を設定できます。この属性は、許可ポリシー条件で使用できます。デフォルト値は CiscoSecure-Group-Id です。 | ||||
| ステップ 6 | [送信(Submit)] をクリックします。 |
RADIUS トークン サーバの削除
RSA ID ソース
Cisco ISE では、外部データベースとして RSA SecurID サーバがサポートされています。RSA SecurID の 2 要素認証は、ユーザの PIN と、タイム コード アルゴリズムに基づいて使い捨てのトークン コードを生成する個別に登録された RSA SecurID トークンで構成されます。異なるトークン コードが固定間隔(通常は 30 または 60 秒ごと)で生成されます。RSA SecurID サーバでは、この動的な認証コードが検証されます。各 RSA SecurID トークンは固有であり、過去のトークンに基づいて将来のトークンの値を予測することはできません。そのため、正しいトークン コードが PIN とともに提示された場合、その人が有効なユーザである確実性が高くなります。したがって、RSA SecurID サーバでは、従来の再利用可能なパスワードよりも信頼性の高い認証メカニズムが提供されます。
Cisco ISE では、次の RSA ID ソースがサポートされています。
次のいずれかの方法で、RSA SecurID 認証テクノロジーと統合できます。
Cisco ISE の RSA SecurID トークン サーバは、RSA SecurID 認証テクノロジーと RSA SecurID エージェントを使用して接続します。
Cisco ISE と RSA SecurID サーバの統合
Cisco ISE と RSA SecurID サーバを接続するには、次の 2 つの管理ロールが必要です。
ここでは、Cisco ISE に RSA SecurID サーバを外部 ID ソースとして接続するために必要なプロセスについて説明します。RSA サーバについての詳細は、RSA に関するドキュメントを参照してください。
- Cisco ISE の RSA 設定
- RSA SecurID サーバに対する RSA エージェント認証
- 分散 Cisco ISE 環境の RSA ID ソース
- Cisco ISE 展開の RSA サーバの更新
- 自動 RSA ルーティングの上書き
- RSA ノード秘密リセット
- RSA の自動可用性のリセット
Cisco ISE の RSA 設定
RSA 管理システムでは sdconf.rec ファイルが生成されます。このファイルは RSA システム管理者によって提供されます。このファイルを使用すると、Cisco ISE サーバを領域内の RSA SecurID エージェントとして追加できます。このファイルを参照して Cisco ISE に追加する必要があります。プライマリ Cisco ISE サーバは、複製のプロセスによってこのファイルをすべてのセカンダリ サーバに配布します。
RSA SecurID サーバに対する RSA エージェント認証
sdconf.rec ファイルがすべての Cisco ISE サーバにインストールされると、RSA エージェント モジュールが初期化され、RSA 生成のクレデンシャルによる認証が各 Cisco ISE サーバで実行されます。展開内の各 Cisco ISE サーバ上のエージェントが正常に認証されると、RSA サーバとエージェント モジュールは securid ファイルをダウンロードします。このファイルは Cisco ISE ファイル システムに存在し、RSA エージェントによって定義された既知の場所にあります。
分散 Cisco ISE 環境の RSA ID ソース
Cisco ISE 展開の RSA サーバの更新
Cisco ISE で sdconf.rec ファイルを追加した後、RSA サーバを廃止する場合、または新しい RSA セカンダリ サーバを追加する場合、RSA SecurID 管理者は sdconf.rec ファイルを更新することがあります。更新されたファイルは RSA SecurID 管理者によって提供されます。更新されたファイルによって Cisco ISE を再設定できます。Cisco ISE では、更新されたファイルが複製プロセスによって展開内のセカンダリ Cisco ISE サーバに配布されます。Cisco ISE では、まずファイル システムのファイルを更新し、RSA エージェント モジュールに合わせて調整して再起動プロセスを適切に段階的に行います。sdconf.rec ファイルが更新されると、sdstatus.12 および securid ファイルがリセット(削除)されます。
自動 RSA ルーティングの上書き
領域内に複数の RSA サーバを持つことができます。sdopts.rec ファイルはロード バランサの役割を果たします。Cisco ISE サーバと RSA SecurID サーバはエージェント モジュールを介して動作します。Cisco ISE に存在するエージェント モジュールは、領域内の RSA サーバを最大限に利用するためにコストベースのルーティング テーブルを保持します。ただし、領域の各 Cisco ISE サーバの手動設定を使用してこのルーティングを上書きするには、管理者ポータルで sdopts.rec と呼ばれるテキスト ファイルを使用します。このファイルの作成方法については、RSA に関するドキュメントを参照してください。
RSA ノード秘密リセット
securid ファイルは秘密ノード キー ファイルです。RSA が最初に設定されると、RSA では秘密を使用してエージェントが検証されます。Cisco ISE に存在する RSA エージェントが RSA サーバに対して初めて正常に認証されると、securid と呼ばれるファイルがクライアント マシン上に作成され、このファイルを使用して、マシン間で交換されるデータが有効であることが確認されます。展開内の特定の Cisco ISE サーバまたはサーバのグループから securid ファイルを削除する必要がある場合があります(たとえば、RSA サーバでのキーのリセット後など)。領域に対する Cisco ISE サーバからこのファイルを削除するには、Cisco ISE 管理者ポータルを使用できます。Cisco ISE の RSA エージェントが次回正常に認証されたとき、新しい securid ファイルが作成されます。
(注) | Cisco ISE の最新リリースへのアップグレード後に認証が失敗した場合は、RSA 秘密をリセットします。 |
RSA の自動可用性のリセット
sdstatus.12 ファイルは、領域内の RSA サーバのアベイラビリティに関する情報を提供します。たとえば、いずれのサーバがアクティブで、いずれのサーバがダウンしているかに関する情報を提供します。エージェント モジュールは領域内の RSA サーバと連携して、このアベイラビリティ ステータスを維持します。この情報は、sdstatus.12 ファイルに連続的に表示されます。このファイルは、Cisco ISE ファイル システムの既知の場所に供給されます。このファイルは古くなり、現在のステータスが反映されていないことがあります。その場合、現在のステータスが反映されるように、このファイルを削除する必要があります。特定の領域に対する固有の Cisco ISE サーバからファイルを削除するには、管理者ポータルを使用できます。Cisco ISE は RSA エージェントに合わせて調整して、再起動が正しく段階的に行われるようにします。
アベイラビリティ ファイル sdstatus.12 は、securid ファイルがリセットされるか、sdconf.rec または sdopts.rec ファイルが更新されるたびに削除されます。
RSA ID ソースの追加
RSA ID ソースを作成するには、RSA コンフィギュレーション ファイル(sdconf.rec)をインポートする必要があります。RSA 管理者から sdconf.rec ファイルを取得する必要があります。このタスクを実行するには、スーパー管理者またはシステム管理者である必要があります。
RSA ID ソースを追加するには、次のタスクを実行します。RSA コンフィギュレーション ファイルのインポート
Cisco ISE に RSA ID ソースを追加するには、RSA コンフィギュレーション ファイルをインポートする必要があります。
| ステップ 1 | を選択します。 |
| ステップ 2 | [参照(Browse)] をクリックして、クライアント ブラウザを実行しているシステムから新しい sdconf.rec ファイルまたは更新された sdconf.rec ファイルを選択します。
初めて RSA ID ソースを作成する場合、[新しい sdconf.rec ファイルのインポート(Import new sdconf.rec file)] フィールドは必須フィールドです。これ以降は、既存の sdconf.rec ファイルを更新されたファイルで置き換えることができますが、既存のファイルの置き換えは任意です。 |
| ステップ 3 | サーバのタイムアウト値を秒単位で入力します。Cisco ISE はタイムアウトになる前に、指定された秒数 RSA サーバからの応答を待ちます。この値には、1 ~ 199 の任意の整数を指定できます。デフォルト値は 30 秒です。 |
| ステップ 4 | PIN が変更された場合に強制的に再認証するには、[変更 PIN で再認証(Reauthenticate on Change PIN)] チェックボックスをオンにします。 |
| ステップ 5 | [保存(Save)] をクリックします。 Cisco ISE は、次のシナリオもサポートします。 |
Cisco ISE サーバのオプション ファイルの設定および SecurID ファイルと sdstatus.12 ファイルのリセット
| ステップ 1 | Cisco ISE サーバにログインします。 |
| ステップ 2 | を選択します。 |
| ステップ 3 | [RSA インスタンス ファイル(RSA Instance Files)] タブをクリックします。
このページには、展開内のすべての Cisco ISE サーバの sdopts.rec servers ファイルが一覧表示されます。 ユーザが RSA SecurID トークン サーバに対して認証されると、ノードのシークレット ステータスは [作成済み(Created)] と表示されます。ノードのシークレット ステータスは、[作成済み(Created)] または [未作成(Not Created)] のどちらかになります。クリアされると、ノードのシークレット ステータスは [未作成(Not Created)] と表示されます。 |
| ステップ 4 | 特定の Cisco ISE サーバの sdopts.rec ファイルの横にあるオプション ボタンをクリックし、[オプション ファイルの更新(Update Options File)] をクリックします。 |
| ステップ 5 | 次のいずれかを実行します。
|
| ステップ 6 | [OK] をクリックします。 |
| ステップ 7 | Cisco ISE サーバに対応する行をクリックして、そのサーバの securid および sdstatus.12 ファイルをリセットします。 |
| ステップ 8 | [保存(Save)] をクリックします。 |
RSA ID ソースの認証制御オプションの設定
Cisco ISE がどのように認証失敗を定義し、ID キャッシングを有効にするかを指定できます。RSA ID ソースでは、「認証失敗」エラーと「ユーザが見つからない」エラーは区別されず、Access-Reject 応答が送信されます。
Cisco ISE で、要求の処理および失敗のレポート中に、これらの失敗をどのように処理するかを定義できます。ID キャッシングによって、Cisco ISE では、Cisco ISE サーバに対して認証に失敗した要求を 2 回目に処理できます。前の認証から取得された結果および属性を、キャッシュで利用できます。
| ステップ 1 | を選択します。 | ||||
| ステップ 2 | [認証制御(Authentication Control)] タブをクリックします。 | ||||
| ステップ 3 | 次のいずれかを実行します。 | ||||
| ステップ 4 | 最初に認証が成功した後に Cisco ISE がキャッシュにパスコードを保存し、設定された期間内に認証が行われた場合にキャッシュされたユーザ クレデンシャルを後続の認証のために使用するようにする場合は、[パスコード キャッシュの有効化(Enable Passcode Caching)] チェック ボックスにマークを付けます。
パスコードをキャッシュ内に保存する必要がある秒数を [エージング タイム(Aging Time)] フィールドに入力します。この期間内にユーザは同じパスコードで複数回の認証を行うことができます。デフォルト値は 30 秒です。有効な範囲は 1 ~ 300 秒です。
| ||||
| ステップ 5 | [保存(Save)] をクリックして、設定を保存します。 |
RSA プロンプトの設定
Cisco ISE では、RSA SecurID サーバに送信される要求の処理中にユーザに表示される RSA プロンプトを設定できます。
RSA メッセージの設定
Cisco ISE では、RSA SecurID サーバに送信される要求の処理中にユーザに表示されるメッセージを設定できます。
外部 ID ソースとしての SAMLv2 ID プロバイダ
Security Assertion Markup Language(SAML)は XML ベースのオープン規格のデータ形式であり、いずれかのアプリケーションにサインインした後に、管理者は定義された一連のアプリケーションにシームレスにアクセスできます。SAML では、信頼できるビジネス パートナー間で、セキュリティに関連した情報交換を記述します。SAML により、ID プロバイダ(IdP)とサービス プロバイダー(この場合は ISE)の間で、セキュリティ認証情報を交換できます。
SAML シングル サインオン(SSO)は、IdP とサービス プロバイダーの間のプロビジョニング プロセスの一部として、メタデータと証明書を交換することで信頼の輪(CoT)を確立します。サービス プロバイダは IdP のユーザ情報を信頼して、さまざまなサービスやアプリケーションにアクセスできるようにします。
-
異なるユーザ名とパスワードの組み合わせを入力する必要がなくなるため、パスワードの劣化が軽減します。
-
同じ ID に資格情報を再入力する時間が省けるため、生産性が向上します。
-
アプリケーションをホストしているお使いのシステムからサード パーティのシステムに、認証を転送します。
-
認証情報を保護し、安全に保ちます。暗号化機能により、IdP、サービス プロバイダ、ユーザの間で認証情報を保護します。SAML SSO では、IdP とサービス プロバイダー間で転送される認証メッセージを外部ユーザから保護することもできます。
-
パスワードをリセットするためのヘルプ デスクへの問い合わせが減るため、コスト削減につながります。
IdP は、ユーザ、システム、またはサービスの ID 情報を作成、維持、管理する認証モジュールです。IdP は、ユーザ クレデンシャルを保管、検証し、ユーザがサービス プロバイダーの保護リソースにアクセスできる SAML 応答を生成します。
(注) | IdP サービスをよく理解している必要があります。現在インストールされていて、操作可能であることを確認してください。 |
BYOD ポータルでは外部 ID ソースとして IdP を選択できませんが、ゲスト ポータルでは IdP を選択し、BYOD フローをイネーブルにできます。
IdP は、ID ソース順序に追加できません(ID ソース順序 を参照)。
指定された時間(デフォルトでは 5 分)にアクティビティがない場合は、SSO セッションが終了し、セッション タイムアウトのエラー メッセージが表示されます。
ポータルの [エラー(Error)] ページに [再度サインオン(Sign On Again)] ボタンを追加する場合は、[ポータルエラー(Portal Error)] ページの [オプションコンテンツ(Optional Content)] フィールドに次の JavaScript を追加します。
<button class="cisco-ise" data-inline="true" data-mini="true" data-theme="b" id="ui_aup_accept_button" onclick="location.href='PortalSetup.action?portal=<Portal ID>'" type="button">SignOn Again</button>
SAML ID プロバイダーの追加
次のタスクを実行するには、スーパー管理者またはシステム管理者である必要があります。
| ステップ 1 | 証明書が IdP で自己署名されていない場合は、信頼できる証明書ストアに認証局(CA)証明書をインポートします。[管理(Administration)] > [システム(System)] > [証明書(Certificates)] > [信頼できる証明書(Trusted Certificates)] > [インポート(Import)] の順に選択し、CA 証明書をインポートします。 | ||||||||||
| ステップ 2 | [管理(Administration)] > [ID の管理(Identity Management)] > [外部 ID ソース(External Identity Sources)][ワーク センター(Work Centers)] > [ネットワーク アクセス(Network Access)] > [外部 ID ソース(External Identity Sources)] を選択します。 | ||||||||||
| ステップ 3 | [SAML ID プロバイダー(SAML Id Providers)] をクリックします。 | ||||||||||
| ステップ 4 | [追加(Add)] をクリックします。 | ||||||||||
| ステップ 5 | [SAML ID プロバイダー(SAML Identity Provider)] ページで、次の詳細情報を入力します。
| ||||||||||
| ステップ 6 | [送信(Submit)] をクリックします。 | ||||||||||
| ステップ 7 | [ポータル設定(Portal Settings)] ページ(ゲスト ポータル、証明書プロビジョニングまたはデバイス ポータル)に移動して、[認証方式(Authentication Method)] フィールドでそのポータルにリンクする IdP を選択します。
| ||||||||||
| ステップ 8 | [保存(Save)] をクリックします。 | ||||||||||
| ステップ 9 | [管理(Administration)] > [ID の管理(Identity Management)] > [外部 ID ソース(External Identity Sources)] > [SAML ID プロバイダー(SAML Id Providers)][ワーク センター(Work Centers)] > [ネットワーク アクセス(Network Access)] > [外部 ID ソース(External Identity Sources)] > [SAML ID プロバイダー(SAML Id Providers)] を選択します。そのポータルにリンクする IdP を選択し、[編集(Edit)] をクリックします。 | ||||||||||
| ステップ 10 | (オプション)[サービス プロバイダー情報(Service Provider Info)] タブで、ロード バランサの詳細を追加します。ISE ノードの前にロード バランサを追加することで、ID プロバイダーの設定を簡素化し、ISE ノードの負荷を最適化できます。
ロード バランサはソフトウェアベースまたはハードウェアベースのアプライアンスである可能性があります。導入の ISE ノードに要求を転送できる必要があります([ポータル設定(Portal Settings)] ページで指定されたポートを使用して)。 ロード バランサを使用する場合は、ロード バランサの URL のみがサービス プロバイダーのメタデータ ファイルで提供されます。ロード バランサが追加されていない場合は、複数の AssertionConsumerService URL がサービス プロバイダーのメタデータ ファイルに含まれます。
| ||||||||||
| ステップ 11 | [サービスプロバイダー情報(Service Provider Info)] タブで、[エクスポート(Export)] をクリックして、サービス プロバイダーのメタデータ ファイルをエクスポートします。
エクスポートされたメタデータには、Cisco ISE の署名証明書が含まれています。署名証明書は、選択したポータルの証明書と同一です。 エクスポートされたメタデータの ZIP ファイルには、各 IdP の設定に関する基本的な説明を含む Readme ファイルが含まれています(Azure Active Directory、PingOne、PingFederate、SecureAuth、OAM など)。
| ||||||||||
| ステップ 12 | ダイアログボックスで [参照(Browse)] をクリックして、圧縮ファイルをローカルに保存します。メタデータ ファイルのフォルダを解凍します。フォルダを解凍すると、ポータルの名前が付いたメタデータ ファイルを取得します。メタデータ ファイルには、プロバイダー ID とバインディング URI が含まれています。 | ||||||||||
| ステップ 13 | 管理ユーザとして IdP にログインし、サービス プロバイダーのメタデータ ファイルをインポートします。サービス プロバイダーのメタデータ ファイルをインポートする方法の詳細については、ID プロバイダーのメタデータ ファイルをインポートする方法の詳細については、ID プロバイダーのユーザユーザ マニュアルを参照してください。 | ||||||||||
| ステップ 14 | [グループ(Groups)] タブで、必要なユーザ グループを追加します。
[グループ メンバーシップ属性(Group Membership Attribute)] フィールドにユーザのグループ メンバーシップを指定するアサーション属性を入力します。 | ||||||||||
| ステップ 15 | [属性(Attributes)] タブにユーザ属性を追加します。属性を追加するときに、属性が IdP から返されたアサーションでどのように表示されるかを指定できます。[ISE の名前(Name in ISE)] フィールドに指定した名前はポリシー ルールに表示されます。属性でサポートされているのは、次のデータ型です。
| ||||||||||
| ステップ 16 | [詳細設定(Advanced Settings)] タブで、次のオプションを設定します。
| ||||||||||
| ステップ 17 | [送信(Submit)] をクリックします。 |
ID プロバイダの削除
次のタスクを実行するには、スーパー管理者またはシステム管理者である必要があります。
削除する IdP がいずれのポータルにもリンクされていないことを確認します。IdP がポータルにリンクされている場合、削除操作は失敗します。
| ステップ 1 | [管理(Administration)] > [ID の管理(Identity Management)] > [外部 ID ソース(External Identity Sources)] > [SAML ID プロバイダー(SAML Id Providers)][ワーク センター(Work Centers)] > [ネットワーク アクセス(Network Access)] > [外部 ID ソース(External Identity Sources)] > [SAML ID プロバイダー(SAML Id Providers)] を選択します。 |
| ステップ 2 | 削除する IdP の隣のチェックボックスをオンにして、[削除(Delete)] をクリックします。 |
| ステップ 3 | [OK] をクリックして、選択した IdP を削除します。 |
認証失敗ログ
SAML ID ストアに対する認証が失敗し、IdP がユーザを ISE ポータルに(SAML 応答を通じて)リダイレクトすると、ISE は認証ログに障害の理由を報告します。ゲスト ポータルで(BYOD フローの有効無効に関係なく)、認証の失敗の原因を知るために、RADIUS Livelog([操作(Operations)] > [RADIUS] > [ライブ ログ(Live Logs)])を確認できます。ポータルおよびスポンサー ポータル認証失敗の原因を把握するためには、デバイス ポータルおよびスポンサー ポータルで、デバイス ログイン/監査レポートとスポンサー ログイン/監査レポート([操作(Operations)] > [レポート(Reports)] > [ゲスト(Guest)])を確認できます。
ログアウトで障害が発生した場合、My Devices、スポンサーおよびゲスト ポータルの障害の原因を知るためにレポートおよびログを確認することができます。
認証が失敗する原因には次のものが考えられます。
-
SAML 応答の解析エラー
-
SAML 応答の検証エラー(不正な発行者など)
-
SAML アサーションの検証エラー(誤った対象者など)
-
SAML 応答署名の検証エラー(不正な署名など)
-
IdP 署名証明書のエラー(失効した証明書など)
認証に失敗した場合は、認証ログの「DetailedInfo」属性を確認することを推奨します。この属性では、障害理由に関する追加情報が提供されます。
ID ソース順序
ID ソース順序は、Cisco ISE がそれぞれ異なるデータベース内でユーザ クレデンシャルを検索する順序を定義します。Cisco ISE では次の ID ソースがサポートされます。
Cisco ISE に接続されている 2 つ以上のデータベースにユーザ情報がある場合、Cisco ISE でこれらの ID ソース内の情報を検索する順序を定義できます。一致が見つかると、Cisco ISE はそれ以上の検索を行いませんが、クレデンシャルを評価し、ユーザに結果を返します。このポリシーは最初の一致ポリシーです。
ID ソース順序の作成
Cisco ISE に外部 ID ソースを設定していることを確認します。
次のタスクを実行するには、スーパー管理者またはシステム管理者である必要があります。
ゲスト ユーザがローカル WebAuth を使用して認証できるようにするには、ゲスト ポータル認証ソースと ID ソース順序に同じ ID ストアが含まれるように設定する必要があります。
| ステップ 1 | を選択します。 |
| ステップ 2 | ID ソース順序の名前を入力します。また、任意で説明を入力できます。 |
| ステップ 3 | [証明書認証プロファイル(Certificate Authentication Profile)] チェックボックスをオンにし、証明書ベースの認証のための証明書認証プロファイルを選択します。 |
| ステップ 4 | [選択済み(Selected)] リスト ボックスの ID ソース順序に含めるデータベースを選択します。 |
| ステップ 5 | Cisco ISE がデータ ベースを検索する順序に [選択済み(Selected)] リストのデータベースを並べ替えます。 |
| ステップ 6 | [高度な検索リスト(Advanced Search List)] 領域で、次のいずれかのオプションを選択します。
|
| ステップ 7 | [送信(Submit)] をクリックして ID ソース順序を作成すると、その後この ID ソース順序をポリシーで使用できます。 |
ID ソース順序の削除
レポートでの ID ソースの詳細
[認証(Authentications)] ダッシュレット
[認証(Authentications)] ダッシュレットから、障害の理由などの詳細情報にドリルダウンできます。
[操作(Operations)] > [RADIUS ライブログ(RADIUS Livelog)] の順に選択して、リアルタイムで認証の概要を表示します。RADIUS ライブ ログの詳細については、RADIUS ライブ ログを参照してください。
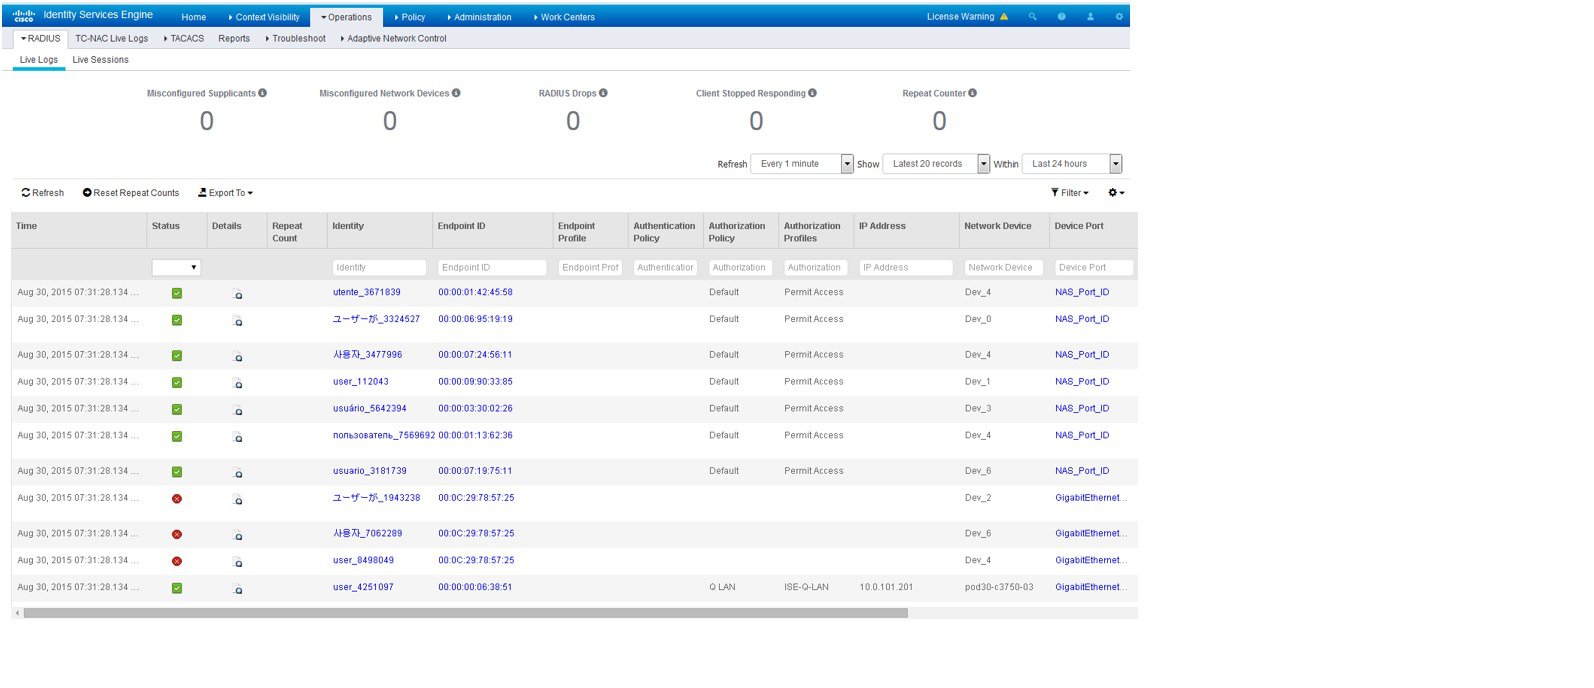
ID ソース レポート
Cisco ISE は ID ソースに関する情報を含むさまざまなレポートを提供します。これらのレポートの詳細については、「使用可能なレポート」の項を参照してください。
 フィードバック