Cisco Service Portal インストレーション ガイド リリース 9.3.2
偏向のない言語
この製品のマニュアルセットは、偏向のない言語を使用するように配慮されています。このマニュアルセットでの偏向のない言語とは、年齢、障害、性別、人種的アイデンティティ、民族的アイデンティティ、性的指向、社会経済的地位、およびインターセクショナリティに基づく差別を意味しない言語として定義されています。製品ソフトウェアのユーザーインターフェイスにハードコードされている言語、RFP のドキュメントに基づいて使用されている言語、または参照されているサードパーティ製品で使用されている言語によりドキュメントに例外が存在する場合があります。シスコのインクルーシブランゲージに対する取り組みの詳細は、こちらをご覧ください。
翻訳について
このドキュメントは、米国シスコ発行ドキュメントの参考和訳です。リンク情報につきましては、日本語版掲載時点で、英語版にアップデートがあり、リンク先のページが移動/変更されている場合がありますことをご了承ください。あくまでも参考和訳となりますので、正式な内容については米国サイトのドキュメントを参照ください。
- Updated:
- 2017年6月8日
章のタイトル: Cognosの高度な設定およびトラブルシューティングに関するヒント
Cognos の高度な設定およびトラブルシューティングに関するヒント
•![]() 「概要」
「概要」
•![]() 「その他の設定」
「その他の設定」
概要
その他の設定
Excel としてレポートを表示するクライアント ブラウザの設定
レポートを Excel 形式で表示して、問題を報告することもできます。Excel 画面は一瞬表示され、すぐに閉じます。この問題に対処するには、Cognos Server URL をクライアント ブラウザのローカル イントラネット ゾーンに追加します。
ステップ 1![]() クライアント ブラウザ ウィンドウを開きます。
クライアント ブラウザ ウィンドウを開きます。
ステップ 2![]() [Tools] > [Internet Options] を選択します。
[Tools] > [Internet Options] を選択します。
ステップ 4![]() [Local Intranet] ゾーンを選択します。
[Local Intranet] ゾーンを選択します。
ステップ 7![]() Cognos Server URL を入力します。
Cognos Server URL を入力します。

(注) Cognos Server URL を確認するには、いずれかの View as Excel 機能を Reporting モジュールで実行してみて、自動的に閉じる前に一瞬表示されるウィンドウのタイトル バーに示されている URL を参照します。これは、入力する必要がある URL です。表示時間が短すぎて URL を確認できない場合、スクリーン キャプチャ アプリケーションをロードして、画面のスナップショットをとります。
Cognos メモリ使用率の設定
Cognos メモリ使用率は、Cognos のヒープ サイズを変更して設定します。Cognos Server のヒープ サイズを変更するには:
ステップ 1![]() IBM Cognos 8 サービスを停止します。
IBM Cognos 8 サービスを停止します。
ステップ 2![]() C:¥Program Files (x86)¥cognos¥c8_64¥bin64 ディレクトリ下にある startup.bat を開きます。
C:¥Program Files (x86)¥cognos¥c8_64¥bin64 ディレクトリ下にある startup.bat を開きます。
ステップ 3![]() startup.bat ファイルで、使用する Cognos マシンの RAM サイズに応じて、Cognos により推奨されている別のヒープ サイズ設定を参照できます。
startup.bat ファイルで、使用する Cognos マシンの RAM サイズに応じて、Cognos により推奨されている別のヒープ サイズ設定を参照できます。
rem " for machines with 1GB RAM "
set CATALINA_OPTS=-Xmx768m -XX:MaxNewSize=384m -XX:NewSize=192m -XX:MaxPermSize=128m %DEBUG_OPTS%
rem " for machines with 2GB RAM "
rem set CATALINA_OPTS=-Xmx1152m -XX:MaxNewSize=576m -XX:NewSize=288m -XX:MaxPermSize=128m %DEBUG_OPTS%
rem " for machines with 3GB RAM "
rem set CATALINA_OPTS=-Xmx1536m -XX:MaxNewSize=768m -XX:NewSize=384m -XX:MaxPermSize=128m %DEBUG_OPTS%
システム RAM サイズに基づいて、上記のヒープ サイズ設定のいずれかを使用するか、ヒープ サイズ設定を変更して、 rem を行の先頭に使用して、残りのヒープ サイズ設定をコメント化します。
ステップ 4![]() IBM Cognos 8 サービスを再起動します。
IBM Cognos 8 サービスを再起動します。
IBM Cognos 8 サーバのタイムアウト間隔の設定
IBM Cognos 8 セッションのタイムアウト設定は、Single Sign-On がシームレスに稼動するように、Service Portal のタイムアウト設定と一致しなければなりません。
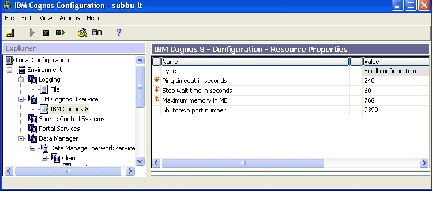
ステップ 1![]() [Start] > [All Programs] > [IBM Cognos 8 - 64] > [IBM Cognos Configuration] を選択します。
[Start] > [All Programs] > [IBM Cognos 8 - 64] > [IBM Cognos Configuration] を選択します。
ステップ 2![]() [Environment] > [IBM Cognos 8 Service] を選択します。
[Environment] > [IBM Cognos 8 Service] を選択します。
ステップ 4![]() [Resource Properties] で、[Ping timeout in seconds] を選択します。タイムアウト間隔(秒数)として 960 を入力します。960 は、最大値です。
[Resource Properties] で、[Ping timeout in seconds] を選択します。タイムアウト間隔(秒数)として 960 を入力します。960 は、最大値です。
ステップ 5![]() 設定を保存します([Save] アイコンをクリックします)。
設定を保存します([Save] アイコンをクリックします)。
ステップ 6![]() IBM Cognos 8 サービスを再起動します。
IBM Cognos 8 サービスを再起動します。
ロールについて
Reporting 機能にアクセスするためのロール
次の表に示されるロールは、Organization Designer モジュールで定義されます。これらは、Reporting および Advanced Reporting モジュールにアクセスするユーザに割り当てる必要があります。
事前定義されているロール「 Service Operations Report User 」にユーザを割り当てる場合、このユーザは、事前に組み込まれている Request Center レポートを実行できる必要があります。
|
|
開発環境から実稼動環境へのレポートの移動
この項では、開発環境で作成した Report Designer レポートおよび Ad-Hoc クエリーを実稼動環境に移動する方法について説明します。
前提条件
ここで説明する [Deployment] オプションを使用してレポートを移動するには、Reporting モジュールを管理できる必要があります。事前定義されているロール Site Administrator には、この機能が含まれます。
エクスポート ファイルの作成
ステップ 1![]() 開発マシンで、 CustomReports という名前のフォルダを Cognos の Public Folders ディレクトリに作成します。フォルダの名前を変更しても構いませんが、パブリック フォルダにする必要があります。
開発マシンで、 CustomReports という名前のフォルダを Cognos の Public Folders ディレクトリに作成します。フォルダの名前を変更しても構いませんが、パブリック フォルダにする必要があります。
ステップ 2![]() 新しいレポートを上記で作成した CustomReports フォルダにコピーします。
新しいレポートを上記で作成した CustomReports フォルダにコピーします。
ステップ 3![]() レポート管理者の機能を持ったユーザとして Service Portal にログインします。
レポート管理者の機能を持ったユーザとして Service Portal にログインします。
ステップ 4![]() 次に示す Reporting モジュールの [Deployment] オプションを選択します。
次に示す Reporting モジュールの [Deployment] オプションを選択します。

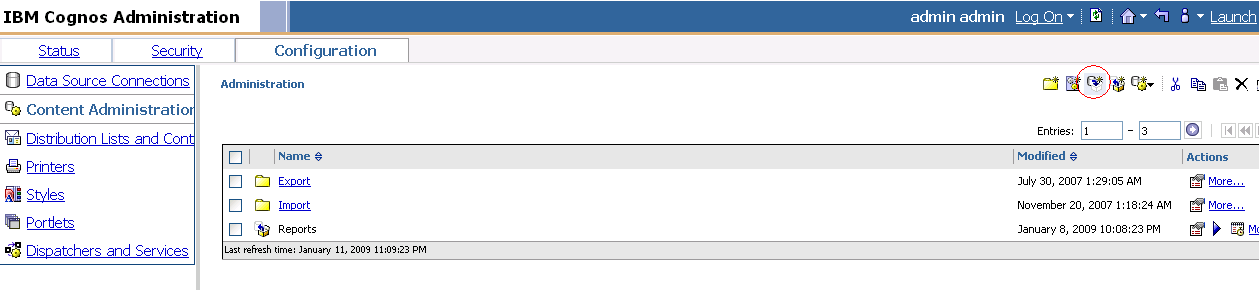
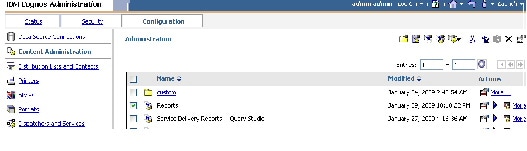
ステップ 5![]() 右上隅の [Launch] に移動し、[IBM Cognos Administration] をクリックします。
右上隅の [Launch] に移動し、[IBM Cognos Administration] をクリックします。
ステップ 6![]() [Configuration] タブをクリックします。
[Configuration] タブをクリックします。
ステップ 7![]() [Content Administration] に移動し、画面の右上隅の [New Export] アイコンを選択します。
[Content Administration] に移動し、画面の右上隅の [New Export] アイコンを選択します。
ステップ 8![]() エクスポートの名前(たとえば、CustomReports)およびその他の詳細を指定し、[Next] をクリックします。
エクスポートの名前(たとえば、CustomReports)およびその他の詳細を指定し、[Next] をクリックします。
ステップ 9![]() [Deployment Method] ページで、[Select public folders and directory content] を選択して、[Next] をクリックします。
[Deployment Method] ページで、[Select public folders and directory content] を選択して、[Next] をクリックします。
ステップ 10![]() [Add] をクリックして、手順 1 で作成した CustomReports フォルダを選択します。カスタム レポート フォルダを選択し、[Add] ボタンをクリックして、下部の [OK] をクリックします。
[Add] をクリックして、手順 1 で作成した CustomReports フォルダを選択します。カスタム レポート フォルダを選択し、[Add] ボタンをクリックして、下部の [OK] をクリックします。
ステップ 11![]() [Disable after import] の選択を解除して、[Next] をクリックします。
[Disable after import] の選択を解除して、[Next] をクリックします。
ステップ 13![]() [Select the directory content] セクションで、[Include Cognos groups and roles] を選択し、[Replace existing entries] を選択して、[Next] をクリックします。
[Select the directory content] セクションで、[Include Cognos groups and roles] を選択し、[Replace existing entries] を選択して、[Next] をクリックします。
ステップ 14![]() [Specify the general options] セクションで、[Include access permissions] を選択して、[Apply to new and existing entries] を選択します。
[Specify the general options] セクションで、[Include access permissions] を選択して、[Apply to new and existing entries] を選択します。
ステップ 15![]() [External namespaces] で [Include references to external namespaces] を選択します。
[External namespaces] で [Include references to external namespaces] を選択します。
ステップ 16![]() [Entry ownership] セクションで、[The user performing the import] を選択して、[Specify the general options] セクションで、[Next] をクリックします。
[Entry ownership] セクションで、[The user performing the import] を選択して、[Specify the general options] セクションで、[Next] をクリックします。
ステップ 17![]() [Specify a deployment archive] セクションで、[Next] をクリックします。
[Specify a deployment archive] セクションで、[Next] をクリックします。
ステップ 18![]() [Review the summary] セクションで、[Next] をクリックします。
[Review the summary] セクションで、[Next] をクリックします。
ステップ 19![]() [Select an action] セクションで、[Finish] をクリックします。
[Select an action] セクションで、[Finish] をクリックします。
ステップ 20![]() [Now] を選択して、[Run with options] オプションで [Run] をクリックします。
[Now] を選択して、[Run with options] オプションで [Run] をクリックします。
CustomReports.zip が Cognos SOURCE マシンの <CognosHome>¥c8¥deployment フォルダに作成されます。
エクスポートされたファイルのインポート
ステップ 1![]() エクスポートされたファイル CustomReports.zip を実稼動マシンの <CognosHome>¥c8¥deployment フォルダにコピーします。
エクスポートされたファイル CustomReports.zip を実稼動マシンの <CognosHome>¥c8¥deployment フォルダにコピーします。
ステップ 2![]() 右上隅の [Launch] に移動し、[IBM Cognos Administration] をクリックします。
右上隅の [Launch] に移動し、[IBM Cognos Administration] をクリックします。
ステップ 3![]() [Configuration] タブをクリックします。
[Configuration] タブをクリックします。
ステップ 4![]() [Content Administration] に移動し、画面の右上隅の [New Import] アイコンを選択します。
[Content Administration] に移動し、画面の右上隅の [New Import] アイコンを選択します。
ステップ 5![]() [CustomReports] を選択し、[Next] をクリックします。
[CustomReports] を選択し、[Next] をクリックします。
ステップ 6![]() [CustomReports] を選択して、[Select the public folders content] で [Next] をクリックします。
[CustomReports] を選択して、[Select the public folders content] で [Next] をクリックします。
ステップ 7![]() [Select the directory content] セクションで、[Next] をクリックします。
[Select the directory content] セクションで、[Next] をクリックします。
ステップ 8![]() [Specify the general options] セクションで、[Next] をクリックします。
[Specify the general options] セクションで、[Next] をクリックします。
ステップ 9![]() [Review the summary] セクションで、[Next] をクリックします。
[Review the summary] セクションで、[Next] をクリックします。
ステップ 10![]() [Select an action] セクションで、[Finish] ボタンをクリックします。
[Select an action] セクションで、[Finish] ボタンをクリックします。
ステップ 11![]() 新しいレポート フォルダ CustomReports が、実稼動マシンのパブリック フォルダ エリアに表示されます。
新しいレポート フォルダ CustomReports が、実稼動マシンのパブリック フォルダ エリアに表示されます。
レポート可能ディクショナリおよびサービスの増加
環境の成長とともに、フォーム データ レポーティング(Ad-Hoc Reporting)ディクショナリおよびサービス テーブルの数を増加する必要があります。たとえば、追加サービスをオンラインにする場合や、追加ディクショナリのコンテンツのレポートが必要な場合などです。
ディクショナリまたはサービス テーブルの増加
ステップ 1![]() テキスト エディタを使用して、< requestcenter.destination >/cognos/config ディレクトリのファイル cognos.properties を開きます。
テキスト エディタを使用して、< requestcenter.destination >/cognos/config ディレクトリのファイル cognos.properties を開きます。
ステップ 2![]() cognos.properties ファイルで次のパラメータ値を編集します。
cognos.properties ファイルで次のパラメータ値を編集します。
DM.IncrementOfDictionaryTables=n
ここで、 n は、データ マートに追加するテーブルの数です。
たとえば、50 のディクショナリおよびサービス テーブルを使用している場合、各パラメータの n に 20 を入力すると、さらに 20 のテーブルが追加され、合計でディクショナリ テーブルが 70、サービス テーブルが 70 に設定されます。つまり、DM_FDR_DICTIONARY_50 は DM_FDR_DICTIONARY_70 に、DM_FDR_SERVICE_50 は DM_FDR_SERVICE_70 になります。
ステップ 3![]() コマンド プロンプト ウィンドウを開いて、< requestcenter.destination >/cognos/bin ディクショナリでスクリプト create_fdr_tables.cmd を実行します。
コマンド プロンプト ウィンドウを開いて、< requestcenter.destination >/cognos/bin ディクショナリでスクリプト create_fdr_tables.cmd を実行します。
このスクリプトは、 cognos.properties ファイルで入力した値に対応するテーブルの数を増加します。
(注) 列(数値、文字(テキスト)、データ型)数は、新しく作成されたテーブルのものと、Ad-Hoc Reporting モジュールのインストール中に設定されたもので同じです。
確認手順
新しいテーブルの追加を確認するには、Datamart データベースにログインして、ディクショナリ/サービス(DM_FDR_DICTIONARY_N/DM_FDR_SERVICE_N)テーブルの数を確認します。
Cognos での HTTPS の設定
Cognos Server での SSL サポートの概要
SSL サポートを Cognos Server でイネーブルにするには、Cognos Gateway のプロトコルを HTTPS に変更する必要があります(IIS などの Web サーバも HTTPS に設定されていることが前提です)。
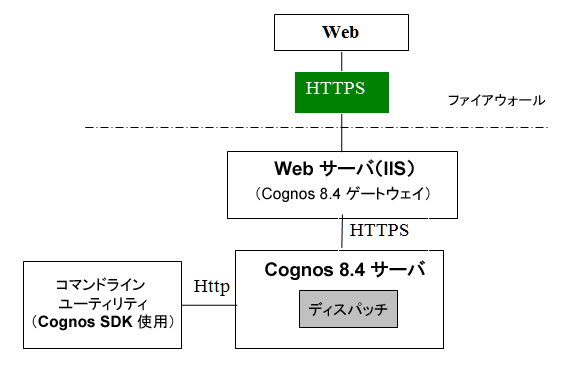
必須条件と前提条件
1.![]() Https は、http://inservice/QA/kb/?View=entry&EntryID=4 を使用して、Cognos Server がインストールされている IIS Server でイネーブルにする必要があります。
Https は、http://inservice/QA/kb/?View=entry&EntryID=4 を使用して、Cognos Server がインストールされている IIS Server でイネーブルにする必要があります。
2.![]() また、IIS で TCP ポート(80)を削除する必要もあります。
また、IIS で TCP ポート(80)を削除する必要もあります。
(注) Windows Server 2008 R2 の場合、TCP ポート(80)を削除できません。そのため、ファイアウォールを使用して TCP ポート(80)をディセーブルにする必要があります。
3.![]() セキュリティのため、Cognos+IIS がインストールされるシステムでは、ファイアウォールを使用して、すべての非 SSL ポート(たとえば、ポート 80 および 9300)をブロックできます。
セキュリティのため、Cognos+IIS がインストールされるシステムでは、ファイアウォールを使用して、すべての非 SSL ポート(たとえば、ポート 80 および 9300)をブロックできます。
4.![]() SA/Reporting で使用されるすべてのコマンドライン ユーティリティは Http プロトコルを使用するため、これらのコマンドは、Cognos Server がインストールされるシステムと同じシステムで実行されます。
SA/Reporting で使用されるすべてのコマンドライン ユーティリティは Http プロトコルを使用するため、これらのコマンドは、Cognos Server がインストールされるシステムと同じシステムで実行されます。
5.![]() コマンドライン ユーティリティの Https/SSL をイネーブルにすると、オーバーヘッドやパフォーマンス問題が生じるため、非 SSL を使用します。
コマンドライン ユーティリティの Https/SSL をイネーブルにすると、オーバーヘッドやパフォーマンス問題が生じるため、非 SSL を使用します。
6.![]() CnfParams テーブルの ‘CognosServername' は、IIS で設定される SSL ポートを設定するように手動で変更する必要があります。
CnfParams テーブルの ‘CognosServername' は、IIS で設定される SSL ポートを設定するように手動で変更する必要があります。
IIS サーバ証明書の Cognos Server へのインポート
ステップ 1![]() IIS で使用されるサーバ証明書は、Cognos 8.4 BI サーバの安全な場所にコピーする必要があります。
IIS で使用されるサーバ証明書は、Cognos 8.4 BI サーバの安全な場所にコピーする必要があります。
(注) サーバ証明書が Base-64 エンコード X.509 形式であることを確認します。
ステップ 2![]() コマンド プロンプトを開いて、フォルダ「C:¥Program Files (x86)¥cognos¥c8_64¥bin」に移動します。
コマンド プロンプトを開いて、フォルダ「C:¥Program Files (x86)¥cognos¥c8_64¥bin」に移動します。
ステップ 3![]() JAVA_HOME を C:¥Program Files (x86)¥cognos¥c8_64¥bin¥jre¥1.5.0 に設定します。
JAVA_HOME を C:¥Program Files (x86)¥cognos¥c8_64¥bin¥jre¥1.5.0 に設定します。
ステップ 4![]() 次のコマンドを入力して、IIS サーバ証明書を Cognos 8.4 の JCA Keystore にインポートします。
次のコマンドを入力して、IIS サーバ証明書を Cognos 8.4 の JCA Keystore にインポートします。
SSL での Cognos 8.4 の設定
ステップ 1![]() [Program Files] > [IBM Cognos 8] > [IBM Cognos Configuration] に移動します。
[Program Files] > [IBM Cognos 8] > [IBM Cognos Configuration] に移動します。
ステップ 2![]() [Environment] > [Gateway URI] に移動し、http を https に変更して、ポート デフォルト 80 ~ 443 に変更します。
[Environment] > [Gateway URI] に移動し、http を https に変更して、ポート デフォルト 80 ~ 443 に変更します。

ステップ 3![]() [Cryptography] > [Use mutual authentication?] に移動して、[True] に変更します。
[Cryptography] > [Use mutual authentication?] に移動して、[True] に変更します。
ステップ 4![]() [Cryptography] > [Cognos] > [Use third party CA?] に移動して、[True] に変更します。
[Cryptography] > [Cognos] > [Use third party CA?] に移動して、[True] に変更します。
ステップ 6![]() IBM Cognos 8.4 サービスを停止します。
IBM Cognos 8.4 サービスを停止します。
SSL の newscale.properties への変更
ステップ 1![]() newscale.properties ファイルで、cognoswebprotocol パラメータの http を https に変更します。
newscale.properties ファイルで、cognoswebprotocol パラメータの http を https に変更します。
ステップ 2![]() Request Center アプリケーション サーバを再起動します。
Request Center アプリケーション サーバを再起動します。
確認
ステップ 1![]() https://CognosServername.domain.com/cognos8 にログインし、Cognos Connection にログインできるかチェックします。
https://CognosServername.domain.com/cognos8 にログインし、Cognos Connection にログインできるかチェックします。
ステップ 2![]() https://RequestCenterServername.domain.com/RequestCenter にログインし、Reporting または Advanced Reporting モジュールにナビゲートできるかチェックします。
https://RequestCenterServername.domain.com/RequestCenter にログインし、Reporting または Advanced Reporting モジュールにナビゲートできるかチェックします。
トラブルシューティング
この章で説明されているエラーが発生したら、推奨されているソリューションを試してみてください。
create_model.cmd が失敗しました(Oracle DB)
エラー
•![]() 設定中に setup.properties のパラメータ datamart.db.schema のデータマート スキーマ ユーザ名が指定されていません。
設定中に setup.properties のパラメータ datamart.db.schema のデータマート スキーマ ユーザ名が指定されていません。
ソリューション
•![]() (<requestcenter.destination>/Cognos/Config)の下にある cognos.properties ファイルを開きます。
(<requestcenter.destination>/Cognos/Config)の下にある cognos.properties ファイルを開きます。
•![]() 次のように、datamart.db.schema の値を編集します。
次のように、datamart.db.schema の値を編集します。
–![]() datamart.db.schema=dbo(SQL Server データベース)
datamart.db.schema=dbo(SQL Server データベース)
–![]() datamart.db.schema=<dm user name>(Oracle データベース)
datamart.db.schema=<dm user name>(Oracle データベース)
(注) アップグレードの場合、setup.properties で同じ変更を行ってから、configure.cmd を実行します(<Cognos_temp_installer>/cognosinstaller)。
•![]() datamart.db.schema パラメータを編集してから、cognos.properties ファイルを保存します。
datamart.db.schema パラメータを編集してから、cognos.properties ファイルを保存します。
•![]() コマンド プロンプト ウィンドウを開いて、<requestcenter.destination>¥Cognos¥bin ディレクトリに移動し、execute create_model.cmd および publish_fdr_pkg.cmd スクリプトを実行します。
コマンド プロンプト ウィンドウを開いて、<requestcenter.destination>¥Cognos¥bin ディレクトリに移動し、execute create_model.cmd および publish_fdr_pkg.cmd スクリプトを実行します。
CAM_AAA_Authenticate が失敗しました
エラー
•![]() 完全修飾ドメイン名を使用してアプリケーションにログインしていません。
完全修飾ドメイン名を使用してアプリケーションにログインしていません。
•![]() Cognos サーバ名に有効なドメイン名が含まれていません。
Cognos サーバ名に有効なドメイン名が含まれていません。
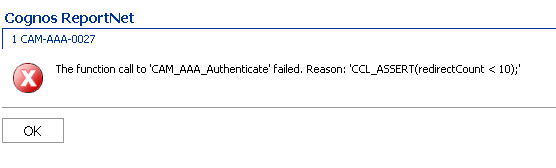
ソリューション 1
完全修飾ドメイン名を使用して Request Center アプリケーションにログインします。ホスト名の完全修飾ドメイン名を指定する必要があります(<host Name>+<domain name(s)>)。
ソリューション 2
•![]() (< cognos_temp_Installer > /cognosinstaller)の下にある setup.properties ファイルを開きます。
(< cognos_temp_Installer > /cognosinstaller)の下にある setup.properties ファイルを開きます。
•![]() サーバ名に完全修飾ドメイン名が含まれていない場合、ゲートウェイおよびアプリケーション サーバを次のように編集します。
サーバ名に完全修飾ドメイン名が含まれていない場合、ゲートウェイおよびアプリケーション サーバを次のように編集します。
–![]() gateway.server.name=inssa.qakqas.celosis.com.
gateway.server.name=inssa.qakqas.celosis.com.
–![]() application.server.name= inssa.qakqas.celosis.com.
application.server.name= inssa.qakqas.celosis.com.
–![]() コマンド プロンプト ウィンドウを開き、< cognos_temp_Installer > /cognosinstaller ディレクトリに移動し、configure.cmd スクリプトを実行します。
コマンド プロンプト ウィンドウを開き、< cognos_temp_Installer > /cognosinstaller ディレクトリに移動し、configure.cmd スクリプトを実行します。
(<requestcenter.destination>/Cognos/bin)下でバッチ スクリプトの実行中にログオンに失敗しました(401 Unauthorized)
エラー
•![]() このエラーの原因は、顧客のポリシーにより IIS で Anonymous アクセス オプションをイネーブルにできないことが考えられます
このエラーの原因は、顧客のポリシーにより IIS で Anonymous アクセス オプションをイネーブルにできないことが考えられます
ソリューション
ステップ 1![]() Internet Services Manager を開きます。
Internet Services Manager を開きます。
ステップ 2![]() Internet Information Services の左ペインで、サーバ名を展開します。
Internet Information Services の左ペインで、サーバ名を展開します。
ステップ 5![]() cgi-bin virtual ディレクトリをクリックします。
cgi-bin virtual ディレクトリをクリックします。
ステップ 6![]() Internet Information Services の右ペインで、 cognos.cgi ファイルを右クリックして、[Properties] をクリックします。Cognos との通信が CGI 以外のゲートウェイで行われる場合、関連ファイルのプロパティをチェックします。
Internet Information Services の右ペインで、 cognos.cgi ファイルを右クリックして、[Properties] をクリックします。Cognos との通信が CGI 以外のゲートウェイで行われる場合、関連ファイルのプロパティをチェックします。
ステップ 7![]() [File Security] タブの [Edit] をクリックします。
[File Security] タブの [Edit] をクリックします。
ステップ 8![]() [Enable Anonymous access] チェックボックスを選択します。
[Enable Anonymous access] チェックボックスを選択します。
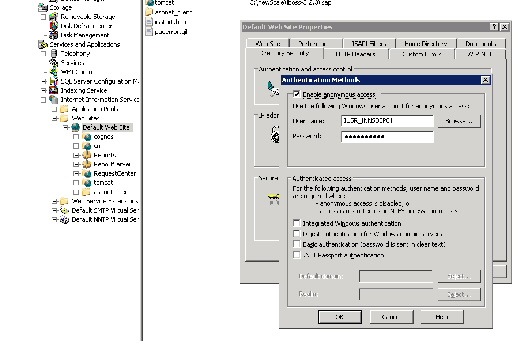
ステップ 10![]() コマンド プロンプト ウィンドウを開いて、<requestcenter.destination>¥Cognos¥bin ディレクトリに移動して、失敗したバッチ スクリプトを実行します。
コマンド プロンプト ウィンドウを開いて、<requestcenter.destination>¥Cognos¥bin ディレクトリに移動して、失敗したバッチ スクリプトを実行します。
Service レポーティング モジュールにログインできません
エラー
•![]() EncryptionMethod パラメータ値が、Request Center データベースの CnfParams テーブルにありません。
EncryptionMethod パラメータ値が、Request Center データベースの CnfParams テーブルにありません。
正しいユーザ ID およびパスワードを指定した後でも、ログイン ページが表示されます。
ソリューション 1
ステップ 1![]() JAVA_HOME 変数をシステム変数から削除します。
JAVA_HOME 変数をシステム変数から削除します。
ソリューション 2
ステップ 1![]() Request Center データベースに移動し、SQLServer Management Studio または Oracle SQL*Plus を開きます。
Request Center データベースに移動し、SQLServer Management Studio または Oracle SQL*Plus を開きます。
ステップ 2![]() クエリー SELECT * FROM CnfParams WHERE Name='EncryptionMethod' を実行します。
クエリー SELECT * FROM CnfParams WHERE Name='EncryptionMethod' を実行します。
ステップ 3![]() 上記のクエリーからレコードが検出されない場合、ステートメント INSERT INTO CnfParams (Name, Value) values (‘EncryptionMethod', ‘MD5') を実行します。
上記のクエリーからレコードが検出されない場合、ステートメント INSERT INTO CnfParams (Name, Value) values (‘EncryptionMethod', ‘MD5') を実行します。
ステップ 5![]() Services に移動し、IBM Cognos 8 サービスを再起動します。
Services に移動し、IBM Cognos 8 サービスを再起動します。
Custom Reports Data Model が存在せず、Request Center の [Ad-Hoc Reporting] リンクをクリックするとエラーが発生します
エラー
•![]() Custom Reports Data Model パッケージが Cognos Server に公開されていません。
Custom Reports Data Model パッケージが Cognos Server に公開されていません。
ソリューション
コマンド プロンプト ウィンドウを開いて、< requestcenter.destination >¥Cognos¥bin ディレクトリに移動し、execute create_model.cmd および publish_fdr_pkg.cmd スクリプトを実行します。
publish_fdr_pkg.cmd successfully... (SQL Server DB) を実行できません
エラー
•![]() 設定中に setup.properties ファイルに指定した Data Mart データベース名( datamart.db.name )の大文字と小文字が区別されていません。
設定中に setup.properties ファイルに指定した Data Mart データベース名( datamart.db.name )の大文字と小文字が区別されていません。
[RequestCenter] ConfUtil: (via classloader) ConfigFile:null
Configuration not yet initialized
[RequestCenter] ConfUtil:(set explictly) ConfigFile:config/cognos.properties
[RequestCenter] ConfUtil:(set explictly) LogConfigFile:config/log4j.xml
[RequestCenter] ConfUtil: ClassLoadersun.misc.Launcher$AppClassLoader@e80a59
[RequestCenter] ConfUtil.init loaded properties from: config/cognos.properties
[RequestCenter] ConfUtil:(via classloader) LogConfigFile:config/log4j.xml
LogUtilFactory - using Impl: com.newscale.bfw.logging.LogUtilCommonsImpl
2007-10-15 10:58:33,744 INFO Executing ScriptPlayer...
2007-10-15 10:58:33,853 INFO A new project is being created.
2007-10-15 10:58:48,137 INFO Transaction count: 834
2007-10-15 10:58:48,137 INFO
2007-10-15 10:58:48,137 INFO
2007-10-15 10:58:48,137 INFO Transaction: 1
2007-10-15 10:58:48,137 INFO Action: SetDefaultLocale successful, continuing...
2007-10-15 10:58:48,137 INFO
2007-10-15 10:58:48,137 INFO Transaction: 2
2007-10-15 10:58:48,152 INFO Action: SetActiveLocale successful, continuing...
2007-10-15 10:58:48,152 INFO
2007-10-15 10:58:48,152 INFO Transaction: 3
2007-10-15 10:58:48,152 INFO Action: Modify successful, continuing...
2007-10-15 10:58:48,152 INFO
2007-10-15 10:58:48,152 INFO Transaction: 4
2007-10-15 10:58:48,152 INFO Action: Modify successful, continuing...
2007-10-15 10:58:51,106 INFO Action: DBImport failed, skipping...
2007-10-15 10:58:51,106 INFO Reason: BMT-MD-5002 The ImportSpec object ‘DatamartD’ of type ‘catalog’ does not exist in the database.
2007-10-15 10:58:51,106 INFO
2007-10-15 10:58:51,106 INFO Transaction: 4 failed, skipping...
(注) ETL スクリプト publish_fdr_pkg.cmd は、DBImport エラー「ImportSpec object ‘DatamartD' of type ‘catalog' does not exist in database.」を生成します。
ソリューション
ステップ 1![]() (<requestcenter.destination>/cognos/config)の下にある cognos.properties ファイルを開きます。
(<requestcenter.destination>/cognos/config)の下にある cognos.properties ファイルを開きます。
ステップ 2![]() パラメータ datamart.db.name を探します。データベースに指定した Data Mart データベースの名前を指定します。大文字と小文字は区別されます。
パラメータ datamart.db.name を探します。データベースに指定した Data Mart データベースの名前を指定します。大文字と小文字は区別されます。
(注) アップグレードの場合、setup.properties ファイルでも同じように変更してから、configure.cmd を実行します(<Cognos_temp_installer>/cognosinstaller)。
例:Data Mart データベースが DataMart として指定されている場合:
ステップ 3![]() コマンド プロンプト ウィンドウを開いて、<requestcenter.destination>¥Cognos¥bin ディレクトリに移動し、execute create_model.cmd および publish_fdr_pkg.cmd スクリプトを実行します。
コマンド プロンプト ウィンドウを開いて、<requestcenter.destination>¥Cognos¥bin ディレクトリに移動し、execute create_model.cmd および publish_fdr_pkg.cmd スクリプトを実行します。
Cognos 8 サービスを開始できず、ディスパッチャ エラーが発生します
エラー
•![]() </cognos_installed_location/c8/logs> にあるログ ファイル(cogserver.log および cogconfig_response.csv)をチェックし、エラー コードを確認して、次に示す各エラー コードに関連するソリューションを参照します。
</cognos_installed_location/c8/logs> にあるログ ファイル(cogserver.log および cogconfig_response.csv)をチェックし、エラー コードを確認して、次に示す各エラー コードに関連するソリューションを参照します。
エラー コード
CFG-ERR-0103:Cognos 8 サービスを開始できません。外部プロセスを実行するとエラー コード値「-1」が返されます。
•![]() Cognos 8 サービスを開始するときに使用されたアカウントのパスワードの有効期限が切れているか、管理者権限がありません。
Cognos 8 サービスを開始するときに使用されたアカウントのパスワードの有効期限が切れているか、管理者権限がありません。
ソリューション 1
ステップ 2![]() [IBM Cognos8 Service] に移動します。右クリックし、[Properties] を選択します。
[IBM Cognos8 Service] に移動します。右クリックし、[Properties] を選択します。
ステップ 3![]() 次に示すように [Logon] タブをクリックします。
次に示すように [Logon] タブをクリックします。
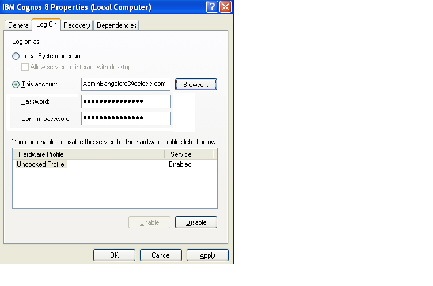
ステップ 4![]() 入力するユーザ アカウントに管理者権限があり、パスワードの有効期限が切れていないことを確認します。
入力するユーザ アカウントに管理者権限があり、パスワードの有効期限が切れていないことを確認します。
ステップ 5![]() サービスに移動し、IBM Cognos 8 サービスを再起動します。
サービスに移動し、IBM Cognos 8 サービスを再起動します。
ソリューション 2
ステップ 2![]() シャットダウン ポート番号を 9399 から 9410 に変更します。
シャットダウン ポート番号を 9399 から 9410 に変更します。
ステップ 3![]() 変更を保存し、IBM Cognos 8 サービスを再起動します。
変更を保存し、IBM Cognos 8 サービスを再起動します。
エラー コード
CAM-CRP-1114:キーストア「C:/Program Files/cognos/c8/configuration/signkeypair¥jCAKeystore」のエイリアス「ca」で認証局自己署名証明書がありません
CAM-CRP-1085:セキュリティ プロバイダ クラスのロード検証中にエラーが発生しました。理由:java.lang.ClassNotFoundException: org.bouncycastle134.jce.provider.
ソリューション
ステップ 1![]() JAVA_HOME をシステム変数から削除します。
JAVA_HOME をシステム変数から削除します。
ステップ 3![]() コマンド プロンプトを開き、(<Cognos_temp_installer>/cognosinstaller)に移動して、 configure.cmd を実行します。
コマンド プロンプトを開き、(<Cognos_temp_installer>/cognosinstaller)に移動して、 configure.cmd を実行します。
エラー コード
CM-CFG-5063:ContentStore との接続時に Content Manager Configuration エラーが検出されました。
•![]() ContentStore データベースの SID に有効な名前がないか、TNS が SID 名で登録されていません。
ContentStore データベースの SID に有効な名前がないか、TNS が SID 名で登録されていません。
ソリューション
ステップ 1![]() SID と Service に ContentStore データベースの同じ名前があり、SID に下線が含まれていないことを確認します。
SID と Service に ContentStore データベースの同じ名前があり、SID に下線が含まれていないことを確認します。
ステップ 2![]() SERVICE NAME ではなく、SID を使用して TNS を登録します。
SERVICE NAME ではなく、SID を使用して TNS を登録します。
ステップ 3![]() 「tnsping <SID>」を介して Oracle インスタンスに接続できることを確認します。
「tnsping <SID>」を介して Oracle インスタンスに接続できることを確認します。
ステップ 4![]() コマンド プロンプト ウィンドウを開き、(<cognos_temp_intaller>/cognos installer)に移動して、 configure.cmd を実行します。
コマンド プロンプト ウィンドウを開き、(<cognos_temp_intaller>/cognos installer)に移動して、 configure.cmd を実行します。
エラー コード
[ERROR] ドライバ「oracle.jdbc.OracleDriver」をロードできなかったため、Content Manager を開始できませんでした。
ソリューション
ステップ 1![]() ojdbc14.jar を //oracle/JDBC/lib から <cognos_install_dir> //cognos/c8/webapps/p2pd/WEB-INF/lib にコピーします。
ojdbc14.jar を //oracle/JDBC/lib から <cognos_install_dir> //cognos/c8/webapps/p2pd/WEB-INF/lib にコピーします。
ステップ 2![]() コマンド プロンプト ウィンドウを開き、(<cognos_temp_intaller>/cognos installer)に移動して、 configure.cmd を実行します。
コマンド プロンプト ウィンドウを開き、(<cognos_temp_intaller>/cognos installer)に移動して、 configure.cmd を実行します。
Cognos8 サービスの設定がハングし、起動しません
エラー
•![]() DEP(Data Execution Prevention)設定(window2003 および window XP)が、cognos 実行可能ファイルをブロックしている可能性があります。
DEP(Data Execution Prevention)設定(window2003 および window XP)が、cognos 実行可能ファイルをブロックしている可能性があります。
ソリューション
ステップ 1![]() システム変数に素材する場合、 JAVA_HOME を削除します。
システム変数に素材する場合、 JAVA_HOME を削除します。
ステップ 2![]() [My Computer] を右クリックして、[Properties] を選択します。
[My Computer] を右クリックして、[Properties] を選択します。
ステップ 3![]() [Advanced] タブをクリックして、[Performance] の最初の [Settings] ボタンをクリックします。
[Advanced] タブをクリックして、[Performance] の最初の [Settings] ボタンをクリックします。
ステップ 4![]() [Data Execution Prevention] タブをクリックします。
[Data Execution Prevention] タブをクリックします。
ステップ 5![]() オプション [Turn on DEP for all programs and services except those I select] を選択します。
オプション [Turn on DEP for all programs and services except those I select] を選択します。
ステップ 6![]() [Add] ボタンをクリックして、次の実行可能ファイルを各場所から追加します。
[Add] ボタンをクリックして、次の実行可能ファイルを各場所から追加します。
path = C:¥Program Files (x86)¥cognos¥c8_64¥bin¥jre¥1.5.0¥bin64 |
|
アップグレード中に Import_reports.cmd が失敗しました
エラー
エラー CM-REQ-4204:既存オブジェクト「/adminFolder/exportDeployment[@name='Reports']」のクラス(exportDeployment)が原因で置換操作に失敗しました。
ソリューション
ステップ 1![]() 管理者として Request Center にログインします。
管理者として Request Center にログインします。
ステップ 2![]() [Reporting] モジュールに移動します。
[Reporting] モジュールに移動します。
ステップ 4![]() 右側で、[Launch] > [IBM Cognos Administration] を選択します。
右側で、[Launch] > [IBM Cognos Administration] を選択します。
ステップ 5![]() [Configuration] タブに移動し、[Content Administration] を選択して、[Reports] を選択します。
[Configuration] タブに移動し、[Content Administration] を選択して、[Reports] を選択します。
ステップ 6![]() [Reports] を削除します(以下を参照してください)。
[Reports] を削除します(以下を参照してください)。
ステップ 7![]() コマンド プロンプトを開き、<requestcenter.destination>¥Cognos¥bin ディレクトリに移動して、 create_reports.cmd スクリプトを実行します。
コマンド プロンプトを開き、<requestcenter.destination>¥Cognos¥bin ディレクトリに移動して、 create_reports.cmd スクリプトを実行します。
Update_datamart.cmd が失敗しました(SQL Server データベース)
エラー
INFO UDA-SQL-0115:SQL リクエストが不正です。
INFO UDA-SQL-0564:[Microsoft OLE DB Provider for SQL Server] がストアド プロシージャ「sp_DropDMIndxs」を検出できませんでした。(SQLSTATE=42000、SQLERRORCODE=2812)
•![]() Data Mart データベース オブジェクト(table/views/stored procedure)のデフォルト スキーマ所有者が dbo ではありませんでした。
Data Mart データベース オブジェクト(table/views/stored procedure)のデフォルト スキーマ所有者が dbo ではありませんでした。
ソリューション
ステップ 1![]() Data Mart データベースのデフォルト スキーマ所有者が dbo であることを確認します。
Data Mart データベースのデフォルト スキーマ所有者が dbo であることを確認します。
ステップ 2![]() コマンド プロンプトを開き、<requestcenter.destination>¥Cognos¥bin ディレクトリに移動して、 update_datamart.cmd スクリプトを実行します。
コマンド プロンプトを開き、<requestcenter.destination>¥Cognos¥bin ディレクトリに移動して、 update_datamart.cmd スクリプトを実行します。
create_model.cmd の実行に成功した後、publish_fdr_pkg.cmd に失敗しました
エラー
この問題の原因として、Reportable Dictionary または Service のクエリー サブジェクト(ディメンション/ファクト テーブル名)が同じであることが考えられます。
(注) c:¥<APP_HOME>¥logs¥cognos_metamodel_update.log に移動し、ログの詳細を確認します。
ソリューション
ログ ファイルに示されている特定のディクショナリまたはサービスを開き、ディクショナリまたはサービスの名前を一意な名前に変更して、 fdr/runETL.jsp 、 create_model.cmd 、 publish_fdr_pkg.cmd の順に実行します。
(注) 次の名前で報告可能なディクショナリまたはサービスに名前を付けないでください。
ETL スクリプトを正しく実行できるように、Service Portal Application Server マシンのシステム クロック、および Service Portal データベース マシンのシステム クロックを正しく設定することが重要です。さらに、Service Portal データベースがある RDBMS インスタンスのデータベース クロックと、データベースがインストールされるオペレーティング システムのシステム クロックは一致する必要があります。すべての日付/時刻の値は、Service Portal データベースおよび GMT の Data Mart データベースに保存されます。そのため、Application Server マシンとデータベース マシンが異なる分散環境では、これら 2 台のマシンの時間帯が異なっていても問題はありません。各マシンが使用する時間帯に対して、システム クロックが正しく設定されていることを確認してください。
Symantec Antivirus を使用する場合、バージョン 10.0.2.2000 以降を実行する必要があります。
レポート URL の検出方法
ソリューション
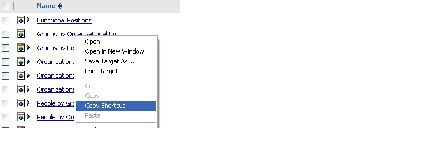
ステップ 1![]() Request Center にログインします。
Request Center にログインします。
ステップ 2![]() [Reporting] モジュールに移動します。
[Reporting] モジュールに移動します。
ステップ 3![]() [Report] を右クリックして、次に示すように [Copy Shortcut] を選択します。
[Report] を右クリックして、次に示すように [Copy Shortcut] を選択します。
ステップ 4![]() Request Center インスタンスを開いたときと同じブラウザ ウィンドウにショートカットを貼り付けた場合、個々のレポートにアクセスできます。
Request Center インスタンスを開いたときと同じブラウザ ウィンドウにショートカットを貼り付けた場合、個々のレポートにアクセスできます。
ステップ 5![]() 新しいブラウザ ウィンドウを開き、ショートカットを貼り付けた場合、ネームスペース ドロップダウン リストが表示されます。[newScale] ネームスペースを選択し、ログイン クレデンシャルを入力します。入力すると、個々のレポートにアクセスできます。
新しいブラウザ ウィンドウを開き、ショートカットを貼り付けた場合、ネームスペース ドロップダウン リストが表示されます。[newScale] ネームスペースを選択し、ログイン クレデンシャルを入力します。入力すると、個々のレポートにアクセスできます。
レポート ホーム ページをデフォルトのリスト ビューから詳細ビューに変更する方法
ソリューション
ステップ 1![]() Request Center アプリケーションにログインします。
Request Center アプリケーションにログインします。
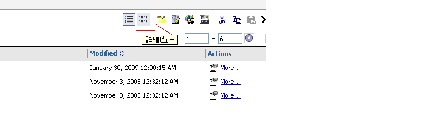
ステップ 2![]() [Reporting] モジュールに移動します。
[Reporting] モジュールに移動します。
ステップ 4![]() 次に示すように、右側に表示される [Details View] ボタンをクリックします。
次に示すように、右側に表示される [Details View] ボタンをクリックします。
 フィードバック