Cisco Service Portal インストレーション ガイド リリース 9.3.2
偏向のない言語
この製品のマニュアルセットは、偏向のない言語を使用するように配慮されています。このマニュアルセットでの偏向のない言語とは、年齢、障害、性別、人種的アイデンティティ、民族的アイデンティティ、性的指向、社会経済的地位、およびインターセクショナリティに基づく差別を意味しない言語として定義されています。製品ソフトウェアのユーザーインターフェイスにハードコードされている言語、RFP のドキュメントに基づいて使用されている言語、または参照されているサードパーティ製品で使用されている言語によりドキュメントに例外が存在する場合があります。シスコのインクルーシブランゲージに対する取り組みの詳細は、こちらをご覧ください。
翻訳について
このドキュメントは、米国シスコ発行ドキュメントの参考和訳です。リンク情報につきましては、日本語版掲載時点で、英語版にアップデートがあり、リンク先のページが移動/変更されている場合がありますことをご了承ください。あくまでも参考和訳となりますので、正式な内容については米国サイトのドキュメントを参照ください。
- Updated:
- 2012年7月18日
章のタイトル: Advanced Reporting について
Advanced Reporting について
•![]() 「概要」
「概要」
•![]() 「Reporting および Advanced Reporting コンポーネントの設定」
「Reporting および Advanced Reporting コンポーネントの設定」
•![]() 「時間帯の設定」
「時間帯の設定」
概要
この章では、Cisco により開発されたさまざまなインストーラ ユーティリティを使用して、Cognos ソフトウェア コンポーネントをインストールして、Cisco Service Portal アプリケーションと統合する方法について説明します。
Cognos 環境は、アプリケーション サーバとデータベース サーバにより構成されます。
•![]() アプリケーション サーバは、IBM Cognos ソフトウェアをインストールし、設定スクリプトを実行して Cognos を Cisco Service Portal アプリケーションと統合するコンピュータです。
アプリケーション サーバは、IBM Cognos ソフトウェアをインストールし、設定スクリプトを実行して Cognos を Cisco Service Portal アプリケーションと統合するコンピュータです。
•![]() データベース サーバは、ContentStore データベースがインストールされたコンピュータです。
データベース サーバは、ContentStore データベースがインストールされたコンピュータです。
次の項では、Cognos アプリケーション サーバおよびデータベース サーバの前提条件について説明します。
対象読者
この章は、Service Portal 製品をインストールおよび設定するシステム管理者およびシステム インテグレータを対象としています。この章では、Cognos および関連コンポーネントのインストールおよび設定について十分理解していることを前提とします。
Cognos アプリケーション サーバの要件
オペレーティング システム
•![]() IBM Cognos バージョン 8.4.1 ソフトウェアは、Windows Server 2008 R2(64 ビット)オペレーティング システムを実行するコンピュータにインストールする必要があります。
IBM Cognos バージョン 8.4.1 ソフトウェアは、Windows Server 2008 R2(64 ビット)オペレーティング システムを実行するコンピュータにインストールする必要があります。
•![]() Cognos アプリケーション サーバのコンピュータと Cisco Service Portal アプリケーションのコンピュータを別々にすることを推奨しますが、必須条件ではありません。ただし、Cisco Service Portal アプリケーションが UNIX または Linux コンピュータで実行される場合、Cognos アプリケーション サーバは、Windows オペレーティング システムと別のコンピュータにする必要があります。
Cognos アプリケーション サーバのコンピュータと Cisco Service Portal アプリケーションのコンピュータを別々にすることを推奨しますが、必須条件ではありません。ただし、Cisco Service Portal アプリケーションが UNIX または Linux コンピュータで実行される場合、Cognos アプリケーション サーバは、Windows オペレーティング システムと別のコンピュータにする必要があります。
メモリおよびディスク領域
•![]() アプリケーション サーバには、2 GB 以上の RAM および 2.5 GB 以上の空きディスク領域が必要です。
アプリケーション サーバには、2 GB 以上の RAM および 2.5 GB 以上の空きディスク領域が必要です。
•![]() %TEMP% ディレクトリを含むドライブには、1 GB 以上の空きディスク領域が必要です(Cognos ソフトウェアをインストールする場合にドライブが異なる場合)。
%TEMP% ディレクトリを含むドライブには、1 GB 以上の空きディスク領域が必要です(Cognos ソフトウェアをインストールする場合にドライブが異なる場合)。
Internet Information Services(IIS)
•![]() 「Web サーバ(IIS)」ロールは Cognos アプリケーション サーバにインストールする必要があります。
「Web サーバ(IIS)」ロールは Cognos アプリケーション サーバにインストールする必要があります。
•![]() 「World Wide Web Publishing Service」は自動起動するように設定されます。
「World Wide Web Publishing Service」は自動起動するように設定されます。
•![]() IIS には「Default Web Site」という名前のサイトが必要です。
IIS には「Default Web Site」という名前のサイトが必要です。
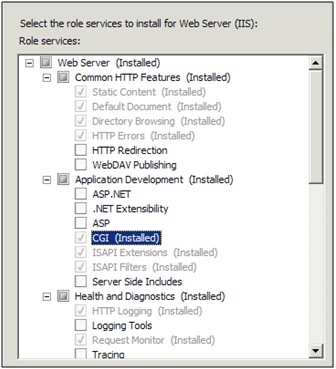
•![]() 次のロール サービスを IIS でイネーブルにする必要があります。
次のロール サービスを IIS でイネーブルにする必要があります。
Internet Explorer
•![]() Microsoft Internet Explorer バージョン 7(IE7)またはバージョン 8(IE8)のみがサポートされます。IE7 または IE8 ブラウザは、Cognos UI または Cisco Service Portal アプリケーション内の「Advanced Reporting」モジュールにアクセスするときに使用します。
Microsoft Internet Explorer バージョン 7(IE7)またはバージョン 8(IE8)のみがサポートされます。IE7 または IE8 ブラウザは、Cognos UI または Cisco Service Portal アプリケーション内の「Advanced Reporting」モジュールにアクセスするときに使用します。
–![]() Run ActiveX controls and plug-ins
Run ActiveX controls and plug-ins
Database Client Connectivity
•![]() 適切な Database Client Connectivity ソフトウェアを Cognos アプリケーション サーバにインストールして、RequestCenter データベース、Datamart データベースおよび ContentStore データベースの 3 つすべてのデータベースに接続するように事前に設定しておく必要があります。
適切な Database Client Connectivity ソフトウェアを Cognos アプリケーション サーバにインストールして、RequestCenter データベース、Datamart データベースおよび ContentStore データベースの 3 つすべてのデータベースに接続するように事前に設定しておく必要があります。
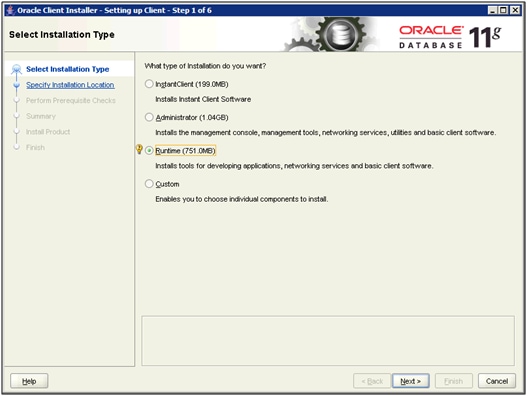
•![]() Oracle 11g :Oracle Client 11.2.0.1(32 ビット)ソフトウェアは必須です(Windows Server 2008 R2 オペレーティング システムが 64 ビット バージョンであっても 32 ビット バージョンの Oracle 11g Client ソフトウェアを使用する必要があります)。Cognos ソフトウェア インストールには、Oracle データベースに接続するときに必要な JDBC ドライバは含まれていません。そのため、ContentStore データベースが Oracle の場合、Oracle Client ソフトウェアを Cognos アプリケーション サーバにインストールする必要があります。Oracle Client 11.2.0.1 をインストールする場合、[Runtime] オプションを選択します。
Oracle 11g :Oracle Client 11.2.0.1(32 ビット)ソフトウェアは必須です(Windows Server 2008 R2 オペレーティング システムが 64 ビット バージョンであっても 32 ビット バージョンの Oracle 11g Client ソフトウェアを使用する必要があります)。Cognos ソフトウェア インストールには、Oracle データベースに接続するときに必要な JDBC ドライバは含まれていません。そのため、ContentStore データベースが Oracle の場合、Oracle Client ソフトウェアを Cognos アプリケーション サーバにインストールする必要があります。Oracle Client 11.2.0.1 をインストールする場合、[Runtime] オプションを選択します。
Oracle Client ソフトウェアをインストールしたら、Net Configuration Assistant プログラムを起動して、ContentStore データベースがある Oracle サーバの「Local Net Service Name」を設定する必要があります。さらに、SQL*Plus を使用したテストを実行して、RequestCenter、Datamart および ContentStore の 3 つすべてのデータベースに接続できるか確認します。
•![]() Microsoft SQL Server 2008 R2 :SQL Server 2008 R2 Client Connectivity ソフトウェアは必要ありません。Cognos インストールには、SQL Server データベース サーバとの接続に必要な JDBC が含まれています。
Microsoft SQL Server 2008 R2 :SQL Server 2008 R2 Client Connectivity ソフトウェアは必要ありません。Cognos インストールには、SQL Server データベース サーバとの接続に必要な JDBC が含まれています。
その他の要件
•![]() アプリケーション サーバの管理者権限を持ったユーザとしてログインして、Cognos ソフトウェアをインストールする必要があります。また、%TEMP% ディレクトリへの読み取りおよび書き込み権限も必要です。
アプリケーション サーバの管理者権限を持ったユーザとしてログインして、Cognos ソフトウェアをインストールする必要があります。また、%TEMP% ディレクトリへの読み取りおよび書き込み権限も必要です。
–![]() Cisco Service Portal アプリケーション サーバ
Cisco Service Portal アプリケーション サーバ
–![]() RequestCenter、Datamart および ContentStore データベースがあるデータベース サーバ
RequestCenter、Datamart および ContentStore データベースがあるデータベース サーバ
•![]() Symantec Antivirus がアプリケーション サーバにインストールされている場合、バージョン 10.0.2.2000 以上を使用する必要があります。
Symantec Antivirus がアプリケーション サーバにインストールされている場合、バージョン 10.0.2.2000 以上を使用する必要があります。
•![]() ドメイン ネーム システム(DNS)をコンピュータに設定している必要があります。ホスト名のプライマリ DNS サフィックスが適切な値(たとえば、 mydomain.com )に割り当てられ、ホスト名が完全修飾ドメイン名に解決される必要があります(たとえば、「ping myserver 」は myserver.mydomain.com に解決される必要があります)。
ドメイン ネーム システム(DNS)をコンピュータに設定している必要があります。ホスト名のプライマリ DNS サフィックスが適切な値(たとえば、 mydomain.com )に割り当てられ、ホスト名が完全修飾ドメイン名に解決される必要があります(たとえば、「ping myserver 」は myserver.mydomain.com に解決される必要があります)。
•![]() Service Portal アプリケーション サーバおよび Cognos アプリケーション サーバは同じドメインに属する必要があります。たとえば、Service Portal アプリケーション サーバが mydomain.com という名前のドメインのコンピュータにインストールされている場合、Cognos アプリケーション サーバも同じドメイン mydomain.com に属する必要があります。
Service Portal アプリケーション サーバおよび Cognos アプリケーション サーバは同じドメインに属する必要があります。たとえば、Service Portal アプリケーション サーバが mydomain.com という名前のドメインのコンピュータにインストールされている場合、Cognos アプリケーション サーバも同じドメイン mydomain.com に属する必要があります。
•![]() このインストール プロセスでは、ホスト名を入力する場合でも、サーバ名を入力する場合でも、完全修飾ドメイン名として入力する必要があります。たとえば、「 localhost 」または「 cognosserver 」ではなく、「 cognosserver.mydomain.com 」を入力します。Service Portal に接続する場合、たとえば、 http://ciscoserviceportal.mydomain.com/RequestCenter のように URL に完全修飾ドメイン名を入力する必要があります。
このインストール プロセスでは、ホスト名を入力する場合でも、サーバ名を入力する場合でも、完全修飾ドメイン名として入力する必要があります。たとえば、「 localhost 」または「 cognosserver 」ではなく、「 cognosserver.mydomain.com 」を入力します。Service Portal に接続する場合、たとえば、 http://ciscoserviceportal.mydomain.com/RequestCenter のように URL に完全修飾ドメイン名を入力する必要があります。
•![]() このインストール プロセスでは、コマンド プロンプト ウィンドウを開いてスクリプトを実行する場合は必ず、コマンド プロンプト ウィンドウに出力全体を表示できるように、コマンド履歴バッファ サイズを(999 などに)増加する必要があります。インストール ログ ファイルにはすべての出力が記録されるわけではありません。
このインストール プロセスでは、コマンド プロンプト ウィンドウを開いてスクリプトを実行する場合は必ず、コマンド プロンプト ウィンドウに出力全体を表示できるように、コマンド履歴バッファ サイズを(999 などに)増加する必要があります。インストール ログ ファイルにはすべての出力が記録されるわけではありません。
Cognos データベース サーバの要件
Advanced Reporting モジュールは、次の 3 つのデータベースにアクセスできる必要があります。
最初の 2 つのデータベースは、Service Portal アプリケーションのセットアップ プログラムを実行する前に作成されています。3 つめのデータベース ContentStore は、Cognos ソフトウェア専用に必要です。次の項では、ContentStore データベースを Oracle 11g または SQL Server 2008 R2 のいずれかで作成する方法について説明します。
ContentStore データベースは、RequestCenter データベースと同じタイプおよび同じ RDBMS バージョンでなければなりません。たとえば、RequestCenter データベースが Oracle 11g にある場合、ContentStore データベースは Oracle 11g に作成する必要があります。RequestCenter データベースが SQL Server 2008 R2 にある場合、ContentStore データベースは SQL Server 2008 R2 に作成する必要があります。
データベース サーバは、クライアント接続のために TCP/IP プロトコルをサポートし、Cognos アプリケーション サーバからアクセスできるように設定する必要があります。
データベース管理者は、ContentStore データベースを定期的にバックアップする必要があります。これは、このデータベースに、カスタム レポートおよびビューや保存レポートなど、すべての Cognos データが含まれているためです。ContentStore データベースのセキュリティとインテグリティを確保するため、許可されない、または不適切なアクセスからデータベースを保護することも重要です。
Oracle 11g での ContentStore データベースの作成
1.![]() Oracle SID 値には、下線文字を使用できません。また、Oracle Service Name と Oracle SID の値が同じであることを確認します。
Oracle SID 値には、下線文字を使用できません。また、Oracle Service Name と Oracle SID の値が同じであることを確認します。
2.![]() Oracle データベースは、ユニコード文字セット(つまり、UTF-8 または UTF-16)を使用するように設定する必要があります。データベースの文字セットがユニコードかどうかを確認するには、次の SQL コマンドを実行します。
Oracle データベースは、ユニコード文字セット(つまり、UTF-8 または UTF-16)を使用するように設定する必要があります。データベースの文字セットがユニコードかどうかを確認するには、次の SQL コマンドを実行します。
NLS_CHARACTERSET パラメータの戻り値が AL32UTF8 または AL16UTF16 の場合、Oracle データベースはユニコードをサポートします。これ以外の場合、新しい Oracle データベースを作成し、作成時に文字セットとして AL32UTF8 または AL16UTF16 を指定する必要があります。
3.![]() ORACLE パラメータ CURSOR_SHARING は EXACT に設定する必要があります。パラメータ CURSOR_SHARING の設定値を確認するには、次のコマンドを実行します。
ORACLE パラメータ CURSOR_SHARING は EXACT に設定する必要があります。パラメータ CURSOR_SHARING の設定値を確認するには、次のコマンドを実行します。
CURSOR_SHARING が EXACT に設定されていない場合、次のコマンドを使用して変更できます。
4.![]() ContentStore のスキーマは、RequestCenter データベースまたは Datamart データベースのスキーマとは異なる必要があります。ただし、ContentStore スキーマが、RequestCenter スキーマと同じ Oracle インスタンスにあっても構いません。
ContentStore のスキーマは、RequestCenter データベースまたは Datamart データベースのスキーマとは異なる必要があります。ただし、ContentStore スキーマが、RequestCenter スキーマと同じ Oracle インスタンスにあっても構いません。
5.![]() 「CSUser」という名前のデータベース ユーザ アカウントを作成します。これは、実行時に ContentStore データベースにアクセスするときに Cognos アプリケーション サーバにより使用されます。
「CSUser」という名前のデータベース ユーザ アカウントを作成します。これは、実行時に ContentStore データベースにアクセスするときに Cognos アプリケーション サーバにより使用されます。
6.![]() 次の権限をデータベース ユーザ アカウント「CSUser」に付与します。
次の権限をデータベース ユーザ アカウント「CSUser」に付与します。
Microsoft SQL Server 2008 R2 での ContentStore データベースの作成
1.![]() SQL Server は「デフォルト インスタンス」としてインストールする必要があります。「名前付きインスタンス」にすることはできません。
SQL Server は「デフォルト インスタンス」としてインストールする必要があります。「名前付きインスタンス」にすることはできません。
2.![]() SQL Server は、混合モード認証で設定する必要があります(つまり、SQL Server 認証と Windows 認証を許可する必要があります)。
SQL Server は、混合モード認証で設定する必要があります(つまり、SQL Server 認証と Windows 認証を許可する必要があります)。
3.![]() ContentStore という名前のデータベースを作成します(データベース名にはスペースを含めることはできません)。ContentStore は、RequestCenter データベースまたは Datamart データベースと別のデータベースにする必要があります。ただし、ContentStore データベースが、RequestCenter データベースと同じ SQL Server インスタンスにあっても構いません。
ContentStore という名前のデータベースを作成します(データベース名にはスペースを含めることはできません)。ContentStore は、RequestCenter データベースまたは Datamart データベースと別のデータベースにする必要があります。ただし、ContentStore データベースが、RequestCenter データベースと同じ SQL Server インスタンスにあっても構いません。
4.![]() データベース照合順序では、大文字と小文字は区別されません。
データベース照合順序では、大文字と小文字は区別されません。
5.![]() 「CSUser」という名前のデータベース ユーザ アカウントを作成します。これは、実行時に ContentStore データベースにアクセスするときに Cognos アプリケーション サーバにより使用されます。
「CSUser」という名前のデータベース ユーザ アカウントを作成します。これは、実行時に ContentStore データベースにアクセスするときに Cognos アプリケーション サーバにより使用されます。

(注) CSUser は、Windows 認証方法ではなく、SQL Server 認証方法を使用して SQL Server に認証される SQL Server ログイン アカウントでなければなりません。
6.![]() データベース ユーザ アカウント「CSUser」を「ContentStore」データベースの db_owner として割り当てます。
データベース ユーザ アカウント「CSUser」を「ContentStore」データベースの db_owner として割り当てます。
ContentStore データベースのサイジング
ContentStore データベースの静は、さまざまな要因により異なります。
•![]() 保存されているレポートの数(およびレポートのページ/行/画像の数)
保存されているレポートの数(およびレポートのページ/行/画像の数)
•![]() 保存されているレポート ビューの数(およびレポートのページ/行の数)
保存されているレポート ビューの数(およびレポートのページ/行の数)
次のガイドライン(Cognos Knowledge Base の記事から編集)は、上記のパラメータから推測した使用状況に基づいて、データベース サイジング要件を予想するときに役に立ちます。
ContentStore サイジングの決定要因を次に示します。
•![]() システム容量:トランザクション ログ。Cognos による 250 アクティブ ユーザあたりの推定値は 3,000,000 KB です。
システム容量:トランザクション ログ。Cognos による 250 アクティブ ユーザあたりの推定値は 3,000,000 KB です。
•![]() 一時容量:レポート生成に必要です。推定値は、同時ユーザあたり 100,000 KB です。
一時容量:レポート生成に必要です。推定値は、同時ユーザあたり 100,000 KB です。
•![]() データ容量:ユーザにより保存されるレポートおよびビュー、ユーザ フォルダ、およびレポートの Framework Manager モデルを保持するために必要です。
データ容量:ユーザにより保存されるレポートおよびビュー、ユーザ フォルダ、およびレポートの Framework Manager モデルを保持するために必要です。
•![]() 保存されるレポートおよびビューの合計数は、ContentStore サイジングを予想するうえで重要な要素で、予想が最も困難です。これは、各ユーザが保存できるレポートのバージョンの数を制限する Cognos 管理者により部分的に制御できます。
保存されるレポートおよびビューの合計数は、ContentStore サイジングを予想するうえで重要な要素で、予想が最も困難です。これは、各ユーザが保存できるレポートのバージョンの数を制限する Cognos 管理者により部分的に制御できます。
•![]() 保存される各レポートのサイズは、レポート ページの数に基づきます。レポートの平均サイズに影響を与える可能性がある要因には、ページ数、フォーマットやテキスト選択、画像の有無があります。Cognos では、ユーザが作成する保存オブジェクトに対する要件を次のように推定しています。
保存される各レポートのサイズは、レポート ページの数に基づきます。レポートの平均サイズに影響を与える可能性がある要因には、ページ数、フォーマットやテキスト選択、画像の有無があります。Cognos では、ユーザが作成する保存オブジェクトに対する要件を次のように推定しています。
•![]() これらの各保存オブジェクトの数は、「一般的」なユーザが保存することを前提としています。これらの数に各オブジェクトのストレージ要件を乗算し、ContentStore 内のデータ容量に関するボリューム(ユーザ)に基づくストレージ要件の推定値を算出します。
これらの各保存オブジェクトの数は、「一般的」なユーザが保存することを前提としています。これらの数に各オブジェクトのストレージ要件を乗算し、ContentStore 内のデータ容量に関するボリューム(ユーザ)に基づくストレージ要件の推定値を算出します。
|
|
|
|
Cognos ソフトウェアのインストール
この項では、Cognos 8.4.1 ソフトウェアをインストールする方法について説明します。
(注) この項で説明されているインストール作業を実行するには、管理者権限を持つユーザとしてログインする必要があります。
Cognos ソフトウェアのダウンロード
ステップ 1![]() Cisco 製品ダウンロード Web サイトにアクセスし、各自に割り当てられたユーザ名とパスワードを使用して認証します。
Cisco 製品ダウンロード Web サイトにアクセスし、各自に割り当てられたユーザ名とパスワードを使用して認証します。
ステップ 2![]() 製品名「Cisco Request Center Reporting」を探すか、製品セレクタ内をナビゲートして、Cognos Business Intelligence インストーラおよびフィックス パックを探します。(ナビゲーション:[Products] > [Network Management and Automation] > [Data Center Management and Automation] > [Intelligent Automation] > [Cisco Request Center Reporting])。
製品名「Cisco Request Center Reporting」を探すか、製品セレクタ内をナビゲートして、Cognos Business Intelligence インストーラおよびフィックス パックを探します。(ナビゲーション:[Products] > [Network Management and Automation] > [Data Center Management and Automation] > [Intelligent Automation] > [Cisco Request Center Reporting])。
ステップ 3![]() [Business Intelligence Install] を選択して、バージョン 8.4.1 の次のファイルを Cognos アプリケーション サーバ マシンにダウンロードします。
[Business Intelligence Install] を選択して、バージョン 8.4.1 の次のファイルを Cognos アプリケーション サーバ マシンにダウンロードします。
|
|
|
ステップ 4![]() 3 つすべての zip ファイルを、C:¥CognosSoftware などの Cognos アプリケーション サーバの一時ディレクトリに解凍します。
3 つすべての zip ファイルを、C:¥CognosSoftware などの Cognos アプリケーション サーバの一時ディレクトリに解凍します。
ステップ 5![]() Cognos マシンにある場合、JAVA_HOME 環境変数を削除します。これは、Cognos インストール プログラムがその埋め込み Java 使用し、これにより、JAVA_HOME 環境変数で定義されている Java のバージョンと競合する可能性があるためです。
Cognos マシンにある場合、JAVA_HOME 環境変数を削除します。これは、Cognos インストール プログラムがその埋め込み Java 使用し、これにより、JAVA_HOME 環境変数で定義されている Java のバージョンと競合する可能性があるためです。
Cognos Business Intelligence Server のインストール
ステップ 1![]() (Cognos ソフトウェアを C:¥CognosSoftware ディレクトリ下に解凍していることを前提とします)フォルダ C:¥CognosSoftware¥CZA87ML¥winx64 を開きます。
(Cognos ソフトウェアを C:¥CognosSoftware ディレクトリ下に解凍していることを前提とします)フォルダ C:¥CognosSoftware¥CZA87ML¥winx64 を開きます。
ステップ 2![]() issetup.exe をダブルクリックして、Cognos セットアップ プログラムを起動します。
issetup.exe をダブルクリックして、Cognos セットアップ プログラムを起動します。
ステップ 3![]() [Component Selection] 画面が表示されるまで、画面に表示されるすべてのデフォルト値を選択してインストール ウィザードを進めます。
[Component Selection] 画面が表示されるまで、画面に表示されるすべてのデフォルト値を選択してインストール ウィザードを進めます。
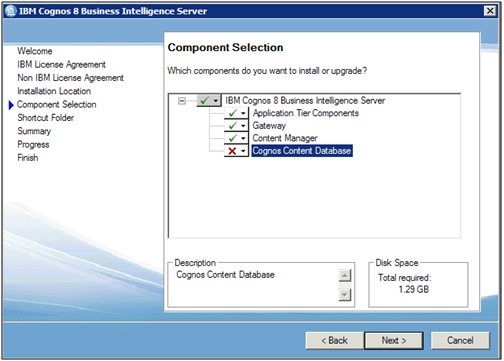
ステップ 4![]() 次の図で緑色のチェックマークが付いたコンポーネントのみを選択します。
次の図で緑色のチェックマークが付いたコンポーネントのみを選択します。
ステップ 5![]() [Next] をクリックして、[Finish] 画面が表示されるまで、残りのインストール ウィザードを進めます。
[Next] をクリックして、[Finish] 画面が表示されるまで、残りのインストール ウィザードを進めます。
ステップ 6![]() [Start IBM Cognos Configuration] オプションを選択解除して、[Finish] をクリックします。
[Start IBM Cognos Configuration] オプションを選択解除して、[Finish] をクリックします。
Cognos Data Manager のインストール
ステップ 1![]() (Cognos ソフトウェアを C:¥CognosSoftware ディレクトリ下に解凍していることを前提とします)フォルダ C:¥CognosSoftware¥CZAH6EN¥winx64 を開きます。
(Cognos ソフトウェアを C:¥CognosSoftware ディレクトリ下に解凍していることを前提とします)フォルダ C:¥CognosSoftware¥CZAH6EN¥winx64 を開きます。
ステップ 2![]() issetup.exe をダブルクリックして、Cognos セットアップ プログラムを起動します。
issetup.exe をダブルクリックして、Cognos セットアップ プログラムを起動します。
ステップ 3![]() [Installation Location] 画面が表示されるまで、画面に表示されるすべてのデフォルト値を選択してインストール ウィザードを進めます。
[Installation Location] 画面が表示されるまで、画面に表示されるすべてのデフォルト値を選択してインストール ウィザードを進めます。
ステップ 4![]() Cognos Business Intelligence Server をインストールしたフォルダと同じ名前を入力します(たとえば、C:¥Program Files (x86)¥cognos¥c8_64)。次に [Next] をクリックします。
Cognos Business Intelligence Server をインストールしたフォルダと同じ名前を入力します(たとえば、C:¥Program Files (x86)¥cognos¥c8_64)。次に [Next] をクリックします。
ステップ 5![]() 「 Warning: You are installing to the same location as a previous installation.Do you want to continue? 」というメッセージが表示されたら、[Yes] をクリックして次に進みます。
「 Warning: You are installing to the same location as a previous installation.Do you want to continue? 」というメッセージが表示されたら、[Yes] をクリックして次に進みます。
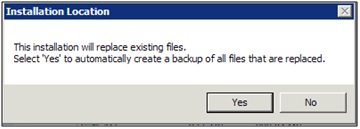
ステップ 6![]() 次のメッセージが表示されたら、[No] をクリックして次に進みます。
次のメッセージが表示されたら、[No] をクリックして次に進みます。
ステップ 7![]() [Component Selection] 画面が表示されたら、次の図で緑色のチェックマークが付いたコンポーネントのみを選択します。
[Component Selection] 画面が表示されたら、次の図で緑色のチェックマークが付いたコンポーネントのみを選択します。
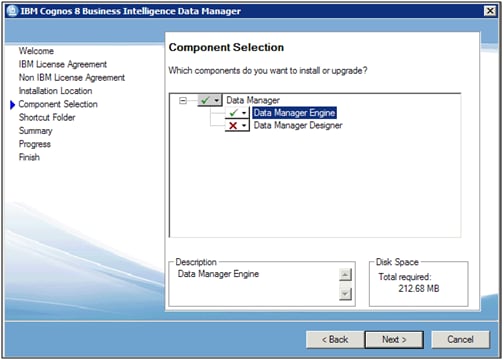
ステップ 8![]() [Next] をクリックして、[Finish] 画面が表示されるまで、残りのインストール ウィザードを進めます。
[Next] をクリックして、[Finish] 画面が表示されるまで、残りのインストール ウィザードを進めます。
ステップ 9![]() [Start IBM Cognos Configuration] オプションを選択解除して、[Finish] をクリックします。
[Start IBM Cognos Configuration] オプションを選択解除して、[Finish] をクリックします。
Cognos Fix Pack 4 のインストール
ステップ 1![]() (Cognos ソフトウェアを C:¥CognosSoftware ディレクトリ下に解凍していることを前提とします)フォルダ「C:¥CognosSoftware¥C8_BI_8_4_1_Win64_FP004¥winx64」を開きます。
(Cognos ソフトウェアを C:¥CognosSoftware ディレクトリ下に解凍していることを前提とします)フォルダ「C:¥CognosSoftware¥C8_BI_8_4_1_Win64_FP004¥winx64」を開きます。
ステップ 2![]() issetup.exe をダブルクリックして、Cognos セットアップ プログラムを起動します。
issetup.exe をダブルクリックして、Cognos セットアップ プログラムを起動します。
ステップ 3![]() [Installation Location] 画面が表示されるまで、画面に表示されるすべてのデフォルト値を選択してインストール ウィザードを進めます。
[Installation Location] 画面が表示されるまで、画面に表示されるすべてのデフォルト値を選択してインストール ウィザードを進めます。
ステップ 4![]() Cognos Business Intelligence Server をインストールしたフォルダと同じ名前を入力します(たとえば、C:¥Program Files (x86)¥cognos¥c8_64)。次に [Next] をクリックします。
Cognos Business Intelligence Server をインストールしたフォルダと同じ名前を入力します(たとえば、C:¥Program Files (x86)¥cognos¥c8_64)。次に [Next] をクリックします。
ステップ 5![]() 次のメッセージが表示されたら、[No] をクリックして次に進みます。
次のメッセージが表示されたら、[No] をクリックして次に進みます。
ステップ 6![]() [Next] をクリックして、[Finish] 画面が表示されるまで、残りのインストール ウィザードを進めます。
[Next] をクリックして、[Finish] 画面が表示されるまで、残りのインストール ウィザードを進めます。
Oracle JDBC ドライバのコピー
ステップ 1![]() ファイル ojdbc5.jar を <ORACLE_HOME>¥JDBC¥lib ディレクトリから Cognos アプリケーション サーバの <COGNOS_HOME>¥webapps¥p2pd¥WEB-INF¥lib ディレクトリにコピーします。
ファイル ojdbc5.jar を <ORACLE_HOME>¥JDBC¥lib ディレクトリから Cognos アプリケーション サーバの <COGNOS_HOME>¥webapps¥p2pd¥WEB-INF¥lib ディレクトリにコピーします。
<ORACLE_HOME> は、Oracle Client 11.2.0.1(32 ビット)ソフトウェアをインストールしたディレクトリです。
<COGNOS_HOME> は、Cognos Business Intelligence Server をインストールしたディレクトリです(たとえば、C:¥Program Files (x86)¥cognos¥c8_64)。
Reporting および Advanced Reporting コンポーネントの設定
この項では、Cognos アプリケーション サーバで使用できるように Reporting および Advanced Reporting コンポーネントを設定する方法について説明します。
(注) この項で説明されているスクリプトを実行するには、管理者権限を持ったユーザとしてログインする必要があります。
Cognosinstaller.zip の解凍
ステップ 1![]() Cognos ソフトウェアが Service Portal と異なるマシンにインストールされている場合、Service Portal マシンの <ServicePortal_Install_Dir>¥cognos ディレクトリ下でファイル cognosinstaller.zip を探し、このファイルを Cognos マシンにコピーします。
Cognos ソフトウェアが Service Portal と異なるマシンにインストールされている場合、Service Portal マシンの <ServicePortal_Install_Dir>¥cognos ディレクトリ下でファイル cognosinstaller.zip を探し、このファイルを Cognos マシンにコピーします。
ステップ 2![]() cognosinstaller.zip を C:¥cognosinstaller ディレクトリに解凍します。C:¥cognosinstaller ディレクトリがすでにマシンに存在する場合、このディレクトリを上書きしないでください。既存のディレクトリの名前を C:¥cognosinstaller.OLD に変更して、cognosinstaller.zip を C:¥cognosinstaller に解凍します。
cognosinstaller.zip を C:¥cognosinstaller ディレクトリに解凍します。C:¥cognosinstaller ディレクトリがすでにマシンに存在する場合、このディレクトリを上書きしないでください。既存のディレクトリの名前を C:¥cognosinstaller.OLD に変更して、cognosinstaller.zip を C:¥cognosinstaller に解凍します。
setup.properties の変更
ステップ 1![]() C:¥cognosinstaller フォルダを開き、ファイル setup.properties のバックアップを作成します。
C:¥cognosinstaller フォルダを開き、ファイル setup.properties のバックアップを作成します。
ステップ 2![]() テキスト エディタを使用して、 setup.properties を変更します。次の表に示されたパラメータだけ変更します。ほとんどの場合、デフォルト値を使用できます。別の値を指定する場合、説明を注意して読み、値を入力するときに使用する必須構文や形式を確認してください。この表に示されていないパラメータは変更しないでください。
テキスト エディタを使用して、 setup.properties を変更します。次の表に示されたパラメータだけ変更します。ほとんどの場合、デフォルト値を使用できます。別の値を指定する場合、説明を注意して読み、値を入力するときに使用する必須構文や形式を確認してください。この表に示されていないパラメータは変更しないでください。
|
|
|
Cognos 8.4.1 ソフトウェアがインストールされているルート フォルダを入力します。ディレクトリ セパレータとしてダブルスラッシュ(¥¥)を使用します。たとえば、「C:¥¥Program Files (x86)¥¥cognos¥¥c8_64」を入力します。 |
|
Cognos マシンの完全修飾ドメイン名を入力します(たとえば、cognos.mydomain.com)。 このリリースでは、gateway.server.name と application.server.name のパラメータ値は同じ値でなければなりません。 |
|
有効な時間帯名を入力します。使用するコンピュータに対応する有効な時間帯名のリストについては、「時間帯の設定」を参照してください。 |
|
Service Portal 管理者ユーザのパスワードを入力します。
(注) この値は、次の項で説明されている、encrypt.cmd ユーティリティを使用して暗号化できます。 |
|
Advanced Reporting ソフトウェア コンポーネントがインストールされるフォルダを入力します。cognos.root と同じ値を入力しないでください。Cognos ソフトウェア インストール フォルダと Service Portal ソフトウェア インストール フォルダは分けてください。ディレクトリ セパレータとしてダブルスラッシュ(¥¥)を使用します。 |
|
| •
(注) この値は、Service Portal セットアップ プログラムにより事前に設定されています。 |
|
RequestCenter データベースのサーバ名または IP アドレスを入力します。たとえば、dbserver.mydomain.com です。
(注) この値は、Service Portal セットアップ プログラムにより事前に設定されています。 |
|
Service Portal データベース サーバのポート番号を入力します。通常の値を次とおりです。
(注) この値は、Service Portal セットアップ プログラムにより事前に設定されています。 |
|
SQL Server の場合、RequestCenter データベースの名前を入力します。 Oracle の場合、 RequestCenter を入力します。
(注) この値は、Service Portal セットアップ プログラムにより事前に設定されています。 |
|
RequestCenter データベースのユーザ名を入力します。
(注) この値は、Service Portal セットアップ プログラムにより事前に設定されています。 |
|
上記の RequestCenter データベース ユーザのパスワードを入力します。
(注) この値は、Service Portal セットアップ プログラムにより事前に設定および暗号化されています。 |
|
Oracle の場合、RequestCenter データベースの Oracle SID を入力します。
(注) SQL Server の場合、このパラメータは無視されます。 |
|
Datamart データベースのサーバ名または IP アドレスを入力します。たとえば、dbserver.mydomain.com です。
(注) この値は、Service Portal セットアップ プログラムにより事前に設定されています。 |
|
Datamart データベース サーバのポート番号を入力します。通常の値を次とおりです。
(注) この値は、Service Portal セットアップ プログラムにより事前に設定されています。 |
|
SQL Server の場合、Datamart データベースの名前を入力します。
(注) この値は、Service Portal セットアップ プログラムにより事前に設定されています。 |
|
|
(注) この値は、Service Portal セットアップ プログラムにより事前に設定されています。 |
|
上記の Datamart データベース ユーザのパスワードを入力します。
(注) この値は、Service Portal セットアップ プログラムにより事前に設定および暗号化されています。 |
|
SQL Server の場合、Datamart データベースがある SQL Server インスタンスの sa ユーザのパスワードを入力します。
(注) この値は、Service Portal セットアップ プログラムにより事前に設定および暗号化されています。 |
|
Oracle の場合、Datamart データベースの Oracle SID を入力します。 SQL Server の場合、このパラメータは無視されます。
(注) この値は、Service Portal セットアップ プログラムにより事前に設定されています。 |
|
SQL Server の場合、値「 dbo 」を入力します。 Oracle の場合、datamart.db.user と同じ値を入力します。ただし、この値はすべて大文字で入力します。たとえば、値「RCUSER」を入力します。 |
|
ContentStore データベースのサーバ名または IP アドレスを入力します。たとえば、dbserver.mydomain.com です。 |
|
上記の ContentStore データベース ユーザのパスワードを入力します。
(注) この値は、次の項で説明されている、encrypt.cmd ユーティリティを使用して暗号化できます。 |
|
SMTP サーバのサーバ名または IP アドレスを入力します。たとえば、smtp.mydomain.com です。 Cognos アプリケーションでは、SMTP サーバが正しく設定されている場合だけ、レポートをユーザに電子メールで送信できます。 |
|
有効な電子メール アドレスを入力します。この電子メール アドレスは、Cognos により発信電子メールの「Sender」として使用されます。 |
ステップ 3![]() セキュリティのため、 encrypt.cmd ユーティリティを使用して、 setup.properties ファイルの次のパスワード パラメータを暗号化できます。
セキュリティのため、 encrypt.cmd ユーティリティを使用して、 setup.properties ファイルの次のパスワード パラメータを暗号化できます。
(注) requestcenter.db.pwd、datamart.db.pwd および datamart.db.sa.pwd の値は、Service Portal セットアップ プログラムにより事前に暗号化されます。パスワードの文字列は、NBvjXV8ttr184ZGNYVuMlw== のようになります。これらのパスワードを再び暗号化する必要はありません。ただし、setup.properties ファイルの他のクリアテキスト パスワードを暗号化する場合、次の指示に従い、これらの値を暗号化します。
1.![]() コマンド プロンプト ウィンドウを開いて、C:¥cognosinstaller ディレクトリにナビゲートします。
コマンド プロンプト ウィンドウを開いて、C:¥cognosinstaller ディレクトリにナビゲートします。
2.![]() 「encrypt.cmd-s < string >」を実行します。ここで、< string > は、暗号化するクリアテキスト パスワードです。
「encrypt.cmd-s < string >」を実行します。ここで、< string > は、暗号化するクリアテキスト パスワードです。
4.![]() 画面の暗号化文字列をコピーして(たとえば、文字列 hJo9O5ZVvXoi57D6mNOEFw== をコピーして)、setup.properties ファイルの該当するパラメータに貼り付けます。基本的に、クリアテキスト値は暗号化した値で上書きします。
画面の暗号化文字列をコピーして(たとえば、文字列 hJo9O5ZVvXoi57D6mNOEFw== をコピーして)、setup.properties ファイルの該当するパラメータに貼り付けます。基本的に、クリアテキスト値は暗号化した値で上書きします。
ステップ 4![]() ファイル setup.properties を保存します。
ファイル setup.properties を保存します。
configure.cmd の実行
ステップ 1![]() Cognos マシンで、コマンド プロンプト ウィンドウを開き、「C:¥cognosinstaller」ディレクトリにナビゲートします。
Cognos マシンで、コマンド プロンプト ウィンドウを開き、「C:¥cognosinstaller」ディレクトリにナビゲートします。
(注) このスクリプトの実行には数分かかります。このスクリプトは、Cognos プロパティ ファイルを設定、データ マート カタログを作成、ContentStore データベースのスキーマをロードします。RequestCenter データベースからのデータ抽出は実行されません。configure.cmd が正常に完了するまで、次の手順に進まないでください。
ステップ 3![]() configure.cmd が正常に完了したら、[Start] > [All Programs] > [Administrative Tools] > [Services] を選択して [Services] ウィンドウを開きます。実行していない場合、 IBM Cognos 8 サービスを起動します。
configure.cmd が正常に完了したら、[Start] > [All Programs] > [Administrative Tools] > [Services] を選択して [Services] ウィンドウを開きます。実行していない場合、 IBM Cognos 8 サービスを起動します。
ステップ 4![]() Cognos マシンでブラウザを開いて、URL http://localhost/cognos8 に接続します。
Cognos マシンでブラウザを開いて、URL http://localhost/cognos8 に接続します。
ステップ 5![]() Service Portal 管理者ユーザのユーザ ID およびパスワードを入力し、[OK] をクリックしてログインします(Service Portal の新規インストールでは、管理者ユーザ ID のデフォルト値は「admin」、パスワードのデフォルト値は「admin」です)。
Service Portal 管理者ユーザのユーザ ID およびパスワードを入力し、[OK] をクリックしてログインします(Service Portal の新規インストールでは、管理者ユーザ ID のデフォルト値は「admin」、パスワードのデフォルト値は「admin」です)。
ステップ 6![]() UI の [My home] リンクをクリックします。
UI の [My home] リンクをクリックします。
ステップ 7![]() UI 右上隅の [Launch] リンクをクリックして、[IBM Cognos Administration] ドロップダウン メニューを選択します。
UI 右上隅の [Launch] リンクをクリックして、[IBM Cognos Administration] ドロップダウン メニューを選択します。
ステップ 9![]() [Directory Names] リストの [newScale] リンクをクリックします。
[Directory Names] リストの [newScale] リンクをクリックします。
ステップ 10![]() Reporting および Advanced Reporting モジュールにアクセスできる Service Portal ロールのリストと、これらのロールが 1 つ以上付与されているユーザのリストが表示されます(リストのページが複数ある場合もあります)。リストが次のスクリーンショットのような場合、この時点での Cognos 設定は正常に行われています。次の項に進んでください。
Reporting および Advanced Reporting モジュールにアクセスできる Service Portal ロールのリストと、これらのロールが 1 つ以上付与されているユーザのリストが表示されます(リストのページが複数ある場合もあります)。リストが次のスクリーンショットのような場合、この時点での Cognos 設定は正常に行われています。次の項に進んでください。
create_datasource.cmd の実行
ステップ 1![]() コマンド プロンプト ウィンドウを開き、<requestcenter.destination>¥ cognos¥bin ディレクトリにナビゲートします。たとえば、requestcenter.destination=C:¥CiscoServicePortal を setup.properties ファイルで設定している場合、C:¥CiscoServicePortal¥cognos¥bin ディレクトリを開きます。
コマンド プロンプト ウィンドウを開き、<requestcenter.destination>¥ cognos¥bin ディレクトリにナビゲートします。たとえば、requestcenter.destination=C:¥CiscoServicePortal を setup.properties ファイルで設定している場合、C:¥CiscoServicePortal¥cognos¥bin ディレクトリを開きます。
ステップ 2![]() create_datasource.cmd を実行します。
create_datasource.cmd を実行します。
ステップ 3![]() create_datasource.cmd が正常に完了したら、Cognos マシンでブラウザを開いて、URL http://localhost/cognos8 に接続します。
create_datasource.cmd が正常に完了したら、Cognos マシンでブラウザを開いて、URL http://localhost/cognos8 に接続します。
ステップ 4![]() Service Portal 管理者ユーザのユーザ ID およびパスワードを入力し、[OK] をクリックしてログインします
Service Portal 管理者ユーザのユーザ ID およびパスワードを入力し、[OK] をクリックしてログインします
ステップ 5![]() UI の [My home] リンクをクリックします。
UI の [My home] リンクをクリックします。
ステップ 6![]() UI 右上隅の [Launch] リンクをクリックして、[IBM Cognos Administration] ドロップダウン メニューを選択します。
UI 右上隅の [Launch] リンクをクリックして、[IBM Cognos Administration] ドロップダウン メニューを選択します。
ステップ 7![]() [Configuration] タブを選択します。
[Configuration] タブを選択します。
ステップ 8![]() 左パネルの [Data Source Connections] リンクをクリックします。
左パネルの [Data Source Connections] リンクをクリックします。
ステップ 9![]() 右パネルに RequestCenter という名前のデータ ソース エントリが表示されます。
右パネルに RequestCenter という名前のデータ ソース エントリが表示されます。

ステップ 10![]() [Actions] 列で、[More...] リンクをクリックします。[Perform an Action - RequestCenter] ページが表示されます。
[Actions] 列で、[More...] リンクをクリックします。[Perform an Action - RequestCenter] ページが表示されます。

ステップ 11![]() [View connections] をクリックします。
[View connections] をクリックします。
ステップ 12![]() [Configuration] タブが再表示され、新しい( Test the connection )アイコンが [ More... ] リンクの横に表示されます。
[Configuration] タブが再表示され、新しい( Test the connection )アイコンが [ More... ] リンクの横に表示されます。
ステップ 13![]() この( Test the connection )アイコンをクリックします。
この( Test the connection )アイコンをクリックします。
ステップ 15![]() 接続テストの [Status] が [Succeeded] となっていることを確認します。次の項に進んでください。
接続テストの [Status] が [Succeeded] となっていることを確認します。次の項に進んでください。
Service Portal レポートのインポート
次のタスクを実行し、Service Portal 標準レポート アーカイブを Cognos 環境にインポートします。
ステップ 1![]() コマンド プロンプト ウィンドウを開き、< requestcenter.destination >¥ cognos¥bin ディレクトリにナビゲートします。
コマンド プロンプト ウィンドウを開き、< requestcenter.destination >¥ cognos¥bin ディレクトリにナビゲートします。
ステップ 2![]() import_reports.cmd を実行します。
import_reports.cmd を実行します。
ステップ 3![]() update_datamart_std.cmd を実行します。
update_datamart_std.cmd を実行します。
Service Portal アプリケーションの再起動
ステップ 1![]() Service Portal アプリケーションを再起動します。 これにより、Service Portal アプリケーション サーバは、Cognos アプリケーション サーバとの統合を可能にする新しい設定を選択できるようになります。JBoss の場合、「CiscoServicePortal Request Center」サービスを再起動します。WebLogic または WebSphere の場合、RequestCenter.ear が導入されている WebLogic サーバまたは WebSphere サーバ全体を再起動します。
Service Portal アプリケーションを再起動します。 これにより、Service Portal アプリケーション サーバは、Cognos アプリケーション サーバとの統合を可能にする新しい設定を選択できるようになります。JBoss の場合、「CiscoServicePortal Request Center」サービスを再起動します。WebLogic または WebSphere の場合、RequestCenter.ear が導入されている WebLogic サーバまたは WebSphere サーバ全体を再起動します。
ステップ 2![]() Service Portal アプリケーションが起動されたら、Service Portal 管理者ユーザとしてログインします。
Service Portal アプリケーションが起動されたら、Service Portal 管理者ユーザとしてログインします。
ステップ 3![]() [Reporting] モジュールを選択します。
[Reporting] モジュールを選択します。
ステップ 5![]() [Public Folders] タブに「Business Value Reports」と「Service Performance Reports」という名前の 2 つのフォルダが表示されていることを確認します。表示されている場合、Service Portal の Reporting モジュールが Cognos アプリケーション サーバと正常に統合されています。
[Public Folders] タブに「Business Value Reports」と「Service Performance Reports」という名前の 2 つのフォルダが表示されていることを確認します。表示されている場合、Service Portal の Reporting モジュールが Cognos アプリケーション サーバと正常に統合されています。

ステップ 6![]() 次の項「Advanced Reporting の設定」に進みます。
次の項「Advanced Reporting の設定」に進みます。
Advanced Reporting の設定
次のスクリプトを実行して、Advanced Reporting コンポーネントを設定します。Advanced Reporting を設定しない場合、「インストール後の作業」に進みます。
ステップ 1![]() 管理者ユーザとして Service Portal アプリケーションにログインします。
管理者ユーザとして Service Portal アプリケーションにログインします。
ステップ 2![]() Service Portal の URL が http:// <ServerName>:<Port> /RequestCenter の場合、管理者ユーザとしてログインしたときと同じブラウザ ウィンドウで、アドレスに http://<ServerName>:<Port>/RequestCenter/fdr/runETL.jsp と入力し [Enter] を押します。
Service Portal の URL が http:// <ServerName>:<Port> /RequestCenter の場合、管理者ユーザとしてログインしたときと同じブラウザ ウィンドウで、アドレスに http://<ServerName>:<Port>/RequestCenter/fdr/runETL.jsp と入力し [Enter] を押します。
ステップ 3![]() 「runETL.jsp」スクリプトが起動します。次のメッセージが画面に表示されるまで待ちます。
「runETL.jsp」スクリプトが起動します。次のメッセージが画面に表示されるまで待ちます。
Processing Form Data Extraction... Form Data Extraction Completed.
ステップ 4![]() Cognos マシンで、コマンド プロンプト ウィンドウを開き、「<requestcenter.destination>¥cognos¥bin」ディレクトリにナビゲートします。
Cognos マシンで、コマンド プロンプト ウィンドウを開き、「<requestcenter.destination>¥cognos¥bin」ディレクトリにナビゲートします。
ステップ 5![]() update_datamart.cmd を実行します。
update_datamart.cmd を実行します。
ステップ 6![]() create_model.cmd を実行します。
create_model.cmd を実行します。
ステップ 7![]() publish_fdr_pkg.cmd を実行します。
publish_fdr_pkg.cmd を実行します。
ステップ 8![]() publish_serviceportfolioreporting_pkg.cmd を実行します。
publish_serviceportfolioreporting_pkg.cmd を実行します。
ステップ 9![]() ログアウトしてから、管理者ユーザとして Service Portal にログインします。
ログアウトしてから、管理者ユーザとして Service Portal にログインします。
ステップ 10![]() [Advanced Reporting] モジュールを選択します。
[Advanced Reporting] モジュールを選択します。
ステップ 11![]() [Ad-Hoc Reports] タブをクリックします。
[Ad-Hoc Reports] タブをクリックします。
ステップ 12![]() [Custom Report Data Models] リンクをクリックします。
[Custom Report Data Models] リンクをクリックします。
ステップ 13![]() [Query Studio] ウィンドウ(以下のスクリーンショットを参照)が表示された場合、Service Portal の Advanced Reporting モジュールが Cognos アプリケーション サーバと正常に統合されています。
[Query Studio] ウィンドウ(以下のスクリーンショットを参照)が表示された場合、Service Portal の Advanced Reporting モジュールが Cognos アプリケーション サーバと正常に統合されています。
インストール後の作業
インストール後には、ETL プロセス実行をスケジュールします。各プロセスにかかる時間は、抽出して Datamart データベースに送信する必要がある RequestCenter データベースのデータ量に比例します。
インストール後の作業:Reporting
Cognos マシンでスケジュール作業として次のスクリプトを設定します。スクリプトはすべて < requestcenter.destination >¥cognos¥bin ディレクトリにあります。
|
|
|
データを RequestCenter データベースから抽出して、Datamart データベースに送信します。これらのデータは、Service Portal 標準レポートの更新に使用されます。このスクリプトは、標準レポートの更新頻度に関係なくスケジュールできます。通常、1 日 1 回、オフピーク時に実行されるようにスケジュールできます。 |
インストール後の作業:Advanced Reporting
Advanced Reporting を使用する場合、この項で説明されている作業も実行する必要があります。
ステップ 1![]() Cognos マシンで、スケジュール作業として次のスクリプトを設定します。スクリプトはすべて < requestcenter.destination >¥cognos¥bin ディレクトリにあります。
Cognos マシンで、スケジュール作業として次のスクリプトを設定します。スクリプトはすべて < requestcenter.destination >¥cognos¥bin ディレクトリにあります。
|
|
|
Cognos レポーティング ツール(Query Studio および Report Studio)により使用されるフレームワーク モデルを作成します。 |
|
Cognos フレームワークを Service Portal の Request Center モジュールに公開します。 |
|
ステップ 2![]() アプリケーション サーバ マシンで、 newscale.properties ファイル(RequestCenter.ear/config ディレクトリ下にあります)を開いて、次のパラメータを変更して、アプリケーション サーバで ETL(Extract-Transform-Load)をイネーブルにし、スケジュールします。
アプリケーション サーバ マシンで、 newscale.properties ファイル(RequestCenter.ear/config ディレクトリ下にあります)を開いて、次のパラメータを変更して、アプリケーション サーバで ETL(Extract-Transform-Load)をイネーブルにし、スケジュールします。
•![]() ENABLE_FDR_ETL_PROCESS=1 :ETL プロセスをイネーブルにします。
ENABLE_FDR_ETL_PROCESS=1 :ETL プロセスをイネーブルにします。
•![]() FDR_ETL_TRIGGER=1 (1 = 毎時、2 = 毎日、3 = 毎分):ETL プロセスの頻度を変更します。
FDR_ETL_TRIGGER=1 (1 = 毎時、2 = 毎日、3 = 毎分):ETL プロセスの頻度を変更します。
•![]() FDR_ETL_TRIGGER_FREQUENCY_HOURLY=<number> :値 <number> は、<number> 時間ごとに ETL プロセスを開始することを示します。このパラメータは、FDR_ETL_TRIGGER が 1(毎時)に設定されている場合だけ使用されます。
FDR_ETL_TRIGGER_FREQUENCY_HOURLY=<number> :値 <number> は、<number> 時間ごとに ETL プロセスを開始することを示します。このパラメータは、FDR_ETL_TRIGGER が 1(毎時)に設定されている場合だけ使用されます。
•![]() FDR_ETL_TRIGGER_FREQUENCY_DAILY=<hh:mm> :<hh:mm>(たとえば、22:30)は、ある時刻に ETL プロセスを実行されることを示します。このパラメータは、FDR_ETL_TRIGGER が 2(毎日)に設定されている場合だけ使用されます。
FDR_ETL_TRIGGER_FREQUENCY_DAILY=<hh:mm> :<hh:mm>(たとえば、22:30)は、ある時刻に ETL プロセスを実行されることを示します。このパラメータは、FDR_ETL_TRIGGER が 2(毎日)に設定されている場合だけ使用されます。
•![]() FDR_ETL_TRIGGER_FREQUENCY_MINUTES=<number> :値 <number> は、<number> 時間ごとに ETL プロセスを開始することを示します。このパラメータは、FDR_ETL_TRIGGER が 3 に設定されている場合だけ使用されます。
FDR_ETL_TRIGGER_FREQUENCY_MINUTES=<number> :値 <number> は、<number> 時間ごとに ETL プロセスを開始することを示します。このパラメータは、FDR_ETL_TRIGGER が 3 に設定されている場合だけ使用されます。
ステップ 3![]() Service Portal アプリケーションがクラスタ化環境で実行される場合、ETL プロセスがクラスタの 1 台のサーバからのみ実行されるように、クラスタのいずれか 1 つだけのノードで newscale.properties ファイルを変更する必要があります。その他のすべてのノードでは、newscale.properties の ENABLE_FDR_ETL_PROCESS パラメータの値は 0(つまりディセーブル)のままにします。
Service Portal アプリケーションがクラスタ化環境で実行される場合、ETL プロセスがクラスタの 1 台のサーバからのみ実行されるように、クラスタのいずれか 1 つだけのノードで newscale.properties ファイルを変更する必要があります。その他のすべてのノードでは、newscale.properties の ENABLE_FDR_ETL_PROCESS パラメータの値は 0(つまりディセーブル)のままにします。
この ETL プロセスは、RequestCenter データベースのレポート データから Datamart データベースにサービスを順々にプッシュします。
サービス デザインおよびレポーティング要件を確認して、目的のディクショナリおよびサービスがレポート可能であることを示すまで、データ ETL プロセスからサービスをイネーブルにしないでください。
ステップ 4![]() Service Portal アプリケーション サーバを再起動します。newscale.properties ファイルでの変更を適用するには、Service Portal アプリケーションを再起動する必要があります。
Service Portal アプリケーション サーバを再起動します。newscale.properties ファイルでの変更を適用するには、Service Portal アプリケーションを再起動する必要があります。
(注) デフォルトでは、Service Form Data ETL プロセスは、newscale.properties ファイルでディセーブルにされています。
Advanced Reporting ETL プロセスは、1 日 1 回、オフピーク時に実行するようにスケジュールすることを推奨します。Datamart データベースのデータは、このプロセスの実行中でも使用できますが、パフォーマンスが低下する可能性があります。
データが同期化されるように、newscale.properties の FDR_ETL_TRIGGER_FREQUENCY のスケジュールに合わせて、すべてのスクリプトのスケジュールを設定します。
update_datamart.cmd および create_model.cmd 間での新しいまたは変更要求は、10,000 件あたり 40 分かかります。create_model.cmd および publish_fdr_pkg.cmd 間での新しいまたは変更要求は、10,000 件あたり 30 分かかります。スクリプト publish_serviceportfolioreporting_pkg は、スクリプト publish_fdr_pkg.cmd と同時または数分後に実行するようにスケジュールできます。
publish_serviceportfolioreporting_pkg 以外の他のスクリプトは、同時に実行しないでください。これらのスクリプトを同時に実行すると、データ競合が発生します。
時間帯の設定
setup.properties ファイルを「setup.properties の変更」の説明に従って設定する場合、 cognos.server.timezone パラメータを値を設定する必要があります。
setup.properties ファイルに指定する正しい値については、次の表を参照してください。コンピュータの時間帯に対応する値を [Time Zone Name] 列から選択します。
(注) 次の時間帯名は、現在、夏時間をサポートしていません。そのため、これらのいずれかの時間帯を使用する場合、GMT オフセットが同じ他のいずれかの時間帯名を使用するか、Cisco Technical Assistance Center(TAC)にお問い合わせください。
Europe/Moscow
Pacific/Fizi
Pacific/Apia
Asia/Yakutsk
Asia/Vladivostok
 フィードバック