Cisco Application Policy Infrastructure Controller エンタープライズ モジュール導入ガイド リリース 1.1.x
偏向のない言語
この製品のマニュアルセットは、偏向のない言語を使用するように配慮されています。このマニュアルセットでの偏向のない言語とは、年齢、障害、性別、人種的アイデンティティ、民族的アイデンティティ、性的指向、社会経済的地位、およびインターセクショナリティに基づく差別を意味しない言語として定義されています。製品ソフトウェアのユーザーインターフェイスにハードコードされている言語、RFP のドキュメントに基づいて使用されている言語、または参照されているサードパーティ製品で使用されている言語によりドキュメントに例外が存在する場合があります。シスコのインクルーシブランゲージに対する取り組みの詳細は、こちらをご覧ください。
翻訳について
このドキュメントは、米国シスコ発行ドキュメントの参考和訳です。リンク情報につきましては、日本語版掲載時点で、英語版にアップデートがあり、リンク先のページが移動/変更されている場合がありますことをご了承ください。あくまでも参考和訳となりますので、正式な内容については米国サイトのドキュメントを参照ください。
- Updated:
- 2017年6月21日
章のタイトル: Cisco APIC-EMのトラブルシューティング
Cisco APIC-EMのトラブルシューティング
- Cisco APIC-EM コンポーネントとアーキテクチャ
- 失敗したインストールのトラブルシューティング
- 設定のトラブルシューティング
- サービスのトラブルシューティング
- パスワードのトラブルシューティング
- トラブルシューティング コマンド
- トラブルシューティング ログ ファイル
Cisco APIC-EM コンポーネントとアーキテクチャ
ここでは、Cisco APIC-EMのコンポーネントと基本的なアーキテクチャについて説明します。この章で説明されているトラブルシューティング作業を行う前に、この項を参照して、コントローラおよびコンポーネントの動作を十分に理解する必要があります。
Cisco APIC-EM は、次のコンポーネントで構成されています。
ホスト
ネットワークに単一ホスト導入またはマルチホスト導入のいずれかを設定できます。ホストの定義は、Grapevine クライアントのインスタンスを実行するアプライアンス、物理サーバまたは仮想マシンです。Grapevine ルート自体は、ホストのオペレーティング システムで動作します。単一ホスト導入またはマルチホスト導入のいずれかを設定できます。3 つのホストを使用するマルチホスト導入は、高可用性とスケールの両方を実現するベスト プラクティスです。マルチホスト構成の各 Grapevine ルートは、他の Grapevine ルートとのアクティブ/アクティブ ステータスを維持するため、他の Grapevine ルートとの調整およびクラスタの全体的な管理が可能になります。
 (注) | マルチホスト導入の詳細については、『Cisco Application Policy Infrastructure Controller エンタープライズ モジュール導入ガイド』を参照してください。 |
Linux コンテナ
Linux コンテナは GNU/Linux を実行しているシステムにソフトウェアの仮想化システムを提供する仮想化テクノロジーです。これらのコンテナによって複数の仮想環境を設定し、同時に実行することができます。
Cisco APIC-EMコンポーネント(Grapevine ルートとクライアント)は Ubuntu オペレーティング システム環境と Linux コンテナ(LXC)を使用します。Grapevine ルートはホスト自体でアプリケーションとして動作します。Grapevine クライアントはホスト内の LXC 上で動作します。
Grapevine
Cisco APIC-EMは、コントローラのインフラストラクチャとサービスをサポートする Elastic Services プラットフォームとして Grapevine を使用し、ネットワークにサービスとしてのプラットフォーム(PaaS)環境を作成します。Grapevine ルートとクライアントはこのインフラストラクチャの主要コンポーネントです。
(注) | Grapevine 開発者コンソールというツールを使用して、サービスを実行しているクライアントおよびルートのトラブルシューティングを行うことができます。Grapevine 開発者コンソールは導入ファイルにバンドルされており、Cisco APIC-EMの初回導入時にインストールされます。このコントローラの IP アドレスとポート番号で Grapevine 開発者コンソールにアクセスできます:https://<controller IP address>:14141 |
ルートとクライアント
Grapevine ルートでは、サービスの更新に関連するすべてのポリシー管理、自身と Grapevine クライアントの両方のサービスのライフサイクルを処理します。Grapevine クライアントとは、サポートされるサービスが実行される場所です。
このリリースのサポートされるサービスのリストについては、『Cisco Application Policy Infrastructure Controller エンタープライズ モジュール導入ガイド』を参照してください。
(注) | SSH(セキュア シェル)を使用してルートにリモートからログインして、問題をトラブルシューティングすることができます。1 時間のデフォルトのアイドル タイムアウトが SSH コンソール ログイン用に設定されています。SSH コンソールで非アクティブ状態が 1 時間続くと自動的にログアウトされます。 |
サービス
Cisco APIC-EMは、お使いのネットワークにサービスとしてのプラットフォーム(PaaS)環境を作成します。この PaaS 環境でのサービスは、要求が増えるとインスタンスを追加し、要求が減るとインスタンスを解放する、水平方向に拡張可能なアプリケーションです。
このリリースのサポートされるサービスのリストについては、『Cisco Application Policy Infrastructure Controller エンタープライズ モジュール導入ガイド』を参照してください。
データベース
Cisco APIC-EMは、アプリケーションおよび Grapevine の 2 つのデータベースをサポートします。アプリケーション データベースはアプリケーションと外部ネットワーク データに使用されます。Grapevine データベースは Grapevine と内部ネットワーク データに使用されます。どちらのデータベースもスケールおよび高可用性のためにマルチホスト環境で複製されます。
ネットワーク
Cisco APIC-EMアーキテクチャでは、外部および内部ネットワークの両方が動作する必要があります。
-
外部ネットワークはネットワーク ホスト、デバイス、および NTP サーバで構成され、ノースバウンド REST API へのアクセスを提供します。また、外部ネットワークではコントローラ GUI にもアクセスできます。
-
内部ネットワークは、接続され相互に通信する(サービス間)Grapevine ルートとクライアントから構成されます。より大きな外部ネットワーク(接続されたデバイス、ホストおよび NTP サーバで構成される)へトラフィックを転送またはそこから受信するため、この内部ネットワークのすべての着信および発信トラフィックは、外部ネットワークに接続されているクライアントのサブセットを通過します。内部ネットワークは隔離され、外部ネットワークおよび他の内部ネットワークからもルーティング不可能です。
ネットワーク接続および NIC
ホスト(物理または仮想)のネットワーク アダプタ(NIC)は次の外部ネットワークに接続されます。
-
インターネット([Make A Wish]要求、テレメトリおよび trustpool の更新にネットワーク アクセスが必要)
-
NTP サーバを含むネットワーク
-
Cisco APIC-EMの管理対象となるデバイスを含むネットワーク
(注) | Cisco APIC-EMは直接インターネットに接続することはできません。NAT が設定されているか、NAT で保護されているデータセンター環境以外には導入できません。 |
失敗したインストールのトラブルシューティング
設定ウィザードを使用してインストールを実行すると、「installation was successful」というメッセージを受信します。このメッセージを受信せず、インストールが失敗した場合、次のトラブルシューティング手順を実行できます。
コア サービスが実行されていることの確認
Cisco APIC-EMの導入ガイドで説明されている手順に従って Cisco APIC-EM を導入済みである必要があります。
マルチホスト クラスタの設定値の確認
Cisco APIC-EMの導入ガイドで説明されている手順に従って Cisco APIC-EM を導入済みである必要があります。
| ステップ 1 | セキュア シェル(SSH)クライアントを使用し、設定ウィザードを使用して指定した IP アドレスでホスト(物理または仮想)にログインします。
| ||
| ステップ 2 | プロンプトが表示されたら、SSH アクセス用の Linux ユーザ名(「grapevine」)とパスワードを入力します。 | ||
| ステップ 3 | 次のコマンドを実行して、マルチホスト設定を表示します。
$ grape root display 次のようなコマンド出力が表示されます。
ROOT                                   PROPERTY             VALUE
----------------------------------------------------------------------

4cbe3972-9872-4771-800d-08c89463f1eb   hostname             root-1
4cbe3972-9872-4771-800d-08c89463f1eb   interfaces           [{'interface': 'eth0', 'ip': '209.165.200.10', 'mac': '00:50:56:100:d2:14', 'netmask': '255.255.255.0'}, {'interface': 'eth1', 'ip': '209.165.200.10', 'mac': '00:50:56:95:5c:18', 'net  mask': '255.255.255.0'}, {'interface': 'grape-br0', 'ip': '209.165.200.11', 'mac': 'ba:ed:c4:19:0d:77', 'netmask': '255.255.255.0'}]
4cbe3972-9872-4771-800d-08c89463f1eb   is_alive             True
4cbe3972-9872-4771-800d-08c89463f1eb   last_heartbeat       Wed Sep 09, 2015 11:02:52 PM (just now)

4cbe3972-9872-4771-800d-08c89463f1eb   public_key           ssh-rsa
c2EAAAADAQABAAABAQDYlyCfidke3MTjGkzsTAu73MtG+lynFFvxWZ4xVIkDkhGC7KCs6XMhORMaABb6
bU4EX/6osa4qyta4NYaijxjL6GL6kPkSBZiEKcUekHCmk1+H+Ypp5tc0wyvSpe5HtbLvPicLrXHHI/TS
Fsa+gLPqg55TflX8RH3i8dHf1Zwq6v4nHVryjAzMXeFYnFHST9e0P62QnkAGh29ktxUpS3fKua9iCVIE
V44t+VvtFaLurG9+FW/ngZwGrR/N0ZJZl6/MQTN3 grapevine@grapevine-root

4cbe3972-9872-4771-800d-08c89463f1eb   root_id              4cbe3972-9872-4771-800d-08c89463f1eb
4cbe3972-9872-4771-800d-08c89463f1eb   root_index           0
4cbe3972-9872-4771-800d-08c89463f1eb   root_version         0.3.0.958.dev140-gda6a16
4cbe3972-9872-4771-800d-08c89463f1eb   vm_password          ******
(grapevine)

#

ROOT                                   PROPERTY             VALUE
----------------------------------------------------------------------

4cbe3972-9872-4771-800d-08c89463f1eb   hostname             root-2
4cbe3972-9872-4771-800d-08c89463f1eb   interfaces           [{'interface': 'eth0', 'ip': '209.165.200.101, 'mac': '00:50:56:100:d2:14', 'netmask': '255.255.255.0'}, {'interface': 'eth1', 'ip': '209.165.200.11', 'mac': '00:50:56:95:5c:18', 'net  mask': '255.255.255.0'}, {'interface': 'grape-br0', 'ip': '209.165.200.11', 'mac': 'ba:ed:c4:19:0d:77', 'netmask': '255.255.255.0'}]
4cbe3972-9872-4771-800d-08c89463f1eb   is_alive             True
4cbe3972-9872-4771-800d-08c89463f1eb   last_heartbeat       Wed Sep 09, 2015 11:02:52 PM (just now)

4cbe3972-9872-4771-800d-08c89463f1eb   public_key           ssh-rsa
c2EAAAADAQABAAABAQDYlyCfidke3MTjGkzsTAu73MtG+lynFFvxWZ4xVIkDkhGC7KCs6XMhORMaABb6
bU4EX/6osa4qyta4NYaijxjL6GL6kPkSBZiEKcUekHCmk1+H+Ypp5tc0wyvSpe5HtbLvPicLrXHHI/TS
Fsa+gLPqg55TflX8RH3i8dHf1Zwq6v4nHVryjAzMXeFYnFHST9e0P62QnkAGh29ktxUpS3fKua9iCVIE
V44t+VvtFaLurG9+FW/ngZwGrR/N0ZJZl6/MQTN3 grapevine@grapevine-root

4cbe3972-9872-4771-800d-08c89463f1eb   root_id              4cbe3972-9873-4771-800d-08c89463f1eb
4cbe3972-9872-4771-800d-08c89463f1eb   root_index           0
4cbe3972-9872-4771-800d-08c89463f1eb   root_version         0.3.0.958.dev140-gda6a16
4cbe3972-9872-4771-800d-08c89463f1eb   vm_password          ******
(grapevine)
このコマンドでは次のデータが表示されます。
| ||
| ステップ 4 | コマンド出力のいずれかのフィールドが正しく表示されない場合は、根本原因の分析(rca)コマンドを入力します。
$ rca | ||
| ステップ 5 | 問題解決のサポートを受けるために、rca コマンド手順で作成された tar ファイルをシスコ サポートに送信します。 |
Cisco APIC-EMGUI へのアクセスの解決
設定ウィザードを使用してネットワーク アダプタ用に設定した IP アドレスを入力して、Cisco APIC-EMGUI にアクセスします。この IP アドレスは、外部ネットワークに接続します。次の形式でブラウザに IP アドレスを入力します。
https://IP address
Cisco APIC-EMGUI にアクセスできない場合は、Grapevine 開発者コンソールにアクセスして障害が発生したサービスや処理に失敗したサービスがあるかどうかを確認する必要があります。
Grapevine 開発者コンソールでは、Cisco APIC-EM導入の状態をモニタできます。Grapevine 開発者コンソールは、Service Elasticity Platform(Grapevine)の一部です。設定ウィザードを使用してネットワーク アダプタ用に設定した IP アドレスと、専用のポート番号(14141)を入力して、Grapevine 開発者コンソールにアクセスします。
マルチホスト クラスタの場合、各ホストにログインする必要はありません。マルチホスト クラスタでは、3 つのホストすべてで実行されているすべてのサービスを 1 つの統合ビューに表示できます。マルチホスト クラスタでは、さまざまなホスト上で実行しているサービスの複数のインスタンスが Grapevine 開発者コンソールに表示されます。
(注) | 1 時間のデフォルトのアイドル タイムアウトが Grapevine 開発者コンソール用に設定されています。Grapevine 開発者コンソールで非アクティブ状態が 1 時間続くと自動的にログアウトされます。 |
Grapevine 開発者コンソールにアクセスして障害が発生したサービスや処理に失敗したサービスがあるかどうかを確認するには、次の手順に従います。
Cisco APIC-EMの導入ガイドで説明されている手順に従って Cisco APIC-EM を導入済みである必要があります。
| ステップ 1 | ブラウザ ウィンドウを開き、設定ウィザードを使用してネットワーク アダプタに対して設定した IP アドレスを入力することにより、Grapevine 開発者コンソールにアクセスします。
たとえば、次の IP アドレスと必要なポート番号を入力します。 https://external network IP address:14141 | ||
| ステップ 2 | プロンプトが表示されたら、管理ユーザ名とパスワードを入力します。
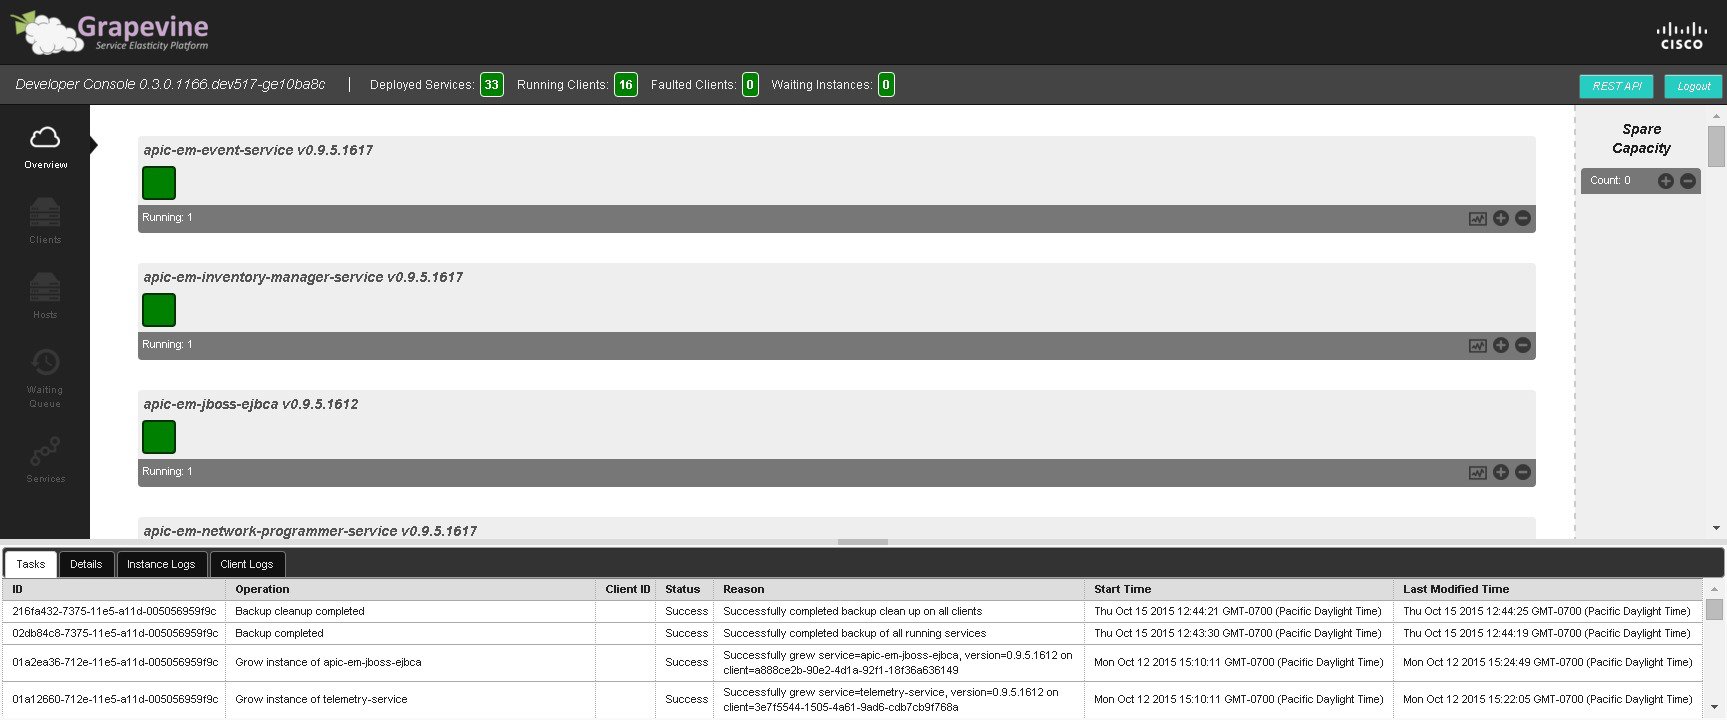
管理ユーザ名とパスワードは、設定ウィザードを使用して設定済みです。 ユーザ名とパスワードを入力すると、Grapevine 開発者コンソールが表示されます。インストールされている各サービスとそのバージョン番号がアルファベット順のリストでコンソールに表示されます。各サービスの下には、そのサービスの状態を表す正方形のアイコンがあります。インストールされていて動作しているサービスは緑色です。障害が発生したサービスや処理に失敗したサービスは赤色です。 | ||
| ステップ 3 | リストを下にスクロールし、次のサービスが導入でインストールされ実行中であることを確認します。
サービスが動作中であるか障害が発生しているかを書き留めます。 | ||
| ステップ 4 | コンソールの [Tasks]タブで、サービスのリストの下に障害が発生したサービスに関するエラー メッセージがあるかどうかを確認します。障害が発生したサービスや処理に失敗したサービスの理由を書き留めます。 | ||
| ステップ 5 | 次の情報をシスコ サポートに問い合わせます。 |
設定のトラブルシューティング
設定上の問題をトラブルシューティングするには、次の手順を実行します。
ウィザードを使用した設定の更新
設定ウィザードをもう一度実行して以前の設定エントリを更新することにより、Cisco APIC-EM導入をトラブルシューティングできます。設定ウィザードでは、保存されている以前の設定値が表示されるため、再入力する必要はありません。
(注) | この手順を実行すると、コントローラのダウンタイムが発生します。したがって、メンテナンス時間中にこの手順を行うことを推奨します。マルチホスト構成の設定の変更については、マルチホスト クラスタの設定の変更を参照してください。 |
Cisco APIC-EMの導入ガイドで説明されている手順に従って Cisco APIC-EM を導入済みです。
| ステップ 1 | セキュア シェル(SSH)クライアントを使用し、設定ウィザードを使用して指定した IP アドレスでホスト(物理または仮想)にログインします。
| ||
| ステップ 2 | プロンプトが表示されたら、SSH アクセス用の Linux ユーザ名(「grapevine」)とパスワードを入力します。 | ||
| ステップ 3 | 次のコマンドを使用して設定ウィザードを再起動します。
$ config_wizard
| ||
| ステップ 4 | 設定ウィザードの現在の設定値を確認して [next>>]をクリックし、以前の設定エントリを更新する特定のステップまで進みます。
たとえば、新しい NTP サーバの IP アドレスを入力する必要がある場合は、[NTP SERVER SETTINGS]画面が表示されるまで [next>>] をクリックします。 | ||
| ステップ 5 | 設定ウィザードで以前に入力して現在表示されている値を更新します。
たとえば、新しい IP アドレスを入力して、NTP サーバ設定を更新できます。 | ||
| ステップ 6 | 設定ウィザード プロセスの最後のステップまで [next>>]をクリックします。 | ||
| ステップ 7 | [proceed>>]をクリックして、設定ウィザードによって Cisco APIC-EM の導入に対する設定変更を保存および適用します。 |
Cisco APIC-EMのリセット
初めて設定ウィザードを使用したときに最初に設定された設定値にコントローラをリセットすることによって、Cisco APIC-EM導入をトラブルシューティングできます。コントローラのリセットは、コントローラが不安定な状態に陥ってしまい、他のトラブルシューティング アクティビティではその状況が解決しなかったときに便利です。
(注) | マルチホスト環境では、この手順を 1 つのホストだけで実行する必要があります。1 つのホストでこの手順を実行したら、他の 2 つのホストは自動的にリセットされます。 |
Cisco APIC-EMの導入ガイドで説明されている手順に従って Cisco APIC-EM を導入済みです。
| ステップ 1 | セキュア シェル(SSH)クライアントを使用し、設定ウィザードを使用して指定した IP アドレスでホスト(物理または仮想)にログインします。
| ||
| ステップ 2 | プロンプトが表示されたら、SSH アクセス用の Linux ユーザ名(「grapevine」)とパスワードを入力します。 | ||
| ステップ 3 | Grapevine ルートの bin ディレクトリに移動します。bin ディレクトリには grapevine スクリプトが含まれています。 | ||
| ステップ 4 | プロンプトに reset_grapevine コマンドを入力して、grapevine リセット スクリプトを実行します。
$ reset_grapevine reset_grapevine コマンドは、設定ウィザードを最初に実行したときに設定した値に設定値を戻します。設定は .JSON ファイルに保存されます。この .JSON ファイルは次の場所にあります:/etc/grapevine/controller-config.json。 reset_grapevine コマンドでは、以前の設定値に戻すために controller-config.json ファイル内のデータが使用されるため、このファイルを削除しないでください。このファイルを削除した場合は、設定ウィザードを再実行して設定データを再入力する必要があります。 Grapevine パスワードを再入力するように求められます。 | ||
| ステップ 5 | Grapevine パスワードをもう一度入力します。
[sudo] password for grapevine:******** すべての仮想ディスクを削除するように求められます。仮想ディスクには、Cisco APIC-EMデータベースがあります。たとえば、コントローラが検出したデバイスに関するデータは、これらの仮想ディスクに保存されます。はい(y)を入力すると、このデータはすべて削除されます。いいえ(n)を入力すると、リセット手順が完了したときに新しいクラスタは既存のデータが入力された状態で起動します。 | ||
| ステップ 6 | n を入力して、すべての仮想ディスクが削除されないようにします。THIS IS A DESTRUCTIVE OPERATION Do you want to delete all VIRTUAL DISKS in your APIC-EM cluster? (y/n):n 次に、Cisco APIC-EM認証タイムアウト ポリシー、ユーザ パスワード ポリシー、およびプライマリ管理者アカウント以外のユーザ アカウントをすべて削除するように求められます。 | ||
| ステップ 7 | n を入力して、認証タイムアウト ポリシー、ユーザ パスワード ポリシー、およびプライマリ管理者アカウント以外のユーザ アカウントがすべて削除されないようにします。THIS IS A DESTRUCTIVE OPERATION Do you want to delete authentication timeout policies, user password policies, and Cisco APIC-EM user accounts other than the primary administrator account? (y/n): n インポートしたすべての証明書を削除するように求められます。 | ||
| ステップ 8 | n を入力して、インポートしたすべての証明書が削除されないようにします。THIS IS A DESTRUCTIVE OPERATION Do you want to delete the imported certificates? (y/n): n すべてのバックアップを削除するように求められます。 | ||
| ステップ 9 | n を入力して、すべてのバックアップが削除されないようにします。THIS IS A DESTRUCTIVE OPERATION Do you want to delete the backups? (y/n): n コントローラは、初めて設定ウィザードを使用して最初に設定した設定値でリセットされます。コントローラのリセットが終了すると、コントローラからのコマンド プロンプトが表示されます。 | ||
| ステップ 10 | セキュア シェル(SSH)クライアントを使用して、ホストからログアウトします。 |
コントローラの工場出荷時のデフォルトへの復元
特定の状況では、Cisco APIC-EMを元の工場出荷時設定に復元する必要があります。たとえば、コントローラ アプライアンスを交換した場合や、不要な設定を完全に削除する必要がある場合などです。このような状況では、コントローラを工場出荷時のデフォルトに復元してから、新しいコントローラとして再設定できます。
この手順では、コントローラを工場出荷時のデフォルトに復元する方法について説明します。
 注意 | この手順では、Cisco APIC-EMとそのホスト(物理または仮想)の両方をシャットダウンします。この手順の最後には、ホストにアクセスして再起動する必要があります。 |
Cisco APIC-EMの導入ガイドで説明されている手順に従って Cisco APIC-EM をすでに導入済みです。
物理コンソールまたは Telnet 接続を使用して Cisco APIC-EMにアクセスできます。
| ステップ 1 | セキュア シェル(SSH)クライアントを使用し、設定ウィザードを使用して指定した IP アドレスでホスト(物理または仮想)にログインします。
| ||
| ステップ 2 | プロンプトが表示されたら、SSH アクセス用の Linux ユーザ名(「grapevine」)とパスワードを入力します。 | ||
| ステップ 3 | プロンプトで reset_grapevine factory コマンドを入力します。
$ reset_grapevine factory | ||
| ステップ 4 | Linux の grapevine パスワードをもう一度入力して、リセット プロセスを開始します。
$ sudo password for grapevine ********* このコマンドを入力すると、reset_grapevine factory コマンドによってコントローラがシャットダウンするという警告が表示されます。 reset_grapevine factory コマンドの実行を確認するように求められます。 | ||
| ステップ 5 | Yes を入力して、reset_grapevine factory コマンドの実行を確認します。
コントローラでは、次のタスクが実行されます。 |
次の作業
次の作業を行います。
Cisco APIC-EMのサポート ファイルの作成
サポート ファイルを作成して、Cisco APIC-EMの導入をトラブルシューティングできます。このサポート ファイルは、ログ、コンフィギュレーション ファイル、およびコマンド出力から構成されます。このサポート ファイルを作成した後、シスコ サポートに電子メールで送信してサポートを受けることができます。
Cisco APIC-EMの導入ガイドで説明されている手順に従って Cisco APIC-EM を導入済みです。
| ステップ 1 | セキュア シェル(SSH)クライアントを使用し、設定ウィザードを使用して指定した IP アドレスでホスト(物理または仮想)にログインします。
| ||
| ステップ 2 | プロンプトが表示されたら、SSH アクセス用の Linux ユーザ名(「grapevine」)とパスワードを入力します。 | ||
| ステップ 3 | ホストの bin ディレクトリに移動します。bin ディレクトリには grapevine スクリプトが含まれています。 | ||
| ステップ 4 | サポート ファイルを作成するには、このディレクトリでrca コマンドを入力します。
$ rca
mkdir: created directory '/tmp grapevine-rca-2014-05-27_04-22-20-PM_PDT-0700'

----------------------------------------------------------------------
RCA package created On Tues May 27 16:22:20 PDT 2014
----------------------------------------------------------------------

[INFO] Generating log for 'vmstat 1 10'
[sudo] password for grapevine:
rca コマンドは、ログ ファイル、コンフィギュレーション ファイル、およびコマンド出力を含む tar ファイルを作成する原因分析スクリプトを実行します。 |
次の作業
問題解決のサポートを受けるために、この手順で作成された tar ファイルをシスコ サポートに送信します。
サービスのトラブルシューティング
この項のトラブルシューティング手順は、サービスの問題をトラブルシューティングする際に役立ちます。
Grapevine 開発者コンソールを使用して、サービス インスタンスのステータス(アクティブ、非アクティブまたは失敗)を確認し、サービスの問題の特定に活用できます。また、Grapevine 開発者コンソールを使用してサービス ログを確認することで問題を特定することもできます。障害または不具合が発生したサービスを特定した後は、サービス インスタンスを手動で生成および収集して問題を解決できます。
Grapevine 開発者コンソール
Cisco APIC-EMは、お使いのネットワークにサービスとしてのプラットフォーム(PaaS)環境を作成します。この PaaS 環境のサービスは、ネットワーク内のクライアントに負荷の増加が発生するとインスタンスを追加する、水平拡張性の高いアプリケーションです。これらのサービスのトラブルシューティングに Grapevine 開発者コンソールを使用します。Grapevine 開発者コンソール ツールは導入ファイルにバンドルされており、Cisco APIC-EMの初回導入時にインストールされます。
(注) | マルチホスト クラスタの場合、Grapevine 開発者コンソールを表示するためにそれぞれのホストにログインする必要はありません。マルチホスト クラスタでは、3 つのホストすべてで実行されているすべてのサービスを 1 つの統合ビューに表示できます。 |
Grapevine 開発者コンソールでは次のウィンドウと機能を提供します。
-
Overview:バージョンとステータスに関する情報を含むサービスのリストが表示されます。このウィンドウでサービスを追加または削除できます。
-
Clients:このウィンドウにクライアントの詳細情報が表示されます。
-
Hosts:このウィンドウにホストの詳細情報が表示されます。
-
WaitingQueue:待機キューの情報が表示されます。
-
Services:サービスの詳細情報が表示されます。このウィンドウでサービスを追加または削除できます。
-
Logs:タスク、インスタンス、およびクライアントログの詳細が表示されます。
(注) | Linux の root ユーザとして Grapevine 開発者コンソールにアクセスすることはできません。導入プロセス時に設定した管理者ユーザ名およびパスワードを使用してのみ Grapevine 開発者コンソールにアクセスできます。 |
Grapevine 開発者コンソールへのログイン
Grapevine 開発者コンソールを使用して次のタスクを実行できます。
注意 | アドバンス ユーザのみが Grapevine 開発者コンソールにアクセスして、サービスのトラブルシューティング タスクを実行するようにしてください。 |
Cisco APIC-EMが正常に導入されている必要があります。
| ステップ 1 | ブラウザ ウィンドウを開き、設定ウィザードを使用してネットワーク アダプタに対して設定した IP アドレスを入力することにより、Grapevine 開発者コンソールにアクセスします。
たとえば、次の IP アドレスと必要なポート番号を入力します。 https://external network IP address:14141 | ||
| ステップ 2 | プロンプトが表示されたら、管理ユーザ名とパスワードを入力します。
管理ユーザ名とパスワードは、設定ウィザードを使用して設定済みです。 Elastic Service Platform(Grapevine)のコンソールが表示されます。 |
次の作業
トラブルシューティングを目的としたサービスのバージョン、ステータス、ログの確認に進みます。
サービス バージョン、ステータス、ログの確認
Grapevine 開発者コンソールを使用して次のタスクを実行できます。
注意 | アドバンス ユーザのみがコンソールにアクセスして、この手順で説明されている作業や、サービスのトラブルシューティングを実行するようにしてください。 |
Cisco APIC-EMが正常に導入され、動作している必要があります。
| ステップ 1 | ブラウザ ウィンドウを開き、設定ウィザードを使用してネットワーク アダプタに対して設定した IP アドレスを入力することにより、Grapevine 開発者コンソールにアクセスします。
たとえば、次の IP アドレスと必要なポート番号を入力します。 https://external network IP address:14141 | ||
| ステップ 2 | プロンプトが表示されたら、管理ユーザ名とパスワードを入力します。
管理ユーザ名とパスワードは、設定ウィザードを使用して設定済みです。 Elastic Service Platform(Grapevine)のコンソールが表示されます。 | ||
| ステップ 3 | コンソールの [Overview]ウィンドウにリストされている各サービスのステータスを確認します。
各サービスは正方形で表されます。緑色の正方形はアクティブなサービス インスタンスを表し、赤色の正方形は障害のあるインスタンスまたは処理に失敗したインスタンスを持つサービスを表しています。色がない正方形は、非アクティブ サービス(開始されたインスタンスも実行中のインスタンスもない)を表しています。 マルチホスト環境では、サービスが 2 つの緑色の正方形で表されることがあります。これは、そのサービスがクラスタ内の 2 つのホスト上で実行されていることを示します。各正方形の上にカーソルを合わせると、そのサービスが実行されているホストが表示されます。 | ||
| ステップ 4 | コンソールの [Overview]ウィンドウで各サービスのバージョンを確認します。
バージョンは、リストされている各サービスのヘッダーにあります。 | ||
| ステップ 5 | 特定のアクティブなサービス インスタンス(緑色の正方形アイコン)をクリックし、ウィンドウの下部にあるインスタンス ログまたはクライアント ログを参照することにより、サービス ログを確認します。 |
次の作業
Grapevine 開発者コンソールでの操作を終了したら、[Logout]ボタンをクリックしてコンソールからログアウトします。
CLI を使用したサービスおよびクライアントのモニタリング
トラブルシューティングのために、開発者コンソールに加えてホストのコマンドライン インターフェイス(CLI)も用意されています。この CLI では、コマンドラインから Cisco APIC-EMの状態をモニタできます。
このガイドで説明されている手順を使用して Cisco APIC-EMを導入済みです。
| ステップ 1 | セキュア シェル(SSH)クライアントを使用し、設定ウィザードを使用して指定した IP アドレスでホスト(物理または仮想)にログインします。
| ||
| ステップ 2 | プロンプトが表示されたら、SSH アクセス用の Linux ユーザ名(「grapevine」)とパスワードを入力します。 | ||
| ステップ 3 | grape service display コマンドを入力して、現在インストールされているすべてのCisco APIC-EM サービスを表示します。各サービスに関する重要なデータが、ハッシュマークで区切って表示されます。
$ grape service display

...

#
rabbitmq                  config                    {}
rabbitmq                  core_service              True
rabbitmq                  enabled                   False
rabbitmq                  endpoint_config           {u'default':
{u'backend_protocol': u'amqp', u'backend_path': u'',
u'frontend_protocol': u'', u'frontend_path': u'', u'frontend_port':
0, u'backend_port': 5672}}
rabbitmq                  kill_as_group             True
rabbitmq                  max_instances             1
rabbitmq                  min_instances             0
rabbitmq                  priority                  1
rabbitmq                  queue_config              {u'queues': [],
u'bindings': [], u'exchanges': []}
rabbitmq                  requirements              {u'template_id':
u'default', u'persistent_disk': False}
rabbitmq                  run_as_group              grapevine
rabbitmq                  run_as_user               grapevine
rabbitmq                  service_type              rabbitmq
rabbitmq                  spare_count               0
rabbitmq                  start_secs                10
rabbitmq                  static_load               10
rabbitmq                  status_interval           60
rabbitmq                  stop_as_group             True
rabbitmq                  stop_signal               TERM
rabbitmq                  version                   1.0.0
#

...
| ||
| ステップ 4 | grape instance display コマンドを入力して、Cisco APIC-EM サービスの実行中インスタンスを表示します。サービスの実行中インスタンスに関する重要なデータが、ハッシュマークで区切って表示されます。
$ grape instance display

...

#
4c4c83db-2da6-4a04-9af6-96c8dac692d1   client_id
4c4c83db-2da6-4a04-9af6-96c8dac692d1
4c4c83db-2da6-4a04-9af6-96c8dac692d1   endpoint_config
{u'default': {u'backend_port': 5672, u'backend_protocol': u'amqp'}}
4c4c83db-2da6-4a04-9af6-96c8dac692d1   interfaces
[{'interface': 'eth0', 'ip': '192.168.0.1', 'mac': '00:50:56:9f:6c:c4'},
{'interface': 'eth1', 'ip': '172.16.0.15', 'mac': '00:50:56:9f:71:46'}]
4c4c83db-2da6-4a04-9af6-96c8dac692d1   is_error           None
4c4c83db-2da6-4a04-9af6-96c8dac692d1   service_type       rabbitmq
4c4c83db-2da6-4a04-9af6-96c8dac692d1   state              running
4c4c83db-2da6-4a04-9af6-96c8dac692d1   task_id            None
4c4c83db-2da6-4a04-9af6-96c8dac692d1   timestamp
Fri Oct 03, 2014 02:05:43 PM (4 days ago)
4c4c83db-2da6-4a04-9af6-96c8dac692d1   version            1.0.0
#

...
| ||
| ステップ 5 | grape client display コマンドを入力して、Cisco APIC-EM で現在実行中のすべての Grapevine クライアントを表示します。各クライアントに関する重要なデータが、ハッシュマークで区切って表示されます。
$ grape client display

CLIENT                                 PROPERTY             VALUE
----------------------------------------------------------------------
ae63a6c1-a946-4df7-a68d-33227eed8134   client_id        ae63a6c1-a946-4df7-a68d-33227eed8134
ae63a6c1-a946-4df7-a68d-33227eed8134   client_version   0.1.0.212.dev633-gf7e21de
ae63a6c1-a946-4df7-a68d-33227eed8134   interfaces       [{'interface': 'eth0', 'ip': '192.168.0.32',
'mac': '00:50:56:9f:3a:90'}]
ae63a6c1-a946-4df7-a68d-33227eed8134   is_alive         True
ae63a6c1-a946-4df7-a68d-33227eed8134   last_heartbeat   Wed Oct 08, 2014 10:22:50 AM (15 secs ago)
ae63a6c1-a946-4df7-a68d-33227eed8134   template_id      default
ae63a6c1-a946-4df7-a68d-33227eed8134   vm_id            ce0a634a-5475-4450-9dce-f3217d855ac4
#

...
すべてのクライアントの is alive プロパティが True である必要があります。 |
パスワードのトラブルシューティング
パスワードの問題をトラブルシューティングするには、次の手順を実行します。
既存の管理者によるパスワード回復の実行
少なくとも 1 つのコントローラ管理者(ROLE_ADMIN)のユーザ アカウントが存在する場合に、ユーザ(管理者、インストーラまたはオブザーバ)のパスワードの回復を実行するには、次のステップを実行してください。
-
パスワード回復を必要とするユーザの仮パスワードを設定するには、既存の管理者にお問い合わせください。
(注)
管理者はユーザ アカウントを削除し、失われたパスワードで再作成することにより、仮パスワードを設定できます。ユーザはコントローラに再びログインして、アクセスし、もう一度パスワードを希望するものに変更できます。
-
ユーザは、仮パスワードでコントローラにログインしてパスワードを変更する必要があります。
(注)パスワードはコントローラ GUI で [Change Password]ウィンドウを使用して変更します。パスワードの変更については、『Cisco Application Policy Infrastructure Controller Enterprise Module Configuration Guide』の第 4 章「Managing Users and Roles」を参照してください。
既存の管理者なしのパスワード回復の実行
次の手順では、コントローラ管理者(ROLE_ADMIN)ユーザ アカウントが 1 つしかなく、このアカウントに正常にログインできない場合に、パスワード回復を実行する方法について説明します。
(注) | 導入に少なくとも 2 つの管理者アカウントを作成することを推奨します。2 つの管理者アカウントがあることで、一方のアカウントが何らかの理由でロックされた場合でも、もう一方のアカウントを使用してロックされたアカウントをロック解除できます。 |
| ステップ 1 | その他に既存の管理者(ROLE_ADMIN)ユーザ アカウントが存在しない場合は、端末から SSH クライアントを使用して、設定ウィザードを使用して指定した IP アドレスでホスト(物理または仮想)にログインします。
| ||
| ステップ 2 | プロンプトが表示されたら、Linux ユーザ名(「grapevine」)とパスワードを入力します。 | ||
| ステップ 3 | コンソールで、Grapevine ルートに対して次のコマンドを入力します。
$ config_wizard このコマンドは、Cisco APIC-EM設定プロセスを開始します。
| ||
| ステップ 4 | [<Create a new APIC-EM cluster>]オプションを選択します。 | ||
| ステップ 5 | [APIC-EM ADMIN USER SETTINGS]を設定するステップまで、設定プロセスを進めます。 | ||
| ステップ 6 | 新しい管理者ユーザ パスワードを指定します。 | ||
| ステップ 7 | 確認のために新しい管理者ユーザ パスワードを再入力します。 | ||
| ステップ 8 | 完了するまで設定ウィザードとそのプロセスを続行します。
この最終ステップによって、クラスタは停止してから復帰します(reset_grapvine コマンドの実行に似ています)。 |
Linux Grapevine ユーザ アカウントのパスワード回復の実行
次の手順を使用して、失われた Linux grapevine ユーザ パスワードを回復できます。この手順は、ホストの Linux オペレーティング システムにアクセスするために必要な Linux grapevine ユーザ パスワードを再設定します。
Linux カーネルにアクセスするには、Linux コンソールを使用してホスト(物理または仮想)にログインする必要があります。
| ステップ 1 | Linux コンソールにログイン中にホスト(物理または仮想)を再起動します。 | ||
| ステップ 2 | GNU GRUB メニューが表示されているときに「e」を押して、ブート コマンドを編集します。
| ||
| ステップ 3 | GNU GRUB メニュー出力で「linux」で始まる行を探し、その行の「ro」を「rw」に変更して「init=/bin/bash」を追加します。
たとえば、次の行を探します。 linux /vmlinuz-3.13.0-24-generic root=/dev/mapper/grapevine--vg-root ro cgroup_enable=memory swapaccount=1 quiet sqlash $vt_handoff これを次の行に変更します。 linux /vmlinuz-3.13.0-24-generic root=/dev/mapper/grapevine--vg-root rw cgroup_enable=memory swapaccount=1 quiet sqlash $vt_handoff init=/bin/bash | ||
| ステップ 4 | Ctrl+xまたは F10 キーを押して、ブート プロセスを続行します。
この時点で、ホストがルート モードで起動します。これにより、Linux の passwd コマンドを入力して、Linux grapevine ユーザのパスワードをリセットできるようになります。 | ||
| ステップ 5 | Linux の passwd コマンドを入力して、Linux grapevine ユーザのパスワードをリセットします。
$ passwd grapevine
| ||
| ステップ 6 | プロンプトが表示されたら、新しい Linux grapevine パスワードを入力します。 | ||
| ステップ 7 | プロンプトが表示されたら、新しい Linux grapevine パスワードをもう一度入力して確認します。 | ||
| ステップ 8 | 次の reboot コマンドを入力してシステムを再起動します。
$ /sbin/reboot -f システムが再起動し、新しい設定とパスワードで開始します。 再起動プロセスの最後に、GNU GRUB メニューが表示されます。 | ||
| ステップ 9 | Enterを押して、Ubuntu OS を起動します。 | ||
| ステップ 10 | Ubuntu OS が起動したら、Linux grapevine ユーザ名とパスワードを入力して、ホストにログインしなおします。
| ||
| ステップ 11 | 次のコマンドを使用して設定ウィザードを再起動します。
$ config_wizard [next>>]をクリックして事前に設定された値を受け入れ、[LINUX USER SETTINGS] ステップに到達するまで設定ウィザード プロセスを進めます。
| ||
| ステップ 12 | [LINUX USER SETTINGS]で値を入力するプロンプトが表示されたら、ステップ 6 で作成した新しい Linux grapevine パスワードを入力します。
| ||
| ステップ 13 | [next>>]をクリックし、このプロセスの最後のステップまで設定ウィザードのプロセスを進めます。
| ||
| ステップ 14 | 設定ウィザード プロセスの最後で [proceed>>]をクリックし、設定ウィザードで設定変更を保存して Cisco APIC-EM に適用します。 |
トラブルシューティング コマンド
Grapevine ルートとクライアントの両方で、Cisco APIC-EMをトラブルシューティングするコマンドを発行できます。
ルート コマンド
次の表で、Cisco APIC-EMのトラブルシューティングのために Grapevine ルートで発行できるコマンドについて説明します。
(注) | Grapevine ルートで grape help コマンドを実行すると、使用可能なコマンドが表示されます。有効なコマンド パラメータおよび使用法については、grape help コマンドを入力します。たとえば、grape helpcapacity_plugin と入力すると、grape capacity_plugin に使用可能なコマンド パラメータが表示されます(add、display および remove)。 |
|
ルート コマンド |
説明 |
||
|---|---|---|---|
|
grape backup delete |
既存のコントローラのバックアップ ファイルを削除します。
|
||
|
grape capacity_plugin display |
Grapevine で使用されている現在の設定を表示します。 |
||
|
grape client display |
現在実行中の Grapevine クライアント数を表示します。このコマンドでは、障害が発生しているクライアントも表示されます。 |
||
|
grape client status |
Grapevine クライアントのステータスを表示します。 |
||
|
grape host evacuatehost_id |
grape host evacuate コマンドは、これが発行されたホストのサービスをすべて収集します。マルチホスト クラスタのホストでこのコマンドを発行すると、サービスが収集されてクラスタ内の残り 2 つのホストに転送されます。単一ホスト構成のホストでこのコマンドを発行すると、すべてのサービスが収集されます。 |
||
|
grape host status host_id |
grape host status コマンドは、これが発行されたホストのサービスをすべて表示します。 |
||
|
grape instance display |
現在実行している Cisco APIC-EMサービスを表示します。 |
||
|
grape instance status |
Cisco APIC-EMサービスのステータスを表示します。 |
||
|
grape network display |
次のものを含む、Grapevine と Cisco APIC-EMの両方で使用されている現在の外部ネットワーク設定を表示します。 |
||
|
grape release display current |
現在実行中の Cisco APIC-EMサービスのバージョンを表示します。 |
||
|
grape release display latest |
Cisco APIC-EMサービスの使用可能な最新バージョンを表示します。 |
||
|
grape release update force |
Cisco APIC-EMのサービスを更新します。 サービスを強制的に更新するには、このコマンドを使用します。 |
||
|
grape root display |
以下を含む Grapevine ルートのプロパティを表示します。 |
||
|
grape service display |
現在インストールされている Cisco APIC-EMサービスを表示します。 |
||
|
grape update_service display |
現在の自動サービス更新の設定を表示します。 コマンド出力の追加フィールドには、シスコ クラウドが更新のためにポーリングされた最終時刻(last_connect_time)、およびシスコ クラウドのステータス(last_connect_status)が示されます。たとえば、シスコ クラウドがアクセス可能かどうかなどです。 |
||
|
grape version |
Grapevine ルートが実行している Grapevine のバージョンを表示します。 |
||
|
rca |
rca コマンドは、ログ ファイル、コンフィギュレーション ファイル、およびコマンド出力を含む tar ファイルを作成する原因分析スクリプトを実行します。このコマンドを実行し、tar ファイルを作成したら、シスコ サポートにファイルを送信して問題解決のサポートを受けることができます。 |
||
|
reset_grapevine |
reset_grapevine コマンドは、設定ウィザードを最初に実行したときに設定した値に設定値を戻します。設定は .JSON ファイルに保存されます。この .JSON ファイルは次の場所にあります:$ /etc/grapevine/controller-config.json。 |
||
|
reset_grapevine factory |
reset_grapevine factory コマンドは、設定値を工場出荷時のデフォルトに戻します。
|
||
|
securityutil openport |
Grapevine ルートとクライアントのオープン ポートを表示します。 オープン ポートはリスナーが 1 つ以上の IP アドレスに存在する TCP または UDP ポートです。 |
||
|
sudo service grapevine status |
すべてのルート コア サービスが実行されているかどうかと、Grapevine ルート コア サービスのステータスを判別します。 |
クライアント コマンド
次の表で、Cisco APIC-EMのトラブルシューティングのために Grapevine クライアントで発行できるコマンドについて説明します。
|
クライアント コマンド |
説明 |
|---|---|
|
grape version |
Grapevine クライアントが実行している Grapevine のバージョンが表示されます。 |
|
sudo service grapevine status |
Grapevine クライアントのコア サービスのステータスと、クライアントのコア サービスがすべて実行されているかどうかを判別します。 |
トラブルシューティング ログ ファイル
ログ ファイルを使用して、Cisco APIC-EMをトラブルシューティングできます。ログ ファイルは、Grapevine ルートとクライアントの両方に保存されます。
(注) | ログ ファイルはシステム障害が発生しても、変更管理用のソフトウェア アップデートが実行されても維持されます。 |
ルート ログ ファイル
次の表に、Cisco APIC-EMのトラブルシューティングに使用できる Grapevine ルートにあるログ ファイルを示します。
|
ディレクトリ |
ファイル名 |
説明 |
|---|---|---|
|
/var/log/ |
boot.log |
このログ ファイルは、ブート プロセスおよびこのプロセス中に発生したエラーの詳細を提供します。ログ ファイルを使用して次の問題をトラブルシューティングします。 |
|
/var/log/ |
config_wizard.log |
このログ ファイルを使用して、Grapevine の初期設定および導入中にエラーが発生したかどうかを判断します。 |
|
/var/log/ |
grapevine_manager.log |
このログ ファイルを使用して、コントローラの UI の [Software Update]フィールドを使用した手動でのファイル更新の間にエラーが発生したかどうかを判断します。 |
|
/var/log/ |
grapevine_manager_activity.log |
このログ ファイルを使用して、コントローラの UI の [Software Update]フィールドを使用した更新の間にエラーが発生したかどうかを判断します。 |
|
/var/log/grapevine |
supervisord.log |
このログ ファイルを使用して、Grapevine ルートのコア サービスのいずれかが予期せず期限切れしていないかどうかを判断します。 |
|
/var/log/ |
cassandra.log |
このログ ファイルを使用して、Grapevine データベースが正常かどうかを判断します。 |
|
/var/log/grapevine |
grapevine_root.log |
ログ ファイルを使用して次の問題をトラブルシューティングします。 |
|
/var/log/grapevine |
grapevine_capacity_manager.log |
このログ ファイルを使用して、Grapevine がなぜ Grapevine クライアントの生成または収集に失敗したのかを判断します。 |
クライアント ログ ファイル
次の表に、Cisco APIC-EMのトラブルシューティングに使用できる Grapevine クライアントにあるログ ファイルを示します。
|
ディレクトリ |
ファイル名 |
説明 |
|---|---|---|
|
/var/log |
boot.log |
このログ ファイルを使用して次のことを判断します。 |
|
/var/log/grapevine |
supervisord.log |
このログ ファイルを使用して、Grapevine クライアントのコア サービスのいずれかが予期せず停止していないかどうかを判断します。 |
|
/var/log/grapevine |
grapevine_client.log |
このログ ファイルは、Grapevine クライアント デーモンのブートストラップ プロセスおよびこのプロセス中に発生したエラーの詳細を提供します。 このログ ファイルを使用して次のことを判断します。 |
|
/var/log/grapevine/services |
service-name/version/service-name.log |
このログ ファイルを使用して、サービスが操作の実行に失敗した原因を特定します。 |
 フィードバック