HTTPサーバを使用したCisco Nexusダッシュボードノードの再イメージング手順
ダウンロード オプション
偏向のない言語
この製品のドキュメントセットは、偏向のない言語を使用するように配慮されています。このドキュメントセットでの偏向のない言語とは、年齢、障害、性別、人種的アイデンティティ、民族的アイデンティティ、性的指向、社会経済的地位、およびインターセクショナリティに基づく差別を意味しない言語として定義されています。製品ソフトウェアのユーザインターフェイスにハードコードされている言語、RFP のドキュメントに基づいて使用されている言語、または参照されているサードパーティ製品で使用されている言語によりドキュメントに例外が存在する場合があります。シスコのインクルーシブ ランゲージの取り組みの詳細は、こちらをご覧ください。
翻訳について
シスコは世界中のユーザにそれぞれの言語でサポート コンテンツを提供するために、機械と人による翻訳を組み合わせて、本ドキュメントを翻訳しています。ただし、最高度の機械翻訳であっても、専門家による翻訳のような正確性は確保されません。シスコは、これら翻訳の正確性について法的責任を負いません。原典である英語版(リンクからアクセス可能)もあわせて参照することを推奨します。
はじめに
このドキュメントでは、HTTPサーバを使用してCisco Nexusダッシュボードノードを再イメージングする手順について説明し、HTTPでホストされたリモートのイメージ展開を介して標準化された効率的なノード再イメージングを確実に行うための明確な手順を示します。
前提条件
- Cisco Integrated Management Controller(CIMC)は、OOB IPアドレスで設定する必要があります。
- Nexusダッシュボードのリリースノートを確認し、どのNexusダッシュボードソフトウェアイメージに再イメージングする必要があるかを確認します。
- ソフトウェアイメージをsoftware.cisco.comから取得します。
- イメージのMD5チェックサムが、Cisco.comで公開されているチェックサムと一致することを確認します。
- HTTPサーバにNexusダッシュボードイメージをアップロードします。
- HTTPサーバは、CIMC管理インターフェイスから到達可能である必要があります。この到達可能性は、CIMC GUIまたはCLIを使用して確認できます。
使用するコンポーネント
このドキュメントの内容は、特定のソフトウェアやハードウェアのバージョンに限定されるものではありません。
このドキュメントの情報は、特定のラボ環境にあるデバイスに基づいて作成されました。このドキュメントで使用するすべてのデバイスは、クリアな(デフォルト)設定で作業を開始しています。本稼働中のネットワークでは、各コマンドによって起こる可能性がある影響を十分確認してください。
背景説明
システムの破損、サポートされていないアップデート、またはアクセスできないGUIが原因で、Cisco Nexusダッシュボードノードに障害が発生した場合、管理者はHTTPサーバでホストされているISOを使用してノードを再イメージングできます。このプロセスには、NexusダッシュボードISOのダウンロード、Webサーバでのホスティング、CIMC(Cisco Integrated Management Controller)を使用したHTTP経由でのISOのマッピングとブートが含まれます。これにより、クラスタの復元の一部として、効率的なリモートノードの回復または再インストールが可能になります。
解決方法
HTTPサーバ経由でND再イメージングを実行するには、次の手順を実行する必要があります。
ステップ1:シスコのWebサイトからファームウェアをダウンロードします。
software.cisco.com/download を開く.
ステップ 2:Nexusダッシュボードインターフェイスにアクセスし、使用可能なリリースオプションから適切なソフトウェアバージョン(たとえば、3.2(2m))を選択します。
例:
ステップ 3:NexusダッシュボードソフトウェアISOイメージをHTTPサーバにコピーします。
例: http://x.x.x.x/iso/
ステップ 4:SSH/コンソールからCisco Integrated Management Controller
- ターミナルウィンドウから、CIMCコンソールにログインします。
# ssh admin@cimc_ip
ここで、cimc_ipはCIMC IPアドレスです。
例:
# ssh admin@x.x.x.x
admin@x.x.x.x's password:
system#
- スコープをバーチャル・メディアに変更します。
system# scope vmedia
system /vmedia #
-
HTTPサーバに.isoイメージをマッピングします。
system /vmedia # map-www volume_name http://http_server_ip_and_path iso_file_name
場所:
-
volume_nameは、ボリュームの名前です。
-
http_server_ip_and_pathは、HTTPサーバのIPアドレスと.isoファイルの場所へのパスです。
-
iso_filenameは、.isoファイルの名前です。
例:
注:http_server_ip_and_pathとiso_filenameの間にはスペースがあります。
system /vmedia # map-www apic http://x.x.x.x/iso/ nd-dk9.3.2.2m.iso
Server username: admin
Server password:
Confirm password:
注:クレデンシャルを入力して、Enterキーを押します。
-
マッピングステータスを確認します。
 system /vmedia # show mappings detail

The Map-Status must be shown as OK.

For Example:

system /vmedia # show mappings detail
Volume apic:
    Map-Status: OK
    Drive-Type: CD
    Remote-Share: http://x.x.x.x/iso/

    Remote-File:nd-dk9.3.2.2m.iso
    Mount-Type: www
    Mount-Options: noauto,username=admin,password=********3
    system /vmedia #
マッピングが失敗した場合、またはマッピング中にエラーが発生した場合は、unmapコマンドを使用して既存のマッピングを削除してから、マッピングを再試行できます。
Server # scope vmedia
Server /vmedia # show mappings
Volume  Map-status   Drive-type     remote-share        remote-file                mount-type
------  ----------  ------------  ------------------- -------------------        -----------
Huu     OK           removable    http://x.x.x.x/ rhel-server-6.1-x86_6.iso      www
Server /vmedia # unmap Huu
Server /vmedia # show mappings
Volume  Map-status   Drive-type     remote-share        remote-file                mount-type
------  ----------  ------------  ------------------- -------------------        -----------
-
SOLに接続して、インストールプロセスを監視します。
system /vmedia # connect host
CISCO Serial Over LAN:
Press Ctrl+x to Exit the session
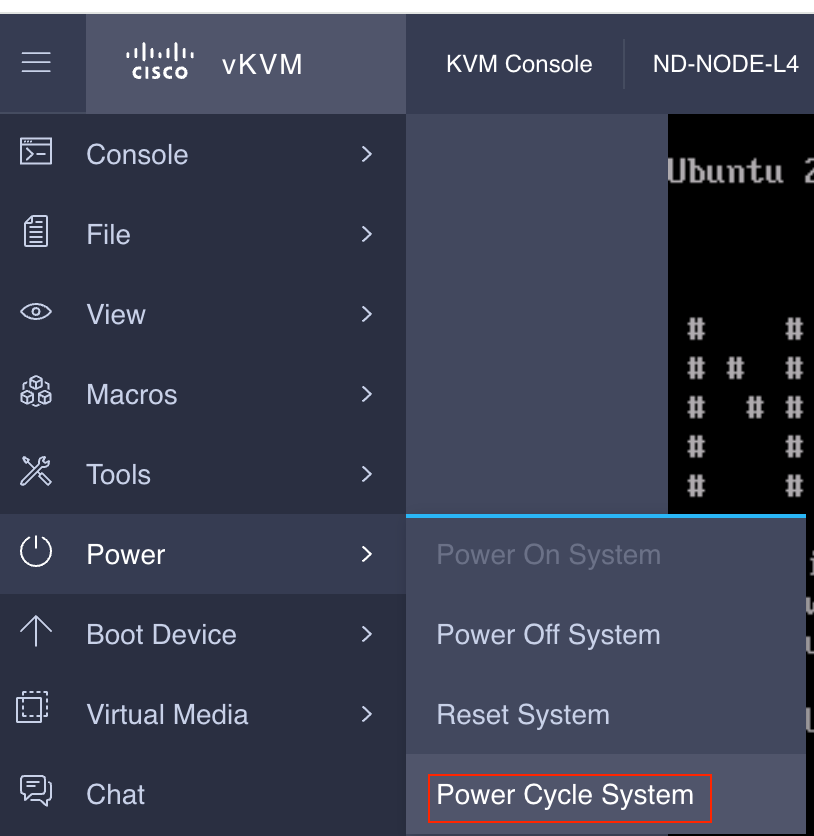
ステップ5:CIMC GUIのKVMコンソールから電源を再投入します。
Choose Power > Power Cycle System (cold boot) to power cycle the controller.
SOLコンソールから:起動プロセス中に画面を見て、適切なタイミングでF6を押して起動選択メニューに入る準備をします。
例:
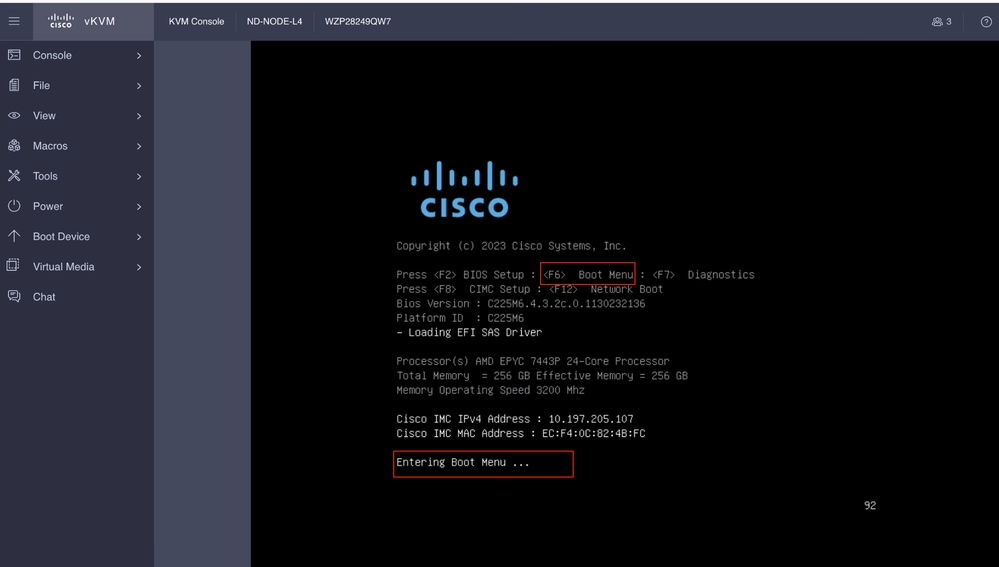
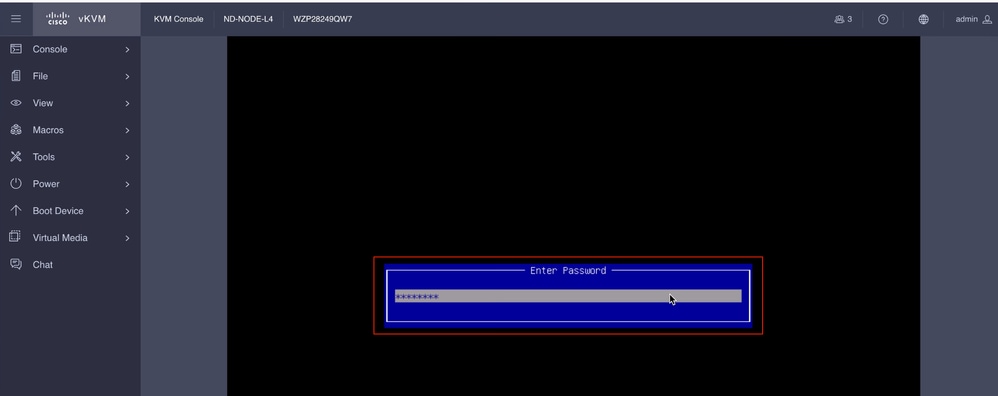
また、BIOSパスワードを入力する必要がある場合もあります。デフォルトのパスワードは password です。
ブート選択メニューで、ワンタイムブートデバイスとしてCisco CIMC-Mapped vDVD2.00オプションを選択します。
ステップ6:CIMC CLIに戻り、Connect Hostの出力を監視します。
CIMC cliをモニタすると、「To speed up the install, enter iso url in next 10 minutes then the enter http server URL with Nexus Dashboard image」というメッセージが表示されます。
Boot000A* UEFI: Cisco CIMC-Mapped vDVD2.00 PciRoot(0x1)/Pci(0x8,0x1)/Pci(0x0,0x3)/USB(1,0)/USB(2,0)/Unit(3)/CDROM(1,0x35,0x5597ed)..BO'
+ return 1
+ '[' -n '' ']'
++ mount
++ grep /run/install/repo
++ cut -f 1 -d ' '
++ tr -d '[:digit:]'
++ true
+ usbdevice=
+ mkdir /mnt/usbdata
+ '[' -n '' ']'
+ '[' true = true ']'
+ read_iso_url
+ dmesg --console-off
+ true
+ echo 'To speed up the install, enter iso url. Type '\''skip'\'' to use local media:'
To speed up the install, enter iso url. Type 'skip' to use local media:
+ echo ' Either http://server/path/to/file or nfs:server:/path/to/file are supported'
Either http://server/path/to/file or nfs:server:/path/to/file are supported
+ read -r -p '? ' url

 http://x.x.x.x197.204.4/iso/DCApps/ND/nd-dk9.3.2.1i.iso << Enter the http server details  >>
+ '[' http://x.x.x.x197.204.4/iso/DCApps/ND/nd-dk9.3.2.1i.iso = skip ']'
+ '[' http://x.x.x.x197.204.4/iso/DCApps/ND/nd-dk9.3.2.1i.iso = '' ']'
+ '[' http = nfs: ']'
+ echo http://x.x.x.x197.204.4/iso/DCApps/ND/nd-dk9.3.2.1i.iso
+ grep -q '\[.*\]'
++ awk -F '/|:' '{print $4}'
+ urlip=x.x.x.x197.204.4
+ '[' -z x.x.x.x197.204.4 ']'
+ break
+ dmesg --console-on
+ '[' -n http://x.x.x.x197.204.4/iso/DCApps/ND/nd-dk9.3.2.1i.iso ']'
+ '[' http://x.x.x.x197.204.4/iso/DCApps/ND/nd-dk9.3.2.1i.iso '!=' skip ']'
+ dmesg --console-of
ステップ7:HTTP URLの入力後、ブートプロセスが続行されます。
注:staticオプションを選択すると、インターフェイス名、管理IPアドレス、およびゲートウェイの入力が求められます。
+ set +e
+ configured=0
+ interface=none
+ addr=none
+ gw=none
+ '[' 0 -eq 0 ']'
+ echo 'Configuring network interface'
Configuring network interface
+ echo 'type static, dhcp, bash for a shell to configure networking, or url to re-enter the url: '
type static, dhcp, bash for a shell to configure networking, or url to re-enter the url:
+ read -p '? ' ntype
? static << Enter the static  to configure the networking >>
+ case $ntype in
+ configure_static
+ '[' none '!=' none ']'
注:スタティックを入力すると、CIMCインターフェイスがリストダウンされ、正しいインターフェイスが選択されます。誤ったインターフェイスを選択した場合、パケット損失は100 %になり、pingの3回の失敗試行の後(パケット損失が0になるまで)、インターフェイスが1つずつ選択されることを認識していない場合、パケット損失が0になるまで正しいインターフェイスの選択を再度求められます。
次に例を示します。
+ echo 'Available interfaces'
Available interfaces
+ ls -l /sys/class/net
total 0
lrwxrwxrwx 1 root root 0 Aug 12 03:53 eno5 -> ../../devices/pci0000:40/0000:40:03.1/0000:46:00.0/0000:47:01.0/0000:49:00.0/0000:4a:00.0/0000:4b:00.0/net/eno5
lrwxrwxrwx 1 root root 0 Aug 12 03:53 eno6 -> ../../devices/pci0000:40/0000:40:03.1/0000:46:00.0/0000:47:01.0/0000:49:00.0/0000:4a:00.0/0000:4b:00.1/net/eno6
lrwxrwxrwx 1 root root 0 Aug 12 03:53 enp1s0f0 -> ../../devices/pci0000:00/0000:00:01.1/0000:01:00.0/net/enp1s0f0
lrwxrwxrwx 1 root root 0 Aug 12 03:53 enp1s0f1 -> ../../devices/pci0000:00/0000:00:01.1/0000:01:00.1/net/enp1s0f1
lrwxrwxrwx 1 root root 0 Aug 12 03:51 lo -> ../../devices/virtual/net/lo
+ read -p 'Interface to configure: ' interface
Interface to configure: enp1s0f0        <<  select the correct interface   >>
+ read -p 'address: ' addr
注: ND-NODE-L4では、インターフェイス名をenp1s0fX形式で指定する必要があります。ここで、Xは数値IDです。SE-NODE-G2には、enoXの形式が必要です。ここで、Xは数値です。
ステップ8.インターフェイスのチェックを修正する。
インターフェイスの入力後、http serverへのpingを試行し、選択したインターフェイスが正しければ、パケット損失は0 %である必要があり、http serverからのイメージのフェッチを開始します。
例:パケット損失が0 %の正しいインターフェイスを入力した後。
Interface to configure: enp1s0f0
+ read -p 'address: ' addr
address: x.x.x.x/24
+ read -p 'gateway: ' gw
gateway:x.x.x.x
+ ip addr add x.x.x.x/24 dev enp1s0f0
+ ip link set enp1s0f0 up
+ ip route add default via x.x.x.x
++ seq 1 6
+ for count in $(seq 1 6)
+ ping -c 1 x.x.x.x
PING x.x.x.x (x.x.x.x): 56 data bytes

---x.x.x.x ping statistics ---
1 packets transmitted, 0 packets received, 100% packet loss
+ sleep 20
+ for count in $(seq 1 6)
+ ping -c x.x.x.x
PING x.x.x.x (x.x.x.x): 56 data bytes
64 bytes from x.x.x.x : seq=0 ttl=63 time=0.512 ms

---x.x.x.x ping statistics ---
1 packets transmitted, 1 packets received, 0% packet loss
round-trip min/avg/max = 0.512/0.512/0.512 ms
+ configured=1
+ break
+ '[' 1 -eq 0 ']'
+ set -e
+ tmpiso=/tmp/cdrom.iso
+ echo 'Fetching http://x.x.x.x/iso/DCApps/ND/nd-dk9.3.2.2f.iso to /tmp/cdrom.iso'
Fetching http://x.x.x.x/iso/DCApps/ND/nd-dk9.3.2.2f.iso to /tmp/cdrom.iso >> started fetching the apic image from HTTP server
+ '[' http = nfs: ']'
+ download http://x.x.x.x/iso/DCApps/ND/nd-dk9.3.2.2f.iso /tmp/cdrom.iso
+ local url=http://x.x.x.x/iso/DCApps/ND/nd-dk9.3.2.2f.iso dest=/tmp/cdrom.iso tries=5
+ wget --server-response --no-check-certificate --tries=5 --progress=dot:mega --read-timeout=60 --output-document=/tmp/cdrom.iso.tmp http://x.x.x.x197.204.4/iso/DCApps/ND/nd-dk9.3.2.2f.iso
--2025-08-12 09:39:08-- http://x.x.x.x197.204.4/iso/DCApps/ND/nd-dk9.3.2.2f.iso
Connecting to x.x.x.x:80... connected.
HTTP request sent, awaiting response...
HTTP/1.1 200 OK
Date: Tue, 12 Aug 2025 09:39:09 GMT
Server: Apache/2.4.6 (CentOS) OpenSSL/1.0.2k-fips mod_wsgi/3.4 Python/2.7.5
Last-Modified: Tue, 10 Jun 2025 06:51:41 GMT
ETag: "2c66bd000-6373220f3b940"
Accept-Ranges: bytes
Content-Length: 11918888960
Keep-Alive: timeout=5, max=100
Connection: Keep-Alive
Content-Type: application/octet-stream
Length: 11918888960 (11G) [application/octet-stream]
Saving to: '/tmp/cdrom.iso.tmp'
誤ったインターフェイスを選択した場合、パケット損失は100 %になり、pingを3回失敗すると、正しいインターフェイスの選択を再度求められます。
例:100 %パケット損失で間違ったインターフェイスを入力した後。
+ read -p 'Interface to configure: ' interface
Interface to configure: enp11s0
+ read -p 'address: ' addr
address: x.x.x.x/24
+ read -p 'gateway: ' gw
gateway: x.x.x.x
+ ip addr add x.x.x.x/24 dev enp11s0
+ ip link set enp11s0 up
+ ip route add default via x.x.x.x
++ seq 1 2
+ for count in '$(seq 1 2)'
+ ping -c 1 x.x.x.x
PING x.x.x.x (x.x.x.x) 56(84) bytes of data.
From x.x.x.x icmp_seq=1 Destination Host Unreachable

--- x.x.x.x ping statistics ---
1 packets transmitted, 0 received, +1 errors, 100% packet loss, time 0ms

+ sleep 20
+ for count in '$(seq 1 2)'
+ ping -c 1 x.x.x.x
PING x.x.x.x (x.x.x.x) 56(84) bytes of data.
From x.x.x.x icmp_seq=1 Destination Host Unreachable

--- x.x.x.x ping statistics ---
1 packets transmitted, 0 received, +1 errors, 100% packet loss, time 0ms

+ sleep 20
+ '[' 0 -eq 0 ']'
+ echo 'Configuring network interface'
Configuring network interface
+ echo 'type static, dhcp, bash for a shell to configure networking, or url to re-enter the url: ' <>
type static, dhcp, bash for a shell to configure networking, or url to re-enter the url:
+ read -p '? ' ntype
?
CIMC CLIをモニタし、約40 ~ 50分待ちます。CLIで次の出力が表示されます。
+ log 'Shutting down Atomix Installer'
+ echo 'Shutting down Atomix Installer'
Shutting down Atomix Installer
+ log 'reboot: Power down'
+ echo 'reboot: Power down'
reboot: Power down
+ sleep 5
+ poweroff
+ ec[  533.195532] sysrq: Emergency Sync
ho s
[  533.195563] sysrq: Emergency Sync
[  533.212106] sysrq: Emergency Sync
[  533.212117] sysrq: Emergency Remount R/O
[  533.212189] sysrq: Power Off
[  533.212226] kvm: exiting hardware virtualization
[  533.213874] EXT4-fs (sdf1): re-mounted. Opts: (null). Quota mode: none.
[  533.215431] sd 1:0:0:0: [sdf] Synchronizing SCSI cache
[  533.215749] EXT4-fs (dm-3): re-mounted. Opts: (null). Quota mode: none.
[  533.216395] EXT4-fs (dm-1): re-mounted. Opts: (null). Quota mode: none.
[  533.217221] EXT4-fs (sdf6): re-mounted. Opts: (null). Quota mode: none.
[  533.217689] EXT4-fs (sdf4): re-mounted. Opts: (null). Quota mode: none.
[  533.218965] Emergency Remount complete
[  533.218997] Emergency Sync complete
[  533.218997] Emergency Sync complete
[  533.219002] Emergency Sync complete
[  533.359024] sd 1:0:0:0: [sdf] Stopping disk
+ echo s
+ echo s
+ echo u
+ echo o
+ log 'Nap time'
+ echo 'Nap time'
Nap time
+ true
+ sleep 60
[  535.571545] megaraid_sas 0000:41:00.0: megasas_disable_intr_fusion is called outbound_intr_mask:0x40000009
[  535.692202] ACPI: PM: Preparing to enter system sleep state S5
[  535.706849] reboot: Power down
ステップ9:電源オフ後にSOLを終了する
SOLコンソールにメッセージpoweroffが表示されるまで待ち、Ctrlキーとx(Ctrl+x)キーを押してSOLを終了し、再度CIMCにログインしてスコープを再度変更します。
(i) Change the scope to virtual media again:
system# scope vmedia
system /vmedia #
(ii) Unmap the .iso image that you mapped in 2.c:
 system /vmedia # unmap volume_name
 At the Save mapping prompt, enter yes if you want to save the mapping or no if you do not want to save the mapping. For example:
 system /vmedia # unmap apic
 Save mapping? Enther 'yes' or 'no' to confirm (CTRL-C to cancel) → yes
 system /vmedia #
(iii) Connect back to SOL again:
 system /vmedia #  connect host
電源を切った後、KVMを使用してシステムの電源を再投入する必要があります。その後、次の手順に進みます。
ステップx.x.x.x初回ブートセットアップ
[  274.210045] nd_bootstrap.sh[2628]:   INFO[0174] bootDisk: found disk=/dev/sdf bootPart=/dev/sdf4 espPart=/dev/sdf3
[  274.224041] nd_bootstrap.sh[2628]:   INFO[0174] boot devices/filesystems have been mounted
[  274.236038] nd_bootstrap.sh[2628]:   INFO[0174] |12231-start| ["expand-stub.bash" "/boot/efi/EFI/atx-current/kernel.efi"]
[  274.251228] nd_bootstrap.sh[2628]:   INFO[0174] |12231-out  | 21870+1 records in
[  274.262061] nd_bootstrap.sh[2628]:   INFO[0174] |12231-out  | 21870+1 records out
[  274.272065] nd_bootstrap.sh[2628]:   INFO[0174] |12231-out  | 11197856 bytes (11 MB, 11 MiB) copied, 0.0716082 s, 156 MB/s
[  274.287060] nd_bootstrap.sh[2628]:   INFO[0174] |12231-out  | 0+1 records in
[  274.297060] nd_bootstrap.sh[2628]:   INFO[0174] |12231-out  | 0+1 records out
[  274.307049] nd_bootstrap.sh[2628]:   INFO[0174] |12231-out  | 187 bytes copied, 7.2325e-05 s, 2.6 MB/s
[  274.566030] nd_bootstrap.sh[2628]:   INFO[0175] |12231-out  | 102375+1 records in
[  274.576055] nd_bootstrap.sh[2628]:   INFO[0175] |12231-out  | 102375+1 records out
[  274.588059] nd_bootstrap.sh[2628]:   INFO[0175] |12231-out  | 52416297 bytes (52 MB, 50 MiB) copied, 0.329377 s, 159 MB/s
[  274.604075] nd_bootstrap.sh[2628]:   INFO[0175] |12231-out  | 0+1 records in
[  OK  ] Finished atomix-boot-setup.
[  274.615055] nd_bootstrap.sh[2628]:   INFO[0175] |12231-out  | 0+1 records out
Starting Initial cloud-init job (pre-networking)...
[  274.634046] nd_bootstrap.sh[2628]:   INFO[0175] |12231-out  | 82 bytes copied, 9.4287e-05 s, 870 kB/s
[  274.656064] nd_bootstrap.sh[2628]:   INFO[0175] |12231-exit | rc=0
[  274.666047] nd_bootstrap.sh[2628]:   INFO[0175] Boot()                    duration=175321
[  274.837851] cloud-init[12253]: Cloud-init v. 24.1.3-0ubuntu1~22.04.5 running 'init-local' at Tue, 12 Aug 2025 09:53:39 +0000. Up 274.82 seconds.
Press any key to run first-boot setup on this console...
Starting Nexus Dashboard setup utility
Welcome to Nexus Dashboard 3.2.2f
Press Enter to manually bootstrap your first master node..
ステップ 11Nexusダッシュボード管理インターフェイスの管理者パスワードと管理ネットワークの設定
Starting Nexus Dashboard setup utility
Welcome to Nexus Dashboard 3.2.2f
Press Enter to manually bootstrap your first master node...

Admin Password:
Reenter Admin Password:
Management Network:
  IP Address/Mask: x.x.x.x/24
  Gateway: x.x.x.x
configを再入力しますか?(y/N):N
System configured successfully
Initializing System on first boot. Please wait..
[  OK  ] Listening on Network Service Netlink Socket.
[  OK  ] Finished Initial cloud-init job (pre-networking).
[  OK  ] Reached target Preparation for Network.
         Starting Network Configuration...
[  OK  ] Started Network Configuration.
[  OK  ] Reached target Network.
Starting Wait for Network to be Configured...
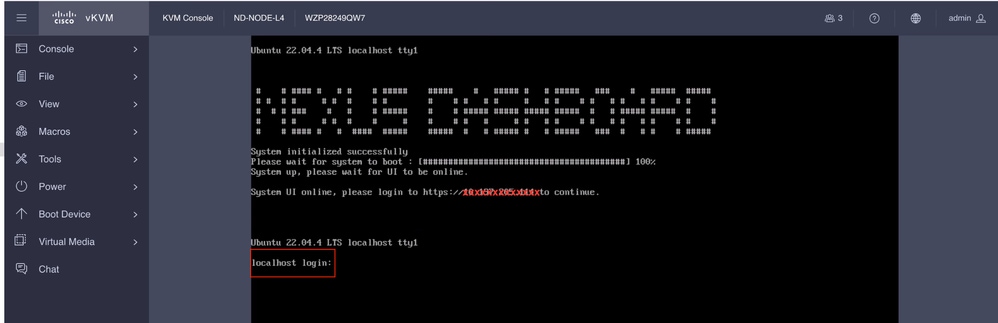
ステップ 12Nexusダッシュボードノードにログインする準備ができました。残りの設定では、管理インターフェイスIPを使用してND GUIにログインできます
コンソールから:
Ubuntu 22.04.4 LTS localhost ttyS0

#    # #### #   # #    # #####    #####    #   ##### #   # #####   ###    #   #####  #####

# #  # #     # #  #    # #        #    # #   # #     #   # #    # #   # #   # #    # #    #

#  # # ###    #   #    # #####    #    # ##### ##### ##### #####  #   # ##### #####  #    #

#    # #     # #  #    #     #    #    # #   #     # #   # #    # #   # #   # #    # #    #

#    # #### #   #  ####  #####    #####  #   # ##### #   # #####   ###  #   # #    # #####
System initialized successfully
[  564.309561] cloud-init[12560]: Cloud-init v. 24.1.3-0ubuntu1~22.04.5 running 'modules:final' at Tue, 12 Aug 2025 09:58:28 +0000. Up 564.27 seconds.
ci-info: no authorized SSH keys fingerprints found for user ubuntu.
<14>Aug 12 09:58:29 cloud-init: #############################################################
<14>Aug 12 09:58:29 cloud-init: -----BEGIN SSH HOST KEY FINGERPRINTS-----
<14>Aug 12 09:58:29 cloud-init: 256 SHA256:vKu7Zj3MAP+vFOXaeW14HClEhAwrSpA9AqcUC4SZVlU root@localhost (ECDSA)
<14>Aug 12 09:58:29 cloud-init: 256 SHA256:I7eiUnQq6pZsoFPy+UxIUQ66jQOgHyG4zGuF6cAtSl0 root@localhost (ED25519)
<14>Aug 12 09:58:29 cloud-init: 3072 SHA256:SvodRIEgWzEAaQQdH2rlw0qLziBbv0e88VAGkt/ox14 root@localhost (RSA)
<14>Aug 12 09:58:29 cloud-init: -----END SSH HOST KEY FINGERPRINTS-----
<14>Aug 12 09:58:29 cloud-init: #############################################################

-----BEGIN SSH HOST KEY KEYS-----
ecdsa-sha2-nistp256 AAAAE2VjZHNhLXNoYTItbmlzdHAyNTYAAAAIbmlzdHAyNTYAAABBBBf9S1BXcR48cWcIKhvfjLGYufJgycGIf1Yx8OpRsk4e1I+y80J/x5dfX90h+3cwt9kjH8IubMpleK66mlW+xd0= root@localhost
ssh-ed25519 AAAAC3NzaC1lZDI1NTE5AAAAIGWTN7hoB2/dYSVA0gpV88FWh2iRD2hwJ2LMryhhhQHg root@localhost
ssh-rsa AAAAB3NzaC1yc2EAAAADAQABAAABgQCeM+In/dciDwCKEPLV/97oIA5pHHRBRf0Lij5NcUwzYAf9q/m/lUsdzv2zVYc4WAJd8uX9ZxDAGa9D358Tvxh/lKzBKqNQpQdAjyby6IGGui+UK9Mq1RVxoUkFtIIJ97IzaBoR9ScnucMXpu5mp5OAjws+VrUhKk1XNFAui1QgW507I0Xk+2AaR/W0rwJCQRsHx3orDxCwJkDQDiQQAf/SrvSnuAe/8pSuCuvscqPjZeIF7LnJ6dAms0XXrhbxRQ8c4q/Ud6RL2sKjinlZPfqsbVFSpjbJ9m4jtXvuGE5llyJbS1FcU8DsFbkY6HH9JQru49iXcd5mKt7fyPg0ypp7Hl+2g07mEcYlEMBXxNZw+HqNW27xp0ZkRfWO+Zl2t0s6DjM0LHWqV0wZLYqqBTlQIkhf2irM6mr7s2bVAcvEsuZzG9d7uY8aC/CR5GwkgKW8s4oI7m56ccdRPHV0qQFXnBybBToUInmIK+1fxtaUXYbQbQ83wxNOvG7O55gDsws= root@localhost
-----END SSH HOST KEY KEYS-----
[  564.364630] cloud-init[12560]: Cloud-init v. 24.1.3-0ubuntu1~22.04.5 finished at Tue, 12 Aug 2025 09:58:29 +0000. Datasource DataSourceAtomix [sources=/var/lib/cloud/seed/atomix][dsmode=net].  Up 564.36 seconds
Please wait for system to boot : [########################################] 100%
System up, please wait for UI to be online.
System UI online, please login to https://x.x.x.x to continue. << Access the Nexus Dashboard GUI via this URL >>
Ubuntu 22.04.4 LTS localhost ttyS0
localhost login:
KVMから:
更新履歴
| 改定 | 発行日 | コメント |
|---|---|---|
1.0 |
29-Aug-2025
|
初版 |
 フィードバック