Procedure for Re-Imaging Cisco Nexus Dashboard Nodes Using an HTTP Server
Available Languages
Download Options
Bias-Free Language
The documentation set for this product strives to use bias-free language. For the purposes of this documentation set, bias-free is defined as language that does not imply discrimination based on age, disability, gender, racial identity, ethnic identity, sexual orientation, socioeconomic status, and intersectionality. Exceptions may be present in the documentation due to language that is hardcoded in the user interfaces of the product software, language used based on RFP documentation, or language that is used by a referenced third-party product. Learn more about how Cisco is using Inclusive Language.
Introduction
This document describes the procedure for re-imaging Cisco Nexus Dashboard nodes using an HTTP server, offering clear, step-by-step guidance to ensure standardized and efficient node re-imaging via remote HTTP-hosted image deployment.
Prerequisites
- Cisco Integrated Management Controller(CIMC) must be configured with OOB IP address.
- Check Nexus Dashboard Release notes, and confirm to which Nexus Dashboard software image you need to re-image.
- Obtain Software image from software.cisco.com.
- Confirm that the MD5 Checksum of the image, matches the one published on Cisco.com.
- Upload the Nexus Dashboard image on HTTP server.
- The HTTP server must be reachable from the CIMC Management Interface. This reachability can be verified using either the CIMC GUI or CLI.
Components Used
This document is not restricted to specific software and hardware versions.
The information in this document was created from the devices in a specific lab environment. All of the devices used in this document started with a cleared (default) configuration. If your network is live, ensure that you understand the potential impact of any command.
Background Information
When a Cisco Nexus Dashboard node fails—due to system corruption, unsupported updates, or inaccessible GUI—administrators can re-image the node using an ISO hosted on an HTTP server. The process involves downloading the Nexus Dashboard ISO, hosting it on a web server, and using CIMC (Cisco Integrated Management Controller) to map and boot the ISO via HTTP. This enables efficient, remote node recovery or reinstallation as part of cluster restoration.
Solution
To perform ND re-imaging via an HTTP server, the following steps are required:
Step 1.Download the firmware from the Cisco Website.
Open software.cisco.com/download.
Step 2. Access the Nexus Dashboard interface and select the appropriate software version—for example, 3.2(2m)—from the available release options.
For Example:
Step 3. Copy the Nexus Dashbaord Software ISO Image to the HTTP Server.
Example: http://x.x.x.x/iso/
Step 4. SSH/Console to Cisco Integrated Management Controller.
- From a terminal window, log in to the CIMC console.
# ssh admin@cimc_ip
Where cimc_ip is the CIMC IP address.
For example:
# ssh admin@x.x.x.x
admin@x.x.x.x's password:
system#
- Change the scope to virtual media:
system# scope vmedia
system /vmedia #
-
Map the .iso image to the HTTP server.
system /vmedia # map-www volume_name http://http_server_ip_and_path iso_file_name
Where:
-
volume_name is the name of the volume.
-
http_server_ip_and_path is the IP address of the HTTP server and the path to the .iso file location.
-
iso_filename is the name of the .iso file.
For example:
Note: There is space between the http_server_ip_and_path and the iso_filename.
system /vmedia # map-www apic http://x.x.x.x/iso/ nd-dk9.3.2.2m.iso
Server username: admin
Server password:
Confirm password:
Note: Enter the credentials and press Enter.
-
Check the mapping status:
 system /vmedia # show mappings detail

The Map-Status must be shown as OK.

For Example:

system /vmedia # show mappings detail
Volume apic:
    Map-Status: OK
    Drive-Type: CD
    Remote-Share: http://x.x.x.x/iso/

    Remote-File:nd-dk9.3.2.2m.iso
    Mount-Type: www
    Mount-Options: noauto,username=admin,password=********3
    system /vmedia #
If mapping fails or an error occurs during mapping, you can use the unmap command to remove the existing mapping, and then attempt the mapping again.
Server # scope vmedia
Server /vmedia # show mappings
Volume  Map-status   Drive-type     remote-share        remote-file                mount-type
------  ----------  ------------  ------------------- -------------------        -----------
Huu     OK           removable    http://x.x.x.x/ rhel-server-6.1-x86_6.iso      www
Server /vmedia # unmap Huu
Server /vmedia # show mappings
Volume  Map-status   Drive-type     remote-share        remote-file                mount-type
------  ----------  ------------  ------------------- -------------------        -----------
-
Connect to SOL to monitor the installation process:
system /vmedia # connect host
CISCO Serial Over LAN:
Press Ctrl+x to Exit the session
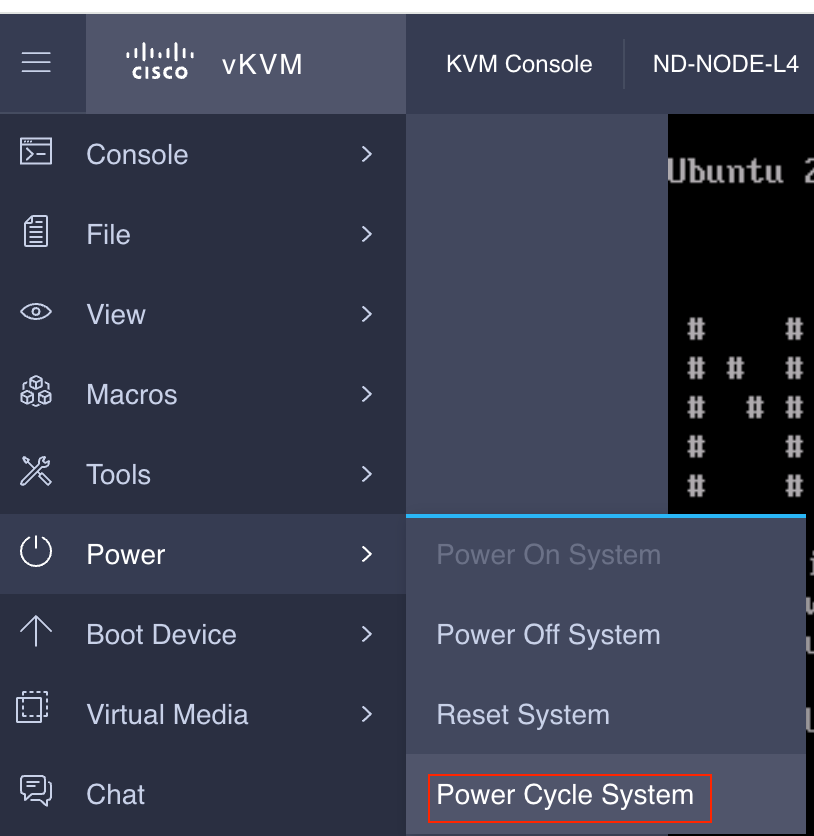
Step 5. Power Cycle from the KVM Console of CIMC GUI.
Choose Power > Power Cycle System (cold boot) to power cycle the controller.
From the SOL console: Watch the screen during the boot process and prepare to press F6 at the appropriate moment to enter the boot selection menu.
For example:
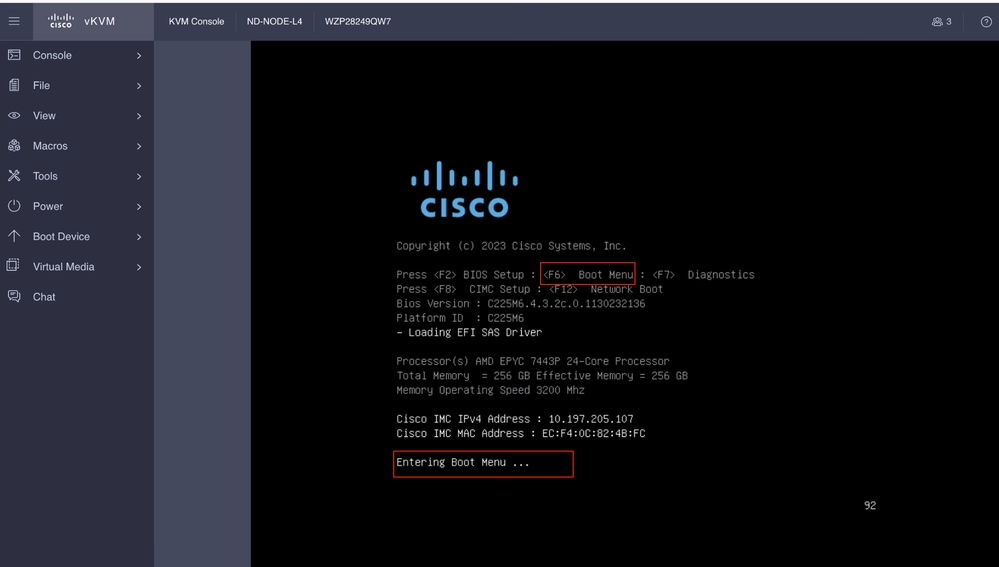
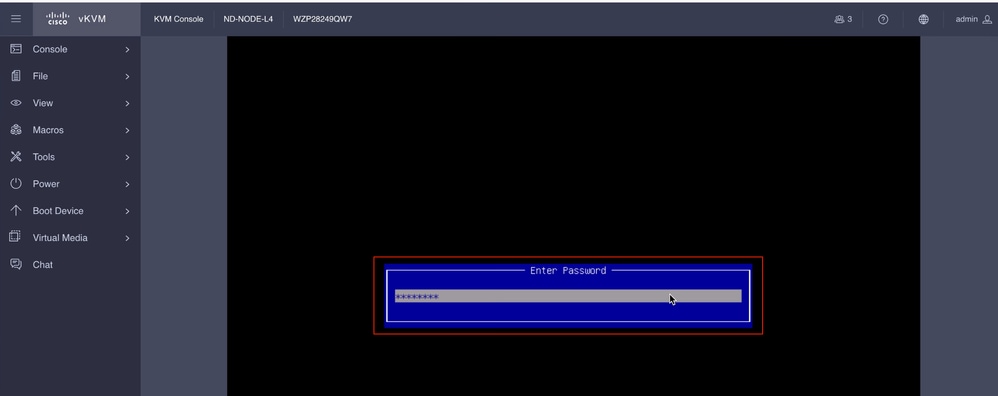
You can also have to enter the BIOS password. The default password is password.
At the boot selection menu, select the Cisco CIMC-Mapped vDVD2.00 option as the one-time boot device.
Step 6. Go Back to CIMC CLI and Monitor the Output of Connect Host.
Monitor the CIMC cli , when get the message To speed up the install, enter iso url in next ten minutes then the enter http server URL with Nexus Dashbaord image.
Boot000A* UEFI: Cisco CIMC-Mapped vDVD2.00 PciRoot(0x1)/Pci(0x8,0x1)/Pci(0x0,0x3)/USB(1,0)/USB(2,0)/Unit(3)/CDROM(1,0x35,0x5597ed)..BO'
+ return 1
+ '[' -n '' ']'
++ mount
++ grep /run/install/repo
++ cut -f 1 -d ' '
++ tr -d '[:digit:]'
++ true
+ usbdevice=
+ mkdir /mnt/usbdata
+ '[' -n '' ']'
+ '[' true = true ']'
+ read_iso_url
+ dmesg --console-off
+ true
+ echo 'To speed up the install, enter iso url. Type '\''skip'\'' to use local media:'
To speed up the install, enter iso url. Type 'skip' to use local media:
+ echo ' Either http://server/path/to/file or nfs:server:/path/to/file are supported'
Either http://server/path/to/file or nfs:server:/path/to/file are supported
+ read -r -p '? ' url

 http://x.x.x.x197.204.4/iso/DCApps/ND/nd-dk9.3.2.1i.iso << Enter the http server details  >>
+ '[' http://x.x.x.x197.204.4/iso/DCApps/ND/nd-dk9.3.2.1i.iso = skip ']'
+ '[' http://x.x.x.x197.204.4/iso/DCApps/ND/nd-dk9.3.2.1i.iso = '' ']'
+ '[' http = nfs: ']'
+ echo http://x.x.x.x197.204.4/iso/DCApps/ND/nd-dk9.3.2.1i.iso
+ grep -q '\[.*\]'
++ awk -F '/|:' '{print $4}'
+ urlip=x.x.x.x197.204.4
+ '[' -z x.x.x.x197.204.4 ']'
+ break
+ dmesg --console-on
+ '[' -n http://x.x.x.x197.204.4/iso/DCApps/ND/nd-dk9.3.2.1i.iso ']'
+ '[' http://x.x.x.x197.204.4/iso/DCApps/ND/nd-dk9.3.2.1i.iso '!=' skip ']'
+ dmesg --console-of
Step 7. After Entering the HTTP URL, Boot Process Will Continue.
Note: Choose static option, you will be asked to enter the interface name, management IP address and gateway.
+ set +e
+ configured=0
+ interface=none
+ addr=none
+ gw=none
+ '[' 0 -eq 0 ']'
+ echo 'Configuring network interface'
Configuring network interface
+ echo 'type static, dhcp, bash for a shell to configure networking, or url to re-enter the url: '
type static, dhcp, bash for a shell to configure networking, or url to re-enter the url:
+ read -p '? ' ntype
? static << Enter the static  to configure the networking >>
+ case $ntype in
+ configure_static
+ '[' none '!=' none ']'
Note: After typing the static it will list down the CIMC interface, select the correct interface. if you selected the wrong interface then the packet loss will be 100% then after three fail attempts of ping , it will again ask to select the correct interface until packet loss is 0 if you are not aware about interface select the all interface one by one.
For Example
+ echo 'Available interfaces'
Available interfaces
+ ls -l /sys/class/net
total 0
lrwxrwxrwx 1 root root 0 Aug 12 03:53 eno5 -> ../../devices/pci0000:40/0000:40:03.1/0000:46:00.0/0000:47:01.0/0000:49:00.0/0000:4a:00.0/0000:4b:00.0/net/eno5
lrwxrwxrwx 1 root root 0 Aug 12 03:53 eno6 -> ../../devices/pci0000:40/0000:40:03.1/0000:46:00.0/0000:47:01.0/0000:49:00.0/0000:4a:00.0/0000:4b:00.1/net/eno6
lrwxrwxrwx 1 root root 0 Aug 12 03:53 enp1s0f0 -> ../../devices/pci0000:00/0000:00:01.1/0000:01:00.0/net/enp1s0f0
lrwxrwxrwx 1 root root 0 Aug 12 03:53 enp1s0f1 -> ../../devices/pci0000:00/0000:00:01.1/0000:01:00.1/net/enp1s0f1
lrwxrwxrwx 1 root root 0 Aug 12 03:51 lo -> ../../devices/virtual/net/lo
+ read -p 'Interface to configure: ' interface
Interface to configure: enp1s0f0        <<  select the correct interface   >>
+ read -p 'address: ' addr
Note: ND-NODE-L4 requires interface names in the format enp1s0fX, where X is a numerical identifier. SE-NODE-G2 requires the format enoX, where X is a number.
Step 8. Correct Interface Check.
After Entering the interface it will try to ping http server and if selected interface is correct then packet loss must be 0% and start fetching the image from http server.
For Example: After Entering the correct interface with 0% Packet loss.
Interface to configure: enp1s0f0
+ read -p 'address: ' addr
address: x.x.x.x/24
+ read -p 'gateway: ' gw
gateway:x.x.x.x
+ ip addr add x.x.x.x/24 dev enp1s0f0
+ ip link set enp1s0f0 up
+ ip route add default via x.x.x.x
++ seq 1 6
+ for count in $(seq 1 6)
+ ping -c 1 x.x.x.x
PING x.x.x.x (x.x.x.x): 56 data bytes

---x.x.x.x ping statistics ---
1 packets transmitted, 0 packets received, 100% packet loss
+ sleep 20
+ for count in $(seq 1 6)
+ ping -c x.x.x.x
PING x.x.x.x (x.x.x.x): 56 data bytes
64 bytes from x.x.x.x : seq=0 ttl=63 time=0.512 ms

---x.x.x.x ping statistics ---
1 packets transmitted, 1 packets received, 0% packet loss
round-trip min/avg/max = 0.512/0.512/0.512 ms
+ configured=1
+ break
+ '[' 1 -eq 0 ']'
+ set -e
+ tmpiso=/tmp/cdrom.iso
+ echo 'Fetching http://x.x.x.x/iso/DCApps/ND/nd-dk9.3.2.2f.iso to /tmp/cdrom.iso'
Fetching http://x.x.x.x/iso/DCApps/ND/nd-dk9.3.2.2f.iso to /tmp/cdrom.iso >> started fetching the apic image from HTTP server
+ '[' http = nfs: ']'
+ download http://x.x.x.x/iso/DCApps/ND/nd-dk9.3.2.2f.iso /tmp/cdrom.iso
+ local url=http://x.x.x.x/iso/DCApps/ND/nd-dk9.3.2.2f.iso dest=/tmp/cdrom.iso tries=5
+ wget --server-response --no-check-certificate --tries=5 --progress=dot:mega --read-timeout=60 --output-document=/tmp/cdrom.iso.tmp http://x.x.x.x197.204.4/iso/DCApps/ND/nd-dk9.3.2.2f.iso
--2025-08-12 09:39:08-- http://x.x.x.x197.204.4/iso/DCApps/ND/nd-dk9.3.2.2f.iso
Connecting to x.x.x.x:80... connected.
HTTP request sent, awaiting response...
HTTP/1.1 200 OK
Date: Tue, 12 Aug 2025 09:39:09 GMT
Server: Apache/2.4.6 (CentOS) OpenSSL/1.0.2k-fips mod_wsgi/3.4 Python/2.7.5
Last-Modified: Tue, 10 Jun 2025 06:51:41 GMT
ETag: "2c66bd000-6373220f3b940"
Accept-Ranges: bytes
Content-Length: 11918888960
Keep-Alive: timeout=5, max=100
Connection: Keep-Alive
Content-Type: application/octet-stream
Length: 11918888960 (11G) [application/octet-stream]
Saving to: '/tmp/cdrom.iso.tmp'
If you selected the wrong interface then the packet loss will be 100% then after three fail attempts of ping it will again ask to select the correct interface.
For Example: After Entering the wrong interface with 100% Packet loss.
+ read -p 'Interface to configure: ' interface
Interface to configure: enp11s0
+ read -p 'address: ' addr
address: x.x.x.x/24
+ read -p 'gateway: ' gw
gateway: x.x.x.x
+ ip addr add x.x.x.x/24 dev enp11s0
+ ip link set enp11s0 up
+ ip route add default via x.x.x.x
++ seq 1 2
+ for count in '$(seq 1 2)'
+ ping -c 1 x.x.x.x
PING x.x.x.x (x.x.x.x) 56(84) bytes of data.
From x.x.x.x icmp_seq=1 Destination Host Unreachable

--- x.x.x.x ping statistics ---
1 packets transmitted, 0 received, +1 errors, 100% packet loss, time 0ms

+ sleep 20
+ for count in '$(seq 1 2)'
+ ping -c 1 x.x.x.x
PING x.x.x.x (x.x.x.x) 56(84) bytes of data.
From x.x.x.x icmp_seq=1 Destination Host Unreachable

--- x.x.x.x ping statistics ---
1 packets transmitted, 0 received, +1 errors, 100% packet loss, time 0ms

+ sleep 20
+ '[' 0 -eq 0 ']'
+ echo 'Configuring network interface'
Configuring network interface
+ echo 'type static, dhcp, bash for a shell to configure networking, or url to re-enter the url: ' <<Asking again to select the interface after selecting the type i,e static >>
type static, dhcp, bash for a shell to configure networking, or url to re-enter the url:
+ read -p '? ' ntype
?
Keep Monitor the CIMC CLI and wait for approx. 40-50 Min , you will get following output on cli.
+ log 'Shutting down Atomix Installer'
+ echo 'Shutting down Atomix Installer'
Shutting down Atomix Installer
+ log 'reboot: Power down'
+ echo 'reboot: Power down'
reboot: Power down
+ sleep 5
+ poweroff
+ ec[  533.195532] sysrq: Emergency Sync
ho s
[  533.195563] sysrq: Emergency Sync
[  533.212106] sysrq: Emergency Sync
[  533.212117] sysrq: Emergency Remount R/O
[  533.212189] sysrq: Power Off
[  533.212226] kvm: exiting hardware virtualization
[  533.213874] EXT4-fs (sdf1): re-mounted. Opts: (null). Quota mode: none.
[  533.215431] sd 1:0:0:0: [sdf] Synchronizing SCSI cache
[  533.215749] EXT4-fs (dm-3): re-mounted. Opts: (null). Quota mode: none.
[  533.216395] EXT4-fs (dm-1): re-mounted. Opts: (null). Quota mode: none.
[  533.217221] EXT4-fs (sdf6): re-mounted. Opts: (null). Quota mode: none.
[  533.217689] EXT4-fs (sdf4): re-mounted. Opts: (null). Quota mode: none.
[  533.218965] Emergency Remount complete
[  533.218997] Emergency Sync complete
[  533.218997] Emergency Sync complete
[  533.219002] Emergency Sync complete
[  533.359024] sd 1:0:0:0: [sdf] Stopping disk
+ echo s
+ echo s
+ echo u
+ echo o
+ log 'Nap time'
+ echo 'Nap time'
Nap time
+ true
+ sleep 60
[  535.571545] megaraid_sas 0000:41:00.0: megasas_disable_intr_fusion is called outbound_intr_mask:0x40000009
[  535.692202] ACPI: PM: Preparing to enter system sleep state S5
[  535.706849] reboot: Power down
Step 9. Exit SOL After Power Off
Wait until you see the message poweroff in the SOL console, then exit from SOL by pressing Ctrl and x (Ctrl+x) and login to CIMC again and change the scope again.
(i) Change the scope to virtual media again:
system# scope vmedia
system /vmedia #
(ii) Unmap the .iso image that you mapped in 2.c:
 system /vmedia # unmap volume_name
 At the Save mapping prompt, enter yes if you want to save the mapping or no if you do not want to save the mapping. For example:
 system /vmedia # unmap apic
 Save mapping? Enther 'yes' or 'no' to confirm (CTRL-C to cancel) → yes
 system /vmedia #
(iii) Connect back to SOL again:
 system /vmedia #  connect host
After powering down, you need to power the system back up using the KVM, and then proceed with the next steps.
Step x.x.x.x First-boot setup
[  274.210045] nd_bootstrap.sh[2628]:   INFO[0174] bootDisk: found disk=/dev/sdf bootPart=/dev/sdf4 espPart=/dev/sdf3
[  274.224041] nd_bootstrap.sh[2628]:   INFO[0174] boot devices/filesystems have been mounted
[  274.236038] nd_bootstrap.sh[2628]:   INFO[0174] |12231-start| ["expand-stub.bash" "/boot/efi/EFI/atx-current/kernel.efi"]
[  274.251228] nd_bootstrap.sh[2628]:   INFO[0174] |12231-out  | 21870+1 records in
[  274.262061] nd_bootstrap.sh[2628]:   INFO[0174] |12231-out  | 21870+1 records out
[  274.272065] nd_bootstrap.sh[2628]:   INFO[0174] |12231-out  | 11197856 bytes (11 MB, 11 MiB) copied, 0.0716082 s, 156 MB/s
[  274.287060] nd_bootstrap.sh[2628]:   INFO[0174] |12231-out  | 0+1 records in
[  274.297060] nd_bootstrap.sh[2628]:   INFO[0174] |12231-out  | 0+1 records out
[  274.307049] nd_bootstrap.sh[2628]:   INFO[0174] |12231-out  | 187 bytes copied, 7.2325e-05 s, 2.6 MB/s
[  274.566030] nd_bootstrap.sh[2628]:   INFO[0175] |12231-out  | 102375+1 records in
[  274.576055] nd_bootstrap.sh[2628]:   INFO[0175] |12231-out  | 102375+1 records out
[  274.588059] nd_bootstrap.sh[2628]:   INFO[0175] |12231-out  | 52416297 bytes (52 MB, 50 MiB) copied, 0.329377 s, 159 MB/s
[  274.604075] nd_bootstrap.sh[2628]:   INFO[0175] |12231-out  | 0+1 records in
[  OK  ] Finished atomix-boot-setup.
[  274.615055] nd_bootstrap.sh[2628]:   INFO[0175] |12231-out  | 0+1 records out
Starting Initial cloud-init job (pre-networking)...
[  274.634046] nd_bootstrap.sh[2628]:   INFO[0175] |12231-out  | 82 bytes copied, 9.4287e-05 s, 870 kB/s
[  274.656064] nd_bootstrap.sh[2628]:   INFO[0175] |12231-exit | rc=0
[  274.666047] nd_bootstrap.sh[2628]:   INFO[0175] Boot()                    duration=175321
[  274.837851] cloud-init[12253]: Cloud-init v. 24.1.3-0ubuntu1~22.04.5 running 'init-local' at Tue, 12 Aug 2025 09:53:39 +0000. Up 274.82 seconds.
Press any key to run first-boot setup on this console...
Starting Nexus Dashboard setup utility
Welcome to Nexus Dashboard 3.2.2f
Press Enter to manually bootstrap your first master node..
Step 11. Configure Admin Password and Management Network of the Nexus Dashboard management interface
Starting Nexus Dashboard setup utility
Welcome to Nexus Dashboard 3.2.2f
Press Enter to manually bootstrap your first master node...

Admin Password:
Reenter Admin Password:
Management Network:
  IP Address/Mask: x.x.x.x/24
  Gateway: x.x.x.x
Re-enter config?(y/N): N
System configured successfully
Initializing System on first boot. Please wait..
[  OK  ] Listening on Network Service Netlink Socket.
[  OK  ] Finished Initial cloud-init job (pre-networking).
[  OK  ] Reached target Preparation for Network.
         Starting Network Configuration...
[  OK  ] Started Network Configuration.
[  OK  ] Reached target Network.
Starting Wait for Network to be Configured...
Step 12. Nexus Dashboard Node is ready for Login. You can login to the ND GUI using the management interface IP for the rest of the configuration
From Console :
Ubuntu 22.04.4 LTS localhost ttyS0
# # #### # # # # ##### ##### # ##### # # ##### ### # ##### #####
# # # # # # # # # # # # # # # # # # # # # # # # # #
# # # ### # # # ##### # # ##### ##### ##### ##### # # ##### ##### # #
# # # # # # # # # # # # # # # # # # # # # # # # #
# # #### # # #### ##### ##### # # ##### # # ##### ### # # # # #####
System initialized successfully
[ 564.309561] cloud-init[12560]: Cloud-init v. 24.1.3-0ubuntu1~22.04.5 running 'modules:final' at Tue, 12 Aug 2025 09:58:28 +0000. Up 564.27 seconds.
ci-info: no authorized SSH keys fingerprints found for user ubuntu.
<14>Aug 12 09:58:29 cloud-init: #############################################################
<14>Aug 12 09:58:29 cloud-init: -----BEGIN SSH HOST KEY FINGERPRINTS-----
<14>Aug 12 09:58:29 cloud-init: 256 SHA256:vKu7Zj3MAP+vFOXaeW14HClEhAwrSpA9AqcUC4SZVlU root@localhost (ECDSA)
<14>Aug 12 09:58:29 cloud-init: 256 SHA256:I7eiUnQq6pZsoFPy+UxIUQ66jQOgHyG4zGuF6cAtSl0 root@localhost (ED25519)
<14>Aug 12 09:58:29 cloud-init: 3072 SHA256:SvodRIEgWzEAaQQdH2rlw0qLziBbv0e88VAGkt/ox14 root@localhost (RSA)
<14>Aug 12 09:58:29 cloud-init: -----END SSH HOST KEY FINGERPRINTS-----
<14>Aug 12 09:58:29 cloud-init: #############################################################
-----BEGIN SSH HOST KEY KEYS-----
ecdsa-sha2-nistp256 AAAAE2VjZHNhLXNoYTItbmlzdHAyNTYAAAAIbmlzdHAyNTYAAABBBBf9S1BXcR48cWcIKhvfjLGYufJgycGIf1Yx8OpRsk4e1I+y80J/x5dfX90h+3cwt9kjH8IubMpleK66mlW+xd0= root@localhost
ssh-ed25519 AAAAC3NzaC1lZDI1NTE5AAAAIGWTN7hoB2/dYSVA0gpV88FWh2iRD2hwJ2LMryhhhQHg root@localhost
ssh-rsa AAAAB3NzaC1yc2EAAAADAQABAAABgQCeM+In/dciDwCKEPLV/97oIA5pHHRBRf0Lij5NcUwzYAf9q/m/lUsdzv2zVYc4WAJd8uX9ZxDAGa9D358Tvxh/lKzBKqNQpQdAjyby6IGGui+UK9Mq1RVxoUkFtIIJ97IzaBoR9ScnucMXpu5mp5OAjws+VrUhKk1XNFAui1QgW507I0Xk+2AaR/W0rwJCQRsHx3orDxCwJkDQDiQQAf/SrvSnuAe/8pSuCuvscqPjZeIF7LnJ6dAms0XXrhbxRQ8c4q/Ud6RL2sKjinlZPfqsbVFSpjbJ9m4jtXvuGE5llyJbS1FcU8DsFbkY6HH9JQru49iXcd5mKt7fyPg0ypp7Hl+2g07mEcYlEMBXxNZw+HqNW27xp0ZkRfWO+Zl2t0s6DjM0LHWqV0wZLYqqBTlQIkhf2irM6mr7s2bVAcvEsuZzG9d7uY8aC/CR5GwkgKW8s4oI7m56ccdRPHV0qQFXnBybBToUInmIK+1fxtaUXYbQbQ83wxNOvG7O55gDsws= root@localhost
-----END SSH HOST KEY KEYS-----
[ 564.364630] cloud-init[12560]: Cloud-init v. 24.1.3-0ubuntu1~22.04.5 finished at Tue, 12 Aug 2025 09:58:29 +0000. Datasource DataSourceAtomix [sources=/var/lib/cloud/seed/atomix][dsmode=net]. Up 564.36 seconds
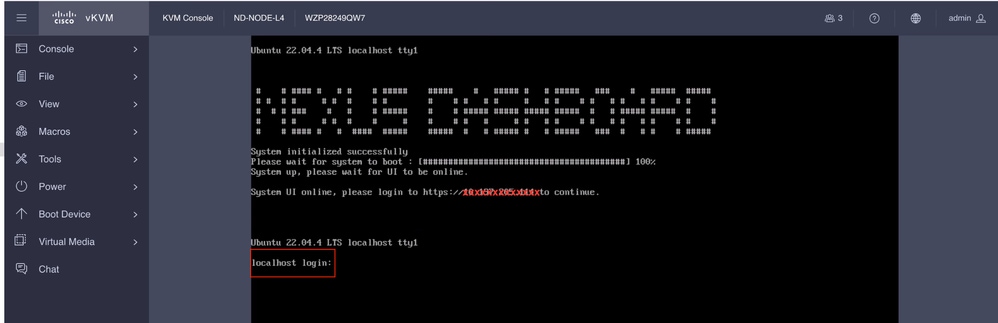
Please wait for system to boot : [########################################] 100%
System up, please wait for UI to be online.
System UI online, please login to https://x.x.x.x to continue. << Access the Nexus Dashboard GUI via this URL >>
Ubuntu 22.04.4 LTS localhost ttyS0
localhost login:
From KVM :
Revision History
| Revision | Publish Date | Comments |
|---|---|---|
1.0 |
29-Aug-2025
|
Initial Release |
Contributed by Cisco Engineers
- Shivam TripathiTAC
 Feedback
Contact Cisco
- Open a Support Case

- (Requires a Cisco Service Contract)