Managing Custom Reference Data

Custom Reference Data Overview

Custom reference data is data specific to a service provider and provides a way to create their own data tables and to populate them. It adds variations of existing use cases configured in Policy Builder.


Note

All Policy Servers (qns) must be restarted after a CRD table schema is modified (for example, column added/removed).


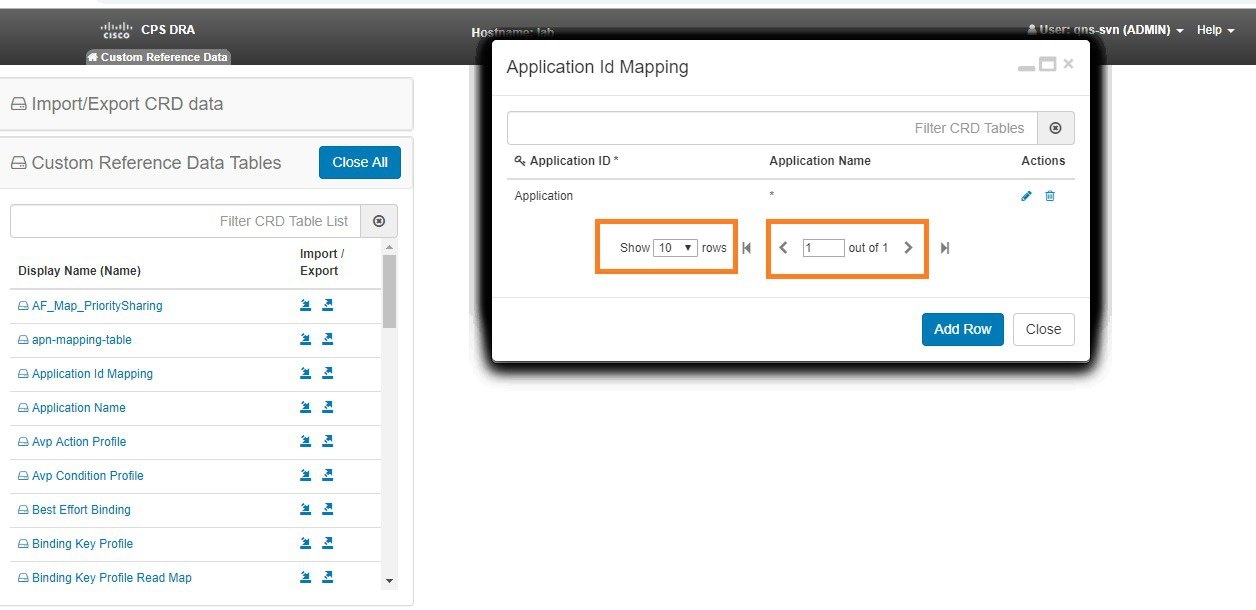
CRD also supports the pagination component in which the data is displayed according to the number of rows configured per page. You can change the number of rows to be displayed per page. Once you set the value for rows per page, the same value is used across the Central unless you change it. Also, you can navigate to other pages using the arrows.

Import And Export CRD Data

The Import/Export CRD data option enables you to perform the following operations:

  • Enables users to export the CRD data packaged in .crd file

  • Enables users to import the CRD tables in a CSV format

A valid imported file should follow CRD schema and should have all required files.

Export Custom Reference Data

Perform the following steps to export CRD data:

Procedure


Step 1

Log in to the CPS Central.

Step 2

Click Custom Reference Data.

Step 3

Click Import/Export CRD Data.

Under Export Custom Reference Data, the following options are displayed:

  • Use 'zip' file extension. Enables easier viewing of export contents for advanced users.

  • Export CRD to Golden Repository. When system is in BAD state then crd cache will be built by using golden-crd data.


Export CRD in Zip File

Procedure

Step 1

Select Use 'zip' file extension check box to export contents of the CRD table in a csv format in zip file.

Step 2

Click Export. The zip file pops up and lets you save or open the file.

Step 3

Click Save File.

Step 4

Click OK.


Export CRD to Repository

Procedure

Step 1

Select Export CRD to Golden Repository check box to export CRD to golden repository which can be used to restore cust_ref_data in case of error scenario(s). A new input text box is displayed.

Step 2

Add a hostname or IP address to push CRD to repository. You can add multiple hostnames or IP addresses by clicking on the plus sign.

Note 

During adding of SVN destination, you can complete the entry by clicking on the button with the plus sign or pressing Enter. Upon completing the entry, the input is validated. If the input is invalid, it is rejected and an error message is displayed. Valid entries are stored in chronological order of entry, into separate input fields which are disabled. If you choose not to have a particular SVN destination, you can delete the entry by clicking the delete sign.

Step 3

Click Export to push the CRD to golden-crd svn location. A success message is displayed.

In case of exceptions, error response message is sent to client with response code as “500”.


Export CRD using CLI

You can execute the following curl command to export existing CRD data into SVN.

curl -s -S -k -u <username>:<password>-H Content-Type:application/json -X 
GET https://<server-ip>:<port>/proxy/custrefdata/_export?goldenCrdSvnUrl=<SVN_HOST>

After sucessful curl command execution , CRD data is pushed to golden-crd location and success response is sent to client in JSON format.

{"statusCode" : "200","message":"Golden CRD exported sucessfully"}

You can provide different SVN locations with comma separated. goldenCrdHost must contains only valid IPv4 address or a hostname. On executing curl command with multiple SVN locations is validated. If goldenCrdHost is invalid, it is rejected and an error message is sent to client.

{"statusCode" : "500","message":" goldenCrdHost must contains only valid IPv4 address or a hostname"}

In case of any other exceptions, error response message is sent to client with response code as “500”.

Manually Pushing CRD

You can also push CRD to golden_crd SVN location. You can download CRD data from Control Center or PB Central then extract the zip/crd archive file.%;

Create a .metadata file in same CRD extracted directory and add crdversion into .metadata file. You can get CRD version from cust_ref_data collections from MongoDB.

crdversion=MONGO_CRD_VERSION

You can push all the contents from CRD extracted directory to Golden CRD SVN location (http://<IP | Hostname>/repos/golden-crd.

Push all the contents using SVN Import command from CRD extracted directory using the following command:

svn import http://<IP | Hostname>/repos/golden-crd -m “pushing golden-crd manually”

Import Custom Reference Data

Perform the following steps to import CRD tables:

Procedure


Step 1

Log in to the CPS Central.

Step 2

Click Custom Reference Data.

Step 3

Select File to Import…

The File Upload dialog box is displayed from where you can select a file to be imported.

Step 4

Click Import.

Note 

A warning message is displayed in the success modal for bulk import of CRD tables when the archive file to import has CRD tables with Svn Crd Data flag enabled.


View Custom Reference Data Tables

Custom Reference Data Tables section lists the custom reference data (CRD) tables in an alphabetic order along with its description.

You can select a CRD table from the displayed list and view its data. The search filter is added to support full and partial string match.

A key icon is displayed before the column name of the selected CRD tables. This provides the following information:

  • Indicates whether the column in the selected CRD table is a key column or non-key column.

  • Indicates the type of Runtime Binding and its value in a tooltip when you hover over it.

The following operations can be performed:

  • Add a record to the table

  • Edit record of the table

  • Delete a record of the table

The results are paginated for easy access and scrollbars can be used when there are more number of columns.


Note

The edit, delete and add options are disabled for CRD tables with Svn Crd Data flag enabled.


View Multiple CRD Tables

Procedure


Step 1

Navigate to Custom Reference Data.

Step 2

In the left-hand pane, select CRD tables listed under Display Name.

The tables are displayed on the right-hand side. You can drag and resize the tables horizontally.

Step 3

Click Close.

Note 
  • By default the Custom Reference Data Tables tab is expanded. Only one of the panels can be expanded at a time. For example, when the Import/Export CRD data tab is expanded, the Custom Reference Data Tables tab is closed and vice versa.

  • You can use the scroll bar to view records in a large CRD table.

  • You can use the Add Row option to enter records.

  • You can use the Close option to close a CRD table.

  • You can click Close All option to close multiple tables.


Edit Multiple CRD Tables

Procedure


Step 1

Navigate to Custom Reference Data.

Step 2

In the left-hand pane, select CRD tables listed under Display Name.

The tables are displayed on the right-hand side.

  1. To modify record values, click edit icon. A CRD record modal popup is displayed.

  2. To enter record values, click Add Row.

  3. To delete records, click delete icon.

Step 3

Click Done.

Step 4

Click Close.

Note 
  • You can edit only one CRD table at a time.

  • The SVN CRD tables have only read only option.

  • You can click Close All option to close multiple tables.


Import Custom Reference Data Table

Perform the following steps to import a custom reference data table:

Procedure


Step 1

In CPS Central, navigate to Custom Reference Data.

Step 2

Select any CRD table.

Step 3

Click the Import option provided against the selected CRD table.

The File to Import dialog box is displayed from where you can select a file to be imported.

Note 

The import link is disabled for CRD tables with Svn Crd Data flag enabled.

Step 4

Select a file.

Step 5

After the file is loaded, Click Import.

Note 
  1. The selected file should be of XLS or CSV format.

  2. The name of the selected file should match that of the CRD table name.

  3. If you try to import data with wrong headers, "Mismatch found between imported csv headers and policy builder table columns" error message is displayed.

  4. If you try to import data having duplicate records, "Duplicate rows found in the imported data for table: (table_name). Duplicate records count: (duplicate_count)? error message is displayed.

  5. If you try to import multiple CRD tables during traffic it may have call flow impact. It is recommended to import multiple CRD tables during maintenance window.

Data Imported success message is displayed.