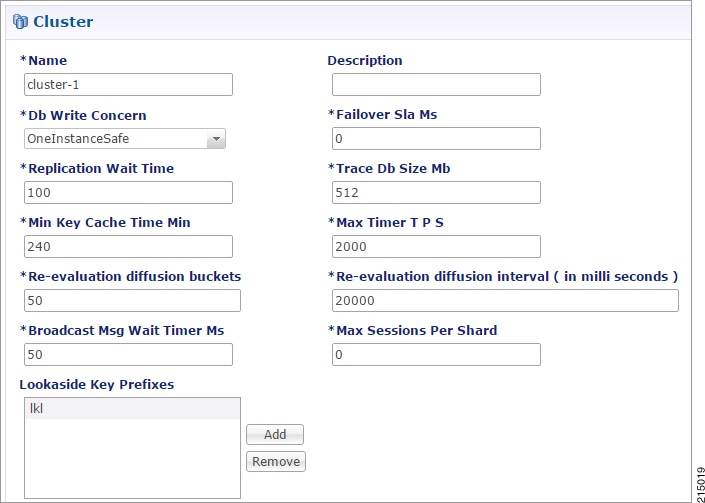
Basic Systems Configuration

Overview

The Cisco Policy Suite provides the Policy Builder as an interface for policy management. Policies translate a Service Provider’s business rules into actionable, logical processing methods that the Cisco Policy Suite enforces on the network.

The Cisco Policy Suite ships with some standard base policies that serve as a starting point for customization to suit a Service Provider's specific business rules.

Policy Builder Repository Configuration

This section covers the following topics:

The Policy Builder uses a Subversion version control repository to store the configuration data created in the UI. The data entered in the UI is translated into XML (Eclipse Modeling Framework xmi files) when saved.

As work is done in the UI, changes are saved to a temporary directory on the pcrfclient01. (The directory is specified in the Repository configuration dialog.) Therefore, you can log out and back in and the latest changes will remain. However, if someone else makes a change and commits, then your local changes are lost.

There are two options for saving configuration changes:

  • Publish to Runtime

  • Save to Client Repository

When saving to the client repository, the configuration is pushed to Subversion, but it is saved in a client only repository and not copied over to the runtime environment repository. If you 'Publish to Runtime', the configuration is saved to the client repository and also copied to the runtime environment repository. The CPS servers check the runtime environment repository for changes and will update automatically when changes are committed.

Best Practices

Typically, publishing configuration changes to a lab environment to run tests is best. And then when satisfied with the test results, you can publish the new configuration to a production environment.

Revert

As Subversion is a source code tracking repository, each version of a configuration is numbered and stored in the Subversion repository history. Therefore, it is also possible to revert to any version of a configuration. The Policy Builder does not have a way to do this via the GUI, but using the Subversion command line tools, any version of the configuration can be made the current revision. For more information, refer to Subversion documentation for how to use the command line tools.

Default Repositories

The CPS deployment installs Subversion and creates a default client and runtime repository. The Subversion repositories are synced using Subversion's Master/Slave replication between the pcrfclient01 and pcrfclient02 nodes.

  • Client - http://pcrfclient01/repos/configuration

  • Runtime - http://pcrfclient01/repos/run

The Policy Builder start screen shows a dialog that lets you define repositories and choose a repository to check out for editing. A repository definition named “Repository” is installed by default and uses the default client repository (http://pcrfclient01/repos/configuration). The default PB user (qns-svn) with the default password is also setup.

Figure 1. Choose Policy Builder Data


Adding a Client Repository Definition

Procedure


Step 1

Start Cisco Policy Builder.

Step 2

In the Choose Policy Builder data repository ... dialog box, select Add New Repository from the drop-down list.

Figure 2. Adding a New Repository Definition


The Repository dialog box appears.
Figure 3. Repository Configuration Fields


The following parameters can be configured under Repository:

Configure the parameters according to the network requirements.

Table 1. Repository Parameters

Parameter

Description

Name

This required field uniquely identifies your repository's site with a name.

Note 

We recommend the following format for naming repositories: customername_project_date, where underscores are used to separate customer name, project and date. Date can be entered in the format: MMDDYYYY.

Username and Password

Enter a username that is configured to view Policy Builder data. The password can be saved for faster access, but it is less secure. A password, used with the Username, permits, or denies access to make changes to the repository.

Save Password

Select this check box to save the password on the local hard drive. This password is encrypted and saved as a cookie on the server.

Url

You can have several branches in the version control software to save different versions of configuration data. Create a branch in the version control software before assigning it in this screen.

Enter the URL of the branch of the version control software server that is used to check-in this version of the data.

Local Directory

This value do not need to be changed.

This is the location on the hard drive where the Policy Builder configuration objects are stored in version control.

When you click either Publish or Save to Repository, the data is saved from this directory to the version control application specified in the Url text field.

The field supports the following characrters:
  • Uppercase: A to Z

  • Lowercase: a to z

  • Digits: 1 to 9

  • Non-alphanumeric: /

Note 
The user needs to provide the specified characters above.

Validate on Close

Select this check box to see if the values for Username, Password, or the URL are legitimate and unique. If not, the screen displays an error message and provides a chance to correct the errors.

Remove

Removes the display of the repository in Cisco Policy Builder.

Note 

The remove link here does not delete any data at that URL. The local directory is deleted.

Step 3

Click OK to save your work to the local directory.

Note 

When your change screens, Cisco Policy Builder automatically saves your work. Cisco recommends saving your work to the local directory by clicking on the diskette icon on the Policy Builder GUI or CTRL-S on the keyboard.

Step 4

If you are ready to commit these changes to the version control software, select File > Save to Client Repository on the Policy Builder home screen.


Editing a Client Repository Definition

Use this procedure to change any of the following details of client repository:

  • Client repository name

  • Username, password, and password save mechanism

  • Client repository temporary save URL

  • Client repository local directory save file path

Procedure


Step 1

Open a browser and enter the URL of the Cisco Policy Builder.

Step 2

Use the drop-down list in the Choose Policy Builder data repository... dialog box to select the desired repository.

Step 3

Click the Edit button.

Step 4

In the Repository dialog box, make the required changes.

Step 5

Click OK to save the changes to the repository definition.


Removing a Client Repository Definition

This procedure removes a repository from Cisco Policy Builder. This procedure does not delete the actual Subversion repository, just the definition for access in the Policy Builder.

Procedure


Step 1

Open a browser and enter the URL of the Cisco Policy Builder.

Step 2

Use the drop-down list in the Choose Policy Builder data... dialog box to select the desired repository.

Step 3

Click Remove. A confirmation dialog box appears.

Step 4

Click OK to delete the repository.


Saving Policy Builder Configuration Data to a Client Repository

Procedure


Step 1

Open a browser and enter the URL of the Cisco Policy Builder.

Step 2

Use the drop-down list on the Choose Policy Builder data... dialog box to select the desired repository.

Step 3

Click OK to open the Policy Builder GUI.

Step 4

Make the necessary modifications in the Policy Builder.

Step 5

To save the modifications done, select File > Save to Client Repository, or click the diskette icon on the Policy Builder GUI or use CTRL-S on the keyboard.

Step 6

Enter a commit message for the modifications done.

Step 7

Click OK. The modified configurations are saved to the client repository for later updating and publishing to the runtime environment.


Auto Save Policy Builder Configuration Changes

Procedure

Step 1

Open a browser and enter the URL of the Cisco Policy Builder.

Step 2

Use the drop-down list on the Choose Policy Builder data... dialog box to select the desired repository.

Step 3

Click OK to open the Policy Builder GUI.

Step 4

Make changes to configuration data as necessary. For example, if you move from configuration to another configuration without saving the changes, a pop-up Are you sure? dialog box for saving the changes is displayed.

Step 5

Click Yes to save the changes. If you want to disable this notification, click Tools > Preferences. This opens Preferences window.

Figure 4. Preferences


Step 6

Check Expert Mode (silently auto-save changes) flag to enable auto-save option.

Note 

By default, the flag is not checked. You have to check it in order to turn off the Are you sure? save prompt.

Figure 5. Are you sure?


If the flag is not checked, the following options are displayed when updating/creating/copying an object:
  • Updating an Object: While updating an object the PB asks Do you want to save this object? with option buttons as OK and Cancel. If you click OK, the data being worked on is saved and if you click Cancel, the data being worked on is not saved to the repository.

  • Creating an Object: While creating an object the PB asks Are you sure you want to create this object? with option buttons as OK and Cancel. If you click OK, the new object is created with the default values and if you click Cancel, the object is not created.

  • Copying an Object: While copying an object the PB asks Are you sure you want to copy this object? with option buttons as OK and Cancel. If you click OK, the object is copied and if you click Cancel, the object is not copied.

  • This prompt is also displayed for File menu options when you use Publish to Runtime Environment or Save to Client Repository....

Step 7

Once flag is checked, click Apply and OK to save the changes.


Publishing the Client Repository

To put changes into effect and have the Cisco Policy Builder server recognize the configuration changes made in your client session, use the Publish option and save the changes to the server repository.


Note

To save the practice version, publish the client repository to the server. This is the version the server uses for production.


Do not publish to the Policy Builder unless you are completely satisfied with the configuration data in your client repository.

  • Use the Policy Builder interface to either commit or set up a commit repository.

  • Verify your work either by going to a web browser or by looking at the config.properties file.

  • Unpublish with an SVN delete and restore.

When you are ready to put your Policy Builder changes into production, you need to publish them to Subversion. This preserves version history.

CPS supports to save the unpublished commit messages in a property file into the file system. This file is saved in the user directory under the selected repository location. For different users, Policy Builder will generate different property files.

Policy Builder saves the unpublished commit messages into the file system for the following cases:

  • When loading Publish dialog box (File > Publish to Runtime Environment…) then saved commit message, if any, appears for that user in Commit Message pane.

  • While publishing the policy configuration, if publish fails then the entered commit message is saved into the file system.

  • While publishing the policy configuration, if publish succeeds then remove the message from file for the logged in user.

  • If you click Cancel on Publish dialog box then the entered commit message is saved into the file system.

  • If you click Cross (x) on Publish dialog box then the entered commit message is saved into the file system.

  • When loading Saving to Repository dialog box (File > Save to Client Repository…) then saved commit message, if any, appears for that user in Commit Message pane.

  • While saving to client repository, if operation fails then the entered commit message is saved into the file system.

  • While saving to client repository, if operation succeeds then remove the message from file for the logged in user.

  • If you click Cancel on Saving to Repository dialog box then the entered commit message is saved into the file system.

  • If you click Cross (x) on Saving to Repository dialog box then the entered commit message is saved into the file system.

Procedure


Step 1

To publish in Cisco Policy Builder, select File > Publish to Runtime Environment. The Publish dialog box appears.

Figure 6. Publishing to the Runtime Environment


Step 2

If you have already set up the repository to publish to, just enter a commit message.

Step 3

If you have not set up the repository, select Add New Repository from the Publish to: drop-down list and enter the required details for the new repository. For more information, refer to Adding a Client Repository Definition.

Step 4

Verify the changes to Production repository:

  • All changes are published to Subversion, so they are version-controlled and can be rolled back.

  • To verify a publish as part of a troubleshooting process, take the URL seen in the previous screen and put it into a web browser (you may need to substitute the IP). The password is the same as in Cisco Policy Builder.

  • If a traditional web browser cannot access the system, you can use a command line browser from the CPS VM’s URL.


Error Notification during Publishing

During publishing, if there are any errors, the Publish dialog box will display the list of unresolved errors.


Note

Policy Builder does not report errors for read-only objects.


The errors are created in the session and are updated accordingly as the errors are resolved or are newly introduced with respect to their IDs.

The format of error string is as:

<Object_Name> <Feature_Name> :: <Error_String>

You can select and copy one or more of the errors in the list and paste them into another window (for example, in an email or in a file to mask the acceptable errors).
Figure 7. Publish - Unresolved Errors


If you click OK with any unresolved errors in the list then you are prompted with a confirmation asking if the unresolved errors should be published to the repository.
Figure 8. Publishing with Errors - Override


If you click No, then the publish does not happen.

If you click Yes then the commit message is amended to include a note that you have committed with # errors. For example, “User forced the Publish with 3 unresolved errors: <user's commit message>”.

Masking Errors

You can mask the errors if needed where an error is reported by Policy Builder but can still be loaded by the Policy Server. This allows configuration of CPS so that the specified errors are not displayed and you do not ignore the list of unresolved errors and the real errors are not lost amongst a list of acceptable errors.

The file named maskPublishErrors.txt file is created in the folder /etc/broadhop/pb on Cluster Manager (CM). After creating the file, run build_all.sh from CM to rebuild CPS package and push the changes to each VM. The file is populated with the exact message displayed in the GUI. No wildcarding is allowed (so as to prevent accidentally filtering out important messages). The GUI does not display any messages that are in the maskPublishErrors.txt file. The GUI does not count any messages that are in the maskPublishErrors.txt file. If all of the errors in the list are masked because they are in the file then clicking OK in the Publish dialog will not cause the override dialog to be displayed.

Adding a Runtime Repository Definition

A repository definition named Publish Repository is installed by default and uses the default Runtime repository (http://pcrfclient01/repos/run). The default Policy Builder user (qns-svn) with the default password is also setup. The Runtime repository matches the value setup in the /etc/broadhop/qns.conf file.

The qns.conf file is read by all of the active Policy Server and Policy Director nodes and when the policy server process starts up, it checks out the configuration from the Runtime repository.

Figure 9. Runtime Repository Definition


Procedure


Step 1

Open a browser and enter the URL of the Cisco Policy Builder.

Step 2

Use the drop-down list on the Choose Policy Builder data repository... dialog box to select the desired repository.

Step 3

After selecting the required repository, click OK.

Step 4

Make changes to Policy Configuration data as necessary.

Step 5

Select File > Publish to Runtime Environment....

Step 6

Use the drop-down list to select <Add New Repository>.

The Repository dialog box appears.
Step 7

Enter the necessary values and click OK to save your work.

Step 8

Enter a commit message and click OK to publish to the new repository.


Editing a Runtime Repository Definition

Procedure


Step 1

Open a browser and enter the URL of the Cisco Policy Builder.

Step 2

Use the drop-down list on the Choose Policy Builder data repository... dialog box to select the desired repository.

Step 3

After selecting the required repository, click OK.

Step 4

Make changes to Policy Configuration data as necessary.

Step 5

Select File > Publish to Runtime Environment....

Step 6

Use the drop-down list to select the desired repository.

Step 7

In the Repository dialog box, make your changes.

Step 8

Click OK to save the changes to the repository definition.

Step 9

Enter a commit message and click OK to publish to the new repository.


Removing a Runtime Repository Definition

This procedure removes a runtime repository definition from the Cisco Policy Builder. This procedure does not delete the actual Subversion repository, just the definition for access in the Policy Builder.

Procedure


Step 1

Open a browser and enter the URL of the Cisco Policy Builder.

Step 2

Use the drop-down list on the Choose Policy Builder data repository... dialog box to select the desired repository.

Step 3

After selecting the required repository, click OK.

Step 4

Make changes to Policy Configuration data as necessary.

Step 5

Select File > Publish to Runtime Environment....

Step 6

Use the drop-down list to select the desired repository.

Step 7

Click Remove. A confirmation dialog appears.

Step 8

Click OK to delete the repository.

Step 9

Click Cancel to close the dialog box.


Saving Policy Builder Configuration Data to a Runtime Repository

Procedure


Step 1

Open a browser and enter the URL of the Cisco Policy Builder.

Step 2

Use the drop-down list in the Choose Policy Builder data repository... dialog box to select the desired repository.

Step 3

After selecting the required repository, click OK.

Step 4

Make changes to Policy Configuration data as necessary.

Step 5

Select File > Publish to Runtime Environment....

Step 6

Use the drop-down list to select the desired repository.

Step 7

Enter a commit message.

Step 8

Click OK. The data will be saved to the client repository for later updating and publish to the runtime environment.


Switching to a Different Client Repository

You may have several variations of your client repository. One may reflect the configuration currently published to the server. Another might be developed for test purposes.

There are two ways to switch to a different repository:

  • File > Switch Repository...

  • File > Exit: You can select the required repository from Choose Policy Builder data repository... dialog box.

Reverting Changes

There are two main SVN repositories (repos) in the system.

  • Repository publish which contains ONLY the currently running set of policies.

  • Runtime repository which contains a copy of the currently running set of policies along with copies of all previous sets.

To rollback Policy Builder changes, there are two methods:

  • Rollback the configuration repository Policy Builder and then perform a publish as described in Unpublished Changes.

  • Rollback the runtime repository Policy Builder uses and the configuration repository Policy Builder uses.

    For more information, refer to Published Changes.

Unpublished Changes

If you do not want to save the changes, click the Revert link on the Policy Builder start window. All changes that have not been committed to a repository will be removed.

Procedure

Step 1

Open a browser and enter the URL of the Cisco Policy Builder.

Step 2

Use the drop-down list in the Choose Policy Builder data repository... dialog box to select the desired repository.

Step 3

Click the Revert link. A confirmation dialog appears.

The Revert link is only available if there are uncommitted local changes.

Step 4

Click OK to revert changes to the repository definition.


Published Changes

Procedure

Step 1

Check the configuration repository name Policy Builder uses (config_repo). To check the name, use the following steps:

  1. Open a browser and enter the URL of the Cisco Policy Builder.

  2. In the Choose Policy Builder data repository... dialog box, click Edit.

    Figure 10. Choose Policy Builder Data Repository


  3. In the Repository dialog box, look at the contents of the Url field to see the repository name used by the Policy Builder. For example, it is configuration.

    Figure 11. Repository


  4. Record the Policy Builder repository name (config_repo). For example, it is configuration.

Step 2

To locate the ‘r’ number in the repository used by Policy Builder, execute the following command:

svn log http://pcrfclient01/repos/<config_repo> | more

The <config_repo> value comes from Step 1.d.

The following is an example of the svn log command, where <config_repo> is configuration as shown in Step 1.d.

svn log http://pcrfclient01/repos/configuration | more
------------------------------------------------------------------------
r367 | qns-svn | 2015-06-18 12:15:34 -0600 (Thu, 18 Jun 2015) | 1 line
second try
------------------------------------------------------------------------
r364 | qns-svn | 2015-06-17 15:46:19 -0600 (Wed, 17 Jun 2015) | 1 line
corrected java issue
------------------------------------------------------------------------
r361 | qns-svn | 2015-06-16 15:38:28 -0600 (Tue, 16 Jun 2015) | 1 line

Added new Policies
------------------------------------------------------------------------
r358 | qns-svn | 2015-06-16 15:06:57 -0600 (Tue, 16 Jun 2015) | 1 line
""
------------------------------------------------------------------------
r355 | qns-svn | 2015-06-16 14:58:41 -0600 (Tue, 16 Jun 2015) | 1 line
""
------------------------------------------------------------------------
r352 | qns-svn | 2015-06-16 14:52:29 -0600 (Tue, 16 Jun 2015) | 1 line
  1. In the example above, the comment we are looking for is in r361 which is the ‘r’ number we want to rollback to.

  2. Record the config_repo ‘r_number’. In this example, it is r361.

Step 3

Execute the following command to delete the current version from the configuration repository Policy Builder uses:

svn delete http://pcrfclient01/repos/<config_repo> -m ‘deleting for rollback’

Use the <config_repo> value from Step 1.d.

The following is an example of the svn delete command where <config_repo> is configuration.

svn delete http://pcrfclient01/repos/configuration -m ‘deleting for rollback’

Step 4

Execute the following command to restore the Policy Builder configuration repository to a previous version.

svn cp http://pcrfclient01/repos/<config_repo>@<r_number> http://pcrfclient01/repos/<config_repo> -m ‘rolling back to <r_number>’

The <r_number> value is from Step 2.a and the <config_repo> value is from Step 1.d. The ‘-m’ option should be used to add a comment indicating what is being done.

The following is an example of the svn copy command with the <r_number> set to 361 and the <config_repo> set to configuration:

svn cp http://pcrfclient01/repos/configuration@361 http://pcrfclient01/repos/configuration -m ‘rolling back to 361’
Step 5

Execute the following command to verify if the rollback is successful:

svn log http://pcrfclient01/repos/<config_repo> | more

The <config_repo> value is from Step 1.d.

The following is an example of the svn copy command:

svn log http://pcrfclient01/repos/configuration | more
----------------------------------------------------------------------
r367 | qns-svn | 2015-06-18 12:15:34 -0600 (Thu, 18 Jun 2015) | 1 line
rolling back to 361
-----------------------------------------------------------------------
Note 

The output should have the ‘-m’ option's text entered in Step 4 as the comment.

Step 6

Open Policy Builder and verify the polices to which you have rolled back. Normally the customer should be able to verify the policies in Policy Builder.

Step 7

Perform a publish in Policy Builder and make sure to add a comment indicating that the publish is being done to complete the rollback. For example, “publishing to complete rollback to <r_number>”.


System Configuration

The Systems node in the Reference Data tab represents the Cisco Policy Suite runtime environment as it exists in the network environment.

  • System: There must always be at least one system defined in the Policy Builder. The system represents the customer deployment. In HA, the system represents a set of PCRF clusters that share the same session database. System is used to define any common things across the clusters, such as load balancing, and so on.

  • Cluster: Each system contains one or more clusters - each of which represents a single High-Availability (HA) site environment. A cluster is used for define the configurations related to the blades. A cluster shares the same set of policy directors (that communicates as a group). A customer can take a fully installed PCRF and replicate it to a second cluster.

    Each cluster can contain node instances. A node instance corresponds to a physical node in a deployment cluster such as a session manager or Policy Director (load balancer). It is very rare that a deployed system needs to have node instances configured in the Policy Builder. Configurations flow downhill, meaning that if you define a Plugin Configuration for Unified API at the system level, each cluster and subsequently each instance gets that configuration by default.

    There are two types of clusters: HA and GR. This document discusses HA clusters. For information related to GR clusters, refer to CPS Geographic Redundancy Guide for this release.


    Note

    In an HA environment you should not make any configuration in Cluster node.


Plug-in configuration done at cluster level overrides the same definition at system level. For example, if you configure Custom Reference Data at cluster level, it will override the Custom Reference Data configuration done at system level.

There is a default deployment configuration for mobile. system-1 is the default system name and cluster-1 is the default cluster name.

If a customer wants to change the system name, they need to change it in qns.conf (/etc/broadhop/qns.conf) file also to reflect it in Policy Builder:

-Dcom.broadhop.run.systemId=<system name>

Adding a System

After installation, use this procedure to set up your Cisco Policy Builder by using an example populated with default data. You can change anything that does not apply to your deployment.

Procedure


Step 1

Click the Reference Data tab, and then click the Systems node to display the Systems tree.

Figure 12. Systems Tree


Step 2

Click System... under Create Child: to open the System pane on the right side.

Figure 13. System Pane
Step 3

Fill in the Name field, and provide a description of this system. Enter the rest of the parameters based on your network requirements.

Table 2. System Parameters

Parameter

Description

Name

The name of the CPS system.

Description

Description of this entire system.

Session Expiration Hours

If no messages are received in x hours, the session will be removed.

Note 

The maximum value allowed for this parameter is 590 hours. However, the combination of the number of hours specified for this parameter and the number of minutes specified for the Session Expiration Minutes parameter cannot exceed 35,400 minutes.

Default value is 8.

Session Expiration Minutes

If no messages are received in x minutes, the session will be removed.

Note 

The combined value of Session Expiration Hours multiplied by 60 plus Session Expiration Minutes should not exceed 35,400.

Default value is 0.

Timeout for Unknown Session

Time in minutes hat CPS keeps a session alive after the subscriber logs off. With this, other network entities involved in the session can let the session close gracefully.

Default value is 0.

Timeout For Soft Delete

Determines the time in seconds during which a 'soft delete' session is maintained for a CPS session after session stop.

Default value is 30.

Enable Multi Primary Key

Select this check box to allow two primary keys to be utilized by maintaining a map of each separate primary key and storing the 'true' multi-primary key as a UUID related to the two maps. Changing this setting has a negative performance impact and should only be done at the request of the BU. Recommendation is to keep Enable Multi Primary Key unchecked.

Default is unchecked.

Enable Number Normalization

Select this check box to enable number normalization under system configuration. The following fields are displayed under Number Normalization List:

  • Number Type - Type of IMSI/MSISDN.

  • Number Length - Length of the normalized IMSI/MSISDN.

  • Number Prefix - Prefix to be normalized from the number.

Cluster link

Click this link to create a cluster under this system.

Current System Link

Click this link to make a copy of this system, with its clusters and instances.

Step 4

If the created system needs to be used, then after publishing, the following property needs to be updated in the qns.conf configuration file:

-Dcom.broadhop.run.systemId=<system name>

where <system name> is the system name defined in the previous step.


Soft Delete Session

A soft delete session is an entry in the session database which maintains session data after session stop with an auto-generated unique primary key, but still maintains needed secondary keys. This allows messages which come after session stop to still be processed while also allowing a session with the same primary key to be immediately created. The CPS code determines when soft delete sessions are required and what secondary keys are needed.

Soft Delete Example (Mobile)

A Gx session with a Gy associated session exists. A Gx CCR-T is received that terminates the CPS session, resulting in a soft-delete session which contains Gy session information and associated Gy secondary keys. A Gy CCR-t is received and the soft-delete session is loaded and updated with the charging information through the end of the session. After the soft delete timeout, the soft delete session is removed.

Adding an HA Cluster

At install time, a system, cluster, and instance are set up. If you need to change the cluster definition, or want to add others, use these steps.

Procedure


Step 1

Begin with a system at the Systems node in the Reference Data tab.

Figure 14. System Configuration


Step 2

Click the Cluster link to set up your first cluster.

Since some data is relevant at the cluster level, you always have at least one cluster, even if it is a cluster of one instance.

Figure 15. Cluster Configuration


The following parameters can be configured for the Cluster:

Table 3. Cluster Parameters

Parameter

Description

Name

The name of the cluster. This name must correspond to the value stated in the config.ini file on the Cisco Policy Server.

Description

A brief description of the cluster.

Db Write Concern

Controls the write behavior of sessionMgr and for what errors exceptions are raised. Default option is OneInstanceSafe. For more information, refer to MongoDB documentation.

Failover Sla Ms

This parameter is used to enter the amount of time to wait before starting failover database handling. The time is in milliseconds.

Replication Wait Time

This option specifies a time limit, in milliseconds, for the write concern. This parameter is applicable only if you select TwoInstanceSafe in Db Write Concern.

This parameter causes write operations to return with an error after the specified limit, even if the required write concern eventually succeeds. When these write operations return, MongoDB does not undo successful data modifications performed before the write concern exceeded the replication wait time limit. This time is in milliseconds.

Trace Db Size Mb

Determines the size in megabytes of the policy_trace database capped collection.

Default value is 512.

Min Key Cache Time Min

The minimum amount of time in minutes to keep a secondary key for a session.

Default value is 2000.

Max Timer T P S

This parameter controls the maximum number of internally generated transactions per second (TPS) the system will produce. For example, if the system needs to generate RAR messages to refresh quotas, the max TPS for the creation of the RAR messages will be limited by this value.

Default value is 2000.

System internally recalculates the TPS based on Number of Shards (excluding backup shards) and Number of Policy Servers (QNS).

Timer Expired TPS = (Max Timer TPS / Number of shards) * Number of Policy Servers (QNS)

For example, assuming "Number of Shards" are 8 and "Number of Policy Servers (QNS)" are 4 and Max Timer T P S is configured as 2000.

Timer Expired TPS = (2000/8) * 4

Timer Expired TPS = 1000

Further this "Timer Expired TPS" would be throttled or diffused based on diffusion parameters. (Refer diffusion parameters for more details)

Re-evaluation diffusion buckets

Defines the number of batches, or “buckets”, into which CPS will divide the transactions to be processed when the rate limiting TPS function of CPS is triggered. The rate limiting feature is defined in the Max Timer T P S field above.

When a TPS rate limit condition is encountered, CPS will divide the total number of re-evaluation transactions to be processed by the number of buckets defined in this field. CPS will process the transactions in each bucket, one by one, while also adding a brief delay between the processing of each bucket. Refer to the Re-evaluation diffusion interval parameter below to configure this delay.

This functionality prevents spikes in traffic when a large number of sessions qualify for re-evaluation at the exact same time. This functionality diffuses the rate at which transactions are sent to the CPS policy engine only. It does not wait for end-to-end processing to occur.

To disable this functionality, set both Re-evaluation diffusion buckets and Re-evaluation diffusion interval parameters to 0 (zero).

If the TPS rate limiting functionality has been disabled, this functionality will also be disabled.

Default value is 50 (buckets).

Re-evaluation diffusion interval ( in milliseconds )

Defines the delay before processing the next bucket. Enter the sum of all the delays between all the buckets.

Assuming Re-evaluation diffusion buckets is configured as 50 and the Re-evaluation diffusion interval is configured as 20000 milliseconds. Then it will introduce a delay of 408 milliseconds before proceeding with the next bucket of transactions.

Delay between buckets = Diffusion Interval (ms) / (Diffusion Buckets - 1)

Delay between buckets = 20000/49

Delay between buckets = 408 (ms)

Default value is 20 milliseconds.

With default configuration, there will be no diffusion. As 20/50 will be 0 (It ignores decimal).

Broadcast Msg Wait Timer Ms

The amount of time in milliseconds for the Policy Engine to wait between sending each Broadcast Policy Message.

Default value is 50.

Max Sessions Per Shard

This is the maximum number of shard per session.

Disable Secondary Key Full Scan DB

Enable or disable full scan for secondary key database lookups. By default, the secondary key database lookups is enabled.

Disabling secondary key database lookups helps in reducing PCRF processing latencies.

Lookaside Key Prefixes

To improve Gx/Rx lookup and caching performance, we can add the lookaside key prefixes. In order to identify the correct shard for subscriber lookup/query, the PCRF needs to know the secondary key (which is internally stored in secondary key cache) for mapping and the exact shard that will be queried for subscriber data. This helps prevent the system from scanning/querying all the available shards in the system to fetch the subscriber record. Reducing the data range for scanning/querying leads to enhanced system performance.

The following four keys should be added so that the secondary keys for session binding are stored in the secondary key cache.

  • diameter

  • RxTGPPSessionKey

  • FramedIpKey

  • USuMSubscriberIdKey – This key should be added only when SPR is used.

  • MSBMSubscriberIdKey – This key should be added only when balance is used.

This would prevent the system from scanning/querying all the available shards in the system to fetch the subscriber record which eventually leads to enhanced system performance.

Note 

For GR setup, a Lookaside Key Prefix called single must be added under the Cluster session for each Cluster for faster session Lookups based on memcache when SingleSy feature is enabled.

Admin Database

  • Primary Database IP Address: The IP address of the session manager database that holds session information for Cisco Policy Builder and Cisco Policy Server.

  • Secondary Database IP Address: The IP address of the database that provides fail over support for the primary database.

    This is the mirror of the database specified in the Primary IP Address field. Use this only for replication or replica pairs architecture. This field is present but deprecated to maintain downward compatibility.

  • Database Port: Port number of the database for session data.

    Default value is 27717.

Endpoint Database

  • Primary Database IP Address: The IP address of the session manager database that holds session information for Cisco Policy Builder and Cisco Policy Server.

  • Secondary Database IP Address: The IP address of the database that provides fail over support for the primary database.

    This is the mirror of the database specified in the Primary IP Address field. Use this only for replication or replica pairs architecture. This field is present but deprecated to maintain downward compatibility.

  • Database Port: Port number of the database for Session data.

    Default value is 27717.

Trace Database

  • Primary Database IP Address: The IP address of the sessionmgr node that holds trace information which allows for debugging of specific sessions and subscribers based on unique primary keys.

  • Secondary Database IP Address: The IP address of the database that provides fail over support for the primary database.

    This is the mirror of the database specified in the Primary IP Address field. Use this only for replication or replica pairs architecture. This field is present but deprecated to maintain downward compatibility.

  • Database Port: Port number of the database for Session data.

    Default value is 27717.

Data Centre Parameter

Deprecated

Common Time Changes

Deprecated

Step 3

From the Systems tree, open up the cluster that you just added and check the plug-in configurations.

Any of the configurations you specify here are used at the cluster level only and cascade down to the instance level if no configuration is set on the instance.

At this point, the plug-ins are available to the cluster but are not configured.

Click any one of them to open the detailed page in the right pane, and check and set your own configuration data. However, there is rarely a need to use the Threading Configuration or the Async Threading Configuration unless instructed to do so.

Step 4

If the created cluster needs to be used, then after publishing, following property needs to be updated in the qns.conf configuration file:

-Dcom.broadhop.run.clusterId=<cluster name>

where, <cluster name> is the cluster name defined in Policy Builder.


Adding an Instance

Procedure

Step 1

Begin with a Cluster at the Systems node in the Reference Data tab.

Step 2

Under Create Child:, click the Instance link to open the Instance pane.

Figure 16. Instance Configuration


Step 3

Type the Name and Description.

Step 4

From the Systems tree, open up the instance node that you just added and check the plug-in configurations.

At this point, plug-ins are available but not configured at the instance level.

Click any one of the plug-ins to open the detailed page in the right pane and check and set your own configuration data.

Any of the configuration data you have here are used at the instance level, overriding any plug-ins set at the system level or the cluster level.