Workgroup Bridges

Overview

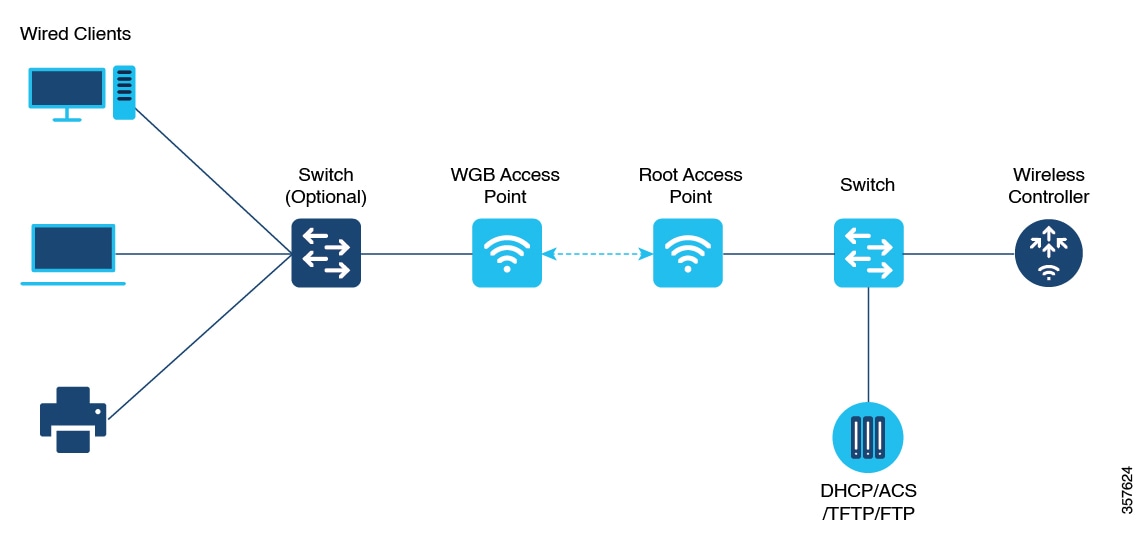
A workgroup bridge (WGB) is an Access Point (AP) mode to provide wireless connectivity to wired clients that are connected to the Ethernet port of the WGB AP. A WGB connects a wired network over a single wireless segment by learning the MAC addresses of its wired clients on the Ethernet interface and reporting them to the WLC through infrastructure AP using Internet Access Point Protocol (IAPP) messaging. The WGB establishes a single wireless connection to the root AP, which in turn, treats the WGB as a wireless client.

Universal WGB (uWGB) is a complementary mode of WGB feature that acts as a wireless bridge between the wired client connected to uWGB and wireless infrastructure including Cisco and non-Cisco wireless network. One of the wireless interface is used to connect with the access point. The radio MAC is used to associate AP.

Figure 1. Example of a WGB

Starting from Cisco IOS XE Dublin 17.11.1, WGB is supported on the Cisco Catalyst IW9167E Heavy Duty Access Points.

Limitations and Restrictions

This section provides limitations and restrictions for WGB and uWGB modes.

  • The WGB can associate only with Cisco lightweight access points. The universal WGB can associate to a third party access point.

  • In a Meraki wireless infrastructure that uses WPA1 security, uWGB do not associate with any SSIDs.

  • Speed and duplex are automatically negotiated based on the capabilities of the locally connected endpoint and cannot be manually configured on the AP’s wired 0 and wired 1 interfaces.

  • Per-VLAN Spanning Tree (PVST) and packets are used to detect and prevent loops in the wired and wireless switching networks. WGB transparently bridge STP packets. WGB can bridge STP packets between two wired segments. Incorrect or inconsistent configuration of STP in the wired segments can cause WGB wireless link to be blocked by the connected switch(es) to Access Point or WGB. This could cause WGB to disconnect from AP or AP disconnection to Controller to drop, and wired clients not receiving IP addresses, as STP begins to block switch port in the wired network. If administrator needs to disable bridging of STP between the wired segments by the WGB, we recommend disabling the STP on the directly connected switches in the wireless network.

  • The following features are not supported for use with a WGB:

    • Idle timeout

    • Web authentication

  • With Layer 3 roaming, if you plug a wired client into the WGB network after the WGB has roamed to another controller (for example, to a foreign controller), the wired client’s IP address displays only on the anchor controller, not on the foreign controller.

  • When you deauthenticate a WGB record from a controller, all of the WGB wired clients’ entries are also deleted.

  • These features are not supported for wired clients connected to a WGB:

    • MAC filtering

    • Link tests

    • Idle timeout

  • Associating a WGB to a WLAN that is configured for Adaptive 802.11r is not supported.

  • WGB supports IPv6 only when IPv4 is enable. But there is no impact on WGB wired clients IPv6 traffic.

  • WGB management IPv6 does not work after WGB uplink association is completed. WGB can get an IPv6 address when the association is successful. But IPv6 ping will not be passed from or to WGB. SSH from wireless or wired client to WGB management IPv6 is not working. The workaround to bypass the pingable issue is to re-enable IPv6, even though IPv6 has already been enabled and the IPv6 address has been assigned.

  • uWGB mode does not support SSH connecting to itself.

  • uWGB mode supports neither TFTP nor SFTP. For software upgrade, you should perform it from WGB mode. For more information, see uWGB Image Upgrade.

  • uWGB does not support host IP service. Some functions, such as image upgrade via radio uplink and remote management via SSH session, are not supported.

  • For IW9167EH WGB/uWGB mode, the packet retries [N] drop command does not work in IOS XE Release 17.11.1.

  • DFS channels are supported on IW9167EH WGB/uWGB from Release 17.13.1.

  • Only Dot11Radio 0 and Dot11Radio 1 interfaces can be used as wireless uplink on IW9167EH WGB/uWGB.

  • When the infrastructure AP operates on a non-DFS (Dynamic Frequency Selection) channel and changes its channel bandwidth, the WGB stays connected to the infrastructure AP using the original channel bandwidth.

    To make sure the WGB connects to the AP with the correct channel bandwidth. Use wireless client mac-address <wgb-wireless-client-mac-address> deauthenticate command on the wireless controller to deauthenticate the WGB wireless client.

Configuring Strong Password in Day0

It is required to set a strong password for WGB/uWGB after first login. The username and strong password should follow these rules:

  1. Username length is between 1 and 32 characters.

  2. Password length is between 8 to 120 characters.

  3. Password must contain at least one uppercase character, one lowercase character, one digit, and one punctuation.

  4. Password can contain alphanumeric characters and special characters (ASCII decimal code from 33 to 126), but the following special characters are not permitted: " (double quote), ' (single quote), ? (question mark).

  5. Password cannot contain three sequential characters.

  6. Password cannot contain three same characters consecutively.

  7. Password cannot be the same as or reverse of the username.

  8. New password must have at least four different characters compared to the current password.

For example, by default, the credential is

  • username: Cisco

  • password: Cisco

  • enable password: Cisco

To reset the credential with the following strong password:

  • username: demouser

  • password: DemoP@ssw0rd

  • enable password: DemoE^aP@ssw0rd

User Access Verification
Username: Cisco
Password: Cisco

% First Login: Please Reset Credentials

Current Password:Cisco
Current Enable Password:Cisco
New User Name:demouser
New Password:DemoP@ssw0rd
Confirm New Password:DemoP@ssw0rd
New Enable Password:DemoE^aP@ssw0rd
Confirm New Enable Password:DemoE^aP@ssw0rd

% Credentials changed, please re-login

[*04/18/2023 23:53:44.8926] chpasswd: password for user changed
[*04/18/2023 23:53:44.9074]
[*04/18/2023 23:53:44.9074] Management user configuration saved successfully
[*04/18/2023 23:53:44.9074]


User Access Verification
Username: demouser
Password: DemoP@ssw0rd
APFC58.9A15.C808>enable
Password:DemoE^aP@ssw0rd
APFC58.9A15.C808#

Note


In above example, all passwords are displayed in plain text for demonstration purpose. In real case, they are hidden by asterisks (*).


Controller Configuration for WGB

For a WGB to join a wireless network, you need to configure specific settings on the WLAN and related policy profile on the controller.

Follow these steps to configure the Cisco Client Extensions option and set the support of Aironet IE in the WLAN:

  1. Enter WLAN configuration submode. The profile-name is the profile name of the configured WLAN.

    #wlan profile-name
  2. Configure the Cisco Client Extensions option and set the support of Aironet IE on the WLAN.

    #ccx aironet-iesupport

    Note


    Without this configuration, WGB is not able to associate to AP.


Follow these steps to configure WLAN policy profile:

  1. Enter wireless policy configuration mode.

    #wireless profile policy profile-policy
  2. Assign the profile policy to the VLAN.

    #vlan vlan-id
  3. Configure WGB VLAN client support.

    #wgb vlan

uWGB Image Upgrade

uWGB mode does not support TFTP or SFTP. To perform a software upgrade, follow these steps:

Procedure


Step 1

Connect a TFTP or SFTP server to wired 0 port of uWGB.

Step 2

Turn radio interfaces into Administratively Down state.

configure Dot11Radio <0|1> disable

Example:

#configure Dot11Radio 0 disable
#configure Dot11Radio 1 disable

Step 3

Convert uWGB to WGB mode.

configure Dot11Radio slot_id mode wgb ssid-profile ssid_profile_name

Example:

#configure Dot11Radio 1 mode wgb ssid-profile a_uwgb_demo_ssid

This command will reboot with downloaded configs.
Are you sure you want continue? <confirm>

Note


ssid_profile_name can be any existing SSID profile configured by users.

Step 4

After rebooting, assign a static IP address to the WGB.

configure ap address ipv4 static IPv4_address netmask Gateway_IPv4_address

Example:

#configure ap address ipv4 static 192.168.1.101 255.255.255.0 192.168.1.1

Step 5

Verify the ICMP ping works.

ping server_IP

Example:

#ping 192.168.1.20
Sending 5, 100-byte ICMP Echos to 192.168.1.20, timeout is 2 seconds

PING 192.168.1.20
!!!!!
Success rate is 100 percent (5/5), round-trip min/avg/max = 0.858/0.932/1.001 ms

Step 6

Upgrade the software.

archive download /reload <tftp | sftp | http >://server_ip /file_path

Step 7

Convert WGB back to uWGB.

configure Dot11Radio slot_id mode uwgb wired_client_mac_addr ssid-profile ssid_profile_name

Example:

#configure Dot11Radio 1 mode uwgb 00b4.9e00.a891 ssid-profile a_uwgb_demo_ssid

WGB Configuration

The typical WGB configuration involves the following steps:

  1. Create an SSID profile.

  2. Configure radio as workgroup, and associate the SSID profile to the radio.

  3. Turn on the radio.

WGB uplink supports various security methods, including:

  • Open (unsecured)

  • PSK

  • Dot1x (LEAP, PEAP, FAST-EAP, TLS)


Note


Ensure that the below configuration order is followed when EAP-TLS security is desired on the WGB:

  1. Configure the device username/password, NTP server, hostname, and valid IP address.

  2. Create trustpoints and import the certificates using your preferred method.

  3. (Optional) Configure the dot1x credentials.

  4. Create the EAP profile and map the method, trustpoint name and dot1x credentials (optional).

  5. Bind the EAP profile to the SSID profile.

  6. Bind the SSID profile to the preferred radio.


The following is an example of Dot1x FAST-EAP configuration:

configure dot1x credential demo-cred username demouser1 password Dem0Pass!@
configure eap-profile demo-eap-profile dot1x-credential demo-cred
configure eap-profile demo-eap-profile method fast
configure ssid-profile demo-FAST ssid demo-fast authentication eap profile demo-eap-profile key-management wpa2
configure dot11radio 0 mode wgb ssid-profile demo-FAST
configure dot11radio 0 enable

The following sections provide detailed information about WGB configuration.

Configure IP address

Configure IPv4 address

  • Use the configure ap address ipv4 dhcp command to configure IPv4 address using DHCP.

    Device#configure ap address ipv4 dhcp 
  • Use the configure ap address ipv4 static ipv4_addr netmask gateway command to configure the static IPv4 address. By doing so, you can manage the device using a wired interface without an uplink connection.
    Device#configure ap address ipv4 static ipv4_addr netmask gateway
Verify current IP configuration

Use show ip interface brief command to view the current IP address configuration.

Device#show ip interface brief

Configure IPv6 address

Use the configure ap address ipv6 static ipv6_addr prefixlen [gateway] command to configure the static IPv6 address. This configuration allows you to manage the AP through a wired interface without uplink connection.

Device#configure ap address ipv6 static ipv6_addr prefixlen [gateway]
Enable IPv6 auto configuration

Use the configure ap address ipv6 auto-config enable command to enable the IPv6 auto configuration on the AP.

Device#configure ap address ipv6 auto-config enable 

Note


  • Use the configure ap address ipv6 auto-config disable command to disable the IPv6 auto configuration on the AP.

  • Use the configure ap address ipv6 auto-config enable command to enable IPv6 SLAAC. Note that SLAAC does not apply to CoS of WGB. This command configures IPv6 address with DHCPv6 instead of SLAAC.


Configure IPv6 address using DHCP
Use the configure ap address ipv6 dhcp command to configure IPv6 address using DHCP.
Device#configure ap address ipv6 dhcp 
Verify current IP configuration

Use the show ipv6 interface brief command to verify current IP address configuration.

Device#show ipv6 interface brief

Configure a Dot1X credential

Use the configure dot1x credential profile-name username name password pwd command to configure Dot1x credential.
Device#configure dot1x credential profile-name username name password pwd

Verify WGB EAP Dot1x profile

Use the show wgb eap dot1x credential profile command to view the status of WGB EAP Dot1x profile.

Device#show wgb eap dot1x credential profile 

Deauthenticate WGB wired client

Use the clear wgb client {all |single mac-addr} command to deauthenticate WGB wired client.

Device#clear wgb client {all |single mac-addr} 

Configure an EAP profile

Perform these steps to configure an EAP profile:

  1. Attach the Dot1x credential profile to the EAP profile.

  2. Attach the EAP profile to the SSID profile.

  3. Attach the SSID profile to the radio.

Procedure


Step 1

Use the configure eap-profile profile-name method { fast | leap | peap | tls} command to configure the EAP profile.

Device#configure eap-profile profile-name method { fast | leap | peap | tls} 

Note


Choose an EAP profile method.

  • fast

  • peap, or

  • tls.

Step 2

Use the configure eap-profile profile-name trustpoint { default | name trustpoint-name} command to attach the CA trustpoint for TLS. By default, the WGB uses the internal MIC certificate for authentication.

Device#configure eap-profile profile-name trustpoint { default | name trustpoint-name} 

Step 3

Use the configure eap-profile profile-name dot1x-credential profile-name command to attach the dot1x-credential profile.

Device#configure eap-profile profile-name dot1x-credential profile-name 

Step 4

[Optional] Use the configure eap-profile profile-name delete command to delete an EAP profile.

Device#configure eap-profile profile-name delete 

Configure trustpoint manual enrollment for terminal

Procedure


Step 1

Use the configure crypto pki trustpoint ca-server-name enrollment terminal command to create a trustpoint in WGB.

Device#configure crypto pki trustpoint ca-server-name enrollment terminal 

Step 2

Use the configure crypto pki trustpoint ca-server-name authenticate command to authenticate a trustpoint manually.

Device#configure crypto pki trustpoint ca-server-name authenticate

Enter the base 64 encoded CA certificate.

Enter quit to finish the certificate.

Note


If you use an intermediate certificate, import all the certificate chains in the trustpoint.

Example:

Device#configure crypto pki trustpoint demotp authenticate
 
Enter the base 64 encoded CA certificate.
....And end with the word "quit" on a line by itself....
 
-----BEGIN CERTIFICATE-----
[base64 encoded root CA certificate]
-----END CERTIFICATE-----
-----BEGIN CERTIFICATE-----
[base64 encoded intermediate CA certificate]
-----END CERTIFICATE-----
quit

Step 3

Use the configure crypto pki trustpoint ca-server-name key-size key-length command to configure a private key size.

Device#configure crypto pki trustpoint ca-server-name key-size key-length 

Step 4

Use the configure crypto pki trustpoint ca-server-name subject-name name [Optional] 2ltr-country-code state-name locality org-name org-unit email command to configure the subject-name.

Device#configure crypto pki trustpoint ca-server-name subject-name name [Optional] 2ltr-country-code state-name locality org-name org-unit email 

Step 5

Use the configure crypto pki trustpoint ca-server-name enroll command to generate a private key and certificate signing request (CSR).

Device#configure crypto pki trustpoint ca-server-name enroll 

Create the digitally signed certificate using the CSR output in the CA server.

Step 6

Use the configure crypto pki trustpoint ca-server-name import certificate command to import the signed certificate in WGB.

Device#configure crypto pki trustpoint ca-server-name import certificate 

Enter the base 64 encoded CA certificate.

Enter quit to finish the certificate.

Device#quit 

Step 7

[Optional] Use the configure crypto pki trustpoint trustpoint-name delete command to delete a trustpoint.

Device#configure crypto pki trustpoint trustpoint-name delete 

Step 8

Use the show crypto pki trustpoint command to view the trustpoint summary.

Device#show crypto pki trustpoint

Step 9

Use the show crypto pki trustpoint trustpoint-name certificate command to view the content of the certificates that are created for a trustpoint.

Device#show crypto pki trustpoint trustpoint-name certificate 

Configure trustpoint auto-enrollment for WGB

Procedure


Step 1

Use the configure crypto pki trustpoint ca-server-name enrollment url ca-server-url command to enroll a trustpoint in the WGB using the server URL.

Device#configure crypto pki trustpoint ca-server-name enrollment url ca-server-url 

Step 2

Use the configure crypto pki trustpoint ca-server-name authenticate command to authenticate a trustpoint.

Device#configure crypto pki trustpoint ca-server-name authenticate 

This command fetches the CA certificate from CA server automatically.

Step 3

Use the configure crypto pki trustpoint ca-server-name key-size key-length command to configure a private key size.

Device#configure crypto pki trustpoint ca-server-name key-size key-length 

Step 4

Use the configure crypto pki trustpoint ca-server-name subject-name name [Optional] 2ltr-country-code state-name locality org-name org-unit email command to configure the subject-name.

Device#configure crypto pki trustpoint ca-server-name subject-name name [Optional] 2ltr-country-code state-name locality org-name org-unit email 

Step 5

Use the configure crypto pki trustpoint ca-server-name enroll command to enroll the trustpoint.

Device#configure crypto pki trustpoint ca-server-name enroll 

Request the digitally signed certificate from the CA server.

Step 6

Use the configure crypto pki trustpoint ca-server-name auto-enroll enable renew-percentage command to enable auto-enroll.

Device#configure crypto pki trustpoint ca-server-name auto-enroll enable renew-percentage 

Note


Use the configure crypto pki trustpoint ca-server-name auto-enroll disable command to disable the auto-enroll.

Step 7

[Optional] Use the configure crypto pki trustpoint trustpoint-name delete command to delete a trustpoint.

Device#configure crypto pki trustpoint trustpoint-name delete 

Step 8

Use the show crypto pki trustpoint command to view the trustpoint summary.

Device#show crypto pki trustpoint 

Step 9

Use the show crypto pki trustpoint trustpoint-name certificate command to view the details of the certificate for a specific trustpoint.

Device#show crypto pki trustpoint trustpoint-name certificate 

Step 10

Use the show crypto pki timers command to view the public key infrastructure (PKI) timer information.

show crypto pki timers

Device#show crypto pki timers 

Configure manual certificate enrollment using TFTP server

Procedure


Step 1

Specify the enrollment method.

Use the configure crypto pki trustpoint ca-server-name enrollment tftp tftp-addr/file-name command to retrieve the CA and client certificate for a trustpoint.

Device#configure crypto pki trustpoint ca-server-name enrollment tftp tftp-addr/file-name 

Step 2

Use the configure crypto pki trustpoint ca-server-name authenticate command to authenticate a trustpoint manually.

Device#configure crypto pki trustpoint ca-server-name authenticate 

This retrieves and authenticates the CA certificate from the specified TFTP server. If the file specification is included, the WGB adds the extension .ca to the specified filename.

Step 3

Use the configure crypto pki trustpoint ca-server-name key-size key-length command to configure a private key size.

Device#configure crypto pki trustpoint ca-server-name key-size key-length 

Step 4

Use the configure crypto pki trustpoint ca-server-name subject-name name [Optional] 2ltr-country-code state-name locality org-name org-unit email command to configure the subject-name.

Device#configure crypto pki trustpoint ca-server-name subject-name name [Optional] 2ltr-country-code state-name locality org-name org-unit email 

Step 5

Use the configure crypto pki trustpoint ca-server-name enroll command to generate a private key and Certificate Signing Request (CSR).

Device#configure crypto pki trustpoint ca-server-name enroll 

This generates certificate request and sends the request to the TFTP server. The filename to be written is appended with the .req extension.

Step 6

Use the configure crypto pki trustpoint ca-server-name import certificate command to import the signed certificate in WGB.

Device#configure crypto pki trustpoint ca-server-name import certificate

The console terminal uses TFTP to import a certificate and the WGB tries to get the approved certificate from the TFTP. The filename to be written is appended with the .crt extension.

Step 7

Use the show crypto pki trustpoint command to view the trustpoint summary.

Device#show crypto pki trustpoint 

Step 8

Use the show crypto pki trustpoint trustpoint-name certificate command to view the content of the certificates that are created for a trustpoint.

Device#show crypto pki trustpoint trustpoint-name certificate 

SSID configuration

SSID configuration consists of the following two parts:

  1. Create an SSID profile

  2. Configuring Radio Interface for Workgroup Bridges

Create an SSID profile

Choose one of these authentication protocols to configure the SSID profile:

  1. Open authentication

  2. PSK authentication

    • PSK WPA2 authentication

    • PSK Dot11r authentication, and

    • PSK Dot11w authentication.

  3. Dot1x authentication

Configure an SSID profile using open authentication

Use the configure ssid-profile ssid-profile-name ssid radio-serv-name authentication open command to configure an SSID profile using open authentication.

Device#configure ssid-profile ssid-profile-name ssid radio-serv-name authentication open 
Configure an SSID profile using PSK authentication

Choose one of these authentication protocols to configure an SSID profile using PSK authentication:

  • configure an SSID profile using PSK WPA2 authentication

  • configure an SSID profile using PSK Dot11r authentication, and

  • configure an SSID profile using PSK Dot11w authentication .

Configure an SSID profile using PSK WPA2 authentication

Use the configure ssid-profile ssid-profile-name ssid SSID_name authentication psk preshared-key key-management wpa2 command to configure an SSID profile using PSK WPA2 authentication.

Device#configure ssid-profile ssid-profile-name ssid SSID_name authentication psk preshared-key key-management wpa2
Configure an SSID profile using PSK Dot11r authentication

Use the configure ssid-profile ssid-profile-name ssid SSID_name authentication psk preshared-key key-management dot11r command to configure an SSID profile using PSK Dot11r authentication.

Device#configure ssid-profile ssid-profile-name ssid SSID_name authentication psk preshared-key key-management dot11r 
Configure an SSID profile using PSK Dot11w authentication

Use the configure ssid-profile ssid-profile-name ssid SSID_name authentication psk preshared-key key-management dot11w command to configure an SSID profile using PSK Dot11w authentication

Device#configure ssid-profile ssid-profile-name ssid SSID_name authentication psk preshared-key key-management dot11w 
Configure an SSID profile using Dot1x authentication

Use the configure ssid-profile ssid-profile-name ssid radio-serv-name authentication eap profile eap-profile-name key-management { dot11r | wpa2 | dot11w { optional | required}} command to configure an SSID profile using Dot1x authentication.

Device#configure ssid-profile ssid-profile-name ssid radio-serv-name authentication eap profile eap-profile-name key-management { dot11r | wpa2 | dot11w { optional | required}}
Configure an SSID profile using Dot1x EAP-PEAP authentication

Here is an example that shows the configuration of an SSID profile using Dot1x EAP-PEAP authentication:

Device#configure dot1x credential c1 username wgbusr password cisco123456
Device#configure eap-profile p1 dot1x-credential c1
Device#configure eap-profile p1 method peap
Device#configure ssid-profile iot-peap ssid iot-peap authentication eap profile p1 key-management wpa2

Configuring Radio Interface for Workgroup Bridges

  • From the available two radio interfaces, before configuring WGB mode on one radio interface, configure the other radio interface to root-ap mode.

    Map a radio interface as root-ap by entering this command:

    # configure dot11radio radio-slot-id mode root-ap

    Example

    # configure dot11radio 0 mode root-ap

    Note


    When an active SSID or EAP profile is modified, you need to reassociate the profile to the radio interface for the updated profile to be active.
  • Map a radio interface to a WGB SSID profile by entering this command:

    # configure dot11radio radio-slot-id mode wgb ssid-profile ssid-profile-name

    Example

    # configure dot11radio 1 mode wgb ssid-profile psk_ssid
  • Configure a radio interface by entering this command:

    # configure dot11radio radio-slot-id{ enable | disable }

    Example

    # configure dot11radio 0 disable

Note


Only one radio or slot is allowed to operate in WGB mode.


Configuring WGB/uWGB Timer

The timer configuration CLIs are common for both WGB and uWGB. Use the following commands to configure timers:

  • Configure the WGB association response timeout by entering this command:

    # configure wgb association response timeout response-millisecs

    The default value is 100 milliseconds. The valid range is between 100 and 5000 milliseconds.

  • Configure the WGB authentication response timeout by entering this command:

    # configure wgb authentication response timeout response-millisecs

    The default value is 100 milliseconds. The valid range is between 100 and 5000 milliseconds.

  • Configure the WGB EAP timeout by entering this command:

    # configure wgb eap timeout timeout-secs

    The default value is 3 seconds. The valid range is between 2 and 60 seconds.

  • Configure the WGB bridge client response timeout by entering this command:

    # configure wgb bridge client timeout timeout-secs

    Default timeout value is 300 seconds. The valid range is between 10 and 1000000 seconds.

uWGB Configuration

The universal WGB is able to interoperate with non-Cisco access points using uplink radio MAC address, thus the universal workgroup bridge role supports only one wired client.

Most WGB configurations apply to uWGB. The only difference is that you configure wired client’s MAC address with the following command:

configure dot11 <0|1 > mode uwgb <uwgb_wired_client_mac_address > ssid-profile <ssid-profile >

The following is an example of Dot1x FAST-EAP configuration:

configure dot1x credential demo-cred username demouser1 password Dem0Pass!@
configure eap-profile demo-eap-profile dot1x-credential demo-cred
configure eap-profile demo-eap-profile method fast
configure ssid-profile demo-FAST ssid demo-fast authentication eap profile demo-eap-profile key-management wpa2
configure dot11radio 0 mode uwgb fc58.220a.0704 ssid-profile demo-FAST
configure dot11radio 0 enable

The following sections provide detailed information about uWGB configuration.

Configure IP address

Configure IPv4 address

  • Use the configure ap address ipv4 dhcp command to configure IPv4 address using DHCP.

    Device#configure ap address ipv4 dhcp 
  • Use the configure ap address ipv4 static ipv4_addr netmask gateway command to configure the static IPv4 address. By doing so, you can manage the device using a wired interface without an uplink connection.
    Device#configure ap address ipv4 static ipv4_addr netmask gateway
Verify current IP configuration

Use show ip interface brief command to view the current IP address configuration.

Device#show ip interface brief

Configure IPv6 address

Use the configure ap address ipv6 static ipv6_addr prefixlen [gateway] command to configure the static IPv6 address. This configuration allows you to manage the AP through a wired interface without uplink connection.

Device#configure ap address ipv6 static ipv6_addr prefixlen [gateway]
Enable IPv6 auto configuration

Use the configure ap address ipv6 auto-config enable command to enable the IPv6 auto configuration on the AP.

Device#configure ap address ipv6 auto-config enable 

Note


  • Use the configure ap address ipv6 auto-config disable command to disable the IPv6 auto configuration on the AP.

  • Use the configure ap address ipv6 auto-config enable command to enable IPv6 SLAAC. Note that SLAAC does not apply to CoS of WGB. This command configures IPv6 address with DHCPv6 instead of SLAAC.


Configure IPv6 address using DHCP
Use the configure ap address ipv6 dhcp command to configure IPv6 address using DHCP.
Device#configure ap address ipv6 dhcp 
Verify current IP configuration

Use the show ipv6 interface brief command to verify current IP address configuration.

Device#show ipv6 interface brief

Configure a Dot1X credential

Use the configure dot1x credential profile-name username name password pwd command to configure Dot1x credential.
Device#configure dot1x credential profile-name username name password pwd

Verify WGB EAP Dot1x profile

Use the show wgb eap dot1x credential profile command to view the status of WGB EAP Dot1x profile.

Device#show wgb eap dot1x credential profile 

Configure an EAP profile

Perform these steps to configure an EAP profile:

  1. Attach the Dot1x credential profile to the EAP profile.

  2. Attach the EAP profile to the SSID profile.

  3. Attach the SSID profile to the radio.

Procedure


Step 1

Use the configure eap-profile profile-name method { fast | leap | peap | tls} command to configure the EAP profile.

Device#configure eap-profile profile-name method { fast | leap | peap | tls} 

Note


Choose an EAP profile method.

  • fast

  • peap, or

  • tls.

Step 2

Use the configure eap-profile profile-name trustpoint { default | name trustpoint-name} command to attach the CA trustpoint for TLS. By default, the WGB uses the internal MIC certificate for authentication.

Device#configure eap-profile profile-name trustpoint { default | name trustpoint-name} 

Step 3

Use the configure eap-profile profile-name dot1x-credential profile-name command to attach the dot1x-credential profile.

Device#configure eap-profile profile-name dot1x-credential profile-name 

Step 4

[Optional] Use the configure eap-profile profile-name delete command to delete an EAP profile.

Device#configure eap-profile profile-name delete 

Configure trustpoint manual enrollment for terminal

Procedure


Step 1

Use the configure crypto pki trustpoint ca-server-name enrollment terminal command to create a trustpoint in WGB.

Device#configure crypto pki trustpoint ca-server-name enrollment terminal 

Step 2

Use the configure crypto pki trustpoint ca-server-name authenticate command to authenticate a trustpoint manually.

Device#configure crypto pki trustpoint ca-server-name authenticate

Enter the base 64 encoded CA certificate.

Enter quit to finish the certificate.

Note


If you use an intermediate certificate, import all the certificate chains in the trustpoint.

Example:

Device#configure crypto pki trustpoint demotp authenticate
 
Enter the base 64 encoded CA certificate.
....And end with the word "quit" on a line by itself....
 
-----BEGIN CERTIFICATE-----
[base64 encoded root CA certificate]
-----END CERTIFICATE-----
-----BEGIN CERTIFICATE-----
[base64 encoded intermediate CA certificate]
-----END CERTIFICATE-----
quit

Step 3

Use the configure crypto pki trustpoint ca-server-name key-size key-length command to configure a private key size.

Device#configure crypto pki trustpoint ca-server-name key-size key-length 

Step 4

Use the configure crypto pki trustpoint ca-server-name subject-name name [Optional] 2ltr-country-code state-name locality org-name org-unit email command to configure the subject-name.

Device#configure crypto pki trustpoint ca-server-name subject-name name [Optional] 2ltr-country-code state-name locality org-name org-unit email 

Step 5

Use the configure crypto pki trustpoint ca-server-name enroll command to generate a private key and certificate signing request (CSR).

Device#configure crypto pki trustpoint ca-server-name enroll 

Create the digitally signed certificate using the CSR output in the CA server.

Step 6

Use the configure crypto pki trustpoint ca-server-name import certificate command to import the signed certificate in WGB.

Device#configure crypto pki trustpoint ca-server-name import certificate 

Enter the base 64 encoded CA certificate.

Enter quit to finish the certificate.

Device#quit 

Step 7

[Optional] Use the configure crypto pki trustpoint trustpoint-name delete command to delete a trustpoint.

Device#configure crypto pki trustpoint trustpoint-name delete 

Step 8

Use the show crypto pki trustpoint command to view the trustpoint summary.

Device#show crypto pki trustpoint

Step 9

Use the show crypto pki trustpoint trustpoint-name certificate command to view the content of the certificates that are created for a trustpoint.

Device#show crypto pki trustpoint trustpoint-name certificate 

Configure trustpoint auto-enrollment for WGB

Procedure


Step 1

Use the configure crypto pki trustpoint ca-server-name enrollment url ca-server-url command to enroll a trustpoint in the WGB using the server URL.

Device#configure crypto pki trustpoint ca-server-name enrollment url ca-server-url 

Step 2

Use the configure crypto pki trustpoint ca-server-name authenticate command to authenticate a trustpoint.

Device#configure crypto pki trustpoint ca-server-name authenticate 

This command fetches the CA certificate from CA server automatically.

Step 3

Use the configure crypto pki trustpoint ca-server-name key-size key-length command to configure a private key size.

Device#configure crypto pki trustpoint ca-server-name key-size key-length 

Step 4

Use the configure crypto pki trustpoint ca-server-name subject-name name [Optional] 2ltr-country-code state-name locality org-name org-unit email command to configure the subject-name.

Device#configure crypto pki trustpoint ca-server-name subject-name name [Optional] 2ltr-country-code state-name locality org-name org-unit email 

Step 5

Use the configure crypto pki trustpoint ca-server-name enroll command to enroll the trustpoint.

Device#configure crypto pki trustpoint ca-server-name enroll 

Request the digitally signed certificate from the CA server.

Step 6

Use the configure crypto pki trustpoint ca-server-name auto-enroll enable renew-percentage command to enable auto-enroll.

Device#configure crypto pki trustpoint ca-server-name auto-enroll enable renew-percentage 

Note


Use the configure crypto pki trustpoint ca-server-name auto-enroll disable command to disable the auto-enroll.

Step 7

[Optional] Use the configure crypto pki trustpoint trustpoint-name delete command to delete a trustpoint.

Device#configure crypto pki trustpoint trustpoint-name delete 

Step 8

Use the show crypto pki trustpoint command to view the trustpoint summary.

Device#show crypto pki trustpoint 

Step 9

Use the show crypto pki trustpoint trustpoint-name certificate command to view the details of the certificate for a specific trustpoint.

Device#show crypto pki trustpoint trustpoint-name certificate 

Step 10

Use the show crypto pki timers command to view the public key infrastructure (PKI) timer information.

show crypto pki timers

Device#show crypto pki timers 

Configure manual certificate enrollment using TFTP server

Procedure


Step 1

Specify the enrollment method.

Use the configure crypto pki trustpoint ca-server-name enrollment tftp tftp-addr/file-name command to retrieve the CA and client certificate for a trustpoint.

Device#configure crypto pki trustpoint ca-server-name enrollment tftp tftp-addr/file-name 

Step 2

Use the configure crypto pki trustpoint ca-server-name authenticate command to authenticate a trustpoint manually.

Device#configure crypto pki trustpoint ca-server-name authenticate 

This retrieves and authenticates the CA certificate from the specified TFTP server. If the file specification is included, the WGB adds the extension .ca to the specified filename.

Step 3

Use the configure crypto pki trustpoint ca-server-name key-size key-length command to configure a private key size.

Device#configure crypto pki trustpoint ca-server-name key-size key-length 

Step 4

Use the configure crypto pki trustpoint ca-server-name subject-name name [Optional] 2ltr-country-code state-name locality org-name org-unit email command to configure the subject-name.

Device#configure crypto pki trustpoint ca-server-name subject-name name [Optional] 2ltr-country-code state-name locality org-name org-unit email 

Step 5

Use the configure crypto pki trustpoint ca-server-name enroll command to generate a private key and Certificate Signing Request (CSR).

Device#configure crypto pki trustpoint ca-server-name enroll 

This generates certificate request and sends the request to the TFTP server. The filename to be written is appended with the .req extension.

Step 6

Use the configure crypto pki trustpoint ca-server-name import certificate command to import the signed certificate in WGB.

Device#configure crypto pki trustpoint ca-server-name import certificate

The console terminal uses TFTP to import a certificate and the WGB tries to get the approved certificate from the TFTP. The filename to be written is appended with the .crt extension.

Step 7

Use the show crypto pki trustpoint command to view the trustpoint summary.

Device#show crypto pki trustpoint 

Step 8

Use the show crypto pki trustpoint trustpoint-name certificate command to view the content of the certificates that are created for a trustpoint.

Device#show crypto pki trustpoint trustpoint-name certificate 

SSID configuration

SSID configuration consists of the following two parts:

  1. Create an SSID profile

  2. Configuring Radio Interface for uWGB

Create an SSID profile

Choose one of these authentication protocols to configure the SSID profile:

  1. Open authentication

  2. PSK authentication

    • PSK WPA2 authentication

    • PSK Dot11r authentication, and

    • PSK Dot11w authentication.

  3. Dot1x authentication

Configure an SSID profile using open authentication

Use the configure ssid-profile ssid-profile-name ssid radio-serv-name authentication open command to configure an SSID profile using open authentication.

Device#configure ssid-profile ssid-profile-name ssid radio-serv-name authentication open 
Configure an SSID profile using PSK authentication

Choose one of these authentication protocols to configure an SSID profile using PSK authentication:

  • configure an SSID profile using PSK WPA2 authentication

  • configure an SSID profile using PSK Dot11r authentication, and

  • configure an SSID profile using PSK Dot11w authentication .

Configure an SSID profile using PSK WPA2 authentication

Use the configure ssid-profile ssid-profile-name ssid SSID_name authentication psk preshared-key key-management wpa2 command to configure an SSID profile using PSK WPA2 authentication.

Device#configure ssid-profile ssid-profile-name ssid SSID_name authentication psk preshared-key key-management wpa2
Configure an SSID profile using PSK Dot11r authentication

Use the configure ssid-profile ssid-profile-name ssid SSID_name authentication psk preshared-key key-management dot11r command to configure an SSID profile using PSK Dot11r authentication.

Device#configure ssid-profile ssid-profile-name ssid SSID_name authentication psk preshared-key key-management dot11r 
Configure an SSID profile using PSK Dot11w authentication

Use the configure ssid-profile ssid-profile-name ssid SSID_name authentication psk preshared-key key-management dot11w command to configure an SSID profile using PSK Dot11w authentication

Device#configure ssid-profile ssid-profile-name ssid SSID_name authentication psk preshared-key key-management dot11w 
Configure an SSID profile using Dot1x authentication

Use the configure ssid-profile ssid-profile-name ssid radio-serv-name authentication eap profile eap-profile-name key-management { dot11r | wpa2 | dot11w { optional | required}} command to configure an SSID profile using Dot1x authentication.

Device#configure ssid-profile ssid-profile-name ssid radio-serv-name authentication eap profile eap-profile-name key-management { dot11r | wpa2 | dot11w { optional | required}}
Configure an SSID profile using Dot1x EAP-PEAP authentication

Here is an example that shows the configuration of an SSID profile using Dot1x EAP-PEAP authentication:

Device#configure dot1x credential c1 username wgbusr password cisco123456
Device#configure eap-profile p1 dot1x-credential c1
Device#configure eap-profile p1 method peap
Device#configure ssid-profile iot-peap ssid iot-peap authentication eap profile p1 key-management wpa2

Configuring Radio Interface for uWGB

  • From the available two radio interfaces, before configuring WGB mode on one radio interface, configure the other radio interface to root-ap mode.

    Map a radio interface as root-ap by entering this command:

    # configure dot11radio radio-slot-id mode root-ap

    Example

    # configure dot11radio 0 mode root-ap

    Note


    When an active SSID or EAP profile is modified, you need to reassociate the profile to the radio interface for the updated profile to be active.


  • Map a radio interface to a WGB SSID profile by entering this command:

    # configure dot11radio radio-slot-id mode uwgb uwgb-wired-client-mac-address ssid-profile ssid-profile-name

  • Configure a radio interface by entering this command:

    # configure dot11radio radio-slot-id{ enable | disable }

    Example

    # configure dot11radio 0 disable

    Note


    After configuring the uplink to the SSID profile, we recommend you to disable and enable the radio for the changes to be active.


Note


Only one radio or slot is allowed to operate in uWGB or WGB mode.


Converting Between WGB and uWGB

To convert from WGB to uWGB, use the following command:

#configure dot11radio <0 |1 > mode uwgb <WIRED_CLIENT_MAC > ssid-profile <SSID_PROFILE_NAME >

To convert from uWGB to WGB, use the following command. This conversion involves a reboot of the AP.

#configure Dot11Radio 1 mode wgb ssid-profile <SSID_PROFILE_NAME>

 This command will reboot with downloaded configs.
 Are you sure you want continue? [confirm]

Fast Roaming With Assistant Second 5G Radio

IW9167EH is equipped with dual 5G radios. Only the first 5G (radio 1) can be used as uplink. With proper configuration, the second 5G can accelarate scanning in roaming.


Note


This feature is supported only on WGB mode, and is not supported on uWGB mode.


To enable this feature, use the following command:

#configure dot11radio 2 mode scan

When the assistant scanning feature is enabled, the second radio keeps scanning configured SSID based on the channel list. By defualt, the channel list contains all supported 5G channels (based on reg domain).

You can also configure the channel list explicitly, using the following command:

#configure wgb mobile station interface dot11Radio 1 scan <channel> [add|delete]

By default, candidate AP entries in scanning table ages out in 1200 ms. You can adjust the timer by the following command:

#configure wgb scan radio 2 timeout
  <1-5000>  Scanning ap expire time

Note


AP selection algorithm picks candidate with best RSSI from the scanning table. In some cases, the RSSI values are out-of-date. This can lead to a failed roaming.


Note


It is recommended to make the second 5G radio (antenna port 5-8) have the same antenna installation as the first 5G radio (antenna port 1-4).


Check the scanning table by using the following command:

#show wgb scan
Best AP expire time: 5000 ms

************[ AP List ]***************
BSSID                RSSI   CHANNEL   Time
FC:58:9A:15:E2:4F     84     136       1531
FC:58:9A:15:DE:4F     37     136       41

***********[ Best AP ]****************
BSSID                RSSI   CHANNEL   Time
FC:58:9A:15:DE:4F    37     136       41

LED Pattern

Two new LED patterns are added to IW9167EH WGB mode:

  • When WGB is in disassociated state, the System LED is blinking RED.

  • When WGB makes association to parent AP, System LED turns to solid GREEN.

Configuring WGB/uWGB Radio Parameters

Configuring WGB Radio Antenna

Use the following command to configure WGB radio antenna gain. The default antenna gain is 4 dBi.

configure dot11 <0|1|2> antenna gain <1-30>

Use the following command to configure WGB radio antenna. Default is abcd-antenna.

configure dot11 <0|1|2> antenna <a-antenna|ab-antenna|abcd-antenna>

802.11ax 1600ns and 3200ns Guard Interval

802.11ax supports multiple Guard Interval (GI) value: 800ns, 1600ns, and 3200ns. By default, GI is set to 800ns. But you can set it to a different value.

Longer GI is commonly used in outdoor deployment.

#configure dot11radio <0|1|2> guard-interval
  1600  Configure 1600 ns guard interval (only in HE mode)
  3200  Configure 3200 ns guard interval (only in HE mode)
  800   Configure 800 ns guard interval

Customized Transmit Power

By default, the transmit power of the radio is set to AUTO(0) level.

To manually set the transmit power of the radio use the following command:

# configure Dot11Radio <0|1|2> txpower-level <0-8>

Assign Country Code to WGB/uWGB With -ROW PID

On day 0, you should assign proper country code to the WGB/uWGB with -ROW reg domain. WGB will load corresponding power table after rebooting.

To assign country code, use the following command:

#configure countrycode
  Supported ROW country codes:
  GB VN

  WORD  Select one of above ROW country codes.

Note


After the ROW country code is configured, if you want to change the configuration to another country, you need to perform a factory reset first, and then configure the new country code.


Indoor Deployment for -E Domain and United Kingdom

IW9167EH supports indoor deployment for -E domain and GB in -ROW domain .

For outdoor mode, the IW9167EH 5G radio supports channels 100, 104, 108, 112, 116, 120, 124, 128, 132, 136, 140. When indoor deployment is enabled, 5G radio supports channels 36, 40, 44, 48, 52, 56, 60, 64, 100, 104, 108, 112, 116, 120, 124, 128, 132, 136, 140.

To configure indoor mode, use the configure wireless indoor-deployment enable command.

To disable indoor mode, use the configure wireless indoor-deployment disable command.

#configure wireless indoor-deployment
  disable  Disable indoor deployment
  enable   Enable indoor deployment

You can check the indoor or outdoor mode by using the show controllers Dot11Radio [1|2] command. In the command output, "-Ei" means the indoor mode is enabled, and "-E" means indoor mode is disabled, as shown in the following examples. The CLI output also shows the supported channels.

#show controllers Dot11Radio [1|2]
…
Radio Info Summary:
=======================
Radio: 5.0GHz
Carrier Set: (-Ei)  ( GB )
Base radio MAC: FC:58:9A:15:B7:C0
Supported Channels:
36 40 44 48 52 56 60 64 100 104 108 112 116 120 124 128 132 136 140

#show controllers Dot11Radio [1|2]
…
Radio Info Summary:
=======================
Radio: 5.0GHz
Carrier Set: (-E)  ( GB )
Base radio MAC: FC:58:9A:15:B7:C0
Supported Channels:
100 104 108 112 116 120 124 128 132 136 140

Configuring WGB Roaming Parameters

Use the following command to configure the threshold duration and signal strength to trigger reconnecting. Default value is: period 20s and threshold -70db.

# configure wgb mobile period <time> <rssi-threshold>

Use the following command to configure beacon miss count to trigger reconnecting. Default value is 10.

# config wgb beacon miss-count <count>

Use the following command to configure max packet retry to trigger reconnecting. Default value is 64.

# configure wgb packet retries <retry-count>

Use the following command to configure the static roaming channel:

# configure wgb mobile station interface dot11Radio <slot_id> scan <channel_id> add

Use the following command to delete the mobile channel:

# configure wgb mobile station interface dot11Radio <slot_id> scan <channel_id> delete

Use the following command to scan all channels:

# configure wgb mobile station interface Dot11Radio 1 scan all

Importing and Exporting WGB Configuration

You can upload the working configuration of an existing WGB to a server, and then download it to the new deployed WGBs.

To upload the configuration to a server, use the following command:

#copy configuration upload <sftp:|tftp://> ip-address [directory] [file-name]

To download a sample configuration to all WGBs in the deployment, use the following command:

#copy configuration download <sftp:|tftp://> ip-address [directory] [file-name]

The access point will reboot after the copy configuration download command is executed. The imported configuration will take effect after the rebooting.

Verifying the Configuration of WGB and uWGB

Use the show run command to check whether the AP is in WGB mode or uWGB mode.

  • WGB:

    #show run
    AP Name              : APFC58.9A15.C808
    AP Mode              : WorkGroupBridge
    CDP State            : Enabled
    Watchdog monitoring  : Enabled
    SSH State            : Disabled
    AP Username          : admin
    Session Timeout      : 300
     
     
    Radio and WLAN-Profile mapping:-
    ====================================
    Radio ID    Radio Mode    SSID-Profile                    SSID
              Authentication
    --------------------------------------------------------------------------------
    --------------------------
    1           WGB           myssid                          demo
              OPEN
     
     
    Radio configurations:-
    ===============================
    Radio Id             : NA
       Admin state       : NA
       Mode              : NA
    Radio Id             : 1
       Admin state       : DISABLED
       Mode              : WGB
       Dot11 type        : 11ax
    Radio Id             : NA
       Admin state       : NA
       Mode              : NA
     
  • uWGB:

    #show run
    AP Name              : APFC58.9A15.C808
    AP Mode              : WorkGroupBridge
    CDP State            : Enabled
    Watchdog monitoring  : Enabled
    SSH State            : Disabled
    AP Username          : admin
    Session Timeout      : 300
     
     
    Radio and WLAN-Profile mapping:-
    ====================================
    Radio ID    Radio Mode    SSID-Profile                    SSID
              Authentication
    --------------------------------------------------------------------------------
    --------------------------
    1           UWGB          myssid                          demo
              OPEN
     
     
    Radio configurations:-
    ===============================
    Radio Id             : NA
       Admin state       : NA
       Mode              : NA
    Radio Id             : 1
       Admin state       : DISABLED
       Mode              : UWGB
       Uclient mac       : 0009.0001.0001
       Current state     : WGB
       UClient timeout   : 0 Sec
       Dot11 type        : 11ax
    Radio Id             : NA
       Admin state       : NA
       Mode              : NA
    

Use the show wgb dot11 associations command to verify the configuration of WGB and uWGB.

  • WGB:

    #show wgb dot11 associations
    Uplink Radio ID : 1
    Uplink Radio MAC : 00:99:9A:15:B4:91
    SSID Name : roam-m44-open
    Parent AP Name : APFC58.9A15.C964
    Parent AP MAC : 00:99:9A:15:DE:4C
    Uplink State : CONNECTED
    Auth Type : OPEN
    Dot11 type : 11ax
    Channel : 100
    Bandwidth : 20 MHz
    Current Datarate (Tx/Rx) : 86/86 Mbps
    Max Datarate : 143 Mbps
    RSSI : 53
    IP : 192.168.1.101/24
    Default Gateway : 192.168.1.1
    IPV6 : ::/128
    Assoc timeout : 100 Msec
    Auth timeout : 100 Msec
    Dhcp timeout : 60 Sec
  • uWGB:

    #show wgb dot11 associations
    Uplink Radio ID : 1
    Uplink Radio MAC : 00:09:00:01:00:01
    SSID Name : roam-m44-open
    Parent AP MAC : FC:58:9A:15:DE:4C
    Uplink State : CONNECTED
    Auth Type : OPEN
    Uclient mac : 00:09:00:01:00:01
    Current state : UWGB
    Uclient timeout : 60 Sec
    Dot11 type : 11ax
    Channel : 36
    Bandwidth : 20 MHz
    Current Datarate (Tx/Rx) : 77/0 Mbps
    Max Datarate : 143 Mbps
    RSSI : 60
    IP : 0.0.0.0
    IPV6 : ::/128
    Assoc timeout : 100 Msec
    Auth timeout : 100 Msec
    Dhcp timeout : 60 Sec