Cisco MSE Virtual Appliance Installation Guide for CMX Release 10.1
Bias-Free Language
The documentation set for this product strives to use bias-free language. For the purposes of this documentation set, bias-free is defined as language that does not imply discrimination based on age, disability, gender, racial identity, ethnic identity, sexual orientation, socioeconomic status, and intersectionality. Exceptions may be present in the documentation due to language that is hardcoded in the user interfaces of the product software, language used based on RFP documentation, or language that is used by a referenced third-party product. Learn more about how Cisco is using Inclusive Language.
- Updated:
- May 4, 2015
Chapter: Installing Cisco MSE in a VMware Virtual Machine
- Virtualization Concepts
- Installation Overview
- Cisco MSE Virtual Appliance Deployment Checklist
- Cisco CMX Services Deployment Checklist
- Requirements for Installing Cisco MSE Virtual Appliance
- Hardware Guidelines
- Downloading the Cisco MSE OVA File
- Deploying the Cisco MSE OVA File Using the VMware vSphere Client
- Installing a Cisco MSE Virtual Appliance
- Setting Up the Cisco MSE Virtual Appliance and Cisco CMX Services
- Verifying CMX Services
Installing a Cisco MSE Virtual Appliance
This chapter describes how to install and deploy a Cisco Mobility Services Engine (MSE) virtual appliance, which is distributed as an Open Virtual Appliance (OVA) file.
Cisco MSE OVA is a prebuilt software solution that comprises one or more virtual machines (VMs) that are packaged, maintained, updated, and managed as a single unit. Cisco MSE virtual appliance is not offered on an ISO or an Advanced Encryption Standard (AES) image; therefore you cannot perform a manual installation.
Cisco MSE acts as a platform (physical or virtual Cisco MSE appliance) to deploy and run the Cisco Connected Mobile Experiences (CMX) services. The MSE virtual appliance installation provides the choice of installing a single-box solution that supports any of the following Cisco CMX services:
- Detect & Locate, Analytics and Connect & Engage
- Detect & Locate and Connect & Engage
- Detect & Locate and Analytics
This chapter contains the following sections:
- Virtualization Concepts
- Installation Overview
- Cisco MSE Virtual Appliance Deployment Checklist
- Cisco CMX Services Deployment Checklist
- Requirements for Installing Cisco MSE Virtual Appliance
- Hardware Guidelines
- Downloading the Cisco MSE OVA File
- Deploying the Cisco MSE OVA File Using the VMware vSphere Client
- Installing a Cisco MSE Virtual Appliance
- Setting Up the Cisco MSE Virtual Appliance and Cisco CMX Services
- Verifying CMX Services
Virtualization Concepts
Refer to these documents for information on virtualization:
- https://www.vmware.com/pdfvirtualization.pdf
- http://pubs.vmware.com/vsphere-55/index.jsp#com.vmware.vsphere.vcenterhost.doc/GUID-ED375B12-7D08-4B7E-81EE-DCE83E51B1AF.html
- http://pubs.vmware.com/vsphere-55/index.jsp#com.vmware.vsphere.install.doc/GUID-41638619-B14E-4074-BB90-DACAA1440C1C.html?resultof=%2522%2545%2553%2558%2569%2522%2520%2522%2565%2573%2578%2569%2522%2520
Installation Overview
This table lists the Cisco MSE installation process.
|
|
|
|---|---|
1. Review the deployment checklist and prepare for installation of a Cisco MSE virtual appliance. |
Cisco MSE Virtual Appliance Deployment Checklist and Hardware Guidelines |
Deploying the Cisco MSE OVA File Using the VMware vSphere Client |
|
4. Configure the basic configurations and install the Cisco MSE virtual appliance. |
|
Setting Up the Cisco MSE Virtual Appliance and Cisco CMX Services |

Note![]() If you are upgrading a 10.0 deployment to 10.1, see the “Upgrading a 10.0 Deployment to 10.1” section.
If you are upgrading a 10.0 deployment to 10.1, see the “Upgrading a 10.0 Deployment to 10.1” section.
Cisco MSE Virtual Appliance Deployment Checklist
Review the following checklist before attempting to deploy the Cisco MSE virtual appliance:
- Cisco Wireless LAN Controller (WLC) 7.0 or later.
- SNMP credentials of Cisco WLC (private key for v1 and v2, or username/password for v3).
- Cisco WLC should have an IP connectivity to a Cisco CMX 10.1 instance.
- Port 16113 should be routable from Cisco WLC to the Cisco CMX 10.1 IP address.
- SNMP traffic over port 161 should be routable from Cisco WLC to the Cisco CMX 10.1 IP address.
- Cisco Prime Infrastructure 1.4 or later.
- Cisco WLC is synced with the Cisco Prime Infrastructure 1.4 or later.
- Map size is less than 5 MB in the Cisco Prime Infrastructure.
- There are less than 1000 access points on a single map.
- In Cisco Prime Infrastructure, the hierarchy of maps is campus, building, and zone.
- The following functionalities are not available in Cisco CMX 10.1:
–![]() Wireless intrusion prevention system (wIPS)
Wireless intrusion prevention system (wIPS)
- VMware virtualization environment ESXi 5.1 or later.
- Cisco CMX 10.1 should have been tested with the following browser:
- Determine the IP address, NetMask, Default Gateway, DNS Server IP address, and NTP Server IP address for the new Virtual Machine (VM).
- SSH client to log in to the root access of the VM.
- The Secure Copy (SCP) client (on MAC native or installed on PC) or a Secure File Transfer Protocol (SFTP) to move files into Cisco MSE OVA (specifically, map files and images to upgrade).
- Time displayed on the Cisco WLC is always ahead of the Cisco MSE time. Use a common Network Time Protocol (NTP) Server to know the time.
- Cisco CMX 10.1 has a mail notification system. Use the SMTP Mail Server name and authentication mechanism.
- Cisco CMX 10.1 does not render any data on Cisco Prime Infrastructure maps. To allow client display in Cisco Prime Infrastructure 1.4 or later, a parallel Cisco MSE 8.0 is also required.
Cisco CMX Services Deployment Checklist
Requirements for Installing Cisco MSE Virtual Appliance
- VMware ESXi host server (see Table 2 ).
- vSphere client.
- Cisco MSE 10.1 OVA from www.cisco.com/go/mse.
- Hostname, IP address, network mask, gateway, and DNS IP address for the new VM.
- NTP Server name or IP address.
- Existing exported map file from Cisco Prime Infrastructure.
- IP address of the Cisco Wireless Controller, the Controller type, the Controller IP address, the SNMP version, and the SNMP write community string.
- Mail server settings (port number, security settings) and email address.
Hardware Guidelines
Table 2 lists the hardware guidelines for the Cisco MSE virtual appliance.
|
|
|
|
|
|---|---|---|---|
Downloading the Cisco MSE OVA File
Cisco MSE virtual appliance is distributed as an Open Virtualization Archive (OVA) file.
To download the Cisco MSE OVA file, follow these steps:
Step 1![]() Access the MSE image from: https://software.cisco.com/download/navigator.html?mdfid=282152561&i=rm
Access the MSE image from: https://software.cisco.com/download/navigator.html?mdfid=282152561&i=rm
Step 2![]() Select Mobility Services Engine Virtual Appliance.
Select Mobility Services Engine Virtual Appliance.
Step 3![]() Choose Latest > 10.1 for download.
Choose Latest > 10.1 for download.
Step 4![]() Save the Cisco MSE OVA installer to your computer and ensure that it is accessible.
Save the Cisco MSE OVA installer to your computer and ensure that it is accessible.
Deploying the Cisco MSE OVA File Using the VMware vSphere Client
Note![]() Review the “Requirements for Installing Cisco MSE Virtual Appliance” section before you start deploying the Cisco MSE OVA.
Review the “Requirements for Installing Cisco MSE Virtual Appliance” section before you start deploying the Cisco MSE OVA.
To deploy the Cisco MSE OVA file using the VMware VSphere Client, follow these steps.
Step 1![]() Download the Cisco MSE OVA file from the following location:
Download the Cisco MSE OVA file from the following location:
https://software.cisco.com/download/navigator.html?mdfid=282152561&i=rm.
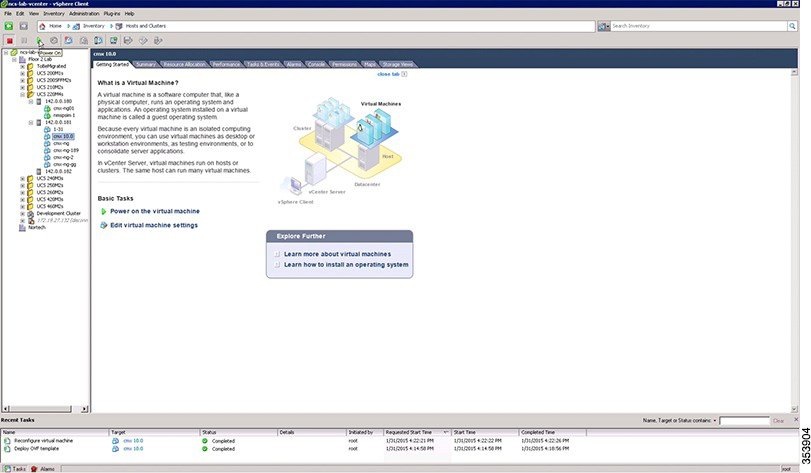
Step 2![]() Deploy the OVA file by using the VMware vSphere client application on your desktop (see Figure 1-1).
Deploy the OVA file by using the VMware vSphere client application on your desktop (see Figure 1-1).
Figure 1-1 VMware vSphere Client

Before powering the newly created virtual machine (VM), edit the virtual machine settings by right-clicking on the VM and selecting Edit Settings….
Step 3![]() Change the memory, the CPUs, and the provisioned disk size to meet the requirements.
Change the memory, the CPUs, and the provisioned disk size to meet the requirements.
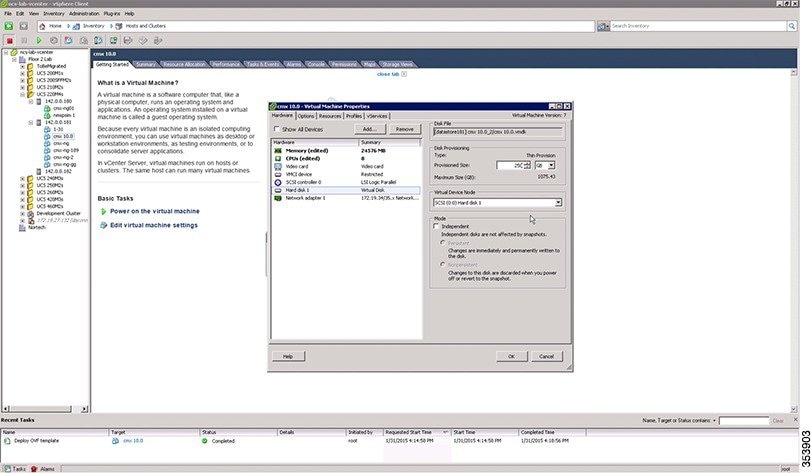
Step 4![]() Power the Virtual Machine, by selecting the VM and clicking Power On the Virtual Machine.
Power the Virtual Machine, by selecting the VM and clicking Power On the Virtual Machine.
Installing a Cisco MSE Virtual Appliance
After deploying the Cisco MSE OVA file, configure the basic settings, install, and start Cisco MSE.
To install and configure a Cisco MSE virtual appliance, follow these steps:
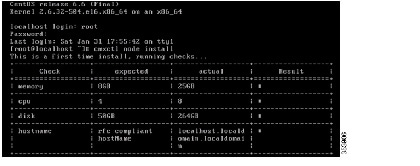
Step 1![]() Log in and begin the installation.
Log in and begin the installation.
------------------------------------------------------------------

Step 2![]() Enter the following command:
Enter the following command:
The installation script verifies that the minimum requirements are met:
Step 3![]() Enter the hostname, IP address, network mask, gateway, and DNS.
Enter the hostname, IP address, network mask, gateway, and DNS.
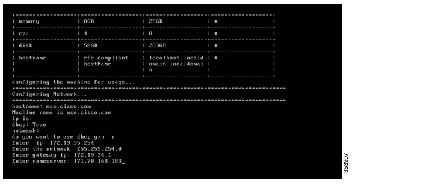
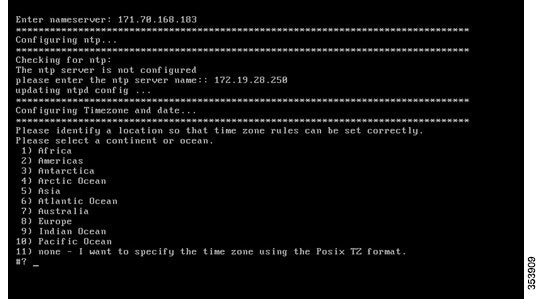
Step 4![]() Enter the NTP Server name or IP address.
Enter the NTP Server name or IP address.
Note![]() If the NTP server is unreachable, use 127.0.0.1 as the server address during installation.
If the NTP server is unreachable, use 127.0.0.1 as the server address during installation.
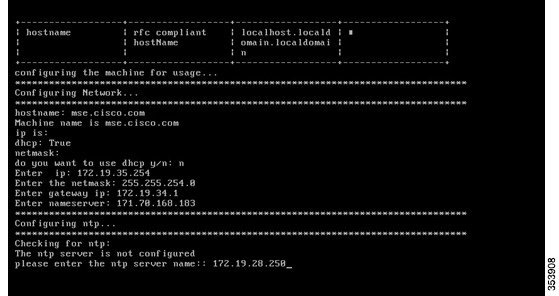
Step 5![]() Configure the time zone and save the changes.
Configure the time zone and save the changes.
Setting Up the Cisco MSE Virtual Appliance and Cisco CMX Services
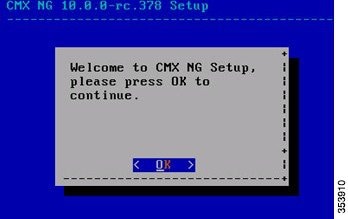
Step 1![]() Press Enter to select OK to start the setup.
Press Enter to select OK to start the setup.
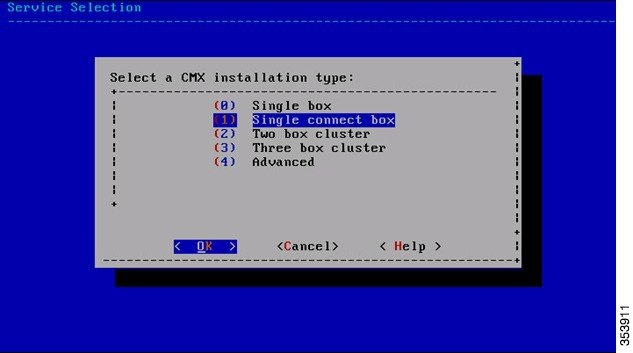
Step 2![]() Select the installation type, that is, the CMX services, to be deployed on the Cisco MSE virtual appliance of your choice.
Select the installation type, that is, the CMX services, to be deployed on the Cisco MSE virtual appliance of your choice.
- (0) Single box and press Enter or "OK". This option enables you to install release 10.1 with Analytics and Location.
- (1) Single connect box and press Enter or "OK". This option enables you to install release 10.1 with Connect and Location.
- (2) Single connect box with Analytics and press Enter or "OK". This option enables you to install release 10.1 with Analytics, Location, and Connect.
Step 3![]() Press Enter to select "All".
Press Enter to select "All".

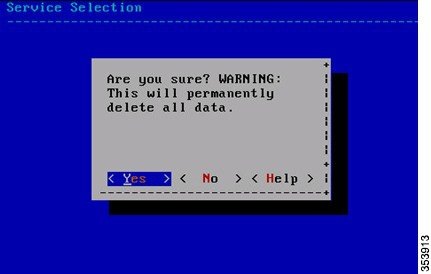
Step 4![]() Press Enter to select "Yes".
Press Enter to select "Yes".
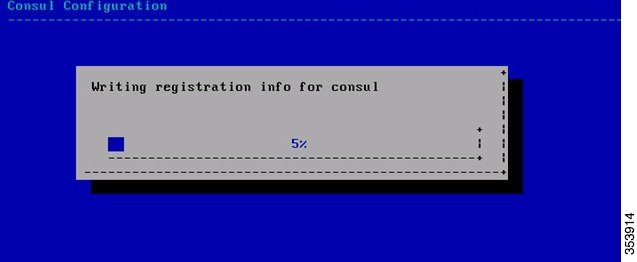
The setup and configuration will start and take a few minutes.
It will go through the following steps:
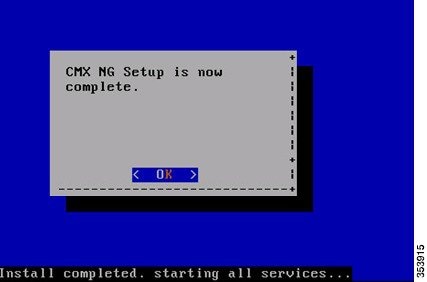
Step 5![]() Press Enter for "OK" to complete the installation and start all the Cisco MSE services.
Press Enter for "OK" to complete the installation and start all the Cisco MSE services.
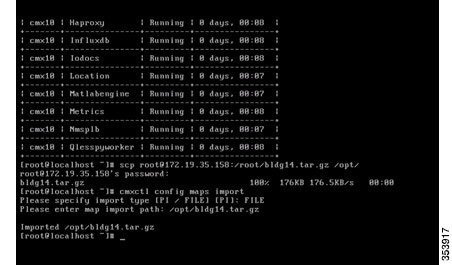
Step 6![]() Enter the cmxctl status command to verify that all services are up and running.
Enter the cmxctl status command to verify that all services are up and running.

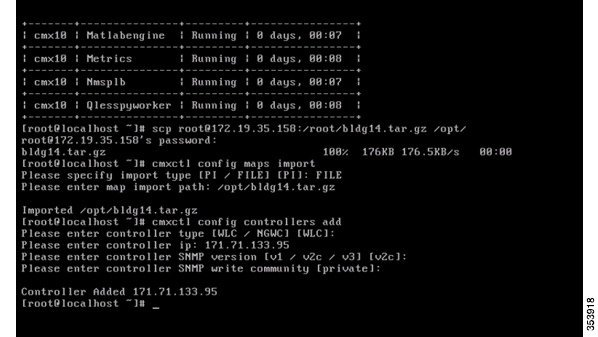
Step 7![]() Copy the map file from its saved location.
Copy the map file from its saved location.
Step 8![]() Add the Wireless LAN Controller (WLC).
Add the Wireless LAN Controller (WLC).
Step 9![]() Launch the CMX 10.1 user interface and verify the following:
Launch the CMX 10.1 user interface and verify the following:
- Cisco WLC and its connection status—Choose System > Dashboard. The Controller group box lists all the controllers added to the system and the active connections are shown in green color.
- Clients on the map—Click the Locations tab to view all clients on the map.
- Network Mobility Services Protocol (NMSP) status—Click the System tab to check when was the last time CMX received the NMSP message.
- Current visitor count and dwell time—Click the Analytics tab to verify the visitor count and dwell time.
Step 10![]() Configure the mail server settings to receive system notifications and alerts.
Configure the mail server settings to receive system notifications and alerts.

The DEFAULT CLUSTER > SETTINGS page appears.
- Click the Mail Server tab.
- Enter a name for the mail server in the Name text box.
- Enter the email address in the Email Address text box.
- Enter the port number in the Port text box.
- Click Save to save the changes.
Verifying CMX Services
You can use the System tab of the CMX 10.1 user interface to verify overall system health including the status of CMX services.
The System tab contains four sub tabs.
- Dashboard—Provides a system at a glance view
- Alerts—Enables you to view live alerts.
- Patterns—Enables you detect patterns of various criteria such as Client Count, CPU Usage, Memory Usage, etc.
- Metrics—Enables you to view system metrics
In the Dashboard of the System tab, make sure all services, memory, and CPU have a healthy status (green) for each Cisco MSE/CMX node and there is at least one active Wireless LAN Controller.
 Feedback