Product or Feature Overview
With the advent of internet of things, the number of devices that connect to the internet is increased multifold. Not all of these devices support 802.1x supplicant and need an alternate mechanism to connect to the internet. One of the security mechanisms, WPA-PSK could be considered as an alternative. With the current configuration, the pre-shared-key is the same for all clients that connect to the same WLAN. In certain deployments such as Educational Institutions, this results in the key being shared to unauthorized users resulting in security breach. Therefore, above mentioned and other requirements lead to the need for provisioning unique pre-shared keys for different clients on a large scale.
-
Identity PSKs are unique pre-shared keys created for individuals or groups of users on the same SSID.
-
No complex configuration required for clients. The same simplicity of PSK, making it ideal for IoT, BYOD, and guest deployments.
-
Supported on most devices, where 802.1X may not, enabling stronger security for IoT.
-
Easily revoke access, for a single device or individual, without affecting everyone else.
-
Thousands of keys can easily be managed and distributed via the AAA server.
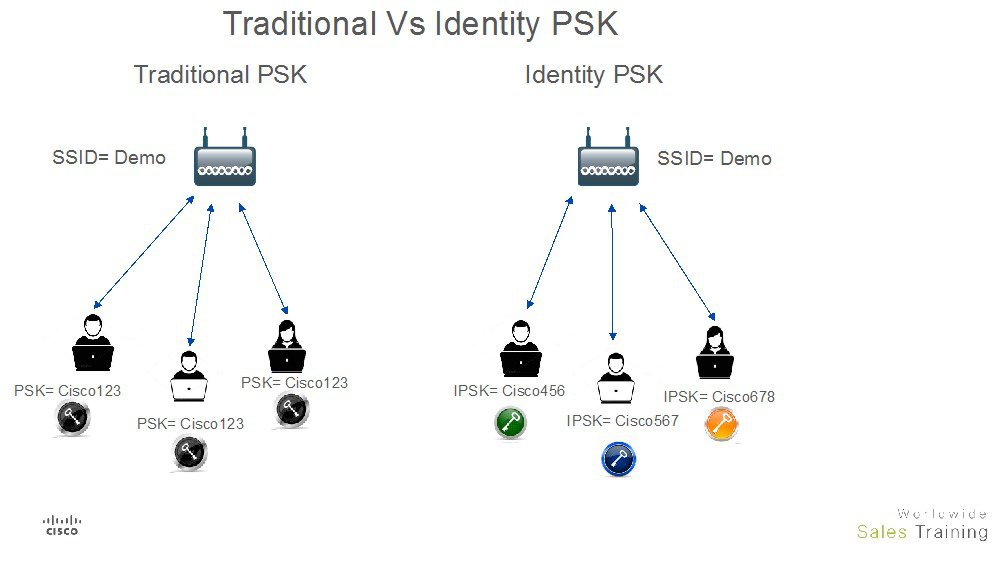
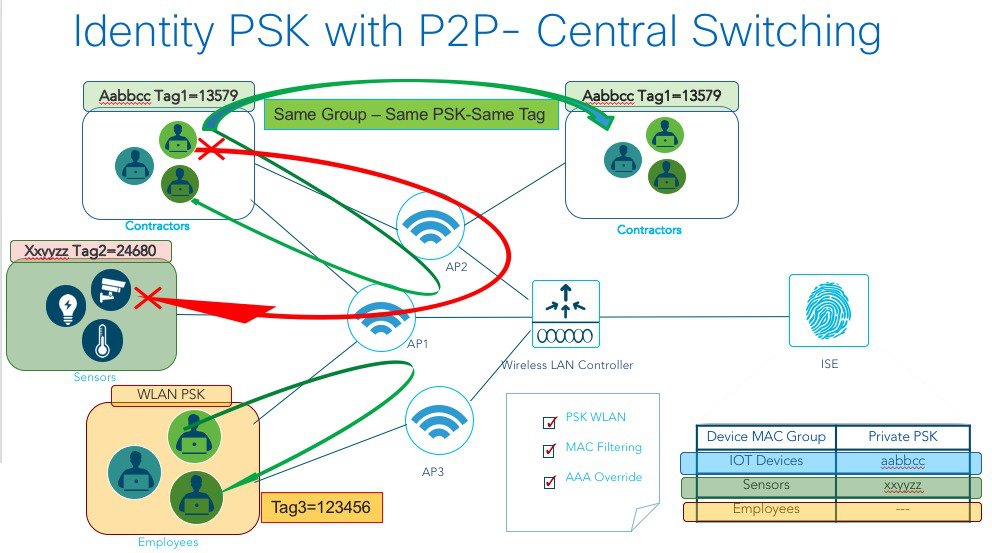
As depicted in the above diagram, in the Traditional PSK, for all the clients that connect to a particular SSID, the key would remain same leading to security issues. With Identity PSK, every client connecting to the same SSID can have potentially a different key.
IPSK solution
During client authentication, the AAA server would authorize the client mac address and send the passphrase (if configured) as part of the Cisco-AVPair list. The WLC would receive this as part of the radius response and would process this further for the computation of PSK.
When the client sends association request to the SSID broadcasted by the access point, the Wireless LAN Controller forms the RADIUS request packet with the particular mac address of the client and relays to the RADIUS server.
The RADIUS server performs the authentication and checks whether the client is allowed or not and sends either ACCESS-ACCEPT or ACCESS-REJECT as response to the WLC.
To support Identity PSK, in addition to sending the authentication response, the authentication server would also provide the AV Pair passphrase for this specific client. This is used further for the computation of PSK.
The RADIUS server could also provide additional parameters such as username, VLAN, QoS, etc in the response, that is specific to this client. For multiple devices that is owned by a single user, the passphrase could remain the same.

Configurations Steps for IPSK
IPSK can be configured on any AAA serer that supports Cisco av-pair. In this deployment guide we focus on the configuration on the Cisco Identity Service Engine. ISE 2.2 Configuration Steps
Procedure
| Step 1 |
Add wireless controller under test on ISE as shown below with a secret password configured in "Radius Authentication Setting" and then Submit the configuration. 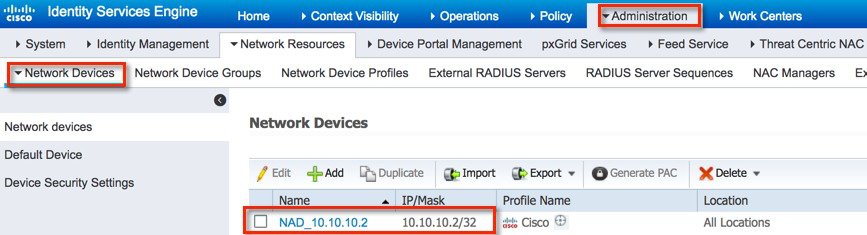 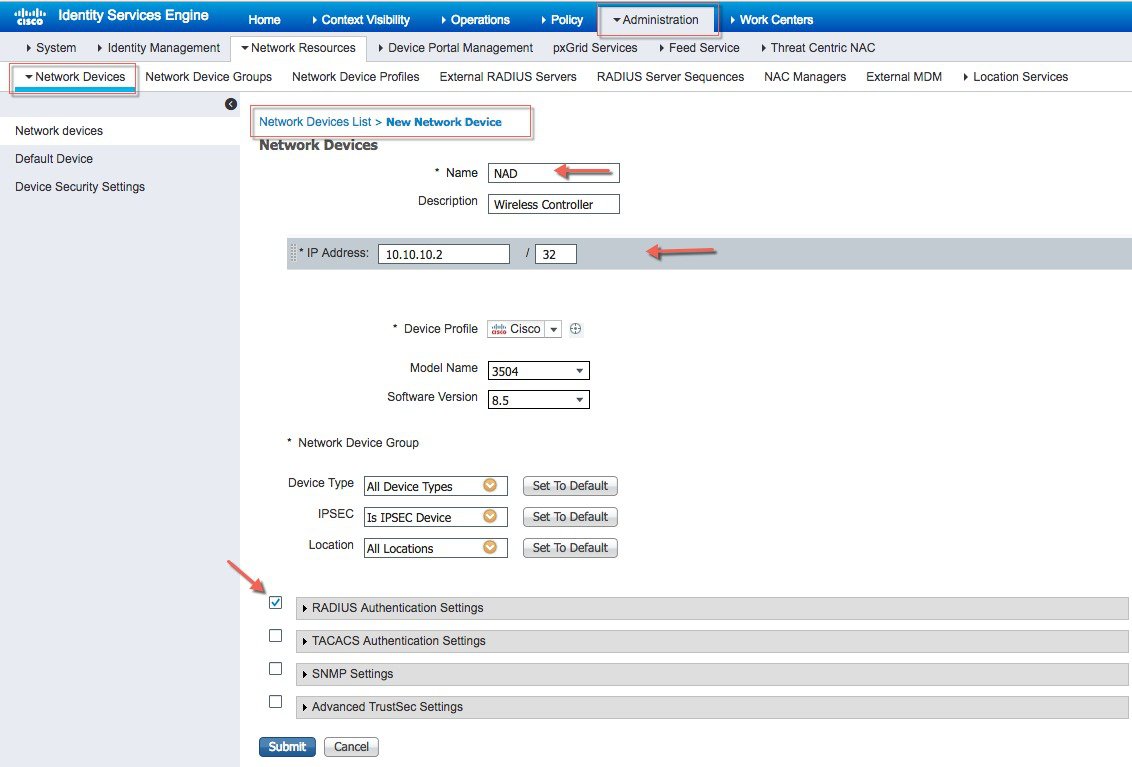 |
||||
| Step 2 |
Create an Authorization Profile and verify it Under Policy > Results > Authorization > Authorization Profiles IPSK-Device as shown in example below. 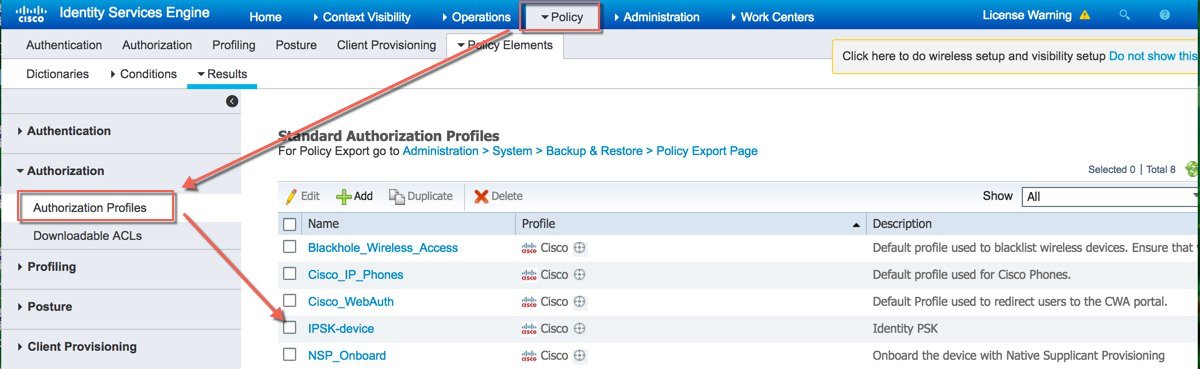 |
||||
| Step 3 |
Create Authorization profile With Access Type Access_Accept with cisco-av-pair(s) with psk-mode and psk password as shown in the example below is configured.  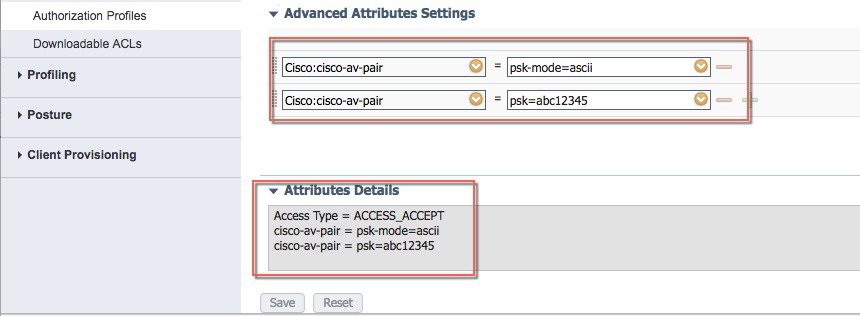 |
||||
| Step 4 |
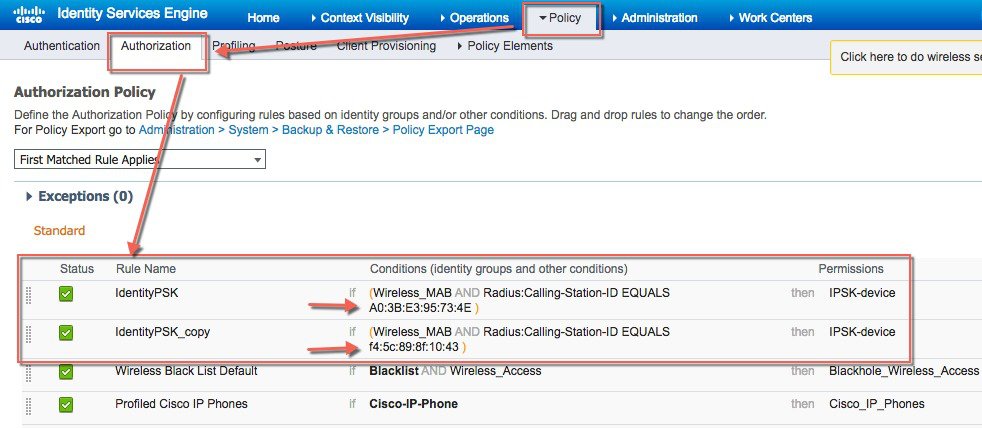
Under Policy > Authorization Configure Rule for every Device or User MAC address to be used with IPSK as shown in example below. Use as many Mac address entries as you wish.
  |
||||
| Step 5 |
Verify every step performed above and make sure all configuration are applied and saved. |
Controller Configuration Steps
Procedure
| Step 1 |
Create WLAN on your controller as in the shown example Pod1-IPSK. 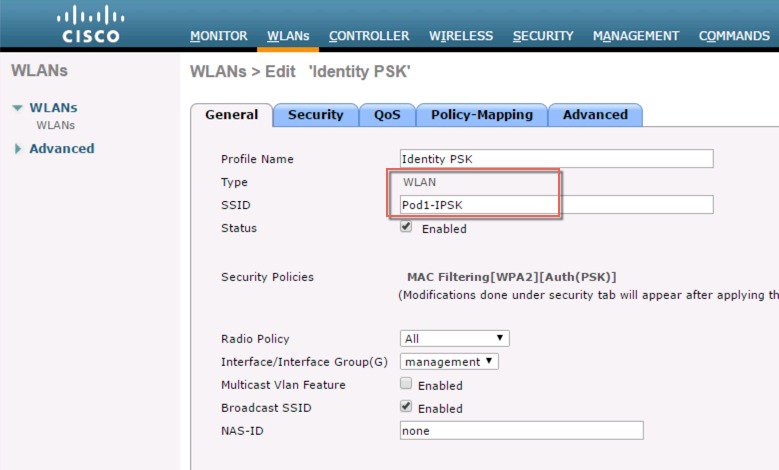 |
| Step 2 |
Configure WLAN with Security WPA2/PSK and enable MAC filtering. In the example below the PSK key used is PSK=12345678. 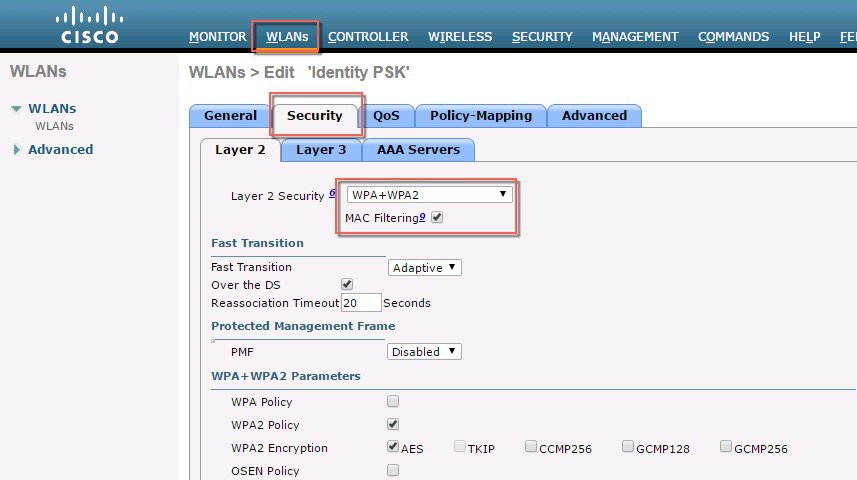 |
| Step 3 |
Configure WLAN with Security WPA2/PSK and configure PSK. In the example below the PSK key used is PSK=12345678.  |
| Step 4 |
Configure on the WLC the Authentication Server with ISE IP address and apply it to WLAN Pod1-IPSK created in the steps above. In our example, ISE IP address is 10.91.104.106. 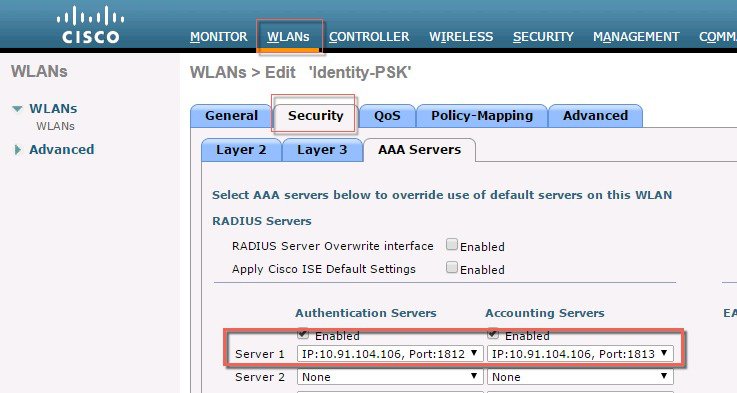 |
| Step 5 |
Lastly, under WLAN advanced settings enable AAA Override.  |
WLC Local Policies Combined with IPSK
Just like AVC, mDNS or Open DNS profile can be mapped to a local policy for a client with a particular device type.IPSK also can be combined with Local policies on the controller and mapped to a specific WLAN. When configuring the AV-pair=PSK-mode and PSK-password on the AAA server such as ISE, admin can easily add another AV-pair=role for example for a teacher or a student group and then configure a Local policy to that specific Role.Each local policy can be configured with a different profile name, ACL, Role, Device Type and even Active Hours based on the AAA override to restrict/permit the policy from being able to use/deny the services not allowed by the profile on the same WLAN.
When combining IPSK and Local Policies on the same WLAN the use cases can be unlimited and open to many different deployment scenarios.
For example on campus admin can configure a use case where students have to login with IPSK and then apply local policy that only those students belonging to the group Students can access specific applications at certain bandwidth on specific device and during specific time. There practically unlimited set of capabilities and tweaks available when combining the two.
Introduction to Profiling and Policy Engine on the WLC
Cisco currently offers a rich set of features which provide device identification,on boarding,posture,and policy,through ISE. This new feature on the WLC does the profiling of devices based on protocols such as HTTP, DHCP, and so on to identify the end devices on the network.The user can configure the device-based policies and enforce per user or per device policy on the network.The WLC will also display statistics based on per user or per device end points and policies applicable per device.
With BYOD (Bring your own device), this feature has an impact on understanding the different devices on the network. With this, BYOD can be implemented on a small scale within the WLC itself.
Scope and Objectives
In this section, we will be configuring and implementing Profiling and Policy on a Cisco WLC running AireOS8.5 code.
The profiling and policy enforcement will be configured as two separate components. The configuration on theWLC is based on defined parameters specific to clients joining the network with IPSK security as configured in the previous sections. The policy attributes which are of interest are:
-
Role–Role defines the user type or the user group the user belongs to.
-
PSK-mode ASCII
PSK-password–match of the specific PSK password with the device MAC address
For example: Student or Employee
-
Device–Device defines the type of device.
For example: Windows machine, Smart phone, Apple device such as iPad, iPhone and so on.
-
Time of day–Allows configuration to be defined at what time of the day end-points are allowed on the network.
The above parameters are configurable as policy match attributes. Once the WLC has a match corresponding to the above parameters per end-point,the policy enforcement comes into picture. Policy enforcement will be based on session attributes such as:
-
VLAN
-
ACL
-
Session Timeout
-
QoS
-
Sleeping Client
-
Flexconnect ACL
-
AVC profile
-
mDNS profile
-
Open DNS profile
-
Security Group Tag
The user can configure these policies and enforce end-points with specified policies.The wireless clients will be profiled based on the MAC address, MAC OUI, DHCP, and HTTP user agent (valid Internet required for successful HTTP profiling).The WLC uses these attributes and predefined classification profiles to identify the device.
Profiling and Policy Configuration
Procedure
| Step 1 |
To configure device profiling on a WLAN, go to the specific WLAN on which you want to implement Native profiling and policy and click Advanced. Disable Allow AAA Override if it is enabled. In the DHCP area, check the Required check box for DHCP Addr. Assignment. 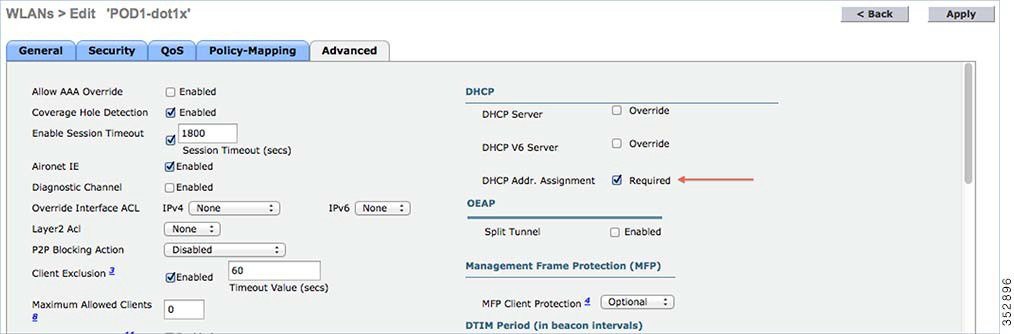 |
||
| Step 2 |
After enabling the DHCP required option, scroll down and in the Local Client Profiling area, enable DHCP Profiling and HTTP Profiling if they are not enabled and click Apply. 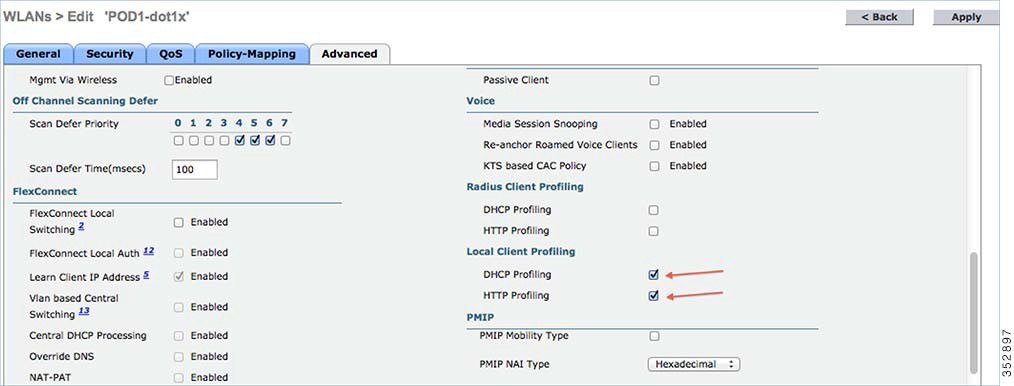 Creating Policies on the WLAN from the WLC GUI |
||
| Step 3 |
Once Profiling is configured, we can move on to create Local policies and apply them on the WLAN. On the WLC menu bar, go to Security > Local Policies, which will take you to the Policy List.  |
||
| Step 4 |
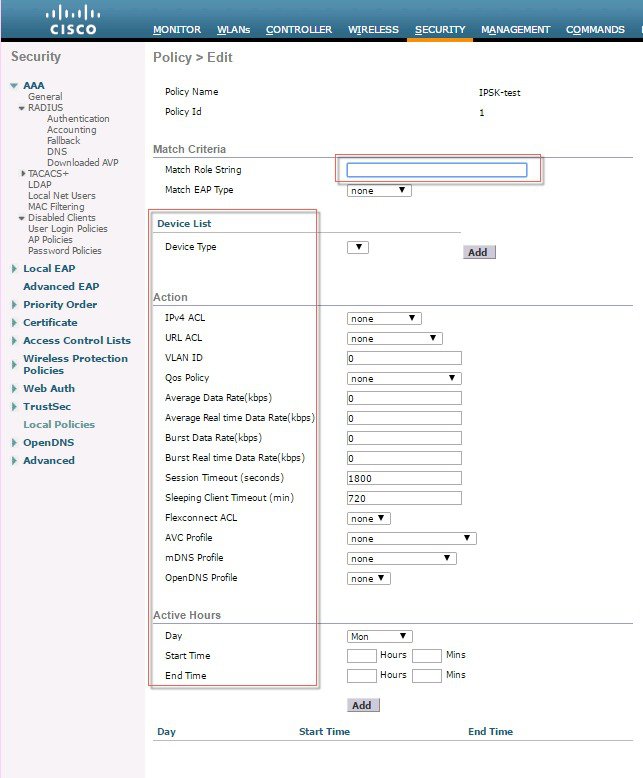
When in the Local Policy List, click New to create a Policy Name. In this example, teacher-LP is used as a policy name, but you can use any name to define your own policy.  Once policy name is configured, you can create policies to match a Role, EAP Type, and DeviceType. Also, you can define the required actions related to the Match criteria. Here, in our setup we use User Role and Device Type to Match Criteria, but you can use any other type if required.
|
||
| Step 5 |
Enter User Role and click Apply. Here the role name "teacher" is used as an example. |
||
| Step 6 |
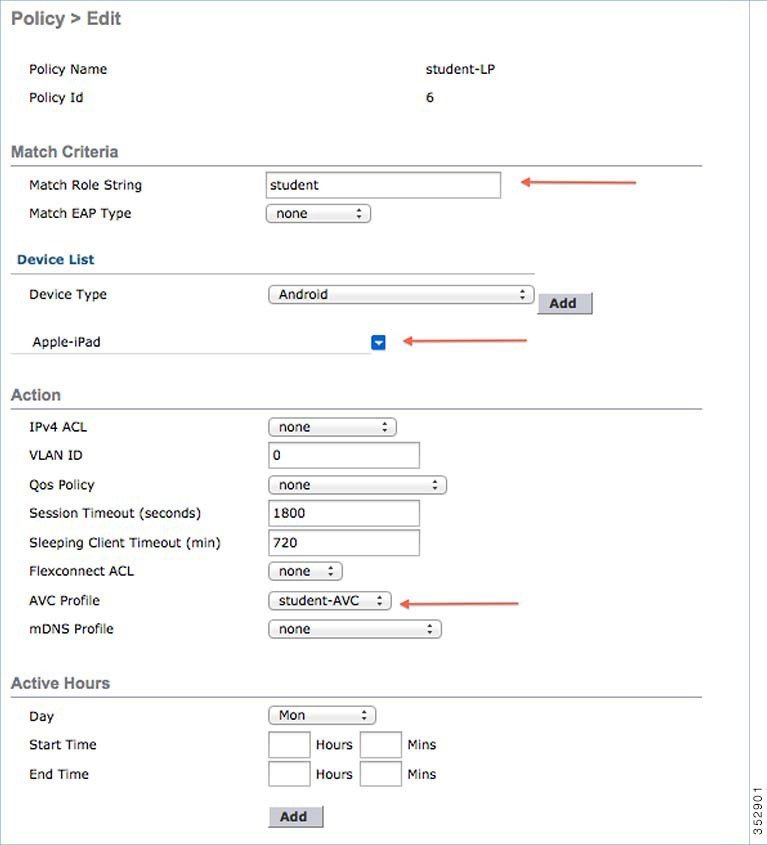
To apply the policy based on a user device, in the Device List area, from the Device Type drop-down list, choose the device type on which you want to enforce the policy and then click Add. Here, we used Apple-iPad as a device type for Match Criteria. You can add Apple-iPhone and other Apple devices as well from the Device Type drop-down list.
|
||
| Step 7 |
To apply the appropriate action, choose from the parameters under the Action area to enforce the policy. Select the AVC profile that should be defined in the last section. 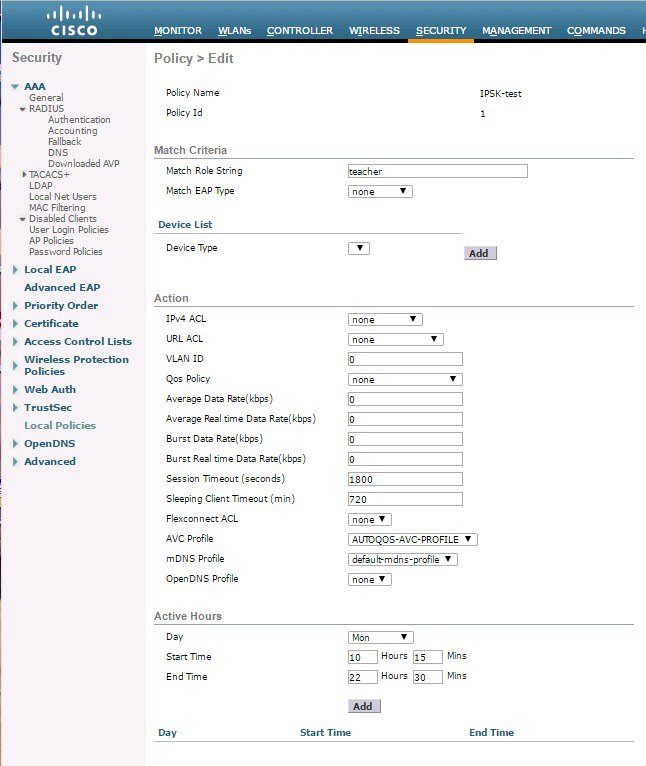
|
||
| Step 8 |
User can create more than one Local policy and apply it for student as “student-LP”.
 |
||
| Step 9 |
Create a default local policy for any other device. If no other ACL is applied in the Local policy, then any other device, other than Apple-iPad, will be able to access the applications because the final filter function of all policies is Allow all. In order to block all applications on all devices except Apple-iPad, create a deny all ACL and apply it on the Local Policy and then apply that policy on the WLAN as the last resort. See the configuration examples in the screenshots below. Create an ACL to deny all IPv4 flow. 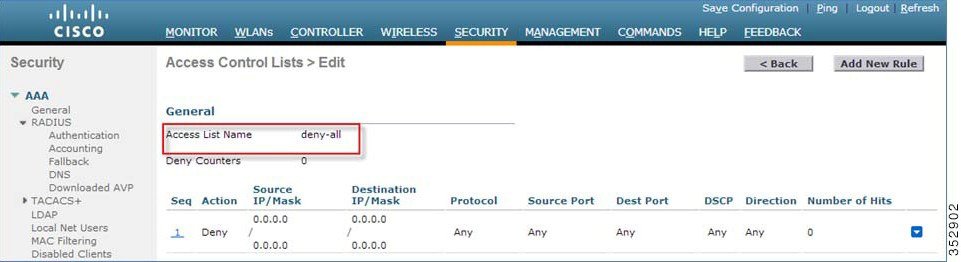 Create a Local Policy Block-all and apply thedeny all ACL to it, do not choose any devices roles or profiles. 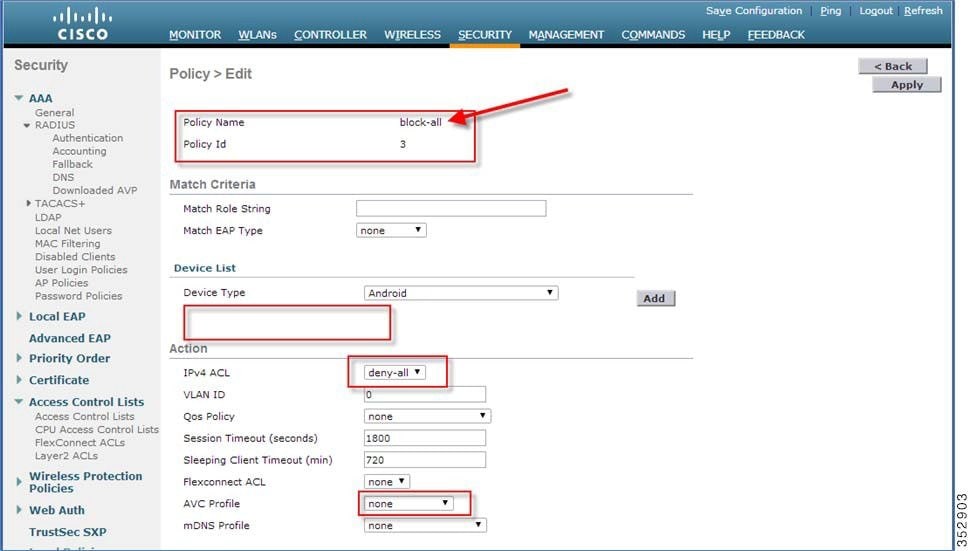 |
Mapping Policy on WLAN
Procedure
| Step 1 |
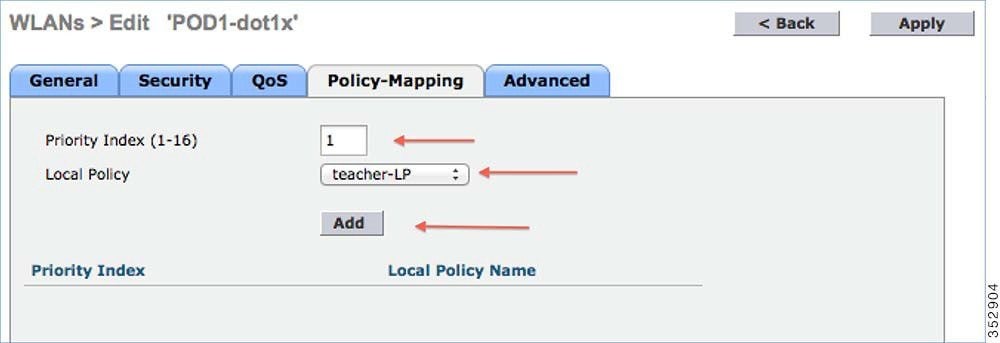
Go to WLANs from the WLC menu bar and click the WLAN ID on which you want the policy to be implemented. From the WLAN edit menu, click the Policy-Mapping tab. Set the Priority index to any value from 1-16. From the Local Policy drop-down list, choose
the policy which you have already created. To apply the policy on the WLAN,
click Add. The policy will be added.
 |
| Step 2 |
Add the appropriate policies to Policy-Mapping under WLAN.  |
| Step 3 |
In the Advanced tab, disable Allow AAA Override if it is enabled as was configured also for IPSK. 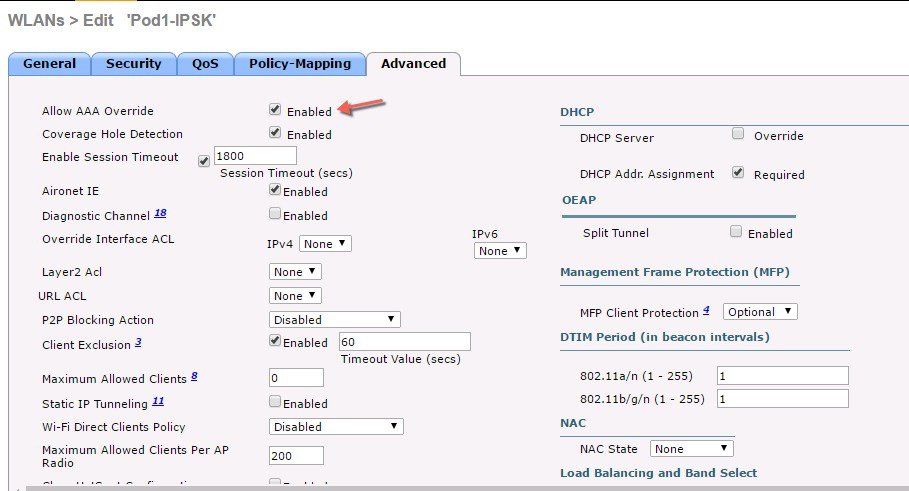 |
| Step 4 |
Check if the AAA role is configured properly, that is, role name on the AAA server should match the role string defined in the local policy. The example below is from the Cisco ISE server configured with cisco-av-pair role=teacher. Same configure for role=students. 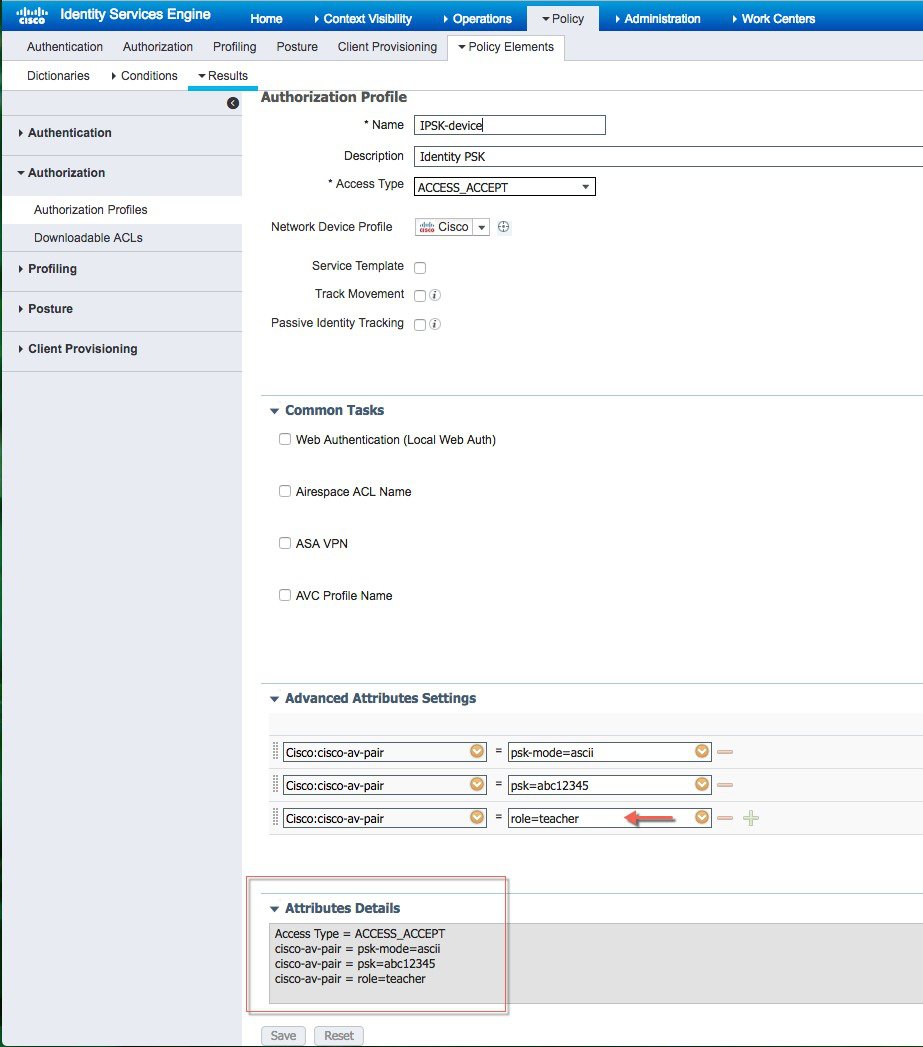 |
End User Device Setup
Procedure
| Step 1 |
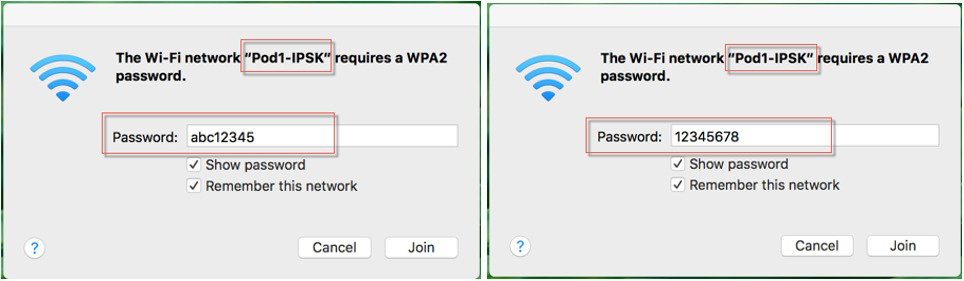
On the End User device with MAC address configured on ISE connect to the WLAN Pod1-IPSK and enter IPSK password abc12345 for that device or as it was configured on ISE. ----- Connection successful |
| Step 2 |
Connect to the same WLAN with PSK 12345678. ---- connection will be un-successful |
| Step 3 |
Connect to the same WLAN with device MAC address not configured on ISE with PSK 12345678. ---– connection successful
 |
| Step 4 |
To verify if the policy is applied from the WLC GUI, go to Monitor > Clients, and then click the Client MAC address. 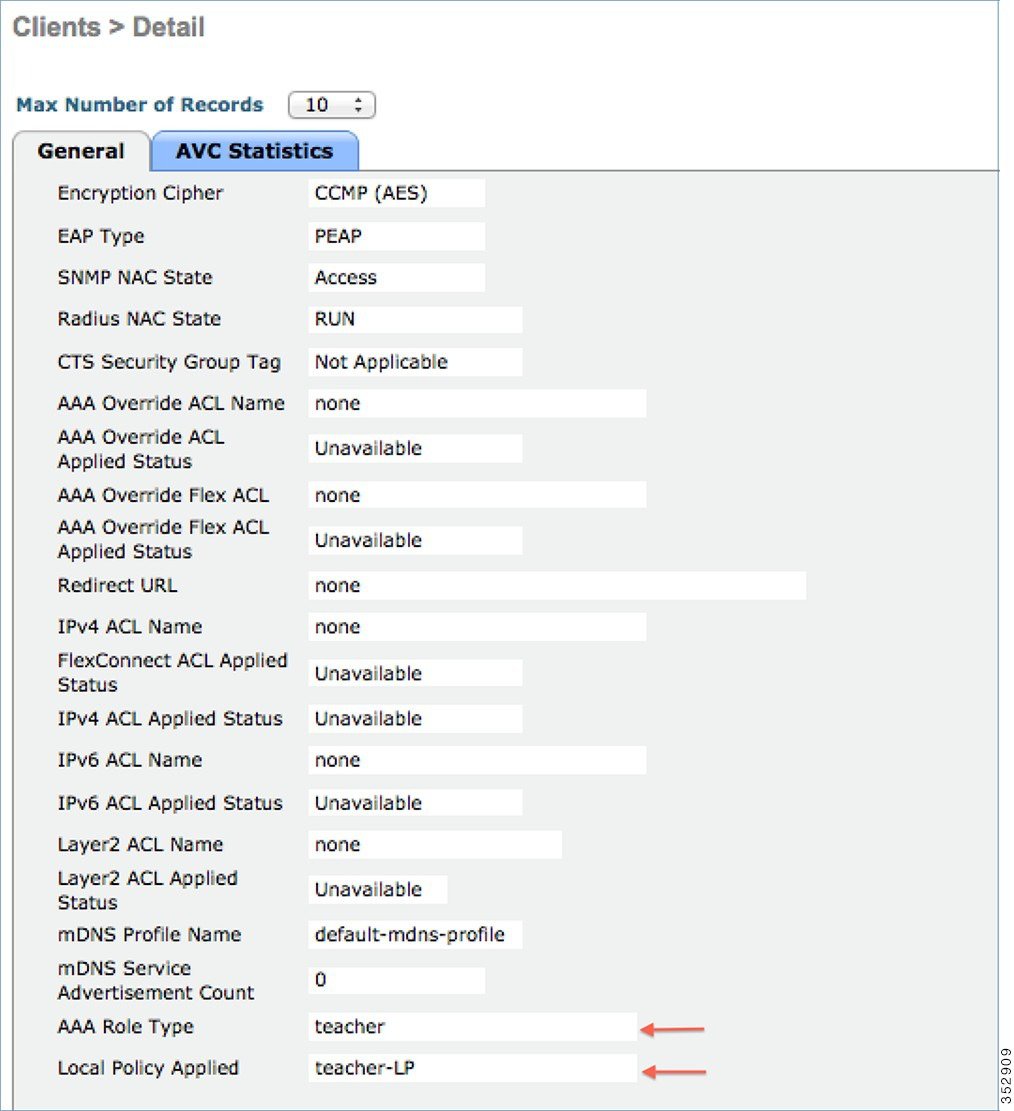 |
Conclusion
-
Controller that has Mac Filtering and AAA overide enabled with ISE configured, will allow IPSK configured devices connect to WLAN with MAC addresses configured on ISE.
-
Devices with MAC addresses configured on ISE will not be able to connect to WLAN generic PSK but only with IPSK configured for that device.
-
Devices with no-MAC addresses configured on ISE will be able to connect to WLAN with generic PSK only.
-
IPSK supports Local Mode and Flexconnect Mode (Central Authentication & Local Switching).
-
IPSK supports FSR and key caching is done fo faster roams to avoid RADIUS connect on every roam.
-
To enable validity of the IPSK at certain scheduled times, the time schedule/validity can be exploited using radius session-timeout attribute in radius response.
IPSK Configuration through CLI commands
config wlan mac-filtering enable <wlanId>
config wlan aaa-override enable <wlanId>
config wlan security wpa akm psk enable <wlanId>
config wlan security wpa akm psk set-key <ascii/hex> <key> <wlanId>
The existing show command would display the configuration of the WLAN and the client.
show wlan <wlanId>
show client detail <clientMac>
iPSK with P2P Blocking in Rel 8.8
This section of the Deployment guide introduces the IdentityPSK enhanced feature with P2P blocking/bridging and provides general guidelines for its deployment. The purpose of this document is to:
-
Provide an overview of 8.8 Feature
-
Highlight supported iPSK with P2P blocking Features
-
Provide details on deploying and managing the 8.8 Feature
Requirements
This new feature will be supported on 1800, 2800 and 3800 Wave-2 APs and on the 3504, 5520 and 8540 controllers. This feature will be supported with IPv4 and IPv6 devices in Locally and Centrally Switched Modes.
Feature Enhancements Overview
With the advent of the internet of things, the number of devices that connect to the internet is increased multifold. Not all of these devices support 802.1x supplicant and need an alternate mechanism to connect to the internet. One of the security mechanisms, WPA-PSK could be considered as an alternative. With the current configuration, the pre-shared-key is the same for all clients that connect to the same WLAN. In certain deployments such as Educational Institutions, this results in the key being shared to unauthorized users resulting in a security breach. Therefore, above mentioned and other requirements leading to the need for provisioning unique pre-shared keys for different clients on a large scale.
-
Identity PSKs are unique pre-shared keys created for individuals or groups of users on the same SSID.
-
No complex configuration required for clients. The same simplicity of PSK, making it ideal for IoT, BYOD, and guest deployments.
-
Supported on most devices, where 802.1X may not, enabling stronger security for IoT.
-
Easily revoke access, for a single device or individual, without affecting everyone else.
-
Thousands of keys can easily be managed and distributed via the AAA server.
-
In release 8.8 IPv6 is supported
In release 8.8 the iPSK feature is enhanced with additional capabilities requested by customers. In some instances customers wish to prevent Client or IoT devices with different or same PSK keys on the same or different WLAN from talking to each other or bridging, in other words, configure peer-to-peer (P2P) blocking or bridging. This new differentiated service has been introduced in release 8.8.
Configuration options for peer to peer blocking:
-
Drop: Drop peer to peer traffic (existing option)
-
Disable: Bridge peer to peer traffic (existing option)
-
Up Stream: Forward up peer to peer traffic (existing option)
-
Allow Private Group: Bridge devices with same Tag ( new option)
|
WLAN P2P configuration |
iPSK Source device tag |
iPSK Destination device tag |
Traffic bridging decision |
Remarks |
|---|---|---|---|---|
|
Drop |
Any |
Any |
Block |
With this configuration, all the P2P traffic gets dropped |
|
Disable |
Any |
Any |
Allow |
With this configuration, all the P2P traffic gets bridged |
|
Up Stream |
Any |
Any |
Forward up |
With this configuration, all the P2P traffic gets forwarded to the next hop switch |
|
Allow Private Group |
T1 |
T2 |
Block |
With this configuration, the P2P traffic with different tag values T1 and T2 gets dropped |
|
Allow Private Group |
T |
T |
Allow |
With this configuration, the P2P traffic with the same tag value T gets bridged |
iPSK P2P Blocking Solution for AP Central Switching
Configurations Steps for iPSK with P2P Blocking
As indicated above, in release 8.8, a new enhanced iPSK option was added to allow iPSK devices to be bridged or blocked.
Scenario-1: If devices connected on the same WLAN and P2P Blocking is set to Allow-Private-Group – the devices will be able to communicate to each other and Bridged if the Tags are the same based on the configuration of the ISE Authorization Profiles.
Scenario-2: If the Tags are the different, based on ISE configuration of Authorization profiles, then the client devices are blocked and cannot communicate with each other.
The two Scenarios below illustrate the communication between two devices based on their assigned tags.
Scenario-1 Example for the same Group
Two client devices connect to the same WLAN and configured on the ISE to belong to the same Group. In this case, both devices will have the same Tag.
Procedure
| Step 1 |
Under WLAN advanced settings choose Allow-Private-Groups. 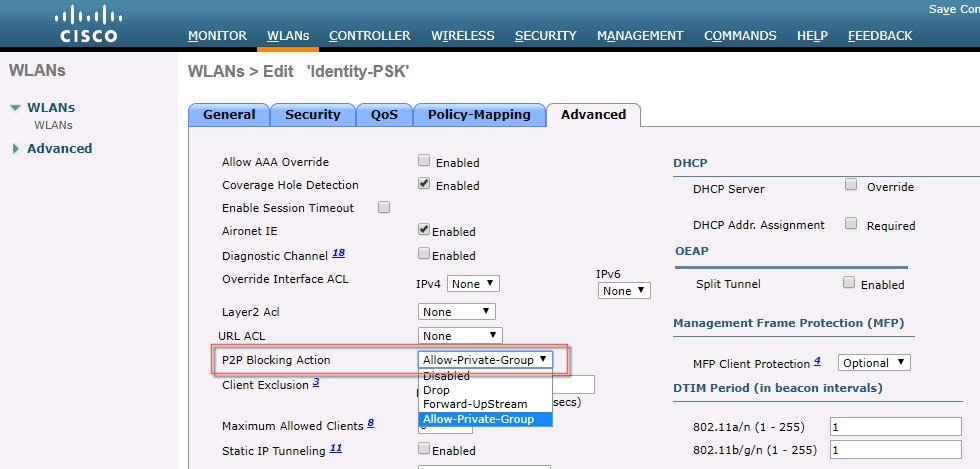 |
| Step 2 |
In this step configure both client devices on ISE with the same Authorization Profile "iPSK-HVAC" as shown in the example below.  |
| Step 3 |
Verify both clients are connected to the controller using the CLI or GUI. The example below shows CLI output of the command “show client summary ipsk-tag" of the two devices with MAC addresses as shown in Step 2, connected and have the same ipsk-tag as shown in the example below. 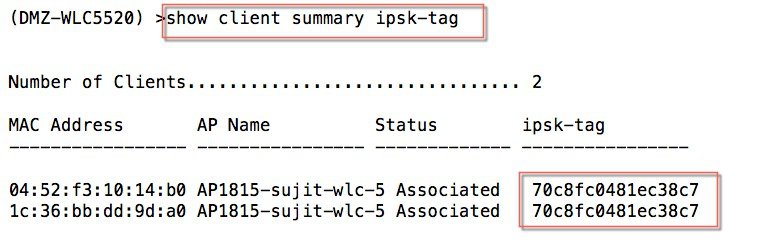 |
| Step 4 |
The same ipsk-tag can be verified on the Controller GUI under the Monitor > Client > General tab. 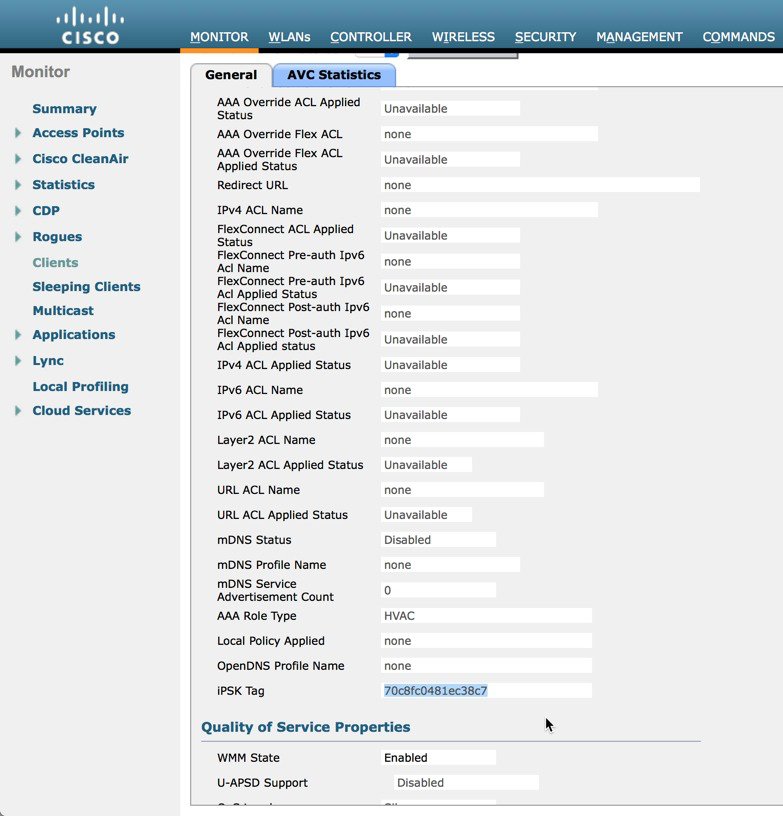 |
| Step 5 |
Since both devices have the same tag they should be able to ping each other. The example below shows the same two devices can communicate in P2P Allow-Private-Group mode with the same tag. IP address 10.0.70.241 is pingable now. 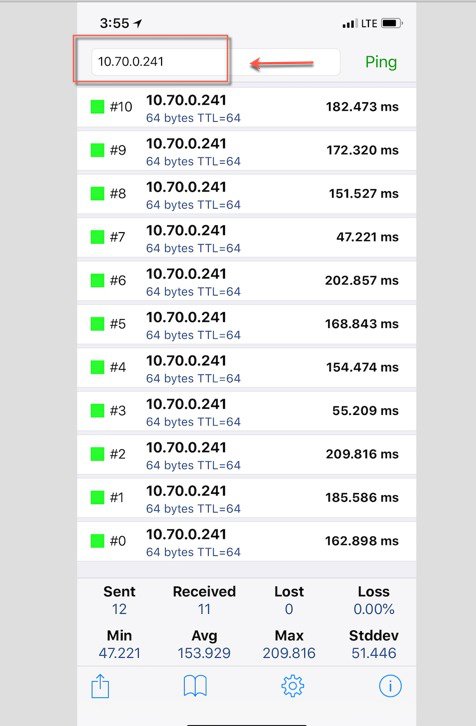 |
Scenario-2 Example
Two client devices connect to the same WLAN and configured on the ISE to belong to a different Group. In this case, both devices will have different PSK and thus controller will assign them different Tags.
Procedure
| Step 1 |
Under WLAN advanced settings the P2P Blocking configuration is the same as before “Allow-Private-Group” with AAA override. |
||
| Step 2 |
In this step configure both client devices on ISE with different Groups in the Authorization Profiles "iPSK-HVAC" and "iPSK-DoorLocks" as shown in the example below.
 |
||
| Step 3 |
Verify both clients are connected to the controller via the CLI or GUI. The example below shows CLI output of the command "show client summary ipsk-tag" of the two devices with MAC addresses as shown in Step 2, connected and have different ipsk-tag as shown in the example below. 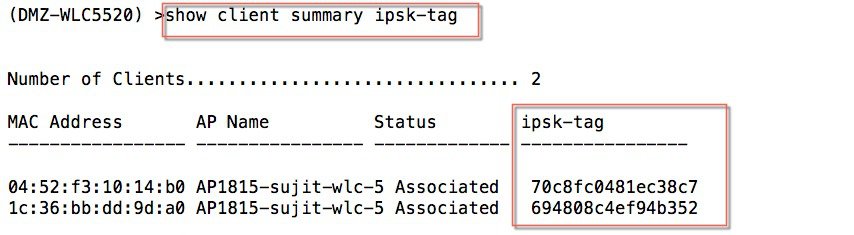 Same can be observed in GUI screen on the controller under Monitor> Clients> Details as shown in the example below: 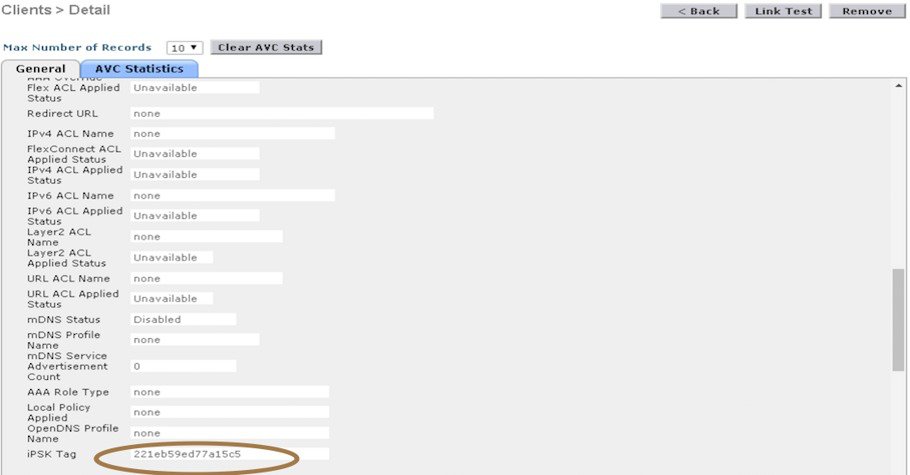 |
||
| Step 4 |
Since each device has a different tag they should not be able to ping each other. The example below shows the same two devices cannot communicate in P2P Allow-Private-Group mode with different tags. IP address 10.0.70.241 is not pingable now. 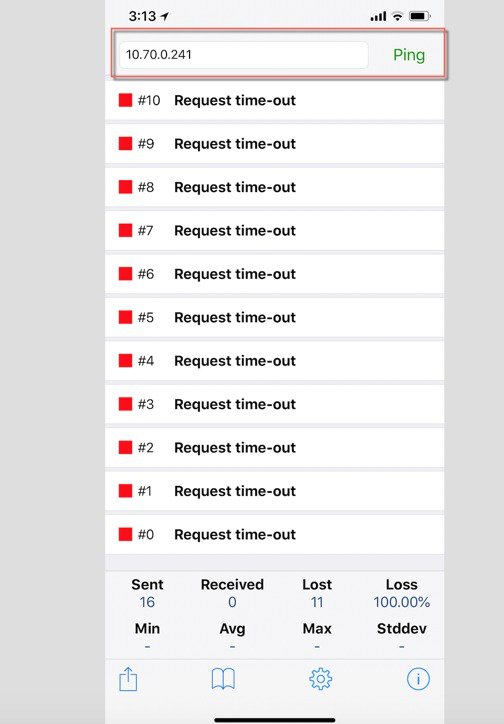 |
 Feedback