Installing vWLC and KVM with Fedora
This chapter contains the following topics:
- Installing Fedora OS
- Updating Fedora OS
- Installing KVM and openvswitch with supporting packages
- Network Configuration
- Installing vWLC Using Virtual Machine Manager (VMM)
- Accessing vWLC's Console
Installing Fedora OS
To install Fedora OS, perform the following steps:
Updating Fedora OS
To update Fedora OS after installation, perform the following steps:
| Step 1 | Update Fedora OS:
yum install update |
| Step 2 | Install GUI:
yum install @gnome-desktop -y |
| Step 3 | Install VNC server --
http://www.namhuy.net/3134/install-vnc-server-on-fedora-20.html:
yum install tigervnc-server -y |
| Step 4 | Install x11:
yum groupinstall "X Software Development" |
Installing KVM and openvswitch with supporting packages
yum install -y @standard @virtualization openvswitch
systemctl enable network.service
systemctl start network.service
systemctl enable openvswitch.service
systemctl start openvswitch.service
Verifying the Installation of KVM
lsmod | grep kvm
Example output on Intel processor:
[root@localhost system]# lsmod | grep kvm
kvm_intel             147785  0
kvm                   464964  1 kvm_intel
Network Configuration
Creating a Bridge and Mapping it to Port (Ethernet Interface)
ovs-vsctl add-br ov_10nw
ovs-vsctl add-port ov_10nw enp2s0f0
ovs-vsctl add-br ov_9nw
ovs-vsctl add-port ov_9nw en
The bridge name must be the same as created in the XML file.
Viewing the Bridge Mapping
ovs-vsctl show
Example
[root@localhost ~]# ovs-vsctl show
099e8b7e-bf00-4071-be62-ec55f9b543cc
    Bridge "ov_9nw"
        Port "ov_9nw"
            Interface "ov_9nw"
                type: internal
        Port "enp2s0f1"
            Interface "enp2s0f1"
    Bridge "ov_10nw"
        Port "ov_10nw"
            Interface "ov_10nw"
                type: internal
        Port "enp2s0f0"
            Interface "enp2s0f0"
    ovs_version: "2.3.1-git3282e51"
Creating XML Files
Create two XML files; one for service-nw (10nw) and the other for management (9nw).
Example
10nw_eth0_ov.xml
9nw_eth1_ov.xml
Both XML files contain VLAN information based on the network, or based on what you want to allow.
Example: To Allow All VLANs
<network>
  <name>10-nw</name>
  <forward mode='bridge'/>
  <bridge name='ov_10nw'/>
  <virtualport type='openvswitch'/>
  <portgroup name='vlan-any' default='yes'>
  </portgroup>
</network>
The bridge name must be the same as created during "ovs-vsctl" command.
If only specific VLANs need to be allowed, use the following format.
<network>
  <name>ov-nw</name>
  <forward mode='bridge'/>
  <bridge name='bridge_1'/>
  <virtualport type='openvswitch'/>
  <portgroup name='all_vlans' default='yes'>
  </portgroup>
  <portgroup name='vlan-152-untagged'>
    <vlan>
        <vlan mode='native-untagged'/>
   <tag id='152'/>
    </vlan>
  </portgroup>
  <portgroup name='vlan-153'>
    <vlan>
      <tag id='153'/>
    </vlan>
  </portgroup>
  <portgroup name='two-vlan'>
    <vlan trunk='yes'>
      <tag id='152'/>
      <tag id='153'/>
    </vlan>
  </portgroup>
</network>
Allowing CDP Packets to Forward from Open vSwitch
ovs-vsctl set bridge ov_9nw other-config:forward-bpdu=true
Viewing the Virtual Network
virsh net-list --all
Deleting the Default Network
virsh net-undefine default
Creating Virtual Network
virsh net-define <xml_file_name>
Viewing the Virtual Network
virsh net-list --all
Starting the Virtual Network
virsh net-start <network_name_that is in the list>
Example
[root@localhost ~]# virsh net-list --all
 Name                 State      Autostart     Persistent
----------------------------------------------------------
 default              inactive   no            yes
[root@localhost ~]# virsh net-undefine default
Network default has been undefined
[root@localhost ~]# virsh net-define 10nw_eth0_ov.xml
Network 10-nw defined from 10nw_eth0_ov.xml
[root@localhost ~]# virsh net-define 9nw_eth1_ov.xml
Network 9-nw defined from 9nw_eth1_ov.xml
[root@localhost ~]# virsh net-list --all
 Name                 State      Autostart     Persistent
----------------------------------------------------------
 10-nw                inactive   no            yes
 9-nw                 inactive   no            yes
[root@localhost ~]# virsh net-start 10-nw
Network 10-nw started
[root@localhost ~]#
[root@localhost ~]# virsh net-start 9-nw
Network 9-nw started
[root@localhost ~]# virsh net-list --all
 Name                 State      Autostart     Persistent
----------------------------------------------------------
 10-nw                active     no            yes
 9-nw                 active     no            yes
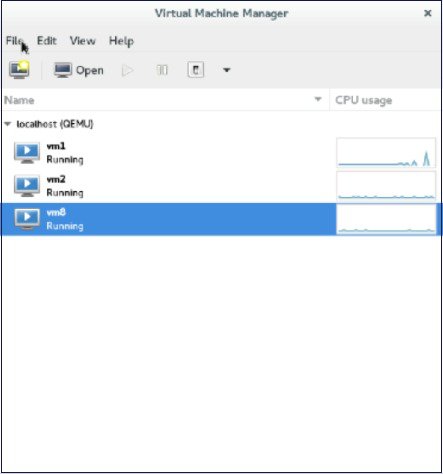
Installing vWLC Using Virtual Machine Manager (VMM)
 Note | Console to Fedora. GUI is required for VMM. |
| Step 1 | Open the terminal (command prompt). | ||||
| Step 2 | Execute the
command
virt-manager.
The Virt
Manager (VMM) pop-up window appears.
| ||||
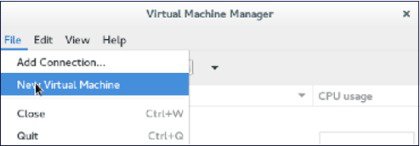
| Step 3 | Create a new
virtual machine (VM).
| ||||
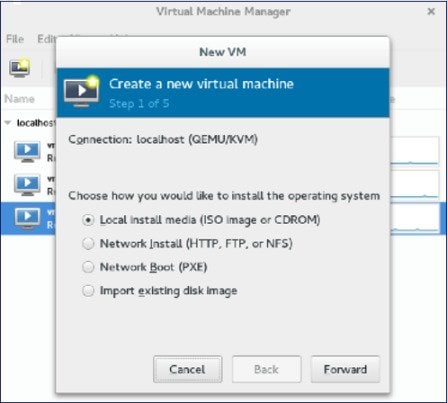
| Step 4 | Select the path.
| ||||
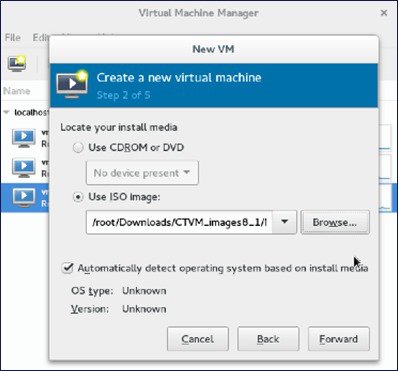
| Step 5 | Select the ISO
file of vWLC.
| ||||
| Step 6 | Select the
memory and CPU.
| ||||
| Step 7 | Select the disk
space.
| ||||
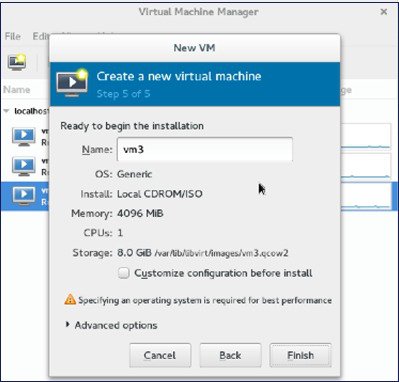
| Step 8 | Name the VM.
| ||||
| Step 9 | Check the
Customize
configuration before install check box and then click
Finish.
(This helps to configure other options)
| ||||
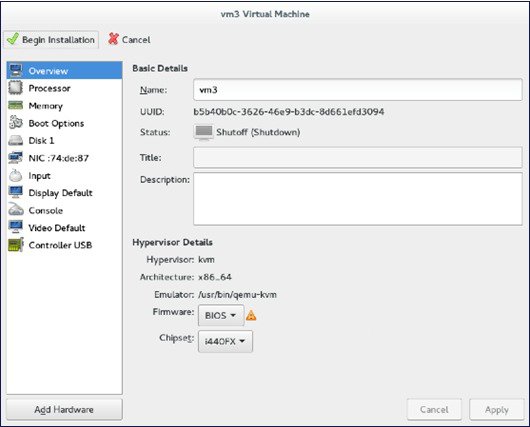
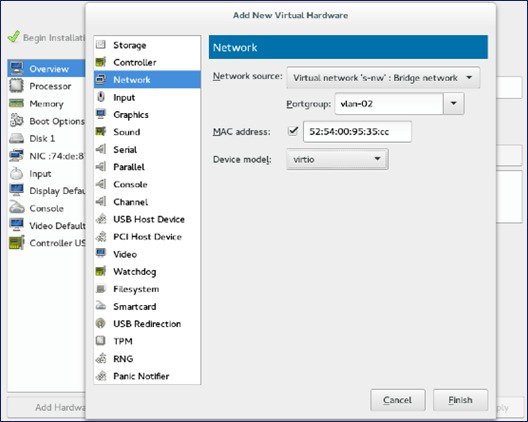
| Step 10 | Click
Add
Hardware.
| ||||
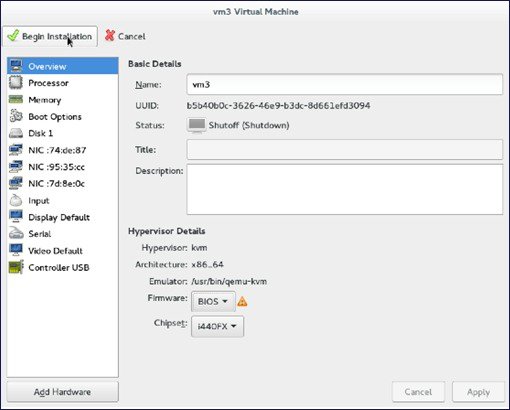
| Step 11 | Click
Begin
Installation.
| ||||
| Step 12 | Wait for WLC prompt for initial configuration. |


Accessing vWLC's Console
To access vWLC's console, perform the following steps:
| Step 1 | From the
terminal, execute the following command:
virsh console <vm_name eg. vm1> | ||
| Step 2 | Reboot vWLC
through virt-manager.
|
 Feedback