WPA3 Deployment Guide
Available Languages
Bias-Free Language
The documentation set for this product strives to use bias-free language. For the purposes of this documentation set, bias-free is defined as language that does not imply discrimination based on age, disability, gender, racial identity, ethnic identity, sexual orientation, socioeconomic status, and intersectionality. Exceptions may be present in the documentation due to language that is hardcoded in the user interfaces of the product software, language used based on RFP documentation, or language that is used by a referenced third-party product. Learn more about how Cisco is using Inclusive Language.
- US/Canada 800-553-2447
- Worldwide Support Phone Numbers
- All Tools
 Feedback
 Feedback
WPA3 Requirements for Wi-Fi 6E (6 GHz) and Wi-Fi 7
WPA3-Enterprise GUI Configuration
WPA3-Enterprise CLI Configuration
WPA3-Enterprise 192-bit GUI Configuration (optional)
WPA3-Enterprise 192-bit CLI Configuration (optional)
WPA3-Enterprise Transition Mode
WPA3-Enterprise Transition Mode GUI Configuration
WPA3-Enterprise Transition Mode CLI Configuration
WPA3-Personal GUI Configuration
WPA3-Personal CLI Configuration
WPA3-Personal SAE Hash-to-Element Method for Password Element Generation
WPA3-Personal SAE Hash-to-Element Method for Password Element Generation CLI configuration
WPA3-Personal SAE with Fast Transition Enabled
WPA3-Personal SAE with Fast Transition Enabled CLI Configuration
WPA3 Personal Transition Mode CLI Configuration
WPA2+WPA3-Personal Transition Mode with 6 GHz
WPA2+WPA3-Personal Transition Mode with 6 GHz GUI Configuration
WPA2+WPA3-Personal Transition Mode with 6 GHz CLI Configuration
WPA3-Enterprise Transition Mode Disable GUI Configuration
WPA3-Enterprise Transition Mode Disable CLI Configuration
WPA3-Personal Transition Mode Disable GUI Configuration
WPA3-Personal Transition Mode Disable CLI Configuration
WPA3 OWE Transition Mode GUI Configuration
WPA3 OWE Transition Mode CLI Configuration
Useful Catalyst 9800 Controller Commands
Wi-Fi Protected Access 3 (WPA3) is the latest generation of Wi-Fi security protocol and is a successor to WPA2. WPA3 is an enhancement to WPA2 and enforces 802.11i and 802.11w IEEE standards. WPA3 introduces new features on enterprise, personal, and open security networks through an increase in cryptographic strength, allowing for a more secure authentication process for all WPA3-supported endpoints.
It is designed to:
● Strengthen Wireless Security
● Simplify secure connectivity for users
● Provide robust protection even with weak passwords
● Secure public/open Wi-Fi networks.

Overall, WPA3 significantly raises the security baseline of Wi-Fi networks, protecting users against common attacks like brute-force password guessing, passive snooping, and session hijacking, while also making setup more user-friendly.
● WPA3-Enterprise, for 802.1X security networks. This leverages IEEE 802.1X with SHA-256 as the Authentication and Key Management (AKM).
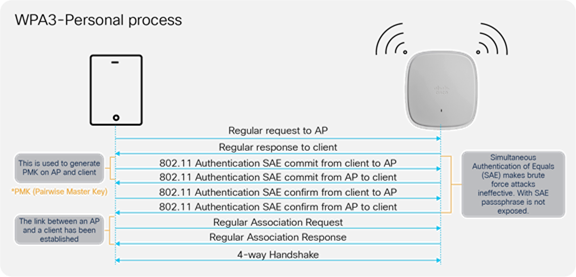
● WPA3-Personal, which uses the Simultaneous Authentication of Equals (SAE) method for personal security networks. There are two sub-methods to derive the Password Element in SAE:
◦ Hunting and Pecking (HnP)
◦ Hash-to-Element (H2E)
Note: Wi-Fi 6E (6 GHz) and Wi-Fi 7 requires Hash-to-Element as mandatory, as HnP is prone to brute force dictionary attacks.
● WPA3 Transition Mode (WPA2+WPA3 security-based WLANs for both personal and enterprise). {Starting 17.12.1, this can be used with 1 SSID and 1 Profile and support 6GHz band.}
● Opportunistic Wireless Encryption (OWE) for open security networks.
WPA3 Requirements for Wi-Fi 6E (6 GHz) and Wi-Fi 7
Wi-Fi Alliance mandated WPA3 for 6 GHz band and Wi-Fi 7 to ensure modern security and protect from vulnerabilities and provide a secure foundation for new device ecosystems.
WPA3 Requirements in Wi-Fi 6E (6 GHz) :
● WPA3 is mandatory for all Wi-Fi 6E devices operating in 6 GHz band.
● WPA3-Personal (SAE) with H2E for home/personal use.
● WPA3-Enterprise (802.1X, with optional 192-bit security suite) for enterprise deployments.
● Enhanced Open (OWE) for open networks requiring encryption without passwords
● Protected Management Frames (PMF) is mandatory in 6 GHz.
● WPA2 is not permitted in 6 GHz operation.
Note: While, as per the WPA3 v3.4 specifications (Section 11.2), Enhanced Open transition mode is not supported with Wi-Fi 6E (6 GHz) and deprecated in Wi-Fi 7, a lot of vendors (including Cisco up to IOS® XE 17.18) do not enforce that yet. Therefore, it is technically possible to configure, for example, an Open SSID on 5 GHz, a corresponding Enhanced Open SSID on 5 and 6 GHz, with Transition Mode enabled and without complying to the standards specifications.
WPA3 Requirements in Wi-Fi 7
● WPA3 is mandatory for all Wi-Fi 7 devices for features like Multi Link Operation and 802.11be data rates.
● WPA3-Personal (SAE) with GCMP256 as Cipher and SAE-EXT-KEY or the FT equivalent of it FT-SAE-EXT-KEY as AKMs.
● Note: AKM or Authentication and Key Management (AKM) refers to the mechanism used to authenticate clients to establish the cryptographic keys that protect wireless communications. Consider it as the “handshake + key exchange” part of the security process.
● WPA3-Enterprise with GCMP256 as the cipher and 802.1X-SHA256 or the FT equivalent of it FT+802.1X (which still uses SHA256, though it’s not explicit in naming) as AKM.
Note: Cipher requirement of GCMP256 is required for WPA3-Enterprise. However, it’s not strictly enforced in the Access Point and Wireless clients and CCMP128 is allowed for backwards compatibility
● Enhanced Open (OWE) with GCMP256 as Cipher for open networks requiring encryption without passwords
● Protected Management Frames (PMF) is mandatory.
● Beacon Protection is mandatory.
Note: Beacon Protection is implicitly enabled in the controller.
Note: Similar to Wi-Fi 6E, Enhanced Transition Mode is not supported for Wi-Fi 7 operation in 6 GHz band. It is technically possible to configure a Enhanced Transition Mode with Wi-Fi 7, but to comply to the standards, it is recommended to configure a pure OWE only WLAN for Wi-Fi 7 operation in 6 GHz band.
Note: Because Wi-Fi 7 is still a recent certification at the time of this writing, with an as early as possible release, many vendors did not enforce all these security requirements from the beginning.
The table below provides the security requirements for different Wi-Fi standards.
Table 1. Security requirements for different Wi-Fi standards
| Legacy (Wi-Fi 5) |
Wi-Fi 6 |
Wi-Fi 6E (6 GHz) |
Wi-Fi 7 |
| Open |
Open (OWE support required) |
Enhanced Open (AKM: OWE) (Cipher: CCMP128) |
Enhanced Open (AKM: OWE) (Cipher: CCMP128 and GCMP256) |
| WPA1/WPA2/WPA3 Transition WPA3-Personal, PMF Optional |
WPA2/WPA3 Transition/WPA3-Personal, PMF Optional (WPA2 – AKM – PSK, FT+PSK, PSK (SHA-256)) (WPA3 – AKM – SAE, FT+SAE) (Cipher: CCMP128 or AES) |
WPA3-Personal, PMF Mandatory (AKM: SAE, FT+SAE) (Cipher: CCMP128 or AES) |
WPA3-Personal, PMF Mandatory (AKM: SAE-EXT-KEY, FT-SAE-EXT-KEY) (Cipher: CCMP128 and GCMP256) |
| WPA1/WPA2/WPA3 Transition/WPA3-802.1X (Enterprise), PMF Optional |
WPA2/WPA3 Transition/WPA3-802.1X (Enterprise), PMF Optional (AKM 802.1X, FT+802.1X, and 802.1X-SHA256, 802.1X-SuiteB) (Cipher: AES, CCMP128, GCMP128, GCMP256)
|
WPA3 Enterprise, PMF Mandatory (AKM: FT+802.1X, 802.1X-SHA256, 802.1X-SuiteB) (Cipher: AES, CCMP128, GCMP128, and GCMP256) |
WPA3 Enterprise, PMF Mandatory (AKM: FT+802.1X, 802.1X-SHA256, 802.1X-SuiteB) (Cipher: AES, CCMP128, GCMP128, and GCMP256) |
For WPA3-Personal SAE hash-to-element method for password element generation - minimum software version 17.7.1 should be used.
1. For WPA3-Enterprise and WPA3-Personal Transition disabled - minimum software version 17.7.1 should be used.
2. For WPA3-Personal with SAE as AKM + Fast Transition (FT) - minimum software version 17.9 should be used.
3. For WPA-Personal with SAE-EXT-KEY and FT-SAE-EXT-KEY for Wi-Fi 7 – minimum software version 17.15.2 should be used.
More recently, Cisco has been progressively enforcing the configuration options to be compliant with the Wi-Fi 7 certification. Here are the version-specific behaviors:
IOS XE 17.15.3 and later 17.15.x versions
In this software release, all the WLANs are broadcasted as Wi-Fi 7 SSIDs, provided that Wi-Fi 7 is enabled globally and regardless of the security settings.
A client can associate as Wi-Fi 7 capable and achieve Wi-Fi 7 data rates regardless of the security method it uses, provided it’s still supported by the WLAN. However, the client can only associate as MLO capable (on one or more bands) if it respects the strict requirements for Wi-Fi 7 security, or else it is rejected.
This could potentially cause issues when some early Wi-Fi 7 clients unable to support more secure ciphers, like GCMP256, try to associate as Wi-Fi 7 MLO capable to a WLAN, whose security settings do not match the Wi-Fi 7 requirements. In such a situation, the client is rejected because of the invalid security settings (still allowed to be configured under the WLAN).
Table 2. Cisco® Catalyst® 9800 Series Wireless Controller WPA3 support matrix
| 9800-L-F |
9800-L-C |
9800-L |
9800-40 |
9800-80 |
| Yes, starting with 16.12.1s |
Yes, starting with 16.12.1s |
Yes, starting with 16.12.1s |
Yes, starting with 16.12.1s |
Yes, starting with 16.12.1s |
Table 3. Catalyst 9100 Access Points WPA3 support matrix
| 9105AX |
9115AX |
9117AX |
9120AX |
9130AX |
9124AXE |
9136AX |
9166/9164/9162 |
| Yes* |
Yes* |
Yes* |
Yes* |
Yes |
Yes |
Yes |
Yes |
The purpose of this deployment guide is to provide details of the different WPA3 modes and steps to configure them on the Cisco Catalyst 9800 Series controller, using either the GUI or the Command-Line Interface (CLI).
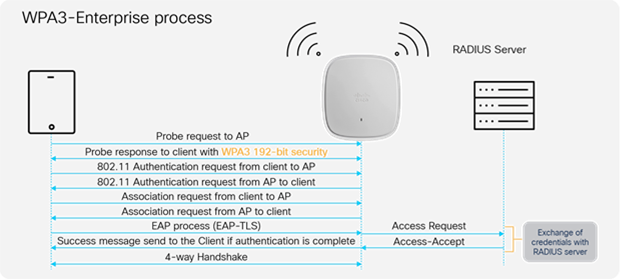
WPA3-Enterprise builds upon the foundation of WPA2-Enterprise with the additional requirement of using Protected Management Frames on all WPA3 connections with 802.1X for user authentication with a RADIUS server. By default, WPA3 uses 128-bit encryption, but it also introduces an optionally configurable SuiteB-192 bit cryptographic strength encryption using GMCP-256, which gives additional protection to any network transmitting sensitive data. The WPA3-Enterprise is highly preferred and recommended to be used and commonly seen in enterprises, financial institutions, government, and other market sectors where network security is most critical.

WPA3-Enterprise GUI Configuration
The following steps create a WLAN with WPA3-Enterprise security:
Step 1. Choose Configuration > Tags and Profiles > WLANs.
Step 2. Click Add.
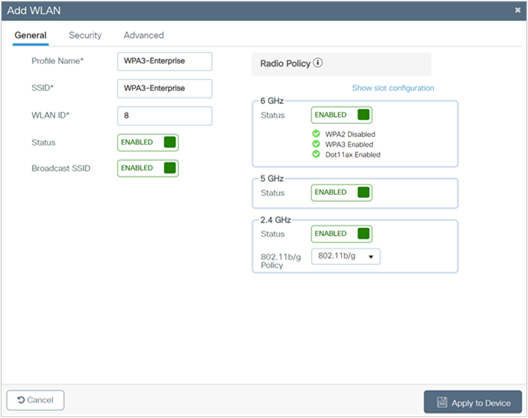
Step 3. In the General tab, enter the Profile Name (friendly identifier). Both the SSID and WLAN ID are populated automatically.
Step 4. Enable the Status and Broadcast SSID toggle buttons to have APs associated with this profile begin broadcasting this configured WLAN.
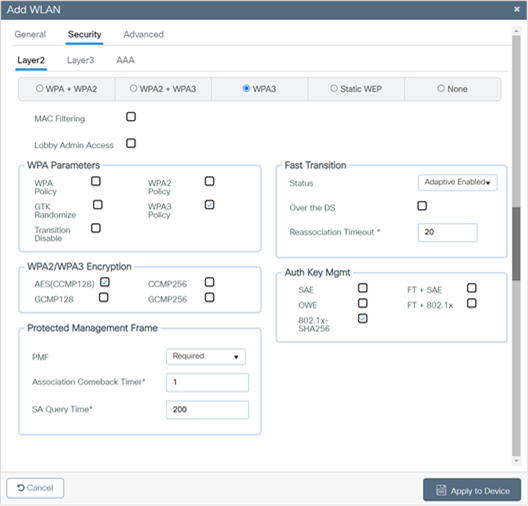
Step 5. Click the Security tab > Layer 2 tab. From the Layer 2 Security Mode drop-down list, choose WPA3.
Step 6. Confirm that the PMF is set to Required.
Step 7. Check the WPA3 Policy, AES, and 802.1X-SHA256 check boxes, then unselect any other selected parameters.
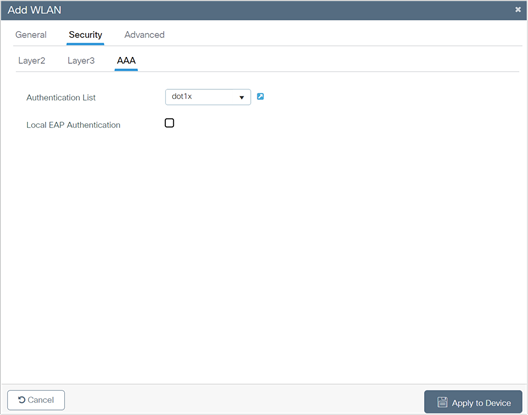
Step 8. Click the Security tab and click the AAA tab and from the Authentication List drop-down list, choose the preconfigured RADIUS Server Authentication List.
Step 9. Click Apply to Device to save and finish the WLAN creation process.
WPA3-Enterprise CLI Configuration
The following steps create a WLAN with WPA3-Enterprise security:
Table 4. WPA3-Enterprise CLI Configuration
|
|
Command |
Purpose |
| Step 1 |
configure terminal |
Enters global configuration mode. |
| Step 2 |
wlan wlan-name wlan-id SSID-name Example: Device(config)# wlan WPA3-Enterprise 8 WPA3-Enterprise |
Enters the WLAN configuration sub-mode. |
| Step 3 |
no security wpa akm dot1x |
Disables Security Auth Key Management (AKM) 802.1X-SHA1. |
| Step 4 |
no security wpa wpa2 |
Disables WPA2 security. |
| Step 5 |
security wpa akm dot1x-sha256 |
Enables Security Auth Key Management (AKM) 802.1X-SHA2. |
| Step 6 |
security wpa wpa3 |
Enables WPA3 support. |
| Step 7 |
no security ft adaptive |
Disables FT adaptive. |
| Step 8 |
security dot1x authentication-list list-name Example: Device(config-wlan)# security dot1x authentication-list dot1x |
Configures security authentication list for 802.1X security. |
| Step 9 |
no shutdown |
Enables the WLAN. |
| Step 10 |
end |
Returns to the privileged EXEC mode. |
WPA3-Enterprise 192-bit GUI Configuration (optional)
For endpoints that support SuiteB192-1X encryption, refer to the client interoperability matrix section below, or reach out to the device vendor.
The following steps create a WLAN with 192-bit WPA3-Enterprise security:
Step 1. Choose Configuration > Tags and Profiles > WLANs.
Step 2. Click Add.
Step 3. In the General tab, enter the Profile Name (friendly identifier). Both the SSID and WLAN ID are populated automatically.
Step 4. Enable the Status and Broadcast SSID toggle buttons to have APs associated with this profile begin broadcasting this configured WLAN.
Step 5. Click the Security > Layer 2 tab. From the Layer 2 Security Mode drop-down list, choose WPA3.
Step 6. Confirm that the PMF is set to Required.
Step 7. Disable Fast Transition.
Step 8. Check the WPA3 Policy, GCMP256, and SUITEB192-1X check boxes, then unselect any other selected parameters.
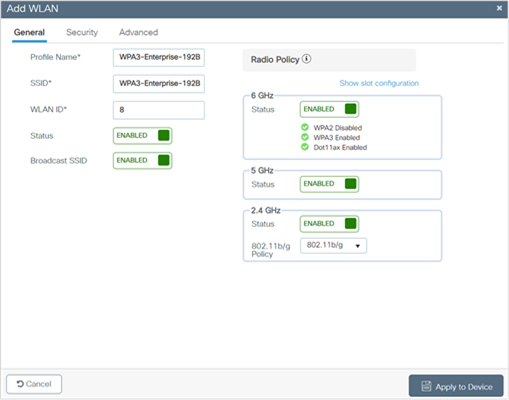
Step 9. Click the Security tab and click the AAA tab and from the Authentication List drop-down list, choose the preconfigured RADIUS Server Authentication List.

Step 10. Click Apply to Device to save and finish the WLAN creation process.
Note: SuiteB192-1X is not supported in C9120/C9105/C9115 APs and in FlexConnect Mode.
WPA3-Enterprise 192-bit CLI Configuration (optional)
The following steps create a WLAN with 192-bit WPA3-Enterprise security:
Table 5. WPA3-Enterprise 192-bit encryption CLI configuration
|
|
Command or action |
Purpose |
| Step 1 |
configure terminal |
Enters global configuration mode. |
| Step 2 |
wlan <wlan-name> wlan-id <SSID-name> Example: Device(config)# wlan WPA3-Enterprise-192B 8 WPA3-Enterprise-192B |
Enters the WLAN configuration sub-mode. |
| Step 3 |
no security ft adaptive |
Disables Fast Transition Adaptive support. |
| Step 4 |
no security wpa wpa2 |
Disables WPA2 security. |
| Step 5 |
no security wpa wpa2 ciphers aes |
Disables WPA2/CCMP128 support. |
| Step 6 |
security wpa wpa2 ciphers gcmp256 |
Enables GCMP256 support. |
| Step 7 |
no security wpa akm dot1x |
Disables security AKM 802.1X-SHA1 support. |
| Step 8 |
security wpa wpa3 |
Enables WPA3 support. |
| Step 9 |
security dot1x authentication-list list-name Example: Device(config-wlan)# security dot1x authentication-list dot1x |
Configures security authentication list for 802.1X security. |
| Step 10 |
no shutdown |
Enables the WLAN. |
| Step 11 |
end |
Returns to the privileged EXEC mode. |
WPA3-Enterprise Transition Mode
The WPA3-Enterprise Transition Mode, also known as WPA3+WPA2-Enterprise mixed-mode configuration, is used when some clients can support only up to WPA2 and some clients can support up to WPA3. The WPA3-capable clients will use WPA3-Enterprise’s 802.1X-SHA256 AKM, while the WPA2-capable clients can use WPA2-Enterprise’s 802.1X SHA1 or 802.1X-SHA256. This mode applies to both the bands 2.4 GHz and 5 GHz.
Note: This mode should be used only when necessary. For maximum security, the recommended mode is to use only WPA3 and not a mix of WPA3 and WPA2. Some older devices (like Wi-Fi 5) may not support transition method and may not be able to associate.
Note: Per 6 GHz standard, broadcasting a WLAN in the 6-GHz band is not allowed when configured with WPA2 security (applies to both WPA2 only and WPA2+WPA3 WLAN), so this essentially leads to the behavior that we don’t support 6-GHz radio when WLAN is configured with WPA2.
This poses limitations in certain use cases when legacy clients want to support 802.1X-SHA1 along with PMF optional in 5-GHz on the same SSID, whereas 6-GHz clients support 802.1X-SHA256 AKM with PMF mandatory.
To support these deployments, the recommendation in pre-17.12.1 SW versions was to use WPA2+WPA3 transition mode with the same WLAN with different profiles to support both legacy and the latest 6-GHz clients. The challenge with this design is roaming. The roaming between bands in this configuration is not supported, and it is always full roam, which is not preferred.
Starting from 17.12.1, we support transition mode with pure WPA3 for the 6-GHz band, which allows users to enable WPA2+WPA3 in the same WLAN with 6 GHz. This mode eliminates the need to create two different profiles to accommodate legacy and the latest 6-GHz devices. In this mode, the WPA2+WPA3 transition mode can be used in 2.4-GHz/5-GHz, and only WPA3 relevant configurations will be pushed on the 6-GHz band when WLAN has both WPA2 & WPA3 configurations.
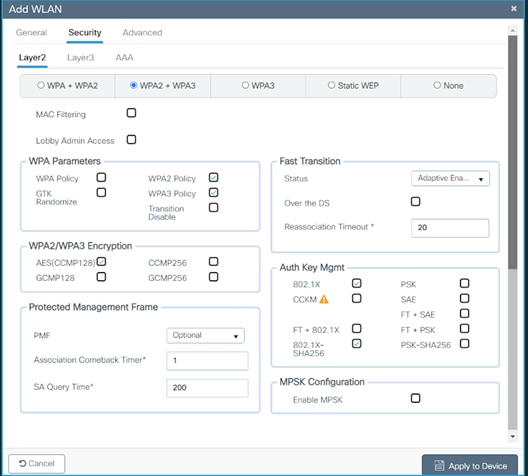
WPA3-Enterprise Transition Mode GUI Configuration
The following steps create a WLAN with WPA3+WPA2-Enterprise mixed-mode-level security:
Step 1. Choose Configuration > Tags and Profiles > WLANs.
Step 2. Click Add.
Step 3. In the General tab, enter the Profile Name (friendly identifier). The SSID and WLAN ID are populated automatically.
Step 4. Enable the Status and Broadcast SSID toggle buttons to have APs associated with this profile begin broadcasting this configured WLAN.
Step 5. Starting 17.12, 6-GHz Radio Policy will be enabled, for a WPA3-Enterprise Transition Mode with only WPA3 broadcasted in the 6 GHz band.

Step 6. Click the Security > Layer 2 tab. From the Layer 2 Security Mode drop-down list, choose WPA3.
Step 7. Confirm that the PMF is set to Optional.

Step 8. Scroll down to the WPA Parameters. Check the WPA2 Policy, WPA3 Policy, and Encryption AES, and check the 802.1X and 802.1X-SHA256 check boxes.
Step 9. Click Apply to Device to save and finish the WLAN creation process.
WPA3-Enterprise Transition Mode CLI Configuration
The following steps create a WLAN with WPA3+WPA2-Enterprise mixed-mode-level security:
Table 6. WPA3-Enterprise Transition Mode CLI Configuration
|
|
Command |
Purpose |
| Step 1 |
configure terminal
|
Enters global configuration mode. |
| Step 2 |
wlan wlan-name wlan-id SSID-name Example: Device (config)# wlan WPA3+WPA2-Enterprise 8 WPA3+WPA2-Enterprise |
Enters the WLAN configuration submode. |
| Step 3 |
security wpa wpa3 |
Enables WPA3. |
| Step 4 |
Security wpa wpa2 |
Enables WPA2. |
| Step 5 |
security wpa akm dot1x-sha256 |
Enables the 802.1X SHA2 AKM. |
| Step 6 |
radio policy dot11 24ghz |
Enables the 2.4-GHz band. |
| Step 7 |
radio policy dot11 5ghz |
Enables the 5-GHz band. |
| Step 8 |
no shutdown |
|
| Step 9 |
end |
Note: This security combination can be used with FT-enabled mode as well.
WPA3-Personal uses 128-bit (AES) or 256-bit (GCMP256) cryptographic-strength encryption with a password-based authentication method through SAE for user authentication purposes. In addition, unlike WPA2-Personal, WPA3-Personal heightens network security against offline dictionary attacks by limiting password guesses. This requirement makes hacking into a network much more time-consuming and dissuades attempts at a brute force attack.
WPA3-Personal provides the following key advantages:
● Creates a shared secret that is different for each SAE authentication
● Protects against brute force “dictionary” attacks and passive attacks
● Provides forward secrecy
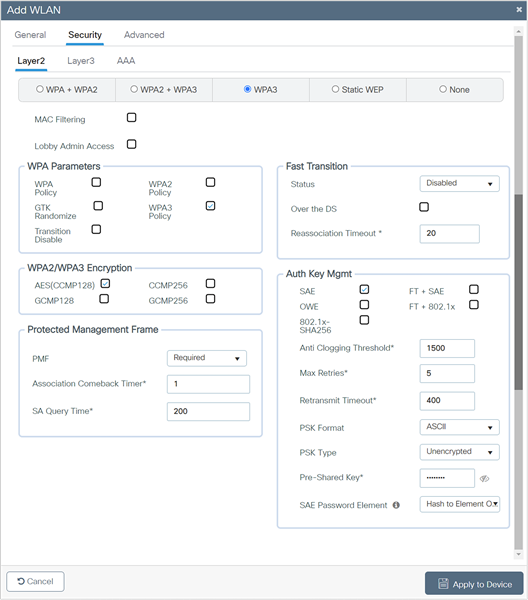
WPA3-Personal GUI Configuration
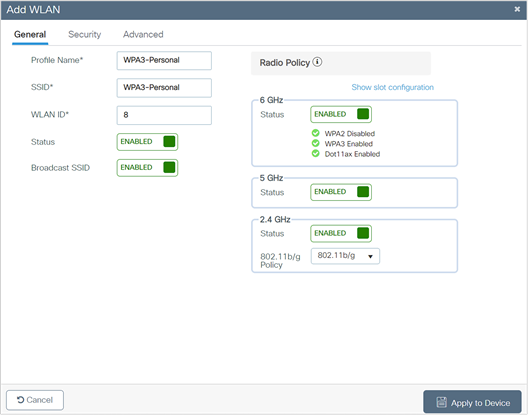
The following steps create a WLAN with WPA3-Personal-level security:
Step 1. Choose Configuration > Tags and Profiles > WLANs.
Step 2. Click Add.
Step 3. In the General tab, enter the Profile Name (friendly identifier). The SSID and WLAN ID are populated automatically.
Step 4. Enable the Status and Broadcast SSID toggle buttons to have APs associated with this profile begin broadcasting this configured WLAN.
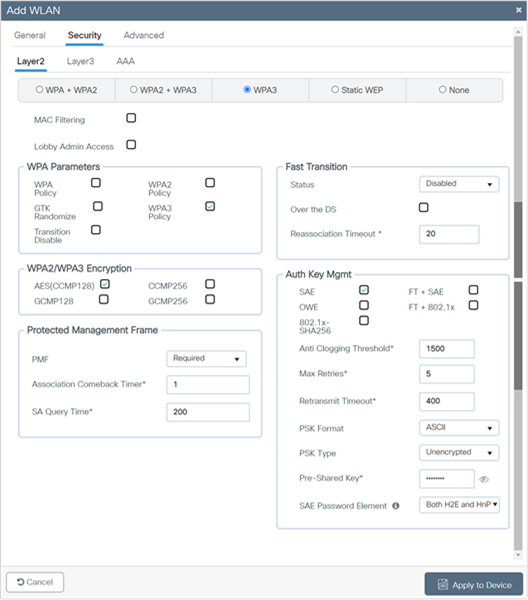
Step 5. Click the Security > Layer 2 tab. From the Layer 2 Security Mode drop-down list, choose WPA3.
Step 6. Confirm that the PMF is set to Required.
Step 7. Disable Fast Transition.
Step 8. Scroll down to the WPA Parameters. Check the WPA3 Policy, AES, and SAE check boxes.
Step 9. Enter the Pre-Shared Key and from the PSK Format drop-down list, choose the PSK format and from the PSK Type drop-down list, choose the PSK type.

Step 10. Click Apply to Device to save and finish the WLAN creation process.
Note: If only the 6-GHz band is used, the SAE Password Element supported is Hash to Element (H2E). Hunting and Pecking (HnP) cannot be used in a 6 GHz-only network. If both 5 GHz and 2.4 GHz are used, H2E and HnP can be used as the SAE Password Element. IOS-XE 17.12 version takes care of only using H2E in 6 GHz band.
WPA3-Personal CLI Configuration
The following steps create a WLAN with WPA3-Personal-level security:
Table 7. WPA3-Personal CLI configuration
|
|
Command |
Purpose |
| Step 1 |
configure terminal |
Enters global configuration mode. |
| Step 2 |
wlan wlan-name wlan-id SSID-name Example: Device(config)# wlan WPA3-Personal 8 WPA3-Personal |
Enters the WLAN configuration sub-mode. |
| Step 3 |
no security wpa akm dot1x |
Disables security AKM 802.1X. |
| Step 4 |
no security ft over-the-ds |
Disables Fast Transition over the data source on the WLAN. |
| Step 5 |
no security ft |
Disables 802.11r Fast Transition on the WLAN. |
| Step 6 |
no security wpa wpa2 |
Disables WPA2 security. PMF is disabled now. |
| Step 7 |
security wpa wpa2 ciphers aes |
Enables Advanced Encryption Standard (AES)/CCMP128 ciphers. |
| Step 8 |
security wpa psk set-key ascii value preshared-key Example: Device(config-wlan)# security wpa psk set-key ascii 0 Cisco123 |
Specifies a preshared key. |
| Step 9 |
security wpa wpa3 |
Enables WPA3 support. Note: If both WPA2 and WPA3 are supported (SAE and PSK together), it is optional to configure PMF. However, you cannot disable PMF. For WPA3, PMF is mandatory. |
| Step 10 |
security wpa akm sae |
Enables AKM SAE support. |
| Step 11 |
security wpa akm sae pwe h2e/hnp/both |
Chooses the Password Element. |
| Step 12 |
no shutdown |
Enables the WLAN. |
| Step 13 |
End |
Returns to the privileged EXEC mode. |
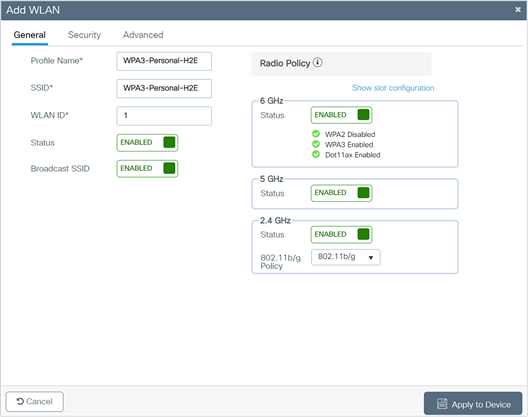
WPA3-Personal SAE Hash-to-Element Method for Password Element Generation
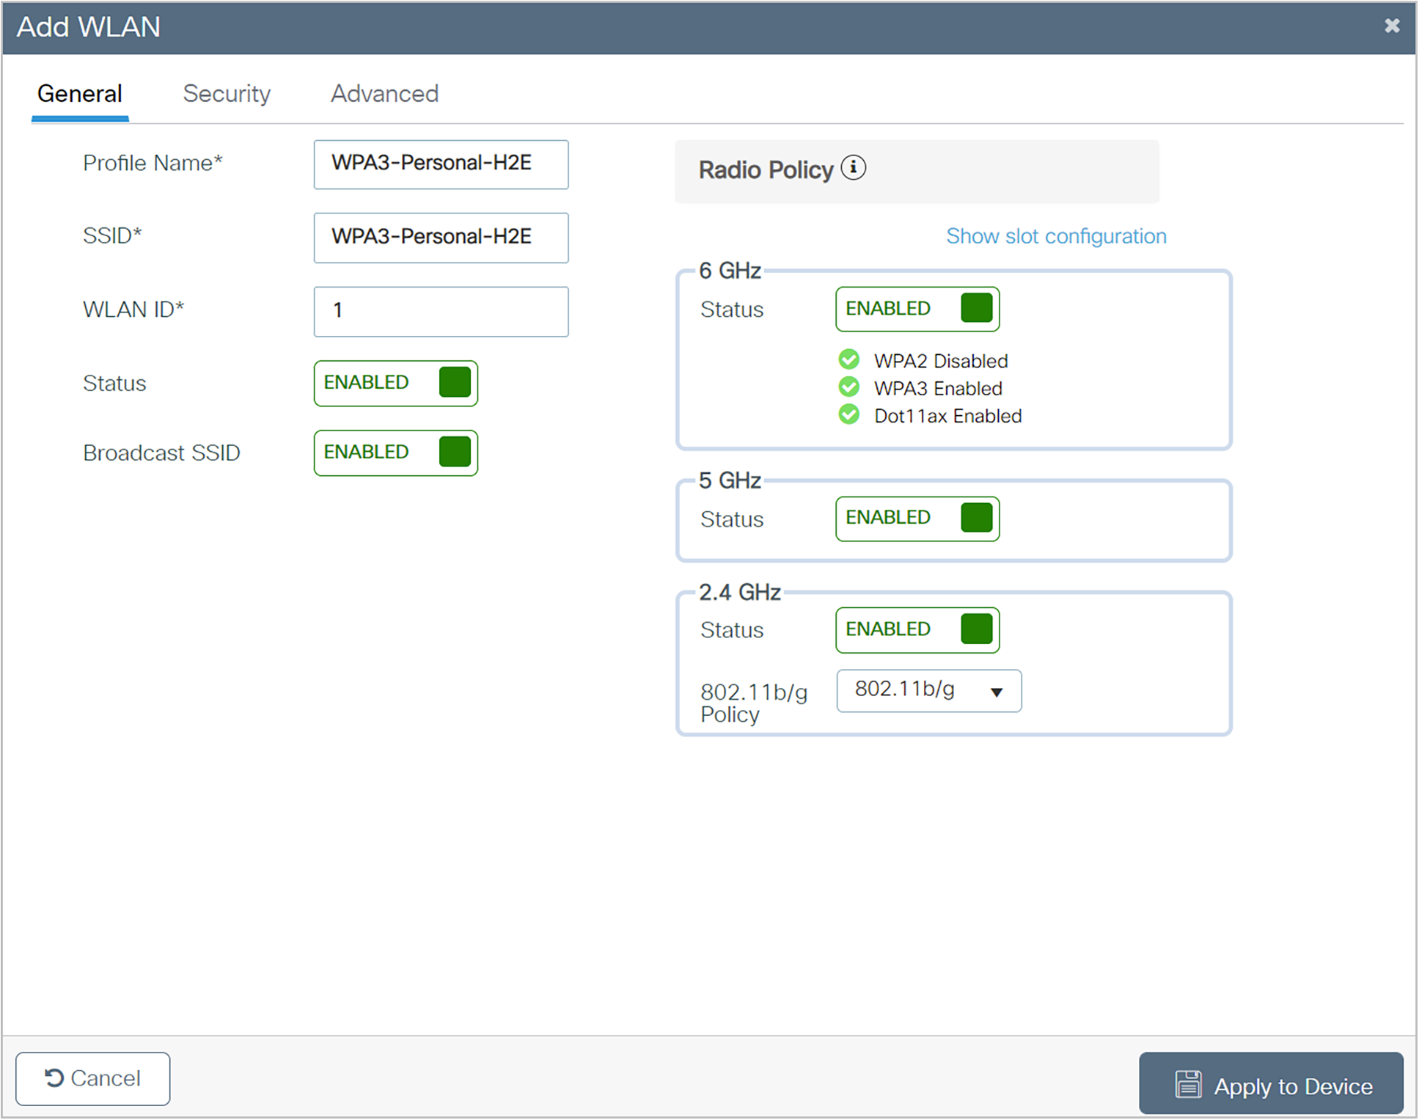
The following steps will create a WLAN with WPA3-Personal-level security with H2E for password element generation:
Step 1. Choose Configuration > Tags and Profiles > WLANs.
Step 2. Click Add.
Step 3. In the General tab, enter the Profile Name (friendly identifier). The SSID and WLAN ID are populated automatically.
Step 4. Enable the Status and Broadcast SSID toggle buttons to have APs associated with this profile begin broadcasting this configured WLAN.
Step 5. Click the Security > Layer 2 tab. From the Layer 2 Security Mode drop-down list, choose WPA3.
Step 6. Confirm that the PMF is set to Required.
Step 7. Disable Fast Transition.
Step 8. Scroll down to the WPA Parameters. Check the WPA3 Policy, AES, and SAE check boxes.
Step 9. Enter the Pre-Shared Key and then from the PSK Format drop-down list, choose the PSK format, and from the PSK Type drop-down list, choose the PSK type.
Step 10. From the SAE Password Element drop-down list, enable Hash to Element Only.
WPA3-Personal SAE Hash-to-Element Method for Password Element Generation CLI configuration
The following steps create a WLAN with WPA3-Personal-level security with H2E for password element generation:
Table 8. WPA3-Personal SAE hash-to-element CLI configuration
|
|
Command |
Purpose |
| Step 1 |
configure terminal |
Enters global configuration mode. |
| Step 2 |
wlan wlan-name wlan-id SSID-name Example: Device(config)# wlan WPA3-Personal-H2E 1 WPA3-Personal-H2E |
Enters the WLAN configuration submode. |
| Step 3 |
no security wpa akm dot1x |
Disables security AKM 802.1X. |
| Step 4 |
security wpa wpa3 |
Enables WPA3. |
| Step 5 |
no security ft |
Disables 802.11r Fast Transition on the WLAN. |
| Step 6 |
no security wpa wpa2 |
Disables WPA2 security. PMF is disabled now. |
| Step 7 |
security wpa wpa2 ciphers aes |
Enables AES/CCMP128 ciphers. |
| Step 8 |
security wpa psk set-key ascii value preshared-key Example: Device(config-wlan)# security wpa psk set-key ascii 0 Cisco123 |
Specifies a preshared key. |
| Step 9 |
security wpa akm sae |
Enables AKM SAE support. |
| Step 10 |
security wpa akm sae pwe h2e |
Enables H2E for password element generation. |
| Step 11 |
no shutdown |
Enables the WLAN. |
| Step 12 |
End |
Returns to the privileged EXEC mode. |
WPA3-Personal SAE with Fast Transition Enabled
Starting from Cisco IOS® XE version 17.9.1, WPA3-Personal SAE with Fast Transition (SAE-FT) is supported. Follow the instructions below to configure the WLAN for WPA3 SAE-FT.
The following steps create a WLAN with WPA3-Personal-level SAE security with Fast Transition enabled:
Step 1. Choose Configuration > Tags and Profiles > WLANs.
Step 2. Click Add.
Step 3. In the General tab, enter the Profile Name (friendly identifier). The SSID and WLAN ID are populated automatically.
Step 4. Enable the Status and Broadcast SSID toggle buttons to have APs associated with this profile begin broadcasting this configured WLAN.
Step 5. Click the Security > Layer 2 tab. From the Layer 2 Security Mode drop-down list, choose WPA3
Step 6. Confirm that the PMF is set to Required.
Step 7. Enable Fast Transition.
Step 8. Scroll down to the WPA Parameters. Check the WPA3 Policy, AES, and SAE check boxes.
Step 9. Enter the Pre-Shared Key and from the PSK Format drop-down list, choose the PSK format and from the PSK Type drop-down list, choose the PSK type.
Step 10. Enable Hash to Element Only or HnP or both from the SAE Password Element drop-down.

WPA3-Personal SAE with Fast Transition Enabled CLI Configuration
The following steps create a WLAN with WPA3-Personal-level security with Fast Transition enabled:
Table 9. WPA3-Personal SAE FT CLI configuration
|
|
Command |
Purpose |
| Step 1 |
configure terminal |
Enters global configuration mode. |
| Step 2 |
wlan wlan-name wlan-id SSID-name Example: Device(config)# wlan WPA3-Personal-H2E 1 WPA3-Personal-H2E |
Enters the WLAN configuration sub-mode. |
| Step 3 |
no security wpa akm dot1x |
Disables security AKM 802.1X. |
| Step 4 |
security wpa wpa3 |
Enables WPA3. |
| Step 5 |
security ft |
Enables 802.11r Fast Transition on the WLAN. |
| Step 6 |
no security wpa wpa2 |
Disables WPA2 security. PMF is disabled now. |
| Step 7 |
security wpa wpa2 ciphers aes |
Enables AES/CCMP128 ciphers. |
| Step 8 |
security wpa psk set-key ascii value preshared-key Example: Device(config-wlan)# security wpa psk set-key ascii 0 Cisco123 |
Specifies a preshared key. |
| Step 9 |
security wpa akm sae |
Enables AKM SAE support. |
| Step 10 |
Security wpa akm ft sae |
Enables FT SAE. |
| Step 11 |
no shutdown |
Enables the WLAN. |
| Step 12 |
End |
Returns to the privileged EXEC mode. |
The WPA3-Personal Transition Mode, also known as WPA2+WPA3-Personal mixed-mode configuration, is used when some clients are capable of supporting only WPA2 and some clients are capable of supporting up to WPA3. The WPA3-capable clients will use WPA3-Personal’s SAE, while the WPA2-capable clients will use WPA2-Personal’s PSK. This mode applies to both the bands of 2.4-GHz and 5-GHz. In IOS-XE 17.12, the same SSID in transition mode for 2.4 and 5 GHz bands and will be WPA3 only in 6 GHz band.
Note: This mode should be used only when necessary. For maximum security, the recommended mode is to use only WPA3 and not a mix of WPA3 and WPA2.
Note: Per 6-GHz standard, broadcasting a WLAN in the 6-GHz band is not allowed when configured with WPA2 security (applies to both WPA2 only and WPA2+WPA3 WLAN), so this essentially leads to behavior that we don’t support 6-GHz radio when WLAN is configured with WPA2.
We do have use cases like 2.4-GHz/5-GHz that can be on PSK/SAE AKM with PMF optional and 6-GHz with SAE AKM for WPA3 on the same SSID, which is not a valid configuration pre-17.12.1.
To support these deployments, the recommendation in pre-17.12.1 SW versions were to use WPA2+WPA3 transition mode with the same WLAN with different profiles to support both legacy and the latest 6-GHz clients. The challenge with this design is roaming. The roaming b/w bands in this configuration are not supported and it is always full roam, which is not preferred.
Starting from 17.12.1, we are supporting transition mode with pure WPA3 for 6 GHz band, which allows users to enable WPA2+WPA3 in the same WLAN with 6-GHz. This mode eliminates the need to create two different profiles to accommodate legacy and the latest 6-GHz devices. In this mode, WPA2+WPA3 transition mode can be used in 2.4-GHz/5-GHz and only WPA3 relevant configs will be pushed on the 6-GHz band when WLAN has both WPA2 and WPA3 configurations.
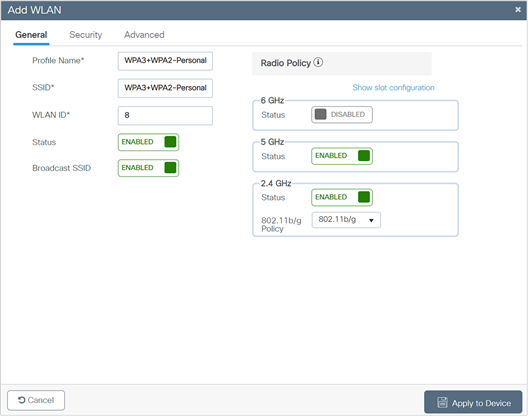
The following steps create a WLAN with WPA3+WPA2-Personal mixed-mode-level security:
Step 1. Choose Configuration > Tags and Profiles > WLANs.
Step 2. Click Add.
Step 3. In the General tab, enter the Profile Name (friendly identifier). The SSID and WLAN ID are populated automatically.
Step 4. Enable the Status and Broadcast SSID toggle buttons to have APs associated with this profile begin broadcasting this configured WLAN.
Step 5. Disable the 6-GHz band.
Step 6. Click the Security > Layer 2 tab. From the Layer 2 Security Mode drop-down list, choose WPA3.
Step 7. Confirm that the PMF is set to Optional.
Step 8. Scroll down to the WPA Parameters. Check the WPA2 Policy, WPA3 Policy, AES, PSK, and SAE check boxes.
Step 9. Enter the Pre-Shared Key and from the PSK Format drop-down list, choose the PSK format and from the PSK Type drop-down list, choose the PSK type.
Step 10. Click Apply to Device to save and finish the WLAN creation process.
WPA3 Personal Transition Mode CLI Configuration
The following steps create a WLAN with WPA3+WPA2-Personal mixed-mode-level security:
Table 10. WPA3 Personal transition mode CLI configuration
|
|
Command |
Purpose |
| Step 1 |
configure terminal |
Enters global configuration mode. |
| Step 2 |
wlan wlan-name wlan-id SSID-name Example: Device(config)# wlan WPA3+WPA2-Personal 1 WPA3+WPA2-Personal |
Enters the WLAN configuration submode. |
| Step 3 |
no security wpa akm dot1x |
Disables security AKM 802.1X. |
| Step 4 |
no security ft |
Disables 802.11r Fast Transition on the WLAN. |
| Step 5 |
security wpa wpa2 ciphers aes |
Configures the WPA2 cipher. Note: You can check whether the cipher is configured by using the no security wpa wpa2 ciphers aes command. If the cipher is not reset, configure the cipher. |
| Step 6 |
security wpa psk set-key ascii 0 Cisco123 |
Specifies a preshared key. |
| Step 7 |
security wpa wpa3 |
Enables WPA3 support. Note: If both WPA2 and WPA3 are supported (SAE and PSK together), it is optional to configure PMF. However, you cannot disable PMF. For WPA3, PMF is mandatory. |
| Step 8 |
security wpa akm sae |
Enables AKM SAE support. |
| Step 9 |
security wpa akm psk |
Enables AKM PSK support. |
| Step 10 |
radio policy dot11 24ghz |
Enables the 2.4-GHz band. |
| Step 11 |
radio policy dot11 5ghz |
Enables the 5-GHz band. |
| Step 12 |
no shutdown |
Enables the WLAN. |
| Step 13 |
end |
Returns to the privileged EXEC mode. |
WPA2+WPA3-Personal Transition Mode with 6 GHz
Per 6-GHz standard, broadcasting a WLAN in the 6-GHz band is not allowed when configured with WPA2 security (applies to both WPA2 only and WPA2+WPA3 WLAN), so this essentially leads to behavior that we don’t support 6-GHz radio when WLAN is configured with WPA2.
We do have use cases like 2.4-GHz/5-GHz that can be on PSK/SAE AKM with PMF optional and 6-GHz with SAE AKM for WPA3 on the same SSID, which is not a valid configuration pre-17.12.1.
To support these deployments, the recommendation in pre-17.12.1 SW versions were to use WPA2+WPA3 transition mode with the same WLAN with different profiles to support both legacy and the latest 6-GHz clients. The challenge with this design is roaming. The roaming b/w bands in this configuration are not supported and it is always full roam, which is not preferred.
Starting from 17.12.1, we are supporting transition mode with pure WPA3 for 6 GHz band, which allows users to enable WPA2+WPA3 in the same WLAN with 6-GHz. This mode eliminates the need to create two different profiles to accommodate legacy and the latest 6-GHz devices. In this mode, WPA2+WPA3 transition mode can be used in 2.4-GHz/5-GHz and only WPA3 relevant configs will be pushed on the 6-GHz band when WLAN has both WPA2 and WPA3 configurations.
WPA2+WPA3-Personal Transition Mode with 6 GHz GUI Configuration
Step 1. Choose Configuration > Tags and Profiles > WLANs.
Step 2. Click Add.
Step 3. In the General tab, enter the Profile Name (friendly identifier). Both the SSID and WLAN ID are populated automatically.
Step 4. Enable the Status and Broadcast SSID toggle buttons to have Access Points (APs) associated with this profile begin broadcasting this configured WLAN.
Step 5. Click the Security tab > Layer 2 tab. From the Layer 2 Security Mode drop-down list, choose WPA3.
Step 6. Confirm that the PMF is set to Optional.
Note: Though PMF is optional, with WPA3 configuration, it will be considered required for the 6-GHz band.
Step 7. Choose the WPA2 & WPA3 Policy in WPA Parameters, AES(CCMP128) in WPA2/WPA3 encryption, and enable PSK & SAE check boxes, then unselect any other selected parameters.
Step 8. Input the Shared key.
Step 9. Click Apply to Device to save and finish the WLAN creation process.
WPA2+WPA3-Personal Transition Mode with 6 GHz CLI Configuration
The following steps create a WLAN with WPA3+WPA2-Personal transition mode with 6 GHz enabled:
Table 11. WPA2+WPA3 Transition mode with pure 6 GHz CLI configuration
|
|
Command |
Purpose |
| Step 1 |
configure terminal |
Enters global configuration mode. |
| Step 2 |
wlan wlan-name wlan-id SSID-name Example: Device(config)# wlan WPA2+WPA3-PTM 1 WPA2+WPA3-PTM |
Enters the WLAN configuration submode. |
| Step 3 |
no security wpa akm dot1x |
Disables security AKM for 802.1X. |
| Step 4 |
no security ft |
Disables 802.11r Fast Transition on the WLAN. |
| Step 5 |
security wpa wpa2 ciphers aes |
Configures the WPA2 cipher. Note: You can check whether the cipher is configured by using the no security wpa wpa2 ciphers aes command. If the cipher is not reset, configure the cipher. |
| Step 6 |
security wpa psk set-key ascii 0 Cisco123 |
Specifies a preshared key. |
| Step 7 |
security wpa wpa3 |
Enables WPA3 support. Note: If both WPA2 and WPA3 are supported (SAE and PSK together), it is optional to configure PMF. However, you cannot disable PMF. For WPA3, PMF is mandatory. |
| Step 8 |
security wpa akm sae |
Enables AKM SAE support. |
| Step 9 |
security wpa akm psk |
Enables AKM PSK support. |
| Step 10 |
radio policy dot11 6ghz |
Enables the 6-GHz band. |
| Step 11 |
radio policy dot11 24ghz |
Enables the 2.4-GHz band. |
| Step 12 |
radio policy dot11 5ghz |
Enables the 5-GHz band. |
| Step 13 |
no shutdown |
Enables the WLAN. |
| Step 14 |
end |
Returns to the privileged EXEC mode. |
WPA2+WPA3-Personal Transition Mode with 6 GHz CLI Output
#show wlan summary
Number of WLANs: 1
ID Profile Name SSID Status 2.4GHz/5GHz Security 6GHz Security
---------------------------------------------------------------------------------------------------------------------------------------------------------------------------------------------------------------------------------------------------------------------------------------
1 WPA2+WPA3-PTM WPA2+WPA3-PTM UP [WPA2 + WPA3][PSK][SAE][AES] [WPA3][SAE][AES]
Transition Disable is an indication from an AP to a STA, that the STA is to disable certain transition modes for subsequent connections to the AP's network.
Ease of network upgrade: WPA2 devices have been there for many years in Wi-Fi networks, so it was important to have a mode of deployment where both WPA2 and WPA3 devices can co-exist. This certainly helps Wi-Fi networks migrate gradually from WPA2 to WPA3-based networks. Wi-Fi Alliance has introduced the WPA3 Transition modes for both personal and enterprise networks. With transition mode enabled on SSID, both WPA2 and WPA3 supporting devices can connect simultaneously, thus paving the path for the gradual migration of the device eco-system from WPA2 to WPA3.
Transition Disable: With the above ease of network upgrade using transition mode comes the security challenge of WPA3 STAs (stations) undergoing downgrade attacks. The attackers can force WPA3 STAs to downgrade to use WPA2 and legacy security-vulnerable technologies. To circumvent this problem, the Wi-Fi alliance has introduced the “Transition Disable” indication, using which APs and network operators can update WPA3 STAs that the network is fully upgraded to support the most secured algorithm defined in a transition mode. The Transition Disable indication is used (in a 4-way handshake during association) to disable transition modes for that network on a STA, and therefore provide protection against downgrade attacks. STAs upon receiving this indication, shall disable certain transition modes for subsequent connections and will disallow association without negotiation of PMF.
An STA implementation might enable certain transition modes (and possibly other legacy security algorithms) in a network profile.
For example, a WPA3-Personal STA might by default enable WPA3-Personal transition mode in a network profile, which enables a pre-shared key (PSK) algorithm. However, when a network (fully) supports the most secure algorithm defined in a transition mode, it can use the Transition Disable indication to disable transition modes for that network on an STA, and therefore protect against downgrade attacks.
On one side, this is good for security, as it will migrate all client devices to WPA3 only as they join the transition mode WLAN, but if the network is composed of multiple physical locations, for example, some are set to WPA2, others to WPA3/WPA2 transition mode, this will cause the migrated clients to fail when moved to a location with WPA2 only.
This is a possible scenario for some large networks, with the same SSID covering different controllers/AP setups and with configurations not matching 100%. The largest example would be “eduroam”, which shares the same SSID name worldwide. Setting this could have serious issues for clients moving across different network providers, so please use this with care, and only if you can ensure the same security setting is set properly across all network locations.
This method is not generally recommended and should be enabled only when it is absolutely necessary.
Note: An AP that uses Transition Disable indication is not required to disable the corresponding transition mode(s) on its own BSS. For example, the APs in a WPA3-Personal network might use Transition Disable indication to ensure that all STAs that support WPA3-Personal are protected against downgrade attacks while still enabling WPA3-Personal transition mode on their BSS so that legacy STAs can connect.
Note: This method is not generally recommended and should be enabled only when it is absolutely necessary.
The below section explains how to enable Transition Disable in the WLAN.
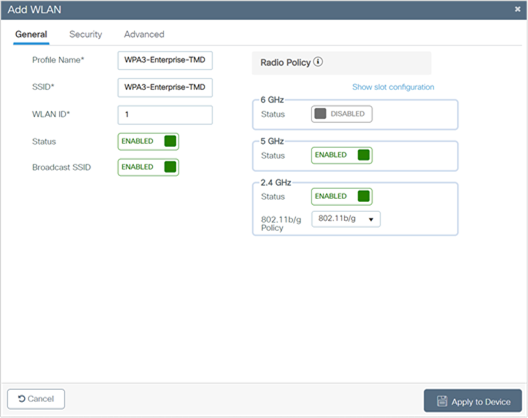
WPA3-Enterprise Transition Mode Disable GUI Configuration
The following steps create a WLAN with WPA3-Enterprise security with Transition Disable:
Step 1. Choose Configuration > Tags and Profiles > WLANs.
Step 2. Click Add.
Step 3. In the General tab, enter the Profile Name (friendly identifier). The SSID and WLAN ID are populated automatically.
Step 4. Enable the Status and Broadcast SSID toggle buttons to have APs associated with this profile begin broadcasting this configured WLAN.
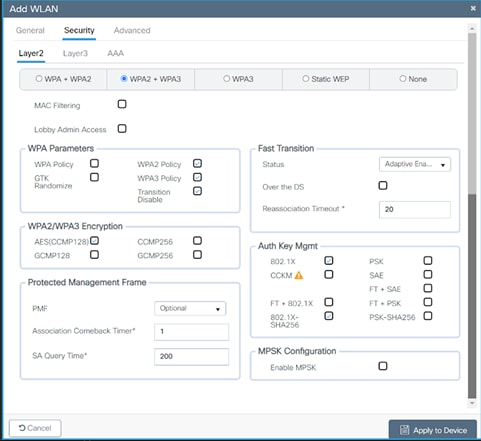
Step 5. Starting 17.12, 6-GHz Radio Policy will be enabled, for a WPA3-Enterprise Transition Mode with only WPA3 broadcast in the 6 GHz band. Check the Security tab and enable the WPA2 + WPA3 option.
Step 6. Scroll down to the WPA Parameters. Check the WPA2 and WPA3 Policy, AES, and 802.1X and 802.1X-SHA256 check boxes as AKM.
Step 7. Confirm that the PMF is set to be Optional.
Step 8. Enable Transition Disable under WPA Parameters.

WPA3-Enterprise Transition Mode Disable CLI Configuration
Table 12. WPA3-Enterprise Transition Mode Disable CLI Configuration
|
|
Command |
Purpose |
| Step 1 |
configure terminal |
Enters global configuration mode. |
| Step 2 |
wlan wlan-name wlan-id SSID-name Example: Device(config)# wlan WPA3-Enterprise-TMD 1 WPA3-Enterprise-TMD |
Enters the WLAN configuration submode. |
| Step 3 |
security wpa wpa3 |
Enables WPA3. |
| Step 4 |
security wpa wpa2 |
Enables WPA2 security. PMF is optional now. |
| Step 5 |
security wpa wpa2 ciphers aes |
Enables Advanced Encryption Standard (AES)/CCMP128 ciphers. |
| Step 6 |
security wpa akm dot1x-sha256 |
Enables AKM 802.1x-SHA256. |
| Step 7 |
transition-disable |
Enables Transition Disable. |
| Step 8 |
radio policy dot11 5ghz |
Enables the 5-GHz band. |
| Step 9 |
radio policy dot11 24ghz |
Enables the 2.4-GHz band. |
| Step 10 |
no shutdown |
Enables the WLAN. |
| Step 11 |
end |
Returns to the privileged EXEC mode. |
Note: This security combination can be used with FT enabled mode as well.
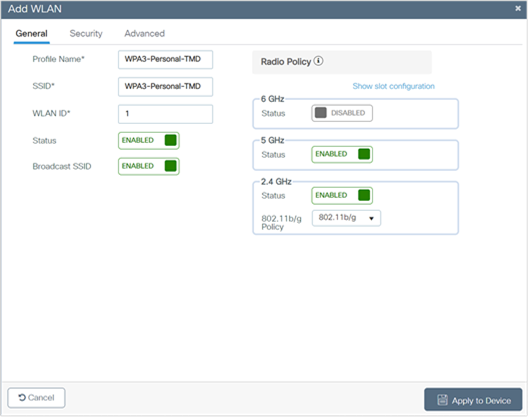
WPA3-Personal Transition Mode Disable GUI Configuration
The following steps create a WLAN with WPA3-Personal-level security with Transition Disable:
Step 1. Choose Configuration > Tags and Profiles > WLANs.
Step 2. Click Add.
Step 3. In the General tab, enter the Profile Name (friendly identifier). The SSID and WLAN ID are populated automatically.
Step 4. Enable the Status and Broadcast SSID toggle buttons to have APs associated with this profile begin broadcasting this configured WLAN.
Step 5. Disable the 6 GHz band.
Step 6. Under the Security tab, enable the WPA2+WPA3 option.
Step 7. Disable Fast Transition.
Step 8. Scroll down to the WPA Parameters. Check the WPA2 and WPA3 Policy, AES, and SAE and PSK check boxes as AKM.
Step 9. Enter the Pre-Shared Key and from the PSK Format drop-down list, choose the PSK format and from the PSK Type drop-down list, choose the PSK type.
Step 10. Confirm that the PMF be Optional.
Step 11. Enable the Transition Disable option in WPA Parameters.

WPA3-Personal Transition Mode Disable CLI Configuration
Table 13. WPA3-Personal transition mode disable CLI configuration
|
|
Command |
Purpose |
| Step 1 |
configure terminal |
Enters global configuration mode. |
| Step 2 |
wlan wlan-name wlan-id SSID-name Example: Device(config)# wlan WPA3-Personal-TMD 1 WPA3-Personal-TMD |
Enters the WLAN configuration sub-mode. |
| Step 3 |
no security wpa akm dot1x |
Disables security AKM 802.1X. |
| Step 4 |
security wpa wpa3 |
Enables WPA3. |
| Step 5 |
no security ft |
Disables 802.11r Fast Transition on the WLAN. |
| Step 6 |
security wpa wpa2 |
Enables WPA2 security. PMF is optional now. |
| Step 7 |
security wpa wpa2 ciphers aes |
Enables AES/CCMP128 ciphers. |
| Step 8 |
security wpa psk set-key ascii value preshared-key Example: Device(config-wlan)# security wpa psk set-key ascii 0 Cisco123 |
Specifies a preshared key. |
| Step 9 |
security wpa akm sae |
Enables AKM SAE support. |
| Step 10 |
security wpa akm psk |
Enables AKM PSK. |
| Step 11 |
transition-disable |
Enables Transition Disable. |
| Step 11 |
radio policy dot11 24ghz |
Enables 2.4-GHz. |
| Step 12 |
radio policy dot11 5ghz |
Enables 5-GHz. |
| Step 13 |
no shutdown |
Enables the WLAN. |
| Step 14 |
End |
Returns to the privileged EXEC mode. |
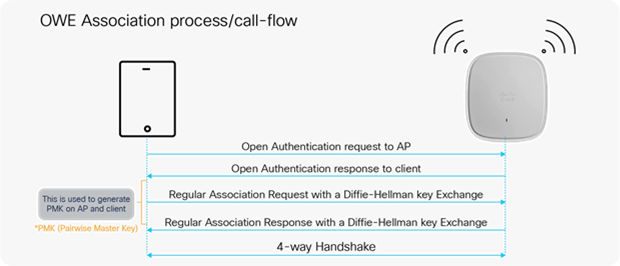
OWE is a security method paired with an open-security wireless network to provide it with encryption to protect the network from eavesdroppers. With OWE, the client and AP perform a Diffie-Hellman key exchange during the endpoint association packet exchange and use the resulting PMK to conduct the 4-way handshake. Being associated with open-security wireless networks, OWE can be used with regular open networks as well as those associated with captive portals.
Refer to the following doc, which details the call flows with packet captures of the association process.
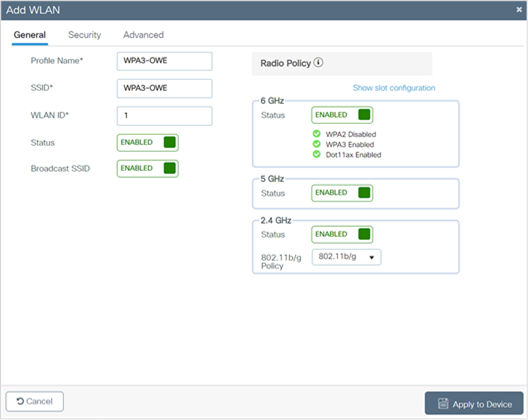
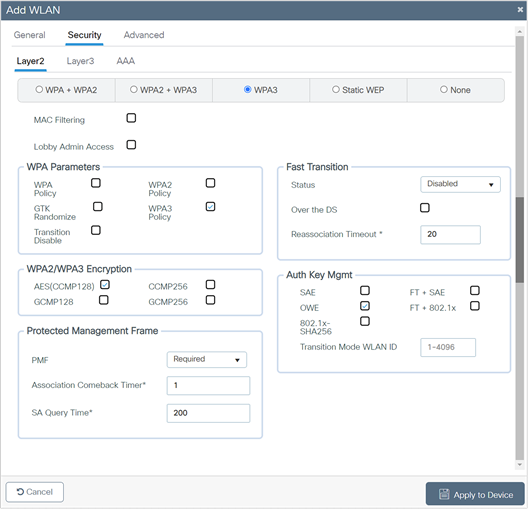
The following steps create a WLAN with WPA3 OWE security:
Step 1. Choose Configuration > Tags and Profiles > WLANs.
Step 2. Click Add.
Step 3. In the General tab, enter the Profile Name (friendly identifier). The SSID and the WLAN ID will be populated automatically.
Step 4. Enable the Status and Broadcast SSID toggle buttons.

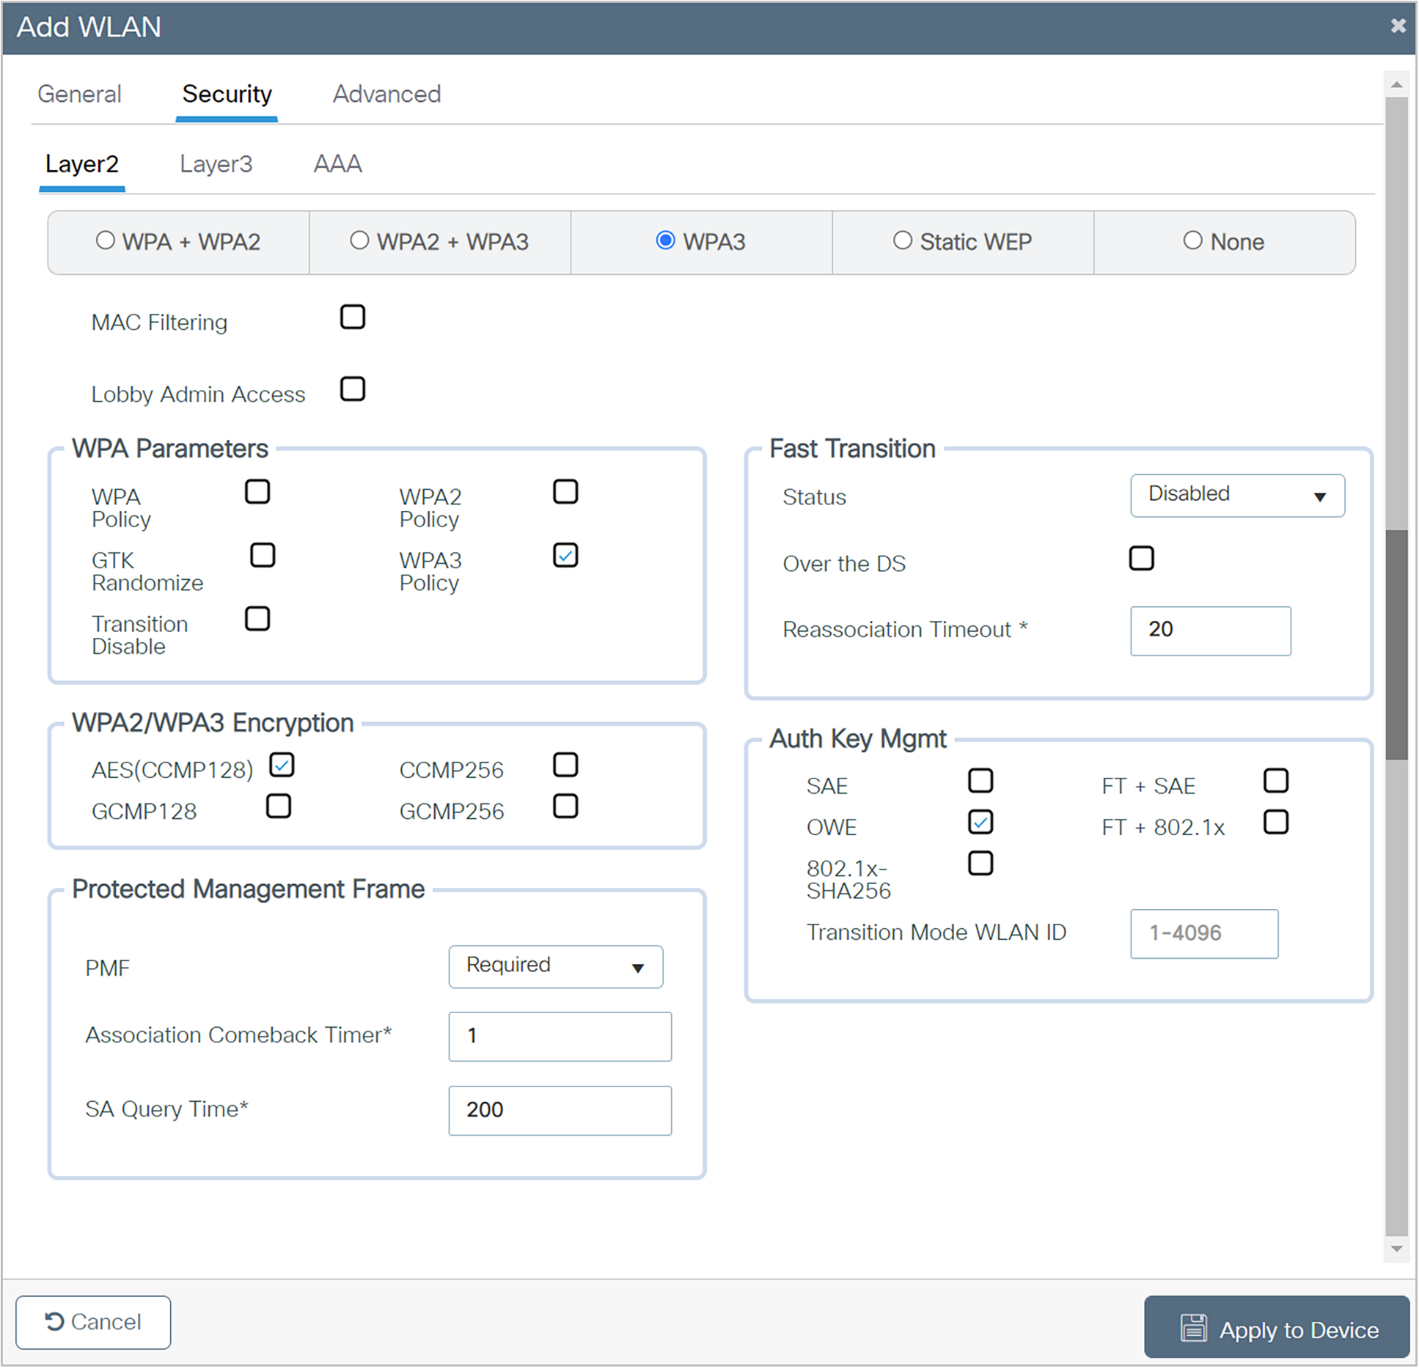
Step 5. Click the Security > Layer 2 tab. From the Layer 2 Security Mode drop-down list, choose WPA3.
Step 6. From the Fast Transition drop-down list, select Disabled.
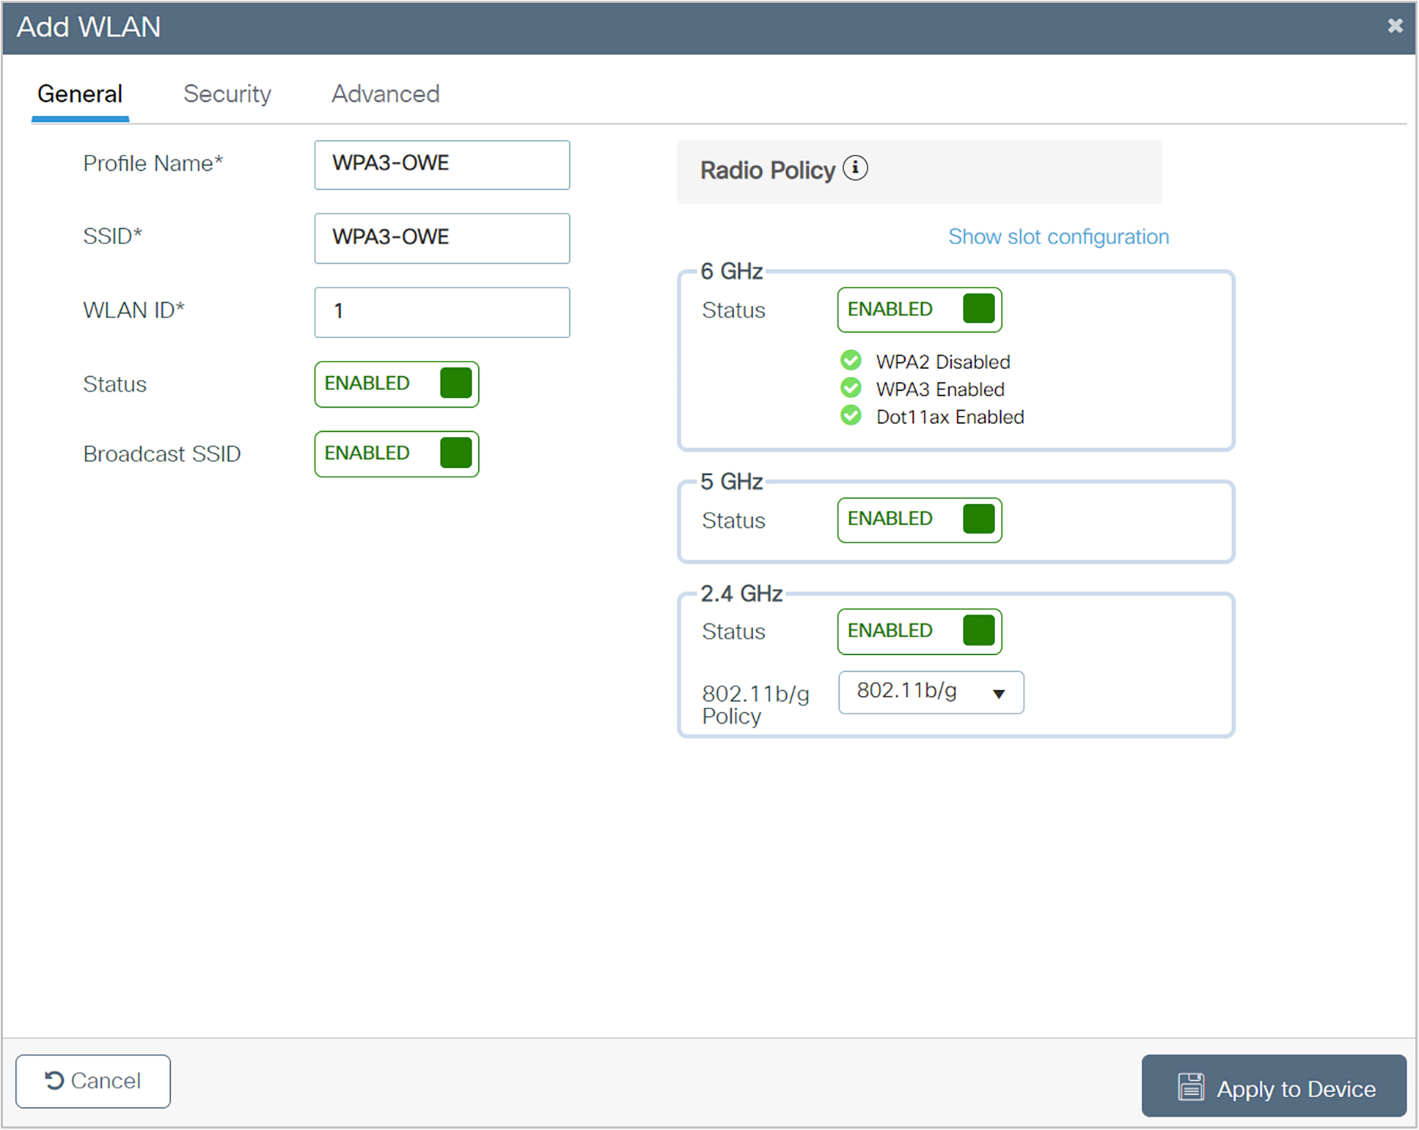
Step 7. Check the WPA3 Policy, AES (CCMP 128), and OWE check boxes. Uncheck any other selected parameters.
Step 8. Click Apply to Device to save and finish the WLAN creation process.
These steps create a WLAN with WPA3 OWE security:
Table 14. WPA3 OWE CLI configuration
|
|
Command |
Purpose |
| Step 1 |
configure terminal Example: Device# configure terminal |
Enters global configuration mode. |
| Step 2 |
wlan wlan-name wlan-id SSID-name Example: Device(config)# wlan WPA3 1 WPA3 |
Enters the WLAN configuration sub-mode. |
| Step 3 |
no security ft |
Disables 802.11r Fast Transition on the WLAN. |
| Step 4 |
no security wpa akm dot1x |
Disables security AKM for 802.1X. |
| Step 5 |
no security wpa wpa2 |
Disables WPA2 security. PMF is disabled now. |
| Step 6 |
security wpa wpa2 ciphers aes |
Enables WPA2 ciphers for AES. Note: The ciphers for WPA2 and WPA3 are common. |
| Step 7 |
security wpa wpa3 |
Enables WPA3 support. |
| Step 8 |
security wpa akm owe |
Enables WPA3 OWE support. |
| Step 9 |
no shutdown |
Enables the WLAN. |
| Step 10 |
End |
Returns to the privileged EXEC mode. |
WPA3 OWE Transition Mode GUI Configuration
The Transition mode was introduced to the public since not all devices support enhanced open capability (refer to the device interoperability matrix). Transition mode is designed to make the enhanced open OWE mode more adaptable. The Wi-Fi Alliance recommends using this strategy to implement an enhanced open wireless network in an environment where not all devices support this mode. The OWE Transition mode requires a separate open SSID configured with properties similar to those of the enhanced open OWE SSID. Both OWE and open WLAN have a corresponding Transition mode WLAN ID, which means that the OWE WLAN has a Transition mode ID set to the open WLAN ID, and the open WLAN has a Transition mode ID set to the OWE WLAN ID.
Note: This is not recommended for Wi-Fi 6E (6 GHz) and Wi-Fi 7 operation as it’s not supported and as of Wi-Fi 7.
Part 1: Hidden WLAN with WPA4 OWE security
The following steps create a hidden WLAN with WPA3 OWE security:
Step 1. Choose Configuration > Tags and Profiles > WLANs.
Step 2. Click Add.
Step 3. In the General tab, enter the Profile Name (friendly identifier). The SSID and WLAN ID are populated automatically.
Step 4. Disable the Status and Broadcast SSID toggle buttons.
Step 5. Note the WLAN ID of the WLAN.
Step 6. Click the Security > Layer 2 tab. From the Layer 2 Security Mode drop-down list, choose WPA3.
Step 7. Confirm that the PMF is set to Required.
Step 8. From the Fast Transition drop-down list, select Disabled.
Step 9. Check the WPA3 Policy, AES (CCMP 128), and OWE check boxes. Uncheck any other selected parameters.
Step 10. Enter the Transition mode WLAN ID, which will be the WLAN ID of the SSID that will be configured next.
Step 11. Click Apply to Device to save and finish the WLAN creation process.
Part 2: WLAN with Open Security
The following steps create a WLAN with open security:
Step 1. Choose Configuration > Tags and Profiles > WLANs.
Step 2. Click Add.
Step 3. In the General tab, enter the Profile Name (friendly identifier).
Step 4. The SSID must match the enhanced open SSID. The WLAN ID is populated automatically.
Step 5. Enable the Status and Broadcast SSID toggle buttons.
Step 6. Click the Security > Layer 2 tab. From the Layer 2 Security Mode drop-down list, choose WPA3.
Step 7. For the Transition Mode WLAN ID, enter the WLAN ID that has Layer 2 security set to Enhanced Open to be mapped to the open WLAN.
Step 8. Click Apply to Device to save and finish the WLAN creation process.
WPA3 OWE Transition Mode CLI Configuration
This section describes WPA3 OWE transition mode configurations.
Part1: Hidden WLAN with WPA3 OWE Security
The following steps create a hidden WLAN with WPA3 OWE security:
Table 15. WPA3 OWE transition mode CLI configuration – Hidden WLAN with WPA3 OWE security
|
|
Command |
Purpose |
| Step 1 |
configure terminal |
Enters global configuration mode. |
| Step 2 |
wlan wlan-name wlan-id SSID-name Example: Device(config)# wlan WPA3-OWE-Hidden 1 WPA3-OWE-Hidden |
Enters the WLAN configuration sub-mode. |
| Step 3 |
no broadcast-ssid |
Disables SSID broadcast. |
| Step 4 |
no security ft |
Disables 802.11r Fast Transition on the WLAN. |
| Step 5 |
no security wpa akm dot1x |
Disables security AKM for 802.1X. |
| Step 6 |
no security wpa wpa2 |
Disables WPA2 security. PMF is disabled now. |
| Step 7 |
security wpa akm owe |
Enables WPA3 OWE support. |
| Step 8 |
security wpa transition-mode-wlan-id 2 |
Enables Transition mode. |
| Step 9 |
security wpa wpa3 |
Enables WPA3 support. |
| Step 10 |
no shutdown |
Enables the WLAN. |
| Step 11 |
End |
Returns to the privileged EXEC mode. |
Part 2: WLAN with Open OWE Security
The following steps create a WLAN with open OWE security:
Table 16. WPA3 OWE transition mode CLI configuration – WLAN with open OWE security
|
|
Command |
Purpose |
| Step 1 |
configure terminal |
Enters global configuration mode. |
| Step 2 |
wlan wlan-name wlan-id SSID-name Example: Device(config)# wlan Open-OWE 2 Open-OWE |
Enters the WLAN configuration sub-mode. Note: The SSID of the hidden WLAN and the open WLAN must be the same. |
| Step 3 |
no security ft over-the-ds |
Disables Fast Transition over the data source on the WLAN. |
| Step 4 |
no security ft |
Disables 802.11r Fast Transition on the WLAN. |
| Step 5 |
no security wpa akm dot1x |
Disables security AKM for 802.1X. |
| Step 6 |
no security wpa |
Disables security. |
| Step 7 |
no security wpa wpa2 ciphers aes |
Disables WPA2 ciphers for AES. |
| Step 8 |
security wpa transition-mode-wlan-id 1 |
Enables Transition mode. |
| Step 9 |
no shutdown |
Enables the WLAN. |
| Step 10 |
end |
Returns to the privileged EXEC mode. |
Useful Catalyst 9800 Controller Commands
To view the system-level statistics for a client that has undergone successful SAE authentication, SAE authentication failures, SAE ongoing sessions, or SAE commits, and to confirm message exchanges, use the following show command:
show wireless stats client detail
To view the WLAN summary details, use the following command:
· show wlan summary
· show wlan all
· show wlan name <wlan-name>
· show wlan id {Starting 17.12.1, the security section on the WLAN is displayed individually for 2.4GHz/5GHz band and 6GHz band as below}
#show wlan id 1
WLAN Profile Name : WPA2+WPA3-TransitionMode
================================================
Identifier : 1
Description :
Network Name (SSID) : WPA2+WPA3-TransitionMode
Status : Enabled
....
Security-2.4GHz/5GHz
....
Security-6GHz
....
#
To view the correct AKM for a client that has undergone SAE authentication, use the following command:
show wireless client mac-address <xxxx.xxxx.xxxx> detail
To view a list of the PMK cache stored locally:
show wireless pmk-cache
Configure debugging of WPA3 on a client by entering this command:
debug client client-mac-address
Configure debugging of SAE events and details by entering this command:
debug sae {events | details} {enable | disable}
● Cisco Catalyst 9800 Series Wireless Controller 17.8.1 Configuration Guide
● Cisco Catalyst 9100 Access Points documentation
