OfficeExtend Access Points

Information About OfficeExtend Access Points

A Cisco OfficeExtend access point (Cisco OEAP) provides secure communications from a Cisco WLC to a Cisco AP at a remote location, seamlessly extending the corporate WLAN over the Internet to an employee’s residence. The user’s experience at the home office is exactly the same as it would be at the corporate office. Datagram Transport Layer Security (DTLS) encryption between the access point and the controller ensures that all communications have the highest level of security.


Note

DTLS is permanently enabled on the Cisco OEAP. You cannot disable DTLS on this access point.


Figure 1. Typical OfficeExtend Access Point Setup.

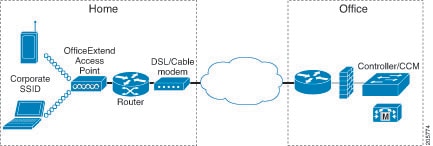
The following figure shows a typical OfficeExtend access point setup.


Note

Cisco OEAPs are designed to work behind a router or other gateway device that is using network address translation (NAT). NAT allows a device, such as a router, to act as an agent between the Internet (public) and a personal network (private), enabling an entire group of computers to be represented by a single IP address. There is no limit to the number of Cisco OEAPs that you can deploy behind a NAT device.


All the supported indoor AP models with integrated antenna can be configured as OEAP except the AP-700I, AP-700W, and AP802 series access points.


Note

All OfficeExtend access points should be in the same access point group, and that group should contain no more than 15 WLANs. A controller with OfficeExtend access points in an access point group publishes only up to 15 WLANs to each connected OfficeExtend access point because it reserves one WLAN for the personal SSID.


Note

See the Release Notes for information about supported Cisco OEAPs.


OEAP in Local Mode

The Cisco OEAP connects to the Cisco WLC in local mode. You cannot alter these settings.


Note

Monitor mode, FlexConnect mode, Sniffer mode, Rogue Detector, Bridge, and SE-Connect are not supported on the Cisco OEAP and are not configurable.

Figure 2. OEAP Mode

Implementing Security


Note

The LSC configuration is optional.


  1. Use local significant certificates (LSCs) to authorize your OfficeExtend access points, by following the instructions in the "Authorizing Access Points Using LSCs" sectionn.

  2. Implement AAA server validation using the access point’s MAC address, name, or both as the username in authorization requests, by entering this command:

    config auth-list ap-policy authorize-ap username {ap_mac | Cisco_AP | both}

    Using the access point name for validation can ensure that only the OfficeExtend access points of valid employees can associate with the controller. To implement this security policy, ensure that you name each OfficeExtend access point with an employee ID or employee number. When an employee is terminated, run a script to remove this user from the AAA server database, which prevents that employee’s OfficeExtend access point from joining the network.

  3. Save your changes by entering this command:

    save config


    Note

    Elements related to CCX are not supported. Also, only 802.1X or PSK is supported. TKIP and AES security encryption settings must be identical for WPA and WPA2.


Licensing for an OfficeExtend Access Point

To use Cisco OEAPs, a base license must be installed and in use on the Cisco WLC. After the license is installed, you can enable the OfficeExtend mode on the supported Cisco Aironet AP models that support OfficeExtend mode.

Configuring OfficeExtend Access Points

After Cisco Aironet access point has associated with the controller, you can configure it as an OfficeExtend access point.

Configuring OfficeExtend Access Points (GUI)

Procedure


Step 1

Choose Wireless to open the All APs page.

Step 2

Click the name of the desired access point to open the All APs > Details page.

Step 3

Enable FlexConnect on the access point as follows:

  1. In the General tab, choose FlexConnect from the AP Mode drop-down list to enable FlexConnect for this access point.

Step 4

Configure one or more controllers for the access point as follows:

  1. Click the High Availability tab.

  2. Enter the name and IP address of the primary controller for this access point in the Primary Controller Name and Management IP Address text boxes.

    Note 

    You must enter both the name and IP address of the controller. Otherwise, the access point cannot join this controller.

  3. If desired, enter the name and IP address of a secondary or tertiary controller (or both) in the corresponding Controller Name and Management IP Address text boxes.

  4. Click Apply. The access point reboots and then rejoins the controller.

    Note 

    The names and IP addresses must be unique for the primary, secondary, and tertiary controllers.

Step 5

Enable OfficeExtend access point settings as follows:

  1. Click the FlexConnect tab.

  2. Select the Enable OfficeExtend AP check box to enable the OfficeExtend mode for this access point. The default value is selected.

    Unselecting this check box disables OfficeExtend mode for this access point. It does not undo all of the configuration settings on the access point. If you want to clear the access point’s configuration and return it to the factory-default settings, enter clear ap config Cisco_AP on the controller CLI. If you want to clear only the access point’s personal SSID, click Reset Personal SSID.

    Note 
    The OfficeExtend AP support is enabled for all the supported Cisco Aironet integrated antenna access points.
    Note 
    Rogue detection is disabled automatically when you enable the OfficeExtend mode for an access point. However, you can enable or disable rogue detection for a specific access point by selecting the Rogue Detection check box on the All APs > Details for (Advanced) page. Rogue detection is disabled by default for OfficeExtend access points because these access points, which are deployed in a home environment, are likely to detect a large number of rogue devices.
    Note 

    DTLS data encryption is enabled automatically when you enable the OfficeExtend mode for an access point. However, you can enable or disable DTLS data encryption for a specific access point by selecting the Data Encryption check box on the All APs > Details for (Advanced) page.

    Note 

    Telnet and SSH access are disabled automatically when you enable the OfficeExtend mode for an access point. However, you can enable or disable Telnet or SSH access for a specific access point by selecting the Telnet or SSH check box on the All APs > Details for (Advanced) page.

    Note 

    Link latency is enabled automatically when you enable the OfficeExtend mode for an access point. However, you can enable or disable link latency for a specific access point by selecting the Enable Link Latency check box on the All APs > Details for (Advanced) page.

  3. Check the Enable Least Latency Controller Join check box if you want the access point to choose the controller with the least latency when joining. Otherwise, leave this check box unchecked, which is the default value. When you enable this feature, the access point calculates the time between the discovery request and discovery response and joins the controller that responds first.

  4. Click Apply.

    The OfficeExtend AP text box on the All APs page shows which access points are configured as OfficeExtend access points.

Step 6

Configure a specific username and password for the OfficeExtend access point so that the user at home can log into the GUI of the OfficeExtend access point:

  1. Click the Credentials tab.

  2. Select the Over-ride Global Credentials check box to prevent this access point from inheriting the global username, password, and enable password from the controller. The default value is unselected.

  3. In the Username, Password, and Enable Password text boxes, enter the unique username, password, and enable password that you want to assign to this access point.

    Note 

    The information that you enter is retained across controller and access point reboots and if the access point joins a new controller.

  4. Click Apply.

    Note 

    If you want to force this access point to use the controller’s global credentials, uncheck the Over-ride Global Credentials check box.

    These credentials are valid for Telnet/SSH and not for GUI of Wave 2 Cisco OEAP. For the GUI of Wave 2 Cisco OEAP, the default username of admin and the default password of admin can be used upon the first login and you are prompted to change the credentials locally on the Cisco OEAP.

Step 7

Configure access to local GUI, LAN ports, and local SSID of the OfficeExtend access points:

  1. Choose Wireless > Access Points > Global Configuration to open the Global Configuration page.

  2. Under OEAP Config Parameters, select or unselect the Disable Local Access check box to enable or disable local access of the OfficeExtend access points.

    Note 
    By default, the Disable Local Access check box is unselected and therefore the Ethernet ports and personal SSIDs are enabled. This configuration does not affect remote LAN. The port is enabled only when you configure a remote LAN.
Step 8

Configure split tunneling for the OfficeExtend access points as follows:

  1. Choose Wireless > Access Points > Global Configuration.

  2. In the OEAP Config Parameters area, select or unselect the Disable Split Tunnel check box.

    Disabling split tunneling here disables split tunneling for all the WLANs and remote LANs. You can also disable split tunneling on a specific WLAN or remote LAN.

  3. Click Apply.

Step 9

Click Save Configuration.

Step 10

If your controller supports only OfficeExtend access points, see the Configuring RRM section for instructions on setting the recommended values for the DCA interval, channel scan duration, and neighbor packet frequency.


Configuring OfficeExtend Access Points (CLI)

Procedure

  • Enable FlexConnect on the access point by entering this command:

    config ap mode flexconnect Cisco_AP

  • Configure one or more controllers for the access point by entering one or all of these commands:

    config ap primary-base controller_name Cisco_AP controller_ip_address

    config ap secondary-base controller_name Cisco_AP controller_ip_address

    config ap tertiary-base controller_name Cisco_AP controller_ip_address


    Note

    You must enter both the name and IP address of the controller. Otherwise, the access point cannot join this controller.


    Note

    The names and IP addresses must be unique for the primary, secondary, and tertiary controllers.


  • Enable the OfficeExtend mode for this access point by entering this command:

    config flexconnect office-extend {enable | disable} Cisco_AP

    The default value is enabled. The disable parameter disables OfficeExtend mode for this access point. It does not undo all of the configuration settings on the access point. If you want to clear the access point’s configuration and return it to the factory-default settings, enter this command:

    clear ap config cisco-ap

    If you want to clear only the access point’s personal SSID, enter this command:

    config flexconnect office-extend clear-personalssid-config Cisco_AP


    Note

    Rogue detection is disabled automatically when you enable the OfficeExtend mode for an access point. However, you can enable or disable rogue detection for a specific access point or for all access points using the config rogue detection {enable | disable} {Cisco_AP | all} command. Rogue detection is disabled by default for OfficeExtend access points because these access points, which are deployed in a home environment, are likely to detect a large number of rogue devices.


    Note

    DTLS data encryption is enabled automatically when you enable the OfficeExtend mode for an access point. However, you can enable or disable DTLS data encryption for a specific access point or for all access points using the config ap link-encryption {enable | disable} {Cisco_AP | all} command.


    Note

    Telnet and SSH access are disabled automatically when you enable the OfficeExtend mode for an access point. However, you can enable or disable Telnet or SSH access for a specific access point using the config ap {telnet | ssh} {enable | disable} Cisco_AP command.


    Note

    Link latency is enabled automatically when you enable the OfficeExtend mode for an access point. However, you can enable or disable link latency for a specific access point or for all access points currently associated to the controller using the config ap link-latency {enable | disable} {Cisco_AP | all} command.


  • Enable the access point to choose the controller with the least latency when joining by entering this command:

    config flexconnect join min-latency {enable | disable} Cisco_AP

    The default value is disabled. When you enable this feature, the access point calculates the time between the discovery request and discovery response and joins the Cisco WLC that responds first.

  • Configure a specific username and password that users at home can enter to log into the GUI of the OfficeExtend access point by entering this command:

    config ap mgmtuser add username user password password enablesecret enable_password Cisco_AP

    The credentials that you enter in this command are retained across controller and access point reboots and if the access point joins a new controller.


    Note

    If you want to force this access point to use the controller’s global credentials, enter the config ap mgmtuser delete Cisco_AP command. The following message appears after you execute this command: “AP reverted to global username configuration.”


  • To configure access to the local network for the Cisco OfficeExtend access points, enter the following command:

    config network oeap local-network {enable | disable}

    When disabled, the local SSIDs, local ports are inoperative; and the console is not accessible. When reset, the default restores local access. This configuration does not affect the remote LAN configuration if configured on the access points.

  • Configure the Dual R-LAN Ports feature, which allows the Ethernet port 3 of Cisco OfficeExtend access points to operate as a remote LAN by entering this command:

    config network oeap dual-rlan-ports {enable | disable}

    This configuration is global to the controller and is stored by the AP and the NVRAM variable. When this variable is set, the behavior of the remote LAN is changed. This feature supports different remote LANs per remote LAN port.

    The remote LAN mapping is different depending on whether the default group or AP Groups is used:
    • Default Group—If you are using the default group, a single remote LAN with an even numbered remote LAN ID is mapped to port 4. For example, a remote LAN with remote LAN ID 2 is mapped to port 4. The remote LAN with an odd numbered remote LAN ID is mapped to port 3. For example, a remote LAN with remote LAN ID 1 is mapped to port 3.

    • AP Groups—If you are using an AP group, the mapping to the OEAP ports is determined by the order of the AP groups. To use an AP group, you must first delete all remote LANs and WLANs from the AP group leaving it empty. Then, add the two remote LANs to the AP group adding the port 3 AP remote LAN first, and the port 4 remote group second, followed by any WLANs.

  • Enable or disable split tunneling by entering this command:

    config network oeap split-tunnel {enable | disable}

    Disabling split tunneling here disables split tunneling for all the WLANs and remote LANs. You can also disable split tunneling on a specific WLAN or remote LAN.

  • Enable split tunneling without gateway override by entering this command:

    config wlan split-tunnel wlan-id enabled apply-acl acl name
  • Enable split tunneling with gateway override by entering this command:

    config wlan split-tunnel wlan-id enabled override gateway gateway ip mask subnet mask apply-acl acl name
  • Save your changes by entering this command:

    save config

    Note

    If your controller supports only OfficeExtend access points, see the Configuring Radio Resource Management section for instructions on setting the recommended value for the DCA interval.


Configuring Split Tunneling for a WLAN or a Remote LAN

Configuring Split Tunneling for a WLAN or a Remote LAN (GUI)

Procedure


Step 1

Choose WLANs and click the WLAN ID to open the WLANs > Edit page.

The WLAN that you choose can be a WLAN or a remote LAN depending on its configuration.

Step 2

Click the Advanced tab.

Step 3

In the OEAP area, select or unselect the Split Tunnel check box.

Step 4

Select the Gateway Override check box to configure the Gateway IP and Subnet Mask. The interface mapped to the WLAN or RLAN will be used if the checkbox is unchecked.

Step 5

From the drop-down list select the Associated ACL. If you choose None, an error message appears indicating that you must choose an ACL.

Step 6

Click Apply.

Step 7

Click Save Configuration.


Configuring Split Tunneling for a WLAN or a Remote LAN (CLI)

Procedure

  • Enable or disable split tunneling for a WLAN by entering this command:

    config wlan split-tunnel wlan-id {enable | disable}
  • See the split tunneling status for a WLAN by entering this command:

    show wlan wlan-id
  • Enable or disable split tunneling for a remote LAN by entering this command:

    config remote-lan split-tunnel rlan-id {enable | disable}
  • See the split tunneling status for a remote LAN by entering this command:

    show remote-lan rlan-id

    Note

    When a remote LAN or wireless client on a corporate SSID communicate among themselves, all the traffic on the corporate SSID and remote LAN is tunneled back to the controller.


Configuring OEAP ACLs

Configuring OEAP ACLs (GUI)

Procedure


Step 1

Choose Wireless > OEAP ACLs .

The OEAP ACL page is displayed.

This page lists all the OEAP ACLs configured on the controller. To remove an ACL, hover your mouse over the blue drop-down arrow adjacent to the corresponding ACL name and choose Remove.

Step 2

Add a new ACL by clicking New.

The Access Control Lists > New page is displayed.

Step 3

In the Access Control List Name text box, enter a name for the new ACL. You can enter up to 32 alphanumeric characters.

Step 4

Click Apply.

Step 5

When the Access Control Lists page reappears, click the name of the new ACL.

When the Access Control Lists > Edit page appears, click Add New Rule.

The Access Control Lists > Rules > New page is displayed.

Step 6

Configure a rule for this ACL as follows:

  1. The controller supports up to 64 rules for each ACL. These rules are listed in order from 1 to 64. In the Sequence text box, enter a value (between 1 and 64) to determine the order of this rule in relation to any other rules defined for this ACL.

    Note 

    If rules 1 through 4 are already defined and you add rule 29, it is added as rule 5. If you add or change a sequence number of a rule, the sequence numbers of the other rules are automatically adjusted to maintain a continuous sequence. For instance, if you change a rule’s sequence number from 7 to 5, the rules with sequence numbers 5 and 6 are automatically reassigned as 6 and 7, respectively.

  2. From the Source drop-down list, choose one of these options to specify the source of the packets to which this ACL is applicable:

    • Any—Any source (This is the default value.)

    • IP Address—A specific source. If you choose this option, enter the IP address and netmask of the source in the corresponding text boxes.

  3. From the Destination drop-down list, choose one of these options to specify the destination of the packets to which this ACL applies:

    • Any—Any destination (This is the default value.)

    • IP Address—A specific destination. If you choose this option, enter the IP address and netmask of the destination in the text boxes.

    • Network List—A specific network list. If you choose this option, enter the corporate subnets configured in the network list.

  4. From the Protocol drop-down list, choose the protocol ID of the IP packets to be used for this ACL. The protocol options that you can use are the following:

    • Any—Any protocol (This is the default value.)

    • TCP

    • UDP

    • Other—Any other Internet-Assigned Numbers Authority (IANA) protocol

      Note 
      If you choose Other, enter the number of the desired protocol in the Protocol text box. You can find the list of available protocols in the INAI website.
  5. From the Action drop-down list, choose Deny to cause this ACL to block packets, Permit to cause this ACL to allow packets, or Nat-route to route all packets matching the rule to the local network or NAT the packets matching the rule to the internet.The default value is Deny.

  6. Click Apply.

    The Access Control Lists > Edit page is displayed on which the rules for this ACL are shown.

  7. Repeat this procedure to add additional rules, if any, for this ACL.

Step 7

Click Save Configuration.


Configuring a Personal SSID on an OfficeExtend Access Point

Procedure


Step 1

Find the IP address of your OfficeExtend access point by doing one of the following:

  • Log on to your home router and look for the IP address of your OfficeExtend access point.

  • Ask your company’s IT professional for the IP address of your OfficeExtend access point.

  • Use an application such as Network Magic to detect devices on your network and their IP addresses.

Step 2

With the OfficeExtend access point connected to your home router, enter the IP address of the OfficeExtend access point in the Address text box of your Internet browser and click Go.

Note 

Make sure that you are not connected to your company’s network using a virtual private network (VPN) connection.

Step 3

When prompted, enter the username and password to log into the access point.

Step 4

On the OfficeExtend Access Point Welcome page, click Enter. The OfficeExtend Access Point Home page appears.

Step 5

Choose Configuration to open the Configuration page.

Step 6

In the SSID text box, enter the personal SSID that you want to assign to this access point. This SSID is locally switched.

Note 

A controller with an OfficeExtend access point publishes only up to 15 WLANs to each connected access point because it reserves one WLAN for the personal SSID.

Step 7

From the Security drop-down list, choose Open, WPA2/PSK (AES), or 104 bit WEP to set the security type to be used by this access point.

Note 

If you choose WPA2/PSK (AES), make sure that the client is configured for WPA2/PSK and AES encryption.

Step 8

If you chose WPA2/PSK (AES) in Step 8, enter an 8- to 38-character WPA2 passphrase in the Secret text box. If you chose 104 bit WEP, enter a 13-character ASCII key in the Key text box.

Step 9

Click Apply.

Note 

If you want to use the OfficeExtend access point for another application, you can clear this configuration and return the access point to the factory-default settings by clicking Clear Config. You can also clear the access point’s configuration from the controller CLI by entering the clear ap config Cisco_AP command.

These steps can be used for configuring a personal SSID on OfficeExtend access points only.


Viewing OfficeExtend Access Point Statistics

Use these commands to view information about the OfficeExtend access points on your network:

  • See a list of all OfficeExtend access points by entering this command:

    show flexconnect office-extend summary

  • See the link delay for OfficeExtend access points by entering this command:

    show flexconnect office-extend latency

  • See the encryption state of all access points or a specific access point by entering this command:

    show ap link-encryption {all | Cisco_AP}

    This command also shows authentication errors, which track the number of integrity check failures, and replay errors, which track the number of times that the access point receives the same packet. See the data plane status for all access points or a specific access point by entering this command:

    show ap data-plane {all | Cisco_AP}

Viewing Voice Metrics on OfficeExtend Access Points

Use this command to view information about voice metrics on the OfficeExtend access points in your network:

show ap stats 802.11{a | b} Cisco_AP
Information similar to the following appears:
OEAP WMM Stats :
  Best Effort:
    Tx Frame Count............................... 0
    Tx Failed Frame Count........................ 0
    Tx Expired Count............................. 0
    Tx Overflow Count............................ 0
    Tx Queue Count............................... 0
    Tx Queue Max Count........................... 0
    Rx Frame Count............................... 0
    Rx Failed Frame Count........................ 0
  Background:
    Tx Frame Count............................... 0
    Tx Failed Frame Count........................ 0
    Tx Expired Count............................. 0
    Tx Overflow Count............................ 0
    Tx Queue Count............................... 0
    Tx Queue Max Count........................... 0
    Rx Frame Count............................... 0
    Rx Failed Frame Count........................ 0
  Video:
    Tx Frame Count............................... 0
    Tx Failed Frame Count........................ 0
    Tx Expired Count............................. 0
    Tx Overflow Count............................ 0
    Tx Queue Count............................... 0
    Tx Queue Max Count........................... 0
    Rx Frame Count............................... 0
    Rx Failed Frame Count........................ 0
  Voice:
    Tx Frame Count............................... 0
    Tx Failed Frame Count........................ 0
    Tx Expired Count............................. 0
    Tx Overflow Count............................ 0
    Tx Queue Count............................... 0
    Tx Queue Max Count........................... 0
    Rx Frame Count............................... 0
    Rx Failed Frame Count........................ 0

View the voice metrics on the OfficeExtend access points in your network using the WLC GUI as follows:

  • ChooseWireless > Access Points > Radios > 802.11a/n/ac or 802.11b/g/n. The 802.11a/n/ac Radios or 802.11b/g/n Radios page appears.

  • Hover your cursor over the blue drop-down arrow for the desired access point and click the Detail link for the desired client to open the Radio > Statistics page.

    This page shows the OEAP WMM counters for this access point.

Network Diagnostics

Network Diagnostics determines the non-DTLS throughput of the system by running a speed test on demand. Network Diagnostics allows troubleshooting of root causes leading to failures. It also determines the link latency and jitter by running a test on demand or periodically.

This section contains the following subsections:

Running Network Diagnostics (GUI)

Procedure


Step 1

Choose WAN > Network Diagnostics.

The Network Diagnostics page is displayed.
Step 2

Click Start Diagnostics.

The diagnostics page is displayed.

Running Network Diagnostics on the Controller

Procedure

Step 1

Choose Wireless > All APs > Details.

Step 2

Choose the Network Diagnostics tab.

The Network Diagnostics page is displayed.
Step 3

Click Start Network Diagnostics.

The diagnostics page is displayed.

Running Network Diagnostics (CLI)

Procedure

  • To run network diagnostics, enter this command on the Cisco WLC:

    show ap network-diagnostics Ap_Name

Remote LANs

This section describes how to configure remote LANs.

Prerequisites

  • You must remove all remote LANs from a controller's configuration before moving to a release that does not support the remote LAN functionality. The remote LAN changes to a WLAN in earlier releases, which could cause an undesirable or unsecured WLAN being broadcast on the wireless network. Remote LAN is only supported in release 7.0.116.0 and later.

Restrictions

  • It is not possible to configure 802.1X on remote LANs through the controller GUI; configuration only through CLI is supported.

This section contains the following subsections:

Configuring a Remote LAN (GUI)

Procedure


Step 1

Choose WLANs to open the WLANs page.

This page lists all of the WLANs and remote LANs currently configured on the controller. For each WLAN, you can see its WLAN/remote LAN ID, profile name, type, SSID, status, and security policies.

The total number of WLANs/Remote LANs appears in the upper right-hand corner of the page. If the list of WLANs/Remote LANs spans multiple pages, you can access these pages by clicking the page number links.

Note 

If you want to delete a Remote LAN, hover your cursor over the blue drop-down arrow for that WLAN and choose Remove, or select the check box to the left of the row, choose Remove Selected from the drop-down list, and click Go. A message appears asking you to confirm your decision. If you proceed, the remote LAN is removed from any access point group to which it is assigned and from the access point’s radio.

Step 2

Create a new Remote-LAN by choosing Create New from the drop-down list and clicking Go. The WLANs > New page appears.

Step 3

From the Type drop-down list, choose Remote LAN to create a remote LAN.

Step 4

In the Profile Name text box, enter up to 32 alphanumeric characters for the profile name to be assigned to this Remote WLAN. The profile name must be unique.

Step 5

From the WLAN ID drop-down list, choose the ID number for this WLAN.

Step 6

Click Apply to commit your changes. The WLANs > Edit page appears.

Note 

You can also open the WLANs > Edit page from the WLANs page by clicking the ID number of the WLAN that you want to edit.

Step 7

Use the parameters on the General, Security, and Advanced tabs to configure this remote LAN. See the sections in the rest of this chapter for instructions on configuring specific features.

Step 8

On the General tab, select the Status check box to enable this remote LAN. Be sure to leave it unselected until you have finished making configuration changes to the remote LAN.

Note 

You can also enable or disable remote LANs from the WLANs page by selecting the check boxes to the left of the IDs that you want to enable or disable, choosing Enable Selected or Disable Selected from the drop-down list, and clicking Go.

Step 9

Click Apply to commit your changes.

Step 10

Click Save Configuration to save your changes.


Configuring a Remote LAN (CLI)

Procedure

  • See the current configuration of the remote LAN by entering this command:

    show remote-lan remote-lan-id

  • Enable or disable remote LAN by entering this command:

    config remote-lan {enable | disable} remote-lan-id

  • Enable or disable 802.1X authentication for remote LAN by entering this command:

    config remote-lan security 802.1X {enable | disable} remote-lan-id


    Note

    The encryption on a remote LAN is always “none.”
  • Enable or disable local EAP with the controller as an authentication server by entering this command:

    config remote-lan local-auth enable profile-name remote-lan-id

  • If you are using an external AAA authentication server, use the following command:

    config remote-lan radius_server auth {add | delete} remote-lan-id server id

    config remote-lan radius_server auth {add | delete} remote-lan-id