Installing and Configuring the Access Point
Before You Begin
The following sections provide information on how to install and configure the Cisco Aironet 1810 Series OfficeExtend Access Point. The specifications of the access point (AP), the parts, mounting options, powering options and other hardware installation procedures are provided in the Getting Started Guide - Cisco Aironet 1810 Series OfficeExtend Access Points, at:
http://www.cisco.com/c/en/us/td/docs/wireless/access_point/1810/quick/guide/oeap1810getstart.html
Ensure that the AP is properly mounted and ready to be powered up before proceeding with the sections that follow. This document is meant to be used in conjunction with the following guides:
http://www.cisco.com/c/en/us/td/docs/wireless/access_point/1810/quick/guide/oeap1810getstart.html
http://www.cisco.com/c/en/us/td/docs/wireless/controller/technotes/8-3/b_Cisco_OfficeExtend_Access_Point_.html
Installing the Access Point in the Network
Figure 1-1 Cisco Aironet 1810 Series OfficeExtend AP Network Deployment Overview
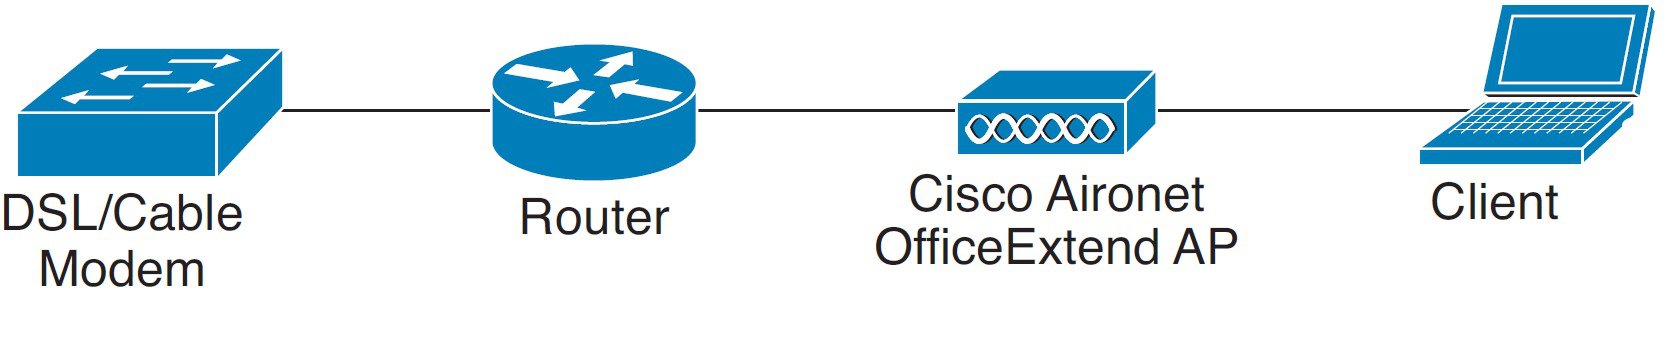

Note![]() In some cases your broadband modem may have an integrated router capability and therefore you do not require a separate router placed between the broadband modem and the Cisco Aironet 1810 Series OfficeExtend Access Point.
In some cases your broadband modem may have an integrated router capability and therefore you do not require a separate router placed between the broadband modem and the Cisco Aironet 1810 Series OfficeExtend Access Point.
To install the Cisco Aironet 1810 Series OfficeExtend AP, follow these steps:
Step 1![]() Connect the WAN port of the Cisco OfficeExtend Access Point 1810 to your home router/gateway. The Cisco OfficeExtend Access Point gets an IP address from the home router/ gateway.
Connect the WAN port of the Cisco OfficeExtend Access Point 1810 to your home router/gateway. The Cisco OfficeExtend Access Point gets an IP address from the home router/ gateway.
Note![]() The Cisco OfficeExtend Access Point is not designed to replace the functionality of a home router, and it should not be connected directly to the service provider gateway.
The Cisco OfficeExtend Access Point is not designed to replace the functionality of a home router, and it should not be connected directly to the service provider gateway.
Step 2![]() After the Cisco OfficeExtend Access Point has started, connect a computer to the port labeled as LAN3. LAN3 is a dedicated local port on OEAP1810. The computer gets an IP address from the default DHCP address pool of 10.0.0.0/24.
After the Cisco OfficeExtend Access Point has started, connect a computer to the port labeled as LAN3. LAN3 is a dedicated local port on OEAP1810. The computer gets an IP address from the default DHCP address pool of 10.0.0.0/24.
Step 3![]() Open an Internet browser and go to the IP address of the access point. The default IP address is 10.0.0.1
Open an Internet browser and go to the IP address of the access point. The default IP address is 10.0.0.1
Note![]() Make sure your laptop is not connected to your company’s network using a virtual private network (VPN) connection.
Make sure your laptop is not connected to your company’s network using a virtual private network (VPN) connection.
Step 4![]() At the OfficeExtend Access Point login window, click Login, and then enter the username and password to log into the access point. The default username and password are admin and admin.
At the OfficeExtend Access Point login window, click Login, and then enter the username and password to log into the access point. The default username and password are admin and admin.
Step 5![]() Choose Configuration > WAN.
Choose Configuration > WAN.
Step 6![]() Enter the IP address of the Wireless LAN Controller in the Controller IP Address field.
Enter the IP address of the Wireless LAN Controller in the Controller IP Address field.
Step 7![]() Leave the Static IP check box unchecked to allow the WAN IP address to be assigned by DHCP.
Leave the Static IP check box unchecked to allow the WAN IP address to be assigned by DHCP.
Step 8![]() Click Apply to commit your changes.
Click Apply to commit your changes.
Step 9![]() On the verification screen, click Continue.
On the verification screen, click Continue.
The AP connects to the controller and downloads the current software image. Allow 5 minutes for the device to download and reboot with the new code and configuration.
Note![]() The AP restarts when any change is applied on local the GUI. For example, changing the settings for the personal SSID causes interruption to the corporate SSID. It recovers only after the AP rejoins the controller.
The AP restarts when any change is applied on local the GUI. For example, changing the settings for the personal SSID causes interruption to the corporate SSID. It recovers only after the AP rejoins the controller.
Note![]() You do not need to configure any SSIDs for your AP to connect to your company network. The access point receives the company SSID when it connects to the company network by way of the Internet. If you have problems connecting to your company network, contact your IT administrator. You can configure your local SSID WLAN for other devices. See the“Configuring Radio Channels on the Access Point” section.
You do not need to configure any SSIDs for your AP to connect to your company network. The access point receives the company SSID when it connects to the company network by way of the Internet. If you have problems connecting to your company network, contact your IT administrator. You can configure your local SSID WLAN for other devices. See the“Configuring Radio Channels on the Access Point” section.
Note![]() Cisco Aironet 1810 Series OfficeExtend access points are designed to work behind a router or other gateway device that is using network address translation (NAT). NAT allows a device, such as a home router or gateway, to act as an agent between the Internet (public) and a personal network (private), thereby enabling an entire group of computers to be represented by a single IP address. There is not limit to the number of Cisco Aironet 1810 Series OfficeExtend access points that can be deployed behind a single NAT device.
Cisco Aironet 1810 Series OfficeExtend access points are designed to work behind a router or other gateway device that is using network address translation (NAT). NAT allows a device, such as a home router or gateway, to act as an agent between the Internet (public) and a personal network (private), thereby enabling an entire group of computers to be represented by a single IP address. There is not limit to the number of Cisco Aironet 1810 Series OfficeExtend access points that can be deployed behind a single NAT device.
Configuring the Wireless LAN Controller IP Address on the Access Point
Follow these steps to configure the IP address of the Wireless LAN Controller on your Cisco Aironet 1810 Series OfficeExtend access point.
Step 1![]() Obtain the IP address of your Wireless LAN controller from your company’s IT professional.
Obtain the IP address of your Wireless LAN controller from your company’s IT professional.
Step 2![]() Access the 1810 Series OfficeExtend access point GUI as described in “Accessing the GUI” section.
Access the 1810 Series OfficeExtend access point GUI as described in “Accessing the GUI” section.
Step 3![]() Choose Configuration > WAN tab.
Choose Configuration > WAN tab.
Step 4![]() Enter the IP address of the primary controller in the Controller IP Address field.
Enter the IP address of the primary controller in the Controller IP Address field.
Step 5![]() Leave the Static IP check box unchecked to allow the WAN IP address to be assigned by DHCP.
Leave the Static IP check box unchecked to allow the WAN IP address to be assigned by DHCP.
Step 6![]() Click Apply to commit your changes.
Click Apply to commit your changes.
A verification screen is displayed.
The 1810 Series OfficeExtend Access point will connect to the controller and download the current software image. Allow the device 5 minutes to download and reboot with the new code and configuration.
Configuring Radio Channels on the Access Point
Follow these steps to configure a radio channel for your 1810 Series OfficeExtend access point.
Step 1![]() Access the 1810 Series OfficeExtend access point GUI as described in “Accessing the GUI” section.
Access the 1810 Series OfficeExtend access point GUI as described in “Accessing the GUI” section.
Step 2![]() Choose Configuration > System.
Choose Configuration > System.
Step 3![]() Choose the desired radio interface – either 2.4 GHz or 5 GHz.
Choose the desired radio interface – either 2.4 GHz or 5 GHz.
Step 4![]() From the Status drop-down list, choose Enabled to enable the wireless interface.
From the Status drop-down list, choose Enabled to enable the wireless interface.
Step 5![]() From the Channel Selection drop-down list, choose the channel on which this interface will operate.
From the Channel Selection drop-down list, choose the channel on which this interface will operate.
Note![]() 802.11n mode should be enabled by default. If it is disabled, choose Enabled from the 802.11 n-mode drop-down list.
802.11n mode should be enabled by default. If it is disabled, choose Enabled from the 802.11 n-mode drop-down list.
Step 6![]() Click Apply to commit your changes.
Click Apply to commit your changes.
Configuring Personal Wireless LANs
Step 1![]() Access the 1810 Series OfficeExtend access point GUI as described in “Accessing the GUI” section.
Access the 1810 Series OfficeExtend access point GUI as described in “Accessing the GUI” section.
Step 2![]() Choose Configuration > SSID.
Choose Configuration > SSID.
Step 3![]() Choose the radio band, which can be either 2.4 GHz or 5.0 GHz. You can duplicate the configuration on both bands, or have different settings on each band.
Choose the radio band, which can be either 2.4 GHz or 5.0 GHz. You can duplicate the configuration on both bands, or have different settings on each band.
Step 4![]() In the Personal Network section:
In the Personal Network section:
a.![]() Check the Enabled check box to enable this wireless connection. By default it is disabled.
Check the Enabled check box to enable this wireless connection. By default it is disabled.
b.![]() Check the Broadcast check box to broadcast the SSID over the air. By default it is unchecked.
Check the Broadcast check box to broadcast the SSID over the air. By default it is unchecked.
c.![]() In the SSID field, enter the personal SSID that you want to assign to this access point. This SSID will be locally switched.
In the SSID field, enter the personal SSID that you want to assign to this access point. This SSID will be locally switched.
Note![]() Your personal SSID Wireless LAN and your company SSID Wireless LAN are different. When you configure your personal Wireless LAN, use an SSID name that is different from your company’s SSID to help avoid confusion.
Your personal SSID Wireless LAN and your company SSID Wireless LAN are different. When you configure your personal Wireless LAN, use an SSID name that is different from your company’s SSID to help avoid confusion.
Step 5![]() In the Security Section, enable WPA2-PSK with AES encryption.
In the Security Section, enable WPA2-PSK with AES encryption.
Step 6![]() Click Apply to commit your changes.
Click Apply to commit your changes.
Step 7![]() In the verification screen, click Continue.
In the verification screen, click Continue.
 Feedback