Requirements

Planning Considerations

Expressway for Mobile and Remote Access Deployments

Expressway for Mobile and Remote Access for Cisco Unified Communications Manager allows users to access their collaboration tools from outside the corporate firewall without a VPN client. Using Cisco collaboration gateways, the client can connect securely to your corporate network from remote locations such as public Wi-Fi networks or mobile data networks.

You set up Expressway for Mobile and Remote Access as follows:
  1. Set up servers to support Expressway for Mobile and Remote Access using Cisco Expressway-E and Cisco Expressway-C.*

    1. See the following documents to set up the Cisco Expressway servers:
      • Cisco Expressway Basic Configuration Deployment Guide

      • Mobile and Remote Access via Cisco Expressway Deployment Guide

      * If you currently deploy a Cisco TelePresence Video Communications Server (VCS) environment, you can set up Expressway for Mobile and Remote Access. For more information, see Cisco VCS Basic Configuration (Control with Expressway) Deployment Guide and Mobile and Remote Access via Cisco VCS Deployment Guide.

    2. Add any relevant servers to the whitelist for your Cisco Expressway-C server to ensure that the client can access services that are located inside the corporate network.

      To add a server to the Cisco Expressway-C whitelist, use the HTTP server allow setting.

      This list can include the servers on which you host voicemail or contact photos.

  2. Configure an external DNS server that contains the _collab-edge DNS SRV record to allow the client to locate the Expressway for Mobile and Remote Access server.

  3. If you deploy a hybrid cloud-based architecture where the domain of the IM and presence server differs from the domain of the voice server, ensure that you configure the Voice Services Domain.

    The Voice Services Domain allows the client to locate the DNS server that contains the _collab-edge record.

    You can configure the voice services domain using one of the following methods:
    • Client configuration file (all Cisco Jabber clients)

    • Configuration URL (all Cisco Jabber clients except Cisco Jabber for Windows)

    • Installer options (Cisco Jabber for Windows only)


Important

In most cases, users can sign in to the client for the first time using Expressway for Mobile and Remote Access to connect to services from outside the corporate firewall. In the following cases, however, users must perform initial sign in while on the corporate network:
  • If the voice services domain is different from the services domain. In this case, users must be inside the corporate network to get the correct voice services domain from the jabber-config.xml file.

  • If the client needs to complete the CAPF enrollment process, which is required when using a secure or mixed mode cluster.


Figure 1. How the Client Connects to the Expressway for Mobile and Remote Access. The following diagram illustrates the architecture of an Expressway for Mobile and Remote Access environment.

Supported Services

The following table summarizes the services and functionality that are supported when the client uses Expressway for Mobile and Remote Access to remotely connect to Cisco Unified Communications Manager.

Table 1. Summary of supported services for Expressway for Mobile and Remote Access
Service Supported Unsupported
Directory
UDS directory search

X

LDAP directory search

X

Directory photo resolution

X

* Using HTTP white list on Cisco Expressway-C

Intradomain federation

X

* Contact search support depends of the format of your contact IDs. For more information, see the note below.

Interdomain federation

X

Instant Messaging and Presence
On-premises

X

Cloud

X

Chat

X

Group chat

X

High Availability: On-premises deployments

X

File transfer: On-premises deployments

X

File transfer: Cloud deployments

X

Desktop clients, some file transfer features are supported for mobile clients.

Video desktop share - BFCP

X (Cisco Jabber for mobile clients only support BFCP receive.)

Audio and Video
Audio and video calls

X

* Cisco Unified Communications Manager 9.1(2) and later

Deskphone control mode (CTI)

X

Remote Desktop Control

X

Extend and connect

X

Dial via Office - Reverse

X

Session persistency

X

Early media

X

Self Care Portal access

X

Voicemail
Visual voicemail

X

* Using HTTP white list on Cisco Expressway-C

Cisco WebEx Meetings
On-premises

X

Cloud

X

Cisco WebEx desktop share

X

Installation
Installer update

X

* Using HTTP white list on Cisco Expressway-C

Customization
Custom HTML tabs

X

* Using HTTP white list on Cisco Expressway-C

(Desktop clients only)
Security
End-to-end encryption

X

CAPF enrollment

X

Troubleshooting
Problem report generation

X

Problem report upload

X

High Availability (failover)
Audio and Video services

X

Voicemail services

X

IM and Presence services

X

Directory
When the client connects to services using Expressway for Mobile and Remote Access, it supports directory integration with the following limitations.
  • LDAP contact resolution —The client cannot use LDAP for contact resolution when outside of the corporate firewall. Instead, the client must use UDS for contact resolution.

    When users are inside the corporate firewall, the client can use either UDS or LDAP for contact resolution. If you deploy LDAP within the corporate firewall, Cisco recommends that you synchronize your LDAP directory server with Cisco Unified Communications Manager to allow the client to connect with UDS when users are outside the corporate firewall.

  • Directory photo resolution — To ensure that the client can download contact photos, you must add the server on which you host contact photos to the white list of your Cisco Expressway-C server. To add a server to Cisco Expressway-C white list, use the HTTP server allow setting. For more information, see the relevant Cisco Expressway documentation.

  • Intradomain federation — When you deploy intradomain federation and the client connects with Expressway for Mobile and Remote Access from outside the firewall, contact search is supported only when the contact ID uses one of the following formats:
    • sAMAccountName@domain

    • UserPrincipleName (UPN)@domain

    • EmailAddress@domain

    • employeeNumber@domain

    • telephoneNumber@domain

  • Interdomain federation using XMPP — The client does not support interdomain federation with XMPP standard-based environments such as Google Talk when it connects with Expressway for Mobile and Remote Access from outside the firewall.

Instant Messaging and Presence

When the client connects to services using Expressway for Mobile and Remote Access, it supports instant messaging and presence with the following limitations.

File transfer — The client does not support file transfer including screen capture with Cisco Unified Communications Manager IM and Presence Service deployments. File Transfer is supported only with Cisco WebEx cloud deployments with desktop clients. Managed File Transfer is supported with Cisco Unified Communication IM and Presence when Cisco Jabber is connected to Cisco Unified services using Expressway. Peer-to-Peer files transfer is not supported.

Audio and Video Calling
When the client connects to services using Expressway for Mobile and Remote Access, it supports voice and video calling with the following limitations.
  • Cisco Unified Communications Manager — Expressway for Mobile and Remote Access supports video and voice calling with Cisco Unified Communications Manager Version 9.1.2 and later. Expressway for Mobile and Remote Access is not supported with Cisco Unified Communications Manager Version 8.x.

  • Deskphone control mode (CTI) — The client does not support deskphone control mode (CTI), including extension mobility.

  • Extend and connect — The client cannot be used to:
    • Make and receive calls on a Cisco IP Phone in the office.

    • Perform mid-call control such as hold and resume on a home phone, hotel phone, or Cisco IP Phone in the office.

  • Dial via Office - Reverse — The client cannot make Dial via Office - Reverse calls from outside the firewall.

  • Session Persistency — The client cannot recover from audio and video calls drop when a network transition occurs. For example, if a users start a Cisco Jabber call inside their office and then they walk outside their building and lose Wi-Fi connectivity, the call drops as the client switches to use Expressway for Mobile and Remote Access.

  • Early Media — Early Media allows the client to exchange data between endpoints before a connection is established. For example, if a user makes a call to a party that is not part of the same organization, and the other party declines or does not answer the call, Early Media ensures that the user hears the busy tone or is sent to voicemail.

    When using Expressway for Mobile and Remote Access, the user does not hear a busy tone if the other party declines or does not answer the call. Instead, the user hears approximately one minute of silence before the call is terminated.

  • Self care portal access — Users cannot access the Cisco Unified Communications Manager Self Care Portal when outside the firewall. The Cisco Unified Communications Manager user page cannot be accessed externally.

    Cisco Expressway-E proxies all communications between the client and unified communications services inside the firewall. However, the Cisco Expressway-E does not proxy services that are accessed from a browser that is not part of the Cisco Jabber application.

Voicemail

Voicemail service is supported when the client connects to services using Expressway for Mobile and Remote Access.


Note

To ensure that the client can access voicemail services, you must add the voicemail server to the white list of your Cisco Expressway-C server. To add a server to Cisco Expressway-C white list, use the HTTP server allow setting. For more information, see the relevant Cisco Expressway documentation.


Cisco WebEx Meetings

When the client connects to services using Expressway for Mobile and Remote Access, it supports only cloud-based conferencing using Cisco WebEx Meetings Center.

The client cannot access the Cisco WebEx Meetings Server or join or start on-premises Cisco WebEx meetings.

Installation

When the client connects to services using Expressway for Mobile and Remote Access, it supports installer updates.


Note

To ensure that the client can download installer updates, you must add the server that hosts the installer updates to the white list of your Cisco Expressway-C server. To add a server to the Cisco Expressway-C white list, use the HTTP server allow setting. For more information, see the relevant Cisco Expressway documentation.


Customization

When the client connects to services using Expressway for Mobile and Remote Access, it supports custom HTML tab configuration for desktop clients.


Note

To ensure that the client can download the custom HTML tab configuration, you must add the server that hosts the custom HTML tab configuration to the white list of your Cisco Expressway-C server. To add a server to the Cisco Expressway-C whitelist, use the HTTP server allow setting. For more information, see the relevant Cisco Expressway documentation.


Security
When the client connects to services using Expressway for Mobile and Remote Access, it supports most security features with the following limitations.
  • Initial CAPF enrollment — Certificate Authority Proxy Function (CAPF) enrollment is a security service that runs on the Cisco Unified Communications Manager Publisher that issues certificates to Cisco Jabber (or other clients). To successfully enrol for CAPF, the client must connect from inside the firewall or using VPN.

  • End-to-end encryption — When users connect through Expressway for Mobile and Remote Access and participate in a call:
    • Media is encrypted on the call path between the Cisco Expressway-C and devices that are registered to the Cisco Unified Communications Manager using Expressway for Mobile and Remote Access.

    • Media is not encrypted on the call path between the Cisco Expressway-C and devices that are registered locally to Cisco Unified Communications Manager, if either Cisco Jabber or an internal device is not configured with Encrypted security mode.

    • Media is encrypted on the call path between the Expressway-C and devices that are registered locally to Cisco Unified Communnication Manager, if both Cisco Jabber and internal device are configured with Encypted security mode.

Troubleshooting

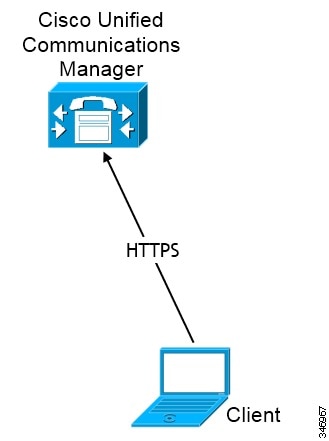
Problem report upload — When the desktop client connects to services using Expressway for Mobile and Remote Access, it cannot send problem reports because the client uploads problem reports over HTTPS to a specified internal server.

To work around this issue, users can save the report locally and send the report in another manner.

High Availability (failover)

High Availability means that if the client fails to connect to the primary server, it fails over to a secondary server with little or no interruption to the service. In relation to high availability being supported on the Expressway for Mobile and Remote Access, high availability refers to the server for the specific service failing over to a secondary server (such as Instant Messaging and Presence), and not the Cisco Expressway-E server itself failing over.

Some services are available on the Expressway for Mobile and Remote Access that are not supported for high availability. This means that if users are connected to the client from outside the corporate network and the instant messaging and presence server fails over, the services will continue to work as normal. However, if the audio and video server or voicemail server fails over, those services will not work as the relevant servers do not support high availability.

Deployment in a Virtual Environment

You can deploy Cisco Jabber for Windows in virtual environments using the following software:

  • Citrix XenDesktop 7.5

  • Citrix XenDesktop 7.1

  • Citrix XenDesktop 7.0

  • Citrix XenDesktop 5.6

  • Citrix XenApp 7.5 Enterprise Edition for Windows Server 2008 R2 Standard Service Pack 1 64 bit, published desktop

  • Citrix XenApp 6.5 Feature Pack 2 Enterprise Edition for Windows Server 2008 Service Pack 2 64 bit, published desktop
  • Citrix XenApp 6.5 Feature Pack 1 Enterprise Edition for Windows Server 2008 R2 Standard Service Pack 1 64 bit, published desktop

  • Citrix XenApp 6.5 Enterprise Edition for Windows Server 2008 R2 Standard Service Pack 1 64 bit, published desktop

  • VMware Horizon View 6.0

  • VMware Horizon View 5.3
  • VMware Horizon View 5.2

Supported Features

  • Instant messaging and presence with other Cisco Jabber clients
  • Desk phone control
  • Voicemail
  • Presence integration with Microsoft Outlook 2007, 2010 and 2013

Note

Cisco Jabber credentials caching is not supported when using Cisco Jabber in non-persistent virtual deployment infrastructure (VDI) mode.


Softphones in Virtual Environments

Use Cisco Virtualization Experience Media Engine (VXME) for softphone calls in a virtual environment.

Roaming Profiles

The client stores user data such as user call history and configuration store cache on the local machine for use when the user next signs in. In virtual environments, users do not always access the same virtual desktop. To guarantee a consistent user experience, these files need to be accessible every time the client is launched.

To preserve the user's personal settings in a virtual environment when roaming between hosted virtual desktops, use dedicated profile management solutions from Citrix and VMware.

Citrix Profile Management is a profile solution for Citrix environments. In deployments with random hosted virtual desktop assignments, Citrix Profile Management synchronizes each user's entire profile between the system it is installed on and the user store.

VMware View Persona Management preserves user profiles and dynamically synchronizes them with a remote profile repository. VMware View Persona Management does not require the configuration of Windows roaming profiles and can bypass Windows Active Directory in the management of View user profiles. Persona Management enhances the functionality of existing roaming profiles.

You can specify which files and folders to omit from synchronization by adding them to an exclusion list. To include a subfolder within an excluded folder, add the subfolder to an inclusion list.

To preserve the user's personal settings, do not exclude the following directories:
  • AppData\Local\Cisco
  • AppData\Local\JabberWerxCPP
  • AppData\Roaming\Cisco
  • AppData\Roaming\JabberWerxCPP

Client Information Storage

The client stores user information in the following locations:

C:\Users\username\AppData\Local\Cisco\Unified Communications\Jabber\CSF
Folder Name Description
Contacts Contact cache files
History Call history and chat history
Photo cache Caches the directory photos locally
C:\Users\username\AppData\Roaming\Cisco\Unified Communications\Jabber\CSF
Folder Name Description
Config Maintains users' Jabber configuration files and stores configuration store cache
Credentials Stores encrypted user name and password file

How the Client Connects to Services

To connect to services, Cisco Jabber requires the following information:
  • Source of authentication that enables users to sign in to the client.

  • Location of services.

You can provide that information to the client with the following methods:
URL Configuration

Users are sent an email from their administrators. The email contains a URL that will configure the domain needed for service discovery.

Service Discovery

The client automatically locates and connects to services.

Manual Connection Settings

Users manually enter connection settings in the client user interface.

Recommended Connection Methods

The method that you should use to provide the client with the information it needs to connect to services depends on your deployment type, server versions, and product modes. The following tables highlight various deployment methods and how to provide the client with the necessary information.

Table 2. On-Premises Deployments for Cisco Jabber for Windows

Product Mode

Server Versions

Discovery Method

Non DNS SRV Record Method

Full UC (default mode)

Release 9.1.2 and later:

  • Cisco Unified Communications Manager

  • Cisco Unified Communications Manager IM and Presence Service

A DNS SRV request against _cisco-uds .<domain>

Use the following installer switches and values:

  • AUTHENTICATOR=CUP
  • CUP_ADDRESS=

    <presence_server_address>

Full UC (default mode)

Release 8.x:

  • Cisco Unified Communications Manager

  • Cisco Unified Presence

A DNS SRV request against _cuplogin.<domain>

Use the following installer switches and values:

  • AUTHENTICATOR=CUP
  • CUP_ADDRESS=

    <presence_server_address>

IM Only (default mode)

Release 9 and later:
  • Cisco Unified Communications Manager IM and Presence Service

A DNS SRV request against _cisco-uds .<domain>

Use the following installer switches and values:

  • AUTHENTICATOR=CUP
  • CUP_ADDRESS=

    <presence_server_address>

IM Only (default mode)

Release 8.x:
  • Cisco Unified Presence

A DNS SRV request against _cuplogin .<domain>

Use the following installer switches and values:

  • AUTHENTICATOR=CUP
  • CUP_ADDRESS=

    <presence_server_address>

Phone Mode

Release 9 and later:
  • Cisco Unified Communications Manager

A DNS SRV request against _cisco-uds.<domain>

Use the following installer switches and values:

  • AUTHENTICATOR=CUCM
  • TFTP=<CUCM_address>
  • CCMCIP=<CUCM_address>
  • PRODUCT_MODE=phone_mode

High availability is not supported using this method of deployment.

Phone Mode

Release 8.x:
  • Cisco Unified Communications Manager

Manual connection settings

Use the following installer switches and values:

  • AUTHENTICATOR=CUCM
  • TFTP=<CUCM_address>
  • CCMCIP=<CUCM_address>
  • PRODUCT_MODE=phone_mode

High availability is not supported using this method of deployment.

Cisco Unified Communications Manager release 9.x and earlier—If you enable Cisco Extension Mobility, the Cisco Extension Mobility service must be activated on the Cisco Unified Communications Manager nodes that are used for CCMCIP. For information about Cisco Extension Mobility, see the Feature and Services guide for your Cisco Unified Communications Manager release.


Note

Cisco Jabber release 9.6 and later can still discover full Unified Communications and IM-only services using the _cuplogin DNS SRV request but a _cisco-uds request will take precedence if it is present.

Use the SERVICES_DOMAIN installer switch to specify the value of the domain where DNS records reside if you want users to bypass the email screen during the first login of a fresh installation.


Note

The services domain is read from a cached configuration if you are upgrading from Cisco Jabber for Windows 9.2.
Table 3. On-Premises Deployments for Cisco Jabber for Mac

Product Mode

Server Versions

Discovery Method

Full UC (default mode)

Release 9 and later:

  • Cisco Unified Communications Manager

  • Cisco Unified Communications Manager IM and Presence Service

A DNS SRV request against _cisco-uds.<domain>

Full UC (default mode)

Release 8.x:

  • Cisco Unified Communications Manager

  • Cisco Unified Presence

A DNS SRV request against _cuplogin.<domain>

Table 4. On-Premises Deployments for Cisco Jabber for Android and Cisco Jabber for iPhone and iPad

Product Mode

Server Versions

Discovery Method

Full UC (default mode)

Release 9 and later:

  • Cisco Unified Communications Manager

  • Cisco Unified Communications Manager IM and Presence Service

A DNS SRV request against _cisco-uds .<domain> and _cuplogin.<domain>

Full UC (default mode)

Release 8.x:

  • Cisco Unified Communications Manager

  • Cisco Unified Presence

A DNS SRV request against _cuplogin.<domain>

IM Only (default mode)

Release 9 and later: Cisco Unified Communications Manager IM and Presence Service

A DNS SRV request against _cisco-uds .<domain> and _cuplogin.<domain>

IM Only (default mode)

Release 8.x: Cisco Unified Presence

A DNS SRV request against _cuplogin .<domain>

Phone mode

Release 9 and later: Cisco Unified Communications Manager

A DNS SRV request against _cisco-uds.<domain>

Phone mode

Release 8.x: Cisco Unified Communications Manager

Manual connection settings or bootstrap file

Manual connection settings


Note

Cisco Unified Communications Manager version 9 and later can still discover full Unified Communications and IM-only services using the _cuplogin DNS SRV request but a _cisco-uds request will take precedence if it is present.
Table 5. Hybrid Cloud-Based Deployments

Server Versions

Connection Method

Cisco Webex Messenger

HTTPS request against https://loginp.webexconnect.com/cas/FederatedSSO?org=<domain>

Table 6. Cloud-Based Deployments

Deployment Type

Connection Method

Enabled for single sign-on (SSO)

Cisco Webex Administration Tool

Bootstrap file to set the SSO_ORG_DOMAIN argument.

Not enabled for SSO

Cisco Webex Administration Tool

Sources of Authentication

A source of authentication, or an authenticator, enables users to sign in to the client.

Three possible sources of authentication are as follows:
  • Cisco Unified Communications Manager IM and Presence—On-premises deployments in either full UC or IM only.

  • Cisco Unified Communications Manager—On-premises deployments in phone mode.

  • Cisco Webex Messenger Service—Cloud-based or hybrid cloud-based deployments.

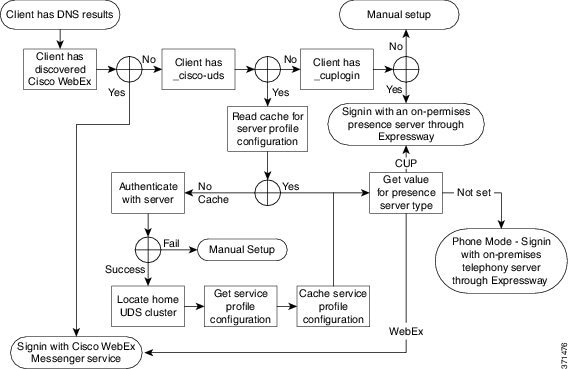
Initial Launch Sequence

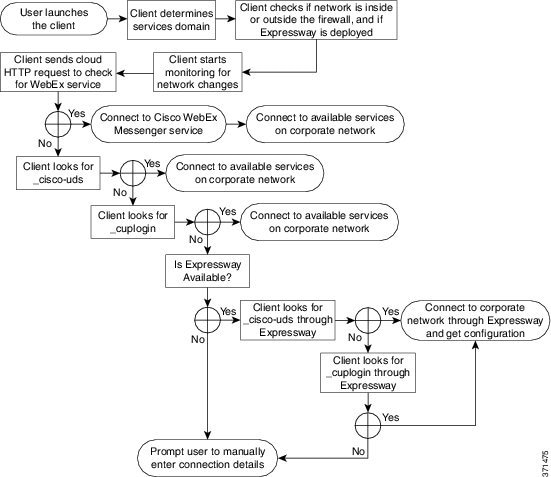
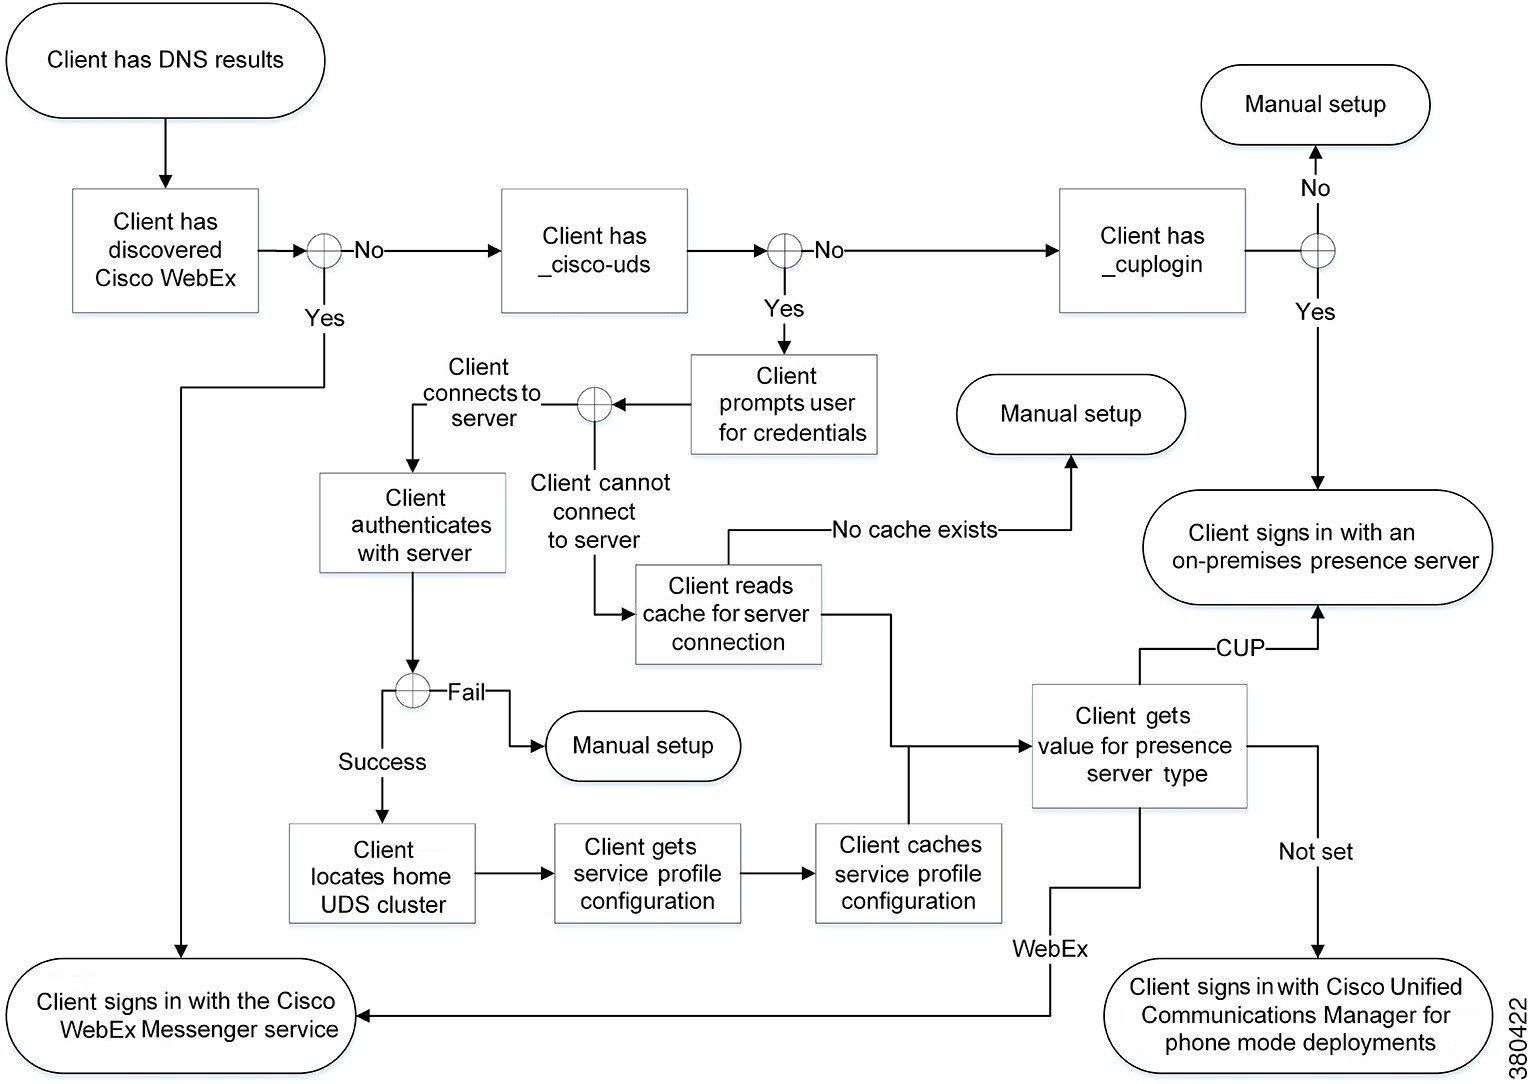
On the initial launch after installation, Cisco Jabber starts in the default product mode. The client then gets an authenticator and signs the user in. After sign in, the client determines the product mode.
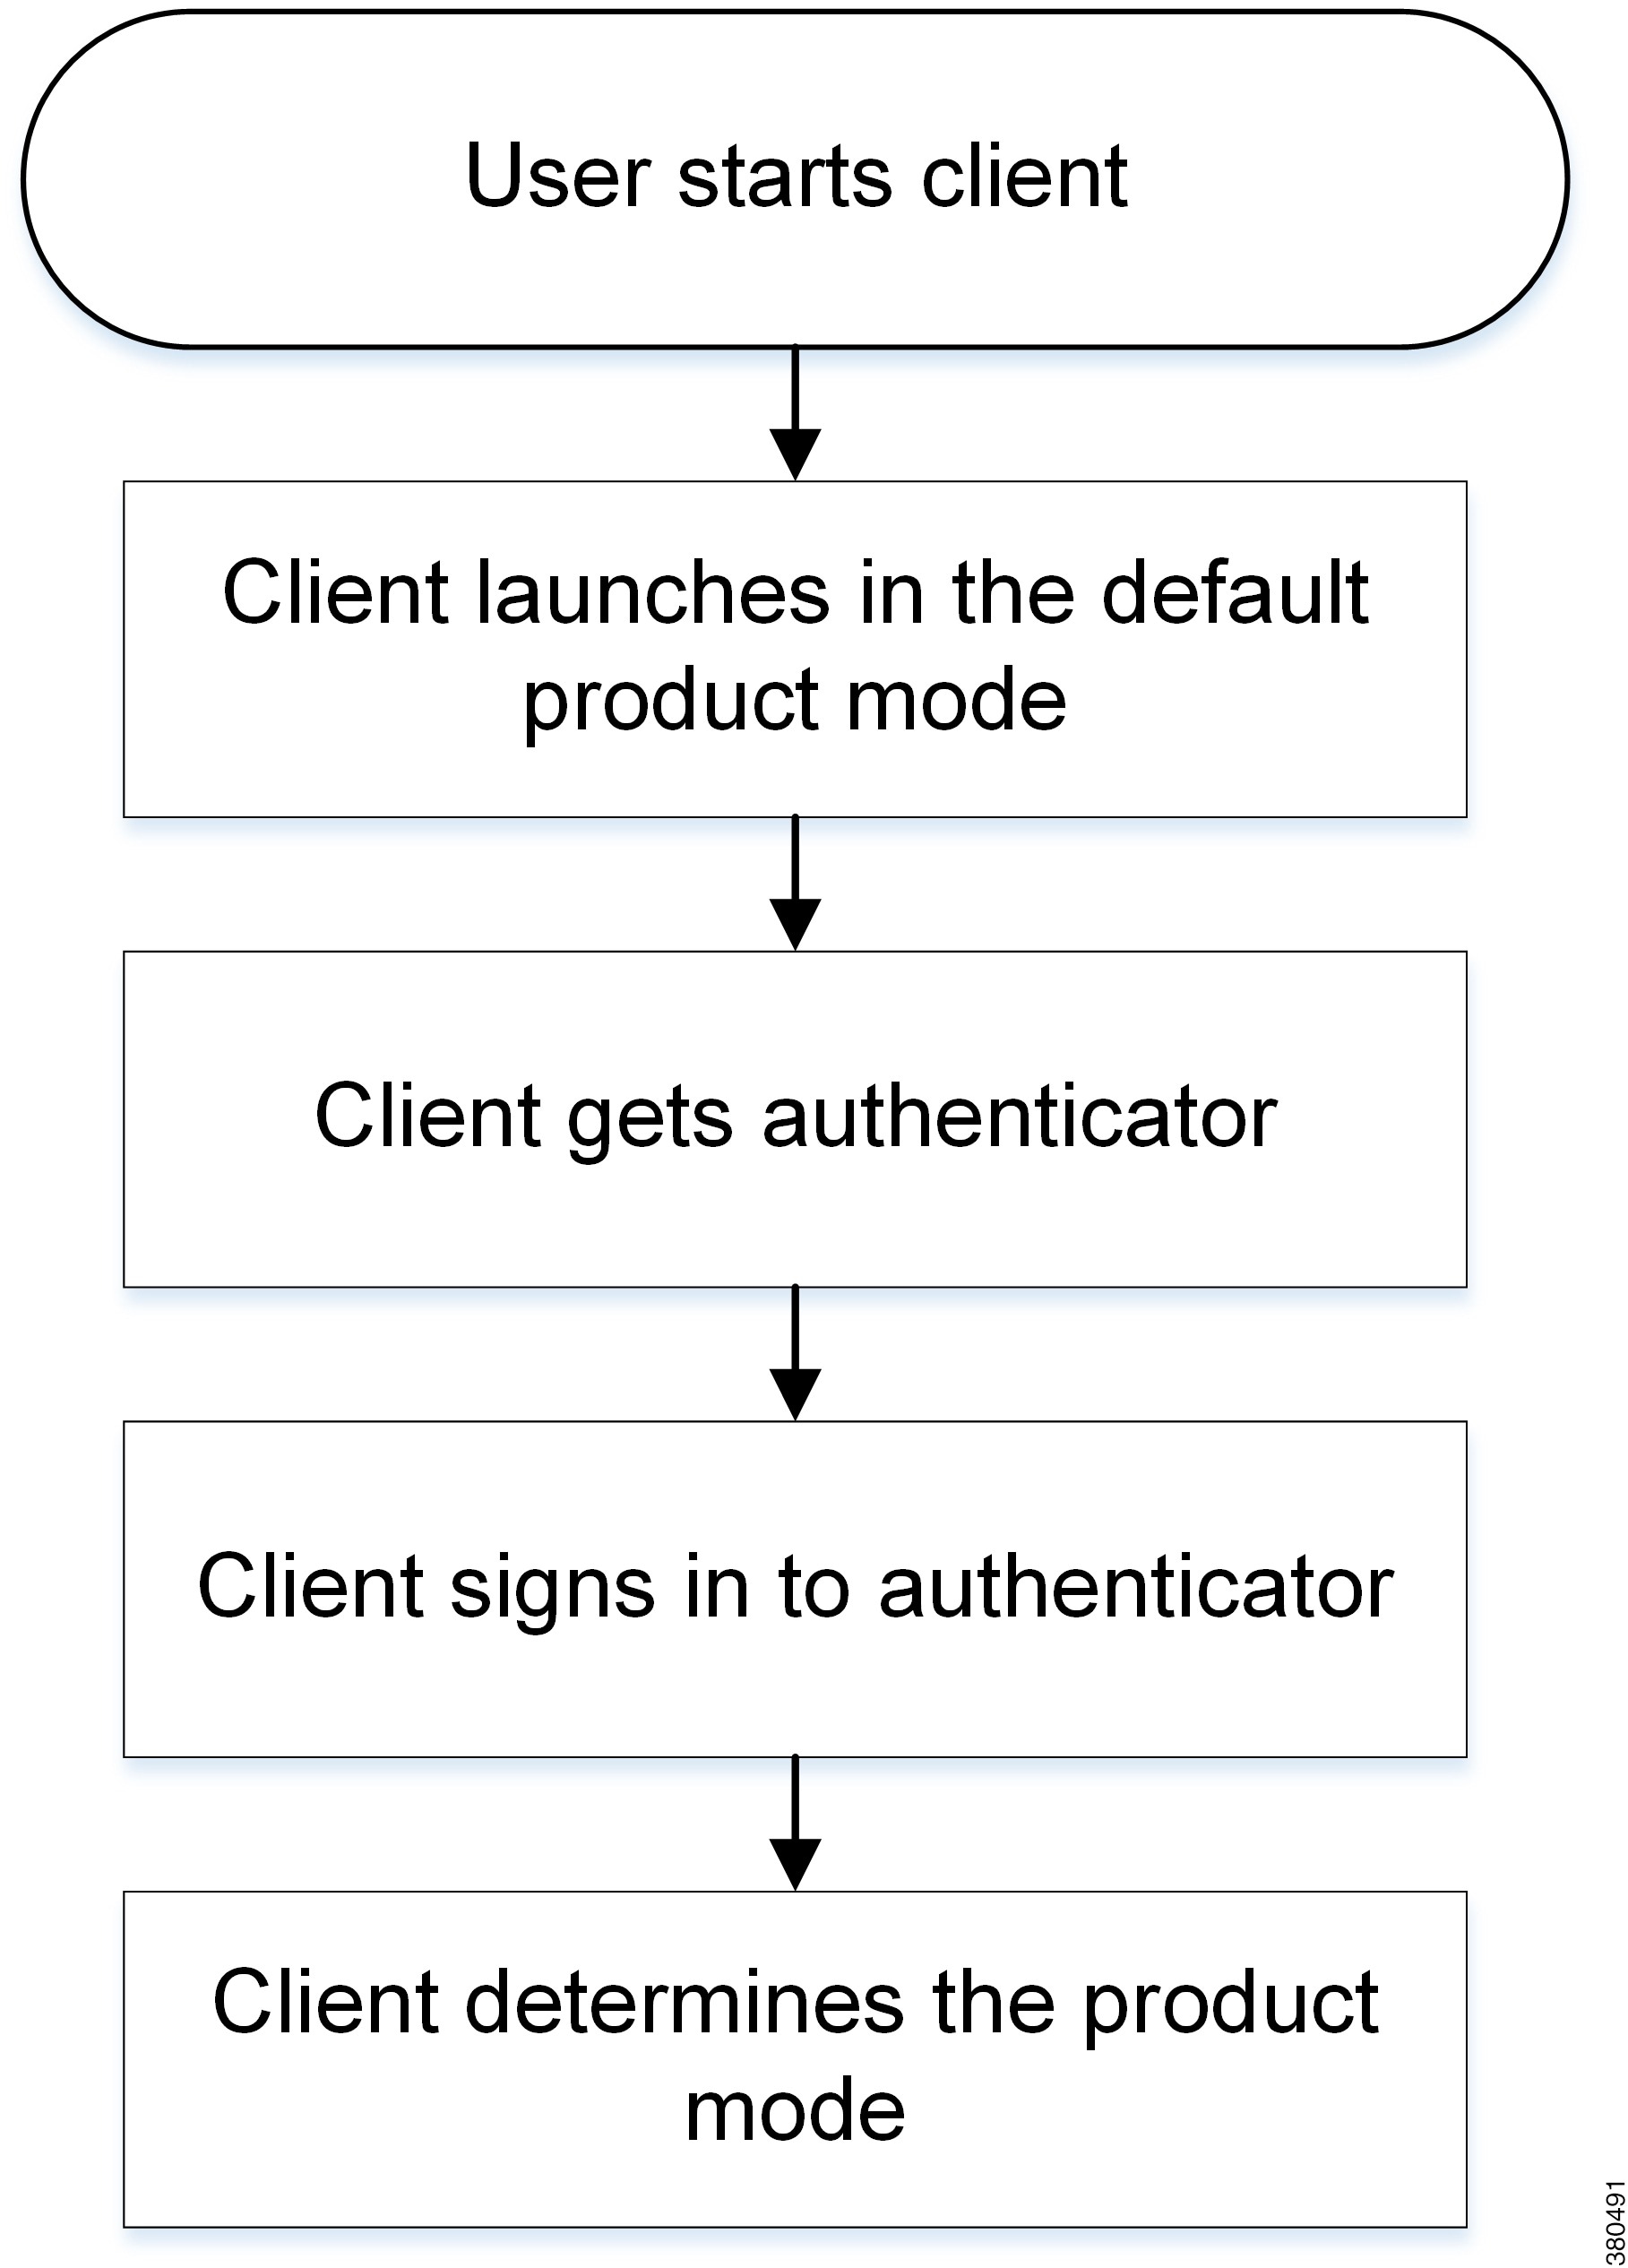
The following diagram illustrates the initial launch sequence:
How the Client Gets an Authenticator
Cisco Jabber looks for an authenticator as follows:
  1. Client checks cache for manual settings.

    Users can manually enter authenticator through the client user interface.

  2. Client checks cache to discover if the user's domain is a Webex organisation..

    The client chooses Webex as the authenticator.

  3. Client makes a Webex cloud service HTTP request to discover if the user's organisation domain is a Webex organisation.

    The client chooses Webex as the authenticator.

  4. Client checks cache for service discovery.

    The client loads settings from previous queries for service (SRV) records.

  5. Client queries for SRV records.

    The client queries the DNS name server for SRV records to locate services.

    If the client finds the _cisco-uds SRV record, it can get the authenticator from the service profile.

If the client cannot get an authenticator, it prompts the user to manually select the source of authentication in the client user interface.

About Service Discovery

Service discovery enables clients to automatically detect and locate services on your enterprise network. Clients query domain name servers to retrieve service (SRV) records that provide the location of servers.

The primary benefits to using service discovery are as follows:
  • Speeds time to deployment.

  • Allows you to centrally manage server locations.


Important

If you are migrating from Cisco Unified Presence 8.x to Cisco Unified Communications Manager IM and Presence Service 9.0 or later, you must specify the Cisco Unified Presence server FQDN in the migrated UC service on Cisco Unified Communications Manager. Open Cisco Unified Communications Manager Administration interface. Select User Management > User Settings > UC Service.

For UC services with type IM and Presence, when you migrate from Cisco Unified Presence 8.x to Cisco Unified Communications Manager IM and Presence Service the Host Name/IP Address field is populated with a domain name and you must change this to the Cisco Unified Presence server FQDN.


However, the client can retrieve different SRV records that indicate to the client different servers are present and different services are available. In this way, the client derives specific information about your environment when it retrieves each SRV record.

The following table lists the SRV records that you can deploy and explains the purpose and benefits of each record:

SRV Record

Purpose

Why You Deploy

_cisco-uds

Provides the location of Cisco Unified Communications Manager version 9.0 and later.

The client can retrieve service profiles from Cisco Unified Communications Manager to determine the authenticator.

  • Eliminates the need to specify installation arguments.

  • Lets you centrally manage configuration in UC service profiles.

  • Enables the client to discover the user's home cluster.

    As a result, the client can automatically get the user's device configuration and register the devices. You do not need to provision users with Cisco Unified Communications Manager IP Phone (CCMCIP) profiles or Trivial File Transfer Protocol (TFTP) server addresses.

  • Supports mixed product modes.

    You can easily deploy users with full UC, IM only, or phone mode capabilities.

  • Supports Expressway for Mobile and Remote Access.

_cuplogin

Provides the location of Cisco Unified Presence.

Sets Cisco Unified Presence as the authenticator.

  • Supports deployments with Cisco Unified Communications Manager and Cisco Unified Presence version 8.x.

  • Supports deployments where all clusters have not yet been upgraded to Cisco Unified Communications Manager 9.

_collab-edge Provides the location of Cisco VCS Expressway or Cisco Expressway-E.

The client can retrieve service profiles from Cisco Unified Communications Manager to determine the authenticator.

  • Supports deployments with Expressway for Mobile and Remote Access.

How the Client Locates Services
The following steps describe how the client locates services with SRV records:
  1. The client's host computer or device gets a network connection.

    When the client's host computer gets a network connection, it also gets the address of a Domain Name System (DNS) name server from the DHCP settings.

  2. The user employs one of the following methods to discover the service during the first sign in:

    • Manual—The user starts Cisco Jabber and then inputs an email-like address on the welcome screen.

    • URL configuration—URL configuration allows users to click on a link to cross-launch Cisco Jabber without manually inputting an email.

    • Mobile Configuration Using Enterprise Mobility Management—As an alternative to URL configuration, you can configure Cisco Jabber using Enterprise Mobility Management (EMM) with Android for Work on Cisco Jabber for Android and with Apple Managed App Configuration on Cisco Jabber for iPhone and iPad. You need to configure the same parameters in the EMM console that are used for creating URL configuration link.

    To create a URL configuration link, you include the following:

    • ServicesDomain—The domain that Cisco Jabber uses for service discovery.

    • VoiceServicesDomain—For a hybrid deployment, the domain that Cisco Jabber uses to retrieve the DNS SRV records can be different from the ServicesDomain that is used to discover the Cisco Jabber domain.

    • ServiceDiscoveryExcludedServices—In certain deployment scenarios, services can be excluded from the service discovery process. These values can be a combination of the following:
      • WEBEX

      • CUCM

      • CUP


    Note

    When all three parameters are included, service discovery does not happen and the user is prompted to manually enter connection settings.


    Create the link in the following format:

    ciscojabber://provision?ServicesDomain=<domain_for_service_discover>
    &VoiceServicesDomain=<domain_for_voice_services>
    &ServiceDiscoveryExcludedServices=<services_to_exclude_from_service_discover>
    Examples:
    • ciscojabber://provision?servicesdomain=example.com
    • ciscojabber://provision?servicesdomain=example.com
      &VoiceServicesDomain=VoiceServices.example.com
    • ciscojabber://provision?servicesdomain=example.com
      &ServiceDiscoveryExcludedServices=WEBEX,CUCM

    Provide the link to users using email or a website.


    Note

    If your organization uses a mail application that supports cross-launching proprietary protocols or custom links, you can provide the link to users using email, otherwise provide the link to users using a website.


  3. The client gets the address of the DNS name server from the DHCP settings.

  4. The client issues an HTTP query to a Central Authentication Service (CAS) URL for the Cisco Webex Messenger service.

    This query enables the client to determine if the domain is a valid Cisco Webex domain.

  5. The client queries the name server for the following SRV records in order of priority:
    • _cisco-uds

    • _cuplogin

    • _collab-edge

The client caches the results of the DNS query to load on subsequent launches.

The following is an example of an SRV record entry:


_cisco_uds._tcp.DOMAIN SRV service location:
 priority = 0
 weight = 0
 port = 8443
 svr hostname=192.168.0.26
Client Issues HTTP Query
In addition to querying the name server for SRV records to locate available services, the client sends an HTTP query to the CAS URL for the Cisco WebEx Messenger service. This request enables the client to determine cloud-based deployments and authenticate users to the Cisco WebEx Messenger service.

When the client gets a domain from the user, it appends that domain to the following HTTP query:

http://loginp.webexconnect.com/cas/FederatedSSO?org=

For example, if the client gets example.com as the domain from the user, it issues the following query:

http://loginp.webexconnect.com/cas/FederatedSSO?org=example.com

That query returns an XML response that the client uses to determine if the domain is a valid Cisco WebEx domain.

If the client determines the domain is a valid Cisco WebEx domain, it prompts users to enter their Cisco WebEx credentials. The client then authenticates to theCisco WebEx Messenger service and retrieves configuration and UC services configured in Cisco WebEx Org Admin.

If the client determines the domain is not a valid Cisco WebEx domain, it uses the results of the query to the name server to locate available services.


Note

The client will use any configured system proxies when sending the HTTP request to the CAS URL. Proxy support for this request has the following limitations :

  • Proxy Authentication is not supported.
  • Wildcards in the bypass list are not supported. Use example.com instead of *.example.com for example.

Cisco UDS SRV Record

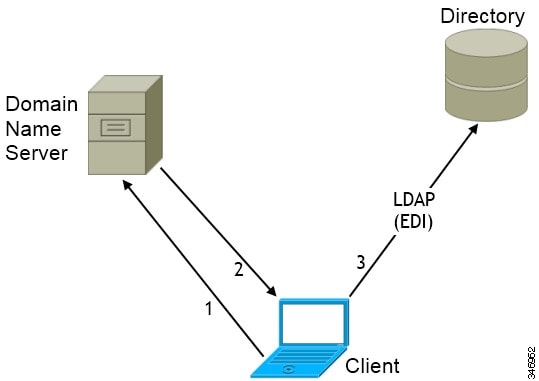
In deployments with Cisco Unified Communications Manager version 9 and later, the client can automatically discover services and configuration with the _cisco-uds SRV record.

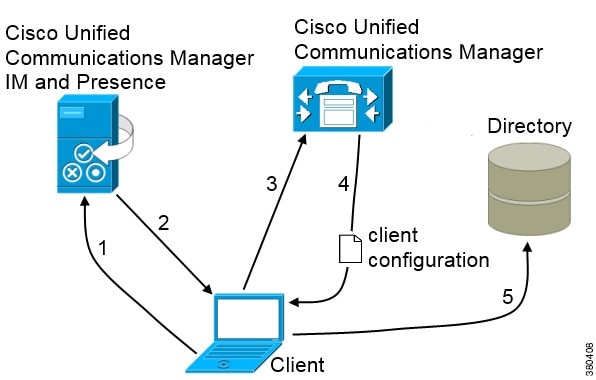
The following figure shows how the client uses the _cisco-uds SRV record.
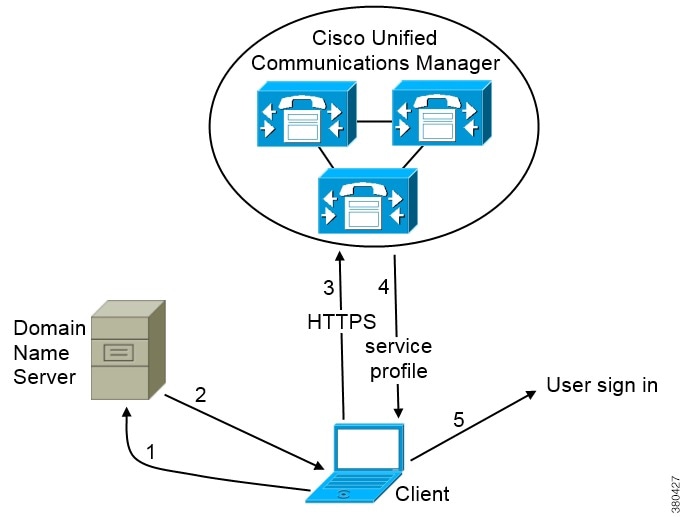
Figure 2. UDS SRV Record Login Flow
  1. The client queries the domain name server for SRV records.

  2. The domain name server returns the _cisco-uds SRV record.

  3. The client locates the user's home cluster.

    As a result, the client can retrieve the device configuration for the user and automatically register telephony services.


    Important

    In an environment with multiple Cisco Unified Communications Manager clusters, you can configure the Intercluster Lookup Service (ILS). ILS enables the client to find the user's home cluster and discover services.

    If you do not configure ILS, you must manually configure remote cluster information, similar to the Extension Mobility Cross Cluster (EMCC) remote cluster setup. For more information on remote cluster configurations, see the Cisco Unified Communications Manager Features and Services Guide.


  4. The client retrieves the user's service profile.

    The user's service profile contains the addresses and settings for UC services and client configuration.

    The client also determines the authenticator from the service profile.

  5. The client signs the user in to the authenticator.

The following is an example of the _cisco-uds SRV record:
_cisco-uds._tcp.example.com     SRV service location:
          priority       = 6
          weight         = 30
          port           = 8443
          svr hostname   = cucm3.example.com
_cisco-uds._tcp.example.com     SRV service location:
          priority       = 2
          weight         = 20
          port           = 8443
          svr hostname   = cucm2.example.com
_cisco-uds._tcp.example.com     SRV service location:
          priority       = 1
          weight         = 5
          port           = 8443
          svr hostname   = cucm1.example.com
CUP Login SRV Record

Cisco Jabber can automatically discover and connect to Cisco Unified Presence or Cisco Unified Communications Manager IM and Presence Service with the _cuplogin SRV record.

The following figure shows how the client uses the _cuplogin SRV record.
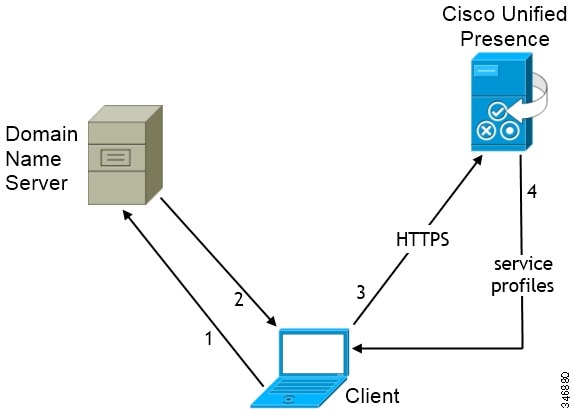
Figure 3. CUP SRV Record Login Flow
Presence service discovery
  1. The client queries the domain name server for SRV records.

  2. The name server returns the _cuplogin SRV record.

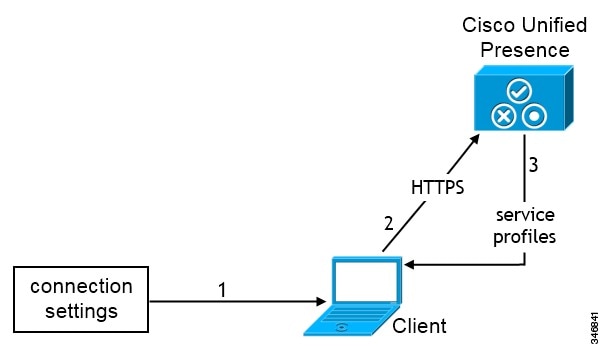
    As a result, Cisco Jabber can locate the presence server and determine that Cisco Unified Presence is the authenticator.

  3. The client prompts the user for credentials and authenticates to the presence server.

  4. The client retrieves service profiles from the presence server.


Tip

The _cuplogin SRV record also sets the default server address on the Advanced Settings window.


The following is an example of the _cuplogin SRV record:
_cuplogin._tcp.example.com      SRV service location:
          priority       = 8
          weight         = 50
          port           = 8443
          svr hostname   = cup3.example.com
_cuplogin._tcp.example.com      SRV service location:
          priority       = 5
          weight         = 100
          port           = 8443
          svr hostname   = cup1.example.com
_cuplogin._tcp.example.com      SRV service location:
          priority       = 7
          weight         = 4
          port           = 8443
          svr hostname   = cup2.example.com
Collaboration Edge SRV Record

Cisco Jabber can attempt to connect to internal servers through Expressway for Mobile and Remote Access to discover services with the following _collab-edge SRV record.

The following figure shows how the client uses the _collab-edge SRV record.
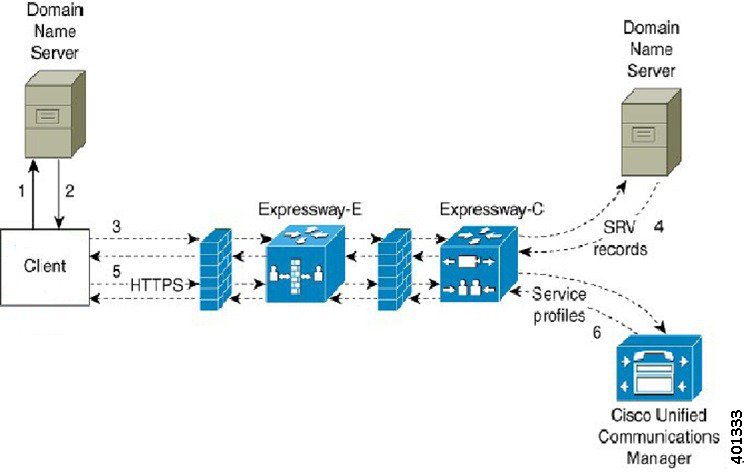
Figure 4. Collaboration Edge Record Login Flow
  1. The client queries the external domain name server for SRV records.

  2. The name server returns the _collab-edge SRV record and does not return the _cuplogin or _cisco-uds SRV records.

    As a result, Cisco Jabber can locate the Cisco Expressway-E server.

  3. The client requests the internal SRV records (through Expressway) from the internal domain name server.

    These SRV records must include the _cisco-uds SRV record.

  4. The client obtains the internal SRV records (through Expressway).

    As a result, the client can locate the Cisco Unified Communications Manager server.

  5. The client requests the service profiles (through Expressway) from Cisco Unified Communications Manager.

  6. The client retrieves the service profiles (through Expressway) from Cisco Unified Communications Manager.

    The service profile contains the user's home cluster, the primary source of authentication, and the client configuration.

Configuration URL

You can create a configuration URL to make it easier for users to set up the client for the first time. Users can click this link to cross-launch Cisco Jabber without having to manually enter service discovery information.

To use this feature, you must create a URL and then distribute that URL to users.

Configuration URL

To enable users to launch Cisco Jabber without having to manually enter service discovery information, create and distribute a configuration URL to users.

You can provide a configuration URL link to users by emailing the link to the user directly, or by posting the link to a website.

Include the following parameters in the URL:
  • ServicesDomain—Required. Every configuration URL must include the domain of the IM and presence server that Cisco Jabber needs for service discovery.

  • VoiceServiceDomain—Required only if you deploy a hybrid cloud-based architecture where the domain of the IM and presence server differs from the domain of the voice server. Set this parameter to ensure that Cisco Jabber can discover voice services.

  • ServiceDiscoveryExcludedServices—Optional. You can exclude any of the following services from the service discovery process:

    • Webex—When you set this value, the client:
      • Does not perform CAS lookup

      • Looks for:

        • _cisco-uds

        • _cuplogin

        • _collab-edge

    • CUCM—When you set this value, the client:
      • Does not look for _cisco-uds

      • Looks for:

        • _cuplogin

        • _collab-edge

    • CUP—When you set this value, the client:
      • Does not look for _cuplogin

      • Looks for:

        • _cisco-uds

        • _collab-edge

    You can specify multiple, comma-separated values to exclude multiple services.

    If you exclude all three services, the client does not perform service discovery and prompts the user to manually enter connection settings.

  • ServicesDomainSsoEmailPrompt—Optional. Specifies whether the user is shown the email prompt for the purposes of determining their home cluster.

    • ON

    • OFF

  • Telephony_Enabled—Specifies whether the user has phone capability or not. The default is true.
    • True

    • False

  • ForceLaunchBrowser—Used to force user to use the external browser. Applies to Cisco Jabber mobile clients.
    • True

    • False


    Note

    ForceLaunchBrowser is used for client certificate deployments and for devices with Android OS below 5.0.


Create the configuration URL in the following format:
ciscojabber://provision?ServicesDomain=<domain_for_service_discover>
&VoiceServicesDomain=<domain_for_voice_services>
&ServiceDiscoveryExcludedServices=<services_to_exclude_from_service_discover>
&ServicesDomainSsoEmailPrompt=<ON/OFF>

Note

The parameters are case sensitive. When you create the configuration URL, you must use the following capitalization:
  • ServicesDomain

  • VoiceServicesDomain

  • ServiceDiscoveryExcludedServices

  • ServicesDomainSsoEmailPrompt

  • Telephony_Enabled

  • ForceLaunchBrowser


Examples
  • ciscojabber://provision?ServicesDomain=cisco.com

  • ciscojabber://provision?ServicesDomain=cisco.com
    &VoiceServicesDomain=alphauk.cisco.com
  • ciscojabber://provision?ServicesDomain=service_domain
    &VoiceServicesDomain=voiceservice_domain&ServiceDiscoveryExcludedServices=WEBEX
  • ciscojabber://provision?ServicesDomain=cisco.com
    &VoiceServicesDomain=alphauk.cisco.com&ServiceDiscoveryExcludedServices=CUCM,CUP
  • ciscojabber://provision?ServicesDomain=cisco.com
    &VoiceServicesDomain=alphauk.cisco.com&ServiceDiscoveryExcludedServices=CUCM,CUP
    &ServicesDomainSsoEmailPrompt=OFF
Provide Users with Configuration URL from a Website

You can provide a configuration URL link to users by emailing the link to the user directly, or by posting the link to a website.


Note

Due to a limitation of the Android operating system, Cisco Jabber for Android users can encounter an issue if they open the configuration URL directly from an Android application. To work around this issue, we recommend that you distribute your configuration URL link using a website.


If you want to use the website explore option for URL provisioning, we recommended you to use Mozilla Firefox.

Use the following procedure to distribute the link from a website.

Procedure

Step 1

Create an internal web page that includes the configuration URL as an HTML hyperlink.

Step 2

Email the link to the internal web page to users.

In the email message, instruct users to perform the following steps:
  1. Install the client.

  2. Click the link in the email message to open the internal web page.

  3. Click the link on the internal web page to configure the client.


Manual Connection Settings

Manual connection settings provide a fallback mechanism when Service Discovery is not used.

When you start Cisco Jabber, you can specify the authenticator and server address in the Advanced settings window. The client caches the server address to the local application configuration that loads on subsequent starts.

Cisco Jabber prompts users to enter these advanced settings on the initial start as follows:
  • On-Premises with Cisco Unified Communications Manager release 9.x and Later — If the client cannot get the authenticator and server addresses from the service profile.

  • Cloud-Based or On-Premises with Cisco Unified Communications Manager release 8.x — If you do not set the authenticator in the bootstrap file. The client also prompts users to enter server addresses in the Advanced settings window if you do not set server addresses in the bootstrap file or with SRV records.

Settings that you enter in the Advanced settings window take priority over any other sources including SRV records and bootstrap settings.

If you select either Cisco IM & Presence or Cisco Communications Manager 8.xoptions, the client retrieves UC services from Cisco Unified Presence or Cisco Unified Communications Manager IM and Presence Service. The client does not use service profiles or SSO discovery.


Note

For Cisco Jabber for Windows, service discovery stops after 20 seconds regardless of the number of servers the SRV record resolves to. During service discovery, once Cisco Jabber finds _cisco-uds, it attempts to connect to the first 2 servers within 20 seconds. Cisco Jabber doesn't attempt to connect to any servers after it's attempted service discovery for the highest 2 priority servers.

Users can manually point to the working server or re-order SRV priorities to at least one of the top two priority servers available for service discovery.


Manual Connection Settings for On-Premises Deployments

Users can set Cisco Unified Presence or Cisco Unified Communications Manager IM and Presence Service as the authenticator and specify the server address in the Advanced settings window.


Remember

You can automatically set the default server address with the _cuplogin SRV record.


The following diagram illustrates how the client uses manual connection settings in on-premises deployments:
User enters connection settings
  1. Users manually enter connection settings in the Advanced settings window.

  2. The client authenticates to Cisco Unified Presence or Cisco Unified Communications Manager IM and Presence Service.

  3. The client retrieves service profiles from the presence server.

Manual Connection Settings for On-Premises Deployments in Phone Mode
Users can set Cisco Unified Communications Manager as the authenticator and specify the following server addresses in the Advanced settings window:
  • TFTP server

  • CCMCIP server

The following diagram illustrates how the client uses manual connection settings in phone mode deployments:
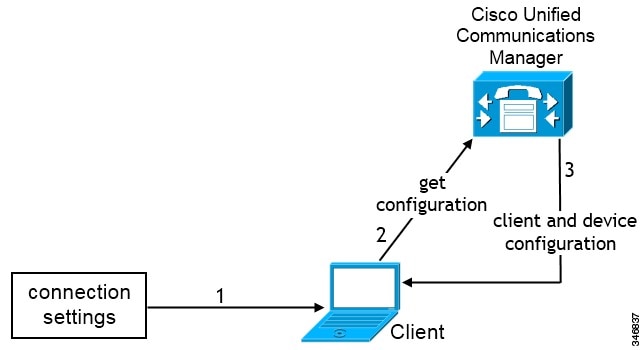
User enters connection settings
  1. Users manually enter connection settings in the Advanced settings window.

  2. The client authenticates to Cisco Unified Communications Manager and gets configuration.

  3. The client retrieves device and client configuration.

Manual Connection Settings for Cloud-Based Deployments

Users can set the Cisco WebEx Messenger service as the authenticator and specify the CAS URL for login in the Advanced settings window.
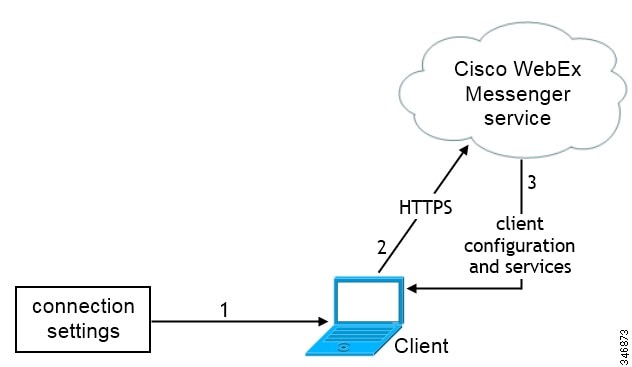
The following diagram illustrates how the client uses manual connection settings in cloud-based deployments:
User enters connection settings
  1. Users manually enter connection settings in the Advanced settings window.

  2. The client authenticates to the Cisco WebEx Messenger service.

  3. The client retrieves configuration and services.

Automatic Connection Setting for Service Discovery

Users can select the Automatic option in the Advanced settings window to discover servers automatically.

The Automatic option allows users change from manually setting the service connection details to using service discovery. For example, on the initial launch, you manually set the authenticator and specify a server address in the Advanced settings window.

The client always checks the cache for manual settings. The manual settings take higher priority over SRV records, and for Cisco Jabber for Windows, the bootstrap file. For this reason, if you decide to deploy SRV records and use service discovery, you override the manual settings from the initial launch.

Installer Switches: Cisco Jabber for Windows

When you install Cisco Jabber, you can specify the authenticator and server addresses. The installer saves these details to a bootstrap file. When users launch the client for the first time, it reads the bootstrap file. The bootstrap file takes priority if service discovery is deployed.

Bootstrap files provide a fallback mechanism for service discovery in situations where service discovery has not been deployed and where you do not want users to manually specify their connection settings.

The client only reads the bootstrap file on the initial launch. After the initial launch, the client caches the server addresses and configuration, and then loads from the cache on subsequent launches.

We recommend that you do not use a bootstrap file, and instead use service discovery, in on-premises deployments with Cisco Unified Communications Manager release 9.x and later.

Bootstrap Settings for On-Premises Deployments
The following table lists the argument values for various deployment types.

Product Mode

Server Releases

Argument Values

Full UC (Default Mode)

Release 9 and later:
  • Cisco Unified Communications Manager

  • Cisco Unified Communications Manager IM and Presence Service

Use the following installer switches and values:

  • AUTHENTICATOR=CUP
  • CUP_ADDRESS=

    <presence_server_address>

Full UC (Default Mode)

Release 8.x:
  • Cisco Unified Communications Manager

  • Cisco Unified Presence

Use the following installer switches and values:

  • AUTHENTICATOR=CUP
  • CUP_ADDRESS=

    <presence_server_address>

IM Only (Default Mode)

Release 9 and later:
  • Cisco Unified Communications Manager IM and Presence Service

Use the following installer switches and values:

  • AUTHENTICATOR=CUP
  • CUP_ADDRESS=

    <presence_server_address>

IM Only (Default Mode)

Release 8.x:
  • Cisco Unified Presence

Use the following installer switches and values:

  • AUTHENTICATOR=CUP
  • CUP_ADDRESS=

    <presence_server_address>

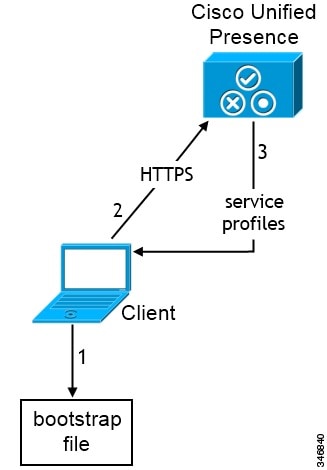
The following diagram illustrates how the client uses bootstrap settings in on-premises deployments:

Connect through bootstrap file

When users start the client for the first time, the following occurs:
  1. The client retrieves settings from the bootstrap file.

    The client starts in default mode and determines that Cisco Unified Communications Manager IM and Presence Service is the authenticator. The client also gets the address of the presence server, unless Service Discovery results dictate otherwise.

  2. The client authenticates to Cisco Unified Communications Manager IM and Presence Service .

  3. The client retrieves service profiles from the presence server.

Bootstrap Settings for On-Premises Deployments in Phone Mode
During installation, you set values for arguments as follows:
  • Set CUCM as the value for AUTHENTICATOR.

  • Set phone_mode as the value for PRODUCT_MODE.

  • Set the TFTP server address as the value for TFTP.

  • Set the CTI server address as the value for CTI.

  • Set the CCMCIP server address as the value for CCMCIP.

    Cisco Unified Communications Manager release 9.x and earlier—If you enable Cisco Extension Mobility, the Cisco Extension Mobility service must be activated on the Cisco Unified Communications Manager nodes that are used for CCMCIP. For information about Cisco Extension Mobility, see the Feature and Services guide for your Cisco Unified Communications Manager release.
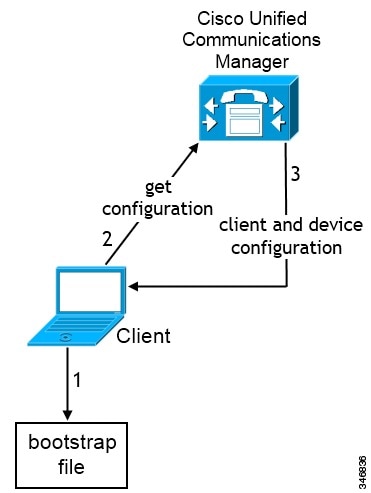
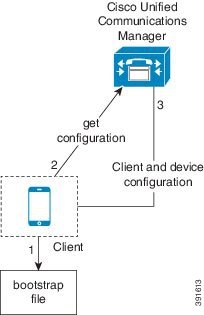
The following diagram illustrates how the client uses bootstrap settings in phone mode deployments:
Client gets address from the bootstrap file
User enters connection settings
When users start the client for the first time, the following occurs:
  1. The client retrieves settings from the bootstrap file.

    The client starts in phone mode and determines that Cisco Unified Communications Manager is the authenticator. The client also gets the addresses for the TFTP and CTI servers, unless Service Discovery results dictate otherwise.

    The client starts in phone mode and determines that Cisco Unified Communications Manager is the authenticator. The client also gets the addresses for the TFTP server, unless Service Discovery results dictate otherwise.

  2. The client authenticates to Cisco Unified Communications Manager and gets configuration.

  3. The client retrieves device and client configuration.

Bootstrap Settings for Cloud-Based Deployments
During installation, you set values for arguments as follows:
  • Set WEBEX as the value for AUTHENTICATOR.

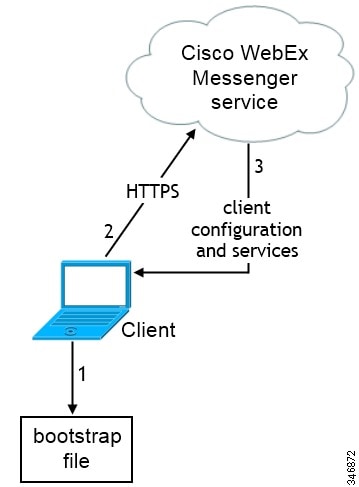
The following diagram illustrates how the client uses bootstrap settings in cloud-based deployments:

Connect through bootstrap file

When users start the client for the first time, the following occurs:
  1. The client retrieves settings from the bootstrap file.

    The client starts in default mode and determines that the Cisco WebEx Messenger service is the authenticator, unless Service Discovery results dictate otherwise.

  2. The client authenticates to the Cisco WebEx Messenger service.

  3. The client retrieves configuration and services.

Hardware Requirements

Hardware Requirements for Cisco Jabber for Windows

Installed RAM

  • 2 GB RAM on Microsoft Windows 7 and Windows 8

Free Physical Memory

  • 128 MB

Free Disk Space

  • 256 MB

CPU Speed and Type

  • Mobile AMD Sempron Processor 3600+ 2 GHz
  • Intel Core2 CPU T7400 @ 2. 16 GHz

GPU

  • DirectX11 on Microsoft Windows 7

I/O Ports

  • USB 2.0 for USB camera and audio devices.

Hardware Requirements for Cisco Jabber for Mac

Installed RAM

  • 2 GB RAM

Free Physical Memory

  • 1 GB

Free Disk Space

  • 300 MB

CPU Speed and Type

  • Intel Core 2 Duo or later processors in any of the following Apple hardware:
  • Mac Pro

  • MacBook Pro (including Retina Display model)

  • MacBook

  • MacBook Air

  • iMac

  • Mac Mini

I/O Ports

  • USB 2.0 for USB camera and audio devices.

Device Requirements for Cisco Jabber for Android

Device Support

Cisco Jabber for Android is available from the Google Play Store.

Cisco specifically supports Cisco Jabber for Android on audio and video for the following Android device and operating system combinations:

  • Samsung Galaxy SII (Android OS 4.1.2 to Android OS 4.4 latest)

  • Samsung Galaxy SIII (Android OS 4.1.2 to Android OS 4.4 latest)

  • Samsung Galaxy S4 (Android OS 4.2.2 to Android OS 4.4 latest)

  • Samsung Galaxy S4 mini (Android OS 4.2.2 to Android OS 4.4 latest)

  • Samsung Galaxy S5 (Android OS 4.4.x)

  • Samsung Galaxy Note II (Android OS 4.2 to Android OS 4.4 latest)

  • Samsung Galaxy Note III (Android OS 4.3 to Android OS 4.4 latest)

  • Samsung Galaxy Rugby Pro (Android OS 4.2.2 to Android OS 4.4 latest)

  • Samsung Galaxy Note Pro 12.2 (Android OS 4.4.x)

  • Google Nexus 5 (Android OS 4.4.x and Android OS 5.0)

  • Google Nexus 10 (Android OS 4.4.x and Android OS 5.0)

  • Sony Xperia Z1 (Android OS 4.2 to Android OS 4.4 latest)

  • Sony Xperia ZR/A (Android OS 4.1.2 to Android OS 4.4 latest)

  • Sony Xperia Z2 (Android OS 4.4.x)

  • Sony Xperia M2 (Android OS 4.3)

  • LG G2 (Android OS 4.2.2 to Android OS 4.4 latest)

  • Motorola Moto G (Android OS 4.4.x)


Note

Cisco supports Cisco Jabber for Android using IM only mode on all Android devices which meet the following minimum specifications:

  • Android OS 4.1.2 or higher to Android OS 4.4.x

  • 1.5 GHz dual-core or higher (quad-core recommended)

  • Display 320 x 480 or higher

  • Cisco Jabber for Android does not support the Tegra 2 chipset


Note

Cisco supports Cisco Jabber for Android with tested Android devices. Although other devices are not officially supported, you may be able to use Cisco Jabber for Android with other devices.

In general, you should be able to run Cisco Jabber for Android on any Android device that meets the following minimum specifications.
  • Minimum requirements for IM and Presence
    • Android OS 4.1.2 or higher to Android OS 4.4.x

    • 1.5 GHz dual-core or higher (quad-core recommended)

    • Display 320 x 480 or higher

    • Cisco Jabber for Android does not support the Tegra 2 chipset

  • Minimum requirements for two-way video
    • Android OS 4.1.2 or higher to Android OS 4.4.x

    • 1.5 GHz dual-core or higher (quad-core recommended)

    • Display 480 x 800 or higher

    • Cisco Jabber for Android does not support the Tegra 2 chipset


Note

Due to an Android kernel issue, Cisco Jabber cannot register to the Cisco Unified Communications Manager on some Android devices. To resolve this problem, try the following:
  • Upgrade the Android kernel to the latest version. This solution applies to the following supported devices:

    • Samsung Galaxy SII (Android OS 4.1.2 to Android OS 4.4 latest)

    • Samsung Galaxy SIII (Android OS 4.1.2 to Android OS 4.4 latest)

    • Samsung Galaxy S4 (Android OS 4.2.2 to Android OS 4.4 latest)

    • Samsung Galaxy S4 mini (Android OS 4.2.2 to Android OS 4.4 latest)

    • Samsung Galaxy S5 (Android OS 4.4.x)

    • Samsung Galaxy Note II (Android OS 4.2 to Android OS 4.4 latest)

    • Samsung Galaxy Note III (Android OS 4.3 to Android OS 4.4 latest)

    • Samsung Galaxy Rugby Pro (Android OS 4.2.2 to Android OS 4.4 latest)

    • Samsung Galaxy Note Pro 12.2 (Android OS 4.4.x)

    • Google Nexus 5 (Android OS 4.4.x and Android OS 5.0)

    • Google Nexus 10 (Android OS 4.4.x and Android OS 5.0)

    • LG G2 (Android OS 4.2.2 to Android OS 4.4 latest)

    • Motorola Moto G (Android OS 4.4.x)

  • Set the Cisco Unified Communications Manager to use mixed mode security, enable secure SIP call signaling, and use port 5061. See the Cisco Unified Communications Manager Security Guide for your release for instructions on configuring mixed mode with the Cisco CTL Client. You can locate the security guides in the Cisco Unified Communications Manager Maintain and Operate Guides. This solution applies to the following supported devices:

    • Sony Xperia Z1 (Android OS 4.2 to Android OS 4.4 latest)

    • Sony Xperia ZR/A (Android OS 4.1.2 to Android OS 4.4 latest)

    • Sony Xperia Z2 (Android OS 4.4.x)

    • Sony Xperia M2 (Android OS 4.3)


Bluetooth Device Support

Cisco specifically tested and supports the following Bluetooth devices with Cisco Jabber for Android:
  • Jabra Motion

  • Jawbone ICON for Cisco Bluetooth Headset

  • Plantronics BackBeat 903+

  • Jabra Wave+

  • Jabra Easygo


Note

Cisco supports Cisco Jabber for Android with tested Bluetooth devices. Although other Bluetooth devices are not officially supported, you may be able to use Cisco Jabber for Android with other devices.


Important

Using a Bluetooth device on a Samsung Galaxy SIII may cause distorted ringtone and distorted call audio.

If you use a Samsung Galaxy S4 with either Jawbone ICON for Cisco Bluetooth Headset or Plantronics BackBeat 903+, you may experience problems due to compatibility issues between these devices.


Remote Access


Note

Administrators can configure remote access using either a VPN or Expressway for Mobile and Remote Access. If administrators configure Expressway for Mobile and Remote Access, there is no need to configure VPN access.

Cisco AnyConnect Secure Mobility Client

To connect with VPN, users can use the latest version of Cisco AnyConnect Secure Mobility Client, which is available from the Google Play Store.

Device Requirements for Cisco Jabber for iPhone and iPad

Device Support

Cisco Jabber for iPhone and iPad is available from the Apple App Store.

Cisco supports Cisco Jabber for iPhone and iPad on the following iOS devices:

  • iTouch 5

  • iPhone model 4, 4S, 5, 5C, and 5S


    Note

    Video call is not supported for iPhone model 4
  • iPad second, third, fourth generation, iPad mini with Retina display, and iPad Air

The device must be able to access the corporate network using Wi-Fi or VPN.

Device Operating System Support

iOS support: iOS 7

Bluetooth Headset Support

iTouch: supported (optional)

iPhone: supported (optional)

iPad: Supported (optional)

Software Requirements

For successful deployment, ensure that client workstations meet the software requirements.

Operating System Requirements

Operating Systems for Cisco Jabber for Windows

You can install Cisco Jabber for Windows on the following operating systems:
  • Microsoft Windows 8.1 32 bit

  • Microsoft Windows 8.1 64 bit

  • Microsoft Windows 8 32 bit

  • Microsoft Windows 8 64 bit

  • Microsoft Windows 7 32 bit

  • Microsoft Windows 7 64 bit


Note

Cisco Jabber for Windows does not require the Microsoft .NET Framework or any Java modules.


Note

For Microsoft Windows 7 or 8.x, you can download Cisco Media Services Interface (MSI) 4.1.2 for use with deskphone video.

Important

Cisco Jabber for Windows supports Microsoft Windows 8 in desktop mode only.


Operating Systems for Cisco Jabber for Mac

You can install Cisco Jabber for Mac on the following operating systems:
  • Apple OS X Yosemite 10.10 (or later)

  • Apple OS X Mavericks 10.9 (or later)

  • Apple OS X Mountain Lion 10.8.1 (or later)

Software Requirements for On-Premise Servers

On-Premises Servers for Cisco Jabber for Windows and Cisco Jabber for Mac

Cisco Jabber uses domain name system (DNS) servers during startup. DNS servers are mandatory for Cisco Jabber.

Cisco Jabber supports the following on-premises servers:
  • Cisco Unified Communications Manager, release 8.6(2) or later

  • Cisco Unified Presence, release 8.6(2) or later

  • Cisco Unity Connection, release 8.6(2) or later

  • Cisco WebEx Meetings Server, version 1.5 or later (Windows only)

  • Cisco WebEx Meetings Server, version 2.0 or later (Mac only)

  • Cisco Expressway Series for Cisco Unified Communications Manager

    • Cisco Expressway-E, version 8.1.1 or later

    • Cisco Expressway-C, version 8.1.1 or later

  • Cisco TelePresence Video Communications Server

    • Cisco VCS Expressway, version 8.1.1 or later

    • Cisco VCS Control, version 8.1.1 or later

Cisco Jabber supports the following features with Cisco Unified Survivable Remote Site Telephony, Version 8.5:
  • Basic call functionality

  • Ability to hold and resume calls

Refer to the Cisco Unified SCCP and SIP SRST System Administrator Guide for information about configuring Cisco Unified Survivable Remote Site Telephony at: http://www.cisco.com/en/US/docs/voice_ip_comm/cusrst/admin/sccp_sip_srst/configuration/guide/SCCP_and_SIP_SRST_Admin_Guide.html.

For Cisco Unified Communications Manager Express support details, refer to the Cisco Unified CME documentation: http://www.cisco.com/en/us/products/sw/voicesw/ps4625/products_device_support_tables_list.html

On-Premises and Cloud Servers for Cisco Jabber for Android and iOS

Cisco Jabber uses domain name system (DNS) servers during startup. DNS servers are mandatory for Cisco Jabber.

Cisco Jabber for mobile clients supports the following cloud servers:

WebEx Meeting Center

WebEx Meeting Center WBS28+

Cisco Jabber for mobile clients supports the following on-premises nodes and servers:

Cisco Unified Communications Manager
  • Cisco Unified Communications Manager, Release 8.6(2) or later

Cisco Unified Presence
  • Cisco Unified Presence, Release 8.6(2)

Cisco Unified Communications Manager IM and Presence Service

Note

Cisco Unified Communications Manager IM and Presence Service is formerly known as Cisco Unified Presence.
  • Cisco Unified Communications Manager IM and Presence Service, Release 9.1(1)

  • Cisco Unified Communications Manager IM and Presence Service, Release 9.1(2)

  • Cisco Unified Communications Manager IM and Presence Service, Release 10.0(1)

  • Cisco Unified Communications Manager IM and Presence Service, Release 10.5(1)

  • Cisco Unified Communications Manager IM and Presence Service, Release 10.5(2)

  • Cisco Unified Communications Manager IM and Presence Service, Release 11.0

Video Conferencing Bridge
  • Cisco TelePresence MCU 5310

  • Cisco TelePresence Server 7010

  • Cisco TelePresence Server MSE 8710

  • Cisco Integrated Services Router (with Packet Voice/Data Module [PVDM3])


    Note

    Expressway for Mobile and Remote Access is not supported with Cisco Integrated Services Router (with PVDM3).


Cisco Unity Connection
  • Cisco Unity Connection, Release 8.6(2) or later

Cisco WebEx Meetings Server
  • Cisco WebEx Meetings Server, version 2.0 or later

Cisco WebEx Meetings Client
Cisco WebEx Meetings client, later than version 4.5

Note

This Cisco WebEx Meetings Server client, version 8.0 supports Collaboration Meeting Room and Personal Meeting Room.


Cisco Unified Survivable Remote Site Telephony

Cisco Jabber for mobile clients support the following features with Cisco Unified Survivable Remote Site Telephony, version 8.5.

Cisco Expressway Series for Cisco Unified Communications Manager (Optional)

Use the following servers to set up mobile and remote access for the client. The Expressway servers do not provide call control for Cisco Jabber. The client uses Cisco Unified Communications Manager for call control.

  • Cisco Expressway-E, version 8.5

  • Cisco Expressway-C, version 8.5

  • Cisco Expressway, version 8.2

  • Cisco Expressway, version 8.2.1

If you currently deploy a Cisco TelePresence Video Communications Server (VCS) environment, you can set up Cisco Expressway for Mobile and Remote Access. A VCS environment requires Cisco VCS Expressway, version 8.1.1 and Cisco VCS Control, version 8.1.1.

Cisco Adaptive Security Appliance (Optional)
  • Cisco Adaptive Security Appliance (ASA) 5500 Series, version 8.4(1) or later.

  • Cisco Adaptive Security Device Manager (ASDM), version 6.4 or later.

  • Cisco AnyConnect Secure Mobility Client Integration (Optional)—Android devices must run the latest version of Cisco AnyConnect Secure Mobility Client, which is available from the Google Play Store.


    Note

    When you are using AnyConnect with Samsung, the supported version is 4.0.01128.


  • ASA license requirements—Use one of the following combinations:

    • AnyConnect Essentials and AnyConnect Mobile licenses

    • AnyConnect Premium and AnyConnect Mobile licenses

  • Certificate authority (CA) if using certificate-based authentication—Cisco IOS Certificate Server, Microsoft Windows Server 2008 R2 Enterprise Certificate Authority, or Microsoft Windows Server 2003 Enterprise Certificate Authority.

On-Premises Servers for Cisco Jabber for iPhone and iPad

Cisco Unified Communications Manager

Cisco Jabber for iPhone and iPad supports the following on-premises servers:

Cisco Jabber uses domain name system (DNS) servers during startup. DNS servers are mandatory for Cisco Jabber.

  • Cisco Unified Communications Manager, Release 8.6(2)

  • Cisco Unified Communications Manager, Release 9.1(2)

  • Cisco Unified Communications Manager, Release 10.0(1)

  • Cisco Unified Communications Manager, Release 10.5(1)

  • Cisco Unified Communications Manager, Release 10.5(2)

Cisco Unified Presence
  • Cisco Unified Presence, Release 8.6(1)

  • Cisco Unified Presence, Release 8.6(2)

Cisco Unified Communications Manager Release IM and Presence Service

Note

Cisco Unified Communications Manager IM and Presence Service is formerly known as Cisco Unified Presence.


  • Cisco Unified Communications Manager IM and Presence Service, Release 9.1(1)

  • Cisco Unified Communications Manager IM and Presence Service, Release 9.1(2)

  • Cisco Unified Communications Manager IM and Presence Service, Release 10.0(1)

  • Cisco Unified Communications Manager IM and Presence Service, Release 10.5(1)

  • Cisco Unified Communications Manager IM and Presence Service, Release 10.5(2)

Cisco Unity Connection
  • Cisco Unity Connection, Release 8.5

  • Cisco Unity Connection, Release 8.6(1)

  • Cisco Unity Connection, Release 8.6(2)

  • Cisco Unity Connection, Release 9.1(1)

  • Cisco Unity Connection, Release 9.1(2)

  • Cisco Unity Connection, Release 10.0(1)

  • Cisco Unity Connection, Release 10.5(1)

  • Cisco Unity Connection, Release 10.5(2)

Cisco WebEx Meetings Server
  • Cisco WebEx Meetings Server, version 1.5

  • Cisco WebEx Meetings Server, version 2.0

  • Cisco WebEx Meetings Server, version 2.5

  • Cisco WebEx Meetings Client, version 4.5 to 6.5

Cisco Adaptive Security Appliance (Optional)
  • VPN On Demand (Optional)—The Apple iOS On-Demand VPN feature requires certificate-only authentication. If you set up an ASA without certificate-only authentication, the user must manually initiate the AnyConnect VPN connection as needed.

    The iOS device must be able to access the corporate network, servers, and telephony endpoints using a VPN client, such as Cisco AnyConnect Secure Mobility Client.

  • Cisco AnyConnect Secure Mobility Client Integration (Optional)
    • iOS devices must run Cisco AnyConnect Secure Mobility Client version 3.0.09115, which is available from the Apple App Store
    • Cisco ASA 5500 Series Adaptive Security Appliance (ASA), version 8.4(1) or later
    • Cisco Adaptive Security Device Manager (ASDM), version 6.4 or later
    • ASA license requirements—Use one of the following combinations:
      • AnyConnect Essentials and AnyConnect Mobile licenses
      • AnyConnect Premium and AnyConnect Mobile licenses

      Note

      For more information about Cisco AnyConnect license requirements, see VPN License and Feature Compatibility.
    • Certificate authority (CA) if using certificate-based authentication: Cisco IOS Certificate Server, Cisco IOS Certificate Server or Microsoft Windows Server 2003 Enterprise Certificate Authority

Cisco Jabber supports the following features with Cisco Unified Survivable Remote Site Telephony, version 8.6:

  • Basic call functionality

  • Ability to hold and resume calls on different clients with the shared line.

High Availability for Instant Messaging and Presence

High availability refers to an environment in which multiple nodes exist in a subcluster to provide failover capabilities for instant messaging and presence services. If one node in a subcluster becomes unavailable, the instant messaging and presence services from that node failover to another node in the subcluster. In this way, high availability ensures reliable continuity of instant messaging and presence services for Cisco Jabber.

When using an LDAP or UDS contact source on Cisco Jabber for Mac and Cisco Jabber for mobile clients, high availability is not supported. High availability is only supported for LDAP (EDI) on Cisco Jabber for Windows.

Cisco Jabber supports high availability with the following servers:

Cisco Unified Presence releases 8.5 and 8.6
Use the following Cisco Unified Presence documentation for more information about high availability.
Configuration and Administration of Cisco Unified Presence Release 8.6

Multi-node Deployment Administration

Troubleshooting High Availability

Deployment Guide for Cisco Unified Presence Release 8.0 and 8.5

Planning a Cisco Unified Presence Multi-Node Deployment

Cisco Unified Communications Manager IM and Presence Service release 9.0 and higher
Use the following Cisco Unified Communications Manager IM and Presence Service documentation for more information about high availability.
Configuration and Administration of IM and Presence Service on Cisco Unified Communications Manager

High Availability Client Login Profiles

Troubleshooting High Availability

Active Calls on Hold During Failover

You cannot place an active call on hold if failover occurs from the primary instance of Cisco Unified Communications Manager to the secondary instance.

High Availability in the Client
Client Behavior During Failover

If high availability is configured on the server, then after the primary server fails over to the secondary server, the client temporarily loses presence states for up to one minute. Configure the re-login parameters to define how long the client waits before attempting to re-login to the server.

Configure Login Parameters
In Cisco Unified Communications Manager IM and Presence Service, you can configure the maximum and minimum number of seconds that Cisco Jabber waits before attempting to re-login to the server. On the server, you specify the re-login parameters in the following fields:
  • Client Re-Login Lower Limit

  • Client Re-Login Upper Limit

Client Behavior During a Failover

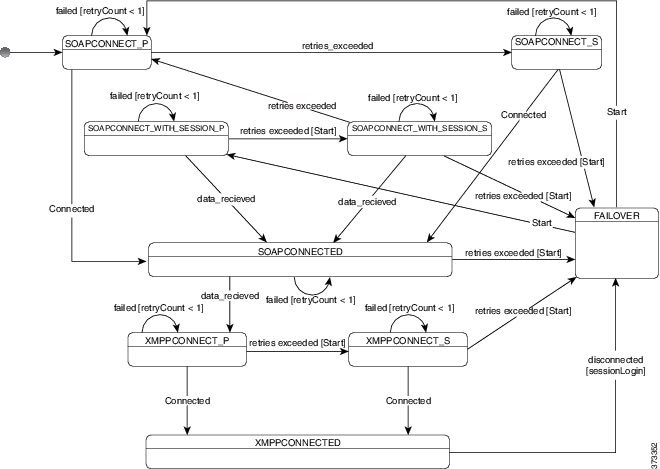
The following figure shows the client's behavior when the Cisco Unified Communications Manager IM and Presence service during a failover.

Figure 5. Client Behavior During a Failover


  1. When the client is disconnected from its active server, the client goes from XMPPCONNECTED state to a FAILOVER state.

  2. From a FAILOVER state, the client tries to attain a SOAPCONNECTED state by attempting SOAPCONNECT_SESSION_P (as the primary server), and if that fails, attempts SOAPCONNECT_SESSION_S (as the secondary server).

    • If it is unable to attain SOAPCONNECT_SESSION_P or SOAPCONNECT_SESSION_S, the client re-enters into the FAILOVER state.
    • From a FAILOVER state, the clients attempts to attain a SOAPCONNECT_P state, and if that fails, attempts to reach a SOAPCONNECT_S state.

    • If the client cannot reach the SOAPCONNECT_P or SOAPCONNECT_S state, then the client does not attempt any more automatic connections to the IM&P server until a user initiates a login attempt.

  3. From a SOAPCONNECT_SESSION_P, SOAPCONNECT_SESSION_S, SOAPCONNECT_P, or SOAPCONNECT_S state, the client retrieves its current primary secondary XMPP server address. This address changes during a failover.

  4. From a SOAPCONNECTED state, the client tries to attain an XMPPCONNECTED state by attempting to connect to the XMPPCONNECT_P state, and if that fails, attempts XMPPCONNECT_S state.

    • If client cannot reach XMPPCONNECT_P or XMPPCONNECT_S state, then the client does not attempt any more automatic connections to the IM&P server until a user initiates a login attempt.
  5. After the client is in an XMPPCONNECTED state, then the client has IM&P capability.

Cloud-Based Servers

Cisco Jabber supports integration with the following hosted servers:
  • Cisco WebEx Messenger service

  • Cisco WebEx Meeting Center, minimum supported versions WBS27 or later

Directory Servers

You can use the following directory servers with Cisco Jabber:

Note

Cisco Jabber for Windows, Cisco Jabber for Mac, Cisco Jabber for iPhone and iPad, and Cisco Jabber for Android support the LDAPv3 standard for directory integration. Any directory server that supports this standard should be compatible with these clients.


  • Active Directory Domain Services for Windows Server 2012 R2

  • Active Directory Domain Services for Windows Server 2008 R2

  • Cisco Unified Communications Manager User Data Server (UDS)

    Cisco Jabber supports UDS using the following Cisco Unified Communications Manager versions:
    • Cisco Unified Communications Manager, version 9.1(2), with the following Cisco Options Package (COP) file: cmterm-cucm-uds-912-5.cop.sgn.
    • Cisco Unified Communications Manager, version 10.0(1). No COP file is required.
  • OpenLDAP

  • Active Directory Lightweight Directory Service (AD LDS) or Active Directory Application Mode (ADAM)


Restriction

Directory integration with OpenLDAP, AD LDS, or ADAM requires that you define specific parameters in a Cisco Jabber configuration file.


Integration with Microsoft Products

Applies to: Cisco Jabber for Windows

Cisco Jabber for Windows supports a range of Microsoft products that integrate with the application. This section describes the support and integrations for these products.

Internet Explorer

Microsoft Internet Explorer 8 or later is required. Cisco Jabber for Windows uses the Internet Explorer rendering engine to display HTML content.

Cisco Jabber for Windows requires Internet Explorer active scripting to render IMs. See https://windows.microsoft.com/en-US/windows/help/genuine/ie-active-script for instructions on enabling active scripting.


Note

Internet Explorer 9 users in Cloud-based deployments that use Single Sign On (SSO) get security alerts when they sign in to Cisco Jabber for Windows. Add webexconnect.com to the list of websites in the Compatibility View Settings window of Internet Explorer 9 to stop these alerts.


Office

Integration with the following versions of Office is supported:

  • Microsoft Office 2013, 32 and 64 bit

  • Microsoft Office 2010, 32 and 64 bit

Office 365

Microsoft Office 365 supports different configuration types based on the plan or subscription type. Cisco Jabber for Windows has been tested with small business plan P1 of Microsoft Office 365. This plan requires an on-premises Active Directory server.

Client-side integration with Microsoft Office 365 is supported with the following applications:

  • Microsoft Office 2013, 32 bit and 64 bit

  • Microsoft Office 2010, 32 bit and 64 bit

  • Microsoft SharePoint 2010

SharePoint

Integration with the following versions of SharePoint is supported:

  • Microsoft SharePoint 2013

  • Microsoft SharePoint 2010

Availability status in Microsoft SharePoint sites is supported only if users access those sites with Microsoft Internet Explorer. You should add the Microsoft SharePoint site to the list of trusted sites in Microsoft Internet Explorer.

Calendar Integration

You can use the following client applications for calendar integration:
  • Microsoft Outlook 2013, 32 bit and 64 bit

  • Microsoft Outlook 2010, 32 bit and 64 bit

  • IBM Lotus Notes 9, 32 bit

  • IBM Lotus Notes 8.5.3, 32 bit

  • IBM Lotus Notes 8.5.2, 32 bit

  • IBM Lotus Notes 8.5.1, 32 bit

  • Google Calendar

Local Contacts in Mac Address Book

Cisco Jabber allows users search for and add local contacts in the Mac Address book.

To search for local contacts in Mac Address book with the client, users must install the Address Book plug-in:
  1. Select Jabber > Install Mac Address Book Plug-In.

To enable the Address Book plug-in:

  1. Select Jabber > Preferences > General > Enable "Mac Address Plug-in".

  2. Restart the client for this to take effect.

To communicate with local contacts in Mac Address book using the client, local contacts must have the relevant details. To send instant messages to contacts, local contacts must have an instant message address. To call contacts in Mac Address book, local contacts must have phone numbers.

Computer Telephony Integration

Cisco Jabber for Windows and Cisco Jabber for Mac for Mac support CTI of Cisco Jabber from a third party application.

Computer Telephony Integration (CTI) enables you to use computer-processing functions while making, receiving, and managing telephone calls. A CTI application can allow you to retrieve customer information from a database on the basis of information that caller ID provides and can enable you to use information that an interactive voice response (IVR) system captures.

For more information on CTI, see the CTI sections in the appropriate release of the Cisco Unified Communications Manager System Guide. Or you can see the following sites on the Cisco Developer Network for information about creating applications for CTI control through Cisco Unified Communications Manager APIs:

Accessibility

Accessibility for Cisco Jabber for Android

Screen Readers

Cisco Jabber for Android is compatible with the TalkBack screen reader. Users who require screen readers should always use the most recent version to ensure the best possible user experience.

Assistive Touch

You can navigate Cisco Jabber for Android using Explore by Touch.

Accessibility for Cisco Jabber for iPhone and iPad

Screen Readers

Cisco Jabber for iPhone and iPad is compatible with the VoiceOver screen reader. Users who require screen readers should always use the most recent version to ensure the best possible user experience.

Assistive Touch

You can navigate Cisco Jabber for iPhone and iPad using Assistive Touch.

Network Requirements

When using Cisco Jabber over your corporate Wi-Fi network, we recommend that you do the following:

  • Design your Wi-Fi network to eliminate gaps in coverage as much as possible, including in areas such as elevators, stairways, and outside corridors.
  • Ensure that all access points assign the same IP address to the mobile device. Calls are dropped if the IP address changes during the call.
  • Ensure that all access points have the same service set identifier (SSID). Hand-off may be much slower if the SSIDs do not match.
  • Ensure that all access points broadcast their SSID. If the access points do not broadcast their SSID, the mobile device may prompt the user to join another Wi-Fi network, which interrupts the call.
Conduct a thorough site survey to minimize network problems that could affect voice quality. We recommend that you do the following:
  • Verify nonoverlapping channel configurations, access point coverage, and required data and traffic rates.
  • Eliminate rogue access points.
  • Identify and mitigate the impact of potential interference sources.
For more information, see the following documentation:
  • The "VoWLAN Design Recommendations" section in the Enterprise Mobility Design Guide.
  • The Cisco Unified Wireless IP Phone 7925G Deployment Guide.
  • The Capacity Coverage & Deployment Considerations for IEEE 802.11g white paper.
  • The Solutions Reference Network Design (SRND) for your Cisco Unified Communications Manager release.
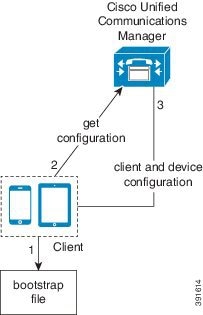
Ports and Protocols

Ports and Protocols for Desktop Clients

The following table lists outbound ports and protocols that Cisco Jabber uses.

Port

Protocol

Description

443

TCP

(Extensible Messaging and Presence Protocol [XMPP] and HTTPS)

XMPP traffic to the WebEx Messenger service.

The client sends XMPP through this port in cloud-based deployments only. If port 443 is blocked, the client falls back to port 5222.

Note 
Cisco Jabber can also use this port for:
  • HTTPS traffic to Cisco Unity Connection and Cisco WebEx Meetings Server.

  • Saving chats to the Microsoft Exchange server.

30000 to 39999

UDP

The client uses this port for far end camera control.

389

UDP/TCP

Lightweight Directory Access Protocol (LDAP) directory server.

636

LDAPS

LDAP directory server (secure).

2748

TCP

Computer Telephony Interface (CTI) used for desk phone control.

3268

TCP

Global Catalog server.

3269

LDAPS

Global Catalog server (secure).

5070 to 6070

UDP

Binary Floor Control Protocol (BFCP) for video desktop sharing capabilities.

5222

TCP

(XMPP)

XMPP traffic to Cisco Unified Presence or Cisco Unified Communications Manager IM and Presence Service.

8443

TCP

( HTTPS )

Traffic to Cisco Unified Communications Manager and Cisco Unified Communications Manager IM and Presence Service.

7080

TCP

( HTTPS )

Cisco Unity Connection for notifications of voice messages (new message, message update, and message deletion).

53

UDP/TCP

Domain Name System (DNS) traffic.

80

HTTP

Saving chats to Microsoft Exchange server.

Depending on your server configuration on Microsoft Exchange, use either port 80 or 443, but not both.

37200

SOCKS5 Bytestreams

Peer-to-peer file transfers.

In on-premises deployments, the client also uses this port to send screen captures.

5060

UDP/TCP

Session Initiation Protocol (SIP) call signaling.

5061

TCP

Secure SIP call signaling.

49152 to 65535

TCP

IM-only screen share.

The client randomly selects a port from the range.

The actual range may vary. To find the real range, enter the netsh interface ipv4 show dynamicportrange tcp command.

You can use the SharePortRangeStart and SharePortRangeSize parameters to narrow the range used for IM screen share. For more information on these parameters, see the section on Common Policies parameters in the Deployment and Installation Guide.

Ports for Additional Services and Protocols

In addition to the ports listed in this section, you should review the required ports for all protocols and services in your deployment. See to the appropriate documentation for your server version. You can find the port and protocol requirements for different servers in the following documents:
  • For Cisco Unified Communications Manager, Cisco Unified Communications Manager IM and Presence Service, and Cisco Unified Presence, see the TCP and UDP Port Usage Guide.

  • For Cisco Unity Connection, see the System Administration Guide.

  • For Cisco WebEx Meetings Server, see the Administration Guide.

  • For Cisco WebEx services, see the Administrator's Guide.

  • Expressway for Mobile and Remote Access, refer to Cisco Expressway IP Port Usage for Firewall Traversal.

Ports and Protocols for Cisco Jabber for Android, iPhone, and iPad

The client uses the ports and protocols listed in the following table. If you plan to deploy a firewall between the client and a server, you must configure the firewall to allow these ports and protocols.


Note

No TCP/IP services are enabled in the client.


Port

Application Layer Protocol

Transport Layer Protocol

Description

Inbound

16384 to 32766

RTP

UDP

Receives Real-Time Transport Protocol (RTP) media streams for audio and video. You set these ports in Cisco Unified Communications Manager.

Outbound

7080

HTTPS

TCP

Used for Cisco Unity Connection to receive notifications of voice messages (new message, message update, and message deleted).

6970

HTTP

TCP

Connects to the TFTP server to download client configuration files.

80

HTTP

TCP

Connects to services such as Cisco WebEx Meeting Center for meetings or Cisco Unity Connection for voicemail.

389

LDAP

TCP (UDP)

Connects to an LDAP directory service.

3268

LDAP

TCP

Connects to a Global Catalog server for contact searches.

443

HTTPS

TCP

Connects to services such as such as Cisco WebEx Meeting Center for meetings or Cisco Unity Connection for voicemail.

636

LDAPS

TCP

Connects securely to an LDAP directory service.

3269

LDAPS

TCP

Connects securely to the Global Catalog server.

5060

SIP

TCP

Provides Session Initiation Protocol (SIP) call signaling.

5061

SIP over Transport Layer Security (TLS)

TCP

Provides secure SIP call signaling.

5222

XMPP

TCP

Connects to Cisco Unified Presence or Cisco Unified Communications Manager IM and Presence Service for instant messaging and presence.

5269

XMPP

TCP

Enables XMPP federation.

8191

SOAP

TCP

Connects to the local port to provide Simple Object Access Protocol (SOAP) web services.

8443

HTTPS

TCP

Is the port for web access to Cisco Unified Communications Manager and includes connections for the following:
  • Cisco Unified Communications Manager IP Phone (CCMCIP) server for assigned devices.

  • User Data Service (UDS) for contact resolution.

16384 to 32766

RTP

UDP

Sends RTP media streams for audio and video.

53

DNS

UDP

Provides hostname resolution.

3804

CAPF

TCP

Issues Locally Significant Certificates (LSC) to IP phones. This port is the listening port for Cisco Unified Communications Manager Certificate Authority Proxy Function (CAPF) enrollment.

For information about port usage for Expressway for Mobile and Remote Access, see Cisco Expressway IP Port Usage for Firewall Traversal.

For information about file transfer port usage see the Managed File Transfer chapter of the Configuration and Administration of IM and Presence Service on Cisco Unified Communications Manager, Release 10.5(2).

Call Control with Accessories API

Cisco Jabber for Windows includes an API that exposes call control functions to third party accessories. This API lets our vendor partners create software plugins that enable their accessories to use the API call control functions in Cisco Jabber.

Compatible Third Party Accessories

You can use certain Cisco compatible accessories such as headsets, speakers, keyboards, and audio devices to perform call control actions with Cisco Jabber from the device. For example, with some headsets you can use controls to answer incoming calls, end active calls, mute audio, and place calls on hold.

For a list of devices that are compatible with Cisco Jabber, refer to the Unified Communications Endpoint and Client Accessories site at: http://www.cisco.com/en/US/prod/voicesw/uc_endpoints_accessories.html


Note

You can use certain third party accessories that are not Cisco compatible. However, Cisco cannot guarantee an optimal user experience with such third party accessories. For the best user experience, you should use only Cisco compatible devices with Cisco Jabber.


Install Vendor Plugins

To use compatible accessories with Cisco Jabber, you must do the following:

Procedure


Step 1

Download a compatible plugin from the third party vendor site.

Step 2

Install the plugin separately to Cisco Jabber.


Plugin Versions

The following are the minimum plugin versions required for integration with Cisco Jabber:
  • Jabra PC Suite Version 2.12.3655

  • Logitech UC Plugin 1.1.27

CTI Supported Devices

To view the list of Computer Telephony Integration (CTI) supported devices: From Cisco Unified Reporting, select Unified CM Phone Feature List. From the Feature drop-down list, select CTI controlled.

Supported Codecs

Supported Codecs for Cisco Jabber for Windows and Cisco Jabber for Mac

Supported Audio Codecs

  • G.722

  • G.722.1—32k and 24k. G.722.1 is supported on Cisco Unified Communications Manager 8.6.1 or later.

  • G.711—a-law and u-law

  • G.729a

Supported Video Codec

  • H.264/AVC

Supported Codecs for Cisco Jabber for Android, iPhone, and iPad

Supported Audio Codecs

Codec

Codec type

Notes

G.711

mu-law

a-law

Supports normal mode.

G.722.1

Supports normal mode.

G.729a

Minimum requirement for low-bandwidth availability.

Only codec that supports low bandwidth mode.

Supports normal mode.

G.722

Opus

Users can turn low bandwidth mode on and off in the client settings if they experience voice quality issues.

Supported Video Codecs

H.264/AVC

Users can turn low bandwidth mode on to improve the video quality issue.

Supported Voicemail Codecs

  • PCM linear

  • G.711—mu-law (default)

  • G.711—a-law

  • GSM 6.10


Note

Cisco Jabber for mobile does not support visual voicemail with G.729. However, you can access voice messages using G.729 and the Call Voicemail feature.


COP Files

COP Files for Cisco Jabber for Windows and Cisco Jabber for Mac

In certain cases, you might need to apply COP files to Cisco Unified Communications Manager.

You can download the following COP files from the Cisco Jabber administration package on Cisco.com:
COP File Description Cisco Unified Communications Manager Versions
ciscocm.installcsfdevicetype.cop.sgn Adds the CSF device type to Cisco Unified Communications Manager.

For more information, see Software Requirements.

7.1.3
cmterm-bfcp-e.8-6-2.cop.sgn Enables CSF devices to support BFCP video desktop sharing.

For more information, see Apply COP File for BFCP Capabilities.

8.6.2 only
ciscocm.addcsfsupportfield.cop.sgn Adds the CSF Support Field field for group configuration files.

For more information, see Create Group Configurations.

8.6.1 and earlier
cmterm-cupc-dialrule-wizard-0.1.cop.sgn Publishes application dial rules and directory lookup rules to Cisco Jabber.

For more information, see Publish Dial Rules.

8.6.1 and earlier

Device COP file for Cisco Jabber for Android

You must install the device COP file on Cisco Unified Communications Manager to add the Cisco Dual Mode for Android device type for the first time, or to update your existing Cisco Dual Mode for Android devices with the configuration settings for the latest release of the client. To obtain the device COP file, do the following:

  1. Go to the software downloads site.

  2. In the search box, search for Cisco Jabber for Android.

  3. On the Cisco Jabber for Android software downloads page, locate the device COP file for your release.

  4. Download the file.

Device COP File for Cisco Jabber for iPhone and iPad

The device COP file adds the TCT/TAB device type to Cisco Unified Communications Manager . To obtain the device COP file, do the following:

  1. Go to the software download site: http://www.cisco.com/go/jabber_iphone_cop..

  2. Locate cmterm-iphone-install-141105.cop.sgn for TCT device and cmterm-jabberipad-140904.cop.sgn for TAB device..

  3. Download the file.

Contact Sources

In on-premises deployments, the client requires a contact source to resolve directory look ups for user information. You can use the following as a contact source:

Enhanced Directory Integration

Enhanced Directory Integration (EDI) is an LDAP-based contact source.

Basic Directory Integration

Basic Directory Integration (BDI) is an LDAP-based contact source.

Cisco Unified Communications Manager User Data Service

Cisco Unified Communications Manager User Data Service (UDS) is a contact source on Cisco Unified Communications Manager.

UDS is used for contact resolution in the following cases:
  • If you configure the DirectoryServerType parameter in the client configuration file to use "UDS".

    With this configuration, the client uses UDS for contact resolution when it is inside or outside of the corporate firewall.

  • If you deploy Expressway for Mobile and Remote Access.

    With this configuration, the client automatically uses UDS for contact resolution when it is outside of the corporate firewall.


Note

Cisco Jabber supports UDS using the following Cisco Unified Communications Manager versions:
  • Cisco Unified Communications Manager Version 9.1(2) or later with the following COP file: cmterm-cucm-uds-912-5.cop.sgn.

  • Cisco Unified Communications Manager Version 10.0(1). No COP file is required.

You can deploy approximately 50 percent of the maximum number of Cisco Jabber clients that your Cisco Unified Communications Manager node supports.

For example, if a Cisco Unified Communications Manager node can support 10,000 Cisco Jabber clients using an LDAP-based contact source, that same node can support 5,000 Cisco Jabber clients using UDS as a contact source.


Enhanced Directory Integration

EDI uses native Microsoft Windows APIs to retrieve contact data from the directory service.

The following are the default settings for on-premises deployments with EDI:
  • Cisco Jabber integrates with Active Directory as the contact source.

  • Cisco Jabber automatically discovers and connects to a Global Catalog.

EDI diagram
In the preceding diagram, the client does the following by default:
  1. Gets the DNS domain from the workstation and looks up the SRV record for the Global Catalog.

  2. Retrieves the address of the Global Catalog from the SRV record.

  3. Connects to the Global Catalog with the logged in user's credentials.

Domain Name Retrieval

Cisco Jabber for Windows retrieves the fully qualified DNS domain from the USERDNSDOMAIN environment variable on the client workstation.

After the client gets the DNS domain, it can locate the Domain Name Server and retrieve SRV records.

If the USERDNSDOMAIN environment variable is not present, you can deploy the LdapUserDomain configuration parameter to specify which domain to execute the request for the LDAP service. If that parameter is not configured, then Jabber uses the domain from the email address screen.

In some instances, the value of the USERDNSDOMAIN environment variable does not resolve to the DNS domain that corresponds to the domain of the entire forest. For example, when an organization uses a sub-domain or resource domain. In this case, the USERDNSDOMAIN environment variable resolves to a child domain, not the parent domain. As a result, the client cannot access information for all users in the organization.

If the USERDNSDOMAIN environment variable resolves to a child domain, you can use one of the following options to enable Cisco Jabber for Windows to connect to a service in the parent domain:

  • Ensure that the Global Catalog or LDAP directory server can access all users in the organization.

  • Configure your DNS server to direct the client to a server that can access all users in the organization when Cisco Jabber for Windows requests a Global Catalog or LDAP directory server.

  • Configure Cisco Jabber for Windows to use the FQDN of the domain controller.

    Specify the FQDN of the domain controller as the value of the PrimaryServerName parameter in your client configuration as follows:
    <PrimaryServerName>parent-domain-fqdn</PrimaryServerName>

Directory Server Discovery

Cisco Jabber can automatically discover and connect to the directory server if:
  • The workstation on which you install Cisco Jabber automatically detects the workstation by determining the user domain.

  • The workstation retrieves the server connection address from the DNS SRV record.

Directory Server

SRV Record

Global Catalog

_gc._msdcs._tcp.domain.com

Domain Controller

LDAP-based directory servers

_ldap._msdcs._tcp.domain.com

Basic Directory Integration

The client retrieves contact data from the directory service as follows.

  1. The client connects to the Cisco Unified Communication Manager IM and Presence Service node.

  2. The client gets the LDAP profile configuration section in the service profile from the Cisco Unified Communication Manager IM and Presence Service node.

    The service profile contains the location of Cisco Unified Communication Manager (TFTP) node. Depending on your configuration, the service profile can also contain the credentials to authenticate with the directory.

  3. The client connects to the Cisco Unified Communication Manager node.

  4. The client downloads the client configuration file from the Cisco Unified Communication Manager node.

    The client configuration file contains the location of the directory. Depending on your configuration, the client configuration file can also contain the credentials to authenticate with the directory.

  5. The client uses the directory location and the authentication credentials to connect to the directory.

Authentication with Contact Sources

BDI requires users to authenticate with the directory source to resolve contacts. You can use the following methods to authenticate with the contact source, in order of priority:
  • Specify credentials in Cisco Unified Presence or Cisco Unified Communications Manager — Specify credentials in a profile on the server. The client can then retrieve the credentials from the server to authenticate with the directory. This method is the most secure option for storing and transmitting credentials.

  • Set common credentials in the client configuration file — Specify a shared username and password in the client configuration file. The client can then authenticate with the directory server.

    Important

    The client transmits and stores these credentials as plain text.

    Use a well-known or public set of credentials for an account that has read-only permissions.


  • Use anonymous binds — Configure the client to connect to the directory source with anonymous binds.

Specify LDAP Directory Configuration on Cisco Unified Presence

If your environment includes Cisco Unified Presence release 8.x, you can specify directory configuration in the LDAP profile. The client can then get the directory configuration from the server to authenticate with the directory source.

Complete the steps to create an LDAP profile that contains authentication credentials, and then assign that profile to users.

Procedure

Step 1

Open the Cisco Unified Presence Administration interface.

Step 2

Select Application > Cisco Unified Personal Communicator > LDAP Profile.

Step 3

Select Add New.

Step 4

Specify a name and optional description for the profile.

Step 5

Specify a distinguished name for a user ID that is authorized to run queries on the LDAP server. Cisco Unified Presence uses this name for authenticated bind with the LDAP server.

Step 6

Specify a password that the client can use to authenticate with the LDAP server.

Step 7

Select Add Users to Profile and add the appropriate users to the profile.

Step 8

Select Save.


What to do next

Specify any additional BDI information in the client configuration file.

Specify LDAP Directory Configuration on Cisco Unified Communications Manager

If your environment includes Cisco Unified Communications Manager release 9.x and later, you can specify credentials when you add a directory service. The client can then get the configuration from the server to authenticate with the directory source.

Complete the steps to add a directory service, apply the directory service to the service profile, and specify the LDAP authentication configuration for the directory service.

Procedure

Step 1

Open the Cisco Unified CM Administration interface.

Step 2

Select User Management > User Settings > UC Service.

The Find and List UC Services window opens.
Step 3

Select Add New.

The UC Service Configuration window opens.
Step 4

In the Add a UC Service section, select Directory from the UC Service Type drop-down list.

Step 5

Select Next.

Step 6

Enter details for the directory service:

  • Product Type — Select Directory

  • Name — Enter a unique name for the directory service

  • Hostname/IP Address — Enter the Hostname, IP Address, or FQDN of the directory server.

  • Protocol Type — From the drop-down list, select:
    • TCP or UDP for Cisco Jabber for Windows

    • TCP or TLS for Cisco Jabber for iPhone or iPad

    • TCP or TLS for Cisco Jabber for Android

Step 7

Select Save.

Step 8

Apply the directory service to your service profile as follows:

  1. Select User Management > User Settings > Service Profile.

    The Find and List Service Profiles window opens.

  2. Find and select your service profile.

    The Service Profile Configuration window opens.

  3. In the Directory Profile section, select up to three services from the Primary, Secondary, and Tertiary drop-down lists:

  4. Specify the Username and Password that the client can use to authenticate with the LDAP server in the following fields:

  5. Select Save.


Set Credentials in the Client Configuration
You can set credentials in the client configuration with the following parameters:
  • BDIConnectionUsername

  • BDIConnectionPassword


Important

The client transmits and stores these credentials as plain text.

Use a well-known or public set of credentials for an account that has read-only permissions.


The following is an example configuration:

<Directory>
  <BDIConnectionUsername>admin@example.com</BDIConnectionUsername>
  <BDIConnectionPassword>password</BDIConnectionPassword>
</Directory>
Use Anonymous Binds

To use anonymous binds, you set the following parameters in the client configuration file:

Parameter

Value

DirectoryServerType

BDI

BDIPrimaryServerName

IP address

FQDN

BDIEnableTLS

True

BDISearchBase1

Searchable organizational unit (OU) in the directory tree

BDIBaseFilter

Object class that your directory service uses; for example, inetOrgPerson

BDIPredictiveSearchFilter

UID or other search filter

A search filter is optional.

The following is an example configuration:

<Directory>
  <DirectoryServerType>BDI</DirectoryServerType>
  <BDIPrimaryServerName>11.22.33.456</BDIPrimaryServerName>
  <BDIEnableTLS>True</BDIEnableTLS>
  <BDISearchBase1>ou=people,dc=cisco,dc=com</BDISearchBase1>
  <BDIBaseFilter>(&amp;(objectClass=inetOrgPerson)</BDIBaseFilter>
  <BDIPredictiveSearchFilter>uid</BDIPredictiveSearchFilter>
</Directory>

Cisco Unified Communications Manager User Data Service

User Data Service (UDS) is a REST interface on Cisco Unified Communications Manager that provides contact resolution.

UDS is used for contact resolution in the following cases:
  • If you set the DirectoryServerType parameter to use a value of UDS in the client configuration file.

    With this configuration, the client uses UDS for contact resolution when it is inside or outside of the corporate firewall.

  • If you deploy Expressway for Remote and Mobile Access.

    With this configuration, the client automatically uses UDS for contact resolution when it is outside of the corporate firewall.

You synchronize contact data into Cisco Unified Communications Manager from a directory server. Cisco Jabber then automatically retrieves that contact data from UDS.

UDS diagram

Enable Integration with UDS

To enable integration with UDS, perform the following steps:

Procedure

Step 1

Create your directory source in Cisco Unified Communications Manager.

Step 2

Synchronize the contact data to Cisco Unified Communications Manager.

After the synchronization occurs, your contact data resides in Cisco Unified Communications Manager.

Step 3

Specify UDS as the value of the DirectoryServerType parameter in your configuration file.

The following is an example configuration where UDS is the directory server type:
<Directory>
 <DirectoryServerType>UDS</DirectoryServerType>
</Directory>
Important 

This step is required only if you want to use UDS for all contact resolution (that is, both inside and outside the firewall). If you configure Expressway for Mobile and Remote Access, the client automatically uses UDS when outside the firewall, regardless of the value of the DirectoryServerType parameter. When using Expressway for Mobile and Remote Access, you can set the value of the DirectoryServerType parameter to either UDS or an LDAP-based contact source for use inside the firewall.

Step 4

For manual connections, specify the IP address of the Cisco Unified Communications Manager server to ensure that the client can discover the server.

The following is an example configuration for the Cisco Unified Communications Manager server:
<UdsServer>11.22.33.444</UdsServer>
Step 5

Configure the client to retrieve contact photos with UDS.

The following is an example configuration for contact photo retrieval:
<UdsPhotoUriWithToken>http://server_name.domain/%%uid%%.jpg</UdsPhotoUriWithToken>

Contact Resolution with Multiple Clusters

For contact resolution with multiple Cisco Unified Communications Manager clusters, synchronize all users on the corporate directory to each cluster. Provision a subset of those users on the appropriate cluster.

For example, your organization has 40,000 users. 20,000 users reside in North America. 20,000 users reside in Europe. Your organization has the following Cisco Unified Communications Manager clusters for each location:
  • cucm-cluster-na for North America

  • cucm-cluster-eu for Europe

In this example, synchronize all 40,000 users to both clusters. Provision the 20,000 users in North America on cucm-cluster-na and the 20,000 users in Europe on cucm-cluster-eu.

When users in Europe call users in North America, Cisco Jabber retrieves the contact details for the user in Europe from cucm-cluster-na.

When users in North America call users in Europe, Cisco Jabber retrieves the contact details for the user in North America from cucm-cluster-eu.

Client Availability

Users can define whether their availability reflects their calendar events by setting an option to let others know they are in a meeting from the Status tab of the Options window from the client. This option synchronizes events in your calendar with your availability. The client only displays In a meeting availability for supported integrated calendars.

The client supports using two sources for the In a meeting availability:

Note

Cisco Jabber for mobile clients don't support this meeting integration.


  • Microsoft Exchange and Cisco Unified Communication Manager IM and Presence Integration — Applies to on-premises deployments. The Include Calendar information in my Presence Status field in Cisco Unified Presence is the same as the In a meeting option in the client. Both fields update the same value in the Cisco Unified Communication Manager IM and Presence database.

    If users set both fields to different values, then the last field that the user sets takes priority. If users change the value of the Include Calendar information in my Presence Status field while the client is running, the users must restart the client for those changes to apply.

  • Cisco Jabber Client — Applies to on-premises and cloud-based deployments. You must disable Cisco Unified Communication Manager IM and Presence and Microsoft Exchange integration for the client to set the In a meeting availability. The client checks if integration between Cisco Unified Communication Manager IM and Presence and Microsoft Exchange is on or off. The client can only set availability if integration is off.

The following deployment scenarios describe how availability is created:

Deployment Scenario

You select In a meeting (according to my calendar)

You do not select In a meeting (according to my calendar)

You enable integration between Cisco Unified Communication Manager IM and Presence and Microsoft Exchange.

Cisco Unified Communication Manager IM and Presence sets availability status

Availability status does not change

You do not enable integration between Cisco Unified Communication Manager IM and Presence and Microsoft Exchange.

Client sets availability status

Availability status does not change

Cloud-based deployments

Client sets availability status

Availability status does not change

Additionally, the following table describes availability that is supported differently by each deployment scenarios:

Availability Enabled in the Client

Availability Enabled by Integrating Cisco Unified Communication Manager IM and Presence with Microsoft Exchange

Offline in a meeting availability is not supported.

Offline in a meeting availability is supported.

In a meeting availability is supported for non-calendar events.

In a meeting availability is not supported for non-calendar events.

Note 

Offline in a meeting availability refers to when the user is not logged in to the client but an event exists in the user's calendar.

Non-calendar events refer to events that do not appear in the user's calendar, such as instant meetings, Offline, or On a call.

Multiple Resource Login

All Cisco Jabber clients register with one of the following central IM and Presence Service nodes when a user logs in to the system. This node tracks availability, contact lists, and other aspects of the IM and Presence Service environment.
  • On-Premises Deployments: Cisco Unified Communications Manager IM and Presence Service.

  • Cloud Deployments: Cisco Webex.

This IM and Presence Service node tracks all of the registered clients associated with each unique network user in the following order:
  1. When a new IM session is initiated between two users, the first incoming message is broadcast to all of the registered clients of the receiving user.

  2. The IM and Presence Service node waits for the first response from one of the registered clients.

  3. The first client to respond then receives the remainder of the incoming messages until the user starts responding using another registered client.

  4. The node then reroutes subsequent messages to this new client.


Note

If there is no active resource when a user is logged into multiple devices, then priority is given to the client with the highest presence priority. If the presence priority is the same on all devices, then priority is given to the latest client the user logged in to.

Instant Message Encryption

Cisco Jabber uses Transport Layer Security (TLS) to secure Extensible Messaging and Presence Protocol (XMPP) traffic over the network between the client and server. Cisco Jabber encrypts point to point instant messages.

On-Premises Encryption

The following table summarizes the details for instant message encryption in on-premises deployments.

Connection

Protocol

Negotiation Certificate

Expected Encryption Algorithm

Client to server

XMPP over TLS v1.2

X.509 public key infrastructure certificate

AES 256 bit

Server and Client Negotiation

The following servers negotiate TLS encryption with Cisco Jabber using X.509 public key infrastructure (PKI) certificates with the following:
  • Cisco Unified Communications Manager IM and Presence

  • Cisco Unified Communications Manager

After the server and client negotiate TLS encryption, both the client and server generate and exchange session keys to encrypt instant messaging traffic.

The following table lists the PKI certificate key lengths for Cisco Unified Communications Manager IM and Presence Service.

Version

Key Length

Cisco Unified Communications Manager IM and Presence Service versions 9.0.1 and higher

2048 bit

Cisco Unified Presence version 8.6.4

2048 bit

Cisco Unified Presence versions lower than 8.6.4

1024 bit

XMPP Encryption

Cisco Unified Communications Manager IM and Presence Service uses 256-bit length session keys that are encrypted with the AES algorithm to secure instant message traffic between Cisco Jabber and the presence server.

If you require additional security for traffic between server nodes, you can configure XMPP security settings on Cisco Unified Communications Manager IM and Presence Service. See the following for more information about security settings:
  • Cisco Unified Presence—Configuring Security on Cisco Unified Presence

  • Cisco Unified Communications Manager IM and Presence Service—Security configuration on IM and Presence

Instant Message Logging

You can log and archive instant messages for compliance with regulatory guidelines. To log instant messages, you either configure an external database or integrate with a third-party compliance server. Cisco Unified Communications Manager IM and Presence Service does not encrypt instant messages that you log in external databases or in third party compliance servers. You must configure your external database or third party compliance server as appropriate to protect the instant messages that you log.

See the following for more information about compliance:
  • Cisco Unified Presence— Instant Messaging Compliance Guide

  • Cisco Unified Communications Manager IM and Presence Service—Instant Messaging Compliance for IM and Presence Service

For more information about encryption levels and cryptographic algorithms, including symmetric key algorithms such as AES or public key algorithms such as RSA, see Next Generation Encryption at this link https://www.cisco.com/c/en/us/about/security-center/next-generation-cryptography.html.

For more information about X.509 public key infrastructure certificates, see the Internet X.509 Public Key Infrastructure Certificate and CRL Profile document at this link https://www.ietf.org/rfc/rfc2459.txt.

Cloud-Based Encryption

The following table summarizes the details for instant message encryption in cloud-based deployments:

Connection

Protocol

Negotiation Certificate

Expected Encryption Algorithm

Client to server

XMPP within TLS

X.509 public key infrastructure certificate

AES 128 bit

Client to client

XMPP within TLS

X.509 public key infrastructure certificate

AES 256 bit

Server and Client Negotiation

The following servers negotiate TLS encryption with Cisco Jabber using X.509 public key infrastructure (PKI) certificates with the Cisco Webex Messenger service.

After the server and client negotiate TLS encryption, both the client and server generate and exchange session keys to encrypt instant messaging traffic.

XMPP Encryption

The Cisco Webex Messenger service uses 128-bit session keys that are encrypted with the AES algorithm to secure instant message traffic between Cisco Jabber and the Cisco Webex Messenger service.

You can optionally enable 256-bit client-to-client AES encryption to secure the traffic between clients.

Instant Message Logging

The Cisco Webex Messenger service can log instant messages, but it does not archive those instant messages in an encrypted format. However, the Cisco Webex Messenger service uses stringent data center security, including SAE-16 and ISO-27001 audits, to protect the instant messages that it logs.

The Cisco Webex Messenger service cannot log instant messages if you enable AES 256 bit client-to-client encryption.

For more information about encryption levels and cryptographic algorithms, including symmetric key algorithms such as AES or public key algorithms such as RSA, see Next Generation Encryption at this link https://www.cisco.com/c/en/us/about/security-center/next-generation-cryptography.html.

For more information about X.509 public key infrastructure certificates, see the Internet X.509 Public Key Infrastructure Certificate and CRL Profile document at this link https://www.ietf.org/rfc/rfc2459.txt.

Client-to-Client Encryption

By default, instant messaging traffic between the client and the Cisco WebEx Messenger service is secure. You can optionally specify policies in the Cisco WebEx Administration Tool to secure instant messaging traffic between clients.

The following policies specify client-to-client encryption of instant messages:
  • Support AES Encoding For IM—Sending clients encrypt instant messages with the AES 256-bit algorithm. Receiving clients decrypt instant messages.

  • Support No Encoding For IM—Clients can send and receive instant messages to and from other clients that do not support encryption.

The following table describes the different combinations that you can set with these policies.

Policy Combination

Client-to-Client Encryption

When the Remote Client Supports AES Encryption

When the Remote Client Does not Support AES Encryption

Support AES Encoding For IM = false

Support No Encoding For IM = true

No

Cisco Jabber sends unencrypted instant messages.

Cisco Jabber does not negotiate a key exchange. As a result, other clients do not send Cisco Jabber encrypted instant messages.

Cisco Jabber sends and receives unencrypted instant messages.

Support AES Encoding For IM = true

Support No Encoding For IM = true

Yes

Cisco Jabber sends and receives encrypted instant messages.

Cisco Jabber displays an icon to indicate instant messages are encrypted.

Cisco Jabber sends encrypted instant messages.

Cisco Jabber receives unencrypted instant messages.

Support AES Encoding For IM = true

Support No Encoding For IM = false

Yes

Cisco Jabber sends and receives encrypted instant messages.

Cisco Jabber displays an icon to indicate instant messages are encrypted.

Cisco Jabber does not send or receive instant messages to the remote client.

Cisco Jabber displays an error message when users attempt to send instant messages to the remote client.


Note

Cisco Jabber does not support client-to-client encryption with group chats. Cisco Jabber uses client-to-client encryption for point-to-point chats only.


For more information about encryption and Cisco WebEx policies, see About Encryption Levels in the Cisco WebEx documentation.

Encryption Icons

Review the icons that the client displays to indicate encryption levels.

Lock Icon for Client to Server Encryption

In both on-premises and cloud-based deployments, Cisco Jabber displays the following icon to indicate client to server encryption:
Lock icon

Padlock Icon for Client to Client Encryption

In cloud-based deployments, Cisco Jabber displays the following icon to indicate client to client encryption:
Padlock icon

Local Chat History

Chat history is retained after participants close the chat window and until participants sign out. If you do not want to retain chat history after participants close the chat window, set the Disable_IM_History parameter to true. This parameter is available to all clients except IM-only users.

For on-premises deployment of Cisco Jabber for Mac, if you select the Save chat archives to: option in the Chat Preferences window of Cisco Jabber for Mac, chat history is stored locally in the Mac file system and can be searched using Spotlight.

Cisco Jabber does not encrypt archived instant messages when local chat history is enabled.

For mobile clients, you can disable local chat history if you do not want unencrypted instant messages to be stored locally.

For desktop clients, you can restrict access to chat history by savings archives to the following directories:
  • Windows, %USERPROFILE%\AppData\Local\Cisco\Unified Communications\Jabber\CSF\History\uri.db

  • Mac: ~/Library/Application Support/Cisco/Unified Communications/Jabber/CSF/History/uri.db.

Quality of Service Configuration

Cisco Jabber supports the following methods for prioritizing and classifying Real-time Transport Protocol (RTP) traffic as it traverses the network:
  • Set DSCP values in IP headers of RTP media packets

Set DSCP Values

Set Differentiated Services Code Point (DSCP) values in RTP media packet headers to prioritize Cisco Jabber traffic as it traverses the network.

Port Ranges on Cisco Unified Communications Manager

You define the port range that the client uses on the SIP profile in Cisco Unified Communications Manager. The client then uses this port range to send RTP traffic across the network.

Port Ranges on Cisco Unified Communications Manager

Cisco Unified Communications Manager lets you define one port range for the client. The client divides this port range equally and uses the lower half for audio calls and the upper half for video calls. For example, you define a port range of 1000 to 3000 in Cisco Unified Communications Manager. The client uses a port range of 1000 to 2000 for audio calls and a port range of 2000 to 3000 for video calls.

You set port ranges on the SIP Profile Configuration window for the Cisco Jabber for iPhone SIP profile on Cisco Unified Communications Manager.

You set port ranges on the SIP Profile Configuration window for the Cisco Jabber for Android SIP profile on Cisco Unified Communications Manager.

To access the SIP Profile Configuration window, select Device > Device Settings > SIP Profile.

The Start Media Port field defines the lowest port available to the client. The Stop Media Port field defines the highest port available. See the SIP Profile Configuration topic in the Cisco Unified Communications Manager documentation for more information.

Define a Port Range on the SIP Profile

The client uses the port range to send RTP traffic across the network. The client divides the port range equally and uses the lower half for audio calls and the upper half for video calls. As a result of splitting the port range for audio media and video media, the client creates identifiable media streams. You can then classify and prioritize those media streams by setting DSCP values in the IP packet headers.

Procedure

Step 1

Open the Cisco Unified CM Administration interface.

Step 2

Select Device > Device Settings > SIP Profile.

Step 3

Find the appropriate SIP profile or create a new SIP profile.

The SIP Profile Configuration window opens.

Step 4

Specify the port range in the following fields:

  • Start Media Port — Defines the start port for media streams. This field sets the lowest port in the range.

  • Stop Media Port — Defines the stop port for media streams. This field sets the highest port in the range.

Step 5

Select Apply Config and then OK.


How the Client Uses Port Ranges
Cisco Jabber equally divides the port range that you set in the SIP profile. The client then uses the port range as follows:
  • Lower half of the port range for audio streams

  • Upper half of the port range for video streams

For example, if you use a start media port of 3000 and an end media port of 4000, the client sends media through ports as follows:
  • Ports 3000 to 3501 for audio streams

  • Ports 3502 to 4000 for video streams

As a result of splitting the port range for audio media and video media, the client creates identifiable media streams. You can then classify and prioritize those media streams by setting DSCP values in the IP packet headers.

Options for Setting DSCP Values

The following table describes the options for setting DSCP values:

Method for Setting DSCP Values Microsoft Windows 7
Set DSCP values with Microsoft Group Policy Yes
Set DSCP values on network switches and routers Yes
Set DSCP values on Cisco Unified Communications Manager No
Set DSCP Values on Cisco Unified Communications Manager

You can set DSCP values for audio media and video media on Cisco Unified Communications Manager. Cisco Jabber can then retrieve the DSCP values from the device configuration and apply them directly to the IP headers of RTP media packets.


Restriction

For later operating systems such as Microsoft Windows 7, Microsoft implements a security feature that prevents applications from setting DSCP values on IP packet headers. For this reason, you should use an alternate method for marking DSCP values, such as Microsoft Group Policy.


For more information on configuring flexible DSCP values, refer to Configure Flexible DSCP Marking and Video Promotion Service Parameters.

Procedure

Step 1

Open the Cisco Unified CM Administration interface.

Step 2

Select System > Service Parameters.

The Service Parameter Configuration window opens.

Step 3

Select the appropriate server and then select the Cisco CallManager service.

Step 4

Locate the Clusterwide Parameters (System - QOS) section.

Step 5

Specify DSCP values as appropriate and then select Save.


Set DSCP Values with Group Policy

If you deploy Cisco Jabber for Windows on a later operating system such as Microsoft Windows 7, you can use Microsoft Group Policy to apply DSCP values.

Complete the steps in the following Microsoft support article to create a group policy: http://technet.microsoft.com/en-us/library/cc771283%28v=ws.10%29.aspx

You should create separate policies for audio media and video media with the following attributes:

Attributes

Audio Policy

Video Policy

Signaling Policy

Application name

CiscoJabber.exe

CiscoJabber.exe

CiscoJabber.exe

Protocol

UDP

UDP

TCP

Port number or range

Corresponding port number or range from the SIP profile on Cisco Unified Communications Manager.

Corresponding port number or range from the SIP profile on Cisco Unified Communications Manager.

5060 for SIP

5061 for secure SIP

DSCP value

46

34

24

Set DSCP Values on the Client

For some configurations, there is an option to enable differentiated services for calls in the Cisco Jabber for Mac client.


Important

This option is enabled by default. Cisco recommends not disabling this option unless you are experiencing issues in the following scenarios:
  • You can hear or see other parties, but you cannot be heard or seen

  • You are experiencing unexpected Wi-Fi disconnection issues

Disabling differentiated service for calls may degrade audio and video quality.


Procedure

In Cisco Jabber for Mac, go to Jabber > Preferences > Calls > Advanced and select Enable Differentiated Service for Calls.


Set DSCP Values on the Network

You can configure switches and routers to mark DSCP values in the IP headers of RTP media.

To set DSCP values on the network, you must identify the different streams from the client application.
  • Media Streams — Because the client uses different port ranges for audio streams and video streams, you can differentiate audio media and video media based on those port range. Using the default port ranges in the SIP profile, you should mark media packets as follows:
    • Audio media streams in ports from 16384 to 24574 as EF

    • Video media streams in ports from 24575 to 32766 as AF41

  • Signaling Streams — You can identify signaling between the client and servers based on the various ports required for SIP, CTI QBE, and XMPP. For example, SIP signaling between Cisco Jabber and Cisco Unified Communications Manager occurs through port 5060.

    You should mark signaling packets as AF31.

Protocol Handlers

Cisco Jabber registers the following protocol handlers with the operating system to enable click-to-call or click-to-IM functionality from web browsers or other applications:
  • XMPP: or XMPP://

    Starts an instant message and opens a chat window in Cisco Jabber.

  • IM: or IM://

    Starts an instant message and opens a chat window in Cisco Jabber.

  • TEL: or TEL://

    Starts an audio or video call with Cisco Jabber.


    Note

    TEL is registered by Apple native phone. It cannot be used to cross launch Cisco Jabber for iPhone and iPad.


  • CISCOTEL: or CISCOTEL://

    Starts an audio or video call with Cisco Jabber.

  • SIP: or SIP://

    Starts an audio or video call with Cisco Jabber.

Registry Entries for Protocol Handlers

To register as a protocol handler, the client writes to the following locations in the Microsoft Windows registry:
  • HKEY_CLASSES_ROOT\tel\shell\open\command

  • HKEY_CLASSES_ROOT\xmpp\shell\open\command

  • HKEY_CLASSES_ROOT\im\shell\open\command

In the case where two or more applications register as handlers for the same protocol, the last application to write to the registry takes precedence. For example, if Cisco Jabber registers as a protocol handler for XMPP: and then a different application registers as a protocol handler for XMPP:, the other application takes precedence over Cisco Jabber.

Protocol Handlers on HTML Pages

You can add protocol handlers on HTML pages as part of the href attribute. When users click the hyperlinks that your HTML pages expose, the client performs the appropriate action for the protocol.

TEL and IM Protocol Handlers

Example of the TEL: and IM: protocol handlers on an HTML page:

<html>
  <body>
    <a href="TEL:1234">Call 1234</a><br/>
    <a href="IM:msmith@domain">Send an instant message to Mary Smith</a>
  </body>
</html>

In the preceding example, when users click the hyperlink to call 1234, the client starts an audio call to that phone number. When users click the hyperlink to send an instant message to Mary Smith, the client opens a chat window with Mary.

CISCOTEL and SIP Protocol Handlers

Example of the CISCOTEL and SIP protocol handlers on an HTML page:

<html>
  <body>
    <a href="CISCOTEL:1234">Call 1234</a><br/>
				<a href="SIP:msmith@domain">Call Mary</a><br/>
    <a href="CISCOTELCONF:msmith@domain;amckenzi@domain">Weekly conference call</a>
  </body>
</html>