Install MRA

Expressway Configuration Summary

The following steps summarize the configuration required on the Expressway-C and Expressway-E.

Procedure


Step 1

Make sure that System host name and Domain name are specified for every Expressway and that each Expressway is synchronized to a reliable NTP service.The hostname can contain only letters, digits, hyphens, and underscores. The first character must be a letter, and the last character must be a letter or a digit.

Step 2

Enable SIP on the Expressway-E and Expressway-C. (SIP is disabled by default on new installs.)

Step 3

[Recommended] Disable automated intrusion protection on the Expressway-C and configure it on the Expressway-E. (From X8.9, this feature is enabled by default on new installations. See Expressway Automated Intrusion Protection)

Step 4

Set Unified Communications mode to Mobile and Remote Access.

Step 5

Configure the Unified CM, IM and Presence Service, and Cisco Unity Connection servers on the Expressway-C.

Step 6

Configure the domains on the Expressway-C for which services are to be routed to Unified CM.

Step 7

[Optional] Create additional deployments and associate domains, and UC services with them.

Step 8

Install appropriate server certificates and trusted CA certificates.

Step 9

Configure a Unified Communications traversal zone connection between Expressway-E and Expressway-C.

Step 10

If required, configure the HTTP server allow list for any web services inside the enterprise that need to be accessed from remote Jabber clients.

Step 11

[Optional] Configure SSO over collaboration edge, to allow for common identity between external Jabber clients and the users' Unified CM profiles.

Configuration changes on Expressway generally take immediate effect. A banner message or alarm will prompt you if a system restart or other action is required.


Installation Requirements

Unified Communications features such as Mobile and Remote Access or Jabber Guest, require a Unified Communications traversal zone connection between the Expressway-C and the Expressway-E.

  • Installing suitable security certificates on the Expressway-C and the Expressway-E.

  • Configuring a Unified Communications traversal zone between the Expressway-C and the Expressway-E.

For information about how to do this, see:

If you want to use XMPP federation, the IM and Presence Service servers must be discovered on the Expressway-C. So that all relevant information is available when generating certificate signing requests.

Expressway-C for Mobile and Remote Access Setup

This section describes the configuration steps required on the Expressway-C for Mobile and Remote Access.

Configure DNS and NTP Settings on Expressway-C

Make sure that the following basic system settings are configured on Expressway.

If you have a cluster of Expressways, you must do this for every peer.

Procedure


Step 1

Access System > DNS, and set the System host name and Domain name.

Step 2

Set the local DNS servers.

Step 3

Access System > Time and ensure that a reliable NTP service is configured.

All Expressway systems must be synchronized to a reliable NTP service.

Step 4

Set the Authentication method in accordance with your local policy.


Enable SIP Protocol During Installation

SIP and H.323 protocols are disabled by default on new installs of X8.9.2 and later versions.

Procedure


Step 1

On the Expressway-C, go to Configuration > Protocols > SIP.

Step 2

Set SIP mode to On and Save the page.


[Recommended] Disable Automated Intrusion Protection on Expressway-C

If your Expressway-C is newly installed from X8.9 onwards, the automated intrusion protection service is running by default. This could prevent your deployment working properly, so we recommend you disable it on the Expressway-C as follows:

See Expressway Automated Intrusion Protection.

Procedure


Step 1

Go to System > Administration.

Step 2

Switch Automated protection service to Off.

Step 3

Click Save.


Enable the Expressway-C for Mobile and Remote Access

To enable Mobile and Remote Access functionality:

Procedure


Step 1

Go to Configuration > Unified Communications > Configuration.

Step 2

Set Unified Communications mode to Mobile and Remote Access.

You must select Mobile and Remote Access before you can configure the relevant domains and traversal zones.

Step 3

Click Save.


Configure the Domains to Route to Unified CM

You must configure the domains for which registration, call control, provisioning, messaging, and presence services are to be routed to Unified CM.

The available services are:

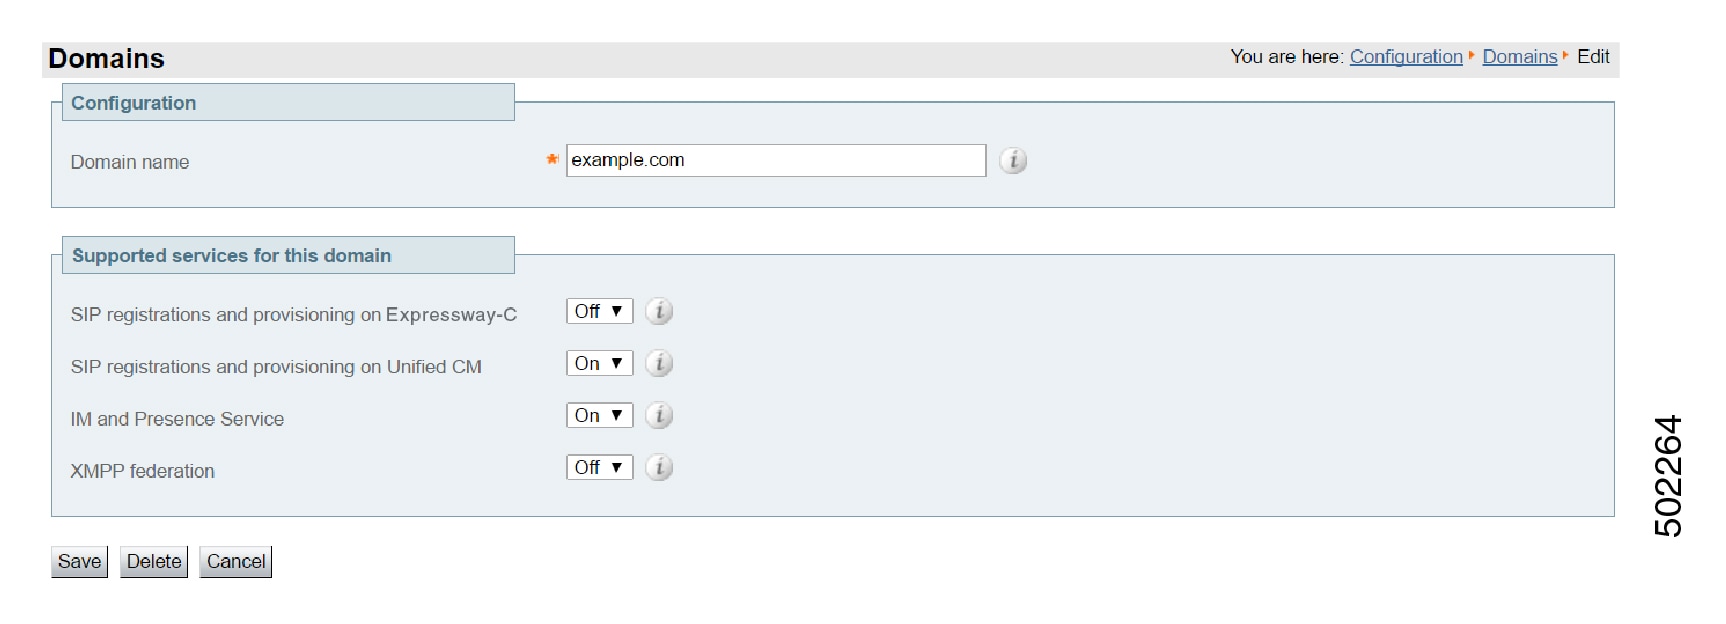
  • SIP registrations and provisioning on Expressway: the Expressway is authoritative for this SIP domain. The Expressway acts as a SIP registrar for the domain and accepts registration requests for any SIP endpoints attempting to register with an alias that includes this domain.

  • SIP registrations and provisioning on Unified CM: Endpoint registration, call control and provisioning for this SIP domain is serviced by Unified CM. The Expressway acts as a Unified Communications gateway to provide secure firewall traversal and line-side support for Unified CM registrations.

  • IM and Presence Service: Instant messaging and presence services for this SIP domain are provided by the Unified CM IM and Presence Service.

  • XMPP federation: Enables XMPP federation between this domain and partner domains.

  • Deployment: Associates the domain with the selected deployment, if there are multiple deployments. This setting is absent if there is only one deployment (there is always at least one).

Turn On all of the applicable services for each domain. For example, the same domain may be used by endpoints such as Jabber or EX Series devices that require line-side Unified Communications support, and by other endpoints such as third-party SIP or H.323 devices that require Expressway support. (In this scenario, the signaling messages sent from the endpoint indicate whether line-side unified communications or Expressway support is required.)

Note that these settings are not entirely independent. You cannot disable SIP registration and provisioning on Unified CM while using IM and Presence Service. You can disable IM and Presence Service while SIP registrations and provisioning on Unified CM is On, but the reverse is not true. So, if you switch IM and Presence Service On, then your setting for SIP registrations and provisioning on Unified CM is ignored and the Expressway-C behaves as though it was On.

Figure 1. Domains

Procedure


Step 1

On Expressway-C, go to Configuration > Domains.

Step 2

Select the domains (or create a new domain, if not already configured) for which services are to be routed to Unified CM.

Step 3

For each domain, turn On the services for that domain that Expressway is to support.


Enable Shared Line and Multiple Lines for MRA Endpoints

If you want MRA endpoints to be able to register multiple lines, or to share lines with other endpoints, then you must enable SIP Path headers on the Expressway-C. Due to a known issue in Unified CM 11.5(1)SU2, only enable SIP Path headers if you are running Unified CM version 11.5(1)SU3 or later (CDETS CSCvd84831 refers).

The default behavior is for the Expressway-C to rewrite the Contact header in REGISTER messages. When you turn SIP Path headers on, the Expressway-C does not rewrite the Contact header, but adds its address into the Path header instead which can benefit CUCM features such as:

  • Device Mobility

  • Real-Time Monitoring Tool (RTMT)

  • Cisco Emergency Responder (CER)

Other features may also be affected by this change where actual IPs are needed. The devices' IP addresses are not useful for determining their location, as they are typically from reserved private ranges and could overlap with your organization's internal range.


Note

Due to design change of CUCM 11.5(1) SU3 and later, CUCM uses the IP in Path header when available before proceeding to use Contact field. A CSCvu52319 has been opened with the CUCM to see if it can look at Contact instead of Path in versions 11.5(1) SU1 or earlier.


Before you begin

Requires Unified CM 11.5(1)SU3 or later.

Procedure


Step 1

On the Expressway-C, go to Configuration > Unified Communications > Configuration.

Step 2

Change SIP Path headers to On.

Step 3

Click Save.

The Expressway-C puts its address in the Path headers of registrations from now on, and preserves the Contact header.

Step 4

Go to Configuration > Unified Communications > Unified CM servers.

Step 5

Click Refresh servers.


Discover Unified Communications Servers and Services for Mobile and Remote Access

The Expressway-C must be configured with the address details of the Unified Communications services/nodes that are going to provide registration, call control, provisioning, voicemail, messaging, and presence services to MRA users.

IM and Presence Service configuration is not required if you're deploying the hybrid model, as these services are provided by the Cisco Webex cloud.

The connections configured in this procedure are static. You must refresh the configuration on the Expressway-C after you reconfigure or upgrade any of the discovered Unified Communications nodes. For more details, see Why You Need to Refresh the Discovered Nodes?. Be aware that as described in that section, Jabber and other endpoints cannot connect during the refresh.

Procedure


Step 1

Go to Configuration > Unified Communications and select the UC server type.

Step 2

Click Refresh servers.


Trust the Certificates Presented to the Expressway-C

If TLS verify mode is On when discovering Unified Communications services, then you must configure the Expressway-C to trust the certificates presented by the IM and Presence Service nodes and Unified CM servers.

Procedure


Step 1

Determine the relevant CA certificates to upload:

  • If the servers' tomcat and CallManager certificates are CA-signed, the Expressway-C's trusted CA list must include the root CA of the certificate issuer.
  • If the servers are using self-signed certificates, the Expressway-C's trusted CA list must include the self-signed certificates from all discovered IM and Presence Service nodes, Cisco Unity Connection servers, and Unified CM servers.
Step 2

Go to Maintenance > Security > Trusted CA certificate and upload the required certificates.

Step 3

Go to Maintenance > Restart options and restart Expressway-C.


Discover Unified CM Servers

Procedure


Step 1

On Expressway-C, go to Configuration > Unified Communications > Unified CM servers.

The page lists any Unified CM nodes that have already been discovered.

Step 2

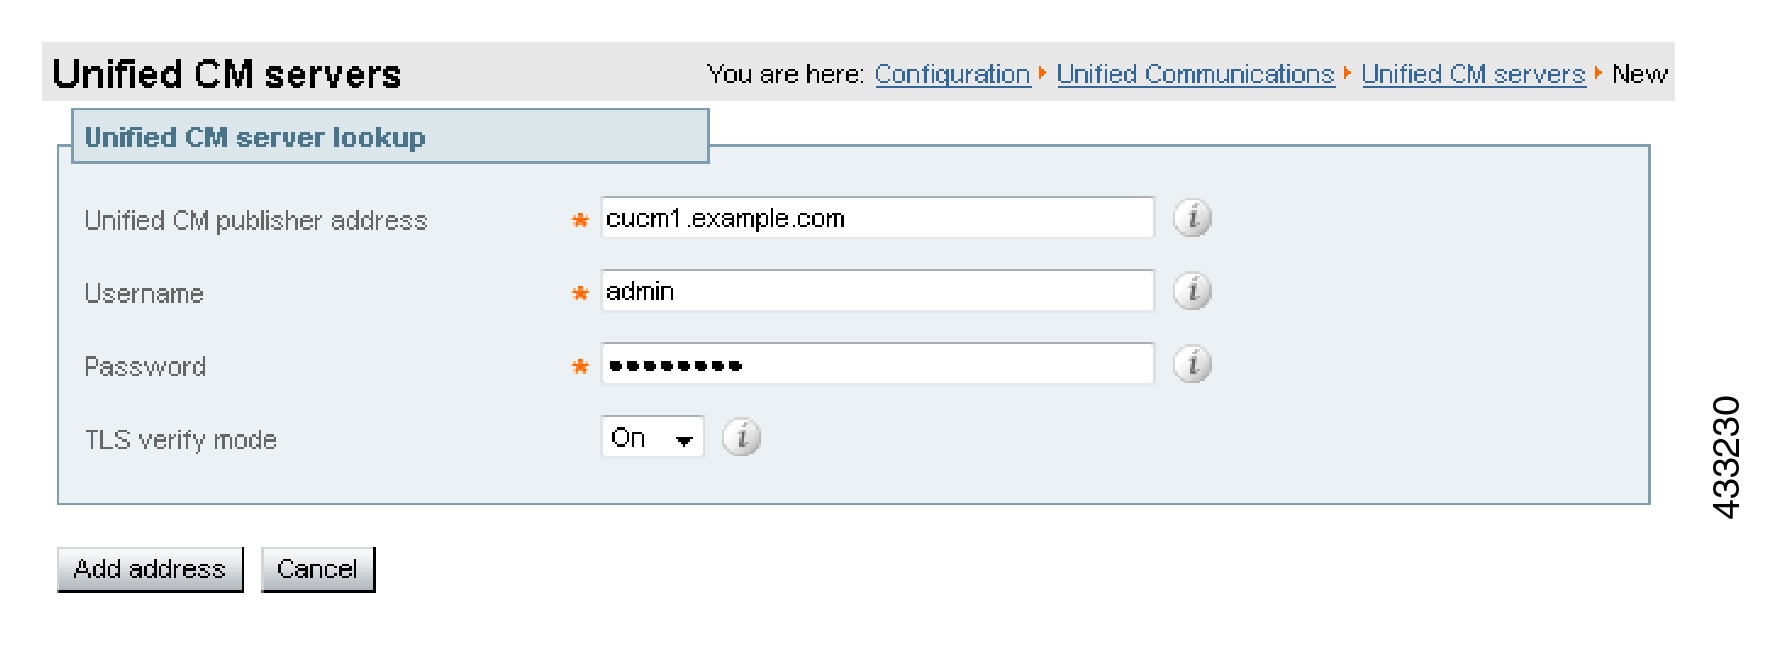
Add the details of a Unified CM publisher node:

  1. Click New.

  2. Enter the Unified CM publisher address.

    You must enter an FQDN when TLS verify mode is On.

  3. Enter the Username and Password of an account that can access this server.

    These credentials are stored permanently in the Expressway database. The corresponding Unified CM user must have the Standard AXL API Access role.

  4. [Recommended] Leave TLS verify mode switched On to ensure Expressway verifies the node's certificates.

    The Unified CM node presents its tomcat certificate for AXL and UDS queries, and its CallManager certificate for subsequent SIP traffic. If the Unified CM server is using self-signed certificates, the Expressway-C's trusted CA list must include a copy of the tomcat certificate and the CallManager certificate from every Unified CM server.

  5. (Optional) To enable support for AES GCM media encryption, set AES GCM support to On.

  6. (Optional) Select which deployment this node/cluster will belong to.

    The Deployment field does not show if you have not created multiple deployments. All nodes belong to the default deployment if you choose not to use multiple deployments.

  7. Click Add address.

    If you enabled TLS verify mode, then the Expressway tests whether a secure connection can be established. It does this so you can find any TLS configuration errors before it continues the discovery process.

    If the secure connection test was successful, or if you did not enable TLS verify mode, then the system attempts to contact the publisher and retrieve details of its associated nodes.

    Figure 2. Configuration Example
Step 3

Repeat the discovery procedure for other Unified CM nodes/clusters, if required.

Step 4

Click Refresh servers to refresh all the node details after configuring multiple publisher addresses.

Step 5

Deleting Unified CM Servers from the Discovered List. Only do this step if you need to remove existing Unified CMs from the Expressway configuration for any reason:

In the Currently found Unified CM nodes list, check the Publisher address entries that you want to remove from the list of discovered nodes and click Delete.


Discover IM and Presence Service Nodes

Procedure


Step 1

On Expressway-C, go to Configuration > Unified Communications > IM and Presence Service nodes.

The page lists any IM and Presence Service nodes that have already been discovered.

Step 2

Add the details of an IM and Presence Service database publisher node:

  1. Click New.

  2. Enter the address of the IM and Presence Service database publisher node .

    You must enter an FQDN when TLS verify mode is On.

  3. Enter the Username and Password of an account that can access this server.

    These credentials are stored permanently in the Expressway database. The corresponding IM and Presence Service user must have the Standard AXL API Access role.

  4. [Recommended] Leave TLS verify mode switched On to ensure Expressway verifies the node's tomcat certificate (for XMPP-related communications).

  5. (Optional) Select which deployment this node/cluster will belong to.

    The Deployment field does not show if you have not created multiple deployments. All nodes belong to the default deployment if you choose not to use multiple deployments.

  6. Click Add address.

    If you enabled TLS verify mode, then the Expressway tests whether a secure connection can be established. It does this so you can find any TLS configuration errors before it continues the discovery process.

    If the secure connection test was successful, or if you did not enable TLS verify mode, then the system attempts to contact the publisher and retrieve details of its associated nodes.

    Figure 3. IM and Presence Service Example

    The status of the discovered node will be Inactive unless a valid traversal zone connection exists between the Expressway-C and the Expressway-E (may not yet be configured).

Step 3

Repeat the discovery procedure for other IM and Presence Service nodes/clusters, if required.

Step 4

Click Refresh servers to refresh all the node details after configuring multiple publisher addresses.


Discover Cisco Unity Connection Servers

Procedure


Step 1

On Expressway-C, go to Configuration > Unified Communications > Unity Connection servers.

The page lists any Cisco Unity Connection nodes that have already been discovered.

Step 2

Add the details of a Cisco Unity Connection publisher node:

  1. Click New.

  2. Enter the Unity Connection address.

    You must enter an FQDN when TLS verify mode is On.

  3. Enter the Username and Password of an account that can access this server.

    These credentials are stored permanently in the Expressway database. The corresponding Cisco Unity Connection user must have the System Administrator or Remote Administrator role.

  4. [Recommended] Leave TLS verify mode switched On to ensure Expressway verifies the node's tomcat certificate.

  5. (Optional) Select which deployment this node/cluster will belong to.

    The Deployment field does not show if you have not created multiple deployments. All nodes belong to the default deployment if you choose not to use multiple deployments.

  6. Click Add address.

    If you enabled TLS verify mode, then the Expressway tests whether a secure connection can be established. It does this so you can find any TLS configuration errors before it continues the discovery process.

    If the secure connection test was successful, or if you did not enable TLS verify mode, then the system attempts to contact the publisher and retrieve details of its associated nodes.

Step 3

Repeat the discovery procedure for other Cisco Unity Connection nodes/clusters, if required.

Step 4

Click Refresh servers to refresh all the node details after configuring multiple publisher addresses.


Automatically Generated Zones and Search Rules

Expressway-C automatically generates non-configurable neighbor zones between itself and each discovered Unified CM node. A TCP zone is always created, and a TLS zone is created also if the Unified CM node is configured with a Cluster Security Mode (System > Enterprise Parameters > Security Parameters) of 1 (Mixed) (so that it can support devices provisioned with secure profiles). The TLS zone is configured with its TLS verify mode set to On if the Unified CM discovery had TLS verify mode enabled. This means that the Expressway-C will verify the CallManager certificate for subsequent SIP communications. Each zone is created with a name in the format 'CEtcp-<node name>' or 'CEtls-<node name>'.

From version X12.5, Expressway automatically generates a neighbor zone named "CEOAuth <Unified CM name>" between itself and each discovered Unified CM node when SIP OAuth Mode is enabled on Unified CM. For details, see Configure OAuth with Refresh (Self-Describing) on Unified CM SIP Lines.

A non-configurable search rule, following the same naming convention, is also created automatically for each zone. The rules are created with a priority of 45. If the Unified CM node that is targeted by the search rule has a long name, the search rule will use a regex for its address pattern match.

Note that load balancing is managed by Unified CM when it passes routing information back to the registering endpoints.

Why You Need to Refresh the Discovered Nodes?

When the Expressway-C discovers a Unified Communications node, it establishes a connection to read the information required to create zones and search rules to proxy requests originating from outside of the network in towards that node. This configuration information is static. Expressway only reads it when you manually initiate discovery of a new node, or when you refresh the configuration of previously discovered nodes. If any related configuration has changed on a node after you discover it, the mismatch between the new configuration and what the Expressway-C knows of that node is likely to cause some kind of failure.

The information that the Expressway-C reads from the Unified Communications node is different for each node type/role. These are examples of UC configuration that you can expect to require a refresh from the Expressway. The list is not exhaustive. If you suspect that a configuration change on a node is affecting MRA services, you should refresh those nodes to eliminate one known source of potential problems.

  • Changing cluster (such as adding or removing a node)

  • Changing security parameters (such as enabling Mixed Mode)

  • Changing connection sockets (such as SIP port configuration)

  • Changing TFTP server configuration

  • Upgrading node software

Devices cannot connect during the refresh

It takes some time to restore services after a server refresh and while the refresh is in progress, Jabber clients and other endpoints are unable to connect over MRA. It is not possible to provide accurate timings as they vary depending on the deployment. For straightforward deployments the refresh typically takes 5 to 10 seconds, but very complex configurations may take upwards of 45 seconds.