Network and System Settings

This section describes network services and settings related options that appear under the System menu of the web interface. These options enable you to configure the Expressway in relation to the network in which it is located, for example its IP settings, firewall rules, intrusion protection and the external services used by the Expressway (for example DNS, NTP and SNMP).

Network Settings

This section describes network services and settings related options that appear under the System menu of the web interface. These options enable you to configure the Expressway in relation to the network in which it is located, for example its IP settings, firewall rules, intrusion protection and the external services used by the Expressway (for example, DNS, NTP, and SNMP).

Ethernet Settings


Note

The speed settings on this page are for systems running on Cisco Expressway physical appliances only. They do not apply to virtual machine (VM)-based systems. The connection speed shown for VM systems is invalid, and always appears as 10000 Mb/s regardless of the actual speed of the underlying physical NIC(s). This is because VMs cannot retrieve the actual speed from the physical NIC.


The Ethernet page (System > Network interfaces > Ethernet) displays the connection speeds between Expressway and the Ethernet networks to which it is connected. As the Expressway only supports auto-negotiation, the Speed is always Auto. The Expressway and the connected switch automatically negotiate the speed and the duplex mode for the connection.

Configuring IP Settings

The IP page (System > Network interfaces > IP) is used to configure the IP protocols and network interface settings of the Expressway.

IP Protocol Configuration

You can configure whether the Expressway uses IPv4, IPv6, or both versions of the IP protocol suite. The default is Both.

  • IPv4 only: it only accepts registrations from endpoints using an IPv4 address, and only takes calls between two endpoints communicating via IPv4. It communicates with other systems via IPv4 only.

  • IPv6 only: it only accepts registrations from endpoints using an IPv6 address, and only takes calls between two endpoints communicating via IPv6. It communicates with other systems via IPv6 only.

  • Both: it accepts registrations from endpoints using either an IPv4 or IPv6 address, and takes calls using either protocol. If a call is between an IPv4-only and an IPv6-only endpoint, the Expressway acts as an IPv4 to IPv6 gateway. It communicates with other systems via either protocol.

Some endpoints support both IPv4 and IPv6, however an endpoint can use only one protocol when registering with the Expressway. Which protocol it uses is determined by the format used to specify the IP address of the Expressway on the endpoint. After the endpoint has registered using either IPv4 or IPv6, the Expressway only sends calls to it using this addressing scheme. Calls made to that endpoint from another device using the other addressing scheme are converted (gatewayed) by the Expressway.

All IPv6 addresses configured on the Expressway are treated as having a /64 network prefix length.

IPv4 to IPv6 Interworking

The Expressway can act as a gateway for calls between IPv4 and IPv6 devices. To enable this feature, select an IP protocol of Both. Calls for which the Expressway is acting as an IPv4 to IPv6 gateway are traversal calls and require a Rich Media Session license.

IP Gateways

You can set the default IPv4 gateway and IPv6 gateway used by the Expressway. These are the gateways to which IP requests are sent for IP addresses that do not fall within the Expressway’s local subnet.

  • The default IPv4 gateway is 127.0.0.1, which should be changed during the commissioning process.

  • The IPv6 gateway, if entered, must be a static global IPv6 address. It cannot be a link-local or a stateless auto-configuration (SLAAC) IPv6 address.

LAN Configuration

LAN 1 is the primary network port on the Expressway. You can configure the IPv4 address and subnet mask, the IPv6 address and the Maximum transmission unit (MTU) for this port. The Expressway is shipped with a default IP address of 192.168.0.100 (for both LAN ports). This lets you connect the Expressway to your network and access it via the default address so that you can configure it remotely.

The IPv6 address, if entered, must be a static global IPv6 address. It cannot be a link-local or stateless auto-configuration (SLAAC) address.

The Maximum transmission unit (MTU) defaults to 1500 bytes.

If you have Advanced Networking enabled, you can also configure these options for the LAN 2 port.

Dedicated Management Interface

If you want to enable the Expressway's DMI:

Procedure

Step 1

Set Use Dedicated Management Interface to Yes.

Step 2

In the LAN3 - DMI section:

  1. Specify the IPv4 and/or IPv6 address of the LAN3 port.

  2. For IPv4 also specify the subnet mask.

  3. For IPv6 use a static, global address. It cannot be link-local or stateless SLAAC.

  4. Optionally change the maximum Ethernet packet size that can be sent over the DMI by setting the Maximum transmission unit (MTU) for the port. The default is 1500 bytes.

Step 3

Restart the system. These changes require a restart to take effect.

The DMI is now activated on LAN3 as an interface for management traffic. If you want the DMI to be the sole interface for management, go on to the next tasks.


What to do next

(Optional) Make DMI Sole Interface

Make DMI Sole Interface
(Optional) Make DMI Sole Interface - Server Management Traffic

Use this task to make management traffic use the DMI, where Expressway is the server.

  1. You can do this for administration services (web user interface, REST API, and CLI) and/or for SNMP. Do either or both the following steps, depending on which services you want to configure for DMI only:

    • Go to the System > SNMP page and in the Configuration section set Use Dedicated Management Interface only to Yes.

    • Go to the System > Administration settings page and in the Services section set Use Dedicated Management Interface only (for administration) to Yes.

  2. You need to restart the system for the changes to take effect for the web user interface and the API, which remain accessible from LAN1 / LAN2 until you restart. Changes take immediate effect for the command line interface (SSH) and SNMP service, regardless of restart.

The specified management services can now be accessed only from the DMI / LAN3 port.


Note

Expressway will not let you disable the DMI while a management service is configured to use it as the only interface.


(Optional) Make DMI Sole Interface - Client Management Traffic Outside Subnet

Depending on the Expressway software version, for management traffic where Expressway acts as the client, the traffic may only be directed to the DMI if the target server is in the same subnet as the DMI / LAN3 port. Check your release notes to see if this issue applies. If it does, and if it's not possible to deploy the server in the same subnet as LAN3, you can optionally force Expressway management traffic to use the DMI, by configuring static IP routes for LAN3 per service.

About Advanced Networking and Dual Network Interfaces

The Advanced Networking feature enables the LAN 2 Ethernet port on the Expressway-E, to allow a secondary IP address for the Expressway. It also includes support for deployments where the Expressway-E is located behind a static NAT device, allowing it to have separate public and private IP addresses.

Configuring Dual Network Interfaces

Dual network interfaces are only supported on Expressway-E systems; you cannot deploy them on an Expressway-C.

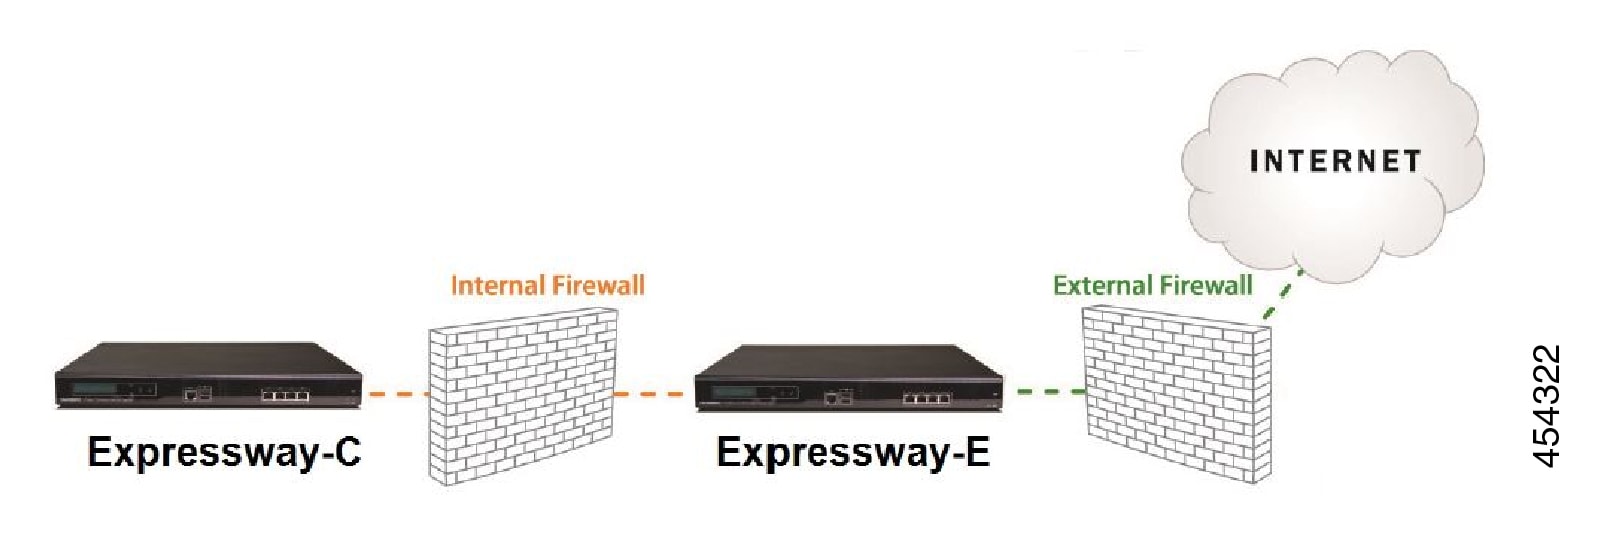
Dual network interfaces are intended for deployments where the Expressway-E is located in a DMZ between two separate firewalls on separate network segments. In such deployments, routers prevent devices on the internal network from being able to route IP traffic to the public internet, and instead the traffic must pass through an application proxy such as the Expressway-E.

To enable dual network interfaces
Before you begin
  • Configure the LAN 1 port and restart the Expressway before you configure the LAN 2 port.

  • The LAN 1 and LAN 2 interfaces must be on different, non-overlapping subnets.

  • If the Expressway-E is in the DMZ, the outside IP address of the Expressway-E must be a public IP address, or if static NAT mode is enabled, the static NAT address must be publicly accessible.

  • The Expressway-E may also be used to traverse internal firewalls within an enterprise. In this case the "public" IP address may not be publicly accessible, but is an IP address accessible to other parts of the enterprise.

  • If you need to change the IP addresses on one or both interfaces, you can do it via the UI or the CLI. You can change both at the same time if required, and the new addresses take effect after a restart.

Procedure

Step 1

Set Use dual network interfaces to Yes.

Step 2

Select LAN2 as the interface in the External LAN interface setting.

You can now choose to enable static NAT on the external interface. This setting also determines which port allocates TURN server relays.

Troubleshooting Tips:
If you have Advanced Networking enabled but only want to configure one of the Ethernet ports, switch Use dual network interfaces to No

Configuring Static NAT

You can deploy the Expressway-E behind a static NAT device, allowing it to have separate public and private IP addresses. This feature is intended for use in deployments where the Expressway-E is located in a DMZ, and has the Advanced Networking feature enabled.

In these deployments, the externally-facing LAN port has static NAT enabled in order to use both a private and public IPv4 address. The internally facing LAN port does not have static NAT enabled and uses a single IP address. In such a deployment, traversal clients should be configured to use the internally-facing IP address of the Expressway-E.

To enable static NAT
For the externally-facing LAN port, specify the following settings:
Procedure

Step 1

In the IPv4 address field, enter the private IP address of the port.

Step 2

Set IPv4 static NAT mode to On.

Step 3

In the IPv4 static NAT address field, enter the public IP address of the port - the IP address as it appears after translation (outside the NAT element).


IPv6 Mode Features and Limitations

When you set the IP interfaces of the Expressway to IPv6 Only mode, those interfaces only use IPv6. They do not use IPv4 to communicate with other systems, and they do not interwork between IPv4 and IPv6 (Dual stack).

Explicit IPv6 Supported Features

  • Calls between Expressway-registered IPv6 endpoints.

  • DiffServ traffic class (TC) tagging.

  • TURN server (on Expressway-E).

  • Automated intrusion protection.

  • DNS lookups.

  • Port usage and status pages.

Supported RFCs

  • RFC 2460: Internet Protocol, Version 6 (IPv6) Specification (partially implemented: static global addresses only).

  • RFC 2464: Transmission of IPv6 Packets over Ethernet Networks.

  • RFC 3596: DNS Extensions to Support IP Version 6.

  • RFC 4213: Basic Transition Mechanisms for IPv6 Hosts and Routers.

  • RFC 4291: IP Version 6 Addressing Architecture.

  • RFC 4443: Internet Control Message Protocol (ICMPv6) for the Internet Protocol Version 6 (IPv6) Specification.

  • RFC 4861: Neighbor Discovery for IP version 6 (IPv6).

  • RFC 5095: Deprecation of Type 0 Routing Headers in IPv6.

  • RFC 6156: Traversal Using Relays around NAT (TURN) Extension for IPv6.

Known Limitations in IPv6 Mode

  • IPv6 addresses must be static; they cannot be link-local or SLAAC addresses.

  • You must restart the Expressway when you change its IP address or its gateway's IP address.

  • Mobile and Remote Access (MRA) is not tested or supported in IPv6 mode. For MRA, the primary call control agent is Unified CM which does not support IPv6.

  • Getting revocation status from distributed Certificate Revocation Lists is not supported in IPv6 mode.

Configuring DNS Settings

The DNS page (System > DNS) is used to configure DNS servers and DNS settings on the Expressway.

Configuring the System Host Name and Domain Name

The System host name defines the DNS host name that this Expressway is known by.

  • It must be unique for each peer in a cluster.

  • It is used to identify the Expressway on a remote log server (a default name of "TANDBERG" is used if the System host name is not specified).

  • It must contain only letters, digits, hyphens, and underscore. The first character must be a letter, and the last character must be a letter or a digit.

The Domain name is used when attempting to resolve unqualified server addresses (for example, ldapserver). It's appended to the unqualified server address before the query is sent to the DNS server. If the server address is fully qualified (for example, ldapserver.mydomain.com) or is in the form of an IP address, the domain name is not appended to the server address before querying the DNS server. The domain name applies to the following Expressway configuration settings:

  • LDAP server

  • NTP server

  • External Manager server

  • Remote logging server

We recommend using an IP address or FQDN (Fully Qualified Domain Name) for all server addresses (The FQDN of the Expressway is the System host name plus the Domain name.)

Impact on SIP messaging

The System host name and Domain name are also used to identify references to this Expressway in SIP messaging, where an endpoint has configured the Expressway as its SIP proxy in the form of an FQDN (as opposed to an IP address, which is not recommended).

In this case the Expressway may, for example, reject an INVITE request if the FQDN configured on the endpoint does not match the System host name and Domain name configured on the Expressway.


Note

This check occurs because the SIP proxy FQDN is included in the route header of the SIP request sent by the endpoint to the Expressway.


Custom domain searches

The Search domains setting is relevant for Edge deployments where the external hosts are in a different DNS domain from Expressway-C, and are configured with non-qualified hostnames. You can optionally use this setting to specify one or more DNS domains. The Expressway appends these domains one by one, to the unqualified hostname and queries DNS for the resultant FQDN. It repeats this process until DNS returns an IP address. This means that there's no need to enter FQDNs when configuring connections between hosts.

Use a space to separate multiple addresses.

DNS requests

By default, DNS requests use a random port from within the system's ephemeral port range. If required, you can specify a custom port range instead by setting DNS requests port range to Use a custom port range and then defining the DNS requests port range start and DNS requests port range end fields.


Note

Setting a small source port range will increase your vulnerability to DNS spoofing attacks.


Configuring DNS Server Addresses

You must specify at least one DNS server to be queried for address resolution if you want to use the following:

  • FQDNs instead of IP addresses when specifying external addresses (for example, for LDAP and NTP servers, neighbor zones, and peers).

  • Features like URI Dialing or ENUM Dialing.

Default DNS servers

You can specify up to five default DNS servers. The Expressway only queries one server at a time. If that server is unavailable the Expressway tries another server from the list.

The order that the servers are specified is not significant. The Expressway favors servers that were last known to be available.

Per-domain DNS servers

As well as the five default DNS servers, you can specify up to five additional explicit DNS servers for specified domains. This can be useful in deployments where specific domain hierarchies need to be routed to their explicit authorities.

For each additional per-domain DNS server address you can specify up to two Domain names. Any DNS queries under those domains are forwarded to the specified DNS server instead of the default DNS servers.

To specify redundant per-domain servers, add an additional per-domain DNS server address and associate it with the same Domain names. DNS requests for those domains are sent in parallel to both DNS servers.

You can use the DNS lookup tool (Maintenance > Tools > Network utilities > DNS lookup) to check which domain name server (DNS server) is responding to a request for a particular hostname.

Transport protocols

The Expressway uses UDP and TCP to do DNS resolution, and DNS servers usually send both UDP and TCP responses. If the UDP response exceeds the UDP message size limit of 512 bytes, then the Expressway cannot process the UDP response. This is not usually a problem, because the Expressway can process the TCP response instead.

However, if you block TCP inbound on port 53, and if the UDP response is greater than 512 bytes, then the Expressway cannot process the response from the DNS. In this case you won't see the results using the DNS lookup tool, and any operations that need the requested addresses will fail.

Caching DNS Records

DNS lookups may be cached to improve performance. The cache is flushed automatically whenever the DNS configuration is changed, and you can optionally force a flush by clicking Flush DNS cache.

Configuring DSCP / Quality of Service Settings

About DSCP Marking

From X8.9, the Expressway supports improved DSCP (Differentiated Service Code Point) packet marking for traffic passing through the firewall, including Mobile and Remote Access. DSCP is a measure of the Quality of Service level of the packet. To provide more granular control of traffic prioritization, DSCP values are set (marked) for these individual traffic types:

Traffic type

Supplied default value

Web UI field

Video

34

QoS Video

Audio

46

QoS Audio

XMPP

24

QoS XMPP

Signaling

24

QoS Signaling

Before X8.9 you had to apply DSCP values to all signaling and media traffic collectively.

You can optionally change the default DSCP values from the System > Quality of Service web UI page (or the CLI).

Notes:
  • DSCP value "0" specifies standard best-effort service.

  • DSCP marking is applied to SIP and H.323 traffic.

  • DSCP marking is applied to TURN media, providing the TURN traffic is actually handled by the Expressway.

  • Traffic type "Video" is assigned by default if the media type cannot be identified. (For example, if different media types are multiplexed on the same port.)

Existing QoS/DSCP Commands and API are Discontinued

Note

From X8.9 we no longer support the previous methods to specify QoS/DSCP values. The former Web UI settings QoS Mode and QoS Value, CLI commands xConfiguration IP QoS Mode and xConfiguration IP QoS Value and corresponding API are now discontinued. Do not use these commands.


What if I currently use these commands?

When you upgrade the Expressway, any existing QoS value you have defined is automatically applied to the new fields and replaces the supplied defaults. For example, if you had a value of 20 defined, all four DSCP settings (QoS Audio, QoS Video, QoS XMPP, QoS Signaling) are set to 20 also.

We don't support downgrades. If you need to revert to your pre-upgrade software version, the QoS settings are reset to their original supplied defaults. So QoS Mode is set to None and QoS Value is set to 0. You will need to manually redefine the values you want to use.

Configuring DSCP Values

To optionally change the supplied DSCP default values, go to the Quality of Service page (System > Quality of Service) and specify the new values you want to use.

Static Routes

You can define static routes from the Expressway to an IPv4 or IPv6 address range. Go to System > Network interfaces > Static routes.

On this page you can view, add, and delete static routes.

Static routes are sometimes required when using the Advanced Networking option and deploying the Expressway in a DMZ. They may also be required in other complex network deployments.

To add a static route:

Procedure

Step 1

Enter the base destination address of the new static route from this Expressway.

For example, enter 203.0.113.0 or 2001:db8::

Step 2

Enter the prefix length that defines the range.

Extending the example, you could enter 24 to define the IPv4 range 203.0.113.0 - 203.0.113.255, or 32 to define the IPv6 range 2001:db8:: to 2001:db8:ffff:ffff:ffff:ffff:ffff:ffff.

The address range field shows the range calculated by the Expressway from the IP address and Prefix length.

Step 3

Enter the IP address of the gateway for your new route.

Step 4

Select an ethernet interface for your new route.

This option is only available if the second ethernet interface is enabled. Select LAN 1 or LAN 2 to force the route via that interface, or select Auto to allow the Expressway to make this route on either interface.

Step 5

Click Create route.

The new static route is listed in the table. You can delete routes from this table if necessary.

Note 
  • IP routes can also be configured using the CLI, using xCommand RouteAdd and the xConfiguration IP Route commands.

  • You can configure routes for up to 50 network and host combinations.

  • Do not configure IP routes by logging in as root and using ip route statements.


Intrusion Protection

Configuring Firewall Rules

Firewall rules provide the ability to configure IP table rules to control access to the Expressway at the IP level. On the Expressway, these rules have been classified into groups and are applied in the following order:

  • Dynamic system rules: these rules ensure that all established connections/sessions are maintained. They also include any rules that have been inserted by the automated detection feature as it blocks specific addresses. Finally, it includes a rule to allow access from the loopback interface.

  • Non-configurable application rules: this incorporates all necessary application-specific rules, for example to allow SNMP traffic and H.323 gatekeeper discovery.

  • User-configurable rules: this incorporates all of the manually configured firewall rules (as described in this section) that refine — and typically restrict — what can access the Expressway. There is a final rule in this group that allows all traffic destined for the Expressway LAN 1 interface (and the LAN 2 interface if the Advanced Networking option key is installed).

There is also a final, non-configurable rule that drops any broadcast or multicast traffic that has not already been specifically allowed or denied by the previous rules.

By default any traffic that is destined for the specific IP address of the Expressway is allowed access, but that traffic will be dropped if the Expressway is not explicitly listening for it. You have to actively configure extra rules to lock down the system to your specifications.


Note

Return traffic from outbound connections is always accepted.


User-configured rules

The user-configured rules are typically used to restrict what can access the Expressway. You can:

  • Specify the source IP address subnet from which to allow or deny traffic.

  • Choose whether to drop or reject denied traffic.

    For certain scenarios, even if there is a firewall rule to drop or reject certain inbound traffic, the Expressway still proxies the traffic. This is because firewall rules apply only to new inbound traffic. If the device on the internal network initiates the outbound connection, the device on the external network uses the same ports to response. It takes high priority than the firewall rules since the IP table contains the existing media path information.

  • Configure well known services such as SSH, HTTP/HTTPS or specify customized rules based on transport protocols and port ranges.

  • Configure different rules for the LAN 1 and LAN 2 interfaces (if the Advanced Networking option key is installed), although note that you cannot configure specific destination addresses such as a multicast address.

  • Specify the priority order in which the rules are applied.

Setting Up and Activating Firewall Rules

Use the Firewall rules configuration page to set up and activate a new set of firewall rules.

The set of rules shown is initially a copy of the current active rules. (On a system where no firewall rules have been defined, the list is empty.) If you have a lot of rules you can use the Filter options to limit the set of rules displayed.


Note

The built-in rules are not shown in this list.


You can change the set of firewall rules by adding new rules, or by modifying or deleting existing ones. Changes to the current active rules are held in a pending state. When you finish making changes, you activate the new rules to replace the previous set. For UDP-related rules, note that new rules only take effect at the next system reboot (although if you delete UDP rules, they become inactive as soon as you activate the rule set).

To configure and activate rules:
Procedure

Step 1

Go to System > Protection > Firewall rules > Configuration.

Step 2

Make your changes by adding, modifying, or deleting rules as required.

To change the order of the rules, use the up/down arrows and to swap the priorities of adjacent rules.

  • New or modified rules are shown as Pending (in the State column).

  • Deleted rules are shown as Pending delete.

Step 3

When you finish configuring the new set of firewall rules, click Activate firewall rules.

Step 4

Confirm that you want to activate the new rules. This will replace the existing set of active rules with the set you have just configured.

After confirming that you want to activate the new rules, they are validated and any errors reported.

Step 5

If there are no errors, the new rules are temporarily activated and you are taken to the Firewall rules confirmation page.

You now have 15 seconds to confirm that you want to keep the new rules:

  • Click Accept changes to permanently apply the rules.

  • If the 15 seconds time limit expires or you click Rollback changes, the previous rules are reinstated and you are taken back to the configuration page.

    The automatic rollback mechanism provided by the 15 seconds time limit ensures that the client system that activated the changes is still able to access the system after the new rules have been applied. If the client system is unable to confirm the changes (because it can no longer access the web interface) then the rollback will ensure that its ability to access the system is reinstated.

Step 6

This step only applies if you add UDP rules. That is, one or more custom rules with Transport=UDP. New UDP rules do not take effect until the next system reboot. In this special case, activating the firewall rules is not sufficient by itself. Deleted UDP rules do not have this requirement, and become inactive as soon as you activate the rule set.

When configuring firewall rules, you also have the option to Revert all changes. This discards all pending changes and resets the working copy of the rules to match the current active rules.


Rule settings

The configurable options for each rule are:

Field

Description

Usage tips

Priority

The order in which the firewall rules are applied.

The rules with the highest priority (1, then 2, then 3 and so on) are applied first.

Firewall rules must have unique priorities. Rule activation will fail if there are multiple rules with the same priority.

Interface

The LAN interface on which you want to control access.

This only applies if the Advanced Networking option key is installed.

IP address and Prefix length

These two fields together determine the range of IP addresses to which the rule applies.

The Address range field shows the range of IP addresses to which the rule applies, based on the combination of the IP address and Prefix length.

The prefix length range is 0-32 for an IPv4 address, and 0-128 for an IPv6 address.

Service

Choose the service to which the rule applies, or choose Custom to specify your own transport type and port ranges.

Note 

If the destination port of a service is subsequently reconfigured on the Expressway, for example from 80 to 8080, any firewall rules containing the old port number will not be automatically updated.

Transport

The transport protocol to which the rule applies.

Only applies if specifying a Custom service.

Start and end port

The port range to which the rule applies.

Only applies if specifying a UDP or TCP Custom service.

Action

The action to take against any IP traffic that matches the rule.

Allow: Accept the traffic.

Drop: Drop the traffic without any response to the sender.

Reject: Reject the traffic with an "unreachable" response.

Dropping the traffic means that potential attackers are not provided with information as to which device is filtering the packets or why.

For deployments in a secure environment, you may want to configure a set of low priority rules (for example, priority 50000) that deny access to all services and then configure higher priority rules (for example, priority 20) that selectively allow access for specific IP addresses.

Description

An optional free-form description of the firewall rule.

If you have a lot of rules you can use the Filter by description options to find related sets of rules.

Current Active Firewall Rules

The Current active firewall rules page (System > Protection > Firewall rules > Current active rules) shows the user-configured firewall rules that are currently in place on the system. There is also a set of built-in rules that are not shown in this list.

If you want to change the rules you must go to the Firewall rules configuration page from where you can set up and activate a new set of rules.

Configuring Automated Intrusion Protection

You can use the automated protection service to detect and block malicious traffic and to help protect the Expressway from dictionary-based attempts to breach login security.

It works by parsing the system log files to detect repeated failures to access specific service categories, such as SIP, SSH and web/HTTPS access. When the number of failures within a specified time window reaches the configured threshold, the source host address (the intruder) and destination port are blocked for a specified period of time. The host address is automatically unblocked after that time period so as not to lock out any genuine hosts that may have been temporarily misconfigured.

You can configure ranges of addresses that are exempted from one or more categories (see Configuring Exemptions).

You should use automated protection in combination with firewall rules; automated protection to dynamically detect and temporarily block specific threats, and firewall rules to permanently block a range of known host addresses.

About Protection Categories

The set of available protection categories on your Expressway are pre-configured according to the software version that is running. You can enable, disable or configure each category, but you cannot add new categories.

The rules which associate specific log file messages with each category are also pre-configured and you cannot change them. You can view example log file entries that would be treated as an access failure/intrusion within a particular category by going to System > Protection > Automated detection > Configuration and clicking on the name of the category. The examples are displayed above the Status section at the bottom of the page.

Enabling Automated Protection

From X8.9, automated intrusion protection is enabled by default for various categories, including the following:
  • HTTP proxy authentication failure

  • HTTP proxy protocol violation

  • SSH authorization failure

  • SSH protocol violation

  • XMPP protocol violation

This change affects new systems. Upgraded systems keep their existing protection configuration.

Procedure

Step 1

Go to System > Administration.

Step 2

Set Automated protection service to On.

Step 3

Click Save.

The service is running now, but you must configure the protection categories and any exemptions necessary for your environment.


Configuring Protection Categories

The Automated detection overview page (System > Protection > Automated detection > Configuration) is used to enable and configure the Expressway's protection categories, and to view current activity.

The page displays a summary of all available categories, showing:

  • Status: This indicates if the category is configured to be On or Off. When On, it additionally indicates the state of the category: this is normally Active, but may temporarily display Initializing or Shutting down when a category has just been enabled or disabled. Check the alarms if it displays Failed.)

  • Currently blocked: The number of addresses currently being blocked for this category.

  • Total failures: The total number of failed attempts to access the services associated with this category.

  • Total blocks: The total number of times that a block has been triggered.


    Note

    • The Total blocks will typically be less than the Total failures (unless the Trigger level is set to 1).

    • The same address can be blocked and released several times per category, with each occurrence counting as a separate block.


  • Exemptions: The number of addresses that are configured as exempt from this category.

From this page, you can also view any currently blocked addresses or any exemptions that apply to a particular category.

Enabling or Disabling Categories
Procedure

Step 1

Go to System > Protection > Automated detection > Configuration.

Step 2

Select the check box alongside the categories you want to enable or disable.

Step 3

Click Enable or Disable as appropriate.


Configuring a Category's Blocking Rules
Procedure

Step 1

Go to System > Protection > Automated detection > Configuration.

Step 2

Click on the name of the category you want to configure. You are taken to the configuration page for that category.

Step 3

Configure the category as required:

  • State: Whether protection for that category is enabled or disabled.

  • Description: A free-form description of the category.

  • Trigger level and Detection window: These settings combine to define the blocking threshold for the category. They specify the number of failed access attempts that must occur before the block is triggered, and the time window in which those failures must occur.

  • Block duration: The period of time for which the block will remain in place.

Step 4

Click Save.


Configuring Exemptions

The Automated detection exemptions page (System > Protection > Automated detection > Exemptions) is used to configure any IP addresses that are to be exempted always from one or more protection categories.
Procedure

Step 1

Go to System > Protection > Automated detection > Exemptions.

Step 2

Click on the Address you want to configure, or click New to specify a new address.

Step 3

Enter the Address and Prefix length to define the range of IP addresses you want to exempt.

Step 4

Select the categories from which the address is to be exempted.

Step 5

Click Add address.

Note 

If you exempt an address that is currently blocked, it will remain blocked until its block duration expires (unless you unblock it manually via the Blocked addresses page).


Managing Blocked Addresses

The Blocked addresses page (System > Protection > Automated detection > Blocked addresses) is used to manage the addresses that are currently blocked by the automated protection service:

  • It shows all currently blocked addresses and from which categories those addresses have been blocked.

  • You can unblock an address, or unblock an address and at the same time add it to the exemption list. Note that if you want to permanently block an address, you must add it to the set of configured firewall rules.

If you access this page via the links on the Automated detection overview page it is filtered according to your chosen category. It also shows the amount of time left before an address is unblocked from that category.

Investigating Access Failures and Intrusions

If you need to investigate specific access failures or intrusion attempts, you can review all the relevant triggering log messages associated with each category. To do this:
Procedure

Step 1

Go to System > Protection > Automated detection > Configuration.

Step 2

Click on the name of the category you want to investigate.

Step 3

Click View all matching intrusion protection triggers for this category.

The system will display all the relevant events for that category. You can then search through the list of triggering events for the relevant event details such as a user name, address or alias.


Automated Protection Service and Clustered Systems

When the automated protection service is enabled in a clustered system:

  • Each peer maintains its own count of connection failures and the trigger threshold must be reached on each peer for the intruder's address to be blocked by that peer.

  • Addresses are blocked against only the peer on which the access failures occurred. This means that if an address is blocked against one peer it may still be able to attempt to access another peer (from which it may too become blocked).

  • A blocked address can only be unblocked for the current peer. If an address is blocked by another peer, you must log in to that peer and then unblock it.

  • Category settings and the exemption list are applied across the cluster.

  • The statistics displayed on the Automated detection overview page are for the current peer only.

Automated Protection in MRA Deployments

The Expressway-C receives a lot of inbound traffic from Unified CM and from the Expressway-E when it is used for Mobile and Remote Access.

If you want to use automated protection on the Expressway-C, you should add exemptions for all hosts that use the automatically created neighbor zones and the Unified Communications secure traversal zone. The Expressway does not automatically create exemptions for discovered Unified CM or related nodes.

Additional Information

  • When a host address is blocked and tries to access the system, the request is dropped (the host receives no response).

  • A host address can be blocked simultaneously for multiple categories, but may not necessarily be blocked by all categories. Those blocks may also expire at different times.

  • When an address is unblocked (either manually or after its block duration expires), it has to fail again for the full number of times as specified by the category's trigger level before it will be blocked for a second time by that category.

  • A category is reset whenever it is enabled. All categories are reset if the system is restarted or if the automated protection service is enabled at the system level. When a category is reset:

    • Any currently blocked addresses are unblocked.

    • Its running totals of failures and blocks are reset to zero.

  • You can view all Event Log entries associated with the automated protection service by clicking View all intrusion protection events on the Automated detection overview page.

  • From X14.0 release:

    • SIP registration failure is enabled by default for new installations and factory reset cases. In case of upgrade scenario, the previous value is retained.

    • SIP authentication failure is enabled by default for new installations and factory reset cases. In case of upgrade scenario, the pervious value is retained.

    • Disable the SIP authentication failure jail rule on Expressway-C if it is impacting the service.

Configuring Rate Limits

The Rate limits overview page (System > Protection > Rate limits > Configuration) is used to limit SIP traffic rate under which Expressway can perform without any issues like crash, high CPU usage, high memory usage etc.

From X14.0 release, rate limit is enabled by default for SIP traffic.

  1. By default, 100 connections per second are allowed with a burst limit of 20 which come on the SIP ports 5060, 5061, & 5062.

  2. You can enable/disable or change number of connections per second and burst limit.

  3. Connections per second range value is 1 to 150 and default value is 100.

  4. Burst limit range value is 15 to 30 and default value is 20.

  5. The bar graph shows number of connections established over the time and number of connections dropped.


Important

  • In case of TCP protocol only "NEW" state is considered as new connection. All the related and established connections are treated as same connection, so that the packets are not dropped from the existing connection.

  • In case of UDP protocol all the related and established connections as "NEW" connections.


Configuring rate limits rules

To configure rate limits rules:

  1. Go to System > Protection > Rate limits > Configuration

  2. Click on the name of the category you want to configure.

    You are taken to the configuration page for that category.

  3. Configure the category as required:

    1. Status – whether rate limit mode is enabled or disabled.

    2. Connections (per second) – Change the number of connections per second.

    3. Burst limit – Maximum initial number of connections/packets to match, this number gets recharged by one every time the limit specified above is not reached, up to this number.

  4. Click Save.

Network Services

Configuring System Name and Access Settings

The System administration page (System > Administration) is used to configure the following settings:

  • Name of the Cisco Expressway system.

  • Methods by which the system may be accessed by administrators. Although you can administer the Expressway through a PC connected directly to the unit with a serial cable, you may want to access the system remotely over IP. You can do this using the web interface via HTTPS, or through a command line interface via SSH.

  • Whether to use FindMe or other provisioning services from the Cisco TelePresence Management Suite Provisioning Extension.

  • Optionally direct management traffic for administration services - web user interface, REST API and CLI - to use Expressway's Dedicated Management Interface (DMI) on LAN3.

Table 1. Settings for the System Administration page

Field

Description

Usage Tips

System name

Used to identify the Expressway. Appears in various places in the web interface, and in the display on the front panel of the unit (so that you can identify it when it is in a rack with other systems).

We recommend using a name which allows you to easily and uniquely identify the system.

Ephemeral port range

The start and end values define the port range to use for ephemeral outbound connections that are not otherwise constrained by Expressway call processing.

Services

Serial port / console

Whether the system can be accessed locally via the VMware console.

Default is On.

Serial port / console access is always enabled for one minute following a restart, even if it is normally disabled.

SSH service

Whether the Expressway can be accessed via SSH and SCP.

Default is On.

Web interface (over HTTPS)

Whether the Expressway can be accessed via the web interface.

Default is On.

Provisioning services

Whether the System > TMS Provisioning Extension services page is accessible in the Expressway web user interface. From there you can connect to the Cisco TelePresence Management Suite Provisioning Extension (Cisco TMSPE) and its provisioning services for users, devices, FindMe and phone books.

Default is Off.

FindMe is deprecated in Expressway from X12.5 and support will be withdrawn in a subsequent release.

Use Dedicated Management Interface only

Optionally requires management traffic for administration services - web user interface, REST API and CLI - to use Expressway's Dedicated Management Interface (DMI) on LAN3.

Default is No.

The same function is available for SNMP management traffic, from the System > SNMP page.

Session limits

Session time out

The number of minutes that an administration session (serial port, HTTPS or SSH) or a FindMe session may be inactive before the session is timed out. Default is 30 minutes.

Per-account session limit

The number of concurrent sessions that each individual administrator account is allowed on each Expressway.

This includes web, SSH and serial sessions. Session limits are not enforced on the root account.

A value of 0 turns session limits off.

System session limit

The maximum number of concurrent administrator sessions allowed on each Expressway.

This includes web, SSH and serial sessions. Session limits are not enforced on the root account. However active root account sessions do count towards the total number of current administrator sessions.

A value of 0 turns session limits off.

System protection

Automated protection service

Whether the automated protection service is active.

Default is On.

After enabling the service you need to configure the specific protection categories.

Automatic discovery protection

Controls how management systems such as Cisco TMS can discover this Expressway.

Off: Automatic discovery is allowed.

On: Cisco TMS must be manually configured to discover this Expressway and must provide administrator account credentials.

Default is Off.

Restart the system for any changes to take effect.

Web server configuration

Redirect HTTP requests to HTTPS

Determines whether HTTP requests are redirected to the HTTPS port.

Default is Off.

HTTPS must also be enabled for access via HTTP to function.

When you enter the address without prepending the protocol, your browser assumes HTTP (on port 80). If this setting is On, Expressway redirects the browser to the Web administrator port.

HTTP Strict Transport Security (HSTS)

Determines whether web browsers are instructed to only ever use a secure connection to access this server. Enabling this feature gives added protection against man-in-the-middle (MITM) attacks.

On: The Strict-Transport-Security header is sent with all responses from the web server, with a 1 year expiry time.

Off: The Strict-Transport-Security header is not sent, and browsers work as normal.

Default is On.

See below for more information about HSTS.

Web administrator port

Sets the https listening port for administrators to access the Expressway web interface.

We strongly recommend using a non-default port for web administration on the Expressway-E if you enable any features that need TCP 443, eg. Meeting Server Web Proxy.

Restart the Expressway to make this change effective.

If you use a non-default port, and you prepend the https:// protocol to the address, you must append the port. For example, you would put the address https://vcse.example.com:7443 into your browser; if you try https://vcse.example.com, the browser assumes port 443 and the Expressway denies access.

Web access to the Expressway could be lost if a network element blocks traffic to the web admin port - you can use SSH or the console to change the port if necessary.

Client certificate-based security

Controls the level of security required to allow client systems (typically web browsers) to communicate with the Expressway over HTTPS.

Not required: The client system does not have to present any form of certificate.

Certificate validation: The client system must present a valid certificate that has been signed by a trusted certificate authority (CA).

Note 

Restart is required if you are changing from Not required to Certificate validation.

Certificate-based authentication: The client system must present a valid certificate that has been signed by a trusted CA and contains the client's authentication credentials.

Default: Not required

Important 
  • Enabling Certificate validation means that your browser (the client system) can use the Expressway web interface only if it has a valid (in date and not revoked by a CRL) client certificate that is signed by a CA in the Expressway's trusted CA certificate list.

  • Ensure your browser has a valid client certificate before enabling this feature. The procedure for uploading a certificate to your browser may vary depending on the browser type and you may need to restart your browser for the certificate to take effect.

  • You can upload CA certificates on the Managing the Trusted CA Certificate List page, and test client certificates on the Testing Client Certificates page.

  • Enabling Certificate-based authentication means that the standard login mechanism is no longer available. You can log in only if your browser certificate is valid and the credentials it provides have the appropriate authorization levels. You can configure how the Expressway extracts credentials from the browser certificate on the Certificate-based Authentication Configuration page.

  • This setting does not affect client verification of the Expressway's server certificate.

Certificate revocation list (CRL) checking

Specifies whether HTTPS client certificates are checked against certificate revocation lists (CRLs).

None: No CRL checking is performed.

Peer: Only the CRL associated with the CA that issued the client's certificate is checked.

All: All CRLs in the trusted certificate chain of the CA that issued the client's certificate are checked.

Default: All

Only applies if Client certificate-based security is enabled.

CRL inaccessibility fallback behavior

Controls the revocation checking behavior if the revocation status cannot be established, for example if the revocation source cannot be contacted.

  • Treat as revoked: Treat the certificate as revoked (and thus do not allow the TLS connection).

  • Treat as not revoked: Treat the certificate as not revoked.

  • Default: Treat as not revoked

Only applies if Client certificate-based security is enabled.

Deployment Configuration

Configuration

Determines the size of the system. The possible options are:

Large: 8 CPU cores , 6 GB memory, and 1 Gbps or 10 Gbps NIC.

Medium: 2 CPU cores: 4 GB memory, and 1 Gbps NIC.

If you upgrade a Medium system with a 1 Gbps NIC, Expressway automatically converts the appliance to a Large system. As a result, Expressway-E listens for multiplexed RTP/RTCP traffic on default demultiplexing ports for Large systems (36000 to 36011). In this case, Expressway drops the calls because these ports are not open on the firewall.

If this problem occurs, do either of the following:

  • To change the system default size to Medium and use the ports that you have configured for multiplexed RTP/RTCP traffic, select Medium.

  • If you prefer to use it as Large system, open the default demultiplexing ports for Large systems on the firewall.

This option is available only for CE1200 and later appliances that are deployed as Expressway-Es, and with the following minimum specification:

  • Supported Expressway software version (detailed in the Cisco Expressway CExxxx Installation Guide for your appliance)

  • CPU: 8 cores

  • Memory: 6 GB

  • NIC: 1 Gbps

By default, access via HTTPS and SSH is enabled. For optimum security, disable HTTPS and SSH and use the serial port to manage the system. Because access to the serial port allows the password to be reset, we recommend that you install the Expressway in a physically secure environment.

HTTP Strict Transport Security

HTTP Strict Transport Security (HSTS) is a mechanism for a web server to force a web browser to communicate with it using secure connections only. Depending on the version, it may not be supported by all browsers. When HSTS is enabled, a browser that supports HSTS will:

  • Automatically turn any insecure links to the website into secure links before accessing the server(for example, http://example.com/page/ is modified to https://example.com/page/).

  • Only allow access to the server if the connection is secure (for example, the server's TLS certificate is valid, trusted, and not expired).

Browsers that do not support HSTS ignore the Strict-Transport-Security header and work as before. They will still be able to access the server.

Compliant browsers only respect Strict-Transport-Security headers if they access the server through its fully qualified name, rather than its IP address.

Configuring SNMP Settings

The SNMP page (System > SNMP) is used to configure the Expressway SNMP settings.

Tools such as Cisco TelePresence Management Suite (Cisco TMS) or HP OpenView may act as SNMP Network Management Systems (NMS). They allow you to monitor your network devices, including the Expressway, for conditions that might require administrative attention. The Expressway supports the most basic MIB-II tree (.1.3.6.1.2.1) as defined in RFC 1213.

The information made available by the Expressway includes:

  • System uptime

  • System name

  • Location

  • Contact

  • Interfaces

  • Disk space, memory, and other machine-specific statistics

SNMP is disabled by default. So to allow the Expressway to be monitored by an SNMP NMS (including Cisco TMS) you need to select an alternative SNMP mode. The configurable options are:

Field

Description

Usage Tips

SNMP mode

Controls the level of SNMP support.

Disabled: no SNMP support.

v3 secure SNMP: supports authentication and encryption.

v3 plus TMS support: secure SNMPv3 plus non-secure access to OID 1.3.6.1.2.1.1.2.0 only.

v2c: non-secure community-based SNMP.

If you want to use secure SNMPv3 but you also use Cisco TMS as your external manager, you must select v3 plus TMS support.

Description

Custom description of the system as viewed by SNMP. The default is to have no custom description (empty field).

When you leave this field empty, the system uses its default SNMP description.

Community name

The Expressway's SNMP community name.

The default is public.

Only applies when using v2c or v3 plus TMS support.

System contact

The name of the person who can be contacted regarding issues with the Expressway.

The default is Administrator.

The System contact and Location are used for reference purposes by administrators when following up on queries.

Location

Specifies the physical location of the Expressway.

Username

The Expressway's SNMP username, used to identify this SNMP agent to the SNMP manager.

Only applies when using v3 secure SNMP or v3 plus TMS support.

Use Dedicated Management Interface only

Optionally requires management traffic for SNMP to use Expressway's Dedicated Management Interface (DMI) on LAN3.

Default is No.

The same function is available for management traffic related to administration services - web user interface, REST API, and CLI - from the System > Administration settings page.

v3 Authentication settings (only applicable to SNMPv3)

Authentication mode

Enables or disables SNMPv3 authentication.

Type

The algorithm used to hash authentication credentials. From X12.5.7, SHA (Secure Hash Algorithm) is the only supported option. MD5 (Message-Digest algorithm 5) passwords are not supported.

Password

The password used to encrypt authentication credentials.

Must be at least 8 characters.

v3 Privacy settings (only applicable to SNMPv3)

Privacy mode

Enables or disables SNMPv3 encryption.

Type

The security model used to encrypt messages.

AES: Advanced Encryption Standard 128-bit encryption.

The default and recommended setting is AES.

Password

The password used to encrypt messages.

Must be at least 8 characters.

The Expressway does not support SNMP traps or SNMP sets, therefore it cannot be managed via SNMP.


Note

SNMP is disabled by default, because of the potentially sensitive nature of the information involved. Do not enable SNMP on a Expressway on the public internet or in any other environment where you do not want to expose internal system information.


Configuring Time Settings

The Time page (System > Time) is used to configure the Expressway's NTP servers and to specify the local time zone.

An NTP server is a remote server with which the Expressway synchronizes in order to ensure its time is accurate. The NTP server provides the Expressway with UTC time.

Accurate time is necessary for correct system operation.

Configuring the NTP Servers

To configure the Expressway with one or more NTP servers to be used when synchronizing system time, enter the Address of up to five servers in one of the following formats, depending on the system's DNS settings (you can check these settings on the DNS page, System > DNS):

  • If there are no DNS servers configured, you must use an IP address for the NTP server

  • If there are one or more DNS servers configured, you can use an FQDN or IP address for the NTP server

  • If there is a DNS Domain name configured in addition to one or more DNS servers, you can use the server name, FQDN or IP address for the NTP server

Three of the Address fields default to NTP servers provided by Cisco.

You can configure the Authentication method used by the Expressway when connecting to an NTP server. Use one of the following options for each NTP server connection:

Authentication method

Description

Disabled

No authentication is used.

Symmetric key

Symmetric key authentication. When using this method a Key ID, Hash method and Pass phrase must be specified. The values entered here must match exactly the equivalent settings on the NTP server. You can use the same symmetric key settings across multiple NTP servers. However, if you want to configure each server with a different pass phrase, you must also ensure that each server has a unique key ID.

Private key

Private key authentication. This method uses an automatically generated private key with which to authenticate messages sent to the NTP server.

Displaying NTP status information

The synchronization status between the NTP server and the Expressway is shown in the Status area as follows:

  • Starting: The NTP service is starting.

  • Synchronized: The Expressway has successfully obtained accurate system time from an NTP server.

  • Unsynchronized: The Expressway is unable to obtain accurate system time from an NTP server.

  • Down: The Expressway's NTP client is not running.

  • Reject: The NTP service is not accepting NTP responses.


Note

Updates may take a few minutes to be displayed in the status table.


Other status information available includes:

Field

Description

NTP server

The actual NTP server that has responded to the request. This may be different to the NTP server in the NTP server address field.

Condition

Gives a relative ranking of each NTP server. All servers that are providing accurate time are given a status of Candidate; of those, the server that the Expressway considers to be providing the most accurate time and is therefore using shows a status of sys.peer.

Flash

A code giving information about the server's status. 00 ok means there are no issues. See the Flash Status Word Reference Table for a complete list of codes.

Authentication

Indicates the status of the current authentication method. One of ok, bad or none. none is specified when the Authentication method is Disabled.

Event

Shows the last event as determined by NTP (for example reachable or sys.peer)

Reachability

Indicates the results of the 8 most recent contact attempts between the Expressway and the NTP server, with a tick indicating success and a cross indicating failure. The result of the most recent attempt is shown on the far right.

Each time the NTP configuration is changed, the NTP client is restarted and the Reachability field will revert to all crosses apart from the far right indicator which will show the result of the first connection attempt after the restart. However, the NTP server may have remained contactable during the restart process.

Offset

The difference between the NTP server's time and the Expressway's time.

Delay

The network delay between the NTP server and the Expressway.

Stratum

The degree of separation between the Expressway and a reference clock. 1 indicates that the NTP server is a reference clock.

Ref ID

A code identifying the reference clock.

Ref time

The last time that the NTP server communicated with the reference clock.

For definitions of the remaining fields on this page, and for further information about NTP, see Network Time Protocol website.

Expressway Time Display and Time Zone

Local time is used throughout the web interface. It is shown in the system information bar at the bottom of the screen and is used to set the timestamp that appears at the start of each line in the Event Log.


Note

UTC timestamps are included at the end of each entry in the Event Log.


Internally, the Expressway maintains its system time in UTC. It is based on the Expressway's operating system time, which is synchronized using an NTP server if one is configured. If no NTP servers are configured, the Expressway uses its own operating system time to determine the time and date.

Specifying your local Time zone lets the Expressway determine the local time where the system is located. It does this by offsetting UTC time by the number of hours (or fractions of hours) associated with the selected time zone. It also adjusts the local time to account for summer time (also known as daylight saving time) when appropriate.

Configuring the Login Page

Use the Login page configuration page (System > Login page) to specify a message and image to appear on the login page. The Welcome message title and text appears to administrators when they log in using the CLI or the web interface.

You can upload an image to appear above the welcome message on the login page, in the web interface.

  • Supported image file formats are JPG, GIF and PNG.

  • Images larger than 200x200 pixels are scaled down.

Optionally you can specify that the welcome message must be acknowledged before the person logging in is allowed to continue. In this case the system displays an acceptance button, which the user must click to continue.

If the Expressway is using the TMS Provisioning Extension services to provide FindMe account data, then users log into their FindMe accounts through Cisco TMS, not through Expressway.


Note

This feature is not configurable using the CLI.


Configuring External Manager Settings

The External Manager page (System > External Manager) is used to configure the Expressway connection to an external management system.

An external manager is a remote system, such as the Cisco TelePresence Management Suite (Cisco TMS), used to monitor events occurring on the Expressway, for example call attempts, connections and disconnections, and as a place for where the Expressway can send alarm information. The use of an external manager is optional.


Note

Cisco TMS identifies the Expressway as a "TANDBERG VCS".


The Expressway will continue to operate without loss of service if its connection to Cisco TMS fails. This applies even if the Expressways are clustered. No specific actions are required as the Expressway and Cisco TMS will automatically start communicating with each other again after the connection is re-established.

Field

Description

Usage Tips

Address and path

To use an external manager, you must configure the Expressway with the IP address or host name and path of the external manager to be used.

If you are using Cisco TMS as your external manager, use the default path of tms/public/external/management/SystemManagementService.asmx

Protocol

Determines whether communications with the external manager are over HTTP or HTTPS.

The default is HTTPS.

Certificate verification mode

Controls whether the certificate presented by the external manager is verified.

If you enable verification, you must also add the certificate of the issuer of the external manager's certificate to the file containing the Expressway's trusted CA certificates. This is done from the Managing the Trusted CA Certificate List page (Maintenance > Security > Trusted CA certificate).

Configuring the Dedicated Management Interface (DMI)

From X12.7, Expressway supports the Dedicated Management Interface (DMI). This is a new network interface that uses the third LAN port (LAN3) to access Expressway for management-related activities. Instead of sharing a routing interface with other traffic, management traffic is sent and received through LAN3 and no other traffic uses that port.

The DMI is disabled by default.


Note

If you are using a physical CE1200 appliance, connect port 3a (See "Figure 2: Rear view of the Cisco Expressway") provided on your physical appliance and configure the DMI address on it as explained in the chapter "Rear Panel Layout". For specific instructions, see "Cisco Expressway CE1200 Appliance Installation Guide".


Introduction to the DMI

Enabling the DMI has two aspects:

  1. Enabling the DMI function - this switches on the LAN3 port for management traffic. However, it is not exclusive and LAN1 (and LAN2 if configured) can also be used - Expressway continues to listen for management traffic on LAN1/LAN2 as well, not just on the LAN3 port.

  2. If you want LAN3 to be the only interface for management traffic, you need to configure the individual management services in Expressway for DMI only.


    Note

    If you have management servers outside the LAN3 subnet, currently you also need to configure static IP routes in order for their traffic to be directed to LAN3.


Expressway management traffic can be classified as server-based or client-based.

Management traffic where Expressway is the server:

  • HTTP(S) - for web UI administration and REST API

  • ssh - for CLI (not for MRA tunnels)

  • SNMP

Management traffic where Expressway is the client, for example:

  • HTTP(S) for feedback events to external managers like Cisco TMS

  • NTP

  • directory (LDAP, Active Directory)

  • remote syslog

  • system metrics (collectd)

How to Configure the DMI

Enable DMI

Before you begin

The new DNS name for the DMI interface must be entered as a Subject Alternative Name (SAN) on the Expressway server certificate. If an IP address is used to access the interface (or a DNS that is not a SAN entry in the certificate) a certificate validation warning will be issued and access may be blocked.

Caution

It is essential to properly secure the DMI, as it provides access into the Expressway configuration.


Procedure


Step 1

Go to System > Network Interfaces > IP and set Use Dedicated Management Interface to Yes.

Step 2

In the LAN3 - DMI section:

  1. Specify the IPv4 and/or IPv6 address of the LAN3 port.

  2. For IPv4 also specify the subnet mask.

  3. For IPv6 use a static, global address. It cannot be link-local or stateless SLAAC.

  4. Optionally change the maximum Ethernet packet size that can be sent over the DMI by setting the Maximum transmission unit (MTU) for the port. The default is 1500 bytes.

Step 3

Restart the system. These changes require a restart to take effect.

The DMI is now activated on LAN3 as an interface for management traffic. If you want the DMI to be the sole interface for management, go on to the next tasks.

Note 

For Expressway VMs, the OVF template includes a customization option to define the DMI IP address.


(Optional) Make DMI Sole Interface

(Optional) Make DMI sole interface - server management traffic

Use this task to make management traffic use the DMI, where Expressway is the server.


Caution

Before you do this, make sure that the required services are accessible on LAN3, else they won't have access after the change to DMI only. This is especially important for administration services, as the only way to recover them would be to turn off DMI using the console (serial/VMWare).


  1. You can do this for administration services (web user interface, REST API, and CLI) and/or for SNMP. Do either or both the following steps, depending on which services you want to configure for DMI only:

    • Go to System > SNMP and in the Configuration section set Use Dedicated Management Interface only to Yes.

    • Go to System > Administration settings and in the Services section set Use Dedicated Management Interface only (for administration) to Yes.

  2. You need to restart the system for the changes to take effect for the web user interface and the API, which remain accessible from LAN1 / LAN2 until you restart. Changes take immediate effect for the command line interface (SSH) and SNMP service, regardless of restart.

The specified management services can now be accessed only from the DMI / LAN3 port.


Note

Expressway will not let you disable the DMI while a management service is configured to use it as the only interface.


(Optional) Make DMI sole interface - client management traffic outside subnet

For management traffic where Expressway acts as the client, depending on your Expressway version the traffic will only be directed to the DMI if the target server is in the same subnet as the DMI / LAN3 port. If it's not possible to deploy the server in the same subnet as LAN3, you can optionally force Expressway management traffic to use the DMI, by configuring static IP routes for LAN3 per service.

Example

This example assumes an Expressway with these subnets:

  • LAN3 subnet range: a.b.128.0 - a.b.191.255

  • LAN1 subnet range: x.y.156.0 - x.y.159.255

Say you want to configure NTP with Expressway. The NTP server is in the LAN1 subnet. You want outgoing NTP traffic from Expressway and incoming responses from NTP to use the DMI / LAN3. This can be achieved by creating a static route for LAN3 (System > Network interfaces > Static routes select Add) with the following settings:

  • IP address: x.y.151.0

  • Prefix length: 24

  • Gateway: 172.22.128.1 (gateway of LAN3 subnet)

  • Interface: LAN3

For more details, see Static Routes.

Configuring TMS Provisioning Extension Services

Cisco TMSPE services are hosted on Cisco TMS. They provide the user, device, and phone book data used by the Expressway's Provisioning Server to service provisioning requests from endpoint devices. They also provide the Expressway with FindMe account configuration data for FindMe services.

From X8.11, the Cisco TMS-hosted provisioning services are enabled through the System > Administration settings page in the web user interface or the device provisioning CLI command (xconfiguration Administration DeviceProvisoning). You do not need special option keys or licenses to enable these services. The following device provisioning services are available:

  • Users

  • FindMe

  • Phone Books

  • Devices

For new installations all services are off by default. For existing systems your current service settings are preserved and remain unchanged after upgrading.


Note

Cisco Expressway X14.0.1 and later releases include more secure parsing of HTTP headers. Hence, Cisco TMS Provisioning Extension (TMSPE) Service will not work with Expressway, if you enable more than one authentication method. Enable only the "Basic Authentication" method for the tmsagent virtual directory in Internet Information Services (IIS) Manager.


Before You Start

If you have not already done so, go to System > Administration and set Provisioning services to On. Then you can use the System > TMS Provisioning Extension services page to configure how Expressway connects to Cisco TMSPE services, and which services you want. (To configure the services themselves, we recommend using the TMS. Changes to Cisco TMSPE service configuration settings made through Expressway are not applied in TMS.)

FindMe is a special case. If you enable provisioning services you may see the following configuration warning alarms. If you plan to use FindMe only, and no other provisioning services, you can ignore these alarms:

  • For phone book requests to work correctly, authentication policy must be enabled on the Default Subzone and any other relevant subzone; authentication must also be enabled on the Default Zone if the endpoints are not registered.

  • For provisioning to work correctly, authentication policy must be enabled on the Default Zone and any other relevant zone that receives provisioning requests.

Configuration Settings

The configurable options for provisioning services are described in the table:

Table 2. Configurable Options for Provisioning Services

Field

Description

Usage Tips

Default connection configuration

This section specifies default connection settings for accessing Cisco TMSPE services. Each service can choose to use these settings, or specify its own connection settings (for example, if a different Cisco TMSPE server is in use per service).

Server address

The IP address or Fully Qualified Domain Name (FQDN) of the service.

Destination port

The listening port on the Cisco TMSPE service.

Encryption

The encryption to connect the Cisco TMSPE service. For more information see Configuring Minimum TLS Version and Cipher Suites.

Off: No encryption.

TLS: Provides TLS encryption.

Default is TLS.

A TLS connection is recommended.

Verify certificate

Controls whether the certificate presented by the Cisco TMSPE service is verified against the Expressway's current trusted CA list and (if any) revocation list.

Default is Yes.

If verification is enabled:

  • IIS (on the Cisco TMSPE server) must be installed with a signed certificate and be set to enforce SSL connections.

  • You must add the certificate of the issuer of the Cisco TMSPE server's certificate to the file containing the Expressway's trusted CA certificates. Do this from the Managing the Trusted CA Certificate List page (Maintenance > Security > Trusted CA certificate).

Check certificate hostname

Controls whether the hostname contained within the certificate presented by the Cisco TMSPE service is verified by the Expressway.

Default is Yes.

Applies if Verify certificate is Yes.

If enabled, the certificate hostname (the Common Name) must match the specified Server address. If the server address is an IP address, the required hostname is obtained through a DNS lookup.

Base group

The ID used to identify this Expressway (or Expressway cluster) with the Cisco TMSPE service.

The TMS administrator will supply this value.

The Base group ID used by the Devices service must be explicitly specified as it is normally different from that used by the other services.

Authentication username and password

The username and corresponding password used by the Expressway to authenticate itself with the Cisco TMSPE service.

If TLS encryption is not enabled, the authentication password is sent in the clear.

Service-specific configuration

You can specify the connection details for each of the Cisco TMSPE services: Users, FindMe, Phone books, and Devices.

Connect to this service

Controls whether the Expressway connects to the Cisco TMSPE service.

Default is No.

If Yes, the status of an enabled connection is shown next to the field: Checking, Active or Failed. (Click details to view full status information.)

Polling interval

The frequency with which the Expressway checks the Cisco TMSPE service for updates. Defaults are:

FindMe: 2 minutes

Users: 2 minutes

Phone books: 1 day

The Device service polling interval is set to 30 seconds and cannot be modified.

You can request an immediate update of all services by clicking Check for updates at the bottom of the page.

Use the default connection configuration

Controls whether the service uses the default connection configuration for Cisco TMSPE services.

Default is Yes.

If No, an additional set of connection configuration parameters appears. There you can specify alternative connection details, to override the default connection settings for the service.

You can do an immediate resynchronization of data between Expressway and Cisco TMS at any time by clicking Perform full synchronization on the TMS Provisioning Extension services page. This will result in a few seconds lack of service on the Expressway while data is deleted and refreshed. If you only need to apply recent updates in Cisco TMS to the Expressway, click Check for updates instead.