Migrate to Packaged CCE

Prerequisites for the Migration Tool

ES37 is specific to Packaged CCE and is not supported in Unified CCE. Before you start migrating to Packaged CCE, install ES37, followed by ES55 on the Administration and Data Server VM. ES 37 and ES55 can be downloaded here.

Also install the CVP 12.0(1) ES5 followed by ES6 before migration.

These ESs contain critical fixes that make sure migration to Packaged CCE 12.0 is seamless.

The user running this tool must have “Config” security group membership for the CCE instance at a bare minimum.

All solution components such as Finesse, CVP, ECE MUST be at version 12.0.

Cisco Unified CM can continue to be on an earlier compatible release for an off-box solution deployment. For more details, see the Contact Center Enterprise Solution Compatibility Matrix, Release 12.0(x) at https://www.cisco.com/c/en/us/td/docs/voice_ip_comm/cust_contact/contact_center/icm_enterprise/ucce_compatibility/matrix/rcct_b_12_0_cce-solution-compatibility-matrix.html

Migration Phases

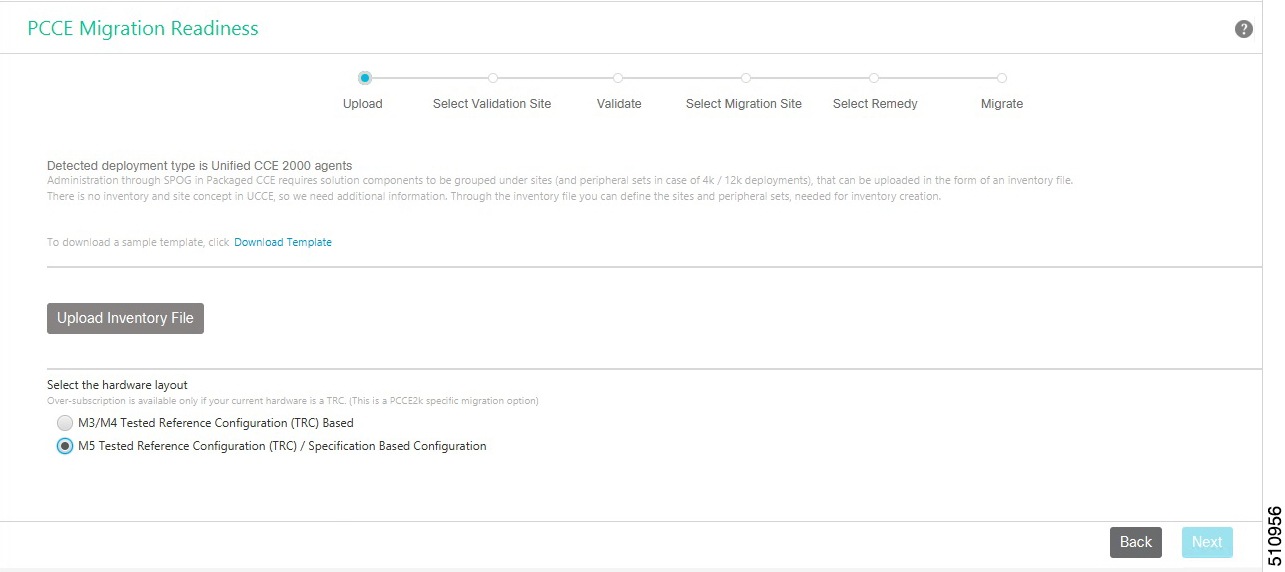
The Migration tool automatically detects the deployment type of the system. It presents options to upload an Inventory file in which you group solution components into sites (and into peripheral sets in a 4000 or 12000 agent deployment), and a CVP Operations Console backup file, to check conformance of your deployment to Packaged CCE.

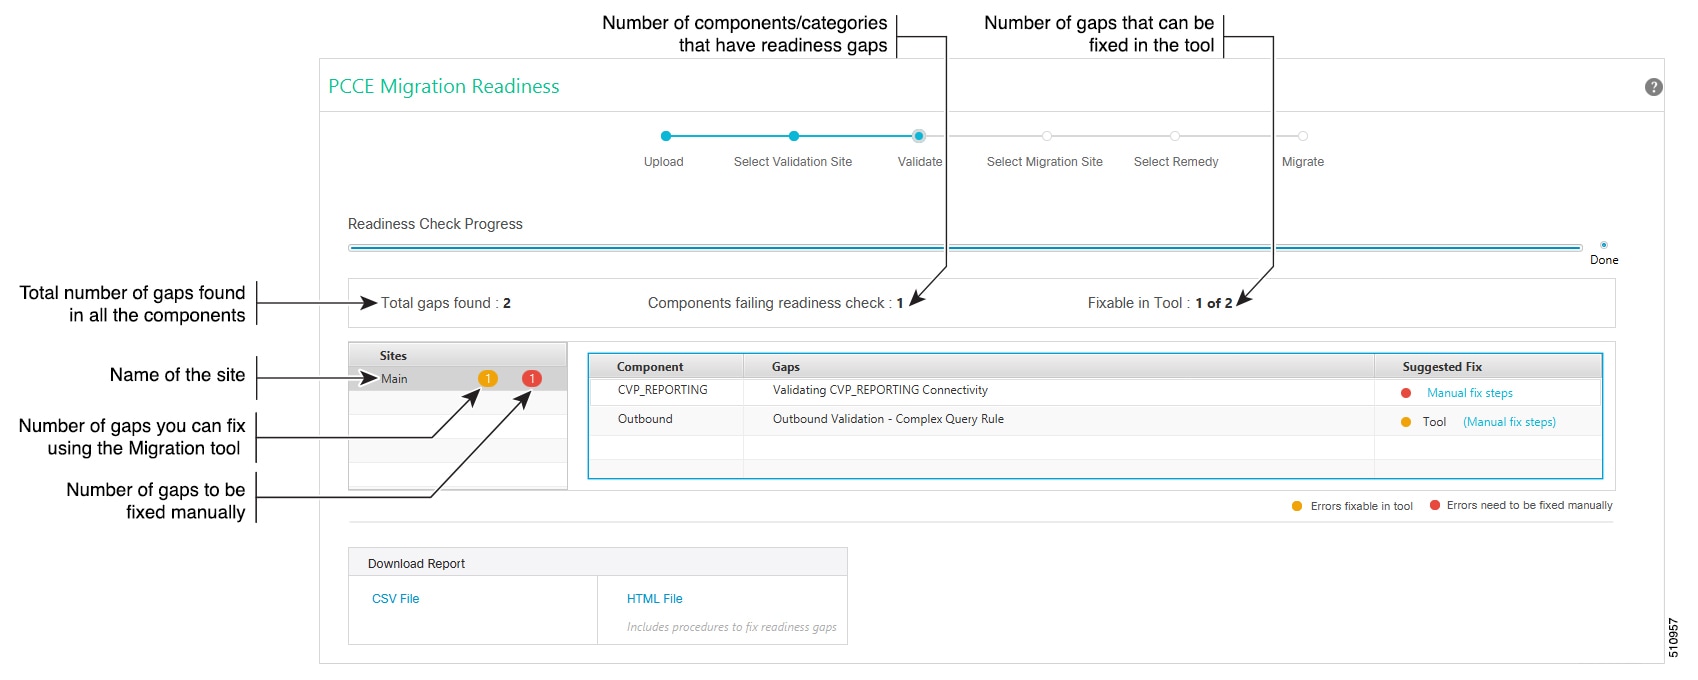
The Migration tool identifies the sites from the uploaded inventory file and then displays options to run the readiness checks. A readiness dashboard shows all gaps identified in the selected site(s), categorizing them in to fixable in the Migration tool and fixable via CCE tools such as Configuration Manager, Cisco Finesse, CVP Operation Console and so on. A detailed HTML report is also available for download, which you can review offline. The report contains a list of all the readiness checks, including those that have passed.

For those gaps identified as fixable in the Migration tool, remedial options are presented in the tool after you select the site(s) for migration. Select your options in the screens that present remedial options for the Outbound Option campaigns, Cisco Finesse, CVP, and VVB. The options you select are only applied during the subsequent migration phase.

Readiness phase:

In this phase, the tool will validate the Unified CCE system and detect any gaps that could hinder migration to Packaged CCE. It can also evaluate the readiness of sites to be administered through Unified CCE Administration, in a multi-stage site-by-site migration scenario.


Note

If your sites contain CVP servers, a few CVP services are restarted by the Migration tool during migration. For this reason, be sure to migrate within a maintenance window (when the system has diverted the network traffic away from those CVP servers).

Both Readiness and Remedy phases perform read-only operations and will not impact the system performance. You may rerun the tool to evaluate readiness as many times as required.


Remedy phase:

Evaluate the Packaged CCE readiness report and review remedial options (both manual/automated) before you start migrating the system to Packaged CCE.

Migrate phase:

Migrates the system from Unified CCE to Packaged CCE, enabling the administration of the sites from Unified CCE Administration.

Launch the Migration Tool

Follow this procedure to launch the Migration tool. The Migration tool can only be run from the Administration and Data Server VM.

Procedure


Step 1

The PCCE Migration tool is packaged as a zip file called PCCEMigrationTool.zip. Extract the PCCEMigrationTool.zip file to a folder.

Step 2

Ensure the administrator has write permissions to this folder.

Step 3

Launch the migration tool by running the batch file named PCCEMigrationTool.bat as an administrator. To do this, right click the batch file and select “Run as administrator”.

The Migration tool logs are collected under the “logs” folder of the extracted zip file.


What to do next

Follow the on-screen instructions as well as the online help of the tool, to first determine the readiness of the Unified CCE system to move to Packaged CCE, and to migrate the system if you wish to proceed.

Inputs for the Migration Tool

Figure 1. Upload Inventory Screen

The Migration Tool requires you to upload the following files to check if your Unified CCE system is ready to be migrated to Packaged CCE:

  • Inventory Details of the Main and Remote Sites:

    Packaged CCE simplifies administration using Unified CCE Administration based on the concept of "sites" and "peripheral sets" in the Packaged CCE inventory. For this reason, when you migrate to Packaged CCE, it is critical to associate the solution components (such as Finesse, CVP) used in the current Unified CCE system with sites and peripheral sets.

    Peripheral sets are a logical collection of CCE components in Packaged CCE 4000 agent and 12000 agent deployments. The main site can have none or more peripheral sets while a remote site must have at least one peripheral set associated with it. If you are migrating to a Packaged CCE 4000 or 12000 agent deployment, associate the CCE components to the peripheral set in the inventory file you upload.

    You must set up the main site to administer solution components through Unified CCE Administration. Similarly, also set up the remote sites so that your entire solution (the main site and all the remote sites) is managed via Unified CCE Administration.

    Packaged CCE mandates the duplexed setup and requires all core CCE components to be available at all times. For more details, see the Reference Design of your deployment type at Strict Enforcement of Configuration and Capacity Limits in Packaged CCE.

    The Migration tool auto-detects the current deployment type and enables the download of a sample CSV file corresponding to your deployment type. When prompted by the tool, download the template. Based on how you planned to set up the main site and remote site inventory, fill in the details in the CSV file and upload it back to the Migration tool. For details on how to fill the CSV file, see the online help. For details on machine credentials, see Machine Credentials


    Note

    When you fill in the CSV file, ensure that the user name for the AW machine is specified in the UPN format. <UserName>@<DomainName>


  • OAMP configurations file

    If you have added CVP or VVB to the Inventory file (ZIP file), the Migration tool prompts you to upload the OAMP configurations zip file. Follow the procedure at Inputs for the Migration Tool for details on how to export the OAMP configurations from the CVP Operations Console. For more details, see the online help.

  • Deployment Type:

    Packaged CCE validates the VM layout based on the hardware layout type of the solution. The hardware layout type you select is stored in the CCE inventory. The inventory scans run periodically to ensure the VM layout is still compliant with the Reference Design of your deployment type.

    This compliance is especially critical when you switch from the Unified CCE 2000 Agent Deployment type to the Packaged CCE 2000 Agent Deployment type. Packaged CCE will validate your VM layout if your deployment is on M3 or M4 servers. The validations are not very strict if your deployment is on the Cisco UCS C240 M5SX server, Cisco Hyperflex C240 M5SX server, or any specification-based servers.

Upload Inventory File

Procedure


Step 1

Click Download Template to download the CSV file. The template for a 2000 agent deployment type differs from a 4000 or 12000 agent deployment type. The Migration tool auto-detects the current deployment type of the system and allows you to download the sample CSV file corresponding to your deployment type.

Step 2

Fill in the following details in the CSV file and save it:

Column

Description

Required?

Permissible Values

machineName

Unique identifier for the machine

Yes

Name must start with an alphabet. Maximum length is limited to 128 characters. Valid characters are a-z, A-Z, 0-9, dot (.), underscore (_), and hyphen (-).

machineType

Machine Type Enum name

Yes

Mandatory machines are:

  • CCE_ROGGER (applicable only for 2000 and 4000 Agents deployment)

  • CCE_ROUTER and CCE_LOGGER (Applicable for 12000 Agents deployment)

  • CCE_AW

  • CUIC_PUBLISHER

  • CUIC_SUBSCRIBER

  • LIVE_DATA

  • IDS_PUBLISHER

  • IDS_SUBSCRIBER

Optional machines:

  • CCE_PG

  • CVP

  • FINESSE_PRIMARY

  • FINESSE_SECONDARY

  • CM_PUBLISHER

  • CM_SUBSCRIBER

  • HDS

  • ECE (refers to ECE Data Server VM for ECE 400 agents and Services Server VM for ECE 1500 agents)

  • ECE_WEB_SERVER

  • CVP_REPORTING

  • GATEWAYS

  • CVVB

  • CUSP

  • SOCIAL_MINER

  • THIRD_PARTY_

    MULTICHANNEL

publicAddress

Public address

Yes

Valid IP address

connectionInfo

Connection information of the machine

Required for CM_PUBLISHER, FINESSE_PRIMARY, ECE_WEB_SERVER, CVP, CVP_REPORTING, CUSP, GATEWAY, CUIC and LIVE_DATA

Enter the user name and password in the following format:

userName=<user>&password=<password>

For more information on the credentials of each component, see Machine Credentials.

ConnectionInfo is optional if you are configuring FTP for CVP (Media Server).

Append the FTP attributes to the user name and password in the following format:
userName=<user>&password=<password>;
mediaServer=<true or false>&ftpUserName=<ftp_username>
&ftpPassword=<ftp_password>
&ftpPort=<ftp_portnumber>
Note 
  • The sample CSV file that you download from the Migration tool, only has connection info populated for those machine types that require them.

  • Unless explicity called out, do not use the UPN format.

  • The Packaged CCE's CCE Administration console, mandates ampersand (&) or equal sign (=) in user names or passwords. The Migration tool does not have such restrictions.

privateAddress

Private address

Required for ROGGER, ROUTER, LOGGER, and PG

Enter the public IP address or hostname for each machine.

peripheralSetName

Note 

Applicable only to 4000 and 12000 Agent Deployment

Peripheral set name

Required for PG, CUCM, Finesse, CVP

Name can start with an alphabet. Maximum length is limited to 10 characters. Valid characters are a-z, A-Z, 0-9, dot (.), and an underscore (_).

side

Side information

Yes

sideA

sideB

Step 3

Click Upload Inventory file to upload the inventory file. The inventory file should contain the details of all the machines in the deployment grouped into sites (and peripheral sets). The inventory file should also include the details of the external machines that you want to manage through the Unified CCE Administration console.

Step 4

The Migration tool detects the deployment type from the Inventory file. If a 2000 agent deployment type is detected, Step 5 is mandatory.

Step 5

Required only for 2000 Agent deployment. Under the Select the Hardware Layout section, select whether to base your deployment on a M3 or M4 Tested Reference Configuration (TRC) or the M5 server. For more details on TRC and Specification Based servers supported by Packaged CCE, see the Solution Design Guide for Cisco Packaged Contact Center Enterprise at https://www.cisco.com/c/en/us/support/customer-collaboration/packaged-contact-center-enterprise/products-technical-reference-list.html.


Machine Credentials

When you are adding machine details to the CSV file, use the following table to enter the credentials of the machines.

Table 1. Machine Credentials

Machine

Editable Field

AW

Diagnostic Framework Service Username and Password

The credentials must be the same for all CCE machines.

Ensure that the user name for the AW is specified in the UPN format.
<UserName>@<DomainName>

Live Data

Administration Username and Password

Finesse

Administration Username and Password

SocialMiner

Administration Username and Password

ECE Web Server

Application Instance, Partition Administration Username, and Password

Virtualized Voice Browser

Administration Username and Password

CUSP

Administration Username and Password

CUIC Publisher

Administration Username and Password

CVP

Windows Administration Username and Password, FTP Enabled, Anonymous Access, FTP Credentials, and Port

Note 

Ensure that the user is a domain user with local administrative rights on the CVP machine. Add the same user's credentials in the CVP Operations Console (OAMP). Also, assign the user to a user group with the Web Services role (such as the Serviceability Administration User Group).

Gateway

Administration Username and Password

CVP Reporting

Windows Administration Username and Password

IDS Publisher

Administration Username and Password

Unified CM Publisher

AXL Username and Password

Upload Configuration Details of Operations Console

Procedure


To export the configuration from the Operations Console:

  1. From the web browser, enter https://ServerIP:9443/oamp,where Server IP is the IP address or hostname of the machine on which the Operations Console is installed.

  2. In the Username field, enter Administrator, which is the default user account.

  3. In the Password field, enter the password.

  4. On the Operations Console page, click System > Export System Configuration > Export.

  5. Save the CVP-OpsConsole-Backup.zip file.


Readiness Dashboard

After the readiness check is complete, the Migration tool displays the results in the Readiness Dashboard.

Figure 2. Readiness Dashboard

The first panel on top provides a summary of the results allowing you to assess the status quickly. The panel displays the following:

Field

Description

Total Gaps Found

Displays the total number of gaps found in all the components in the Inventory file. If all the components pass the readiness checks, the value is 0 (zero).

Components failing Readiness Check

Displays the number of components that failed the readiness check. If all the components pass the readiness checks, the value is 0 (zero).

Fixable in tool

The number of gaps that can be fixed in the tool. If all the readiness checks have passed, the value is "Not Applicable".

Each row shows the number of gaps you can fix using the Migration tool (in yellow) and the number of gaps you must fix using other appropriate tools such as the Configuration Manager, the Cisco Finesse administration console, and the CVP Operations Console (in red).

You may also fix the gaps the Migration tool indicates in yellow using other tools. For details on how to fix using other tools, click Manual Fix Steps. An HTML file opens in the browser with the error description and step-by-step procedure on how to fix that gap in the other tool.

Gaps the Migration tool indicates in red can only be fixed using other tools. You cannot migrate a site until you fix all manual fix gaps in that site. You can only move to the next phase or explore remedial options if there is at least one site that has passed all readiness checks or has gaps that can only be fixed in the Migration tool.

When you click on the name of a site, the following details of that site are displayed:

Field

Description

Peripheral Set

The peripheral set of the component

Component/Category

The name of the component in which the readiness check failure occurred

Gaps

Details exactly what failed during the readiness check

Suggested Fix

Displays one of the following:
  • Displays,Tool if the error can be fixed using the Migration tool. The Migration Tool allows you to fix this error in the following screens. If you want to fix the error without using the Migration tool, click on (Manual fix steps) for the detailed procedure.

  • Displays,Manual Fix Steps if the error cannot be fixed using the Migration tool. Manual Fix Steps is displayed when a appropriate CCE tool should be used to address the readiness gap. For details on how to fix this error, click on Manual fix steps or download the report to get the recommended procedure to fix the gap.

The third panel allows you to download the complete report on all the readiness gaps and, if applicable, the procedures to manually fix the gaps using other appropriate CCE tools in the CSV format or the HTML format. To download the report, click on the CSV file or HTML file links. The report downloads to your system.

Migration

Peripherals migrated to Packaged CCE are managed only using Unified CCE Administration console (and not the Configuration Manager). If you rollback to Unified CCE, the peripherals' administration via Configuration Manager is reenabled when the rollback is complete.

Once the Cisco Finesse servers are migrated to Packaged CCE, the Cisco Finesse Administration (cfAdmin) does not allow you to create, update, or delete the reason codes. You can, however, view the reason code in cfAdmin. Updates to existing reason codes or new reason codes created via Unified CCE Administration is automatically orchestrated or synched with all the Finesse servers to avoid duplication and manual errors.

Rollback in Case of Failures

In case of rollback to Unified CCE or rollback due to a remote site's failed migration, do the following to switch back to Unified CCE:

  1. In the Unified CCE Administration Console, go to Infrastructure > Inventory.

  2. In Deployment Type page, select your Unified CCE deployment type from the Deployment Type drop-down list.

If you rollback a site containing Finesse servers, the administration of reason code labels via CfAdmin is reenabled.

The migration tool performs a reimage of the CVP servers when the sites are migrated to disassociate the servers from OAMP and associate them with CCE Administration Console.Do the following to associate the CVP servers back to the CVP Operations Console.

Procedure


Step 1

On each CVP server, run the reimage.bat file.

Step 2

Click Save & Deploy to save the changes in the CVP Operations Console database and also apply the changes to the device.


What to do next

In case the above steps fail, follow these procedures to associate the servers manually instead of rollback of the entire site:

Reimage the CVP Server

Follow these steps to reimage the CVP Server.

Procedure


Step 1

Stop the CVP Call Server, CVP VXML Server, and CVP WebServiceManager services.

Step 2

Run reimage.bat from C:/Cisco/CVP/bin/TAC.

Step 3

Go to Unified CCE Administration > Overview > Infrastructure Settings > Inventory

Step 4

From the Inventory page, click Sync on the CVP Server to initiate full-sync.

Step 5

When the Sync Status is In Sync, restart the CVP Server.


What to do next

When you reimage CVP, also reimage the CVP Reporting Server. For details, see Reimage the CVP Reporting Server

Reimage the CVP Reporting Server

Follow these steps to reimage CVP Reporting server.

Procedure


Step 1

Stop the CVP Call server and CVP WebServiceManager services.

Step 2

Run reimage.bat from C:/Cisco/CVP/bin/TAC.

Step 3

Go to Unified CCE Administration > Overview > Infrastructure Settings > Inventory

Step 4

From the Inventory page, click Sync on the CVP Reporting server to initiate full-sync.

Step 5

When the Sync Status is In Sync, restart the CVP Reporting server.


Remote Site Rollback from Packaged CCE

Migration of a remote site to Packaged CCE may fail in the Migration phase. In such cases, the deployment type does not automatically revert to the Unified CCE deployment type, although other necessary configurations remain unaffected by your migration attempt.

If a remote site's migration failed, use this API to remove any residue and/or references of that site from the system inventory. After the remote site is removed, you can administer this site's peripherals using the Configuration Manager.

You can roll back all transactions made in the system during your attempt to migrate a remote site using this API. This API does not remove any underlying peripherals, so that you may continue to manage the peripherals the way you managed them before the migration attempt (using the Configuration Manager or other associated tools).

URL

https://<aw-fqdn>/unifiedconfig/config/datacenter/{remoteSiteName}/detach

Parameters

  • FQDN of AW: Fully Qualified Domain Name of the AW machine

  • remoteSiteName: The name of the remote site that has to be deleted from the system.

REST Response

Following are the possible REST responses that can be received:

  • 200 OK (Success)

    The rollback was successful.

  • 404 Not Found

    The remote site entry in the URL is not valid.

  • 403 forbidden

    Roll back of the remote site is prohibited because the migration of the main site to Packaged CCE was successful.