Digital Channels

Task Flow to Enable Digital Channels

To enable digital channels in your contact center solution, follow this task flow:

License Requirements

The digital channel features of Cisco SocialMiner are available in the Premium license version of Cisco Unified Contact Center Express. The feature availability in Unified CCX is based on the type of license for Cisco Unified Contact Center Express.

Install Cisco SocialMiner

SocialMiner is installed as an appliance using the Cisco Unified Operating System (Unified OS). The operating system and the SocialMiner application are installed together using a similar installation process as other Unified OS products such as Cisco Unified Communications Manager and Cisco Unified Intelligence Center.

SocialMiner operates on a VMware Virtual Machine (VM) on hardware that is running a VMware Host Server. SocialMiner currently supports installation of only a single node (as opposed to a duplexed or redundant system).

Perform the following steps to install SocialMiner:

Procedure


Step 1

Create a virtual machine using a VMware Open Virtual Format template.

Step 2

Use the latest OVA template for the fresh installation of SocialMiner release. Go to https://software.cisco.com/download/home/270569179 and download this template.

Step 3

When deploying the template, select either a large or a small deployment from the drop-down list.

Step 4

Mount the SocialMiner DVD or ISO file to the virtual machine and set the virtual machine to boot from the SocialMiner DVD. The installation wizard opens. Use Tab to navigate between elements and then press the space bar or the Enter key to select the element and proceed.

Step 5

Perform the media check when prompted.

Step 6

Follow the instructions on the screen and select Yes or Continue.

Step 7

Use the arrow keys to highlight the correct time zone and then use Tab to navigate to the OK button. Press Enter to proceed.

Step 8

Provide the network information for SocialMiner . You must provide valid hostname with matching IP address. The system confirms that the hostname matches the IP address later in the installation process.

Step 9

Select Yes to provide DNS Client Settings for SocialMiner . Provide DNS servers and the domain. Select OK. DNS configuration is mandatory.

Step 10

Provide an Administrator ID and password. This credential is for platform (Unified OS) administration.

Step 11

Provide information about your organization. This information generates the security (SSL) certificates for this server.

Step 12

You must provide at least one NTP Server. Enter the NTP host address and select OK.

Step 13

Provide a security password.

Step 14

Provide a username and password for the SocialMiner administrator. You can import additional SocialMiner users from Active Directory after the SocialMiner installation is complete.

Step 15

The confirmation window opens. You can select Back to change settings or OK to complete the installation. Installation can take up to 2 hours. The server may reboot to complete the installation steps. If you install from an ISO file and see the virtual machine message, to "Disconnect anyway (and override the lock)?", select Yes. A sign-in prompt appears on the server console.

Step 16

After the installation is complete, perform the one-time setup tasks like:

  1. If your system is installed behind a firewall, set up an HTTP proxy so that feeds can access sites on the Internet.

  2. Configure Active Directory so that more users can sign in.

  3. If you want to use Cisco Unified Intelligence Center, set up the reporting user so that the reporting tool can access the reporting database.


Configure SocialMiner in Unified CCX

SocialMiner Configuration

Use the SocialMiner Configuration web page to configure Cisco SocialMiner . You must configure information only on this web page to enable the chat and email features.

Cisco Unified CCX does not support custom configuration changes on the chat and email campaigns or feeds from the SocialMiner administration page.

This option is available only with the Unified CCX Premium license package. The email feature support for Unified CCX depends on the SocialMiner version. For information about feature compatibility, see the Unified CCX Compatibility related information, located at: https://www.cisco.com/c/en/us/support/customer-collaboration/unified-contact-center-express/products-device-support-tables-list.html.

Any configuration change using SocialMiner Administration interface is not supported.


Note

On a high availability setup, after the Add to Cluster operation is successful, the following message is displayed:

In case of HA, configure the SocialMiner on secondary node after adding to cluster in the secondary node.


Every time you navigate to this page, the state of feeds, campaigns, and notifications rules are validated for chat and email, the connectivity to the email server is checked, and the web page shows the appropriate status. Icons are used as visual indicators to display the status of each service. Hover the cursor over the icon to display a tool tip that explains the reason for the current state. As part of validation, Unified CCX checks the following:

  • SocialMiner XMPP Service

    Unified CCX checks the connectivity with the SocialMiner XMPP service. If the XMPP service is down, the following message is displayed:

    SocialMiner XMPP service is not accessible. Check the logs for more details.

  • SocialMiner Runtime Service

    Unified CCX checks the connectivity with the SocialMiner runtime service. If the runtime service is down, the following message is displayed:

    SocialMiner runtime service is not accessible. Check the logs for more details.

  • SocialMiner Tomcat Service

    Unified CCX checks the connectivity with the SocialMiner Tomcat service. If the Tomcat service is down, the following message is displayed:

    Unable to communicate to the SocialMiner on the IP address(Hostname) provided. Please verify whether SocialMiner is running on this IP address(Hostname) or check the network connection and make sure that SocialMiner is reachable from CCX.

  • SocialMiner Status

    • Feeds

      Unified CCX validates the status of the intended chat and email feeds in SocialMiner .

      • —All the feeds are operating normally in SocialMiner .

      • —One or more feeds mismatches with SocialMiner .

      • —All the feeds are missing in SocialMiner .

    • Campaigns

      Unified CCX validates the status of the intended chat and email campaigns in SocialMiner .

      • —All the campaigns are operating normally in SocialMiner .

      • —One or more campaigns mismatches with SocialMiner .

      • —All the campaigns are missing in SocialMiner .

    • Notifications

      Unified CCX validates the status of the intended chat and email notifications in SocialMiner .

      • —All the notifications are operating normally in SocialMiner .

      • —One or more notifications mismatches with SocialMiner . This status icon also appears after configuration, when no chat and email contact is injected yet. The status will change to normal after successful injection of chat and email contact.

      • —All the notifications are missing in SocialMiner .

    • Email Server

      Unified CCX checks the connectivity with the email server.

      • —Email server is operating normally.

      • Not Configured—Channel provider is not configured.

      • Not Applicable—The following are the reasons for the current state:

        • Cisco Finesse is not active.

        • Email CSQ is not configured.

        • SocialMiner version is incompatible with the Email feature.

      • —Unable to reach the email server.

Procedure

Step 1

From the Unified CCX Administration menu bar, choose Subsystems > Chat > CCP Configuration OR Subsystems > Chat and Email > SocialMiner Configuration as applicable.

The Configuration web page appears.

Note 

Ensure that SocialMiner certificate is uploaded to the Unified CCX Tomcat trust store using the Cisco Unified OS Administration interface. You can also use the set cert import trust tomcat CLI.

Unified CCX and SocialMiner servers must have DNS entries. SocialMiner must be accessible to Unified CCX by hostname. If the entries are not valid, an error is displayed.

Step 2

Complete or modify the following fields for SocialMiner :

Field

Description

IP Address / Host Name

IP address or fully qualified domain name of the SocialMiner server. For example, 192.168.1.5 or host.example.com.

User Name

Username of the SocialMiner administrator.

Password

Password of the SocialMiner administrator.

Note 

When the SocialMiner application password is reset, ensure that the new password is first updated in Unified CCX and then reset the password in SocialMiner . This prevents the account getting locked due to the authentication attempts from Unified CCX with old password.

Step 3

Click Save to save the changes.

Note 
  • If you see an error message, click Save to re-create feeds, campaigns, and notifications for chat and email in SocialMiner.

  • When Unified CCX hostname is changed or when a new Unified CCX node is added, theSocialMiner Configurations must be saved again. This enables the change to take effect to re-create all the notifications for email and chat in SocialMiner .

  • The Classic Chat Web Forms will not work if the feed is deleted from SocialMiner Administration interface. To revive this chat web form, save the SocialMiner configuration in the Unified CCX. A new Feed ID will then be created in the Unified CCX database. Download the Classic Chat Web Form code snippet again from the Chat Widget section of UCCX Administration and redeploy on the website to reflect the new feed ID.


Mail Server Configuration

Use the Mail Server Configuration web page to configure the mail server. This web page is available only when Cisco Finesse is enabled on the Unified CCX node with a premium license.

Before you begin

  • Execute the commands set-service msExchangeIMAP4 -startuptype automatic, and start-service msExchangeIMAP4 on Microsoft Exchange to set the Microsoft Exchange IMAP4 service to start automatically.

  • Execute the command set-service msExchangeIMAP4BE -startuptype automatic, and execute start-service msExchangeIMAP4BE (for Microsoft Exchange 2013) on Microsoft Exchange to set the Microsoft Exchange IMAP4 Back End service to start automatically.

    These commands are specific to the local Exchange server.

  • Create accounts and email addresses to be used for CSQ creation.

Procedure


Step 1

From the Unified CCX Administration menu bar, choose Subsystems > Chat and Email > Mail Server Configuration.

The Mail Server Configuration web page opens.
Step 2

Complete or modify the following fields for the mail server:

Field

Description

Mail Server Settings

Mail Server

Choose the mail server that is required to be configured from the listed options:

  • MS Exchange Server / Office 365

  • Gmail

IMAP Folder Structure

Drafts Folder Name

The name of the drafts folder of the respective mail server that is configured.

Outbox Folder Name

The name of the outbox folder of the MS Exchange Server / Office 365 email server that is configured.

This folder is not available for the Gmail mail server.

Sent Items Folder Name

The name of the sent items folder of the respective mail server that is configured.

Note 

All the listed mail servers have the default folder names prepopulated for all the IMAP folders in English locale. These folder names can be edited and can have custom values.

Incoming (Secure IMAP)

Host Name

Fully qualified domain name (FQDN) of the incoming (IMAP) server. Do not enter the IP address.

Port Number

Port number that is used to connect to the IMAP server.

The default port number is 993.

Outgoing (Secure SMTP)

Host Name

FQDN of the outgoing (SMTP) server. Do not enter the IP address.

Port Number

Port number that is used to connect to the SMTP server.

The default port number is 587.

Proxy Settings

SOCKS

Choose the Enable or Disable radio button to use socks proxy for Mail Server connectivity. By default the Disable option is selected and Enable option is disabled. To enable SOCKS, configure SOCKS Proxy in System Parameters page.

Description

Description of the mail server.

Step 3

Click Update to save the changes.


Contact Service Queues

Before you begin

Procedure


Step 1

From the Unified CCX Administration menu bar, choose Subsystems > Chat > Contact Service Queues or Subsystems > Chat and Email > Contact Service Queues as applicable.

The Contact Service Queues (CSQs) web page opens and displays the information for existing chat and email CSQs if any.

Step 2

To add a new chat or email CSQ, click the Add New icon that appears in the toolbar in the upper left corner of the window or the Add New button that appears at the bottom of the window.

The Contact Service Queue Configuration web page opens.

Step 3

Specify the following fields:

Field Name

Description

CSQ Name

Name for the CSQ.

Resource Selection Criteria

Resource selection criteria chosen for the chat CSQ.

  • Longest Available—Selects the agent who has been in the Available state for the longest amount of time.

  • Most Skilled—Used for expert agent chat distribution. Selects the agent with the highest total competency level. The total competency level is determined by adding the agent's competency levels for each assigned skill that is also assigned to the CSQ.

    • Example 1: If Agent1 is assigned Skill1(5), Skill2(6), and Skill3(7) and CSQ1 specifies Skill1(min=1) and Skill3(min=1), the total competency level for Agent1 for CSQ1 is 12.

    • Example 2: If Agent1 is assigned Skill1(5) and Skill2(6), and Skill3(7) and CSQ1 specifies Skill1(min=1), only, the total competency level for Agent1 for CSQ1 is 5.

Note 
  • To change the competence level for an already configured agent, change the agent skill level and save the CSQ.

  • If two agents score equal in the primary selection criteria, the agent who was updated first will be assigned to the incoming chat until the maximum chats threshold is reached.

Table 1. CSQ Type—Chat

Field Name

Description

CSQ Type

Choose Chat.

Table 2. CSQ Type—Email

Field Name

Description

CSQ Type

Choose Email.

Note 

You can create up to 100 email CSQs. If you exceed the limit, the following error is displayed:

Cisco Unified CCX supports a maximum of 100 Email CSQs. Exceeded maximum limit for Email CSQs.

Mail Server

Fully Qualified Domain Name (FQDN) of email server. This field displays the mail server that you configured.

Email username

The email address to which emails are sent or retrieved.

Email password

Password for the email account.

Inbox Folder Name

The folder from which emails will be fetched and queued for the Contact Service Queue.

Default value = Inbox folder of the selected mail server type

Drafts Folder Name

The folder to which SocialMiner will save the drafts of the emails when agent composes the response.

Outbox Folder Name

The folder to which SocialMiner will move the response email to, when it is being sent.

This folder does not exist for Gmail mail server. The email response being sent will be moved to the drafts folder.

Sent Items Folder Name

The folder to which SocialMiner will move the response email to, when it is sent.

Test Configuration

This checks the following:

  • Connectivity from SocialMiner to the configured mail server by using the user credentials that is specified in the Contact Service Queue (CSQ) configuration.

  • Presence of and permissions to the Inbox, Drafts, Outbox, and Sent Items folder for the user, that is specified in the CSQ configuration.

Poll Interval (Seconds)

Frequency in seconds to fetch emails from the server.

Default value = 600, Range = 10 to 86400

Snapshot Age (Minutes)

Specify the time in minutes from when the emails are to be fetched.

Default value = 120, Range = 10 to 43200

For example, if you specify 120 minutes, this field fetches the emails from the last two hours.

Step 4

Click Next.

The Skill Association for CSQ area opens with the newly assigned CSQ name.

Note 

You can create up to 100 email CSQs. If you exceed the limit, the following error is displayed:

Cisco Unified CCX supports a maximum of 100 Email CSQs. Exceeded maximum limit for Email CSQs.
Step 5

From the Available Skills list, choose the skill that you want to associate with the CSQ by clicking it. To choose more than one skill, press the Ctrl key and click the skills that you want to associate with the CSQ.

Step 6

Click Add.

The chosen skill and the minimum competence level for that skill are displayed in the right pane under the heading Selected.

Note 

To delete the skill from the Skills Required list, click the Delete icon next to Minimum Competence.

Step 7

Specify a minimum competence level for the skill assigned to the CSQ.

Step 8

To view the associated resources, click Show Resources.

Step 9

Click Save to save the changes for the CSQ.

The newly added CSQ appears in the List of CSQs.

Note 

You can create up to 100 email CSQs. If you exceed the limit, the following error is displayed:

Cisco Unified CCX supports a maximum of 100 Email CSQs. Exceeded maximum limit for Email CSQs.

You can sort the CSQs by title by clicking the CSQ Name header and by type by clicking the CSQ Type header.

Step 10

To view the printable report and associated resources, click the CSQ for which you want to view the report and the associated resources and then click Open Printable Report.

Note 

To delete a CSQ, click the CSQ that you want to delete and then click Delete. A warning dialog box appears, asking you to confirm the deletion. To delete, click OK.

Caution 

Deletion of the chat CSQ affects the associated chat web forms. After deleting, modify the corresponding chat web form configurations and generate the HTML code.


Predefined Responses

You can add a maximum of ten chat predefined responses. These predefined responses are available to all the agents in the Manage Chats Gadget on the Finesse Agent Desktop. Use the Predefined Responses page to configure and manage chat predefined responses. To access the predefined responses, choose Subsystems > Chat > Predefined Responses.


Note

Predefined responses are not available in the Cisco Agent Desktop. They are only available with the Finesse Agent Desktop.


Predefined Responses

Using this web page, you can add, modify, and delete predefined responses.

You can add a maximum of 500 chat and email predefined responses in total.


Note

To modify an existing predefined response, click the Title header for the predefined response that you want to modify. To delete an existing predefined response, click the Delete icon for the predefined response that you want to delete.


Procedure

Step 1

From the Unified CCX Administration menu bar, choose Subsystems > Chat > Predefined Responses.

The Predefined Responses web page opens, displaying the information for existing responses, if any.

Step 2

Click the Add New icon that is displayed in the toolbar in the upper left corner of the window or the Add New button that is displayed at the bottom of the window to create a new response.

The Predefined Response Configuration web page opens.

Step 3

Specify the following information:

Field

Description

Title

Unique identifier of the predefined response.

Note 

The special characters angle brackets (< >), parentheses ( ( ) ), double quotation marks (" "), and pipe symbol (|) are not allowed.

Type

Types of media.

Response Description

Description for the predefined response.

  • Rich Text Editor is available to create an HTML-based email predefined response.

    Use the supported tags as provided in the Rich Text Editor for formatting purpose.

  • Plain Text Editor is available to create a chat predefined response.

Note 

The special characters angle brackets (< >), parentheses ( ( ) ), double quotation marks (" "), and pipe symbol (|) are not allowed in Plain Text Editor for Chat Predefines Response.

The maximum characters limit for predefined response for chat and email is 1500.

In case of email, rich text is supported and includes the HTML tag characters for representing rich text.

Tags

Choose a tag for the predefined response.

  • Global for all CSQs: The predefined response is available to all the agents that are associated with all the CSQs.

  • Customize (Maximum 10 CSQs): The predefined response is available only to the agents that are associated with the selected CSQs.

    If you choose this option, select the CSQs from the Available CSQs pane, and then click the left arrow to assign them.

Note 

Predefined responses can be used only for emails sent in HTML format and not plain text.

Step 4

Click Save.

The newly added predefined response appears with the assigned tags in the List of Predefined Responses.

You can sort the predefined responses by title by clicking the Title header and by type by clicking the Type header.


Wrap-Up Reasons

To access the Wrap-Up Reasons, choose Subsystems > Chat and Email > Wrap-Up Reasons.

Use the Wrap-Up Reasons page to configure and manage Wrap-Up categories and reasons for chat and email Contact Service Queues (CSQs). Use the Ellipsis (...) to view all the Wrap-Up Reasons that are added for each Wrap-Up category.

Wrap-Up Reasons

Using this web page, you can add, modify, and delete the Wrap-Up Reasons.

You can add a maximum of 25 Wrap-Up categories. If you exceed the maximum number of categories, the Add New button is disabled.

Procedure

Step 1

From the Unified CCX Administration menu bar, choose Subsystems > Chat and Email > Wrap-Up Reasons.

The Wrap-Up Reasons web page opens, displaying the information for existing Wrap-Up Reasons, if any.
Step 2

Click the Add New icon or the Add New button that is displayed in the toolbar in the upper left corner of the window.

The Wrap-Up Reasons web page opens.

Step 3

Specify the following information:

Field

Description

Category

Specify the name for the Wrap-Up category. Allows up to 40 characters.

Wrap-Up Reasons

Enter the Wrap-Up Reasons for the specified category. Allows up to 40 characters. Click the Add button to add up to 25 Wrap-Up Reasons for each category.

Tags

Choose a tag for the Wrap-Up category.

  • Global for all CSQs: The Wrap-Up reason is available to all the agents that are associated with all the CSQs.

  • Customize : The Wrap-Up reason is available only to the agents that are associated with the selected CSQs.

    If you choose this option, select the CSQs from the Available CSQs pane, and then click the left arrow to assign them.

Note 

You can associate a maximum of 10 Wrap-Up categories to a CSQ.

Step 4

Click Save.

The newly added Wrap-Up category appears with the assigned tags in the List of Wrap-Up Reasons.

Note 

When you reskill or modify a category, the logged in agents can apply Wrap-Up Reasons from the updated list of categories for the new non-voice contacts only.


Email Signatures

To access the email signatures, choose Subsystems > Chat and Email > Email Signatures.

Email Signature Configuration

Using this web page, you can add, modify, and delete email signatures.


Note

To modify an existing email signature, click the Title header for the email signature that you want to modify. To delete an existing email signature, click the Delete icon for the email signature that you want to delete.


Procedure

Step 1

From the Unified CCX Administration menu bar, choose Subsystems > Chat and Email > Email Signatures.

The Email Signature web page opens, displaying the list of existing email signatures that are configured, if any.

Step 2

Click the Add New icon that is displayed in the toolbar in the upper left corner of the window or the Add New button that is displayed at the bottom of the window to create a new email signature.

The Email Signature Configuration web page opens.

Step 3

Specify the following information:

Field

Description

Name

Unique name of the email signature.

Note 

The name can have a maximum of 100 characters.

Content

The email signature content.

Note 

The email signature can have a maximum of 1500 characters. You may format the text of the email signature content, add images, add URL to the email signature, and add the Agent alias information.

The Agent alias variable appears by default when any new email signature is created. If it is removed from the email signature it can be reinserted at the cursor location in the email signature by clicking on the Agent alias variable icon.

When there is no alias configured for an agent, the Agent ID is presented in the email signature by default.

Tags

Choose a tag for the email signature.

  • Global for all CSQs: The email signature is available to all the agents that are associated with all the CSQs.

  • Customize (Maximum 10 CSQs): The email signature is available only to the agents that are associated with the selected CSQs.

    If you choose this option, select the CSQs from the Available CSQs pane, and then click the left arrow to assign them.

Note 

Only one (1) email signature can be tagged as Global for all CSQs.

A CSQ can be tagged with only one (1) email signature.

When an email is responded by an agent of a particular CSQ, the system will check if there is any email signature tagged for that CSQ. The different scenarios are:
  • If there is an email signature tagged to a CSQ, that will be appended in the email response.

  • If there is no CSQ specific email signature, the global signature is appended in the email response.

  • If there is no global email signature and no customized email signature tagged to the CSQ then there will be no email signature appended in the email response.

Step 4

Click Save.

The newly added email signature appears with the assigned tags in the List of Email Signatures.

You can sort the email signatures by title by clicking the Title header and by type by clicking the Type header.


Channel Parameters

Use the Channel Parameters web page to configure channel parameters.

Procedure


Step 1

From the Unified CCX Administration menu bar, choose Subsystems > Chat > Channel Parameters OR Subsystems > Chat and Email > Channel Parameters as applicable.

The Channel Parameters Configuration web page opens.

Step 2

Use this web page to specify or modify the following fields for channel parameters:

Field

Description

No Answer Timeout (Seconds)

The time for an agent to respond to the chat request after which, the chat request is routed back to the chat queue and for the chat toaster to fade out.

This is applicable for the Group Chat request also. However when the chat is not accepted, the chat request is not routed back to the chat queue.

Note 

When you use Chrome or Firefox, the browser overrides the chat toaster notification to fade out in 20 seconds, even if it is configured to a higher value.

Join Timeout (Minutes)

The time after which the customer initiates a chat and, if an agent is not joined, the customer gets a message as per the configuration in the Chat Web Form Configuration page. But an agent can still join the chat after this timeout. The default timeout is one minute and the maximum timeout value allowed is 60 minutes.

Inactivity Timeout (Minutes)

The customer inactivity time after which, the system ends the chat. This timeout is on the customer side only.

The agent gets a message "You are alone in the chat room. Click End to close the chat interface.".

The customer gets a message "Warning: the server connection was lost due to an inactivity timeout or connection failure.".

Inactivity timeout may also apply to contacts in queue that have not yet been accepted by agents. This scenario occurs only when the Join Timeout value is greater than the Inactivity Timeout value.

The customer then gets a message "Sorry, the chat service is currently not available. Please try again later."

Offer Chat Contact When On Voice Call

Click Yes if agents are allowed to handle a chat session during a voice call.

Note 

This setting takes effect when the agent ends the current voice call.

Chats are presented to agents even when they go off-hook or busy in a Non ICD call.

Offer Voice Call When On Chat

Click Yes if agents are allowed to handle a voice call during a chat session.

Note 

This setting takes effect when the agent receives a new incoming chat.

Direct/Consult Transfer to an IPCC extension is an exception. Even if agents are busy on a chat they would still get calls that are transferred to their extension directly.

Maximum Number Of Chat Sessions Per Agent

Number of chat sessions (ranging from 1 to 5) that an agent is allowed to handle.

This includes the group chat sessions also.

Note 

This option is available only if Finesse service is activated. For Cisco Agent Desktop, the value is set to 1.

Maximum Number Of Email Sessions Per Agent

Number of Email sessions (ranging from 1 to 5) that an agent is allowed to handle.

Note 

This option is available only if Finesse service is activated.

Sticky Email Timeout (Hours)

Specify the amount of time for which an email message waits in a specific agent CSQ.

Sticky email routing (Last-agent email routing) is a mechanism to route an email message to the agent who handled the last leg of the email conversation.

When an email message, which is part of an ongoing conversation, comes in and the agent who handled the last leg of the conversation is not available, then the email does not wait indefinitely in that agent queue. After the configured time expires, the email message is placed on the intended CSQ to be handled by any available agent.

Note 

Last-agent email routing is not available if the customer changes the subject line of the email message.

Default = 4 hours, Range = 1 to 120 hours.

Note 

This option is available only if Finesse service is activated.

Step 3

Click Save to save the changes for the channel parameters.

Note 

If any of the above parameters are changed during the call center operation, the updated values are not applied to the existing contacts in the system. The changed parameters will affect only the new contacts coming into the system.


Chat Widgets

Use the Chat Widgets section to configure chat widgets and generate HTML code that can be hosted on the customer website. You can configure and manage the following types of chat widgets:

  • Classic Chat

  • Bubble Chat

To access the Chat Widgets page, choose Subsystems > Chat and Email > Chat Widgets.

Chat Widgets Page

The Chat Widgets page lists the following information and options for each chat widget:

Field

Description

Name

Name of the chat widget.

Description

A brief description.

Widget Type

Configured as a Classic Chat or a Bubble Chat.

Post Chat Rating

Whether post chat rating is available for the chat.

Note 

Post chat rating can be configured for only bubble chat.

Code

Option to generate the web form code for the configured chat widget.

Delete

Option to delete the chat widget.

Chat Widget Configuration

You can add, modify, and delete chat widgets. You can schedule business hours in the chat widget for week days, custom business days, and holidays. You can also configure an off hours message.


Note

  • To modify an existing chat widget, click the chat widget name.

  • To delete an existing chat widget, click the delete icon. Ensure that the widget is removed from the customer website before deleting the widget.

  • The chat schedule is supported only for classic chat.


You can configure or modify Classic Chat and Bubble Chat widgets.

Bubble Chat Widget
To configure a Bubble Chat widget, complete the following steps:
Procedure

Step 1

From the Unified CCX Administration menu bar, choose Subsystems > Chat and Email > Chat Widgets.

The Chat Widgets web page opens, displaying the information for existing chat widgets.

Note 

During the widget configuration, live preview of the widget is possible.

Step 2

Click the Add New icon or the Add New button.

The Bubble Chat Configuration web page opens. The administrator can configure the messages and labels in any language.

Step 3

In the Widget Details area, specify the following information:

Field

Description

Name

Unique name of the chat widget.

Description

Chat widget description.

Step 4

Click Next.

The Attributes - Branding and Identity area appears.
Step 5

Specify the following information:

Section

Field

Description

Font Family

Typeface

Font family used for the text in the Chat Web Form and chat window.

Note 

The default font family is Helvetica. You can change the font family by either selecting from the drop-down or entering a new name. If the selected font family is not available in the system where from the AppAdmin page is accessed, it will display an alert message. When you enter a new name, ensure that the correct spelling (case sensitive) is used. The system does not indicate if you enter an invalid name. Ensure that you use commonly available fonts so as to make it easy for the customers to view the information. Before proceeding, the administrator should ensure that the selected font family is applied on the Chat Web Form preview.

Chat Title

Text

Title text displayed on the Chat Web Form and Chat Bubble.

Text Color

Color of the title text.

Button

Text

Text displayed on the button of the Chat Web Form.

Color

Color of the button.

Text Color

Color of the text displayed on the button.

Agent Message

Message Color

Background color of the agent message in the chat window.

Text Color

Color of the agent message text.

Note 
As you specify the attributes, the Preview area dynamically displays the preview of the Chat Web Form and chat window based on your specifications.
Step 6

Click Next.

The Attributes - Post Chat Rating areas open.
Step 7

Specify the following information:

Field

Description

Enable Post Chat Rating

If this checkbox is checked, post-chat rating will be available for the chat.

The Post Chat Rating column in the Chat Widgets page indicates whether post chat rating is available for a chat.

Label

Text asking the user to rate the chat experience.

Button Text

Text displayed on the button that is used to submit the rating.

Note 
The Preview area dynamically displays the preview of the rating window based on the information specified.
Step 8

Click Next.

The User Form Fields and Problem Statements and CSQ Mapping areas open.
Step 9

In the User Form Fields area, specify the following information:

  1. In Context Service Fieldsets, enter valid fieldsets for configuring the chat widgets.

    Note 
    • Fieldsets are comma separated strings in the format fieldset1, fieldset2 (for example: cisco.base.pod,cisco.ccx.pod). You can enter a maximum number of 10 fieldsets.

    • All the selected User Form Fields except Name and Email must be part of the fieldsets specified, otherwise Context Service operations for chat would fail.

    • To perform Context Service Lookup Customer for chat, the Email field is mandatory in the chat form.

  2. From Available Fields, select the desired fields and move it to Selected Fields.

    To create new fields in addition to the list of available fields, click Add Custom Field, enter the name of the new custom field in the pop-up window and click OK. The new custom field appears in the list of Selected Fields.

Step 10

In the Add problem Statement CSQ mapping area, specify the following information:

  1. In Problem Statement Caption, enter the label for the problem statement field.

  2. Enter the problem statement for the Chat Web Form and map the problem statement with an existing chat CSQ from the CSQ List drop-down list.

To add more problem statements and associate them with a chat CSQ, click Add More. Click the delete icon for a problem statement to delete that problem statement.

Step 11

Click Next. The Chat Messages area appears.

Step 12

Specify the following information:

Section

Field

Description

Initialization Messages

Widget Wait Message

Message displayed to the customer when the customer submits the chat form and waits for an agent to join.

Join Time-out Message

Message displayed on the chat window to inform the customer that no agent is available currently.

In Progress Messages

Text for Text Typing Box

Text directing the customer to enter a message. This text appears in the text box of the chat window where the customer enters messages to be sent.

Agent Joined Message

Message displayed on the chat window to inform the customer that an agent has joined. This message has the Agent Alias or Agent ID. Two text boxes are available to enter text to be displayed before and after the Agent Alias or Agent ID.

Agent Left Message

Message displayed on the chat window to inform the customer that the agent has left. This message will have the Agent Alias or Agent ID. Two text boxes are available to enter text to be displayed before and after the Agent Alias or Agent ID.

End Messages

Close Chat Confirmation Pop-up message

Message displayed on the pop-up window to confirm if the customer wants to close the chat.

In the Negative Response and Positive Response text boxes, enter the text to be displayed on the pop-up window buttons that allows the user to either accept or reject the chat closure.

Close Chat and Download Transcript Confirmation Pop-up Message

Message displayed on the pop-up window to inform the customer that the chat has ended and the chat transcript is ready for download.

In the Negative Response and Positive Response text boxes, enter the text appears on the pop-up window buttons that allows the user to either accept or reject the transcript download.

Error Messages

System Error Message

Message displayed to the customer when the chat service is not available to handle chat requests.

Connectivity Error Message

Message displayed to the customer when the chat is disconnected due to inactivity timeout or connection failure.

Step 13

Click Next. The Service Hours page appears.

Step 14

In Service Hours area, select one of the following options to configure the business hours.

  • Default (24 hours x 7 days)- Select this option if the contact center works 24 hours and 7 days in a week.
  • Select Calendar- Select this option to configure the business hours. Calendar drop-down is enabled for this selection.
Step 15

Select the desired calendar from the drop-down list and click the View link to preview the calendar details such as Business Hours, Custom Business Days, and Holidays.

Step 16

In the Messages area, specifiy the following:

Field Description

Holiday

Message displayed on the bubble chat widget to inform the customer during a holiday.

Off Hours

Message displayed on the bubble chat widget to inform the customer during non-working hours.

Label

Heading text displayed on the bubble chat widget to inform the customer for the business hours details.

Step 17

In the Label for Days of Week area, specify a label for each day of the week.

Step 18

Click Finish.

The code for the Chat Web Form is generated and appears onscreen.
Note 
The Chat Web Form that is generated uses JavaScript. You must access this Chat Web Form from a JavaScript enabled browser.
Step 19

Click Save Code to File to save the generated code. Click Back to Chat Widgets to go to the main Chat Widgets page.

Note 

You can also generate the code from the main Chat Widgets page by clicking on the Code icon against the chat widget name. The generated code appears on a pop-up window. To save this code, click Save Code to File.


Teams

Choose Subsystems > Chat > Teams from the Unified CCXAdministration menu bar to access this configuration area.


Note

The team configuration for chat is the same as it is for voice.


Change the Desktop Layout

The default desktop layout xml must be modified to enable the digital channel gadgets on the Finesse desktop. You must contact the contact center Administrator to make changes to the desktop layout xml.

Procedure


Step 1

Sign in to Cisco Finesse Administration Console.

Step 2

In the Desktop Layout tab, you can define the layout of the Finesse desktop .

Step 3

In the Finesse Layout XML area, make changes to the XML as required to include the new gadgets.

Step 4

Click Save. Finesse validates the XML file to ensure that it is a valid XML syntax and confirms to the Finesse schema.

Note 

For more details on managing the Finesse desktop layout see, Manage Desktop Layout section in Cisco Unified Contact Center Express Administration and Operations Guide.


Configuration of Proxy Based on Deployment of SocialMiner

Proxy settings must be configured for Cisco SocialMiner based on the deployment type.

Procedure


Step 1

Sign in to Cisco Unified Contact Center Express Administration.

Step 2

Navigate to System Menu > System Parameters to modify the fields in Proxy Parameters.

Note 

For more details on the System Parameters see, System Parameters section in Cisco Unified Contact Center Express Administration and Operations Guide.


Certificate Management

The digital channel gadgets to load on the web browsers in the Unified CCX system must have the self-signed and certificate authority (CA) signed certificates. The same signing authority must sign the certificates of SocialMiner and Unified CCX. For more information on how to trust the self-signed certificates and to obtain and upload CA certificates see, Cisco Unified Contact Center Express Administration and Operations Guide.

Procedure


Step 1

Sign in to Cisco Unified OS Administration using your administrator password.

Step 2

Navigate to Security > Certificate Management menu.

Step 3

You can use the Find controls to filter the certificate list.

Step 4

Click the file name of the certificate. The Certificate Configuration window appears and perform the necessary actions.


Unified CCX Agent Email

As part of the Unified CCX Premium license, Unified CCX supports agent email with Finesse.

Administrators should edit the Cisco Finesse Desktop Layout to enable the gadgets to appear on the agent desktop.

As part of the Premium license, Unified CCX agents can service customer email requests using the Agent Email gadget in Cisco Finesse

For more information, see "Cisco Finesse" section in the Cisco Unified Contact Center Express Administration and Operations Guide at :

https://www.cisco.com/c/en/us/support/customer-collaboration/unified-contact-center-express/products-maintenance-guides-list.html.

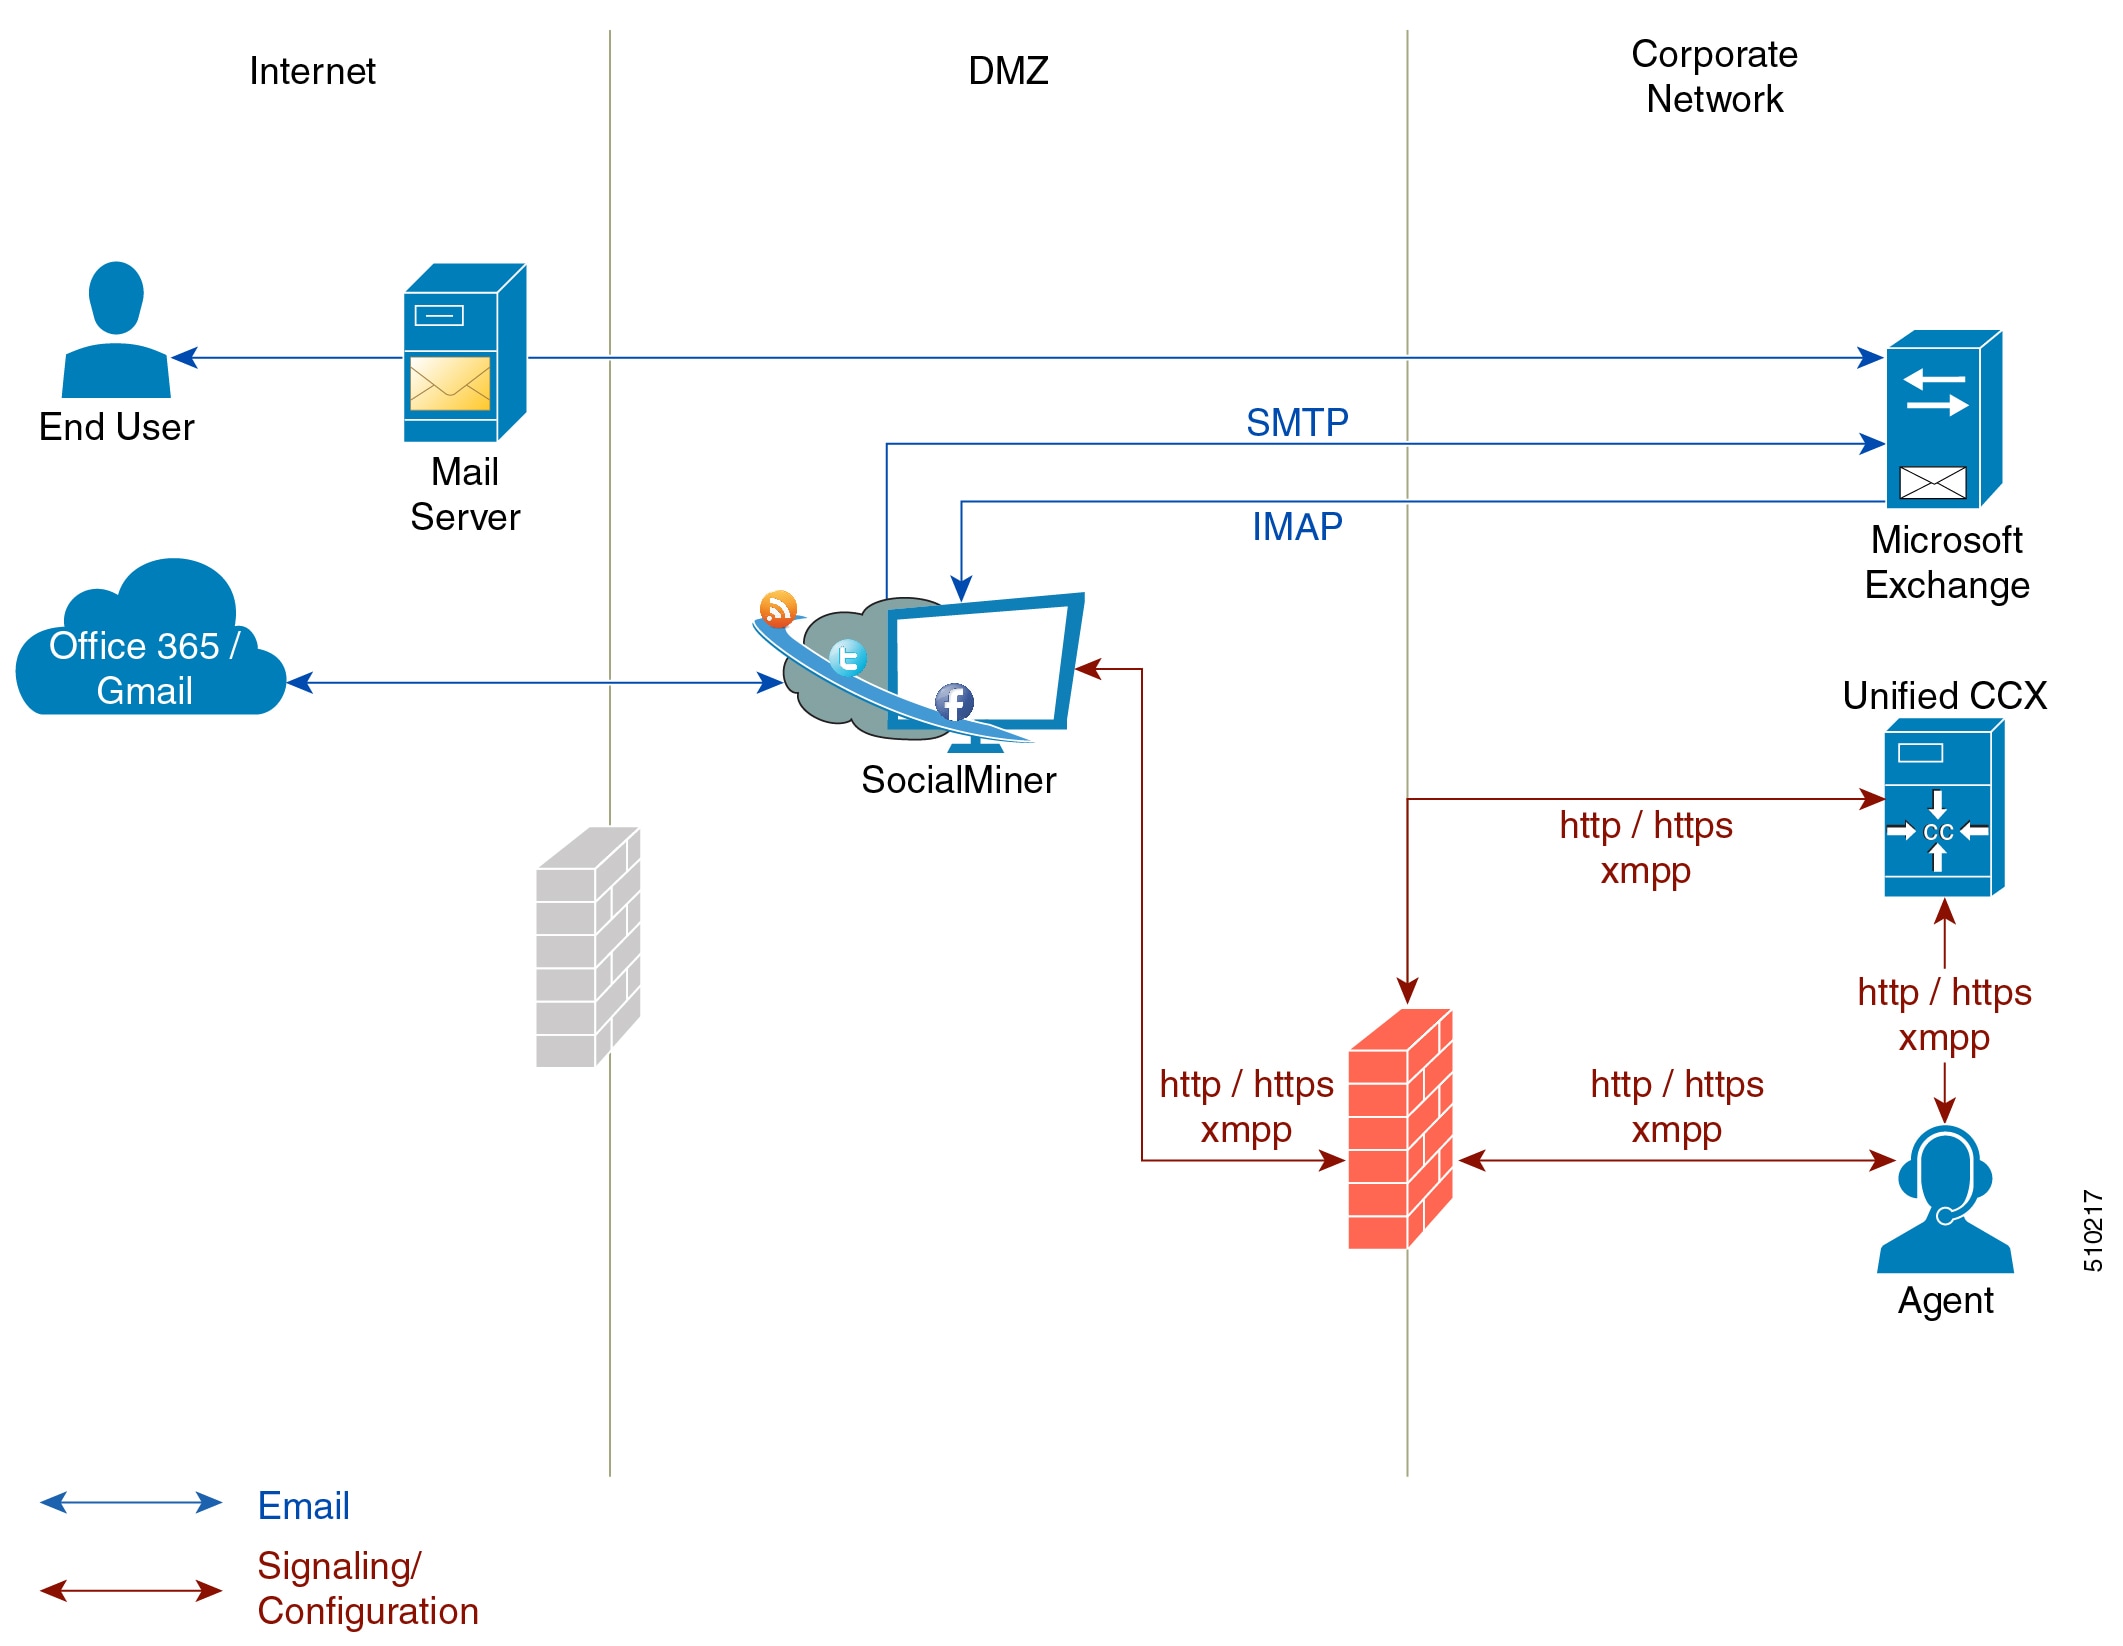
The Agent Email feature requires the deployment of Cisco SocialMiner to handle the email and relay the contact requests from a mail server. One SocialMiner deployment can serve only one Unified CCX deployment (single-node or high-availability deployment), and vice versa.

The Agent Email feature requires the use of an external mail server (Microsoft Exchange 2010, 2013, 2016, 2019, Office 365, and Gmail are supported ). This mail server is not provided, installed, or configured as part of the Unified CCX installation. To communicate with the Exchange Server, SocialMiner uses secure IMAP (for message retrieval) and secure SMTP (for message sending). On the Exchange Server, enable IMAP (SMTP is enabled by default).

For more information about enabling IMAP, see section "Mail Server Configuration" in Cisco Unified Contact Center Express Administration and Operations Guide at:

https://www.cisco.com/c/en/us/support/customer-collaboration/unified-contact-center-express/products-maintenance-guides-list.html.

For details on the integration of Unified CCX with SocialMiner for Agent Email see, https://www.cisco.com/c/en/us/support/docs/customer-collaboration/socialminer/200892-Integrate-UCCX-with-SocialMiner-for-Agen.html.

For details on the unsupported configurations in integration of Unified CCX with SocialMiner see, https://www.cisco.com/c/en/us/support/docs/customer-collaboration/unified-contact-center-express/211530-Unsupported-configurations-for-UCCX-and.html.

Figure 1. Customer Web Site in DMZ


Unified CCX allows email contacts to be routed to agents based on the email addresses to which they are sent by the customers. Cisco Finesse Agent Email feature uses skill-based routing and last-agent email routing.

Separate CSQs are required for Email. You must associate each Email CSQ with a separate email account on the mail server. This account must be dedicated to the Email CSQ feature and must not be used for other purposes. Agent association with Email CSQs is configured in the same manner as Voice CSQs by assigning skills and competency levels to the CSQ.

Cisco Finesse provides a common chat and email state, separate from voice state. Blending ensures that agents can handle voice, email, and chat contacts from the same desktop.

When an agent replies to the customer's email, the reply email address depends on the information in the customer's email. If the customer's email contains the Reply-to header field, the agent's reply email is sent to the email address in the Reply-to header. If the Reply-to header is missing in the customer's email, the agent's reply email is sent to the From address in the customer's email. The sender address of agent's email is the email account associated with the Email CSQ on which the reply is being sent. Upon requeue, Unified CCX ensures that the response is sent with the email address of the requeued CSQ as the From address.

Agent Email Features

The following table describes the email features that are available with the premium package.

Finesse Email is available with Microsoft Exchange, Office 365, and Gmail with a Cisco SocialMiner configured within Unified CCX.

Table 3. Agent Email Features Available with Premium Package

Feature

Fully integrated with Cisco Finesse agent desktop.

Visible alert. Email alert along with pending email count.

Toaster Notification. Toaster Notification. Agent receives a notification when a new email is received when the Cisco Finesse Desktop is not active.

Auto accept email. Incoming emails are automatically presented to the agent without any explicit accept (button click).

Email contact handling Agents can be configured to handle up to five email contacts.

Requeue email. Agent can re-queue an email to another CSQ.

Reply To Header. If the Reply To header is present, the agent's response is sent to that address. Otherwise, it uses the From address of that email to respond.

Reply To, Reply All, Cc, Bcc, Forward Agent can respond to the from email address, edit the To field, can add email addresses in the Cc and Bcc fields to mark copy or blind copy to other contacts, do a Reply All to all the email addresses existing in the email, and Forward the email to any other email address.

Save drafts. The system periodically saves the email drafts.

Discard email. Discards email from the agent desktop, but mails are not deleted from the server.

Rich Text. Rich text is available for the email body, predefined response and email signature.

Predefined Responses. Administrator can configure up to 500 Predefined Responses across chat and email. These Predefined Responses can be tagged Global or with up to 10 CSQ tags.

Email Signatures Administrator can configure email signatures for the Global CSQs and Multiple CSQs. The email signatures can be tagged Global or Custom to upto 10 CSQs.

Wrap-Up Reasons. Agents can select Wrap-Up Reasons for the emails handled by them. A maximum number of five (5) Wrap-Up Reasons can be selected. Wrap-Up Reasons are available only after the Administrator has configured the same for the CSQs.

Attachments. Supported.

Attachment size limit

The total attachment file size limit in an agent's reply has been increased to 20MB.

The size limit of a single file attachment has been increased to 10 MB.

The total size limit of attachments in the incoming email from the customer has been increased to 20 MB.

Historical Reports. See the Cisco Unified CCX Reporting Guide for more details on the reports at, http://www.cisco.com/c/en/us/support/customer-collaboration/unified-contact-center-express/products-user-guide-list.html.

Email Live Data Reports. See the Cisco Unified CCX Reporting Guide for more details on the reports at, http://www.cisco.com/c/en/us/support/customer-collaboration/unified-contact-center-express/products-user-guide-list.html.

Microsoft Exchange. Supported email service.

This must be purchased separately by customer.

Context Service Integration for Chat and Email. Integrates the Context Service with chat and email to store Cisco Contact Center customer data with rich contextual information about interactions, thus resulting in a seamless omni channel experience.

Dedicated or Blended email agents. Agents can be configured to handle emails only or both, email and chat.

Email Routing.

  • Last Agent Email Routing where an attempt is made to route an email to the last agent who handled the email last.

  • Skill and competency based routing that applies to new emails or when Last Agent Email Routing expires.

  • The longest available or most skilled agent selection algorithm.

Dynamic reskilling. Changes to CSQ skills and competencies and agent skills and competencies are applied immediately. Emails that are currently being worked by the agents are not affected.

High Availability (HA) failover. HA is supported in Unified CCX. Upon Unified CCX failover, all emails in the system are automatically requeued and rerouted. Emails are presented to the agents after the failover.

Keyboard shortcuts. Use the keyboard shortcuts for easy access to the Cisco Finesse agent and supervisor desktop features. The keyboard shortcuts are available for both agent and supervisor.

Email Enhancements

Few of the email enhancements that are available with the Cisco Finesse Email feature:
  • The agent can add and modify the To, Cc, and Bcc recipients in the email reply and forward.

  • The agent has an option to click Reply All to send the email response to all the recipients that were initially included in the email

  • The agent has an option to forward the email to any other recipient.

  • The agent can send and receive email messages with attachments of maximum size upto 20 MB.

  • An administrator can create, modify, delete and view email signatures.

    The email signature gets automatically appended to the email response that is sent by the agent.

    In the email signature, the agent details are automatically inserted based on the Agent Alias system variable value. If the Agent Alias value is available, the alias name is inserted. If the alias name is not available, then the Agent ID is inserted in the signature.

    The email signatures are configured and tagged as Global for all CSQs or Customize for selected CSQs. Following are the important criteria while tagging an email signature to CSQs:
    • A CSQ can be tagged with only one email signature.

    • Only one email signature can be tagged as Global for all CSQs.

    • If there are no email signatures configured for a CSQ, there will not be any email signature that gets appended to the email sent by the contact center agent.

Unified CCX Web Chat

As part of the Premium offering, Unified CCX agents can service customer chat requests using the Agent Web Chat Application from the Cisco Agent Desktop or through a standalone browser.

As stated in the overview section, this feature requires a Cisco SocialMiner deployment to accept and relay the contact requests from a customer website. One SocialMiner deployment can serve only one Unified CCX deployment (single node or high availability deployment).

An audio alert is played when the agent receives a new chat request or when there is a new message on an inactive chat session tab. With multiple chat session tabs, the selected chat session tab is considered as active. All other chat session tabs are considered as inactive.

Web Chat Features

The following table describes the web chat features in addition to the chat features that are available in premium package.

Table 4. Web Chat Features Available in Premium Package

Feature

Agent Alias. During a chat session, the customer sees the alias that has been configured for the agent by the administrator. The Agent Alias now supports the character, Space.

Auto chat reject. If no agent is available, the chat request is rejected.

Chat Timeouts. Session timeouts for chat inactivity and maximum wait period.

Typing Indicator. The agent or customer can see when the customer or agent is typing a message.

Audible Alert. An alert is played when the agent receives a new chat request or when there is a new message on an inactive chat session tab.

Toaster Notification. When the Cisco Finesse Desktop session is inactive, the agent receives a toaster notification for a new chat.

Multiple Chat Sessions. Administrators can configure up to a maximum of five concurrent chat sessions per agent.

Predefined Responses. Administrator can configure up to 500 Predefined Responses across chat and email. These Predefined Responses can be tagged Global or with up to 10 CSQ tags.

Chat Transcript. Chat transcripts can be downloaded by the customer after the chat session. Administrators can login to SocialMiner to retrieve chat transcripts.

Live Data and Historical Reports.

See the Cisco Unified Contact Center Express Reporting Guide available at:

http://www.cisco.com/c/en/us/support/customer-collaboration/unified-contact-center-express/products-user-guide-list.html

Supervisor Reports. Team report for CSQ and agents. Agent statistics and CSQ statistics for chat.

Integrated Web Chat General System Features with Cisco Finesse Agent Desktop.

Multiple skills per chat agent. Multiple skills can be assigned to agents handling chat.

Blended voice, chat, and email agents. Agents can be configured for blended voice, chat, and email.

Offer voice calls when on chat. Agents can be offered voice calls when on voice chat.

Offer chat when on voice calls. Agents can be offered chat when on voice calls.

Wrap-Up Reasons. Agent can apply a maximum of five (5) Wrap-Up Reasons to the chats.

Group Chat. Agent can involve another agent in an ongoing chat session to support the customer.

Dedicated chat agents. Agents can be configured to handle only chat.

Separate voice and non-voice state model . Ability to set the Agent State for Voice, Email and Chat.

Visual Customization of the Chat Form. A customizable customer chat form.

Business Hours Setting. The Administrator can configure a schedule for the chat web form based on the business days, working hours, and holidays.

Web Chat Routing. Supports Agent skill and competency-based routing.

  • Longest available

  • Most skilled

  • Agent skill based routing

Dynamic reskilling. Changes to CSQ skills and competencies and agent skills and competencies are applied immediately.

Conditional routing. Web Chat is queued to the appropriate CSQ based on the problem statement selected by the customer.

Rerouting the chats that were not accepted. If the allocated agent does not accept chat within the allowed time limit, the contact is presented to another agent.

Customizable queuing messages. Customizable messages.

High Availability (HA) failover. With Unified CCX in HA, failure of the active server can be detected and the nonvoice subsystem can automatically fail over from the active to the standby server. However, SocialMiner is not supported in HA.

Plain text. Only plaintext chat and predefined responses are supported.

Group Chat

The group chat feature is used when the agent would like to involve another agent in an ongoing chat session to support the customer. This can be used for seeking further information or support for the ongoing chat. A group chat enables an agent to:
  • Send a chat invite to an available agent of the selected CSQ.

  • Enter the summary of the ongoing chat for the other agent. This helps the agent to understand the background of the ongoing chat.

  • Accept or decline the incoming group chat invitation.

Few reporting considerations for the Group Chat feature are:
  • The Historical reports, Chat Agent Details Report and Chat Agent Summary Report reflect the chat session information handled by the agents only after the contact is ended.

  • In Chat Agent Details Historical report (in the case of group chat):

    • Chat Routed CSQ column will show the name of the csq to which the chat contact was initially injected to the agents.

    • Chat Type column will show as 'group chat' for the agents whoever is involved in a group chat.

  • Contacts Abandoned count will now also include the Group Chat contacts which the customer ends while it is being offered to the second Agent​.

Manage Digital Channels

Manage Chat and Email Gadget

The following figure shows the Cisco Finesse Manage Chat and Email gadget for agents.


The Manage Chat and Email gadget allows you to manage chat and email contacts. Chat and email contacts that are assigned to you appear in tabs on the left. You can click each individual tab to view and reply to the contact.

Chat contacts are denoted by a chat icon. The following information appears on each chat contact tab:

  • Customer name

  • Total chat time: Indicates the duration of the chat session.

  • New message indicator: If you receive a message on a chat contact that is not your current contact, the tab flashes for a few seconds. A number appears on the tab that indicates how many messages the customer sent since you last replied.

Email contacts are denoted by an envelope icon. When you begin typing a reply to the email contact, a pencil icon appears on the envelope icon.

The following information appears on each email contact tab:

  • Customer information: Customer email address, customer name (if available).

  • Email timestamp: Indicates the time that the system received the email contact.

  • Email subject: Hovering the mouse over the email tab, displays the subject of the email in a tool tip.


Note

When you accept a chat request, Finesse automatically switches to the Manage Chat and Email tab and the chat becomes the active contact. When you are assigned an email contact, Finesse does not switch tabs and the contact does not become the active contact. An orange icon appears on the envelope icon in the Chat and Email Control gadget.


Email Features

Let us see how we can now use the available email features. You can also see the Cisco Finesse Agent and Supervisor Desktop User Guide for Cisco Unified Contact Center Express for more information.

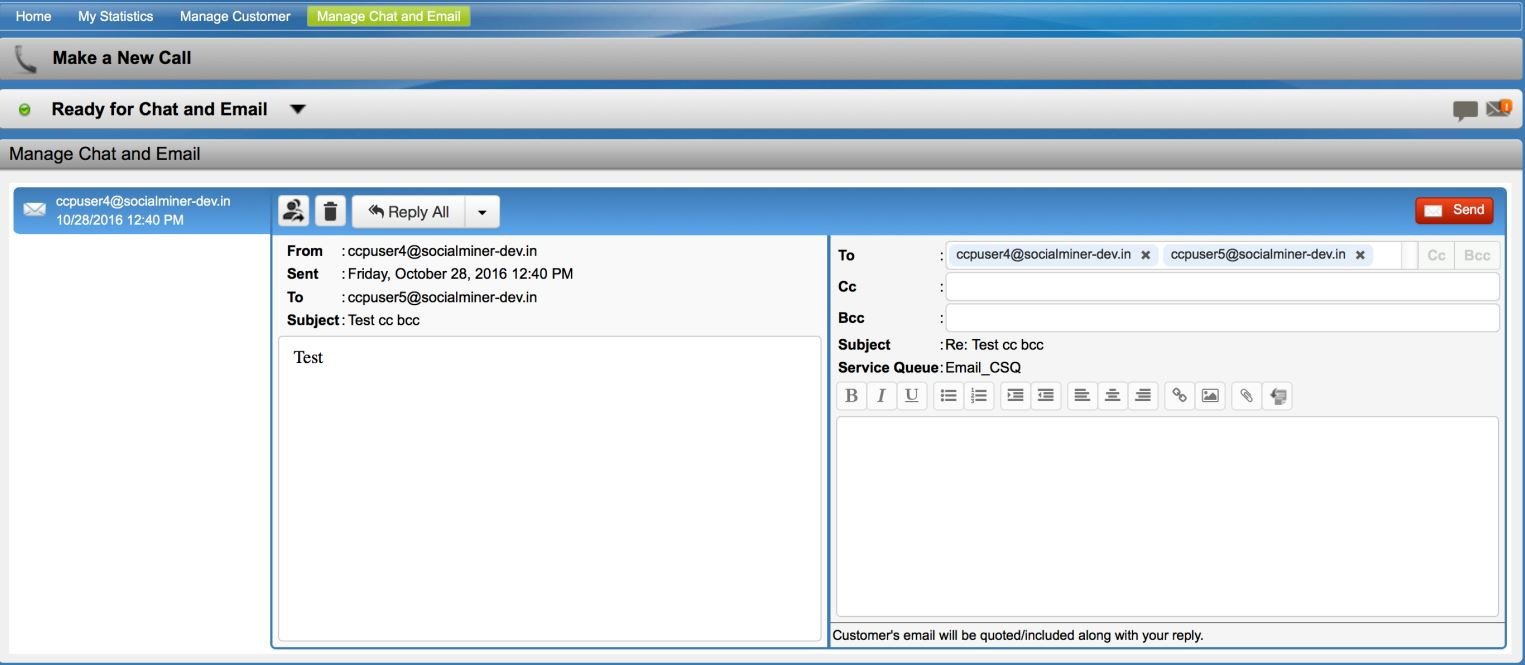
Email Reply Panel

The following figure shows the Email Reply panel of the Manage Chat and Email gadget.

Figure 2. Email Reply panel


The customer email appears on the left. The area where you type the response appears on the right. After you begin your reply, Finesse automatically saves a draft of your message every 3 minutes.


Note

Do not close or reload the browser when you reply to an email or when the email loads on the desktop.


The Email Reply panel provides the following functionality:

Button

Name

Description

Requeue

Requeues an email contact to a new CSQ.

Discard

Discards an email.

Reply

Sends a reply to the email address of the customer.

Reply All

Sends a reply to the customer and to all other email addresses that the customer had included in the original email.

Cc

Allows to include other email addresses to send a copy of the email to them.

Bcc

Allows to include other email addresses to send a blind copy of the email to them.

Forward

Forwards an email to other email addresses.

Bold

Applies bold to the selected text.

Italic

Applies italics to the selected text.

Underline

Underlines the selected text.

Bulleted List

Inserts a bulleted list.

Numbered List

Inserts a numbered list.

Increase Indent

Increases the space between the left margin and the content.

Decrease Indent

Decreases the space between the left margin and the content.

Align Left

Aligns the content to the left margin.

Align Center

Aligns the content to the center.

Align Right

Aligns the content to the right margin.

Add/Edit Link

Creates or modifies a hyperlink of the selected text to the specified URL.

Add Image

Adds a specified image to your reply.

Attach a file

Attaches a specified file to the email reply.

Predefined Response

Inserts a predefined response into your reply.

Note 

If a Predefined Response is not configured, this button is disabled.

If the email is in Plain text format, this button is disabled.

Send

Sends your reply to the customer.

Accept an Email

You must be in Ready state to receive an email contact. When an email contact arrives on your desktop, it is automatically accepted and an orange icon appears on the envelope on the Chat and Email Control gadget.

To view the contact, you must click the Manage Chat and Email tab to go to the Manage Chat and Email gadget. If you have more than one contact assigned to you, in the left panel, click the tab for the email contact that you want to view.

Reply to an Email Contact

Procedure


Step 1

On the Manage Chat and Email gadget, click the email contact that you want to reply to.

Step 2

Click Reply/Reply All to reply to the email address of the customer or to any other email addresses copied by the customer. You may modify or add email addresses in the To field. You may also include Cc and Bcc to include more email addresses by clicking the respective fields.

The maximum number of recipients allowed per field (To, Cc, and Bcc) is 20.

Step 3

In the Email Response area, enter your response to the customer.

You can use a predefined response or type your own response.
Note 

If you select a predefined response, the existing content of the reply is overwritten by the predefined response text.

If Email Signature is configured, it gets appended at the end of the email before sending. The Email Signature is not visible to the sender.

Step 4

When you are finished, click Send.


Forward an Email

Procedure


Step 1

On the Manage Chat and Email gadget, click the email contact that you want to reply to.

Step 2

Click Forward to forward an email to add any other email addresses that you may want to send the email to. You may modify or add email addresses in the To field. You may also include Cc and Bcc to include more email addresses by clicking the respective fields.

Note 
  • The maximum number of recipients allowed per field (To, Cc, and Bcc) is 20.

  • No further attachments can be attached to the outgoing emails.

  • The Reply To field is modified appropriately such that the recipient of the forwarded email can reply to the original sender of the email directly and not send it back to the Contact Center.

  • The Requeue is disabled if you have initiated to forward the email. You must cancel Forward and click Reply/Reply All to requeue the email.

Step 3

In the Email Response area, enter your response.

You can use a predefined response or type your own response.

Note 

If you select a predefined response, the existing content of the reply is overwritten by the predefined response text.

If Email Signature is configured, it gets appended at the end of the email before sending. The Email Signature is not visible to the sender.

Step 4

When you are finished, click Send.


Download Customer Attachments

If a customer includes attachments in an email, the attachment file names appear under the subject of the email. Finesse imposes the following limitations on customer email attachments:

  • The total number of attachments cannot exceed 10.


    Note

    Images within the body of the email are counted as attachments.


  • The size of a single attachment cannot exceed 2 MB.

  • The total size of all attachments cannot exceed 5 MB.

Procedure


Step 1

Click the filename of the attachment you want to open or download.

You are prompted to open or save the file.
Step 2

Choose whether to open the file or save the file to your computer.

Step 3

Repeat Step 1 and Step 2 for each attachment that you want to open or download.


Add a Hyperlink to an Email

Procedure


Step 1

In your email reply, select the text that you want to turn into a hyperlink.

Step 2

Click the Add/Edit Link button.

A dialog box opens where you can enter the URL for the link.
Step 3

In the Please enter a URL to insert box, enter the URL for the link.

Step 4

Click OK.


Add an Image to an Email

Procedure


Step 1

Place your cursor where you want the image to appear.

Step 2

Click the Add Image button.

A dialog box opens where you can enter a URL for the image.
Step 3

In the Please enter a URL for the image box, enter the URL.

Step 4

Click OK.

The image appears inline in the email response.

You can also copy and paste an image into the email response.


Add an Attachment to an Email

You can add up to 10 attachments to an email reply to a customer. The following limitations apply:

  • The size of a single attachment must not exceed 2 MB.

  • The total size of all attachments must not exceed 5 MB.

Procedure


Step 1

Click the Attach a file button.

Step 2

Navigate to the file that you want to send attach to the email.

Step 3

Click Open.

The file appears below the reply panel.
Step 4

Repeat Step 1 and Step 2 for each file that you want to attach (up to 10).

If you want to remove an attachment, click the X to the right of the attachment filename.


Requeue an Email Contact

You can transfer an email contact either to the same Contact Service Queue (CSQ) or to any other CSQ. After you initiate the transfer from the agent desktop, the contacts are requeued to a CSQ.

Last-agent email routing is a mechanism to route an email message to the agent who handled the last leg of the email conversation. When you requeue an email, the email will be routed to the intended CSQ to be handled by any available agent, and last-agent email routing is not considered.


Note

The requeued contact is not requeued to the same agent even if the agent is part of the requeued CSQ and is available to handle more contacts.


When you sign out or refresh your browser, any contacts that you were handling are disassociated from you and requeued to the same CSQ.

Procedure


Step 1

Select the email that you want to requeue.

Step 2

Click the Requeue button.

The list of CSQs is displayed with a search option.
Step 3

Type the CSQ name into the Search box to bring up the desired CSQ or select the CSQ from the list.

A confirmation dialog appears.
Step 4

Click Yes to confirm.


The email is removed from the multiple email sessions panel and requeued to the selected CSQ.

Discard an Email Message

Procedure


Step 1

On the Manage Chat and Email gadget, select the email message that you want to discard.

Step 2

Click the Discard button on the Email Reply panel.

You are prompted to discard the selected email message.

Step 3

Click Yes to confirm.

The email message is discarded.

When you discard an unsent reply that has attachments, the draft of the reply from the agent and the attachments are deleted. The original email message sent by the email contact remains in the Exchange mailbox.


Chat Features

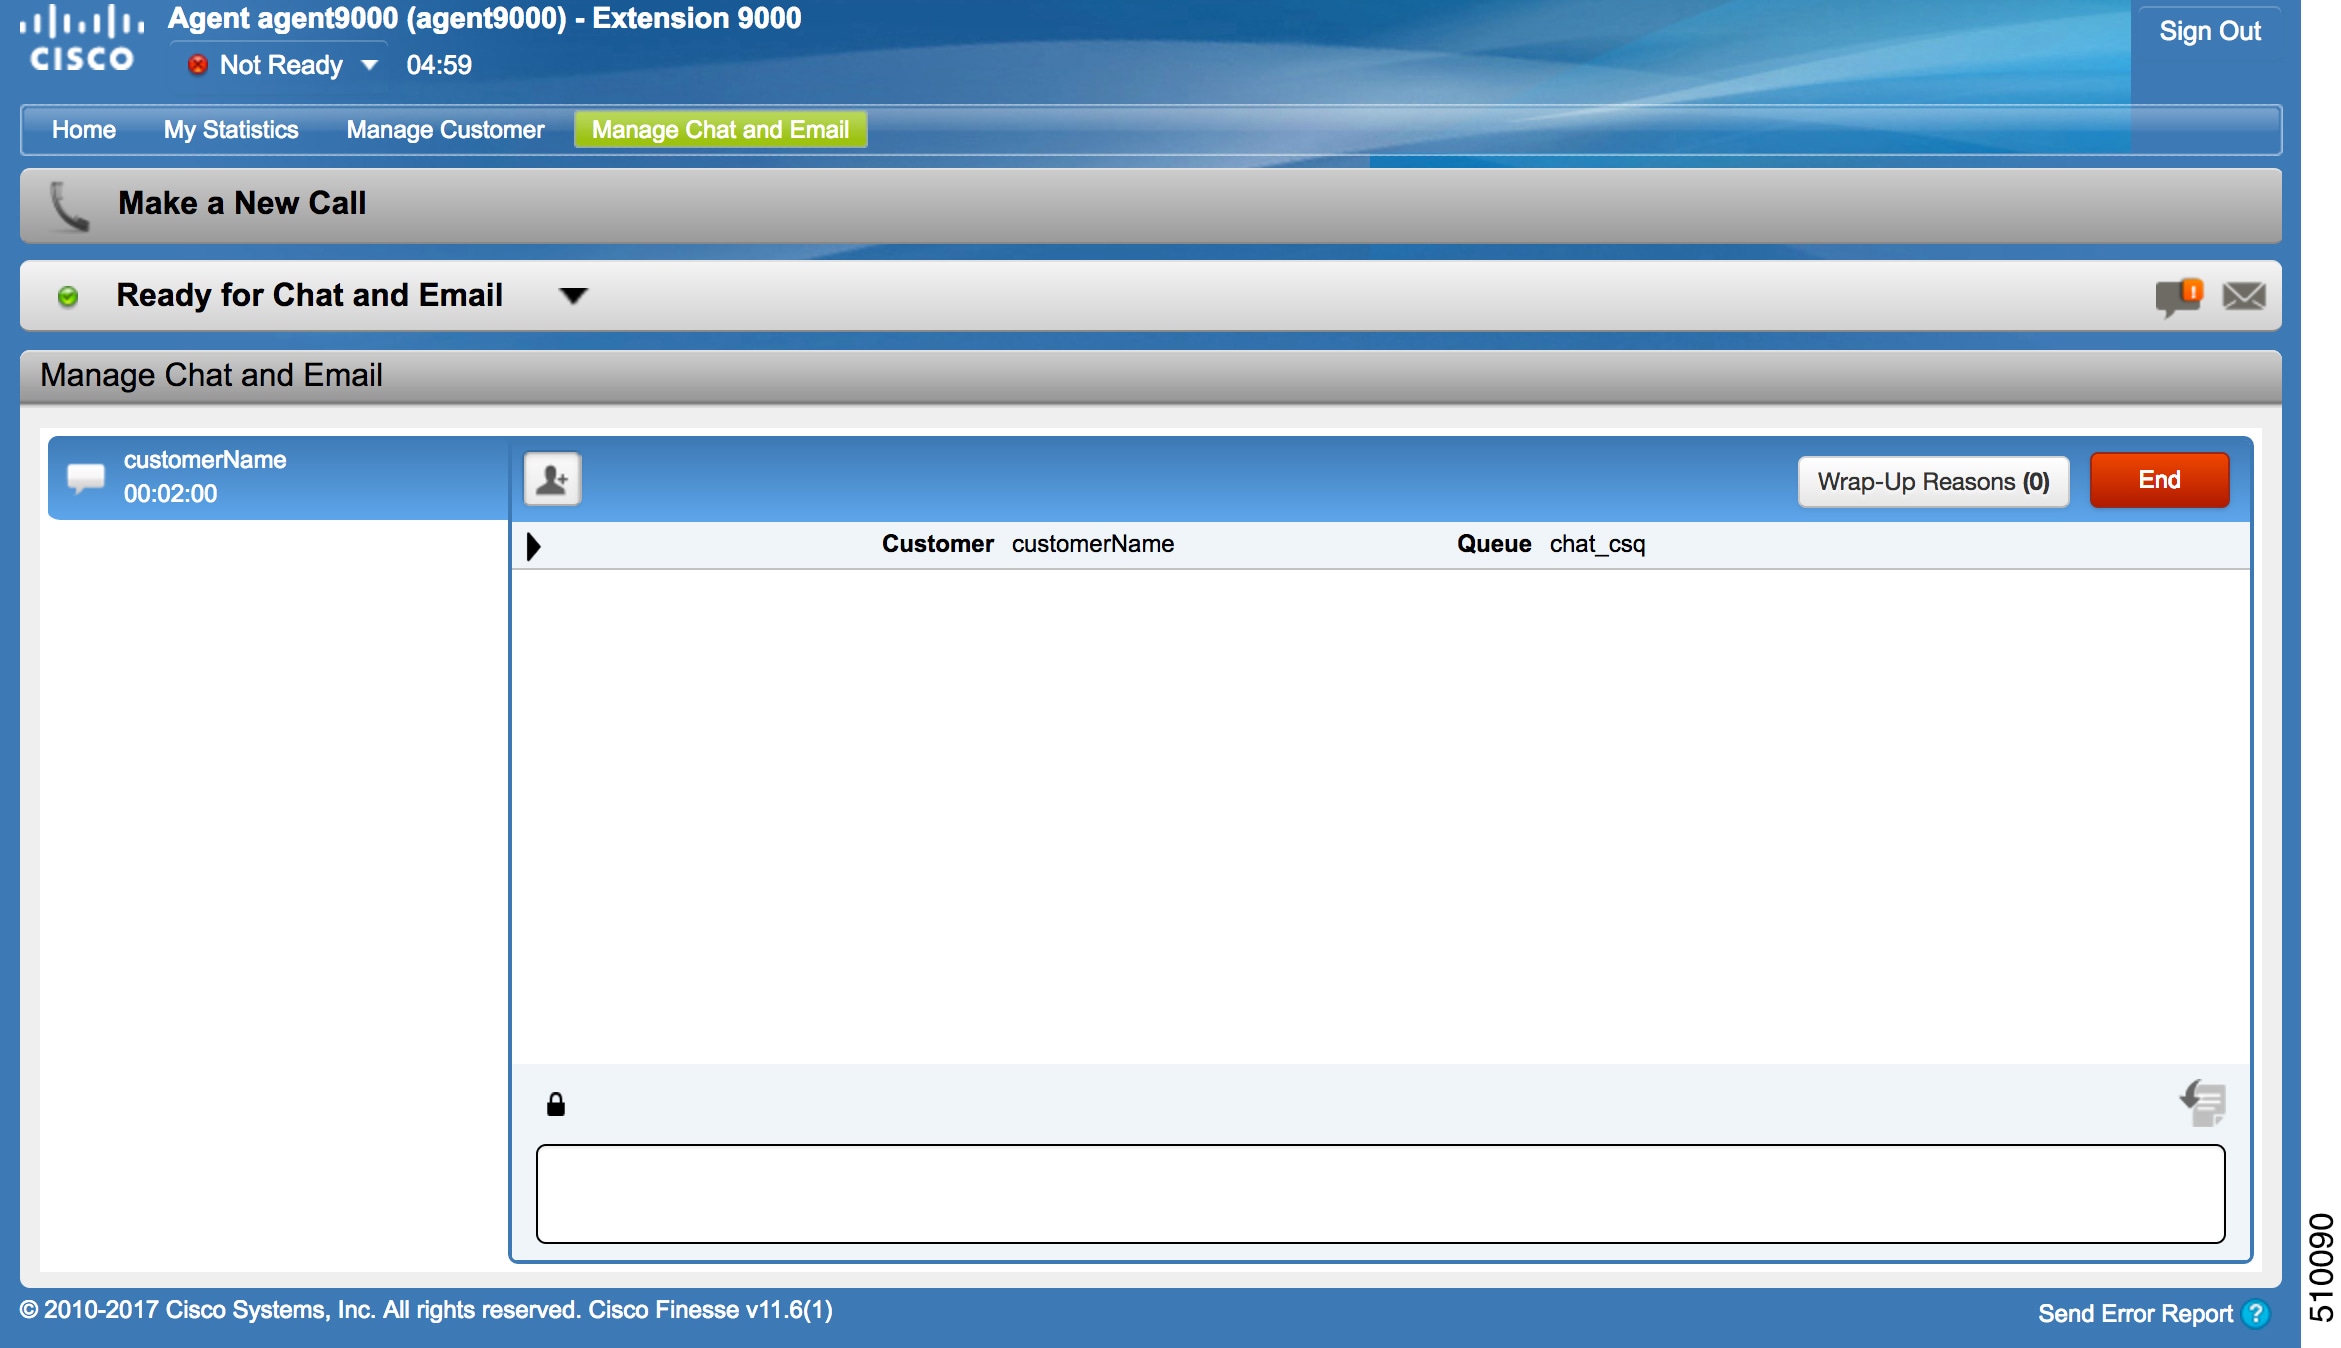
Chat Interaction Panel

The following figure shows the Chat Interaction panel of the Manage Chat and Email gadget.

Figure 3. Chat Interaction Panel

The Chat Interaction panel provides the following functionality:

  • Typing area: Type your message in the typing area. Right-click to perform basic clipboard operations, and to check spelling.

  • The typing awareness indicator shows when the other participant is typing.

  • Group Chat icon: Allow you to initiate a group chat with another agent or supervisor.

  • Group Chat invite appears for the agent to accept or decline the invite.

  • In Group Chat, an agent can click Leave to leave the group chat whenever required.

  • Predefined responses: Click to select a predefined response from the list. When you insert a predefined response, it is placed at the position of your cursor.

  • End chat session: Click End to end a chat session.

  • Customer details area: Click the drop-down arrow next to the customer details to minimize or maximize this area.

Accept a Chat

When a customer initiates a chat session from a website, Unified CCX Web Chat:
  • Sends incoming chat to an available agent.

  • Plays an audio alert (For a, new chat request and new message on an inactive chat).


    Note

    With multiple chat session tabs, the selected chat session tab is considered as active. All other chat session tabs are considered as inactive.


  • Displays contact details of the customer.

When a customer initiates a chat from Facebook Messenger, Unified CCX Web Chat:

  • Prompts agent to accept chat before the time counter expires.

You are presented with incoming chats until you reach the maximum active chat sessions that are set by administrator.

Procedure


Step 1

Click Accept in the incoming chat bar within the specified time to accept the chat.

If this is the first chat, the Manage Chats gadget opens, the chat session starts, and you are connected to the customer.

Note 

Repeat Step 1 when you are presented with a new incoming chat.

A new tab opens for the chat session and new chat session becomes the current session.

Step 2

To end the chat session, click End.


Initiate a Group Chat

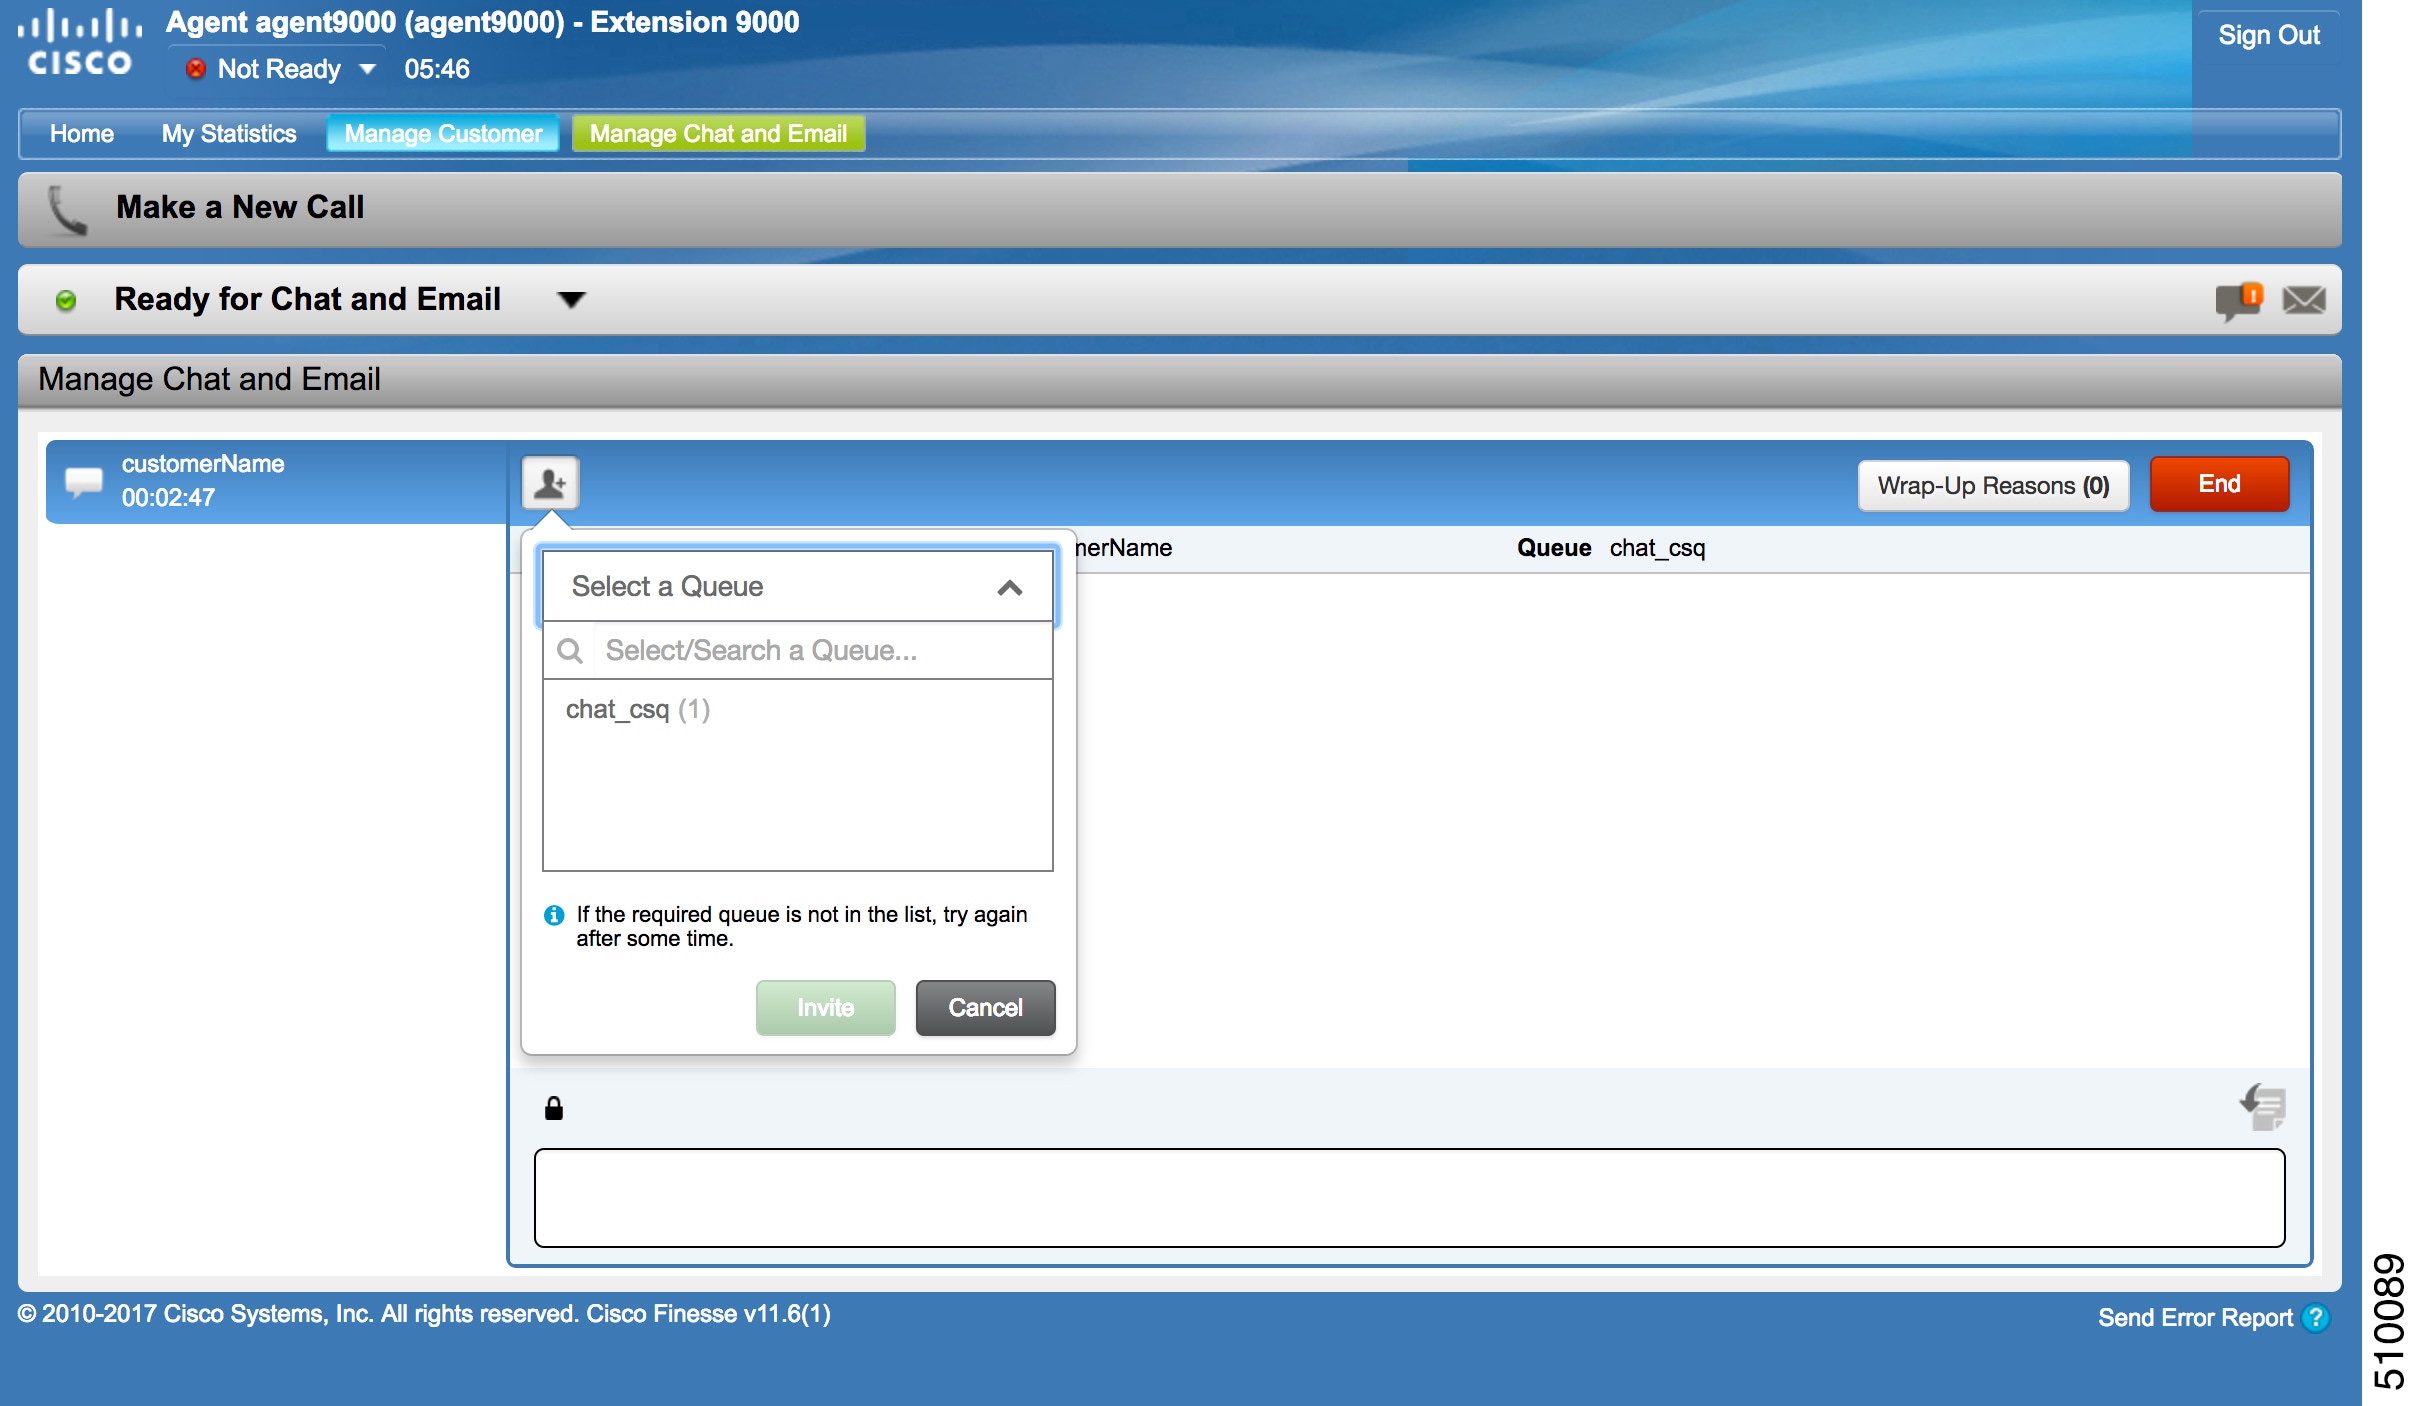
You can initiate a Group Chat when you wish to involve another agent in an ongoing chat session to support the customer. This can be used for seeking further information or support for the ongoing chat. A group chat enables you to:
  • Send a chat invite to an available agent of the selected CSQ.

    The CSQ names are displayed with the number of available agents in that CSQ.
  • Enter the summary of the ongoing chat for the invited agent. This helps the invited agent to understand the context of the ongoing chat.

Figure 4. Initiate Group Chat Invite Interface

Procedure


Step 1

Click Group Chat icon to initiate a group chat with another agent or supervisor.

Step 2

Select a Queue from the list to invite any available agent to join the chat session.

Step 3

You may enter a summary of the chat in the Enter Notes text box. This helps the invited agent to know the context of the chat. This is optional.

Note 

The summary notes are visible only when the first agent enters the notes when the chat session was initiated.

The notes entered by the invitee is displayed only to the invited agent.

Step 4

Click Invite.

The available agent gets a notification to Accept or Decline the chat. When an available agent accepts the group chat, the three participants (the two agents and the customer) may exchange information in the chat window.
Step 5

To leave the chat session, click Leave.

When there is only one agent and the customer in the chat session, the chat can be ended by the Customer or the Agent by clicking End.


Accept a Group Chat

You will receive an incoming group chat notification on the Finesse desktop. You may see the notes of the ongoing chat along with the invite. This helps you to understand the issue for which the group chat was initiated by the inviting agent.

Procedure


Step 1

Click Accept when you see the new group chat notification to join the chat session.

The agent can see chat history upto 100 messages after joining the group chat.

Step 2

You may now exchange information with the other two participants (inviting agent and the customer).

Note 
  • The Group Chat icon is disabled till the time there are two agents in the ongoing chat. Only when one agent chooses to leave the chat session, the Group Chat icon will be enabled again. The agent who wishes to leave the chat session may choose to click Leave. The agent who is still active in the group chat session can initiate another group chat by following the steps detailed in the Initiate a Group Chat section.

  • The maximum number of participants in a Group Chat including the customer is three (3).

  • The notes are not persisted for any subsequent chat sessions with the same customer.


Decline a Group Chat

You will receive an incoming group chat notification on the Finesse desktop. You may also see a summary of the ongoing chat along with the invite. This will help you to know the issue for which the group chat was initiated by the inviting agent.

Procedure


Click Decline when you see the new group chat notification to decline the chat invite.

Note 

The agent who declined the group chat invite is not offered any successive group chat invites for the same chat session till another agent accepts a group chat invite for the same chat session.


Apply Wrap-Up Reasons for Chat and Email

Wrap-Up Reasons are the logical explanations that you can apply when you wrap up the chats and emails handled by you. If your administrator has assigned Wrap-Up Reasons for you, the Wrap-Up Reasons appear in the drop-down list that can be selected. If there are no Wrap-Up Reasons configured by the administrator, it appears blank.

Wrap-Up Reasons that your administrator modifies is available only to the new contacts and not for the contacts that you are currently handling.

Procedure


Step 1

Click Wrap-Up Reasons(0).

In a chat interaction panel you see the Wrap-Up Reasons(0) beside the End and in a group chat interaction panel beside the Leave. In an email reply panel, this is found beside the Send. The number in brackets indicates the count of Wrap-Up Reasons selected. This dynamically changes based on your selection.

Step 2

Select the appropriate Wrap-Up Reasons from the drop-down list.

Step 3

Click OK to close the Wrap-Up Reasons selection pane.

You can change your selection at any time. Click Wrap-Up Reasons(0); to open the Wrap-Up Reasons selection pane. You can select a maximum number of five (5) Wrap-Up Reasons.