Chat and Email Related Tasks

Chat and Email Control Gadget

The Chat and Email Control gadget provides the following functionality:
  • Chat and Email state: The Chat and Email state is different from the Voice state that is displayed below the agent name. The following are the states:
    • Not Ready for Chat and Email:

      • You are set to this state by default when you sign in to the Cisco Finesse desktop.

      • If you refresh the browser, all the active chat sessions are cleared, email sessions are requeued, and you are moved to this state.

      • You can move to this state when you are not ready to handle chat and email.

    • Ready for Chat and Email: You can move to this state when you are ready to handle chat and email.

  • Time-to-accept counter: When you receive an incoming chat, the time counter is displayed and you must accept the chat within the specified time. If you do not accept the chat within the specified time, your state changes to Not Ready for chat and email.

  • Customer details: When an incoming chat arrives on your desktop, the customer details are displayed.

The buttons in the control area:

  • When an incoming chat request arrives, the Accept button, time-to-accept counter, and customer details appear for you to accept the chat.

  • When a new chat request is accepted, an orange icon appears on the top right corner of the chat bubble icon.

  • When you hover over the chat bubble icon, the number of active chat contacts appears.
  • When a new email contact arrives, an orange icon appears in the top right corner of the Envelope icon.

  • When you hover over the Envelope icon, the number of email contacts appears.

The number of chat and email alerts may appear incorrectly in case of any error.

Change Your State

When you sign in to the Finesse desktop, your state is set to Not Ready for Chat and Email by default.

If you are in Ready state, you can set your state to Not Ready.

To accept incoming chat and email contacts, you must set your state to Ready in the Chat and Email Control gadget.

Procedure


Step 1

Click the drop-down arrow beside your current state in the Chat and Email Control gadget.

Step 2

Select the appropriate state from the list.


Accept a Chat

When a customer initiates a chat session from a website, Unified CCX Web Chat:
  • Sends incoming chat to an available agent.

  • Plays an audio alert.

  • Displays contact details of the customer.

  • Prompts agent to accept chat before the time counter expires.

You are presented with incoming chats until you reach the maximum active chat sessions that are set by administrator.

Procedure


Step 1

Click Accept in the incoming chat bar within the specified time to accept the chat.

The Manage Chat and Email gadget opens, chat session starts, and you are connected to the customer.

Note 

Repeat Step 1 when you are presented with a new incoming chat.

A new tab opens for the chat session and new chat session becomes the current session.

Step 2

To end the chat session, click End.
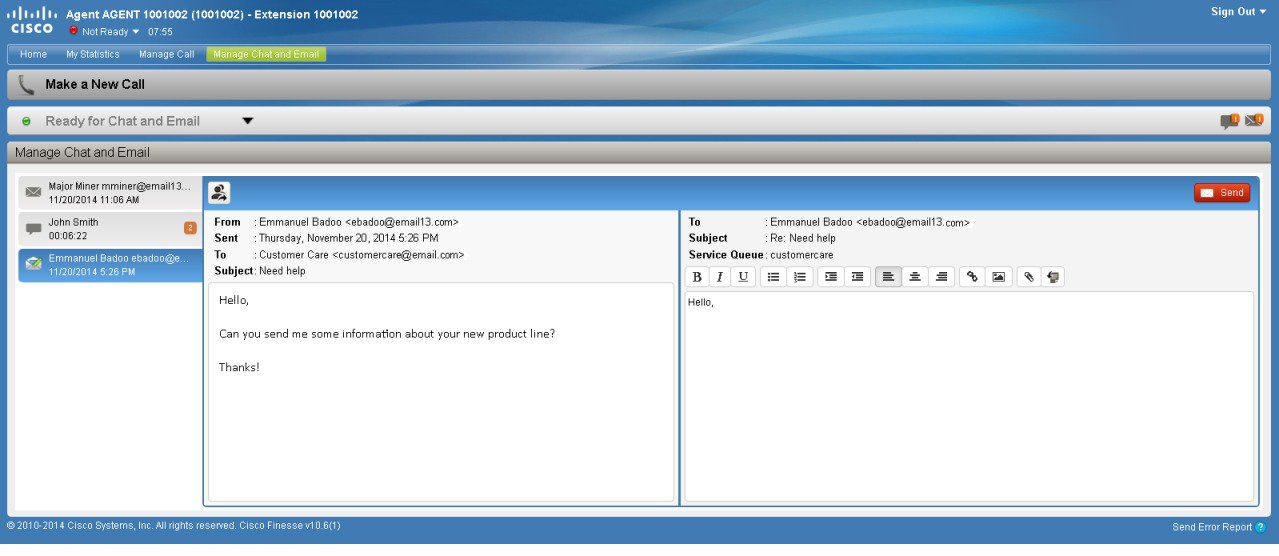

Accept an Email

You must be in Ready state to receive an email contact. When an email contact arrives on your desktop, it is automatically accepted and an orange icon appears on the envelope on the Chat and Email Control gadget.

To view the contact, you must click the Manage Chat and Email tab to go to the Manage Chat and Email gadget. If you have more than one contact assigned to you, in the left panel, click the tab for the email contact that you want to view.

Manage Chat and Email Gadget

The following figure shows the Cisco Finesse Manage Chat and Email gadget for agents.

The Manage Chat and Email gadget allows you to manage chat and email contacts. Chat and email contacts that are assigned to you appear in tabs on the left. You can click each individual tab to view and reply to the contact.

Chat contacts are denoted by a speech bubble icon. The following information appears on each chat contact tab:

  • Customer name

  • Total chat time: Indicates the duration of the chat session.

  • New message indicator: If you receive a message on a chat contact that is not your current contact, the session flashes for a few seconds. A number appears on the tab that indicates how many messages the customer sent since you last replied.

Email contacts are denoted by an envelope icon. When you begin typing a reply to the email contact, a pencil icon appears on the envelope icon.

The following information appears on each email contact tab:

  • Customer information: Customer email address, customer name (if available).

  • Email timestamp: Indicates the time that the system received the email contact.

  • Email subject: Hover your mouse over the email tab to display a tool tip that contains the subject of the email.


Note

When you accept a chat request, Finesse automatically switches to the Manage Chat and Email tab and the chat becomes the active contact. When you are assigned an email contact, Finesse does not switch tabs and the contact does not become the active contact. An orange icon appears on the envelope icon on the Chat and Email Control gadget.


Chat Interaction Panel

The Chat Interaction panel provides the following functionality:

  • Typing area: Type your message in the typing area. Right-click to perform basic clipboard operations, and to check spelling.

  • Predefined responses: Click to select a predefined response from the list. When you insert a predefined response, it is placed at the position of your cursor.

  • End chat session: Click End to end a chat session.

  • Customer details area: Click the drop-down arrow next to the customer details to minimize or maximize this area.

Email Reply Panel

The customer email appears on the left. The area where you type the response appears on the right. After you begin your reply, Finesse automatically saves a draft of your message every 3 minutes.

The Email Reply panel provides the following functionality:

Button

Name

Description

Requeue

Requeue an email contact to a new CSQ.

Bold

Applies bold to the selected text.

Italic

Applies italics to the selected text.

Underline

Underlines the selected text.

Bulleted List

Inserts a bulleted list.

Numbered List

Inserts a numbered list.

Increase Indent

Increases the space between the left margin and the content.

Decrease Indent

Decreases the space between the left margin and the content.

Align Left

Aligns the content to the left margin.

Align Center

Aligns the content to the center.

Align Right

Aligns the content to the right margin.

Add/Edit Link

Creates a hyperlink of the selected text to the specified URL.

Add Image

Adds a specified image to your reply.

Attach a file

Attaches a specified file to the email reply.

Predefined Response

Insert a predefined response into your reply.

Note 

Text that you type before you add a predefined response is overwritten by the predefined response.

Send

Sends your reply to the customer.

Reply to an Email Contact

Procedure


Step 1

On the Manage Chat and Email gadget, click the email contact that you want to reply to.

Step 2

In the Email Response area, type your response to the customer.

You can use a predefined response or type your own response. You can format the text, insert lists, add links, or add images to your response.
Note 

If you select a predefined response, then the existing content of the reply is overwritten by the predefined response text.

Step 3

When you are finished, click Send.

Note 

You must enter a reply before you can click Send. If you attempt to send an empty reply, an error appears that states you cannot send an empty email reply.


Download Customer Attachments

If a customer includes attachments in an email, the attachment filenames appear under the subject of the email. Finesse imposes the following limitations on customer email attachments:

  • The total number of attachments cannot exceed 10.


    Note

    Images within the body of the email are counted as attachments.


  • The size of a single attachment cannot exceed 2 MB.

  • The total size of all attachments cannot exceed 5 MB.

Procedure


Step 1

Click the filename of the attachment you want to open or download.

You are prompted to open or save the file.
Step 2

Choose whether to open the file or save the file to your computer.

Step 3

Repeat Step 1 and Step 2 for each attachment that you want to open or download.


Add a Hyperlink to an Email

Procedure


Step 1

In your email reply, select the text that you want to turn into a hyperlink.

Step 2

Click the Add/Edit Link button.

A dialog box opens where you can enter the URL for the link.
Step 3

In the Please enter a URL to insert box, enter the URL for the link.

Step 4

Click OK.


Add an Image to an Email

Procedure


Step 1

Place your cursor where you want the image to appear.

Step 2

Click the Add Image button.

A dialog box opens where you can enter a URL for the image.
Step 3

In the Please enter a URL for the image box, enter the URL.

Step 4

Click OK.

The image appears inline in the email response.

You can also copy and paste an image into the email response.


Add an Attachment to an Email

You can add up to 10 attachments to an email reply to a customer. The following limitations apply:

  • The size of a single attachment must not exceed 2 MB.

  • The total size of all attachments must not exceed 5 MB.

Procedure


Step 1

Click the Attach a file button.

Step 2

Navigate to the file that you want to send attach to the email.

Step 3

Click Open.

The file appears below the reply panel.
Step 4

Repeat Step 1 and Step 2 for each file that you want to attach (up to 10).

If you want to remove an attachment, click the X to the right of the attachment filename.


Requeue an Email Contact

You can transfer an email contact either to the same Contact Service Queue (CSQ) or to any other CSQ. After you initiate the transfer from the agent desktop, the contacts are requeued to a CSQ.

Last-agent email routing is a mechanism to route an email message to the agent who handled the last leg of the email conversation. When you requeue an email, the email will be routed to the intended CSQ to be handled by any available agent, and last-agent email routing is not considered.


Note

The requeued contact is not requeued to the same agent even if the agent is part of the requeued CSQ and is available to handle more contacts.


When you sign out or refresh your browser, any contacts that you were handling are disassociated from you and requeued to the same CSQ.

Procedure


Step 1

Select the email that you want to requeue.

Step 2

Click the Requeue button.

The list of CSQs is displayed with a search option.
Step 3

Type the CSQ name into the Search box to bring up the desired CSQ or select the CSQ from the list.

A confirmation dialog appears.
Step 4

Click Yes to confirm.


The email is removed from the multiple email sessions panel and requeued to the selected CSQ.

Discard an Email Message

Procedure


Step 1

On the Manage Chat and Email gadget, select the email message that you want to discard.

Step 2

Click the Discard button on the Email Reply panel.

You are prompted to discard the selected email message.

Step 3

Click Yes to confirm.

The email message is discarded.

When you discard an unsent reply that has attachments, the draft of the reply from the agent and the attachments are deleted. The original email message sent by the email contact remains in the Exchange mailbox.