Accessibility Features for the Cisco IP Phone 8800 Series
The Cisco IP Phone 8800 Series provide accessibility features for the blind, and the visually-, hearing-, and mobility-impaired. Because many of these features are standard, they can be used by users with disabilities without requiring any special configuration.
In this document, the term phone support pages refers to the web pages that users can access to set up certain features. For Cisco Unified Communications Manager (Release 10.0 and later), these pages are the Self Care Portal. For Cisco Unified Communications Manager (Release 9.1 and earlier), these pages are the User Options web pages.
Cisco is committed to designing and delivering accessible products and technologies to meet the needs of your organization. You can find more information about Cisco and its commitment to accessibility at this URL: http://www.cisco.com/go/accessibility
New and Changed Features
The following changes were made to this document:
|
Revision |
New and Changed Sections |
|---|---|
|
Mar 2019 |
Added new content to support Multiplatform phones |
|
Nov 2025 |
Added the Font Size feature. |
Hearing-Impaired Accessibility Features
Your phone comes with standard accessibility features that require little or no setup.
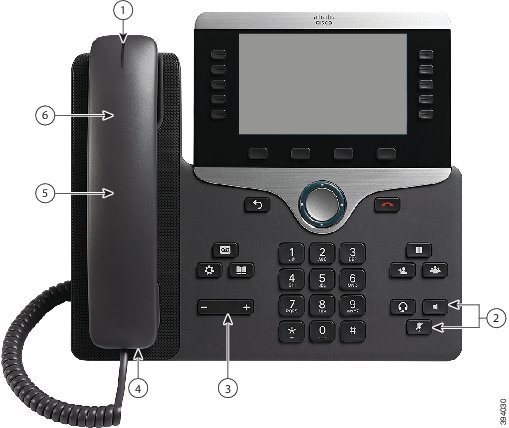
The following table describes the hearing-impaired accessibility features on the Cisco IP Phone 8800 Series.
|
Item |
Accessibility Feature |
Description |
|---|---|---|
|
1 |
Visual message-waiting indicator (handset) |
This lighted strip is visible from all angles. Your phone also provides an audible message-waiting indicator. To change the light or the audible voice-message indicator, sign in to the phone support pages and access the message-indicator settings. You can change each setting to on or off. Your administrator can also change your settings. |
|
2 |
Visual notification of phone state |
|
|
3 |
Adjustable ringtone, pitch, and volume |
Your administrator can also change your settings. |
|
4 |
Inline-amplifier support (handset) |
Cisco IP Phone handsets support third-party inline amplifiers. You attach an amplifier to the handset and cord and it sits between the handset and the IP phone. |
|
5 |
Hearing aid compatible (HAC) handset |
Supports these accessibility features:
|
|
6 |
Acoustic coupled TTY and TDD support (handset) |
Cisco IP Phones support these TTY and TDD features:
For information about setting up TTY, contact your administrator. |
Hearing-Impaired Accessibility Features for Multiplatform Phones
Your phone comes with standard accessibility features that require little or no setup.
The following table describes the hearing-impaired accessibility features on the Cisco IP Phone 8800 Series Multiplatform Phones.
|
Item |
Accessibility Feature |
Description |
|---|---|---|
|
1 |
Visual message-waiting indicator (handset) |
This lighted strip is visible from all angles. Your phone also provides an audible message-waiting indicator. To change the light or the audible voice-message indicator, sign in to the phone support pages and access the message-indicator settings. Your administrator can also change your settings. |
|
2 |
Visual notification of phone state |
|
|
3 |
Adjustable ringtone, pitch, and volume |
Your administrator can also change your settings. |
|
4 |
Inline-amplifier support (handset) |
Cisco IP Phone handsets support third-party inline amplifiers. You attach an amplifier to the handset and cord and it sits between the handset and the IP phone. |
|
5 |
Hearing aid compatible (HAC) handset |
Supports these accessibility features:
|
|
6 |
Acoustic coupled TTY and TDD support (handset) |
Cisco IP Phones support these TTY and TDD features:
For information about setting up TTY, contact your administrator. |
Vision-Impaired and Blind Accessibility Features
Your phone comes with standard accessibility features that require little or no setup.
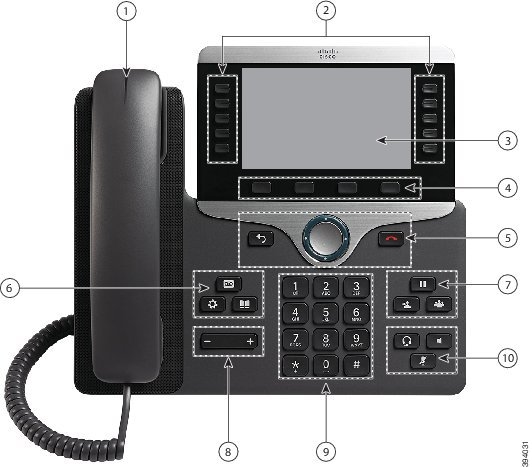
The following table describes the vision-impaired and blind accessibility features on the Cisco IP Phone 8800 Series.
|
Item |
Accessibility Feature |
Description |
|---|---|---|
|
1 |
High-contrast visual and audible alert of an incoming call |
Alerts you to an incoming call. The handset light strip flashes during incoming calls and stays lit when a voicemail message is received. |
|
2 |
Line, feature, and session buttons on the Cisco IP Phone
|
Use line buttons to start, answer, or switch to a call on a particular line. Features, such as speed dial, line status, privacy, do not disturb (DND), and service URLs, can be assigned to feature buttons. Your administrator sets up programmable feature buttons on your phone. Use session buttons to perform tasks, such as answering a call or resuming a held call. Colors indicate your phone's status:
|
|
3 |
Back-lit color LCD screen on the Cisco IP Phone
|
Allows you to adjust your phone screen's brightness. |
|
4 |
Softkeys
|
Provide access to special functions. The functions are displayed on the LCD. |
|
5 |
Navigation Cluster (includes the Navigation ring and the Select button)
|
Use the Navigation ring to move up, down, left, and right in the phone LCD. The Select button is in the center of the Navigation cluster. Use the Back button to return to the previous screen or menu. Use the Release (End Call) button to end a call or session. |
|
6 |
Messages button, Applications button, and Contacts button
|
Allow you to easily access your messages, applications, and contacts. |
|
7 |
Hold button, Transfer button, and Conference button
|
Allow you to use these functions on your phone. |
|
8 |
Volume key
|
Allows you to increase or decrease the ring volume or the sound through the handset, headset, or speakerphone. Press the right side of the rocker key to increase the volume; press the left side of the rocker key to decrease the volume. |
|
9 |
Standard 12-key layout |
Allows you to use existing or familiar key positions. Key 5 has a nib. |
|
10 |
Headset, Speakerphone, and Mute buttons
|
Provide audible notification of the phone state:
|
Adjustable Footstand
You can adjust the footstand to provide optimum phone display viewing and easy access to all buttons and keys.
Vision-Impaired and Blind Accessibility Features for Multiplatform Phones
Your Multiplatform phone comes with standard accessibility features that require little or no setup.
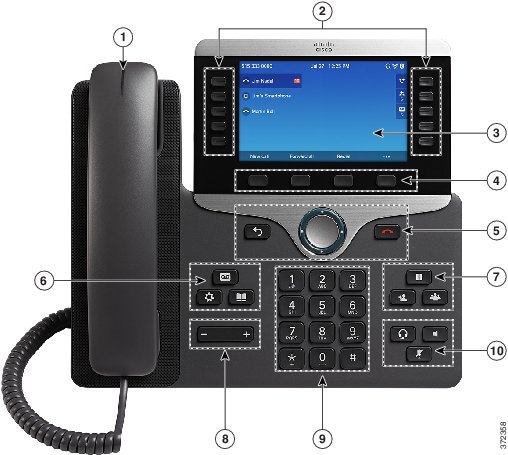
The following table describes the vision-impaired and blind accessibility features on the Cisco IP Phone 8800 Series Multiplatform Phones.
|
Item |
Accessibility Feature |
Description |
|---|---|---|
|
1 |
High-contrast visual and audible alert of an incoming call |
Alerts you to an incoming call. The handset light strip flashes during incoming calls and stays lit when a voicemail message is received. |
|
2 |
Programmable feature buttons and line buttons |
Feature and line buttons, located on either side of the screen, give you access to phone features and phone lines.
Colors indicate your phone's status:
|
|
3 |
Back-lit color LCD screen on the Cisco IP Phone
|
Allows you to adjust your phone screen's brightness. |
|
4 |
Softkeys
|
Provide access to special functions. The functions are displayed on the LCD. |
|
5 |
Navigation Cluster (includes the Navigation ring and the Select button)
|
Use the Navigation ring to move up, down, left, and right in the phone LCD. The Select button is in the center of the Navigation cluster. Use the Back button to return to the previous screen or menu. Use the Release (End Call) button to end a call or session. |
|
6 |
Messages button, Applications button, and Contacts button
|
Allow you to easily access your messages, applications, and contacts. |
|
7 |
Hold button, Transfer button, and Conference button
|
Allow you to use these functions on your phone. |
|
8 |
Volume key
|
Allows you to increase or decrease the ring volume or the sound through the handset, headset, or speakerphone. Press the right side of the rocker key to increase the volume; press the left side of the rocker key to decrease the volume. |
|
9 |
Standard 12-key layout |
Allows you to use existing or familiar key positions. Key 5 has a nib. |
|
10 |
Headset, Speakerphone, and Mute buttons
|
Provide audible notification of the phone state:
|
Adjustable Footstand
You can adjust the footstand to provide optimum phone display viewing and easy access to all buttons and keys.
Voice Feedback
Voice Feedback helps people vision problems to use their Cisco IP Phone. When enabled, a voice prompt helps you navigate your phone buttons, and to use and configure phone features. The voice also reads out incoming Caller IDs, displayed screens and settings, and button functions.
Here are a few important items to keep in mind as you use this feature.
-
Voice Feedback is enabled and disabled with the Select button that is located in the center of the Navigation cluster. When the phone is idle, quickly tap Select three times to turn this feature on or off. A voice prompt alerts you to the feature status.
-
Push a softkey once, and Voice Feedback reads out the feature that is associated with the key. Quickly push the softkey twice to execute the feature.
-
Hard keys, such as the Contacts, Applications, and Messages buttons, are treated differently. Push a hard key once, and a voice reads out the screen name followed by the application or setting that is displayed on the phone.
Volume is adjusted with the Volume button. To adjust your handset volume, lift the receiver from the cradle, and press Volume. If you use a headset, select the Headset button, and then Volume. If you use the speakerphone, select Speakerphone and Volume.
You may not hear Voice Feedback if you select the Headset button, but don't have a connected headset. Select Speakerphone and you hear Voice Feedback again.
When on a call, only you hear Voice Feedback so your privacy is assured. Voice Feedback is only available for English language users. If this feature is not available to you, then it is disabled on your phone.
Font Size (Multiplatform Phones Only)
To have a better visual experience, you can adjust the size of the fonts that are displayed on the phone screen. Note that the customization of the font size does not change few of the texts, such as the texts in a prompt window.
To adjust the font size, press Settings on your phone. Select . Press the Select button to check the font size options. Press Set to choose and save a font size. The font size change is applied immediately.
Mobility-Impaired Accessibility Features
Your phone comes with standard accessibility features that require little or no setup.
To check which phone model you have, press Applications ![]() and select Phone information. The Model number field shows your phone model.
and select Phone information. The Model number field shows your phone model.
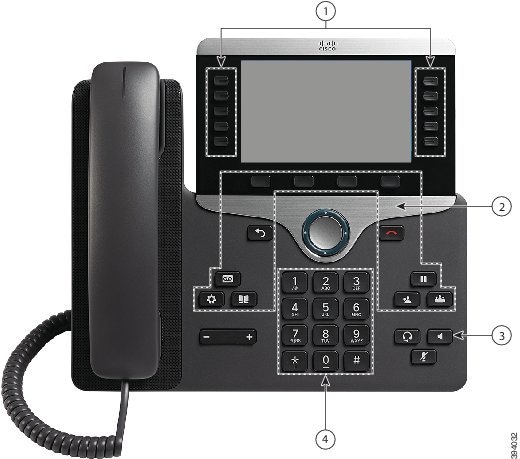
The following table describes the mobility-impaired accessibility features on the Cisco IP Phone 8800 Series.
|
Item |
Accessibility Feature |
Description |
|---|---|---|
|
1 |
Lighted buttons |
Allow you to access the following features:
Indicate your phone's status:
|
|
2 |
Large buttons to access Applications, Messages, Contacts, Hold, Transfer, and Conference |
Allow you to easily access your phone applications, voice messages, corporate and personal directories, and calling features. |
|
3 |
Built-in speakerphone |
Indicates whether the speakerphone is on or off. When the speakerphone is on, the button is lit. |
|
4 |
Tactile-discernible buttons and functions, including a nib on Key 5 |
Allow you to easily locate your phone's keys. For example, Key 5 has a nib, which you can use to locate other key positions. |
Mobility-Impaired Features for Multiplatform Phones
Your phone comes with standard accessibility features that require little or no setup.
To check which phone model you have, press Applications ![]() and select . The Product name field shows your phone model.
and select . The Product name field shows your phone model.
The following table describes the mobility-impaired accessibility features on the Cisco IP Phone 8800 Series.
|
Item |
Accessibility Feature |
Description |
|---|---|---|
|
1 |
Lighted buttons |
Allow you to access the following features:
Indicate your phone's status:
|
|
2 |
Large buttons to access Applications, Messages, Contacts, Hold, Transfer, and Conference |
Allow you to easily access your phone applications, voice messages, corporate and personal directories, and calling features. |
|
3 |
Built-in speakerphone |
Indicates whether the speakerphone is on or off. When the speakerphone is on, the button is lit. |
|
4 |
Tactile-discernible buttons and functions, including a nib on Key 5 |
Allow you to easily locate your phone's keys. For example, Key 5 has a nib, which you can use to locate other key positions. |
Cisco IP Phone 8800 Series Wall Mount Kit Accessibility
The Cisco IP Phone 8800 Series phones can be mounted on a wall using one of the following wall mount kits:
-
Wallmount Kit for Cisco IP Phone 8800 Series—used to mount a single phone on the wall.
-
Wallmount Kit for Cisco IP Phone 8800 Series with single KEM—used to mount a single phone with one attached key expansion module on a wall.
-
Wallmount Kit for Cisco IP Phone 8800 Video Series—used to mount a single video phone on the wall.
The Wallmount Kit for Cisco IP Phone 8800 Series and Wallmount Kit for Cisco IP Phone 8800 Series with single KEM meet the 307.2 Protrusion Limits section of the Americans with Disabilities Act (ADA) ADAAG requirement for mounting a phone on the wall.
The Wallmount Kit for Cisco IP Phone 8800 Video Series is slightly larger and does not meet the 307.2 Protrusion Limits section of the Americans with Disabilities Act (ADA) ADAAG requirement for mounting a phone on the wall.
The following figure shows a side view of the phone with the wall mount kit installed.

Third-Party Accessibility Applications
Cisco works closely with partners to provide solutions that complement the accessibility and usability of Cisco products and solutions. There are third-party applications such as real-time captioning on Cisco IP Phones, Text Telephones for the Deaf (TDD/TTY), Real Time Text (RTT), hearing/voice carry over (HCO/VCO), audible caller ID, inline amplifiers for handsets for louder call sound, "busy lights", audio/visual emergency notifications through Cisco IP Phones (supporting users with disabilities), etc.
For more information about third-party applications, contact your administrator.
Cisco Unified Communications Manager Accessibility Features
The following table provides information on the Cisco Unified Communications Manager (Cisco Unified CM) accessibility features. For more information, see the user guide applicable to your phone.
|
Accessibility Feature |
Description |
Configuration Requirements |
|---|---|---|
|
Programmable Line Key (PLK) |
You can use the line buttons to initiate, answer, or switch to a call on a particular line. A limited number of features, such as speed dial, extension mobility, privacy, Busy Lamp Field (BLF) speed dial, Do Not Disturb (DND), and Service URLs, get assigned to these buttons. The PLK feature expands the features that can be assigned to the line buttons to include those that softkeys normally control; for example New Call, Call Back, End Call, and Forward All. When these features are configured on the line buttons, they are always visible, so you can have a “hard” New Call key. You can access features easily that may be assigned to softkeys normally, which can be too small and difficult to use. |
Standard on all Cisco IP Phones; configuration is required. Your administrator assigns PLKs to your phone. |
|
Audible Message Waiting Indicator (AMWI) |
Cisco Unified IP Phones can send a line-specific stutter dial tone when a voice message is waiting on the phone. You hear it only when using the line with the waiting messages. When you go off hook (on the line for which a voice message has been left), the stutter dial tone is heard. You can change the audible voice-message indicator setting by logging in to your phone support pages, and changing the audible message-indicator setting to On or Off. |
Standard on all Cisco IP Phones. Configuration is required:
|
|
Do Not Disturb (Alert and Reject) |
Your administrator configures the phone to turn on all audible and visual notifications, turn on ringer only, or to choose the type of alert a phone should play for incoming calls. |
Standard on all Cisco IP Phones; configuration is required. |
|
Busy Lamp Field |
You can use the Busy Lamp Field (BLF) feature to monitor the call state of a directory number (DN) associated with a speed-dial button, call log, or directory listing on the phone. In addition, you can use BLF pickup to monitor incoming calls on a directory number. When the DN receives an incoming call, the system alerts the you so that you can then pick up the call. |
Standard on all Cisco IP Phones; configuration is required. |
|
Phone support pages:
|
The Cisco IP Phone is a network device that enables you to do the following actions:
|
Standard on all Cisco IP Phones; configuration is required. |
 Feedback