Provisioning Examples
Provisioning Examples Overview
This chapter provides example procedures for transferring configuration profiles between the Cisco IP Phone and the provisioning server.
For information about creating configuration profiles, refer to Provisioning Scripts.
Basic Resync
This section demonstrates the basic resync functionality of the Cisco IP Phones.
TFTP Resync
The Cisco IP Phone supports multiple network protocols for retrieving configuration profiles. The most basic profile transfer protocol is TFTP (RFC1350). TFTP is widely used for the provisioning of network devices within private LAN networks. Although not recommended for the deployment of remote endpoints across the Internet, TFTP can be convenient for deployment within small organizations, for in-house preprovisioning, and for development and testing. See the In-House Device Preprovisioning section for more information on in-house preprovisioning. In the following procedure, a profile is modified after downloading a file from a TFTP server.
Logging with syslog
The Cisco IP Phone sends a syslog message to the designated syslog server when the device is about to resync to a provisioning server and after the resync has either completed or failed. This server is identified in the web server administration (, Syslog Server parameter). Configure the syslog server IP address into the device and observe the messages that are generated during the remaining procedures.
| Step 1 | Install and activate a syslog server on the local PC. |
| Step 2 | Program the PC IP address into the Syslog_Server parameter of the profile and submit the change: <Syslog_Server>192.168.1.210</Syslog_Server> |
| Step 3 | Click the System tab and enter the value of your local syslog server into the Syslog_Server parameter. |
| Step 4 | Repeat the resync operation as described in the TFTP Resync procedure.
The device generates two syslog messages during the resync. The first message indicates that a request is in progress. The second message marks success or failure of the resync. |
| Step 5 | Verify that your syslog server received messages similar to the following: CP-78xx-3PCC 00:0e:08:ab:cd:ef –- Requesting resync tftp://192.168.1.200/basic.txt Detailed messages are available by programming a Debug_Server parameter (instead of the Syslog_Server parameter) with the IP address of the syslog server, and by setting the Debug_Level to a value between 0 and 3 (3 being the most verbose): <Debug_Server>192.168.1.210</Debug_Server> <Debug_Level>3</Debug_Level> The contents of these messages can be configured by using the following parameters: If any of these parameters are cleared, the corresponding syslog message is not generated. |
Automatic Device Resync
A device can resync periodically to the provisioning server to ensure that any profile changes made on the server are propagated to the endpoint device (as opposed to sending an explicit resync request to the endpoint).
To cause the Cisco IP Phone to periodically resync to a server, a configuration profile URL is defined by using the Profile_Rule parameter, and a resync period is defined by using the Resync_Periodic parameter.
| Step 1 | On the Configuration Utility page, select . |
| Step 2 | Define the Profile_Rule parameter. This example assumes a TFTP server IP address of 192.168.1.200. |
| Step 3 | In the Resync Periodic field, enter a small value for testing, such as 30 seconds. |
| Step 4 | Click Submit all Changes. With the new parameter settings, the Cisco IP Phone resyncs twice a minute to the configuration file that the URL specifies. |
| Step 5 | Observe the resulting messages in the syslog trace (as described in the Logging with syslog section). |
| Step 6 | Ensure that the Resync On Reset field is set to Yes. <Resync_On_Reset>Yes</Resync_On_Reset> |
| Step 7 | Power cycle the Cisco IP Phone to force it to resync to the provisioning server. If the resync operation fails for any reason, such as if the server is not responding, the unit waits (for the number of seconds configured in Resync Error Retry Delay) before it attempts to resync again. If Resync Error Retry Delay is zero, the Cisco IP Phone does not try to resync after a failed resync attempt. |
| Step 8 | (Optional) Set the value of Resync Error Retry Delay field to a small number, such as 30. <Resync_Error_Retry_Delay>30</Resync_Error_Retry_Delay> |
| Step 9 | Disable the TFTP server, and observe the results in the syslog output. |
Unique Profiles, Macro Expansion, and HTTP
In a deployment where each Cisco IP Phone must be configured with distinct values for some parameters, such as User_ID or Display_Name, the service provider can create a unique profile for each deployed device and host those profiles on a provisioning server. Each Cisco IP Phone, in turn, must be configured to resync to its own profile according to a predetermined profile naming convention.
The profile URL syntax can include identifying information that is specific to each Cisco IP Phone, such as MAC address or serial number, by using the macro expansion of built-in variables. Macro expansion eliminates the need to specify these values in multiple locations within each profile.
Other values can be macro expanded in this way, including all the general purpose parameters, GPP_A through GPP_P. An example of this process can be seen in the TFTP Resync section. Macro expansion is not limited to the URL file name, but can also be applied to any portion of the profile rule parameter. These parameters are referenced as $A through $P. For a complete list of variables that are available for macro expansion, see the Macro Expansion Variables section.
In this exercise, a profile specific to the Cisco IP Conference Phone 7832 is provisioned on a TFTP server.
- Exercise: Provision a Specific IP Phone Profile on a TFTP Server
- Provisioning Through Cisco XML
- URL Resolution by Using Macro Expansion
Exercise: Provision a Specific IP Phone Profile on a TFTP Server
| Step 1 | Obtain the MAC address of the phone from its product label. (The MAC address is the number, using numbers and lower–case hex digits, such as 000e08aabbcc. |
| Step 2 | Copy the basic.txt configuration file (described in the TFTP Resync section) to a new file named CP-x8xx-3PCC macaddress.cfg (replacing x8xx with the model number and macaddress with the MAC address of the phone). |
| Step 3 | Move the new file in the virtual root directory of the TFTP server. |
| Step 4 | On the Configuration Utility page, select . |
| Step 5 | Enter tftp://192.168.1.200/CP-7832-3PCC$MA.cfg in the Profile Rule field. <Profile_Rule> tftp://192.168.1.200/CP-7832-3PCC$MA.cfg </Profile_Rule> |
| Step 6 | Click Submit All Changes. This causes an immediate reboot and resync. When the next resync occurs, the Cisco IP Phone retrieves the new file by expanding the $MA macro expression into its MAC address. |
HTTP GET Resync
HTTP provides a more reliable resync mechanism than TFTP because HTTP establishes a TCP connection and TFTP uses the less reliable UDP. In addition, HTTP servers offer improved filtering and logging features compared to TFTP servers.
On the client side, the Cisco IP Phone does not require any special configuration setting on the server to be able to resync by using HTTP. The Profile_Rule parameter syntax for using HTTP with the GET method is similar to the syntax that is used for TFTP. If a standard web browser can retrieve a profile from your HTTP server, the Cisco IP Phone should be able to do so as well.
Exercise: HTTP GET Resync
| Step 1 | Install an HTTP server on the local PC or other accessible host. (The open source Apache server can be downloaded from the internet.) |
| Step 2 | Copy the basic.txt configuration profile (described in the TFTP Resync section) onto the virtual root directory of the installed server. |
| Step 3 | To verify proper server installation and file access to basic.txt, access the profile by using a web browser. |
| Step 4 | Modify the Profile_Rule of the test Cisco IP Phone to point to the HTTP server in place of the TFTP server, so as to download its profile periodically.
For example, assuming the HTTP server is at 192.168.1.300, enter the following value: <Profile_Rule> http://192.168.1.200/basic.txt </Profile_Rule> |
| Step 5 | Click Submit All Changes. This causes an immediate reboot and resync. |
| Step 6 | Observe the syslog messages that the Cisco IP Phone sends. The periodic resyncs should now be obtaining the profile from the HTTP server. |
| Step 7 | In the HTTP server logs, observe how information that identifies the test Cisco IP Phone appears in the log of user agents.
This information should include the manufacturer, product name, current firmware version, and serial number. |
Provisioning Through Cisco XML
For the Cisco IP Conference Phone 7832, designated as x8xx here, provisioning through Cisco XML functions as follows.
You can send an XML object to the phone by a SIP Notify packet or an HTTP Post to the CGI interface of the phone: http://IPAddressPhone/CGI/Execute.
The CP-x8xx-3PCC extends the Cisco XML feature to support provisioning via an XML object:
<CP-x8xx-3PCCExecute>
        <ExecuteItem URL=Resync:[profile-rule]/>
</CP-x8xx-3PCCExecute>
After it receives the XML object, the CP-x8xx-3PCC downloads the provisioning file from [profile-rule]. This rule uses macros to simplify the development of the XML services application.
URL Resolution by Using Macro Expansion
Subdirectories with multiple profiles on the server provide a convenient method for managing a large number of deployed devices. The profile URL can contain:
A provisioning server name or an explicit IP address. If the profile identifies the provisioning server by name, the Cisco IP Phone performs a DNS lookup to resolve the name.
A nonstandard server port that is specified in the URL by using the standard syntax:port following the server name.
The subdirectory of the server virtual root directory where the profile is stored, specified by using standard URL notation and managed by macro expansion.
For example, the following Profile_Rule requests the profile CP-7832-3PCC.cfg, in the server subdirectory /cisco/config, from the TFTP server that is running on host prov.telco.com listening for a connection on port 6900:
<Profile_Rule> tftp://prov.telco.com:6900/cisco/config/$PN.cfg </Profile_Rule>
A profile for each Cisco IP Phone can be identified in a general purpose parameter, with its value referred within a common profile rule by using macro expansion.
For example, assume GPP_B is defined as Dj6Lmp23Q.
The Profile_Rule has the value:
tftp://prov.telco.com/cisco/$B/$MA.cfg
When the device resyncs and the macros are expanded, the Cisco IP Phone with a MAC address of 000e08012345 requests the profile with the name that contains the device MAC address at the following URL:
tftp://prov.telco.com/cisco/Dj6Lmp23Q/000e08012345.cfg
Secure HTTPS Resync
These mechanisms are available on the Cisco IP Phone for resyncing by using a secure communication process:
- Basic HTTPS Resync
- HTTPS with Client Certificate Authentication
- HTTPS Client Filtering and Dynamic Content
- HTTPS Certificate
Basic HTTPS Resync
HTTPS adds SSL to HTTP for remote provisioning so that the:
Confidentiality of information exchanged between the Cisco IP Phone and the provisioning server is ensured.
SSL generates and exchanges secret (symmetric) keys for each connection between the Cisco IP Phone and the server, using public/private key pairs that are pre-installed in the Cisco IP Phone and the provisioning server.
On the client side, the Cisco IP Phone does not require any special configuration setting on the server to be able to resync using HTTPS. The Profile_Rule parameter syntax for using HTTPS with the GET method is similar to the syntax that is used for HTTP or TFTP. If a standard web browser can retrieve a profile from a your HTTPS server, the Cisco IP Phone should be able to do so as well.
In addition to installing a HTTPS server, a SSL server certificate that Cisco signs must be installed on the provisioning server. The devices cannot resync to a server that is using HTTPS unless the server supplies a Cisco-signed server certificate. Instructions for creating signed SSL Certificates for Voice products can be found at https://supportforums.cisco.com/docs/DOC-9852.
Exercise: Basic HTTPS Resync
| Step 1 | Install an HTTPS server on a host whose IP address is known to the network DNS server through normal hostname translation. The open source Apache server can be configured to operate as an HTTPS server when installed with the open source mod_ssl package. |
| Step 2 | Generate a server Certificate Signing Request for the server. For this step, you might need to install the open source OpenSSL package or equivalent software. If using OpenSSL, the command to generate the basic CSR file is as follows: openssl req –new –out provserver.csr This command generates a public/private key pair, which is saved in the privkey.pem file. |
| Step 3 | Submit the CSR file (provserver.csr) to Cisco for signing. (See https://supportforums.cisco.com/docs/DOC-9852 for more information.)
A signed server certificate is returned (provserver.cert) along with a Sipura CA Client Root Certificate, spacroot.cert. |
| Step 4 | Store the signed server certificate, the private key pair file, and the client root certificate in the appropriate locations on the server. In the case of an Apache installation on Linux, these locations are typically as follows: # Server Certificate: SSLCertificateFile /etc/httpd/conf/provserver.cert # Server Private Key: SSLCertificateKeyFile /etc/httpd/conf/pivkey.pem # Certificate Authority: SSLCACertificateFile /etc/httpd/conf/spacroot.cert |
| Step 5 | Restart the server. |
| Step 6 | Copy the basic.txt configuration file (described in the TFTP Resync section) onto the virtual root directory of the HTTPS server. |
| Step 7 | Verify proper server operation by downloading basic.txt from the HTTPS server by using a standard browser from the local PC. |
| Step 8 | Inspect the server certificate that the server supplies. The browser probably does not recognize the certificate as valid unless the browser has been pre-configured to accept Cisco as a root CA. However, the Cisco IP Phones expect the certificate to be signed this way. Modify the Profile_Rule of the test device to contain a reference to the HTTPS server, for example: <Profile_Rule> https://my.server.com/basic.txt </Profile_Rule> This example assumes the name of the HTTPS server is my.server.com. |
| Step 9 | Click Submit All Changes. |
| Step 10 | Observe the syslog trace that the Cisco IP Phone sends. The syslog message should indicate that the resync obtained the profile from the HTTPS server. |
| Step 11 | (Optional)Use an Ethernet protocol analyzer on the Cisco IP Phone subnet to verify that the packets are encrypted.
In this exercise, client certificate verification was not enabled. The connection between Cisco IP Phone and server is encrypted. However, the transfer is not secure because any client can connect to the server and request the file, given knowledge of the file name and directory location. For secure resync, the server must also authenticate the client, as demonstrated in the exercise described in the HTTPS with Client Certificate Authentication section. |
HTTPS with Client Certificate Authentication
In the factory default configuration, the server does not request a SSL client certificate from a client. Transfer of the profile is not secure because any client can connect to the server and request the profile. You can edit the configuration to enable client authentication; the server requires a client certificate to authenticate the Cisco IP Phone before it accepts a connection request.
Because of this requirement, the resync operation cannot be independently tested by using a browser that lacks the proper credentials. The SSL key exchange within the HTTPS connection between the test Cisco IP Phone and the server can be observed with the ssldump utility. The utility trace shows the interaction between client and server.
Exercise: HTTPS with Client Certificate Authentication
| Step 1 | Enable client certificate authentication on the HTTPS server. |
| Step 2 | In Apache (v.2), set the following in the server configuration file: SSLVerifyClient require Also, ensure that the spacroot.cert has been stored as shown in the Basic HTTPS Resync exercise. |
| Step 3 | Restart the HTTPS server and observe the syslog trace from the Cisco IP Phone. Each resync to the server now performs symmetric authentication, so that both the server certificate and the client certificate are verified before the profile is transferred. |
| Step 4 | Use ssldump to capture a resync connection between the Cisco IP Phone and the HTTPS server. If client certificate verification is properly enabled on the server, the ssldump trace shows the symmetric exchange of certificates (first server-to-client, then client-to-server) before the encrypted packets that contain the profile. With client authentication enabled, only a Cisco IP Phone with a MAC address that matches a valid client certificate can request the profile from the provisioning server. The server rejects a request from an ordinary browser or other unauthorized device. |
HTTPS Client Filtering and Dynamic Content
If the HTTPS server is configured to require a client certificate, the information in the certificate identifies the resyncing Cisco IP Phone and supplies it with the correct configuration information.
The HTTPS server makes the certificate information available to CGI scripts (or compiled CGI programs) that are invoked as part of the resync request. For the purpose of illustration, this exercise uses the open source Perl scripting language, and assumes that Apache (v.2) is used as the HTTPS server.
HTTPS Certificate
The Cisco IP Phone provides a reliable and secure provisioning strategy that is based on HTTPS requests from the device to the provisioning server. Both a server certificate and a client certificate are used to authenticate the Cisco IP Phone to the server and the server to the Cisco IP Phone.
To use HTTPS with the phone, you must generate a Certificate Signing Request (CSR) and submit it to Cisco. The Cisco IP Phone generates a certificate for installation on the provisioning server. The Cisco IP Phone accepts the certificate when it seeks to establish an HTTPS connection with the provisioning server.
- HTTPS Methodology
- SSL Server Certificate
- Obtain a Server Certificate
- Client Certificate
- Certificate Structure
- Configure a Custom Certificate Authority
HTTPS Methodology
HTTPS encrypts the communication between a client and a server, thus protecting the message contents from other network devices. The encryption method for the body of the communication between a client and a server is based on symmetric key cryptography. With symmetric key cryptography, a client and a server share a single secret key over a secure channel that is protected by Public/Private key encryption.
Messages encrypted by the secret key can only be decrypted by using the same key. HTTPS supports a wide range of symmetric encryption algorithms. The Cisco IP Phone implements up to 256-bit symmetric encryption, using the American Encryption Standard (AES), in addition to 128-bit RC4.
HTTPS also provides for the authentication of a server and a client engaged in a secure transaction. This feature ensures that a provisioning server and an individual client cannot be spoofed by other devices on the network. This capability is essential in the context of remote endpoint provisioning.
Server and client authentication is performed by using public/private key encryption with a certificate that contains the public key. Text that is encrypted with a public key can be decrypted only by its corresponding private key (and vice versa). The Cisco IP Phone supports the Rivest-Shamir-Adleman (RSA) algorithm for public/private key cryptography.
SSL Server Certificate
Each secure provisioning server is issued a secure sockets layer (SSL) server certificate that Cisco signs directly. The firmware that runs on the Cisco IP Phone recognizes only a Cisco certificate as valid. When a client connects to a server by using HTTPS, it rejects any server certificate that is not signed by Cisco.
This mechanism protects the service provider from unauthorized access to the Cisco IP Phone, or any attempt to spoof the provisioning server. Without such protection, an attacker might be able to reprovision the Cisco IP Phone, to gain configuration information, or to use a different VoIP service. Without the private key that corresponds to a valid server certificate, the attacker is unable to establish communication with a Cisco IP Phone.
Obtain a Server Certificate
Client Certificate
In addition to a direct attack on a Cisco IP Phone, an attacker might attempt to contact a provisioning server through a standard web browser or another HTTPS client to obtain the configuration profile from the provisioning server. To prevent this kind of attack, each Cisco IP Phone also carries a unique client certificate, signed by Cisco, that includes identifying information about each individual endpoint. A certificate authority root certificate that is capable of authenticating the device client certificate is given to each service provider. This authentication path allows the provisioning server to reject unauthorized requests for configuration profiles.
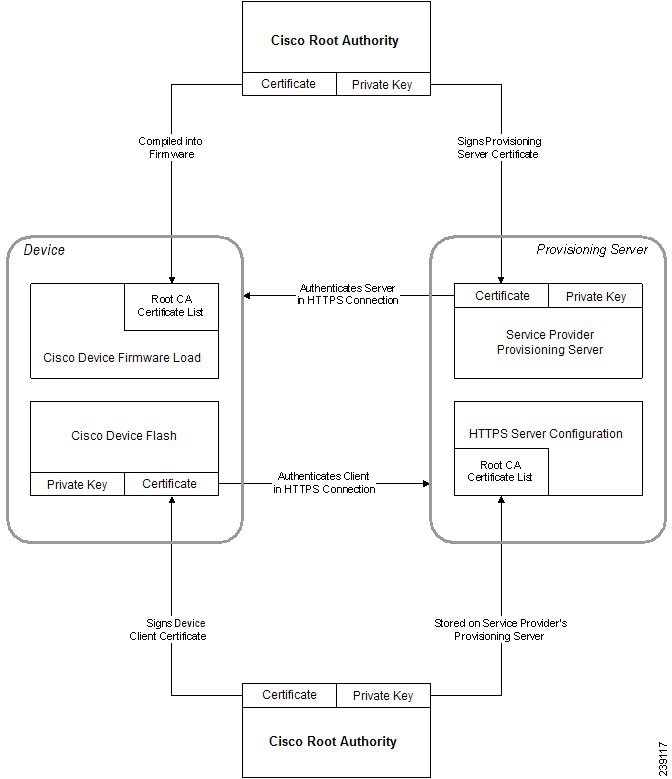
Certificate Structure
The combination of a server certificate and a client certificate ensures secure communication between a remote Cisco IP Phone and its provisioning server. Figure 4-1 illustrates the relationship and placement of certificates, public/private key pairs, and signing root authorities, among the Cisco client, the provisioning server, and the certification authority.
The upper half of the diagram shows the Provisioning Server Root Authority that is used to sign the individual provisioning server certificate. The corresponding root certificate is compiled into the firmware, which allows the Cisco IP Phone to authenticate authorized provisioning servers.
Configure a Custom Certificate Authority
Digital certificates can be used to authenticate network devices and users on the network. They can be used to negotiate IPSec sessions between network nodes.
A third party uses a Certificate Authority certificate to validate and authenticate two or more nodes that are attempting to communicate. Each node has a public and private key. The public key encrypts data. The private key decrypts data. Because the nodes have obtained their certificates from the same source, they are assured of their respective identities.
The device can use digital certificates provided by a third-party Certificate Authority (CA) to authenticate IPSec connections.
The phones support a set of preloaded Root Certificate Authority embedded in the firmware:
Profile Management
This section demonstrates the formation of configuration profiles in preparation for downloading. To explain the functionality, TFTP from a local PC is used as the resync method, although HTTP or HTTPS can be used as well.
Open Profile gzip Compression
A configuration profile in XML format can become quite large if the profile specifies all parameters individually. To reduce the load on the provisioning server, the Cisco IP Phone supports compression of the XML file, by using the deflate compression format that the gzip utility (RFC 1951) supports.
 Note | Compression must precede encryption for the Cisco IP Phone to recognize a compressed and encrypted XML profile. |
For integration into customized back-end provisioning server solutions, the open source zlib compression library can be used in place of the standalone gzip utility to perform the profile compression. However, the Cisco IP Phone expects the file to contain a valid gzip header.
| Step 1 | Install gzip on the local PC. |
| Step 2 | Compress the basic.txt configuration profile (described in the TFTP Resync section) by invoking gzip from the command line:
gzip basic.txt |
| Step 3 | Save the basic.txt.gz file in the TFTP server virtual root directory. |
| Step 4 | Modify the Profile_Rule on the test device to resync to the deflated file in place of the original XML file, as shown in the following example: tftp://192.168.1.200/basic.txt.gz |
| Step 5 | Click Submit All Changes. |
| Step 6 | Observe the syslog trace from the Cisco IP Phone.
Upon resync, the Cisco IP Phone downloads the new file and uses it to update its parameters. |
Profile Encryption by Using OpenSSL
A compressed or uncompressed profile can be encrypted (however, a file must be compressed before it is encrypted). Encryption is useful when the confidentiality of the profile information is of particular concern, such as when TFTP or HTTP is used for communication between the Cisco IP Phone and the provisioning server.
The Cisco IP Phone supports symmetric key encryption by using the 256-bit AES algorithm. This encryption can be performed by using the open source OpenSSL package.
| Step 1 | Install OpenSSL on a local PC. This might require that the OpenSSL application be recompiled to enable AES. |
| Step 2 | Using the basic.txt configuration file (described in the TFTP Resync section), generate an encrypted file with the following command:
>openssl enc –aes-256-cbc –k MyOwnSecret –in basic.txt –out basic.cfg The compressed basic.txt.gz file that was created in Open Profile gzip Compression also can be used, because the XML profile can be both compressed and encrypted. |
| Step 3 | Store the encrypted basic.cfg file in the TFTP server virtual root directory. |
| Step 4 | Modify the Profile_Rule on the test device to resync to the encrypted file in place of the original XML file. The encryption key is made known to the Cisco IP Phone with the following URL option: [--key MyOwnSecret ] tftp://192.168.1.200/basic.cfg |
| Step 5 | Click Submit All Changes. |
| Step 6 | Observe the syslog trace from the Cisco IP Phone.
Upon resync, the Cisco IP Phone downloads the new file and uses it to update its parameters. |
Partitioned Profiles
A Cisco IP Phone downloads multiple separate profiles during each resync. This practice allows management of different kinds of profile information on separate servers and maintenance of common configuration parameter values that are separate from account specific values.
 Feedback