Managed File Transfer

Managed File Transfer

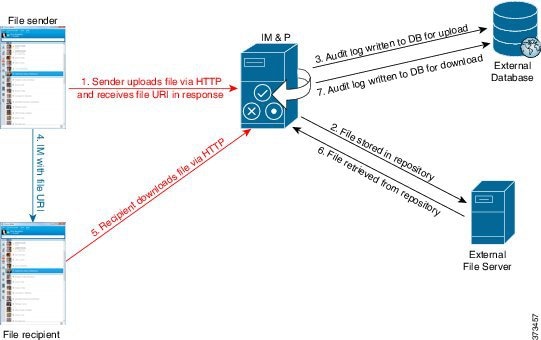
Managed file transfer (MFT) allows an IM and Presence Service client, such as Cisco Jabber, to transfer files to other users, ad hoc group chat rooms, and persistent chat rooms. The files are stored in a repository on an external file server and the transaction is logged to an external database.

This configuration is specific to file transfers and has no impact on the message archiver feature for regulatory compliance.

File Transfer Flow

  1. The sender's client uploads the file via HTTP, and the server responds with a URI for the file.

  2. The file is stored in the repository on the file server.

  3. An entry is written to the external database log table to record the upload.

  4. The sender’s client sends an IM to the recipient; the IM includes the URI of the file.

  5. The recipient’s client requests the file via HTTP. After reading the file from the repository (6) and recording the download in the log table (7), the file is downloaded to the recipient.

The flow for transferring a file to a group chat or persistent chat room is similar, except the sender sends the IM to the chat room, and each chat room participant sends a separate request to download the file.


Note

When a file upload occurs, the managed file transfer service is selected from all managed file transfer services available in the enterprise for the given domain. The file upload is logged to the external database and external file server associated with the node where this managed file transfer service is running. When a user downloads this file, the same managed file transfer service handles the request and logs it to the same external database and the same external file server, regardless of where this second user is homed.


Important Notes

Before you enable managed file transfer on an IM and Presence Service node consider these points:

  • If you deploy any combination of the persistent group chat, message archiver, or managed file transfer features on an IM and Presence Service node, you can assign the same physical external database installation and external file server to all of these features. However, you should consider the potential IM traffic, the number of file transfers, and the file size when you determine the server capacity.

  • Ensure that all clients can resolve the full FQDN of the IM and Presence Service node to which they are assigned. For the managed file transfer feature to work, it is not enough for the clients to resolve the hostname; they must be able to resolve the FQDN.

  • The node public key is invalidated if the node's assignment is removed. If the node is reassigned, a new node public key is automatically generated and the key must be reconfigured on the external file server.

  • The Cisco XCP File Transfer Manager service must be active on each node where managed file transfer is enabled.

You can configure one of the following options on the File Transfer window:

  • Disabled—file transfer is disabled for the cluster.

  • Peer-to-Peer—one-to-one file transfers are allowed, but files are not archived or stored on a server. Group chat file transfer is not supported.

  • Managed File Transfer—one-to-one and group file transfers are allowed. File transfers are logged to a database and the transferred files are stored on a server. The client must also support managed file transfer, otherwise no file transfers are allowed.

  • Managed and Peer-to-Peer File Transfer—one-to-one and group file transfers are allowed. File transfers are logged to a database and the transferred files are stored on a server only if the client supports managed file transfer. If the client does not support managed file transfer, this option is equivalent to the Peer-to-Peer option.


Note

If managed file transfer is configured on a node and you change the File Transfer Type to Disabled or Peer-to-Peer, be aware that the mapped settings to the external database and to the external file server for that node are deleted. The database and file server remain configured but you must reassign them if you re-enable managed file transfer for the node.


Depending on your pre-upgrade setting, after an upgrade to IM and Presence Service Release 10.5(2) or later, either Disabled or Peer-to-Peer is selected.

External Database

You require one unique logical external database instance for each IM and Presence Service node in an IM and Presence Service cluster. The external database logs the metadata associated with a file transfer, including:

  • AFT index—the sequence number that identifies the transaction.

  • JID—the Jabber ID of the user who uploaded or downloaded a file.

  • To JID—the Jabber ID of the user, group chat, or persistent room that is the intended recipient of the file transfer.

  • File name—the autogenerated encoded resource name assigned to the uploaded file.

  • Real file name—the real name of the uploaded file.

  • File server—the hostname or IP address of the file server where the file is stored.

  • File path—the absolute path to the file (including the file name) on the file server.

  • File size—the size of the file in bytes.

  • Time stamp value—the date and time (UTC) the file was uploaded or downloaded.


    Note

    For a full list of the logged metadata, see Database Setup for IM and Presence Service on Cisco Unified Communications Manager at this link.


Important Notes

  • The external database requirements and restrictions differ depending on the features you want to deploy on IM and Presence Service:
    • Managed file transfer—you require one unique logical external database instance for each IM and Presence Service node in an IM and Presence Service cluster.

    • Persistent group chat—you require one unique logical external database instance for each IM and Presence Service node in an IM and Presence Service cluster.


      Note

      Each node requires its own logical database instance, but nodes can share the same physical database installation.


    • Message archiver—we highly recommend that you configure at least one logical external database instance for an IM and Presence Service cluster. However, you may require more than one external database for a cluster depending on your IM traffic and server capacity.

  • If IM and Presence Service connects to an external database server using IPv6, ensure that the enterprise parameter is configured for IPv6 and that the Ethernet interface is set for IPv6 on each node in the deployment. Otherwise, the connection to the external database server fails and the Cisco XCP Message Archiver and Cisco XCP Text Conference Manager services are unable to connect to the external database and fail. For information about configuring IPv6 on IM and Presence Service, see the Related Topics.

  • For information about database size and scalability for the managed file transfer feature, see the Cisco Collaboration System Solution Reference Network Designs (SRND) document at this link: http://www.cisco.com/c/en/us/solutions/enterprise/unified-communication-system/index.html

External Database Disk Usage

You are responsible for managing the database disk usage. You must ensure that the disks or tablespaces do not become full, otherwise the managed file transfer feature may stop working. There are counters and alerts to help you manage database disk usage. See Cisco XCP File Transfer Manager RTMT Alarms and Counters.

The following are sample SQL commands that you can use to purge records from the external database:
  • to remove all records of files that were uploaded, run the following command:

    DELETE

    FROM aft_log

    WHERE method = 'Post';

  • to remove records of all files that were downloaded by a specific user, run the following command:

    DELETE  

    FROM aft_log

    WHERE jid LIKE '<userid>@<domain>%' AND method = 'Get';

  • to remove records of all files that were uploaded after a specific time, run the following command:

    DELETE

    FROM aft_log

    WHERE method = 'Post' AND timestampvalue > '2014-12-18 11:58:39';

See Database Setup for IM and Presence Service on Cisco Unified Communications Manager at this link for sample SQL queries that you can adapt to purge records from the external database.


Note

Files that have not been purged from the external file server can still be accessed or downloaded even if records relating to those files have been purged from the external database.


External File Server

The file server is the repository for files transferred by the managed file transfer feature. Metadata associated with a managed file transfer is stored in an external database.


Note

Files are stored on an external Linux file server, not on the IM and Presence Service node.


External File Server Requirements

Note the following requirements for the external file server.

  • Subject to file server capacity, each IM and Presence Service node requires its own unique logical file server directory, however, nodes can share the same physical file server installation.

  • The file server must support an ext4 file system, SSHv2, and SSH tools.

  • The file server must support OpenSSH 4.9 or later.

  • The network throughput between IM and Presence Service and the external file server must be greater than 60 megabytes per second.

    You can use the show fileserver transferspeed CLI command after you enable managed file transfer to determine your file server transfer speed. Be aware that if you run this command while the system is busy, it may impact the value returned by the command. For more information about this command, see the Command Line Interface Guide for Cisco Unified Communications Solutions at this link.

Recommendations for File Storage Partitions

Cisco recommends that you create one or more separate partitions that are dedicated to file transfer storage so that other applications that run on the server do not write to it. All file storage directories should be created on these partitions.

Consider the following:

  • If you create partitions, be sure to consider that the IM and Presence Service default file size setting (0) allows files up to 4GB to be transferred. This setting can be lowered when you set up managed file transfer.

  • Consider the number of uploads per day and the average file size.

  • Ensure that the partition has sufficient disk space to hold the expected volume of files.

    For example, 12000 users transfer 2 files per hour with an average file size of 100KB = 19.2GB per 8 hour day.

Important Notes

  • You provide and maintain the external file server.

  • You are responsible for managing file storage and disk usage. For more information about file server management, see the Related References.

    There are counters and alerts to help you manage file server disk usage. For more information about the managed file transfer alarms and counters, see the Related References.

  • A file server partition/directory is mounted in the IM and Presence Service directory that is used to store files.

  • The connection to the file server is encrypted using SSHFS, so the content of all files is encrypted.

User Authentication

IM and Presence Service authenticates itself and the file server using SSH keys:
  • IM and Presence Service public key is stored on the file server.

  • During connection, SSHFS validates the IM and Presence Service private key.

  • The file server public key is stored on IM and Presence Service. This allows the IM and Presence Service to ensure that it is connecting to the configured file server and minimize man-in-the-middle attacks.

Public and Private Keys

When a server private/public key pair is generated the private key is usually written to /etc/ssh/ssh_host_rsa_key

The public key is written to /etc/ssh/ssh_host_rsa_key.pub

If these files do not exist, complete the following procedure:

  1. Enter the following command:

    $ ssh-keygen -t rsa -b 2048

  2. Copy the file server's public key.

    You must copy the entire string of text for the public key from the hostname, FQDN, or the IP address (for example, hostname ssh-rsa AAAAB3NzaC1yc...). In most Linux deployments the key contains the server's hostname or FQDN.


    Tip

    If the output from the $ ssh-keygen -t rsa -b 2048 command doesn't contain a hostname, then use the output from the following command instead: $ ssh-keyscan hostname


  3. For each IM and Presence Service node that is configured to use this file server, paste the public key into the External File Server Public Key field on the External File Server Configuration window.


Important

Passwordless SSH must be configured for the managed file transfer feature. See the SSHD man page for full configuration instructions for passwordless SSH.


Note

While checking the status from the publisher node to the subscriber node, and vice verse the information message "The diagnostics tests for this External File Server may be run from here." is displayed.

In the logs we see "pingable": "-7", which means we are viewing the status of other node where the external file server is not configured.

We configure external file server on the publisher node and the publisher nodes public key is shared in the external file server's "Authorized_key" file.


File Server Directories

You can create any directory structure you want, with any directory names. Be certain to create a directory for each managed file transfer enabled node. Later, when you enable managed file transfer on IM and Presence Service, you must assign each directory to a node.


Important

You must create a directory for each node that has managed file transfer enabled.


When the first file transfer occurs, timestamped subdirectories are automatically created, as described in this example:

  • We create the path /opt/mftFileStore/node_1/ on an IM and Presence Service node1.

  • The directory /files/ is autogenerated.

  • The three /chat_type/ directories (im, persistent, groupchat) are autogenerated.

  • The date directory /YYYYMMDD/ is autogenerated.

  • The hour directory /HH/ is autogenerated. If more than 1,000 files are transferred within an hour, additional roll-over directories /HH.n/ are created.

  • The file is saved with an autogenerated encoded resource name, hereafter referred to as file_name.

In this example, our complete path to a file is: /opt/mftFileStore/node_1/files/chat_type/YYYYMMDD/HH/file_name

Using our example path:

  • Files transferred during one-to-one IM on August 11th 2014 between 15.00 and 15.59 UTC are in the following directory:

    /opt/mftFileStore/node_1/files/im/20140811/15/file_name

    Files transferred during persistent group chat on August 11th 2014 between 16.00 and 16.59 UTC are in the following directory:

    /opt/mftFileStore/node_1/files/persistent/20140811/16/file_name

  • The 1001st file transferred during ad hoc chat on August 11th 2014 between 16.00 and 16.59 UTC is in the following directory:

    /opt/mftFileStore/node_1/files/groupchat/20140811/16.1/file_name

  • If no file transfers occur inside of an hour, there are no directories created for that period.


Note

The traffic between IM and Presence Service and the file server is encrypted using SSHFS, but the file contents are written to the file server in unencrypted form.


File Server Management

You are responsible for managing file storage and disk usage. To manage the size of the external database, you can automatically purge files by combining queries with shell scripting. Your queries can use the metadata that is created when files are transferred including transfer type, file type, timestamp, absolute path on the file server to the file, and other information.


Note

Do not purge files that were created during the current UTC hour.


When choosing how to handle IM and group chat, consider that one-to-one IM and group chat are probably transient so transferred files may be deleted promptly. However, keep in mind that:

  • IMs delivered to offline users may trigger a delayed request for a file.
  • Persistent chat transfers may need to be longer lived.

Sample Query and Output

You can perform queries on the AFT_LOG table and then use the output of the queries to purge unwanted files from the external file server.

For example, the following query returns records for every file that was uploaded after a specific date:

SELECT file_path

FROM aft_log

WHERE method = 'Post' AND timestampvalue > '2014-12-18 11:58:39';

The output of this query would be something like this:

/opt/mftFileStore/node_1/files/im/20140811/15/file_name1

/opt/mftFileStore/node_1/files/im/20140811/15/file_name2

/opt/mftFileStore/node_1/files/im/20140811/15/file_name3

/opt/mftFileStore/node_1/files/im/20140811/15/file_name4

...

/opt/mftFileStore/node_1/files/im/20140811/15/file_name99

/opt/mftFileStore/node_1/files/im/20140811/15/file_name100

You can then write a script that uses the rm command and this output to remove these files from the external file server. See Database Setup for IM and Presence Service on Cisco Unified Communications Manager at this link for more sample SQL queries that you can use to purge records from the external file server.


Note

Files that have not been purged from the external file server can still be accessed or downloaded even if records relating to those files have been purged from the external database.


Managed File Transfer Service Parameters

To help you to manage the external file server disk space, you can define the thresholds at which an RTMT alarm is generated with the following service parameters (for the Cisco XCP File Transfer Manager service):
  • External File Server Available Space Lower Threshold—If the percentage of available space on the external file server partition is at or below this value, the XcpMFTExtFsFreeSpaceWarn alarm is raised. The default value for this service parameter is 10%.

  • External File Server Available Space Upper Threshold—If the percentage of available space on the external file server partition reaches or exceeds this value, the XcpMFTExtFsFreeSpaceWarn alarm is cleared. The default value for this service parameter is 15%.

You must restart the Cisco XCP Router service after you change either of these parameters. To configure these parameters, log in to the Cisco Unified CM IM and Presence Administration interface, choose System > Service Parameters, and select the Cisco XCP File Transfer Manager service for the node.


Tip

Do not configure the lower threshold value to be greater than the upper threshold value. Otherwise the Cisco XCP File Transfer Manager service will not start after you restart the Cisco XCP Router service.


Cisco XCP File Transfer Manager RTMT Alarms and Counters

Alerts

When an IM and Presence Service node is integrated with an external server and external database for managed file transfers, the transferred files are delivered to users after they are successfully archived to the external file server and after the file metadata is logged to the external database.

If an IM and Presence Service node loses its connection to the external file server or to the external database, IM and Presence Service does not deliver the file to the recipient.

To ensure that you are notified if the connections are lost, you should verify that the following RTMT alarm settings are properly configured.


Note

Any files that were uploaded before the connection to the external file server was lost and were in the process of being downloaded, fail to be downloaded. However, there is a record of the failed transfer in the external database. To identify these files, the external database fields file_size and bytes_transferred do not match.


Alarm

Problem

Solution

XcpMFTExtFsMountError

Cisco XCP File Transfer Manager has lost its connection to the external file server.

Check the External File Server Troubleshooter for more information.

Check that the external file server is running correctly.

Check if there is any problem with the network connectivity to the external file server.

XcpMFTExtFsFreeSpaceWarn

Cisco XCP File Transfer Manager has detected that the available disk space on the external file server is low.

Free up space on the external file server by deleting unwanted files from the partition used for file transfer.

XcpMFTDBConnectError

Cisco XCP data access layer was unable to connect to the database.

Check the System Troubleshooter for more information.

Check that the external database is running healthy and if there is any problem with the network connectivity to the external database server.

XcpMFTDBFullError

Cisco XCP File Transfer Manager cannot insert or modify data in the external database because either the disk or tablespace is full.

Check the database and assess if you can free up or recover any disk space.

Consider adding additional database capacity.

Cisco XCP MFT Counters

To help you administer managed file transfer, one new folder (Cisco XCP MFT Counters) and six new counters have been added to the RTMT.

Counter

Description

MFTBytesDownloadedLastTimeslice

This counter represents the number of bytes downloaded during the last reporting interval (typically 60 seconds).

MFTBytesUpoadedLastTimeslice

This counter represents the number of bytes uploaded during the last reporting interval (typically 60 seconds).

MFTFilesDownloaded

This counter represents the total number of files downloaded.

MFTFilesDownloadedLastTimeslice

This counter represents the number of files downloaded during the last reporting interval (typically 60 seconds).

MFTFilesUploaded

This counter represents the total number of files uploaded.

MFTFilesUploadedLastTimeslice

This counter represents the number of files uploaded during the last reporting interval (typically 60 seconds).

Configure XCP File Transfer Manager Alarms

Procedure


Step 1

Log in to Cisco Unified IM and Presence Serviceability.

Step 2

Choose Alarm > Configuration.

Step 3

Choose the server (node) to configure the alarm from the Server drop-down list, and click Go.

Step 4

Choose IM and Presence Services from the Service Group drop-down list, and click Go.

Step 5

Choose Cisco XCP File Transfer Manager (Active) from the Service drop-down list, and click Go.

Step 6

Configure the alarm settings as preferred and click Save.


Managed File Transfer Workflow

Procedure

  Command or Action Purpose
Step 1

Set up an external database, see Database Setup for IM and Presence Service on Cisco Unified Communications Manager at this link.

The external database is a repository that stores the metadata associated with archived files.
Step 2

Configure an External Database Instance on IM and Presence Service

Provides the steps required to connect the IM and Presence Service node to an external database.
Step 3

Set Up an External File Server

Provides the steps to configure an external Linux file server.
Step 4

Configure an External File Server Instance on IM and Presence Service

Provides the steps required to connect the IM and Presence Service node to an external file server.
Step 5

Enable Managed File Transfer on IM and Presence Service

Contains the set of instructions to enable the managed file transfer feature on the IM and Presence Service node. Provides ways to link the node to the external database and to link the node to the external file server.

Configure an External Database Instance on IM and Presence Service

Perform this configuration on the IM and Presence Service database publisher node of your cluster.

Before you begin

  • Install and configure an external database, see Database Setup for IM and Presence Service on Cisco Unified Communications Manager at this link.

  • Obtain the hostname or IP address of the external database.

  • If using Oracle as your database, retrieve the tablespace value.

    To determine the tablespace available for your Oracle database, execute the following query as sysdba:

    SELECT DEFAULT_TABLESPACE FROM DBA_USERS WHERE USERNAME = 'UPPER_CASE_USER_NAME';

Procedure


Step 1

Log in to the Cisco Unified CM IM and Presence Administration user interface. Choose Messaging > External Server Setup > External Databases.

Step 2

Click Add New.

Step 3

In the External Database Settings window, enter the following fields and click Save.

Field Description

Database Name

Enter the name of the database that was defined during the external database installation.

Note 

If you are using Oracle, this value must match the Windows service name.

Database Type

From the drop-down list choose the database type: Postgres or Oracle.

Note 

If Oracle is chosen as the database type, the Enable SSL check box and the Tablespace field become active.

Tablespace

Enter the tablespace value.

User Name

Enter the user name for the database user (owner) that you defined during external database installation.

Password

Enter and confirm the password for the database user.

Hostname

Enter the hostname or IP address for the external database.

Port Number

Enter a port number for the external database.

Note 

The default port numbers for Postgres (5432), Oracle (1521), and Oracle with SSL enabled (2484) are prepopulated in the Port Number field. You can choose to enter a different port number if required.

Enable SSL

Check the check box if you want to enable SSL.

  • The check box becomes enabled when Oracle is chosen as the Database Type. The option is not available with Postgres databases.

  • When you change either the Enable SSL check box, or the Certificate Name drop-down field, or both, a notification to restart the corresponding service (Cisco XCP Message Archiver or Cisco XCP Text Conference Manager) assigned to the external database is sent.

Certificate Name

From the drop-down list, choose a certificate.

  • The drop-down list becomes active when the Enable SSL check box is checked.

  • The certificate you need to enable SSL must be uploaded to the cup-xmpp-trust store.

  • After the certificate is uploaded to the cup-xmpp-trust store, you must wait 15 minutes for the certificate to propagate to all the nodes of the IM and Presence Service cluster. If you do not wait, the SSL connection on nodes where the certificate has not propagated fails.

  • If the certificate is missing or deleted from the cup-xmpp-trust store, an alarm XCPExternalDatabaseCertificateNotFound is raised in the Cisco Unified Communications Manager Real Time Monitoring Tool (RTMT).

After you click Save, IM and Presence Service provides the following status information on an external database:

  • Database reachability—verifies that IM and Presence Service can ping an external database.

  • Database connectivity—verifies that IM and Presence Service has successfully established an Open Database Connectivity (ODBC) connection with the external database.

  • Database schema verification—verifies that the external database schema is valid.


Postgres only: If you make a configuration change in the install_dir/data/pg_hba.conf file or the install_dir/data/postgresql.conf file after you assign the external database, you should verify the external database connection.

What to do next

Set Up an External File Server

Set Up an External File Server

Prerequisites

Tasks to complete before you begin to set up an external file server:

Before setting up users, directories, ownership, permissions and other tasks on the file server, complete these steps.

Procedure

Step 1

Install a supported version of Linux.

Step 2

Verify the file server supports SSHv2 and OpenSSH 4.9 or later by entering one of the following commands as root:

# telnet localhost 22

Trying ::1...

Connected to localhost.

Escape character is '^]'.

SSH-2.0-OpenSSH_5.3

Or

# ssh -v localhost

OpenSSH_5.3p1, OpenSSL 1.0.0-fips 29 Mar 2010

debug1: Reading configuration data /root/.ssh/config ...

...debug1: Local version string SSH-2.0-OpenSSH_5.3

...

Step 3

To allow private/public key authentication, make sure that you have the following fields in the /etc/ssh/sshd_config file, set to yes.

  • RSAAuthentication yes

  • PubkeyAuthentication yes

If these are commented out in the file, the setting can be left alone.

Tip 

To enhance security, you can also disable password log in for the file transfer user (mftuser in our example). This forces logging in only by SSH public/private key authentication.

Step 4

Cisco recommends that you create one or more separate partitions that are dedicated to file transfer storage so that other applications that run on the server do not write to it. All file storage directories should be created on these partitions. See the External File Server Requirements topic for more information.


What to do next

Set Up a User

Set Up a User

Procedure

Step 1

On the file server as root, create a user who owns the file storage directory structure (our example uses mftuser) and force creation of the home directory (-m).

# useradd -m mftuser

# passwd mftuser

Step 2

Switch to the mftuser.

# su mftuser

Step 3

Create a .ssh directory under the ~mftuser home directory that is used as a key store.

$ mkdir ~mftuser/.ssh/

Step 4

Create an authorized_keys file under the .ssh directory that is used to hold the public key text for each managed file transfer enabled node.

$ touch ~mftuser/.ssh/authorized_keys

Step 5

Set the correct permissions for passwordless SSH to function.

$ chmod 700 ~mftuser (directory)

$ chmod 700 ~/.ssh (directory)

$ chmod 700 ~/.ssh/authorized_keys (file)

Note 

On some Linux systems these permissions may vary, depending on your SSH configuration.


What to do next

Set Up Directories

Set Up Directories

Procedure

Step 1

Switch back to the root user.

$ exit

Step 2

Create a top-level directory structure (our example uses /opt/mftFileStore/) to hold directories for all of the IM and Presence Service nodes that have managed file transfer enabled.

# mkdir -p /opt/mftFileStore/

Step 3

Give mftuser sole ownership of the /opt/mftFileStore/ directory.

# chown mftuser:mftuser /opt/mftFileStore/

Step 4

Give the mftuser sole permissions to the mftFileStore directory.

# chmod 700 /opt/mftFileStore/

Step 5

Switch to the mftuser.

# su mftuser

Step 6

Create a subdirectory under /opt/mftFileStore/ for each managed file transfer enabled node. (Later, when you enable managed file transfer, you assign each directory to a node.)

$ mkdir /opt/mftFileStore/{node_1,node_2,node_3}

Note 
  • These directories and paths are used in the External File Server Directory field that you enter in the Deploy an External File Server on IM and Presence Service task.

  • If you have multiple IM and Presence Service nodes writing to this file server, you must define a target directory for each node, as we did in our example for three nodes{node_1,node_2,node_3}.

  • Within each node's directory, the transfer type subdirectories (im, groupchat, and persistent) are automatically created by IM and Presence Service, as are all subsequent directories.


What to do next

Obtain the Public Key

Obtain the Public Key

Procedure

Step 1

To retrieve the file server's public key, enter:

$ ssh-keyscan -t rsa host

Where host is the hostname, FQDN, or IP address of the file server.

Note 
  • To avoid a man-in-the-middle attack, where the file server public key is spoofed, you must verify that the public key value that is returned by the ssh-keyscan -t rsa host command is the real public key of the file server.

  • On the file server go to the location of the ssh_host_rsa_key.pub file (in our system it is under /etc/ssh/ ) and confirm the contents of the public key file, minus the host (the host is absent in the ssh_host_rsa_key.pub file on the file server), matches the public key value returned by the command ssh-keyscan -t rsa host.

Step 2

Copy the result of the ssh-keyscan -t rsa host command, not what is in the ssh_host_rsa_key.pub file. Be certain to copy the entire key value, from the server hostname, FQDN, or IP address to the end.

Note 

In most cases the server key begins with the hostname or FQDN, although it may begin with an IP address.

For example, copy:

hostname ssh-rsa AAAQEAzRevlQCH1KFAnXwhd5UvEFzJs...

...a7y49d+/Am6+ZxkLc4ux5xXZueL3GSGt4rQUy3rp/sdug+/+N9MQ==

(ellipses added).

Step 3

Save the result of the ssh-keyscan -t rsa host command to a text file. It is needed when you configure the file server during the Deploy an External File Server on IM and Presence Service procedure.

Step 4

Open the authorized_keys file you created and leave it open. It is used in the Enable Managed File Transfer on IM and Presence Service procedure.


What to do next

Configure an External File Server Instance on IM and Presence Service

Configure an External File Server Instance on IM and Presence Service

The following procedure describes how to configure an external file server instance on IM and Presence Service. You must configure one external file server instance for each node in your cluster that will have managed file transfer enabled. The external file server instances do not need to be physical instances of the external file server. However, be aware that for a given hostname, you must specify a unique external file server directory path for each external file server instance. You can configure all the external file server instances from the same node.

Before you begin

Procedure


Step 1

Log in to the Cisco Unified CM IM and Presence Administration user interface. Choose Messaging > External Server Setup > External File Servers.

Step 2

Click Add New.

The External File Servers window appears.
Step 3

Enter the server details.

Field Description

Name

Enter the name of the file server. Ideally the server name should be descriptive enough to be instantly recognized.

Maximum characters: 128. Allowed values are alphanumeric, dash, and underscore.

Host/IP Address

Enter the hostname or IP address of the file server.

Note 
  • The value entered for the Host/IP Address field must match the beginning of the key that is entered for the External File Server Public Key field (follows).

  • If you change this setting, you must restart the Cisco XCP Router service.

External File Server Public Key

Paste the file server's public key (the key you were instructed to save to a text file) in to this field.

If you did not save the key it can be retrieved from the file server by running the command:

$ ssh-keyscan -t rsa host on the file server. Where host is the IP address, hostname, or FQDN of the file server.

You must copy and paste the entire key text starting with the hostname, FQDN, or IP address to the end. For example, copy:

extFileServer.cisco.com ssh-rsa AAAQEAzRevlQCH1KFAnXwhd5UvEFzJs...

...a7y49d+/Am6+ZxkLc4ux5xXZueL3GSGt4rQUy3rp/sdug+/+N9MQ==

(ellipses added).

Important 

This value must begin with the hostname, FQDN, or IP address that you entered for the Host/IP Address field. For example, if extFileServer is used in the Host/IP Address field, then this field must begin with extFileServer followed by the entire rsa key.

External File Server Directory

The path to the top of the file server directory hierarchy. For example, /opt/mftFileStore/node_1/

User Name

The user name of the external file server administrator.

Step 4

Repeat these steps to create an external file server instance for each node in the cluster that will have managed file transfer enabled.

Step 5

Click Save.


File Server Troubleshooting Tests

After the file server is assigned, the following tests are automatically executed. This occurs when you enable managed file transfer in the next procedure Enable Managed File Transfer on IM and Presence Service. When the file server is assigned and you have started the Cisco XCP File Transfer Manager service, you should return to this section to verify the connection to the file server is trouble free.

The External File Server Status area displays a list of file server tests and results:

  • Verify external file server reachability (pingable)

  • Verify that external file server is listening for connections

  • Verify external file server public key is correct

  • Verify node public key is configured correctly on the external file server

  • Verify external file server directory is valid

  • Verify external file server has been mounted successfully

  • Verify that free disk space is available on the file server


Tip

  • You can change the name of the file server configuration, not the file server itself, after it is assigned.

  • If you had managed file transfer configured and you change existing settings, restarting the Cisco XCP Router service restarts managed file transfer.

  • If you change any other settings without changing them on the file server itself, file transfer stops working and you receive a notification to restart the Cisco XCP Router service.

  • If a database or file server failure occurs, a message is generated that specifies the failure. However, the error response does not distinguish between database, file server, or some other internal failure. The RTMT also generates an alarm if there is a database or file server failure, this alarm is independent of whether a file transfer is occurring.


What To Do Next

Enable Managed File Transfer on IM and Presence Service

Enable Managed File Transfer on IM and Presence Service

Before you begin

Complete the following tasks before you enable managed file transfer:

Procedure


Step 1

Log in to Cisco Unified CM IM and Presence Administration, choose Messaging > File Transfer.

Step 2

In the File Transfer Configuration area of the The File Transfer window, choose either Managed File Transfer or Managed and Peer-to-Peer File Transfer, depending on your deployment.

Step 3

Enter the Maximum File Size. If you enter 0, the maximum size (4GB) applies.

Note 

You must restart the Cisco XCP Router service for this change to take effect.

Step 4

In the Managed File Transfer Assignment area, assign the external database and the external file server for each node in the cluster.

  1. External Database — From the drop-down list, choose the name of the external database.

  2. External File Server — From the drop-down list, choose the name of the external file server.

Step 5

Click Save.

After clicking Save a Node Public Key link, for each assignment, appears.
Step 6

For each node in the cluster that has managed file transfer enabled, you must copy the node's entire public key to the external file server's authorized_keys file.

  1. To display a node's public key, scroll down to the Managed File Transfer Assignment area and click the Node Public Key link. Copy the entire contents of the dialog box including the node's IP address, hostname, or FQDN.

    Example:

    ssh-rsa yc2EAAAABIwAAAQEAp2g+S2XDEzptN11S5h5nwVleKBnfG2pdW6KiLfzu/sFLegioIIqA8jBguNY/...

    ...5s+tusrtBBuciCkH5gfXwrsFS0O0AlfFvwnfq1xmKmIS9W2rf0Qp+A+G4MVpTxHgaonw== imp@imp_node

    (ellipses added).

    Note 
    • If the managed file transfer feature is configured and the File Transfer Type is changed to either Disabled or Peer-to-Peer, all managed file transfer settings are deleted.

    • A node’s keys are invalidated if the node is unassigned from the external database and file server.

  2. On the external file server, if it was not left open, open the ~mftuser/.ssh/authorized_keys file that you created under the mftuser's home directory and (on a new line) append each node's public key.

    Note 

    The authorized_keys file must contain a public key for each managed file transfer enabled IM and Presence Service node that is assigned to the file server.

  3. Save and close the authorized_keys file.

Step 7

Ensure that the Cisco XCP File Transfer Manager service is active on all nodes where managed file transfer is enabled.

This service only starts if an external database and an external file server have been assigned, and if the service can connect to the database and mount the file server. Complete the following steps to check that the Cisco XCP File Transfer Manager service is active on all managed file transfer enabled nodes:

  1. On any node in the cluster, log in to the Cisco Unified IM and Presence Serviceability user interface.

  2. Choose Tools > Service Activation.

  3. Choose a server (node) and click Go.

  4. Ensure the check box next to Cisco XCP File Transfer Manager is checked and that the Activation Status is Activated.

    If the above conditions are not met click Refresh. If the Activation Status remains the same after a Refresh, go to Step 8.

  5. Repeat steps c and d on all nodes where managed file transfer is enabled.

Step 8

If you are configuring the managed file transfer feature on a node for the first time, you must manually start the Cisco XCP File Transfer Manager service, as follows:

  1. On any node in the cluster, log in to the Cisco Unified IM and Presence Serviceability user interface.

  2. Choose Tools > Control Center - Feature Activation

  3. Choose a server (node) and click Go.

  4. In the IM and Presence Services area, click the radio button next to Cisco XCP File Transfer Manager.

  5. Click Start.

  6. Repeat steps c-e for all nodes where managed file transfer is enabled. This should be the same as step f) in step 9 below.

Step 9

(Optional) Configure the managed file transfer service parameters to define the threshold at which an RTMT alarm is generated for the external file server disk space.

  1. Log in to the node's Cisco Unified CM IM and Presence Administration user interface.

  2. Choose System > Service Parameters.

  3. Choose the Cisco XCP File Transfer Manager service for the node.

  4. Enter the required percentage values for the External File Server Available Space Lower Threshold and External File Server Available Space Upper Threshold service parameters.

  5. Choose Save.

Step 10

Restart the Cisco XCP Router service.

  1. On any node in the cluster, log in to the Cisco Unified IM and Presence Serviceability user interface.

  2. Choose Tools > Control Center - Network Services.

  3. Choose a server (node) and click Go.

  4. In the IM and Presence Services area, click the radio button next to Cisco XCP Router.

  5. Click Restart.

  6. Repeat steps c-e for all nodes where managed file transfer is enabled.

Step 11

Verify that there are no problems with the external database setup and with the external file server setup.

  • For the external database:

    1. Log in to the node's Cisco Unified CM IM and Presence Administration user interface.

    2. Choose Messaging > External Server Setup > External Databases.

    3. Check the information provided in the External Database Status area.

  • On the node where you need to verify that the external file server is assigned:
    1. Log in to the node's Cisco Unified CM IM and Presence Administration user interface.

    2. Choose Messaging > External Server Setup > External File Servers.

    3. Check the information provided in the External File Server Status area.


Troubleshooting Managed File Transfer

If managed file transfer fails to start or you are experiencing problems with the feature, do the following:
  1. Check the Cisco XCP File Transfer Manager service logs. Go to the IM and Presence Service Command Line Interface (CLI) and enter the following command: file view activelog epas/trace/xcp/log/AFTStartup.log

  2. If the Cisco RTMT plugin is installed, check it for traces and syslog messages.

Cisco Jabber Client Interoperability

There are a number of configuration options for file transfers. You can configure one of the following file transfer types on IM and Presence Service:
  • Disabled—no file transfers are allowed.

  • Peer-to-Peer—one-to-one file transfers are allowed, but files are not archived or stored on a server. Group chat file transfer is not supported.

  • Managed File Transfer—one-to-one and group file transfers are allowed. File transfers are logged to a database and the transferred files are stored on a server. The client must also support managed file transfer, otherwise no file transfers are allowed.

  • Managed and Peer-to-Peer File Transfer—one-to-one and group file transfers are allowed. File transfers are logged to a database and the transferred files are stored on a server only if the client supports managed file transfer. If the client does not support managed file transfer, this option is equivalent to the Peer-to-Peer option.

This section describes the file transfer functionality between Cisco Jabber pre-10.6 clients, or third party clients, and Cisco Jabber 10.6 and later clients in the following scenarios:
  • Single node deployment where Managed File Transfer is enabled.

  • Single node deployment where Managed and Peer-to-Peer File Transfer is enabled.

  • 2-node cluster deployment, where one node has Managed and Peer-to-Peer File Transfer enabled and the other node has Peer-to-Peer enabled.

  • 2-cluster deployment, where a node in one cluster has Managed and Peer-to-Peer File Transfer enabled and a node in the other cluster has Peer-to-Peer enabled (for simplicity, this scenario assumes one node per cluster).

  • Group Chat in a 2-cluster deployment, where a node in one cluster has either Managed File Transfer or Managed and Peer-to-Peer File Transferenabled and a node in the other cluster has Peer-to-Peer enabled (for simplicity, this scenario assumes one node per cluster).

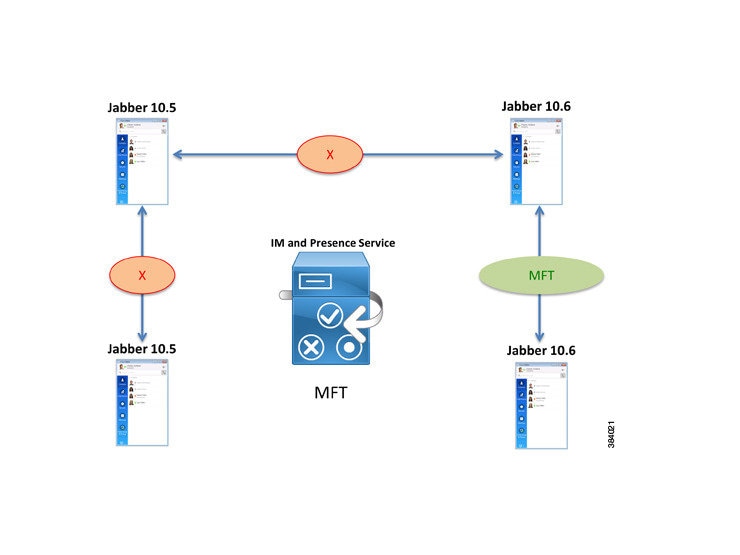
Single Node - Managed File Transfer

The following figure shows a single IM and Presence Service node that has Managed File Transfer (MFT) enabled. Cisco Jabber Release 10.5 clients and Cisco Jabber Release 10.6 clients are registered to the IM and Presence Service node.


In this deployment model, managed file transfers are only supported between Cisco Jabber Release 10.6 clients. Peer-to-peer file transfers are not allowed, regardless of the client release.

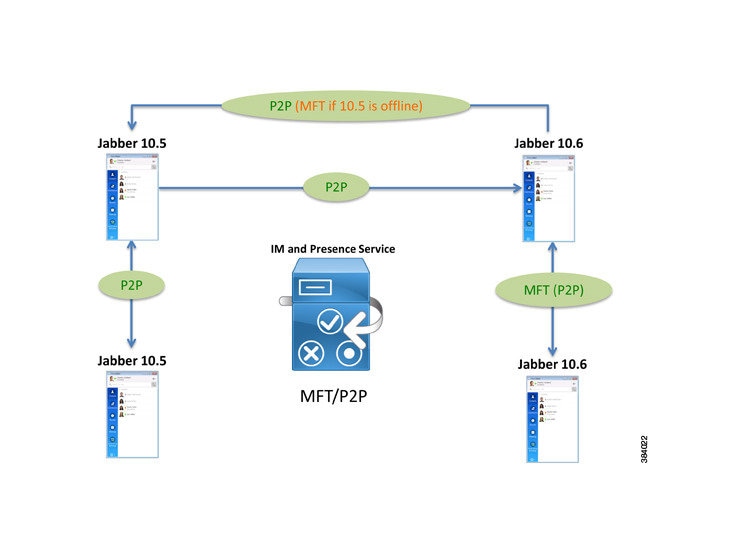
Single Node - Managed and Peer-to-Peer File Transfer

The following figure shows a single IM and Presence Service node that has Managed and Peer-to-Peer File Transfer (MFT/P2P) enabled. Cisco Jabber Release 10.5 clients and Cisco Jabber Release 10.6 clients are registered to the IM and Presence Service node.


In this deployment model, file transfers are allowed and are treated as either managed file transfers or peer-to-peer file transfers depending on the client:
  • File transfers between Cisco Jabber 10.5 clients are treated as peer-to-peer transfers.

  • File transfers between Cisco Jabber 10.6 clients are treated as managed file transfers if the clients are configured to support managed file transfers. However, you can change the client settings to treat file transfers as peer-to-peer transfers.

  • If a Cisco Jabber 10.5 client sends a file to a Cisco Jabber 10.6 client, it is treated as a peer-to-peer file transfer.

  • If a Cisco Jabber 10.6 client sends a file to a Cisco Jabber 10.5 client, it is treated as a peer-to-peer file transfer if peer-to-peer is the default client preference and the Cisco Jabber 10.5 client is online. If the 10.5 client is offline, the file transfer is treated as a managed file transfer but the 10.5 client cannot receive it.

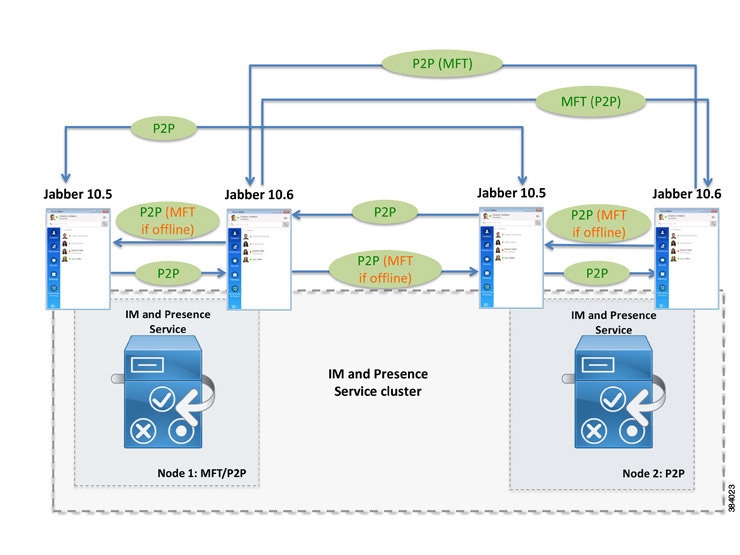
Single Cluster - Mixed Nodes

The following figure shows a cluster with two IM and Presence Service nodes. Node 1 has Managed and Peer-to-Peer File Transfer (MFT/P2P) enabled and Node 2 has Peer-to-Peer (P2P) enabled. Both nodes have Cisco Jabber Release 10.5 clients and Cisco Jabber Release 10.6 clients registered to them.


In this deployment model, file transfers are allowed and are treated as either managed file transfers or peer-to-peer file transfers depending on the client. Use the following legend to interpret the different file transfer behaviours:
  • P2P—file transfers are treated as peer-to-peer file transfers.

  • MFT (P2P)—managed file transfer is the default client preference. However you can reconfigure the clients to use peer-to-peer file transfers.

  • P2P (MFT)—peer-to-peer is the default client preference. However, you can reconfigure the clients to use managed file transfers.

  • P2P (MFT if offline)—peer-to-peer is the default client preference and the recipient is online. If the recipient is offline, it is treated as a managed file transfer by the sender but the recipient cannot receive it.


Note

A node that has Managed File Transfer enabled should not be deployed in a cluster with a node that has Peer-to-Peer enabled. The recommended migration path is to configure the Peer-to-Peer nodes as Managed and Peer-to-Peer File Transfer nodes and then change them to Managed File Transfer nodes.


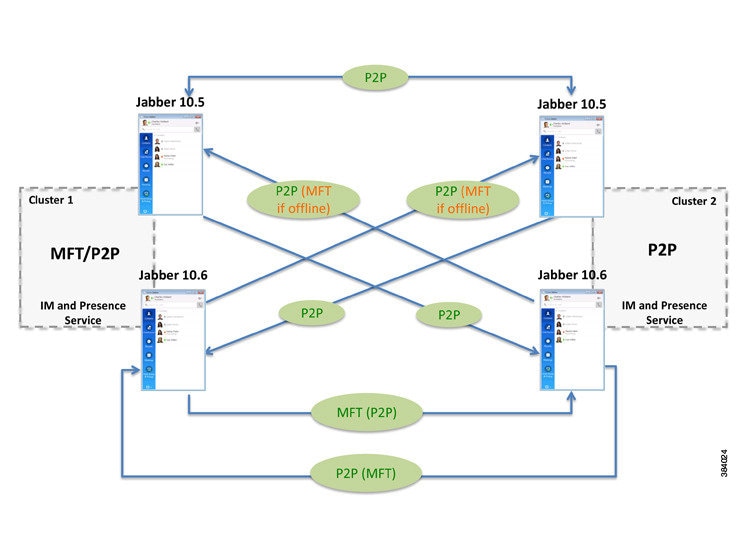
Multiple Cluster - Mixed Nodes

The following figure shows a deployment with two clusters where a node in Cluster 1 has Managed and Peer-to-Peer File Transfer (MFT) enabled and a node in Cluster 2 has Peer-to-Peer (P2P) enabled. Both nodes have Cisco Jabber Release 10.5 clients and Cisco Jabber Release 10.6 clients registered to them.


In this deployment model, file transfers are allowed and are treated as either managed file transfers or peer-to-peer file transfers depending on the client. Use the following legend to interpret the different file transfer behaviours:
  • P2P—file transfers are treated as peer-to-peer file transfers.

  • MFT (P2P)—managed file transfer is the default client preference. However you can reconfigure the clients to use peer-to-peer file transfers.

  • P2P (MFT)—peer-to-peer is the default client preference. However, you can reconfigure the clients to use managed file transfers.

  • P2P (MFT if offline)—peer-to-peer is the default client preference and the recipient is online. If the recipient is offline, it is treated as a managed file transfer by the sender but the recipient cannot receive it.

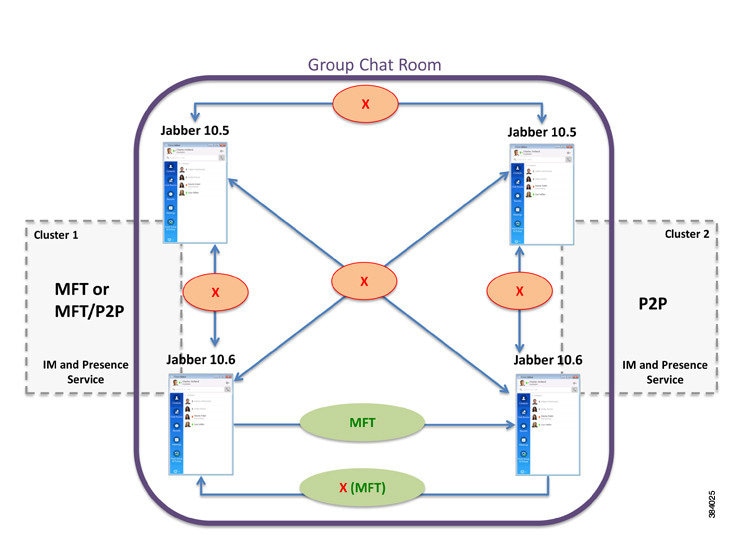
Group Chat

The following figure shows a group chat scenario between two clusters, where a node in Cluster 1 has either Managed File Transfer (MFT) or Managed and Peer-to-Peer File Transfer (MFT/P2P) enabled and a node in Cluster 2 has Peer-to-Peer (P2P) enabled. Both nodes have Cisco Jabber Release 10.5 clients and Cisco Jabber Release 10.6 clients registered to them.


In this scenario, managed file transfers are only supported between Cisco Jabber Release 10.6 clients. Peer-to-peer file transfers are not allowed, regardless of the client release. Use the following legend to interpret the different file transfer behaviours:
  • MFT—managed file transfers are supported and the external file server of the sender’s home node is used to serve the file upload and all the file downloads, regardless of which node the recipient is homed on.

  • X (MFT)—the default client preference is to not allow any file transfers. However, you can reconfigure the client to support managed file transfers.

Mobile and Remote Access for Jabber Clients

For on-premise deployments, Managed File Transfer is the only supported file transfer option for Mobile and Remote Access clients. To use Managed File Transfer or MRA, you must be running a Restricted version of the IM and Presence Service. Managed File Transfer will not work over MRA if you are running an Unrestricted version of the IM and Presence Service.

For more information about Mobile and Remote Access, see this link: http://www.cisco.com/c/en/us/support/unified-communications/telepresence-video-communication-server-vcs/products-installation-and-configuration-guides-list.html

1 Remember to create this directory structure on every other node that will have managed file transfer enabled.