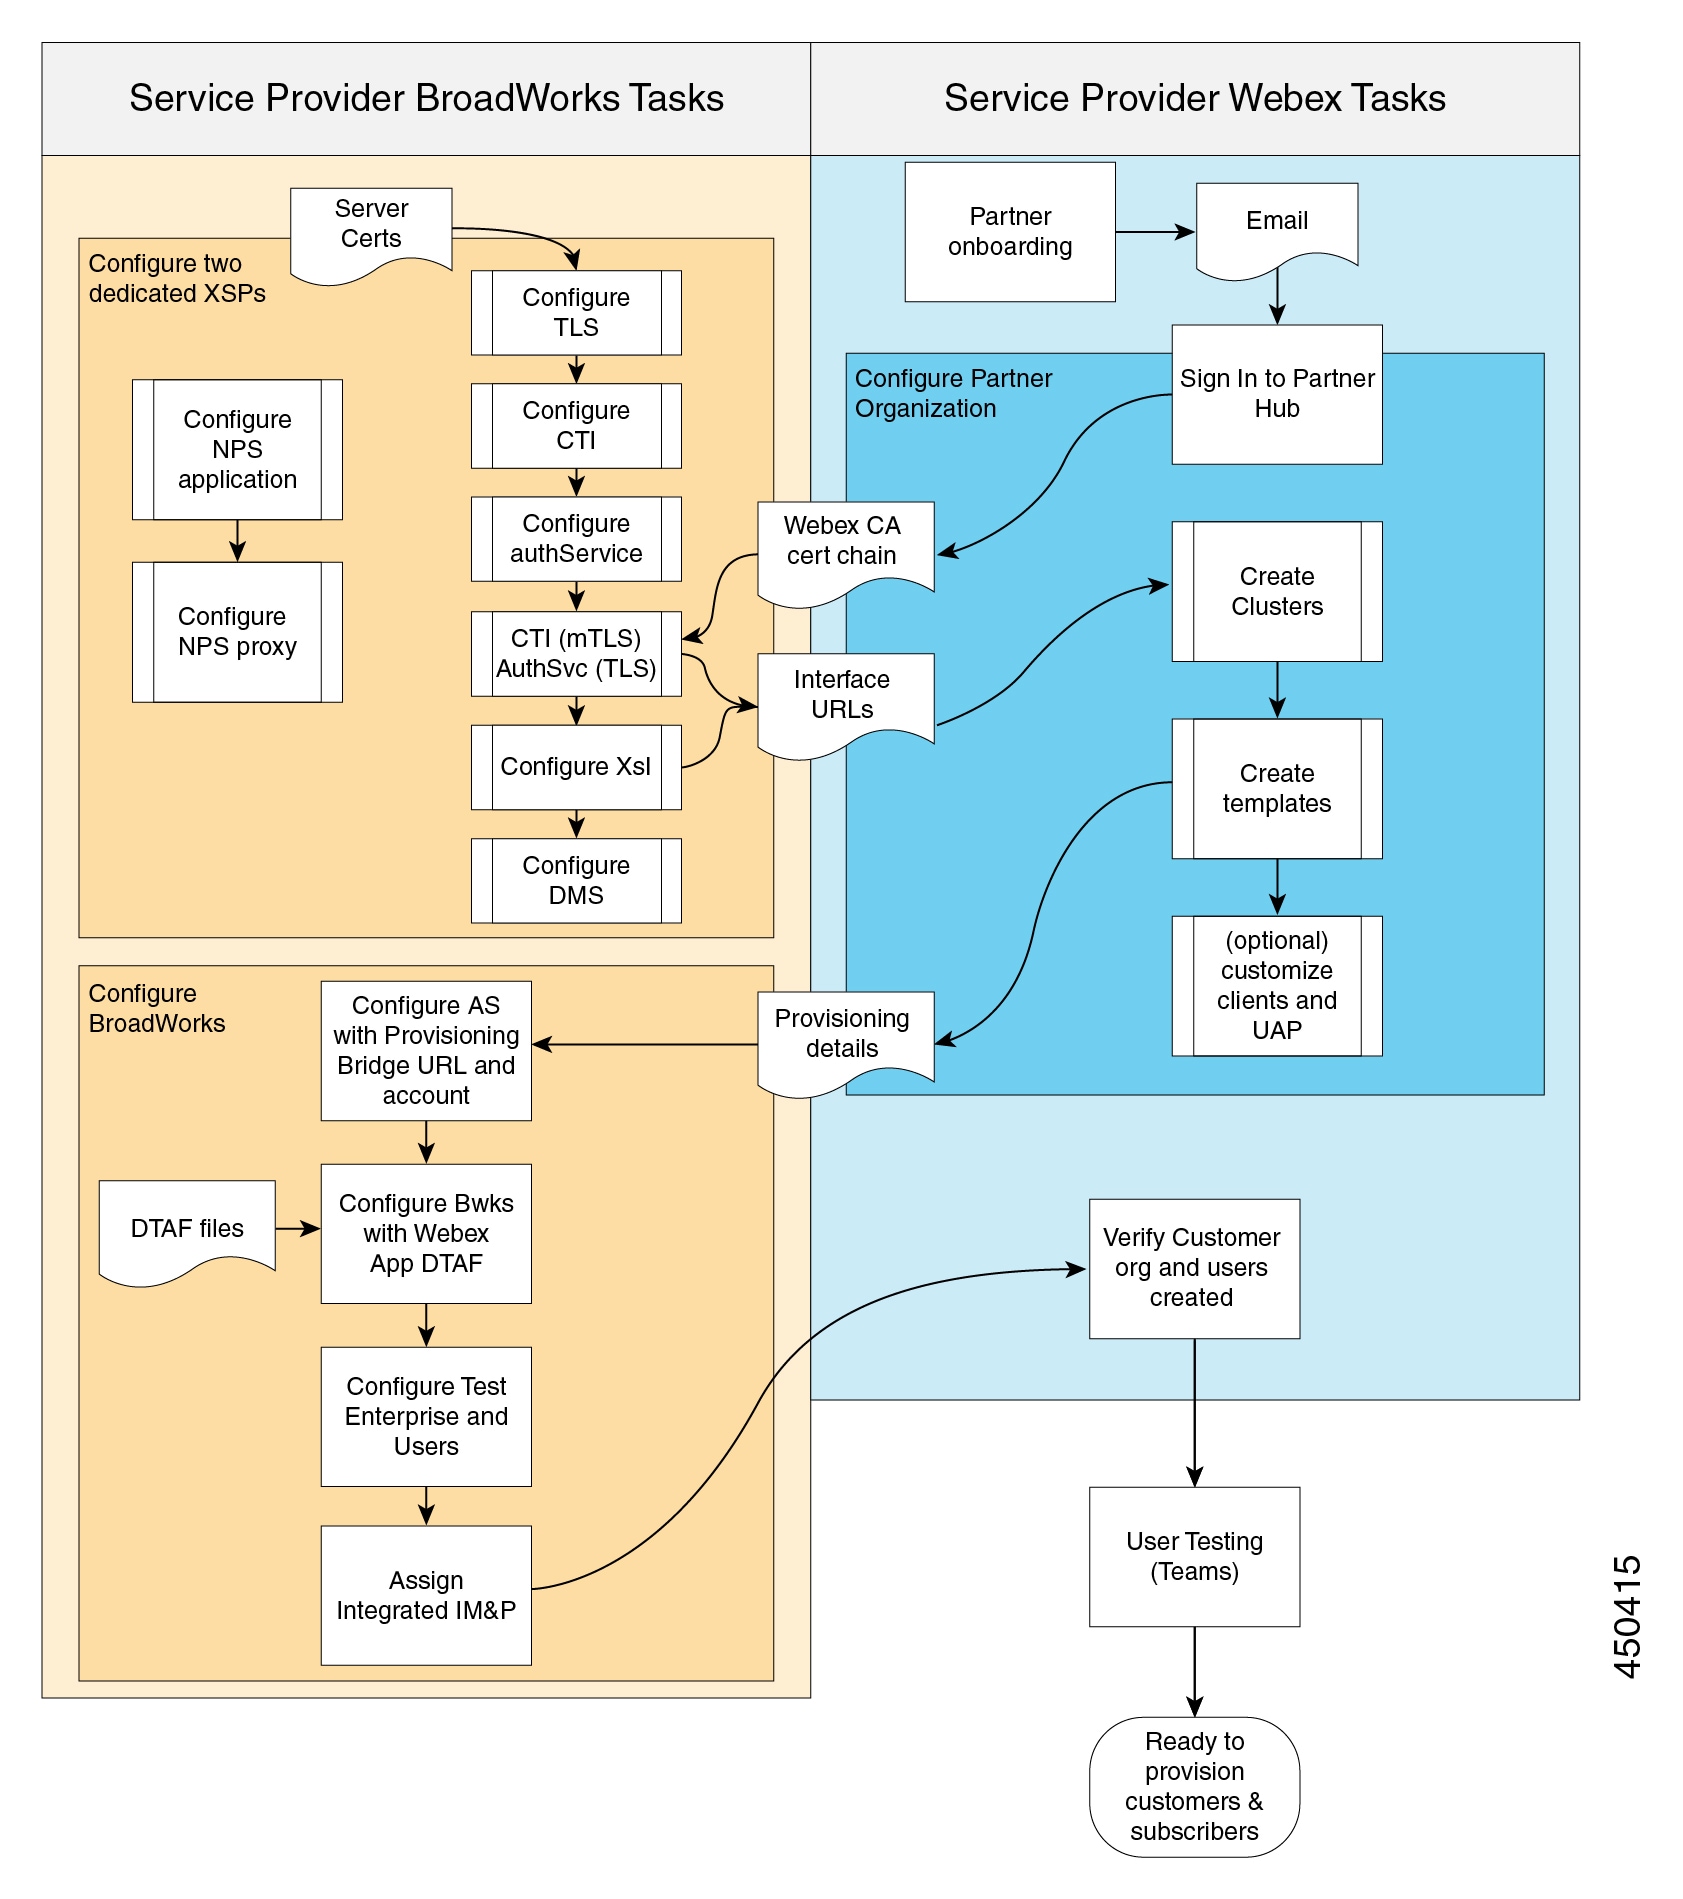
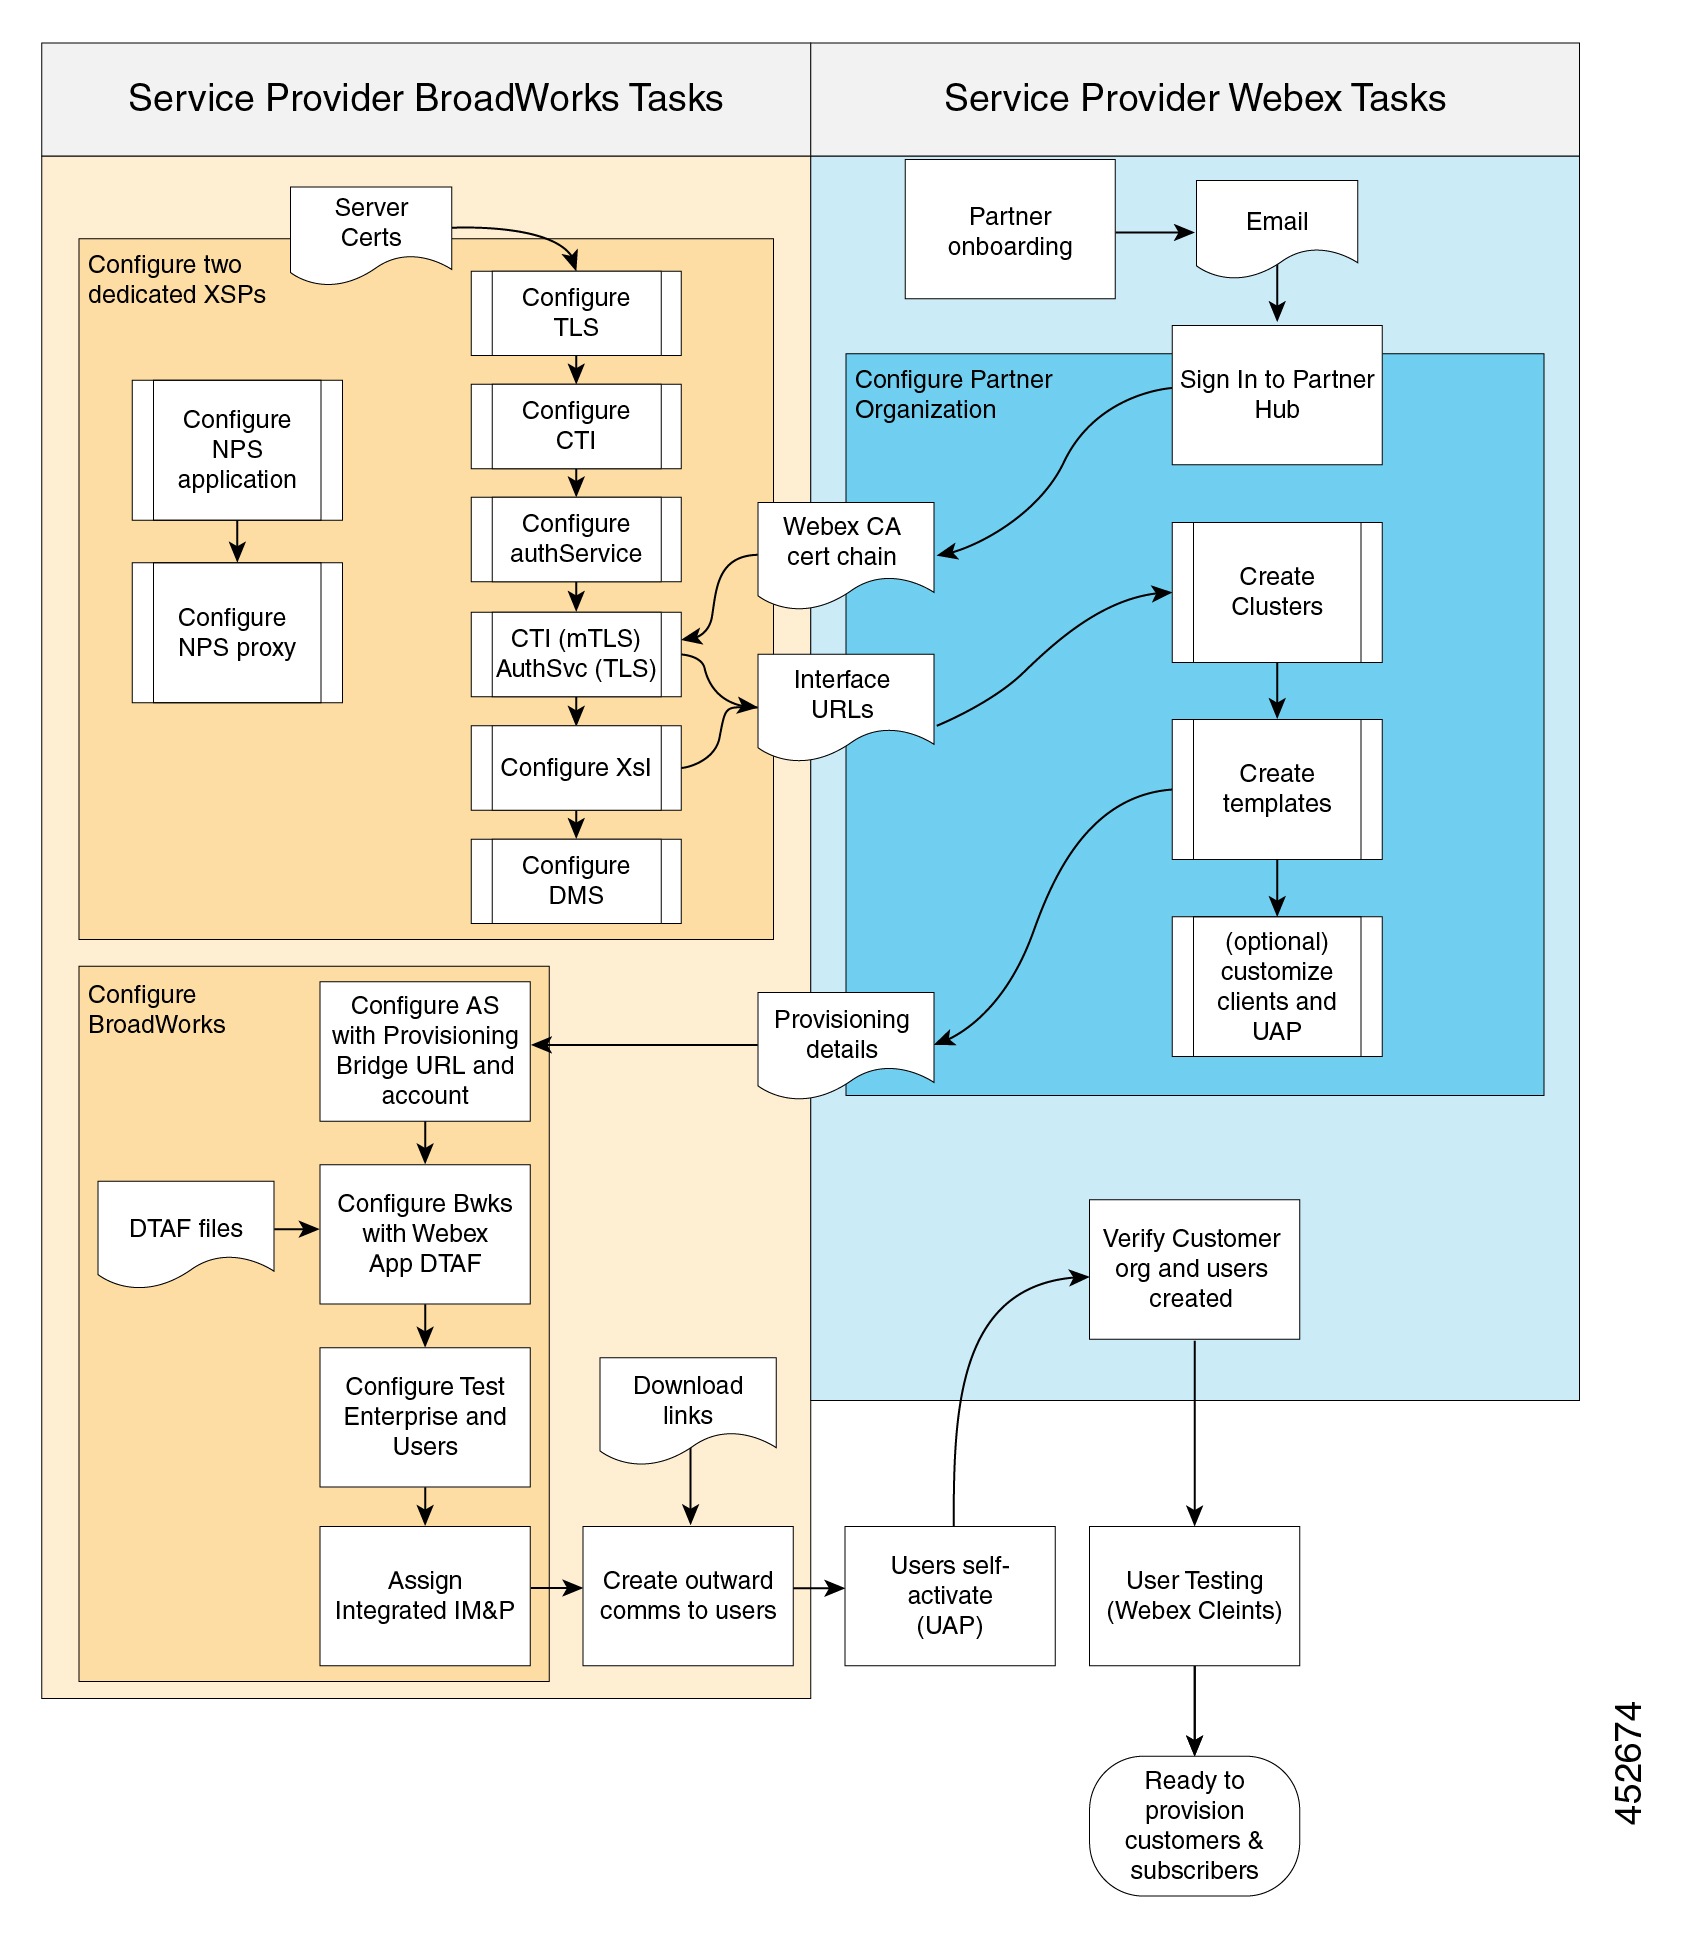
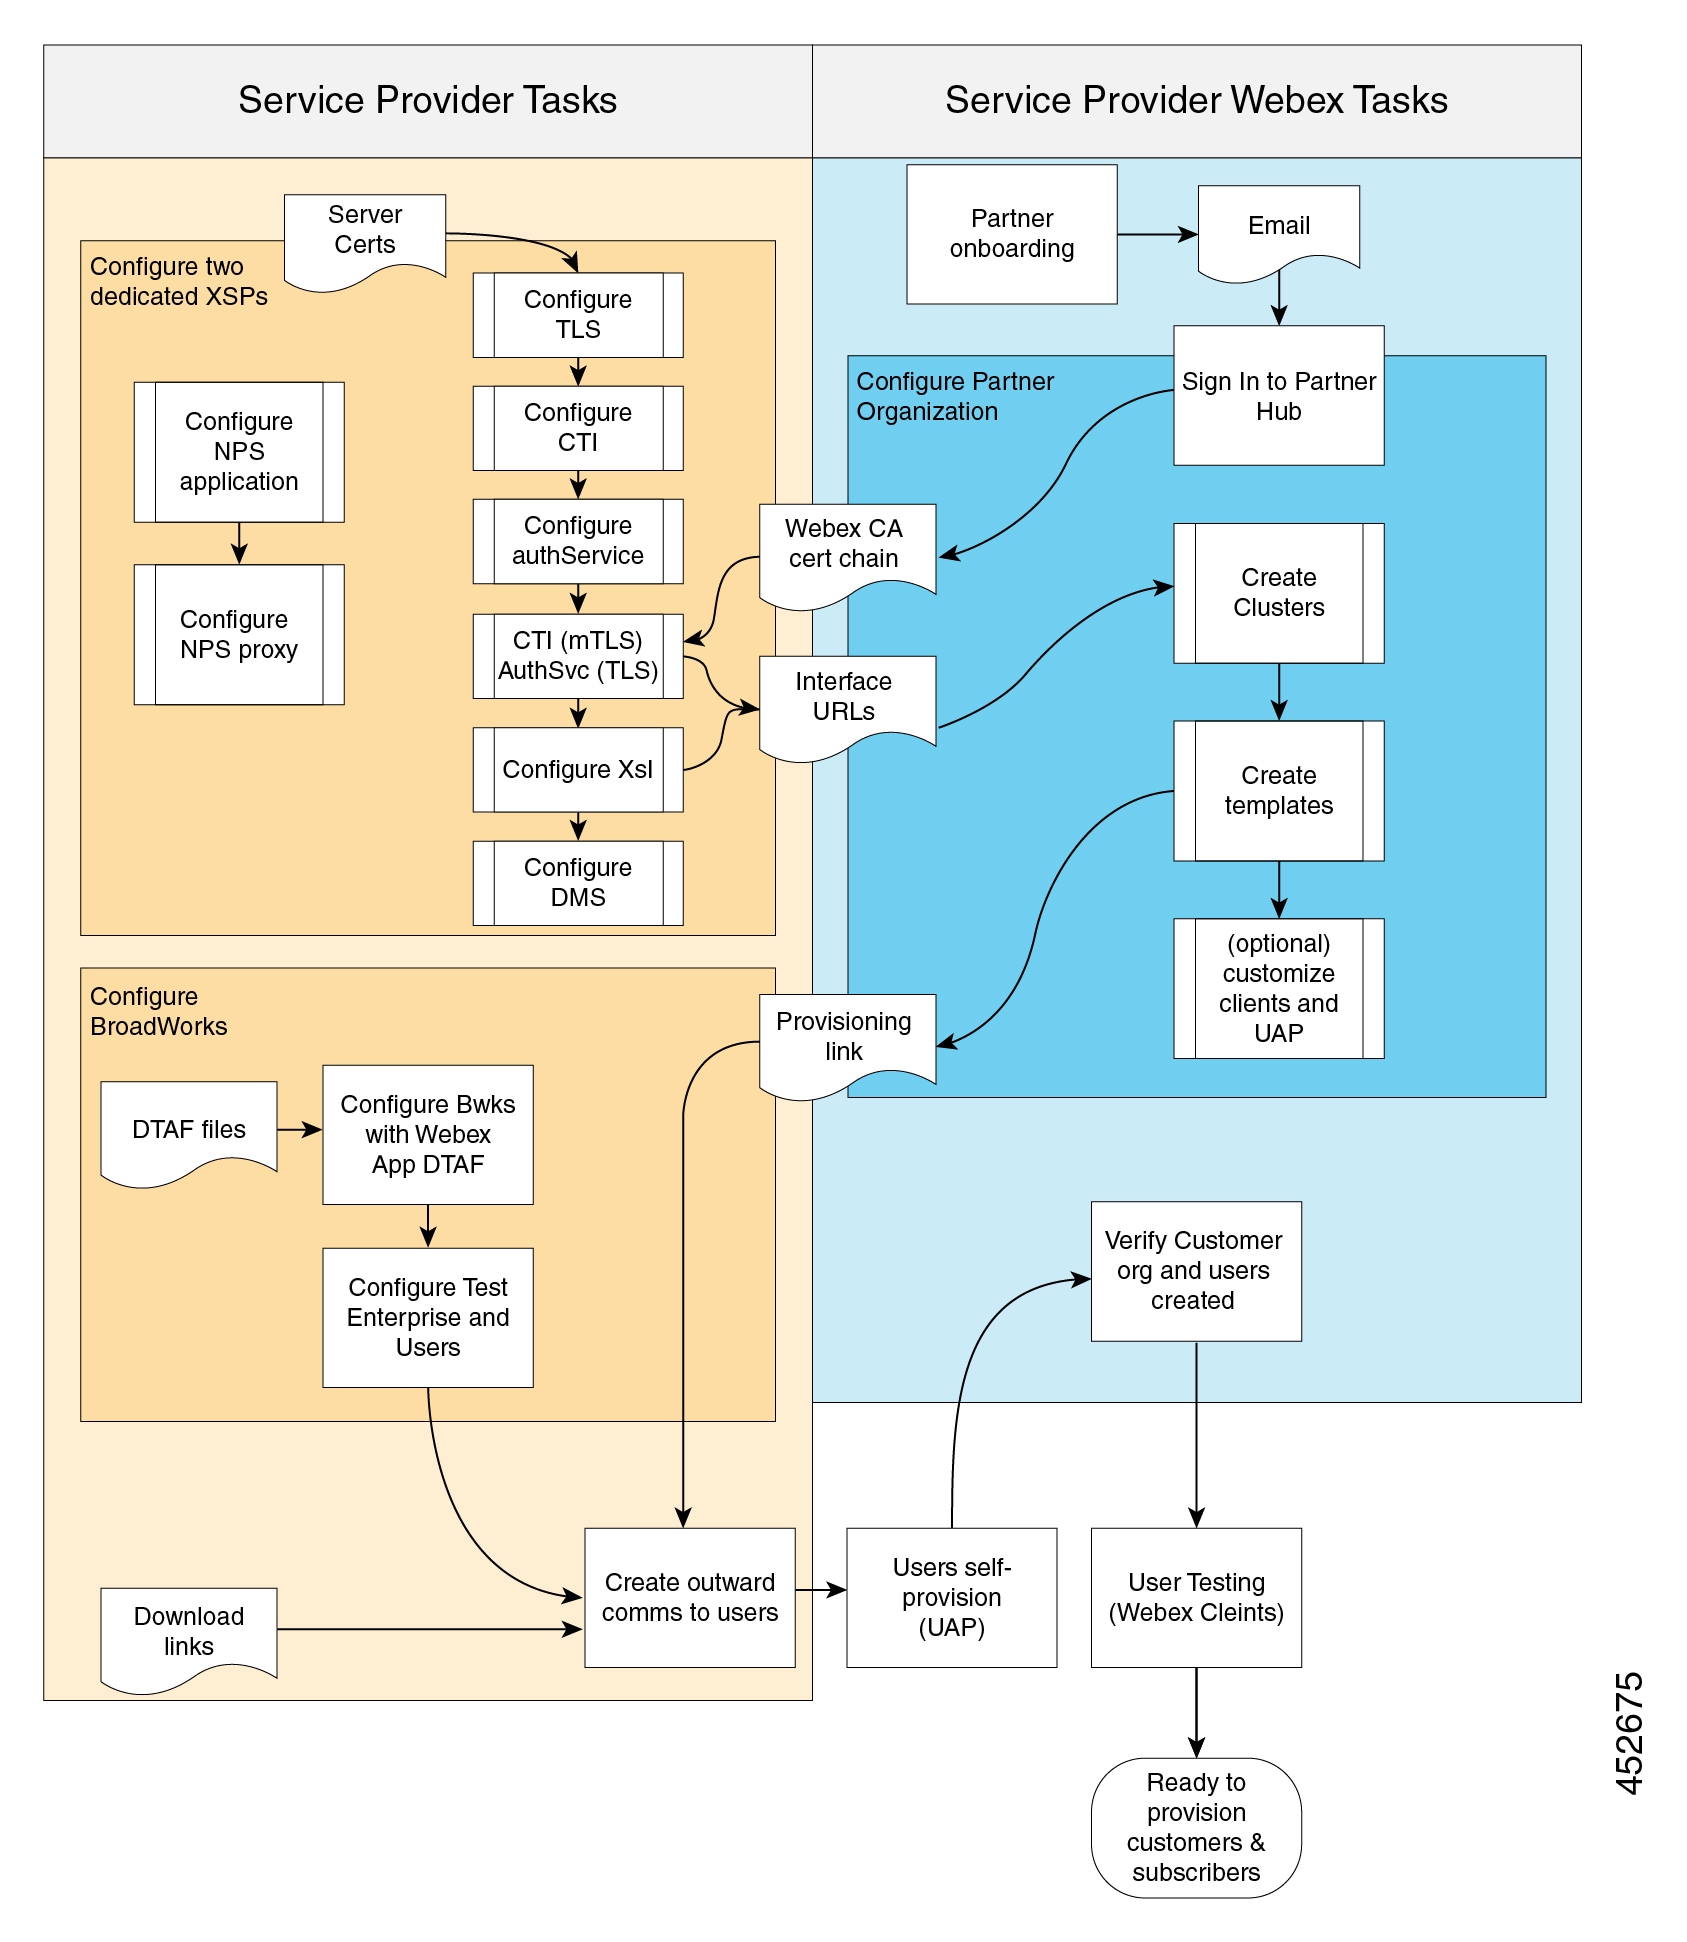
Deployment Overview
The following diagrams represent the typical order of your deployment tasks for the different user provisioning modes. Many of the tasks are common to all provisioning modes.
The documentation set for this product strives to use bias-free language. For the purposes of this documentation set, bias-free is defined as language that does not imply discrimination based on age, disability, gender, racial identity, ethnic identity, sexual orientation, socioeconomic status, and intersectionality. Exceptions may be present in the documentation due to language that is hardcoded in the user interfaces of the product software, language used based on RFP documentation, or language that is used by a referenced third-party product. Learn more about how Cisco is using Inclusive Language.
The following diagrams represent the typical order of your deployment tasks for the different user provisioning modes. Many of the tasks are common to all provisioning modes.
Each Webex for Cisco BroadWorks Service Provider or Reseller needs a to be setup as a Partner Organization for Webex for Cisco BroadWorks. If you have an existing Webex Partner Organization, this can be used.
In order to complete the necessary onboarding, you must execute your Webex Cisco BroadWorks paperwork and new partners must accept the online Indirect Channel Partner Agreement (ICPA). When these steps are completed, Cisco Compliance will create a new Partner Org in Partner Hub (if needed) and send an email with authentication details to the Admin of Record in your paperwork. At the same time, your Partner Activation and/or Customer Success Program Manager will contact you to start your onboarding.
We require that the NPS application be run on a different XSP. Requirements for that XSP are described in Configure Call Notifications from your Network.
You need the following applications / services on your XSPs.
|
Service/Application |
Authentication required |
Service/application purpose |
|---|---|---|
|
Xsi-Events |
TLS (server authenticates itself to clients) |
Call control, service notifications |
|
Xsi-Actions |
TLS (server authenticates itself to clients) |
Call control, actions |
|
Device management |
TLS (server authenticates itself to clients) |
Calling configuration download |
|
Authentication Service |
TLS (server authenticates itself to clients) |
User authentication |
|
Computer Telephony Integration |
mTLS (client and server authenticate each other) |
Telephony presence |
|
Call Settings Webview application |
TLS (server authenticates itself to clients) |
Exposes user call settings in the selfcare portal within the Webex app |
This section describes how to apply the required configurations for TLS and mTLS on these interfaces, but you should reference existing documentation to get the applications installed on your XSPs.
Authentication Service must be co-resident with Xsi applications, because those interfaces must accept long-lived tokens for service authorization. The authentication service is required to validate those tokens.
Authentication service and Xsi can run on the same port if required.
You may separate the other services/applications as required for your scale (dedicated device management XSP farm, for example).
You may co-locate the Xsi, CTI, Authentication Service, and DMS applications.
Do not install other applications or services on the XSPs that are used for integrating BroadWorks with Webex.
Do not co-locate the NPS application with any other applications.
Install and configure the Xsi-Actions and Xsi-Events applications as described in Cisco BroadWorks Xtended Services Interface Configuration Guide.
Only one instance of the Xsi-Events applications should be deployed on the XSP/ADP used for the CTI interface.
All Xsi-Events used for integrating Broadworks with Webex must have the same callControlApplicationName defined under Applications/Xsi-Events/GeneralSettings. For example:
ADP_CLI/Applications/Xsi-Events/GeneralSettings> get
callControlApplicationName = com.broadsoft.xsi-events
When a user is onboarded to Webex, Webex creates a subscription for the user on the AS in order to receive telephony events for presence and call history. The subscription is associated with the callControlApplicationName and the AS uses it to know to which Xsi-Events to send the telephony events.
 Note |
Changing the callControlApplicationName, or not having the same name on all Xsi-Events webapps will impact subscriptions and telephony events functionality. |
Use this procedure to configure the Authentication Service to use CI Token Validation with TLS. This authentication method is recommended if you are running R22 or higher and your system supports it.
Note |
Mutual TLS (mTLS) is also supported as an alternative authentication method for the Auth Service. If you have multiple Webex organizations running off the same XSP server, you must use mTLS authentication because CI Token Validation does not support multiple connections to the same XSP Auth Service. To configure mTLS authentication for the Auth Service instead of CI Token Validation, refer to the Appendix for Configure Services (with mTLS for the Auth Service). |
Note |
If you currently use mTLS for the Auth Service, it's not mandatory that you reconfigure to use CI Token Validation with TLS. |
Obtaining OAuth credentials for your Webex for Cisco BroadWorks.
Install the following patches on each XSP server. Install the patches that are appropriate to your release:
For R22:
For R23:
For R24—no patch required
Install the AuthenticationService application on each XSP service.
Run the following command to activate the AuthenticationService application on the XSP to the /authService context path.
XSP_CLI/Maintenance/ManagedObjects> activate application AuthenticationService 22.0_1.1123/authServiceRun this command to deploy the AuthenticationService on the XSP:
XSP_CLI/Maintenance/ManagedObjects> deploy application /authServiceBroadWorks SW Manager deploying /authService...Starting with Broadworks build 2022.10, the certificates authorities that are coming with Java are no longer automatically included to the BroadWorks trust store when switching to a new version of java. The AuthenticationService opens a TLS connection to Webex to fetch the access token, and needs to have the following in its truststore to validate the IDBroker and Webex URL:
IdenTrust Commercial Root CA 1
Go Daddy Root Certificate Authority - G2
Verify that these certificates are present under the following CLI
ADP_CLI/System/SSLCommonSettings/Trusts/Defaults> get
If not present, run the following command to import the default Java trusts:
ADP_CLI/System/SSLCommonSettings/Trusts/Defaults> importJavaCATrust
Alternatively, you can manually add these certificates as trust anchors with the following command:
ADP_CLI/System/SSLCommonSettings/Trusts/BroadWorks> updateTrust <alias> <trustAnchorFile>
If the ADP is upgraded from a previous release, then the certificate authorities from the old release are automatically imported to the new release and will continue to be imported until they are manually removed.
Note |
The AuthenticationService application is exempt from the validatePeerIdentity setting under ADP_CLI/System/SSLCommonSettings/GeneralSettings, and always validates the peer Identity. See the Cisco Broadworks X509 Certificate Validation FD for more info on this setting. |
Configure the Identity Providers by running the following commands on each XSP server:
XSP_CLI/Applications/AuthenticationService/IdentityProviders/Cisco> get
set clientId client-Id-From-Step1
set enabled true
set clientSecret client-Secret-From-Step1
set ciResponseBodyMaxSizeInBytes 65536
set issuerName <URL>—For the URL, enter the IssuerName URL that applies to your CI Cluster. See following table.
set issuerUrl <URL>—For the URL, enter the IssuerUrl that applies to your CI Cluster. See the following table.
set tokenInfoUrl <IdPProxy URL>—Enter the IdP Proxy URL that applies to your Teams Cluster. See the second table that follows.
| If CI Cluster is... | Set issuerName and issuerURL to... | ||
|---|---|---|---|
|
US-A |
|||
|
EU |
|||
|
US-B |
|||
|
|||
| If Teams Cluster is... | Set tokenInfoURL to...(IdP Proxy URL) | ||
|---|---|---|---|
|
ACHM |
https://broadworks-idp-proxy-a.wbx2.com/broadworks-idp-proxy/api/v1/idp/authenticate |
||
|
AFRA |
https://broadworks-idp-proxy-k.wbx2.com/broadworks-idp-proxy/api/v1/idp/authenticate |
||
|
AORE |
https://broadworks-idp-proxy-r.wbx2.com/broadworks-idp-proxy/api/v1/idp/authenticate |
||
|
|||
Specify the Webex entitlement that must be present in the user profile in Webex by running the following command:
XSP_CLI/Applications/AuthenticationService/IdentityProviders/Cisco/Scopes> set scope broadworks-connector:user
Configure Identity Providers for Cisco Federation using the following commands on each XSP server:
XSP_CLI/Applications/AuthenticationService/IdentityProviders/Cisco/Federation> get
set flsUrl https://cifls.webex.com/federation
set refreshPeriodInMinutes 60
set refreshToken refresh-Token-From-Step1
Run the following command to validate that your FLS configuration is working. This command will return the list of Identity Providers:
XSP_CLI/Applications/AuthService/IdentityProviders/Cisco/Federation/ClusterMap> Get
Configure Token Management using the following commands on each XSP server:
XSP_CLI/Applications/AuthenticationService/TokenManagement>
set tokenIssuer BroadWorks
set tokenDurationInHours 720
Generate and Share RSA Keys. You must generate keys on one XSP then copy them to all other XSPs. This is due to the following factors:
You must use the same public/private key pairs for token encryption/decryption across all instances of the authentication service.
The key pair is generated by the authentication service when it is first required to issue a token.
Note |
If you cycle keys or change the key length, you need to repeat the following configuration and restart all the XSPs. |
Select one XSP to use for generating a key pair.
Use a client to request an encrypted token from that XSP, by requesting the following URL from the client’s browser:
https://<XSP-IPAddress>/authService/token?key=BASE64URL(clientPublicKey)
(This generates a private / public key pair on the XSP, if there wasn’t one already)
The key store location is not configurable. Export the keys:
XSP_CLI/Applications/authenticationService/KeyManagement> exportKeys
Copy the exported file /var/broadworks/tmp/authService.keys to the same location on the other XSPs, overwriting an older .keys file if necessary.
Import the keys on each of the other XSPs:
XSP_CLI/Applications/authenticationService/KeyManagement> importKeys /var/broadworks/tmp/authService.keys
Provide the authService URL to the web container. The XSP’s web container needs the authService URL so it can validate tokens. On each of the XSPs:
Add the authentication service URL as an external authentication service for the BroadWorks Communications Utility:
XSP_CLI/System/CommunicationUtility/DefaultSettings/ExternalAuthentication/AuthService> set url http://127.0.0.1/authService
Add the authentication service URL to the container:
XSP_CLI/Maintenance/ContainerOptions> add tomcat bw.authservice.authServiceUrl http://127.0.0.1/authService
This enables Webex to use the Authentication Service to validate tokens presented as credentials.
Check the parameter with get.
Restart the XSP.
If you have the Authentication Service configured with CI Token validation on R24, you also need to remove the Client Authentication Requirement for the Authentication Service. Run the following CLI command:
ADP_CLI/Interface/Http/SSLCommonSettings/ClientAuthentication/WebApps> set <interfaceIp> <port> AuthenticationService clientAuthReq false
The Authentication Service, Xsi-Actions, and Xsi-Events applications use HTTP server interfaces. Levels of TLS configurability for these applications are as follows:
Most general = System > Transport > HTTP > HTTP Server interface = Most specific
The CLI contexts you use to view or modify the different SSL settings are:
| Specificity | CLI context |
| System (global) |
|
| Transport protocols for this system |
|
| HTTP on this system |
|
| Specific HTTP server interfaces on this system |
|
Reading HTTP Server TLS Interface Configuration on the XSP
Sign in to the XSP and navigate to XSP_CLI/Interface/Http/HttpServer>
Enter the get command and read the results. You should see the interfaces (IP addresses) and, for each, whether they are secure and whether
they require client authentication.
Apache tomcat mandates a certificate for each secure interface; the system generates a self-signed certificate if it needs one.
XSP_CLI/Interface/Http/HttpServer> get
Adding TLS 1.2 Protocol to the HTTP Server Interface
The HTTP interface that is interacting with the Webex Cloud must be configured for TLSv1.2. The cloud does not negotiate earlier versions of the TLS protocol.
To configure the TLSv1.2 protocol on the HTTP Server interface:
Sign in to the XSP and navigate to XSP_CLI/Interface/Http/HttpServer/SSLSettings/Protocols>
Enter the command get <interfaceIp> 443 to see which protocols are already used on this interface.
Enter the command add <interfaceIp> 443 TLSv1.2 to ensure that interface can use TLS 1.2 when communicating with the cloud.
Editing TLS Ciphers Configuration on the HTTP Server Interface
To configure the required ciphers:
Sign in to the XSP and navigate to XSP_CLI/Interface/Http/HttpServer/SSLSettings/Ciphers>
Enter the command get <interfaceIp> 443 to see which ciphers are already used on this interface. There must be at least one from the Cisco recommended suites (see
XSP Identity and Security Requirements in the Overview section).
Enter the command add <interfaceIp> 443 <cipherName> to add a cipher to the HTTP Server interface.
Note |
The XSP CLI requires the IANA standard cipher suite name, not the openSSL cipher suite name. For example, to add the openSSL
cipher See https://ciphersuite.info/ to find the suite by either name. |
Profile Server and XSP are mandatory for Device Management. They must be configured according to instructions in the BroadWorks Device Management Configuration Guide.
The “inmost to outmost” configuration order is listed below. Following this order is not mandatory.
Configure Application Server for CTI Subscriptions
Configure XSPs for mTLS Authenticated CTI Subscriptions
Open Inbound Ports for Secure CTI Interface
Subscribe Your Webex Organization to BroadWorks CTI Events
Update the ClientIdentity on Application Server with the common name (CN) of the Webex for Cisco BroadWorks CTI client certificate.
For each Application Server you are using with Webex, add the certificate identity to the ClientIdentity as follows:
AS_CLI/System/ClientIdentity> add bwcticlient.webex.com
Note |
The common name of the Webex for Cisco BroadWorks client certificate is |
The levels of configurability for the XSP CTI interface are as follows:
Most general = System > Transport > CTI Interfaces > CTI interface = Most specific
The CLI contexts you use to view or modify the different SSL settings are:
|
Specificity |
CLI Context |
|---|---|
|
System (global) (R22 and later) |
XSP_CLI/System/SSLCommonSettings/JSSE/Ciphers> XSP_CLI/System/SSLCommonSettings/JSSE/Protocols> |
|
Transport protocols for this system (R22 and later) |
XSP_CLI/System/SSLCommonSettings/OpenSSL/Ciphers> XSP_CLI/System/SSLCommonSettings/OpenSSL/Protocols> |
|
All CTI interfaces on this system (R22 and later) |
XSP_CLI/Interface/CTI/SSLCommonSettings/Ciphers> XSP_CLI/Interface/CTI/SSLCommonSettings/Protocols> |
|
A specific CTI interface on this system (R22 and later) |
XSP_CLI/Interface/CTI/CTIServer/SSLSettings/Ciphers> XSP_CLI/Interface/CTI/CTIServerSSLSettings/Protocols> |
Note |
On a fresh install, the following ciphers are installed by default at the system level. If nothing is configured at the interface level (for example, at the CTI interface or HTTP interface), this cipher list applies. Note that this list may change over time:
|
Reading CTI TLS Interface Configuration on the XSP
Sign in to the XSP and navigate to XSP_CLI/Interface/CTI/CTIServer>
Enter the get command and read the results. You should see the interfaces (IP addresses) and, for each, whether they require a server certificate
and whether they require client authentication.
XSP_CLI/Interface/CTI/CTIServer> get
  Interface IP  Port  Secure  Server Certificate  Client Auth Req
=================================================================
  10.155.6.175  8012    true                true             true
Adding TLS 1.2 Protocol to the CTI Interface
The XSP CTI interface that is interacting with the Webex Cloud must be configured for TLS v1.2. The cloud does not negotiate earlier versions of the TLS protocol.
To configure the TLSv1.2 protocol on the CTI interface:
Sign in to the XSP and navigate to XSP_CLI/Interface/CTI/CTIServer/SSLSettings/Protocols>
Enter the command get <interfaceIp> to see which protocols are already used on this interface.
Enter the command add <interfaceIp> TLSv1.2 to ensure that interface can use TLS 1.2 when communicating with the cloud.
Editing TLS Ciphers Configuration on the CTI Interface
To configure the required ciphers on the CTI interface:
Sign in to the XSP and navigate to XSP_CLI/Interface/CTI/CTIServer/SSLSettings/Ciphers>
Enter the get command to see which ciphers are already used on this interface. There must be at least one from the Cisco recommended suites
(see XSP Identity and Security Requirements in the Overview section).
Enter the command add <interfaceIp> <cipherName> to add a cipher to the CTI interface.
Note |
The XSP CLI requires the IANA standard cipher suite name, not the openSSL cipher suite name. For example, to add the openSSL
cipher See https://ciphersuite.info/ to find the suite by either name. |
This procedure assumes the XSPs are either internet-facing or face the internet via pass-through proxy. The certificate configuration is different for a bridging proxy (see TLS Certificate Requirements for TLS-bridge Proxy).
For each XSP in your infrastructure that is publishing CTI events to Webex, do the following:
Sign in to Partner Hub.
Go to Settings > BroadWorks Calling and click Download Webex CA Certificate to get CombinedCertChain2023.txt on your local computer.
Note |
These files contain two sets of two certificates. You need to split the files before you upload them to the XSPs. All files are required. |
Split the certificate chain into two certificates - combinedcertchain2023.txt
Open combinedcertchain2023.txt in a text editor.
Select and cut the first block of text, including the lines -----BEGIN CERTIFICATE----- and -----END CERTIFICATE-----, and paste the text block into a new file.
Save the new file as root2023.txt.
Save the original file as issuing2023.txt. The original file should now only have one block of text, surrounded by the lines -----BEGIN CERTIFICATE----- and -----END CERTIFICATE-----.
Copy both text files to a temporary location on the XSP you are securing, e.g. /var/broadworks/tmp/root2023.txt and /var/broadworks/tmp/issuing2023.txt
Sign in to the XSP and navigate to /XSP_CLI/Interface/CTI/SSLCommonSettings/ClientAuthentication/Trusts>
(Optional) Run help updateTrust to see the parameters and command format.
Upload the certificate files to new trust anchors - 2023
XSP_CLI/Interface/CTI/SSLCommonSettings/ClientAuthentication/Trusts> updateTrust webexclientroot2023 /var/broadworks/tmp/root2023.txt
XSP_CLI/Interface/CTI/SSLCommonSettings/ClientAuthentication/Trusts> updateTrust webexclientissuing2023 /var/broadworks/tmp/issuing2023.txt
Note |
All aliases must have a different name. |
Confirm the anchors are updated:
XSP_CLI/Interface/CTI/SSLCommonSettings/ClientAuthentication/Trusts> get
  Alias   Owner                                   Issuer
=============================================================================
webexclientissuing2023       Internal Private TLS SubCA      Internal Private Root
webexclientroot2023       Internal Private Root      Internal Private Root[self-signed]
Allow clients to authenticate with certificates:
XSP_CLI/System/CommunicationUtility/DefaultSettings/ExternalAuthentication/CertificateAuthentication> set allowClientApp trueAdd the CTI SSL interface.
The CLI context depends on your BroadWorks version. The command creates a self-signed server certificate on the interface, and forces the interface to require a client certificate.
On BroadWorks R22 and R23:
XSP_CLI/Interface/CTI/CTIServer> add <Interface IP> 8012 true true true
Replace the server certificate and key on the XSP's CTI interfaces. You need the IP address of the CTI interface for this; you can read it from the following context:
On BroadWorks R22 and R23:
XSP_CLI/Interface/CTI/CTIServer> get
Then run the following commands to replace the interface’s self-signed certificate with your own certificate and private key:
XSP_CLI/Interface/CTI/CTIServer/SSLSettings/Certificates> sslUpdate <interface IP> keyFile</path/to/certificate key file>
                                             certificateFile </path/to/server certificate> chainFile</path/to/chain file>
Restart the XSP.
You need to add and validate the CTI interface when you configure your clusters in Partner Hub. See Configure Your Partner Organization in Partner Hub for detailed instructions.
Specify the CTI address by which Webex can subscribe to BroadWorks CTI Events.
CTI subscriptions are on a per-subscriber basis and are only established and maintained while that subscriber is provisioned for Webex for Cisco BroadWorks.
Call Settings Webview (CSWV) is an application hosted on XSP (or ADP) to enable users to modify their BroadWorks call settings through a webview that they see in the soft client. See the Cisco BroadWorks Call Settings Webview Solution Guide.
Webex makes use of this feature to provide users with access to common BroadWorks call settings that are not native to the Webex App.
If you want your Webex for Cisco BroadWorks subscribers to access call settings beyond the defaults available in the Webex app, you need to deploy Call Settings Webview feature.
Call Settings Webview has two components:
Call Settings Webview application, hosted on a Cisco BroadWorks XSP (or ADP).
The Webex App, which renders the call settings in a Webview.
Windows users: Click Call Settings and then click .
Mac users: Click profile picture, then .
CSWV application must be on the same XSP(s) that host the Xsi-Actions interface in your environment. It is an unmanaged application on XSP, so you need to install and deploy a web archive file.
Sign in to cisco.com and search for "BWCallSettingsWeb" in the software download section.
Find and download the most recent version of the file.
For example, BWCallSettingsWeb_1.8.2_1.war (https://software.cisco.com/download/home/286326302/type/286326345/release/RI.2022.04) was the most recent at the time of writing.
Install, activate, and deploy the web archive according to the Cisco BroadWorks Xtended Service Platform Configuration Guide for your XSP version. (R24 version is https://www.cisco.com/c/dam/en/us/td/docs/voice_ip_comm/broadworks/Design/XSP/BW-XtendedServicesInterfaceConfigGuide.pdf).
Copy the .war file to a temporary location on the XSP, such as /tmp/.
Navigate to the following CLI context and run the install command:
XSP_CLI/Maintenance/ManagedObjects> install application /tmp/BWCallSettingsWeb_1.7.5_1.war
The BroadWorks software manager validates and installs the file.
[Optional] Delete /tmp/BWCallSettingsWeb_1.7.5_1.war (this file is no longer required).
Activate the application:
XSP_CLI/Maintenance/ManagedObjects> activate application BWCallSettingsWeb 1.7.5 /callsettings
The name and version are mandatory for any application, but for CSWV you must also provide a contextPath because it is an unmanaged application. You can use any value that is not used by another application, for example, /callsettings.
Deploy the Call Settings application on the selected context path:
XSP_CLI/Maintenance/ManagedObjects> deploy application /callsettings
You can now predict the call settings URL that you will specify for clients, as follows:
https://<XSP-FQDN>/callsettings/
Notes:
You must supply the trailing slash on this URL when you enter it in the client configuration file.
The XSP-FQDN must match the Xsi-Actions FQDN, because CSWV needs to use Xsi-Actions, and CORS is not supported.
Repeat this procedure for other XSPs in your Webex for Cisco BroadWorks environment (if necessary).
The Call Settings Webview application is now active on the XSPs.
For more detail on client configuration, see Webex for Cisco BroadWorks Configuration Guide.
There's a custom tag in the Webex app configuration file that you can use to set the CSWV URL. This URL shows the call settings to the users through the application interface.
<config>
    <services>
        <web-call-settings target="%WEB_CALL_SETTINGS_TARGET_WXT%">
            <url>%WEB_CALL_SETTINGS_URL_WXT%</url>
        </web-call-settings>
In the Webex app configuration template on BroadWorks, configure the CSWV URL in the %WEB_CALL_SETTINGS_URL_WXT% tag.
If you don't explicitly specify the URL, the default is empty and the call settings page isn't visible to the users.
Make sure you have the latest configuration templates for the Webex app (see Device Profiles).
Set the Web Call Settings Target to csw:
%WEB_CALL_SETTINGS_TARGET_WXT% csw
Set the Web Call Settings URL for your environment, for example:
%WEB_CALL_SETTINGS_URL_WXT% https://yourxsp.example.com/callsettings/
You derived this value when deploying the CSWV application.
<web-call-settings target="csw">
    <url>https://yourxsp.example.com/callsettings/</url>
</web-call-settings>In this document we use the term Call Notifications Push Server (CNPS) to describe an XSP-hosted, or ADP-hosted application that runs in your environment. Your CNPS works with your BroadWorks system to be aware of incoming calls to your users, and pushes notifications of those to the Google Firebase Cloud Messaging (FCM) or Apple Push Notification service (APNs) notification services.
Those services notify the mobile devices of Webex for Cisco BroadWorks subscribers that they have incoming calls on Webex.
For more information about NPS, see the Notification Push Server Feature Description.
A similar mechanism in Webex works with Webex messaging and presence services to push notifications to the Google (FCM) or Apple (APNS) notification services. Those services in turn notify the mobile Webex users of incoming messages or presence changes.
Note |
This section describes how to configure NPS for authentication proxy when the NPS does not already support other apps. If you need to migrate a shared NPS to use NPS proxy, see Updating Cisco BroadWorks NPS to Use NPS Proxy https://help.webex.com/nl5rir2/. |
For compatibility with Webex for Cisco BroadWorks, your CNPS must be patched to support the NPS Proxy feature, Push Server for VoIP in UCaaS.
The feature implements a new design in the Notification Push Server to resolve the security vulnerability of sharing push notification certificate private keys with service providers for mobile clients. Instead of sharing push notification certificates and keys with the service provider, the NPS uses a new API to obtain a short-lived push notification token from Webex for Cisco BroadWorks backend, and uses this token for authentication with the Apple APNs and Google FCM services.
The feature also enhances the capability of the Notification Push Server to push notifications to Android devices through the new Google Firebase Cloud Messaging (FCM) HTTPv1 API.
For more information, see the Push Server for VoIP in UCaaS Feature Description.
The BroadWorks patches for the feature are available on: https://software.cisco.com/download/home/286326302/type/286326345/release/RI.2022.04.
For NPS software and patches, see the section Prepare Your NPS for Webex for Cisco BroadWorks.
Note |
Search and download the patch from the software download page. |
More information on the ADP server can be found at https://www.cisco.com/c/en/us/support/unified-communications/broadworks-application-delivery-platform/model.html.
Apple will no longer support the HTTP/1-based binary protocol on the Apple Push Notification service after March 31, 2021. We recommend that you configure your XSP to use the HTTP/2-based interface for APNs. This update requires that your XSP hosting the NPS be running R22 or later.
|
Step 1 |
Install and configure a dedicated XSP (minimum version R22), or Application Delivery Platform (ADP). |
||
|
Step 2 |
Install the NPS Authentication Proxy patches: XSP R22 patches: XSP R23 patches: |
||
|
Step 3 |
Activate the Notification Push Server application. |
||
|
Step 4 |
(For Android notifications) Enable the FCM v1 API on the NPS.
|
||
|
Step 5 |
(For Apple iOS notifications) Enable HTTP/2 on the NPS.
|
||
|
Step 6 |
Attach a techsupport from the NPS XSP/ADP. |
||
|
Step 7 |
On each AS server, the namedefs file in Example: _pushnotification-client._tcp.qaxsps.broadsoft.com SRV 20 20 443 qa149.vle.broadsoft.com qa149.vle.broadsoft.com IN A 10.193.78.149
|
For fresh installs of an NPS, go to Configure NPS to Use Authentication Proxy
To migrate an existing Android deployment to FCMv1, go to Migrate NPS to FCMv1
This task applies to a new installation of NPS, dedicated to Webex for Cisco BroadWorks.
If you want to configure the authentication proxy on an NPS that is shared with other mobile apps, see Updating Cisco BroadWorks NPS to Use NPS Proxy (https://help.webex.com/nl5rir2).
|
Step 1 |
Obtaining OAuth credentials for your Webex for Cisco BroadWorks. |
|||||||||||||||||||
|
Step 2 |
Create the client account on the NPS:
To verify the values you entered match with what you were given, run
|
|||||||||||||||||||
|
Step 3 |
Enter the NPS Proxy URL, and set the token refresh interval (30 minutes recommended):
|
|||||||||||||||||||
|
Step 4 |
(For Android notifications) Add the Android application ID to the FCM applications context on the NPS.
|
|||||||||||||||||||
|
Step 5 |
(For Apple iOS notifications) Add the application ID to the APNS applications context, making sure to omit the Auth key – set it to empty.
|
|||||||||||||||||||
|
Step 6 |
Configure the following NPS URLs:
|
|||||||||||||||||||
|
Step 7 |
Configure the following NPS connection parameters to the recommended values shown:
|
|||||||||||||||||||
|
Step 8 |
Check if the Application Server is screening application IDs, because you may need to add the Webex apps to the allow list:
|
|||||||||||||||||||
|
Step 9 |
Restart the XSP: |
|||||||||||||||||||
|
Step 10 |
Test call notifications by making calls from a BroadWorks subscriber to two Webex mobile users. Verify that call notification appears on iOS and Android devices. |
This topic contains optional procedures that you can use in Google FCM Console when you have an existing NPS deployment that you need to migrate to FCMv1. There are three procedures:
Migrate UC-One clients to FCMv1—When you have existing UCaaS clients and need to migrate them to use FCMv1.
Migrate SaaS Clients to FCMv1—When you have existing SaaS clients and need to migrate them to use FCMv1.
Update ADP Server—When you are migrating the NPS to an ADP server.
Use the below steps in Google FCM Console to migrate UC-One clients to Google FCM HTTPv1.
Note |
If branding is applied to the client, the client must have the Sender ID. In the FCM Console, see . The setting appears in the Project credentials table. For details, see the Connect Mobile Branding Guide at https://www.cisco.com/c/dam/en/us/td/docs/voice_ip_comm/UC-One/UC-One-Collaborate/Connect/Mobile/IandO/ConnectBrandingGuideMobile-R3_8_3.pdf?. Refer to the
|
Log into FCM Admin SDK at http://console.firebase.google.com.
Select the appropriate Android application.
In the General tab, record the project ID
Navigate to the service accounts tab to configure a service account. You can create a new service account or configure an existing one.
To create a new Service Account:
Click the blue button for create new service account
Click on the blue button to generate a new private key
Download key to a secure location
To reuse an existing service account:
Click on the blue text to view existing service accounts.
Identify the service account to use. Service account needs permission firebaseadmin-sdk.
On the very right, click the hamburger menu and create a new private key.
Download the json file that contains the key and save to a secure location.
Copy the json file onto the XSP.
Configure the project ID and :
XSP_CLI/Applications/NotificationPushServer/FCM/Projects> add <project id> <path/to/json-key-file>
...Done

XSP_CLI/Applications/NotificationPushServer/FCM/Projects> get
  Project ID  Accountkey
========================
  my_project    ********
Configure the application:
XSP_CLI/Applications/NotificationPushServer/FCM/Applications> add <app id> projectId <project id>
...Done

XSP_CLI/Applications/NotificationPushServer/FCM/Applications> get
  Application ID    Project ID
==============================
          my_app    my_project
Enable FCMv1:
XSP_CLI/Applications/NotificationPushServer/FCM> set V1Enabled true
...Done
Run the bwrestart command to restart the XSP.
Use the below steps on Google FCM Console if you want to migrate SaaS clients to FCMv1.
Note |
Make sure that you have already completed the procedure "Configure NPS to Use Authentication Proxy". |
Disable FCM:
XSP_CLI/Applications/NotificationPushServer/FCM> set V1Enabled false
...Done
Run the bwrestart command to restart the XSP.
Enable FCM:
XSP_CLI/Applications/NotificationPushServer/FCM> set V1Enabled true
...Done
Run the bwrestart command to restart the XSP.
Use the below steps in Google FCM Console if you are migrating the NPS to use an ADP server.
Get the JSON file from the Google Cloud Console:
On the Google Cloud Console, go to the Service Accounts page.
Click Select a project, choose your project and click Open.
Find the row of the service account that you want to create a key for, click the More vertical button, then click Create key.
Select a Key type and click Create
The file downloads.
Add FCM to the ADP server:
Import the JSON file to the ADP server using the /bw/install command.
Login to the ADP CLI and add Project and API key:
ADP_CLI/Applications/NotificationPushServer/FCM/Projects> add connect /bw/install/google JSON :
Next, add the Application and key:
ADP_CLI/Applications/NotificationPushServer/FCM/Applications> add com.broadsoft.ucaas.connect projectId connect-ucaas...Done
Verify the configuration:
ADP_CLI/Applications/NotificationPushServer/FCM/Projects> g
Project ID Accountkey
========================
connect-ucaas ********

ADP_CLI/Applications/NotificationPushServer/FCM/Applications> g
Application ID Project ID
===================================
com.broadsoft.ucaas.connect connect-ucaas[once per cluster]
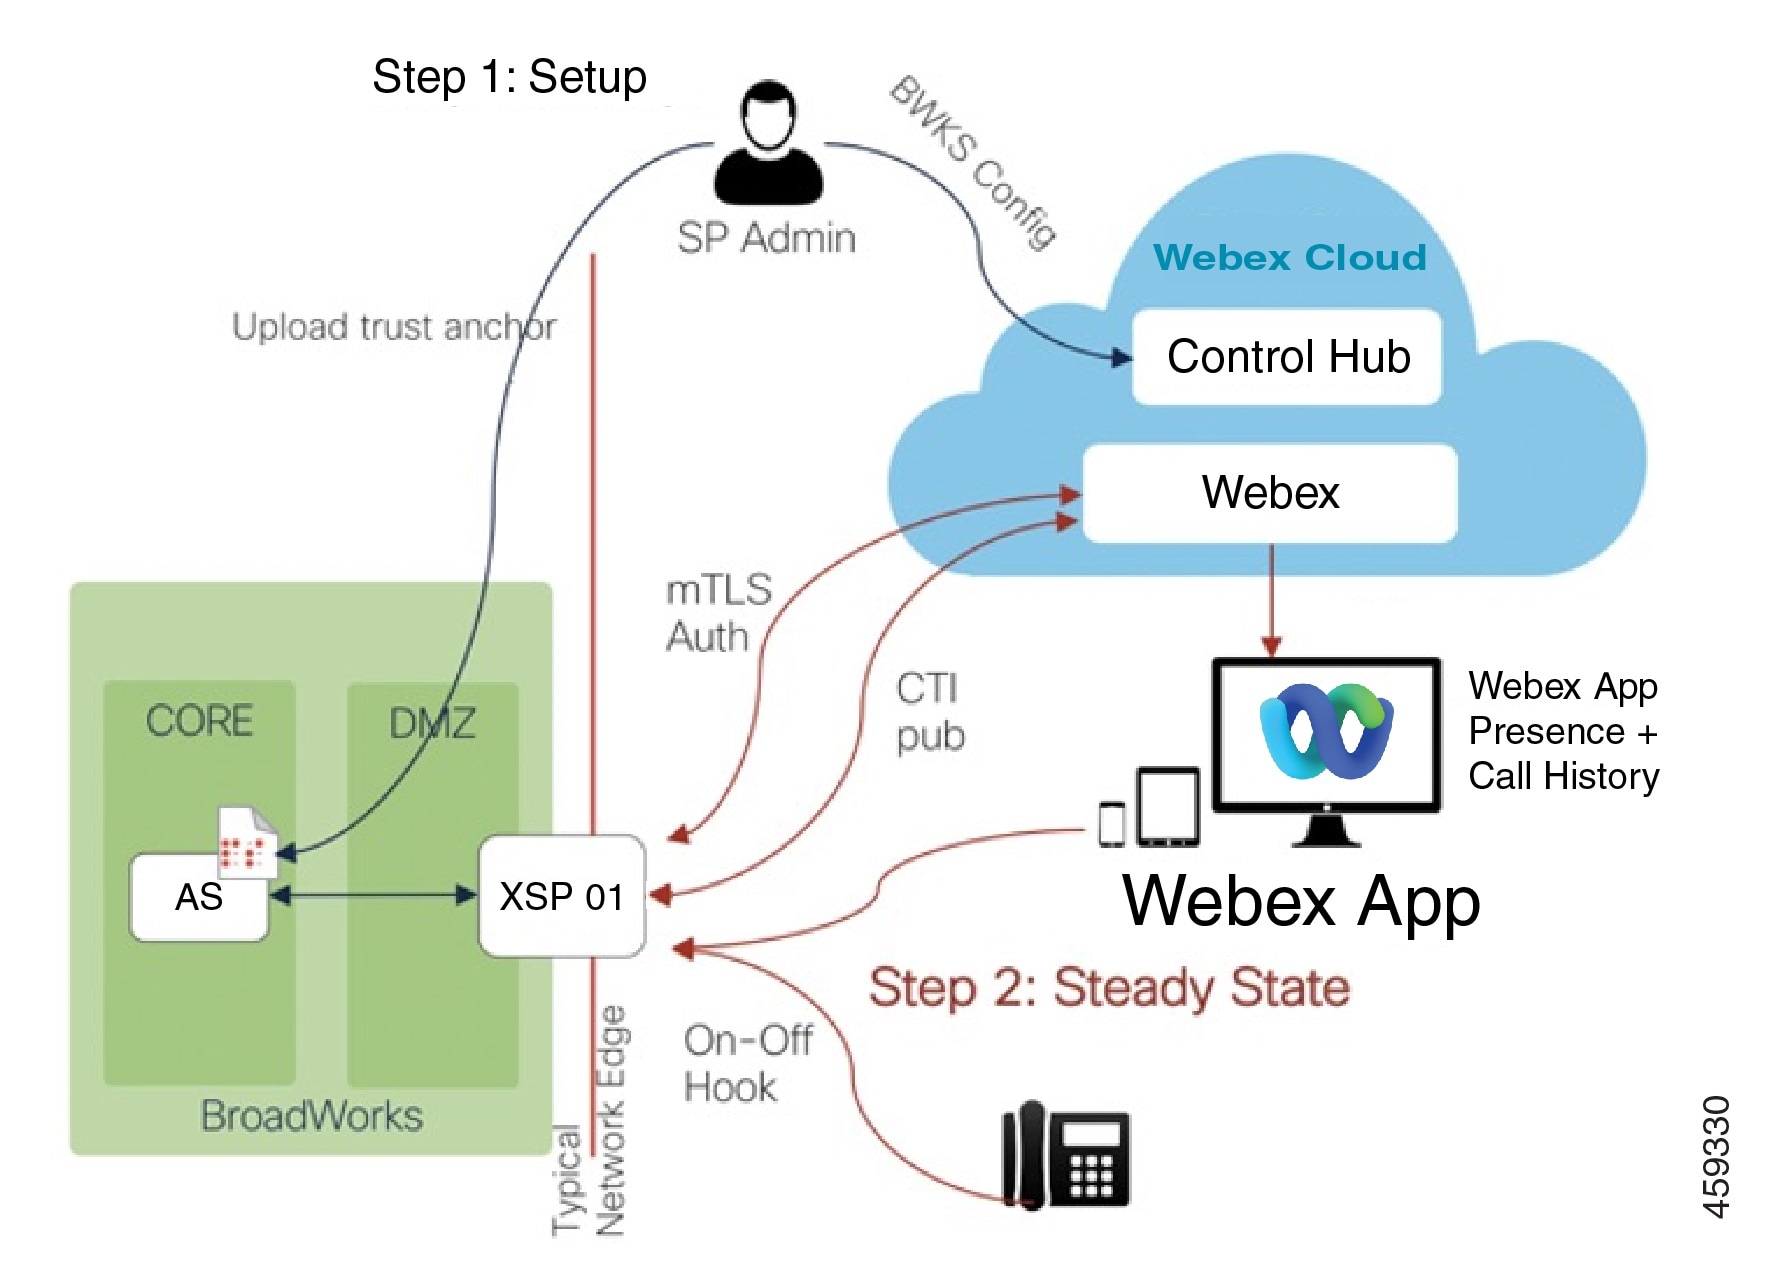
This is done for the following reasons:
To enable Webex cloud to authenticate your users against BroadWorks (via XSP-hosted authentication service).
To enable Webex apps to use Xsi interface for call control.
To enable Webex to listen for CTI events published by BroadWorks (telephony presence and call history).
Note |
The cluster wizard automatically validates the interfaces as you add them. You can continue editing the cluster if any of the interfaces do not validate successfully, but you cannot save a cluster if there are invalid entries. We prevent this because a misconfigured cluster could cause issues that are difficult to solve. |
What you need to do:
Sign in to Partner Hub (admin.webex.com) with your partner administrator credentials.
Open Settings page from the side menu, and find BroadWorks Calling settings.
Click Add Cluster.
This launches a wizard where you supply your XSP interfaces (URLs). You can add a port to the interface URL if you are using a non-standard port.
Name this cluster and click Next.
The cluster concept here is simply a collection of interfaces, typically collocated on an XSP server or farm, that enable Webex to read information from your Application Server (AS). You may have one XSP per AS cluster, or multiple XSPs per cluster, or multiple AS clusters per XSP. Scale requirements for your BroadWorks system are out of scope here.
(Optional) Enter a BroadWorks user Account Name and Password that you know is within the BroadWorks system you are connecting to Webex, then click Next.
The validation tests can use this account to validate the connections to the interfaces in the cluster.
Add your XSI Actions and XSI Events URLs.
Optional. Update the DAS URL with the URL of the Device Activation Service.
Optional. Check the Enable direct BroadWorks authentication check box if you want logins to BroadWorks to be direct to BroadWorks. Otherwise, authentication to BroadWorks is proxied through the Webex-hosted IdP proxy service.
This check box affects these login situations:
User Activation Portal login—Users must enter their BroadWorks credentials when logging in to the portal. The above setting determines if the login is direct to BroadWorks or is through the IdP Proxy.
Client Login—If BroadWorks Authentication is configured in the Onboarding Template, the above setting determines if client login to the Webex App is direct to BroadWorks or is proxied through the IdP Proxy.
Click Next.
On the CTI Interface page, do the following:
Add the CTI URL and Port for the CTI interface to which you want to connect.
Optional. Enable the Call History toggle and then enter your BroadWorks user ID. When this option is selected, BroadWorks call history events get synced to the Webex cloud. Users can view their call history on the Webex App.
Optional. Enable the Do not disturb (DND) sync toggle and then enter your BroadWorks user ID. This option syncs DND events between Webex and BroadWorks, ensuring that the feature works the same on both platforms.
Click Next.
Add your Authentication Service URL.
Select Auth Service with CI token validation.
This option does not require mTLS to protect the connection from Webex, because the Authentication Service properly validates the user token against the Webex identity service before it issues the long-lived token to the user.
Review your entries on the final screen, and then click Create. You should see a success message.
Partner Hub passes the URLs to various Webex microservices that test the connections to the supplied interfaces.
Click View Clusters and you should see your new cluster, and whether the validation succeeded.
The Create button may be disabled on the final (preview) screen of the wizard. If you cannot save the template, it indicates a problem with one of the integrations you just configured.
We implemented this check to prevent errors in subsequent tasks. You can go back through the wizard as you configure your deployment, which may require modifications to your infrastructure (e.g. XSP, load balancer, or firewall) as documented in this guide, before you can save the template.
Sign in to Partner Hub (admin.webex.com) with your partner administrator credentials.
Open Settings page from the side menu, and find BroadWorks Calling settings.
Click View Clusters.
Partner Hub initiates connectivity tests from the various microservices towards the interfaces in the clusters.
After the tests complete, the cluster list page shows status message next to each cluster.
You should see green Success messages. If you see a red Error message, click the affected cluster name to see which setting is causing the problem.
Optional. Select a cluster if you want to see existing settings for that cluster, such as XSI-Actions, XSI-Events, DAS URL and the CTI interface settings.
Onboarding templates are the way that you will apply shared configuration to one or more customers as you onboard them via the provisioning methods. You must associate each template with a cluster (that you created in previous section).
You can create as many templates as you need, but only one template can be associated with a customer.
Sign in to Partner Hub (admin.webex.com) with your partner administrator credentials.
Open Settings page from the side menu, and find BroadWorks Calling settings.
Click Add Template.
This launches a wizard where you can supply configuration for customers that will use this template.
Use the Cluster dropdown to choose the cluster you want to use with this template.
Enter a Template Name, then click Next.
Configure your provisioning mode, using these recommended settings:
|
Setting Name |
Flowthrough provisioning with trusted emails |
Flowthrough provisioning without emails |
User self-provisioning |
|---|---|---|---|
|
Enable BroadWorks Flow Through Provisioning (include provisioning account credentials if On**) |
On Supply the provisioning Account Name and Password as per BroadWorks configuration. |
On Supply the provisioning Account Name and Password as per BroadWorks configuration. |
Off |
|
Automatically Create New Organizations in Control Hub |
On† |
On† |
On† |
|
Service Provider Email Address |
Select an email address from the dropdown (you can type some characters, to find the address if it's a long list). This email address identifies the administrator within your Partner organization who will be granted delegated admin access to any new customer organizations created with the Onboarding template. |
||
|
Country |
Choose which country you use for this template. The country you choose matches customer organizations that are created with this template to a particular region. At present, the region could be (EMEAR) or (North America and rest of world). See the country to region mappings in this spreadsheet. The organization country will determine the default global call-in numbers for Cisco PSTN in Webex Meeting Sites. Refer to the Onboarding section of help page for more information. |
||
|
BroadWorks Enterprise Mode Active |
Enable this if the customers you provision with this template are enterprises in BroadWorks. If they are groups, leave this switch off. If you have a mix of enterprises and groups in your BroadWorks, you should create different templates for those different cases. |
||
Notes from the table:
† This switch ensures that a new customer organization is created if a subscriber’s email domain does not match an existing Webex organization.
This should always be on, unless you are using a manual ordering and fulfilment process (via Cisco Commerce Workspace) to create customer organizations in Webex (before you start provisioning users in those organizations). That option is often referred to as the "Hybrid Provisioning" model, and is out of the scope of this document.
** "Provisioning account" refers to the BroadWorks system-level admin account. On BroadWorks, you need an admin account with these attributes: Administrator Type=Provisioning, Read-only=Off.
Select the default services package for customers using this template (see Packages in the Overview section); either Basic, Standard, Premium or Softphone.
You can override this setting for individual users via Partner Hub.
Optional. Check Disable Cisco Webex Free Calling if you want to disable Webex Calls,.
For Meeting Join Configuration, select one of the following options:
Cisco Call-in Numbers (PSTN)
Partner-provided Call-in Numbers (BYoPSTN)—If you select this option, refer the Bring Your Own PSTN Solution Guide for Webex for Cisco BroadWorks for detailed information on how to configure this option.
Click Next.
There are two approaches for provisioning subscribers with regards to how their identities are verified – using Trusted Emails or Untrusted Emails.
In the Trusted Email workflow users provide email addresses to the partner who adds them in BroadWorks. You as a partner are responsible for provisioning the email address as part of either the flow-through or API method.
Note |
It is highly recommended to use the Trusted provisioning method because it ensures that all subscribers are fully provisioned by you as a partner and there is no action required from the end users. |
In the Untrusted email case users need to verify their emails before provisioning, or users can self-activate themselves.
In the Untrusted case there are several provisioning modes based on the verification settings in the table below:
|
Setting Name |
Flowthrough provisioning without emails |
User self-provisioning |
|---|---|---|
|
Provision Admin First |
Recommended* |
Not applicable |
|
Allow users to self activate |
Not applicable |
Required |
Notes from the table:
* Each customer organization in Webex is required to have at least one user with administrator role. The first user to whom you assign Integrated IM&P in BroadWorks takes the customer administrator role if a new customer organization is created in Webex. As a Service Provider you may want to have control over who gets the role. Checking this setting blocks users from completing activation until the first user you provisioned is activated. If you uncheck this setting, then the first user to become active in the new organization becomes the customer administrator.
Click Next.
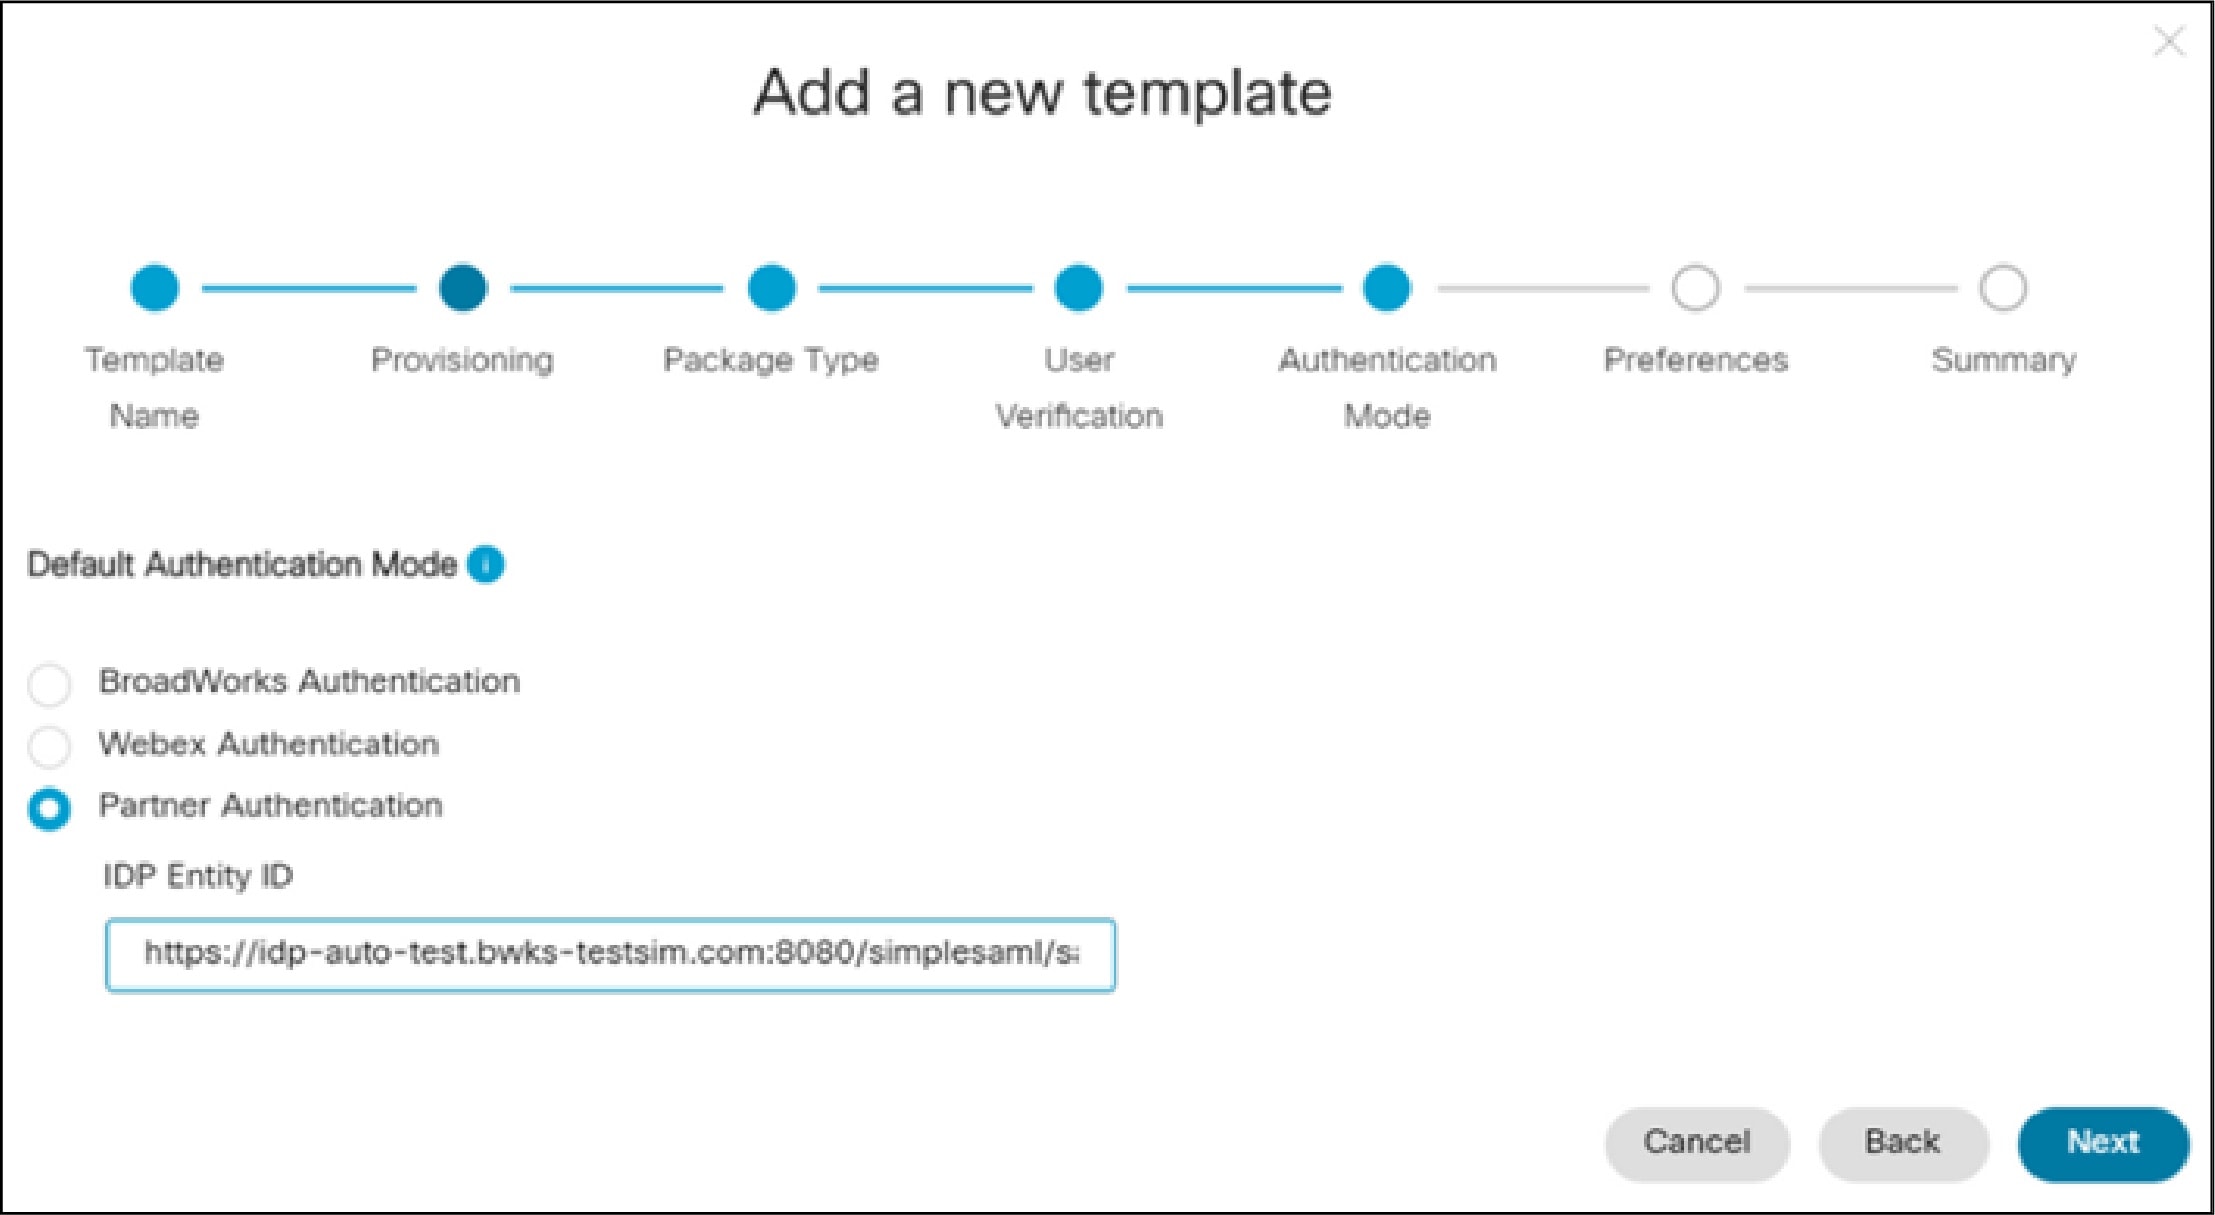
Select the default authentication mode (either BroadWorks Authentication or Webex Authentication) for user login to Webex.
Note |
This setting has no effect on user login to the User Activation Portal. Users must use their BroadWorks user ID and password when logging in to the portal, irrespective of how the Onboarding Template is configured. |
Note |
This setting will be applied to newly created customer organizations only. If partner administrators try to apply a new authentication setting to existing customer organizations, the existing settings apply so that existing users don't lose access. To change the authentication mode for existing customer organizations, you must open a ticket with Cisco TAC. |
(See Authentication Mode in the Prepare your Environment section).
Click Next.
For Preferences, configure the following:
Choose whether you want to Prefill user email addresses in login page.
You should only use this option if you selected BroadWorks Authentication and have also have put the users’ email addresses in the Alternate ID attribute in BroadWorks. Otherwise, they will need to use their BroadWorks username. The login page gives an option to change user, if necessary, but this may lead to login issues.
If you want to enable directory sync, set the Enable phone directory sync for all new customer organizations toggle to On.
This option enables Webex to read BroadWorks contacts into the customer organization, so that users can find and call them from the Webex app.
Enter a Partner Admin.
This name is used in the automated email message from Webex, that invites users to validate their email addresses.
Make sure the Provisioning Existing Organizations toggle is On (the default setting is On).
Click Next.
Review your entries on the final screen. You can click the navigation controls at the top of the wizard to go back and change any details. Click Create.
You should see a success message.
Click View Templates and you should see your new template listed with any other templates.
Click the template name to modify or delete the template, if necessary.
You do not need to re-enter the provisioning account details. The empty password/password confirm fields are there to change the credentials if you need to, but leave them empty to keep the values you gave to the wizard.
Add more templates if you have different shared configurations you want to provide to customers.
Note |
Keep the View Templates page open, as you may need template details for a following task. |
Note |
This task is only required for flow through provisioning. |
If you haven't yet done so, apply the following patch that applies to your release:.
For R22: AP.as.22.0.1123.ap373197
For R23: AP.as.23.0.1075.ap373197
For R24: AP.as.24.0.944.ap384177
Note |
For a complete list of BroadWorks patches that form the requirement for deploying Webex for Cisco BroadWorks, See BroadWorks Software Requirements in the Reference section. |
Change to the Maintenance/ContainerOptions context.
Enable the provisioning URL parameter:
/AS_CLI/Maintenance/ContainerOptions> add provisioning bw.imp.useProvisioningUrl true
Refer to the Cisco BroadWorks Application Server Command Line Interface Administration Guide for details (Interface > Messaging and Service > Integrated IM&P) of the AS commands.
Sign in to Partner Hub and go to .
Click View Templates.
Select the template you’re using to provision this enterprise/group’s subscribers in Webex.
The template details display in a flyout pane on the right. If you haven’t yet created a template, you need to do that before you can get the provisioning URL.
Copy the Provisioning Adapter URL.
Repeat this for other templates if you have more than one.
Note |
You may not want to set system-wide provisioning and service domain if you are using UC-One SaaS. See Decision Points in the Prepare your Environment section. |
Sign in to the Application Server and configure the messaging interface.
AS_CLI/Interface/Messaging> set provisioningUrl provisioningURL
AS_CLI/Interface/Messaging> set provisioningUserId provisioning_account_name
AS_CLI/Interface/Messaging> set provisioningPassword provisioning_account_password
AS_CLI/Interface/Messaging> set enableSynchronization true
Activate the Integrated IMP interface:
/AS_CLI/Service/IntegratedIMP> set serviceDomain example.com
/AS_CLI/Service/IntegratedIMP/DefaultAttribute> set userAttrIsActive true
Note |
You must enter the fully qualified name for the |
In BroadWorks UI, open the enterprise you want to configure, and go to Services > Integrated IM&P.
Select Use service domain and enter a dummy value (Webex ignores this parameter. You could use example.com).
Select Use Messaging Server.
In the URL field, paste the provisioning URL you copied from your template in Partner Hub.
Note |
You must enter the fully qualified name for the |
In the Username field, enter a name for the provisioning administrator. This must match the value on the template in Partner Hub.
Enter a password for the provisioning administrator. This must match the value on the template in Partner Hub.
For Default User Identity for IM&P ID, select Primary.
Click Apply.
Repeat for other enterprises you want to configure for flow through provisioning.
For information on the user data that gets exchanged between BroadWorks and Webex during user provisioning, see Service Provider User Provisioning.
The Pre-Provisioning Check API helps administrators and sales teams by checking for errors before you provision a customer or subscriber for a package. Users or Integrations authorised by a User with the Partner Full Administrator role can use this API to ensure that there are no conflicts or errors with package provisioning for a given customer or subscriber.
The API checks to see if there are conflicts between this customer/subscriber and existing customers/subscribers on Webex. For example, the API may throw errors if the subscriber is already provisioned to a different customer or partner, if the email address exists already for another subscriber, or if there are conflicts between the provisioning parameters and what exists already on Webex. This gives you the opportunity to fix those errors before you provision, increasing the likelihood of successful provisioning.
For more information on the API, see: Webex for BroadWorks Developer Guide
To use the API, go to: Precheck a BroadWorks Subscriber Provisioning
Note |
To access Precheck a BroadWorks Subscriber Provisioning document you need to log in to https://developer.webex.com/ portal. |
Allows partner administrators to configure SAML SSO for newly created customer organizations. Partners can configure a single pre-defined SSO relationship and apply that configuration to the customer organizations that they manage, as well as to their own employees.
Note |
The below Partner SSO steps apply to newly-created customer organizations only. If partner administrators try to add Partner SSO to an existing customer organization, the existing authentication method is retained in order to prevent existing users from losing access. To add Partner SSO to an existing organization, you must open a ticket with Cisco TAC. |
Verify that the third-party Identity Provider provider meets the requirements listed in the Requirements for Identity Providers section of Single Sign-On Integration in Control Hub.
Open a Service Request with Cisco TAC. TAC must establish a trust relationship between the third-party identity provider and Cisco Common Identity service. .
Note |
If your IdP requires the passEmailInRequest feature to be enabled, make sure to include this requirement in the service request. Check with your IdP if you are unsure
of whether this feature is required.
|
Upload the CI metadata file that TAC provided to your Identity Provider.
Configure a Onboarding template. For the Authentication Mode setting, select Partner Authentication. For the IDP Entity ID, enter the EntityID from the SAML metadata XML of the third-party identity provider.
Create a new user in a new customer organization that uses the template.
Very that the user can log in.
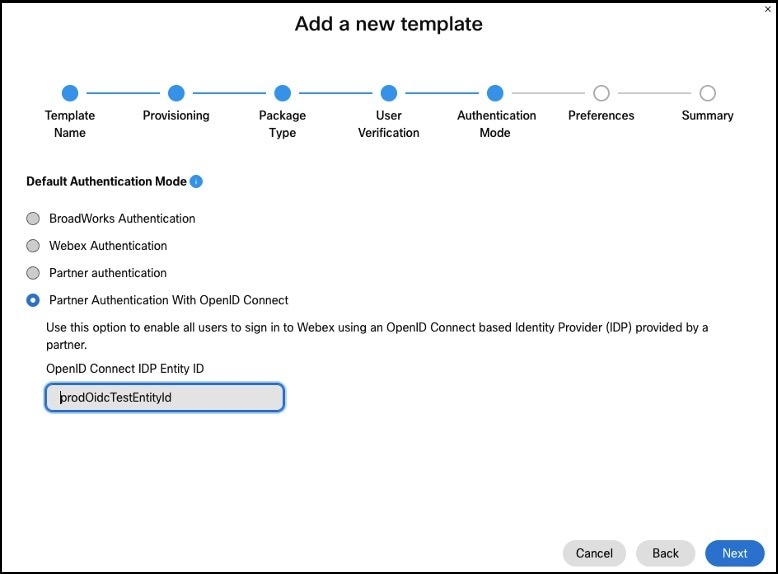
Allows partner administrators to configure OIDC SSO for newly created customer organizations. Partners can configure a single pre-defined SSO relationship and apply that configuration to the customer organizations that they manage, as well as to their own employees.
Note |
The below steps to set up Partner SSO OIDC apply to newly created customer organizations only. If partner administrators try to modify the default authentication type to Partner SSO OIDC in an existing temple, the changes will not apply to the customer organizations already onboarded using the template. To add Partner SSO to an existing customer organization, you must open a ticket with Cisco TAC. |
Open a Service Request with Cisco TAC with the details of the OpenID Connect IDP. The following are mandatory and optional IDP attributes. TAC must set up the IDP on the CI and provide the redirect URI to be configured on the IDP.
|
Attribute |
Required |
Description |
|---|---|---|
|
IDP Name |
Yes |
Unique but case-insensitive name for OIDC IdP config, could consist of letters, numbers, hyphens, underlines, tildes, and dots and max length is 128 characters. |
|
OAuth client Id |
Yes |
Used to request OIDC IdP Authentication. |
|
OAuth client Secret |
Yes |
Used to request OIDC IdP Authentication. |
|
List of scopes |
Yes |
List of scopes which will be used to request OIDC IdP authentication, split by space, e.g. 'openid email profile' Must including openid and email. |
|
Authorization Endpoint |
Yes if discoveryEndpoint not provided |
URL of the IdP's OAuth 2.0 Authorization Endpoint. |
|
tokenEndpoint |
Yes if discoveryEndpoint not provided |
URL of the IdP's OAuth 2.0 Token Endpoint. |
|
Discovery Endpoint |
No |
URL of the IdP's Discovery Endpoint for OpenID endpoints discovery. |
|
userInfoEndpoint |
No |
URL of the IdP's UserInfo Endpoint. |
|
Key Set Endpoint |
No |
URL of the IdP's JSON Web Key Set Endpoint. |
Note |
In addition to the above IDP attributes, the partner organization ID needs to be specified in the TAC request. |
Configure the redirect URI on the OpenID connect IDP.
Configure a Onboarding Template. For the Authentication Mode setting, select Partner Authentication With OpenID Connect and enter the IDP Name provided during the IDP setup as the OpenID Connect IDP Entity ID.
Create a new user in a new customer organization that uses the template.
Very that the user can log in using the SSO authentication flow.
To run Webex for Cisco BroadWorks, it's required that you enable the Call Correlation Identifier. This setting is required for many calling features, including Call Recording, Group Call Pickup, Executive and Executive-Assistant.
Use the CLI to enable the feature on all AS and XSP interfaces.
Run the following commands on AS interfaces. This will enable the AS to send the X-BroadWorks-Correlation-Info SIP header:
AS_CLI/Interface/SIP> set sendCallCorrelationIDNetwork true
AS_CLI/Interface/SIP> set sendCallCorrelationIDAccess true
The enableCallCorrelationID parameter associated with the Xsi-Actions application is used to control the inclusion of call correlation information in
Xsi-Actions logs. It is recommended to have enableCallCorrelationID enabled using the following command on XSP interfaces:
XSP_CLI/Applications/Xsi-Actions/GeneralSettings>set enableCallCorrelationID true
For additional information on the Call Correlation Identifier, see Cisco BroadWorks Call Correlation Identifier Feature Description.
Directory sync ensures that Webex for Cisco BroadWorks users can use the Webex directory to call any calling entity from the BroadWorks server. When this feature is enabled, the full calling directory from the BroadWorks server gets synced to the Webex directory. Users can access the directory from the Webex App and place a call to any calling entity from the BroadWorks server.
To turn Directory Sync on, go to Directory Sync in Webex for Cisco BroadWorks.
Note |
Webex for Cisco BroadWorks flowthrough provisioning adds messaging users and associated calling information from the BroadWorks server to the Webex platform. However, phone lists, non-messaging users, and non-user entities are not included (for example, a conference room phone, fax machine or hunt group number). Turning on Directory sync ensures that all calling entities get added to the Webex platform. |
When Unified Call History is enabled, BroadWorks call events get synced to the Webex cloud and become part of the Webex Unified Call and Meetings History that displays on the Webex App. Users can view their own detailed Call history and Meeting history from the Webex App.
Unified Call History can be enabled by partner-level administrators in Partner Hub on a cluster-by-cluster basis. When this feature is turned on, the BroadWorks deployment syncs the following call events to the Webex cloud:
Call History events—these events get used to build a detailed Unified Call History
Hook Status events—Unified Call History includes hook status optimizations that decrease the amount of network bandwidth for Telephony Presence updates
Before you can configure Unified Call History, make sure that you have patched your system. This feature is dependent on the following BroadWorks patches being installed:
For R22:
AP.as.22.0.1123.ap378585—after patch installation, you must activate feature 25433. For example: AS_CLI/System/ActivatableFeature> activate 25433
For R23:
AP.as.23.0.1075.ap378585—after patch installation, you must activate feature 25433. For example: AS_CLI/System/ActivatableFeature> activate 25433
If using XSP—AP.xsp.23.0.1075.ap378585
If using ADP—Xsi-Events-23_2021.05_1.251.bwar
For R24:
AP.as.24.0.944.ap378585—after patch installation, you must activate feature 25433. For example: AS_CLI/System/ActivatableFeature> activate 25433
Note |
For the full list of BroadWorks patches that you must install as a prerequisite to running Webex for Cisco BroadWorks, See BroadWorks Software Requirements in the Reference section. |
In addition to patching your system, the client config file (config-wxt.xml) must have the following tag set: <call-history enable-unified-history=”%ENABLE_UNIFIED_CALL_HISTORY_WXT%”/>
To have Hunt Group, Call Center and other redirection info in Unified Call History, the following Broadworks patches must be installed and active:
For R23:
AP.as.23.0.1075.ap383346
AP.as.23.0.1075.ap383994
For R24:
AP.as.24.0.944.ap383346
AP.as.24.0.944.ap383994
To have Executive-Assistant info in Unified Call History, the following Broadworks patches must be installed and active:
For R24:
AP.as.24.0.944.ap380052
AP.as.24.0.944.ap384239
ADP running Xsi-Events-24_2022.06 or later
In addition to the Broadworks patches, Directory Sync must also be enabled for the Executive-Assistant Unified Call History.
Note |
When you enable Call History or DND Sync, Webex will send CTI subscription refresh requests for all users under the cluster. Depending on the number of users, this may last up to a few hours. It is recommended to not perform any Broadworks maintenance activity during the same maintenance window. |
To enable Call History on a new cluster, see the steps for adding a cluster in Configure Your Partner Organization in Partner Hub.
To enable Call History on an existing cluster, follow the below steps:
Sign in to Partner Hub at admin.webex.com.
Go to Settings and select an existing cluster.
Verify the cluster connection is good. The right panel should display a green check mark with Connection established.
If this doesn't appear, under Check Connnections (Optional), enter BroadWorks User Id and BroadWorks Password and click Check to verify the connection is good.
Check the Enable call history check box.
Click Save.
The following feature interactions exist for Unified Call History:
Unified Call History is not supported for users who are configured in BroadWorks with Route Lists or Direct Routes. When this situation exists, Call History and Hook Status events do not get sent to the Webex App.
Unified Call History is not supported with extension dialing. Calls that are placed using extension dialing may not be reflected correctly in the Call History.
End users can access and view their Unified Call History from the Webex App. For details, see: Webex | View Call and Meeting History.
Once you enable Unified Call History on a cluster, you cannot disable the feature on your own. If you need to disable the feature, contact Cisco Technical Assistance Center (TAC).
Caller Identification
When the Webex App receives a call, it will attempt to identify who the caller is and display this information in the incoming call notification, the in-call window, and after the call is complete, in the call history and voicemail.
The Webex App will attempt to find the caller ID by matching the incoming phone number with the phone numbers of contacts found in various sources. The Webex App will use the following sources in this order. Once it finds it in one source it will not attempt to search anywhere else.
Note |
If it finds multiple instances of a number in one source, it will not try to choose one of them, in this case, it will not display any caller ID. |
Webex Common Identity (CI) which contains your organization users.
Personal and Organization Contacts. Personal Contacts are visible under the Contacts tab.
Local Address Book. In Windows - Outlook application, in Mac - Mac Contacts, in iOS - iPhone contacts, in Android - Android contacts.
If there is no match found with the incoming phone number, then the app will use the display name in the SIP FROM header if available. Otherwise, it will use the username part of the SIP URI from the SIP From header as a last resort.
For remote call control (i.e., Deskphone Control Mode) XSI info is used, where BWKS ID or extension is used, extracted from remote-party-info in the XSI event. If remote-party-info is not available, then P-Asserted Identity (PAI) (if configured) will be used.
Call Redirection
In the case where a call has been redirected or forwarded, then the app will attempt to show who the caller is and how it was forwarded in the call notification and call history.
Call Forwarded: Shows number that forwarded the call.
Hunt Group: Shows name of the hunt group that forwarded the call.
Call Center Queue: Shows name of the queue that forwarded the call.
Executive-Assistant: Shows name of Executive the call is coming in for.
Exceptions:
For internal call queue calls, where an agent calls back an internal party, the remote party will not see the name of the call queue but will see the name of the agent calling them.
Call Answered Elsewhere:
For Hunt Groups or Call Queues that are set up with simultaneous routing, agents will see a call answered elsewhere in call history if another agent picks up the call. For Hunt Groups or Call Queues with sequential routing, or in an overflow, calls will show as missed call in call history if answered by another agent.
Shared line appearance is the ability to provision other users' lines as shared lines on the end-user device. The shared line configuration for the Webex App is similar to the shared line configuration for desk phones. This specific feature allows you to assign shared line appearances to the end user's Webex App.
This feature benefits the users to handle calls on other user's extension directly from the Webex App.
You can configure shared line appearance only for the desktop version of a Webex App.
You can add a maximum of 10 lines including the primary line to Webex App.
You can't assign workspace line as shared line.
A user cannot be provisioned with Executive-Assistant service at the same time as having Shared Lines.
A user's primary line port should not be changed to a Shared Line.
Requirements
To deploy this feature on Webex for Cisco BroadWorks, you must deploy the following BroadWorks patches:
Patch 1: Owner Flag in Device List to Support Webex Client Shared Lines
R23 without ADP:
AP.as.23.0.1075.ap384179
AP.xsp.23.0.1075.ap384179
R23 with ADP:
AP.as.23.0.1075.ap384179
Xsi-Actions-23_2022.10
R24:
AS: AP.as.24.0.944.ap384179
Xsi-Actions-24_2022.10
R25:
AS: RI release Rel_2022.10_1.310
Xsi-Actions-25_2022.10
Patch 2: Patches for increasing port count on device profile types (in this case for the desktop client: Business Communicator).
RI release Rel_2022.10_1.310
Do Not Disturb (DND) Sync aligns DND settings between Webex and BroadWorks by synchronizing DND status between the two platforms. For example, if a user turns on DND from the Webex App, that status syncs to BroadWorks calling devices. As a result, the user’s BroadWorks-registered desk phone does not ring when someone attempts to call it. Similarly, if a user sets DND from a desk phone, the status syncs to the Webex App. Without this feature, DND updates from one platform don't get recognized by the other platform.
DND Sync gets applied at the BroadWorks cluster level and can be enabled in Partner Hub by a partner administrator.
Make sure that the following patches are applied to the AS and XSP/ADP. Apply only the patches for your BroadWorks version.
For Release 22:
AS patch: AP.as.22.0.1123.ap382615, AP.as.22.0.1123.ap382838
XSP patch: AP.xsp.22.0.1123.ap382615, AP.xsp.22.0.1123.ap382838
For Release 23:
AS patch: AP.as.23.0.1075.ap382615, AP.as.23.0.1075.ap382838
XSP patch: AP.xsp.23.0.1075.ap382615, AP.xsp.23.0.1075.ap382838
ADP apps: Xsi-Actions-23_2022.03_1.220.bwar, Xsi-Events-23_2022.03_1.220.bwar
For Release 24:
AS patch: AP.as.24.0.944.ap382615, AP.as.24.0.944.ap382838
ADP apps: Xsi-Actions-24_2022.03_1.220.bwar, Xsi-Events-24_2022.03_1.220.bwar
After you apply the patches, activate feature 25433 on the AS:
AS_CLI/System/ActivatableFeature> activate 25433
Configure Device Feature Key Synchronization on BroadWorks. Make sure that the phone supports SIP SUBSCRIBE/NOTIFY for the “as-feature-event” event package. For details, see Cisco BroadWorks Device Feature Key Synchronization.
Sign in to Partner Hub
Click Settings.
Click View Cluster and select the appropriate BroadWorks cluster.
Enable the Do not disturb (DND) sync toggle.
Enter your BroadWorks user ID and click Enable.
The system validates that the BroadWorks cluster has the appropriate patches to support DND Sync. If validation fails, the Save button gets disabled.
If validation succeeds, click Save.
Note |
|
You can also enable the feature during cluster creation. For details, see “Configure Your BroadWorks Clusters” in Configure Your Partner Organization in Partner Hub.
You can’t disable DND Sync on your own. To disable the feature, create an engineering BEMS case with the following information:
Family: Spark Service
Product: Calling in Webex (Webex for BroadWorks)
Component: WxBW- Provisioning
The BEMS case must state that Do Not Disturb Sync is to be disabled for a partner. The case must contain partnerId and BroadWorks clusterId.

Webex for Cisco BroadWorks supports four modes of call recording.
|
Recording Modes |
Description |
Controls/Indicators that display on Webex app |
|---|---|---|
|
Always |
Recording is initiated automatically when the call is established. The user has no ability to start or stop recording. |
|
|
Always with Pause/Resume |
Recording is initiated automatically when the call is established. User can pause and resume recording. |
|
|
OnDemand |
Recording is initiated automatically when call is established, but the recording is deleted unless the user presses Start Recording. If user starts recording, the full recording from call setup is retained. After starting the recording, user can also pause and resume recording |
|
|
OnDemand with User-Initiated Start |
Recording does not initiate unless the user selects the Start Recording option on the Webex app. The user has the option to start and stop recording multiple times during a call. |
|
To deploy this feature on Webex for Cisco BroadWorks, you must deploy the following BroadWorks patches:
For R22: AP.as.22.0.1123.ap377718
For R23: AP.as.23.0.1075.ap377718
For R24: AP.as.24.0.944.ap377718
The Call Correlation Identifier must be turned on. For details, see Enable Call Correlation Identifier.
The following configuration tag must be enabled in order to use this feature: %ENABLE_CALL_RECORDING_WXT%.
This feature requires an integration with a third-party call recording platform.
To configure call recording on BroadWorks, go to the Cisco BroadWorks Call Recording Interface Guide.
For user information on how to use the Recording feature, go to the help.webex.com article Webex | Record Your Calls.
To replay a recording, users or administrators must go to their third-party call recording platform.
Webex for Cisco BroadWorks supports Group Call Park and Retrieve. This feature provides a way for users within a group to park calls, which can then be retrieved by other users in the group. For example, retail employees in a store setting could use the feature to park a call that can then be picked up by someone in another department.
Once the feature is configured
While in a call, a user clicks the Park option on their Webex app to park the call at an extension that the system selects automatically. The system displays the extension to the user for a period of 10 seconds.
Another user in the group clicks the Retrieve call option on their Webex app. The user then enters the extension of the parked call in order to continue the call.
For this feature to work, make sure of the following:
The client config file must have the following tags set:
<call-park enabled="%ENABLE_CALL_PARK_WXT%"
        timer="%CALL_PARK_AUTO_CLOSE_DIALOG_TIMER_WXT%"/>
The Call Correlation Identifier must be enabled on the AS and XSP. For details, see Enable Call Correlation Identifier.
Your SBC must be configured to pass the ‘x-broadworks-correlation-in' SIP attribute to and from the Application Server.
For information on how to configure Group Call Park on BroadWorks, see “Add Call Park Group” in the Cisco BroadWorks Application Server Group Web Interface Administration Guide – Part 2. You must create a group and add users to the group.
For information on how to configure the Call Correlation Identifier on BroadWorks, see Cisco BroadWorks Call Correlation Identifier Feature Description.
For user information on how to use Group Call Park, see Webex | Park and Retrieve Calls.
Regular or directed call park is not supported in the Webex app UI, but provisioned users can deploy the feature using Feature Access Codes:
Enter *68 to park a call
Enter *88 to retrieve a call
Barge-in service is commonly used in call center environments or other situations where immediate assistance or intervention may be required.
When a barge-in service is enabled, a designated user or supervisor can enter an active call by initiating a specific command or by using a dedicated button or key combination on their phone or communication device. Once the barge-in request is made, the system establishes a connection with the ongoing call, allowing the authorized person to listen to the conversation or join the call as an active participant.
Barge-in service can be useful in various scenarios. In a call center setting, supervisors or trainers can monitor and coach customer service representatives by listening to their calls in real-time. If necessary, they can intervene to provide guidance or take over the call if the representative is struggling. In emergency situations or critical discussions, authorized personnel can quickly join ongoing conversations to provide assistance or make important decisions.
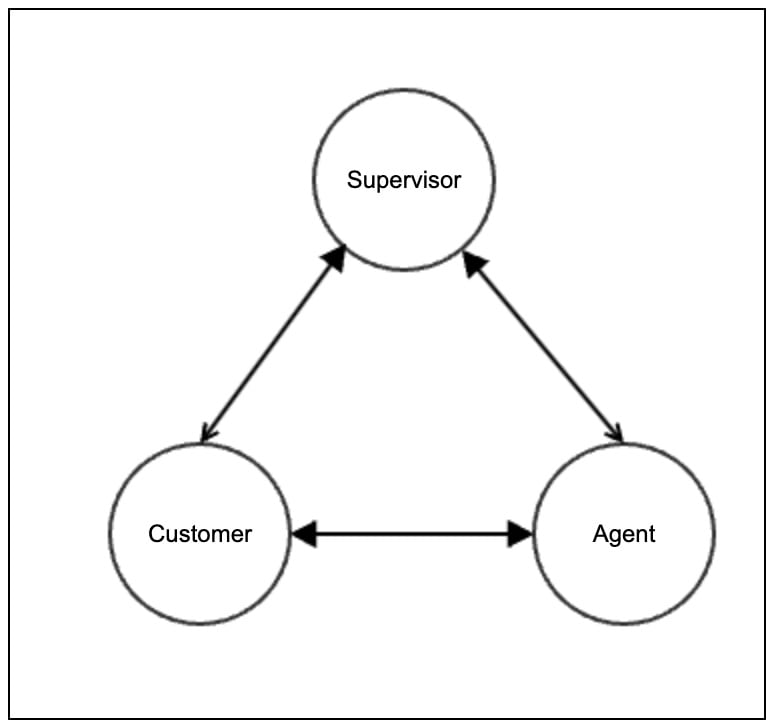
In the Webex app for Barge in, we get a notification that the call is transformed into a conference. There is no additional information in the NOTIFY (call-info or conference-info) what is the type of conference, so we can treat it in a different way.
When a barge-in occurs, a three-way call is established between the parties. The following terms are introduced:
Supervisor: A supervisor is a person who oversees and manages a team of customer service agents or call center representatives. In the context of call barge-in, a supervisor typically has the ability to monitor and intervene in ongoing customer calls. They may use call monitoring tools or software to listen in on calls, provide guidance to agents, and ensure quality control. The supervisor's role may involve training agents, addressing customer concerns, and optimizing the performance of the team.
Customer: A customer refers to an individual or entity that engages with a company or organization to obtain products, services, or support. In the context of call barge-in, a customer is someone who is making or receiving a phone call with a customer service agent. Customers may seek assistance, information, or resolution to their queries or issues during the call. The call barge-in feature allows supervisors or authorized personnel to join the ongoing call between the customer and the agent.
Agent: An agent, also known as a customer service representative or call center agent, is a person responsible for handling customer interactions and providing support or assistance over the phone or other communication channels. Agents are trained to address customer inquiries, resolve problems, process transactions, and deliver a positive customer experience. In the context of call barge-in, an agent is the individual speaking directly to the customer during the phone call. The agent may receive guidance or feedback from the supervisor through call barge-in if necessary.
The Mobile Native Call Escalate to Meeting comes with two unique features:
New Push Notification
Mobile users on a native call can now switch to the Webex App by tapping on the New push notification. When you start a native call screen a New push notification appears on the screen and tapping the notification takes you straight to the Webex App in-call screen.
You see the Webex notification during a mobile phone call if you use Webex Go or your mobile network operator (MNO) has call signaling using Cisco call control for your mobile phone calls.
Move Mobile Call to Meeting
When you're in the middle of a call with someone, you may want to move that call into a meeting to make use of some advanced meetings features like video, share, or whiteboarding. Or invite other people into the discussion and move to a meeting.
BroadWorks Requirements
Activatable feature 25239
R23 with XSP:
AS Patch AP.as.23.0.1075.ap383064
XSP Patch AP.xsp.23.0.1075.ap383064
Patch AP.platform.23.0.1075.ap383064
R23 with ADP:
AS Patch AP.as.23.0.1075.ap383064
ADP with Xsi-Actions-23, CommPilot-23 version > 2022.05_1.303 and NPS version > 2022.08_1.350
R24:
AS patch: AP.as.24.0.944.ap383064
ADP with Xsi-Actions-24, CommPilot-24 version > 2022.05_1.303 and NPS version > 2022.08_1.350
R25:
AS RI release Rel_2022.08_1.354
ADP with Xsi-Actions-25, CommPilot-25 > 2022.08_1.350 and NPS version > 2022.08_1.350
URI Dialing Configuration to support Move Call to Meeting
NS UrlDialing Policy
Define rule for (.*)webex.com to route through I-SBC
NS_CLI/Policy/UrlDialing> get WebexMeetings
 Policy: UrlDialing  Instance: Webex
   unknownSipURIHandling = reject
   disableSubscriberLookups = true
   Enable = true
   CallTypes:
     Selection = {ALL}
     From = {PCS, ALL, TRMT, LO, TPSX, OAX, GNT, DP, LPS, OA, TPS, IOA, MOBX, EA, FGB, MOB, SNEN, POA, SV, SVCD, CAC, IN, TO1X, MS, CSV, VSC, EM, SVCO, SMC, TPSE, ZD, NIL, CS, CT, TF, GAN, VFAC, TO, DA, OAP}
   lineportOnly = false
   enableSipURIMatchingRules = true

NS_CLI/Policy/UrlDialing/Rules> get WebexMeetings
 Policy: UrlDialing  Instance: WebexCalling  Table: Rules
   id            pattern      routingNE  cost  weight            dtg
===================================================================
    1      *@*.webex.com  WebexMeetings     1      50  WebexMeetings
NS Routing NE for I-SBC
Example configuration
NS_CLI/System/Device/RoutingNE> get ne WebexMeetings
 Network Element  WebexMeetings
    Location              =  1281465
    Data Center           =
    Static Cost           =  1
    Static Weight         =  99
    Poll                  =  false
    OpState               =  enabled
    State                 =  OnLine
    Profile               =  NIL_PROFILE
    Remote Lookup Enabled =  false
    Signaling Attributes  =

NS_CLI/System/Device/RoutingNE/Address> get ne WebexMeetings
      Routing NE     Address  Cost  Weight  Port    Transport    Route
=====================================================================
   WebexMeetings sbc-address     1      99     -  unspecified
NS Routing Profile
UrlDialing policy instance added to appropriate routing profile(s)
NS_CLI/Policy/Profile> get profile MyInst
 Profile:  Webex
                  Policy              Instance
    ==========================================
 …
              UrlDialing          WebexMeetings
AS Use NS Route for NetworkURL call
Enable the AS to honor the NS route in Hybrid AS mode
AS_CLI/Interface/IMS> set queryNSForNetworkURL trueWebex for Cisco BroadWorks supports E911 emergency services calling. With this feature, emergency calls get routed to a Public Safety Answering Point (PSAP) who can then direct emergency services to the caller’s location. To use this feature, you must integrate Webex for Cisco BroadWorks with an E911 emergency call provider.
Use the following Webex articles to configure support for E911 emergency calling services:
E911 Emergency Calling in Webex for BroadWorks—Use this article to configure E911 emergency calling in Webex for Cisco BroadWorks using one of the following supported E911 providers:
Bandwidth
Intrado
RedSky
Emergency Call Disclaimer—If you have a location service, you can configure the Emergency Services Disclaimer window on the Webex App to include an option for users to update their location when logging in.
Users download and install their generic Webex apps, for desktop or mobile (for download links, see Webex App Platforms). Once the user authenticates, the client registers against theWebex Cloud for messaging and meetings, retrieves its branding info, discovers its BroadWorks service info and downloads its calling configuration from BroadWorks Application Server (via DMS on XSP).
You configure the calling parameters for Webex apps in BroadWorks (as normal). You configure branding, messaging, and meeting parameters for the clients in Control Hub. You do not directly modify a configuration file.
These two sets of configurations can overlap, in which case the Webex configuration supersedes the BroadWorks configuration.
Webex apps are configured with DTAF files. The clients download a configuration XML file from the Application Server, via the Device Management service on the XSP.
Get the required DTAF files (see Device Profiles in the Prepare Your Environment section).
Check that you have the right tag sets in BroadWorks System > Resources > Device Management Tag Sets.
For each client you're provisioning:
Download and extract the DTAF zip file for the particular client.
Import DTAF files to BroadWorks at System > Resources > Identity/Device Profile Types
Open the newly added device profile for editing and:
Enter the XSP farm FQDN and Device Access Protocol.
Check the Support Remote Party Info check box. This support is required for desktop sharing to work.
Note |
You can also enable Remote Party support by running the following CLI command on the Application Server: AS_CLI/System/DeviceType/SIP> set <device_profile_type> supportRemotePartyInfo true |
Modify the templates according to your environment (see table below).
Save the profile.
Click Files and Authentication and then select the option to rebuild all system files.
|
Name |
Description |
|
Codec Priority |
Configure priority order for the audio and video codecs for VoIP calls |
|
TCP, UDP and TLS |
Configure the protocols used for SIP signaling and media |
|
RTP Audio and Video Ports |
Configure port ranges for RTP audio and video |
|
SIP options |
Configure various options related to SIP (SIP INFO, use rport, SIP proxy discovery, refresh intervals for registration and subscription, etc.) |
Partner customizations—Partner administrators can apply advanced branding customizations that apply to the partner organization and/or customers that the partner manages. See Configure Advanced Branding Customizations.
Customer customizations—If the partner allows customers to apply their own Branding customizations, customer administrators can follow the procedures at Add Your Company Branding to Webex.
Note |
The User Activation Portal uses the same logo that you add for client Branding. |
To customize these options, administators can follow the procedure "Add Feedback and Help Site URLs", which can be found in both of the above Branding articles.
With Flowthrough Provisioning
You must configure all the XSP services, and the partner organization in Control Hub, before you can perform this task.
|
Step 1 |
Assign Service in BroadWorks: |
|
Step 2 |
Verify Customer Organization and Users in Control Hub:
|
|
Step 1 |
Download the Webex app on two different machines. |
|
Step 2 |
Sign in as your test users on the two machines. |
|
Step 3 |
Make test calls. |
 Feedback