Configuring the MaxMind Database

This appendix describes how to configure the MaxMind database for geolocation.

Configuring the MaxMind Database for Geolocation

The MaxMind GeoIP2 City database is a geolocation database that determines the country to which an IP address is associated. The MaxMind GeoIP2 City database also includes the Latitude and Longitude associated with the IP address. The Traffic Routers can use this information from the MaxMind GeoIP2 City database to do the following:

  • To determine the closest Edge cache group for a client requests (for geolocation based routing).

  • To determine which client requests to allow when National geoblocking (NGB) is configured on the Delivery Service. NGB is configured on the Delivery Service when the Geo Limit setting of a Delivery Service is set to “CZF+Country Code”.


Note

For more information on configuring NGB, see the Cisco Media Streamer User Guide.


Perform the following steps to configure the Media Streamer deployment for a MaxMind GeoIP database that can be used for geolocation based routing and NGB:

Procedure


Step 1

Log in to the OMD Repo server as omd_admin and switch to the root user:

[ocdn_adm@omd-repo-salt~]$ sudo su - root
Step 2

Create the /opt/http/util_files directory:

[root@omd-repo-salt~]$ mkdir /opt/http/util_files
Step 3

Copy the MaxMind database file that you received from your Cisco Account team to the /opt/http/util_files folder on the OMD Repo server.

Step 4

On the Repo server logged in as root, change the permissions on the MaxMind database file:

[root@omd-repo-salt~]$ chmod 644 /opt/http/util_files/<MaxMinddb_file_name>

For example:

[root@omd-repo-salt~]$ chmod 644 /opt/http/util_files/GeoIP2-City.mmdb.gz
Step 5

Log in to the Traffic Router as ocdn_adm and confirm that you can access the MaxMind database that you copied to the OMD Repo server.

[ocdn_adm@omd-repo-salt ~]$ curl -v http://<repo-name>/util_files/<geolcation_db_filename> > 
/dev/null

If the MaxMind database file can be successfully accessed, you should receive the message “HTTP/1.1 200 OK” and you should see a Content-Length value other than 0. For example:

[ocdn_adm@omd-tr ~]$ curl -v http://omd-repo.npi.ciscolabs.com/util_files/GeoLite2-City.mmdb.gz > /dev/null
% Total % Received % Xferd Average Speed Time Time Time Current
Dload Upload Total Spent Left Speed
0 0 0 0 0 0 0 0 --:--:-- 0:00:04 --:--:-- 0* About to connect() to omd-repo.npi.ciscolabs.com port 80 (#0)
* Trying 10.86.83.10...
0 0 0 0 0 0 0 0 --:--:-- 0:00:05 --:--:-- 0* Connected to omd-repo.npi.ciscolabs.com (10.86.83.10) port 80 (#0)
> GET /util_files/GeoLite2-City.mmdb.gz HTTP/1.1
> User-Agent: curl/7.29.0
> Host: omd-repo.npi.ciscolabs.com
> Accept: */*
>
< HTTP/1.1 200 OK
< Date: Mon, 26 Nov 2018 21:32:51 GMT
< Server: Apache/2.4.6 (CentOS)
< Last-Modified: Mon, 26 Nov 2018 20:24:19 GMT
< ETag: "176ba25-57b971e2ab128"
< Accept-Ranges: bytes
< Content-Length: 24558117
< Content-Type: application/x-gzip
<
{ [data not shown]
100 23.4M 100 23.4M 0 0 4309k 0 0:00:05 0:00:05 --:--:-- 5915k
Step 6

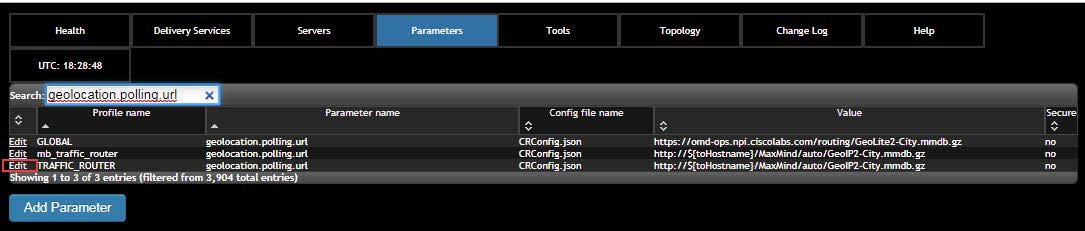
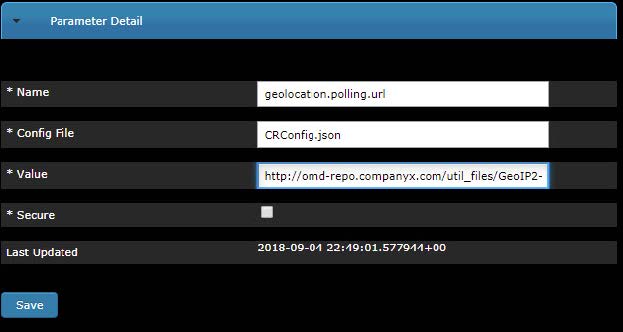
To configure the Traffic Routers to use the MaxMind database file that was uploaded to the Repo server, perform the following steps on the Traffic Ops server:

  1. Log in to the Traffics Ops UI:

    https://<ip or FQDN of the traffic ops>
  2. Choose Parameters > All Profiles. In the search box, enter geolocation.polling.url.

  3. Click the Edit link for the Traffic Router profile you are configuring. (The Traffic Router profile name will likely contain Traffic_Router or CCR_CDN.) The Parameter Detail window appears.

    Figure 1. Edit Traffic Router Profile
  4. In the Value field, modify the value to contain the URL to the MaxMind database file that was uploaded to the Repo server and then click Save. For example, https://repo.companyx.com/util_files/GeoIP2-City.mmdb.gz.

    Figure 2. geolocation.polling.url Value
  5. To push the changes to the Traffic Routers, choose Tools > Snapshot CRConfig and then click Diff CRConfig.

  6. In the CRConfig Diff window that appears, click Write CRConfig and then click OK to push out the new CRConfig.json file.

  7. When you receive the message “Successfully wrote CRConfig.json”, click OK.

Step 7

Wait a few minutes for the MaxMind database file to be pushed to the Traffic Routers and then perform the following steps to verify that the MaxMind database was update successfully on the Traffic Routers:

  1. Log in to the Traffic Router as ocdn_adm.

  2. Verify that the MaxMind database file is in the /opt/traffic_router/db directory:

    [ocdn_adm@omd-tr-01 ~]$ ls -l /opt/traffic_router/db
    -rw-r--r--. 1 root root 4076 Nov 26 18:48 cr-config.json
    -rw-rw-rw-. 1 root root 15 Nov 26 19:17 federations.json
    -rw-rw-rw-. 1 root root 119288018 Nov 26 19:17 GeoIP2-City.mmdb
    -rw-r--r--. 1 root root 187 Nov 15 20:47 health.json
    -rw-rw-rw-. 1 root root 15 Nov 26 19:17 steering.json
  3. If the MaxMind database file is not in the /opt/traffic_router/db directory, on the Traffic Router check the /opt/traffic_router/var/log/traffic_router.log file for any error messages regarding the download of the file. If the MaxMind database file was successfully downloaded, you should see the following messages:

    INFO 2018-11-26T20:36:05.707 [Thread-26] 
    com.comcast.cdn.traffic_control.traffic_router.core.loc.AbstractServiceUpdater - 
    [GeolocationDatabaseUpdater] Successfully updated database 
    /opt/traffic_router/db/GeoLite2-City.mmdb
    INFO 2018-11-26T20:36:05.707 [Thread-26] 
    com.comcast.cdn.traffic_control.traffic_router.core.loc.MaxmindGeolocationService - Loading 
    MaxMind db: /opt/traffic_router/db/GeoLite2-City.mmdb