User Guide for Cisco Digital Media Designer 5.4.x
Bias-Free Language
The documentation set for this product strives to use bias-free language. For the purposes of this documentation set, bias-free is defined as language that does not imply discrimination based on age, disability, gender, racial identity, ethnic identity, sexual orientation, socioeconomic status, and intersectionality. Exceptions may be present in the documentation due to language that is hardcoded in the user interfaces of the product software, language used based on RFP documentation, or language that is used by a referenced third-party product. Learn more about how Cisco is using Inclusive Language.
- Updated:
- September 17, 2012
Chapter: Work with Text
Work with Text
Concepts
Restrictions
Text Rendering Delay with Chinese or Japanese Characters
Any use of Chinese or Japanese characters will delay the start of text rendering by at least 1 minute. (CSCtl12309).
Guidelines for Legible and Readable Text
Simplicity
Plain and simple typefaces are often more effective in digital signage than ornate or eccentric typefaces. With Latin alphabets, we recommend that you use sans-serif type for signage and avoid serifed type. Serifs do not render well on screen. Similar guidance applies to other writing systems.
|
|
|
|
|---|---|---|
|
|
|
|
Color and Contrast
- Avoid bright or saturated colors.
- If your design calls for text against a white background, make the background slightly gray instead.
- Adjust the forground and background tones until there is enough contrast that your text is readable from a distance.
- Light text against a dark background is easier to read on-screen than dark text on a light background.
Text Formatting
Layout
Line Length
In languages that use the Latin alphabet, such as English, readability is high when a line of text is roughly 40 characters long. That’s about an alphabet and a half.
Does your design call for lines of text that are noticeably longer than 40 characters? To compensate for lowered readability, simply increase the line spacing ( leading).
Landscape Orientation
Portrait Orientation
Visual Density — Transparent, Translucent, or Opaque?
You can adjust the density of any object on your canvas. However, the visual impact from this setting might be relative to other attributes of your design.
- Is your canvas filled with any color, picture, or gradient?
- Do the object’s boundaries intersect with, or overlap, any other objects on your canvas? If so, to what degree are those other objects transparent or opaque?
- How many layers exist in your design?
- What is the stacking order of your layers in the Objects drawer?
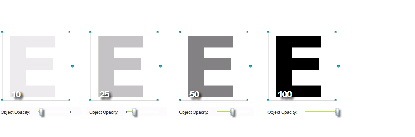
For example, this figure compares four possible scenarios where black text is stacked under a red shape (with a white outline), on an all-white canvas.
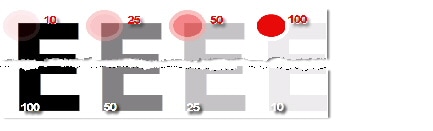
Compare the four variants from left to right.
- Density increases for the red shape.
It rises from 10 percent to 100 percent. So, in the variant where the red shape has just 10 percent density, the black text behind it is clearly visible. This occurs even though the text is on a lower layer. - Meanwhile, density decreases for the black text.
It falls from 100 percent to 10 percent. So, in the variant where the red shape is fully opaque, even its white outline blots out the mostly transparent text on the lower layer.
Procedures
Add a Text Object
Step 1![]() Click Text on the toolbar.
Click Text on the toolbar.

DMD drops a new text object onto your canvas.

Step 2![]() Stop. You have completed this procedure.
Stop. You have completed this procedure.
- Would you like to change anything about this object?
See the “Manipulate a Text Object” section.
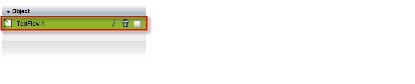
Rename a Text Object
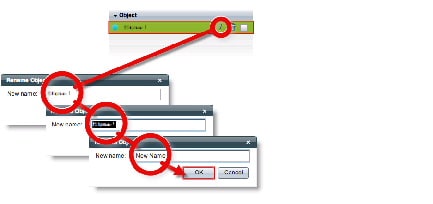
Step 1![]() Select the object that should change. You can:
Select the object that should change. You can:


Step 2![]() Click its Edit icon in the Object drawer, enter its new name, and then click OK.
Click its Edit icon in the Object drawer, enter its new name, and then click OK.
Step 3![]() Stop. You have completed this procedure.
Stop. You have completed this procedure.
- Would you like to change anything about this object?
See the “Manipulate a Text Object” section.
Lock or Unlock a Text Object
While an object is locked, you cannot edit or delete it.
Step 1![]() Select the object that should change. You can:
Select the object that should change. You can:


Step 2![]() Click the Unlocked check box.
Click the Unlocked check box.


Step 3![]() Stop. You have completed this procedure.
Stop. You have completed this procedure.
Delete or Restore a Text Object
Step 1![]() Select the object that should change. You can:
Select the object that should change. You can:


Step 2![]() Click Delete (
Click Delete (s/5_x/5_4/dmd/user/guide/text.fm/jcr:content/renditions/text-17.jpg" ALIGN="BASELINE" ALT="">).

Note![]() The deletion occurs immediately. DMD does not prompt you to confirm this action.
The deletion occurs immediately. DMD does not prompt you to confirm this action.

Tip You can restore an object that was deleted accidentally. Simply choose Edit > Undo immediately afterward. The object returns to its previous state.
Step 3![]() Stop. You have completed this procedure.
Stop. You have completed this procedure.
Manipulate a Text Object
After you click an object to choose it, tabs in the Properties drawer show and sort all of that object’s properties — both editable and uneditable. Various properties apply to various object types.
Set the Text Object’s Size
You can change the size and proportions of an object on your canvas.
Step 1![]() Select the object that should change. You can:
Select the object that should change. You can:


Tip When you check Constrain Proportions, you can change either the width or height manually. Then, DMD adjusts the other one automatically. This convenience ensures that your object’s basic shape does not change.
DMD applies theese new dimensions to the selected object.
Note![]() The change occurs immediately. DMD does not prompt you to confirm this action.
The change occurs immediately. DMD does not prompt you to confirm this action.
Tip You can restore an object that was changed accidentally. Simply choose Edit > Undo immediately afterward. The object returns to its previous state.
Step 3![]() Stop. You have completed this procedure.
Stop. You have completed this procedure.
- Would you like to change anything else about this object?
See the “Manipulate a Text Object” section.
Set the Text Object’s Coordinates
You can move an object on your canvas.
Tip![]() X measures pixel offset from the left canvas edge. Increase it to nudge your object toward the right edge.
X measures pixel offset from the left canvas edge. Increase it to nudge your object toward the right edge.
Y measures pixel offset from the top canvas edge. Increase it to nudge your object toward the bottom edge.
Step 1![]() Select the object that should change. You can:
Select the object that should change. You can:


 Nudge left.
 Nudge right.
 Nudge up.
 Nudge down.
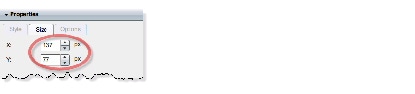
DMD moves to the selected object to its new coordinates.
Note![]() The change occurs immediately. DMD does not prompt you to confirm this action.
The change occurs immediately. DMD does not prompt you to confirm this action.
Tip You can restore an object that was changed accidentally. Simply choose Edit > Undo immediately afterward. The object returns to its previous state.
Step 3![]() Stop. You have completed this procedure.
Stop. You have completed this procedure.
- Would you like to change anything else about this object?
See the “Manipulate a Text Object” section.
Set the Text Rotation Angle
You can rotate an object on your canvas.
Step 1![]() Select the object that should change. You can:
Select the object that should change. You can:


Step 2![]() Click the large handle on the object’s right edge.
Click the large handle on the object’s right edge.
Tip Do not click a corner handle.
Step 3![]() Drag the
Drag the  symbol left or right.

DMD applies the new rotation angle to the selected object.
Note![]() The change occurs immediately. DMD does not prompt you to confirm this action.
The change occurs immediately. DMD does not prompt you to confirm this action.
Tip You can restore an object that was changed accidentally. Simply choose Edit > Undo immediately afterward. The object returns to its previous state.
Step 4![]() Stop. You have completed this procedure.
Stop. You have completed this procedure.
- Would you like to change anything else about this object?
See the “Manipulate a Text Object” section.
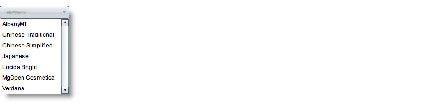
Set the Typeface
You can choose among the typefaces ( fonts) that we have licensed.
Step 1![]() Select the object that should change. You can:
Select the object that should change. You can:


Step 2![]() Choose a typeface from the list on the Styles tab, in the Properties drawer.
Choose a typeface from the list on the Styles tab, in the Properties drawer.
DMD applies the new typeface to the selected object.
Note![]() The change occurs immediately. DMD does not prompt you to confirm this action.
The change occurs immediately. DMD does not prompt you to confirm this action.
Tip You can restore an object that was changed accidentally. Simply choose Edit > Undo immediately afterward. The object returns to its previous state.
Step 3![]() Stop. You have completed this procedure.
Stop. You have completed this procedure.
- Would you like to change anything else about this object?
See the “Manipulate a Text Object” section.
Set the Character Formatting
Step 1![]() Select the object that should change. You can:
Select the object that should change. You can:


Step 2![]() Find the character formatting buttons (
Find the character formatting buttons ( ) on the Style tab, in the Properties drawer.
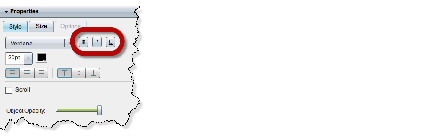
Step 3![]() Click the buttons in any sequence until you obtain the desired result. Experiment. Combine formats.
Click the buttons in any sequence until you obtain the desired result. Experiment. Combine formats.
|
|
|
|
|---|---|---|
|
|
|
|


DMD applies the new character formats to the selected object.
Note![]() The change occurs immediately. DMD does not prompt you to confirm this action.
The change occurs immediately. DMD does not prompt you to confirm this action.
Tip You can restore an object that was changed accidentally. Simply choose Edit > Undo immediately afterward. The object returns to its previous state.
Step 4![]() Stop. You have completed this procedure.
Stop. You have completed this procedure.
- Would you like to change anything else about this object?
See the “Manipulate a Text Object” section.
Set the Text Color
Step 1![]() Select the object that should change. You can:
Select the object that should change. You can:


Step 2![]() Find the color tool (
Find the color tool ( ) on the Style tab in the Properties drawer.
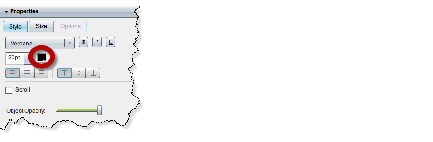
DMD reveals a related control ( ) when your pointer hovers over the color tool.
Step 3![]() Do one of the following.
Do one of the following.
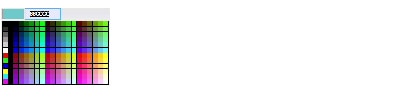
 to reveal a simple color swatch browser.
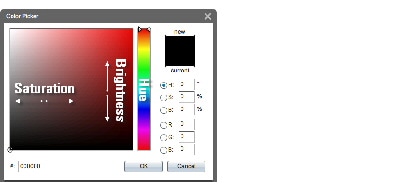
 to open a standard color picker.
DMD applies the new color to the selected object.
Note![]() The change occurs immediately. DMD does not prompt you to confirm this action.
The change occurs immediately. DMD does not prompt you to confirm this action.
Tip You can restore an object that was changed accidentally. Simply choose Edit > Undo immediately afterward. The object returns to its previous state.
Step 4![]() Stop. You have completed this procedure.
Stop. You have completed this procedure.
- Would you like to change anything else about this object?
See the “Manipulate a Text Object” section.
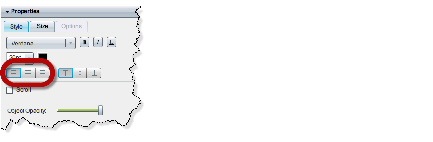
Set the Text Alignment
Adjust the Horizontal Alignment
Step 1![]() Select the object that should change. You can:
Select the object that should change. You can:

Step 2![]() Find the horizontal alignment buttons (
Find the horizontal alignment buttons ( ) on the Style tab, in the Properties drawer.
 aligns to the
left.
aligns to the
left.
 aligns to the
center.
aligns to the
center.
 aligns to the
right.
aligns to the
right.
Note![]() You can apply only one horizontal alignment at a time, per object. You can reset it at any time.
You can apply only one horizontal alignment at a time, per object. You can reset it at any time.
Step 4![]() Stop. You have completed this procedure.
Stop. You have completed this procedure.
- Would you like to change anything else about this object?
See the “Manipulate a Text Object” section.
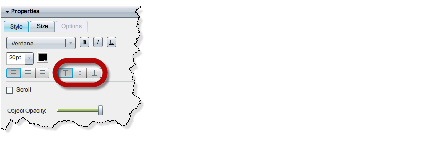
Adjust the Vertical Alignment
Step 1![]() Select the object that should change. You can:
Select the object that should change. You can:


Step 2![]() Find the vertical alignment buttons (
Find the vertical alignment buttons ( ) on the Style tab, in the Properties drawer.
 aligns to the
top.
aligns to the
top.
 aligns to the
middle.
aligns to the
middle.
 aligns to the
bottom.
aligns to the
bottom.
Note![]() You can apply only one vertical alignment at a time, per object. You can reset it at any time.
You can apply only one vertical alignment at a time, per object. You can reset it at any time.
Step 4![]() Stop. You have completed this procedure.
Stop. You have completed this procedure.
- Would you like to change anything else about this object?
See the “Manipulate a Text Object” section.
Set a Text Object’s Visual Density
Visual density causes an object to be transparent, translucent, or opaque.
Step 1![]() Select the object that should change. You can:
Select the object that should change. You can:


Step 2![]() Find the Object Opacity slider (
Find the Object Opacity slider ( ), on the Styles tab, in the Properties drawer.

Step 3![]() Push the slider left or right to control your object’s density.
Push the slider left or right to control your object’s density.
- The far left end causes full transparency.
An object is fully transparent when its density reaches the threshold at 0 ( zero or zed) percent. - Middle values are translucent.
When translucency is your goal, avoid pushing the slider too far in either direction. Subtle translucency at either extreme might never serve its intended purpose. - The far right end causes full opacity.
An object is fully opaque when its density reaches the threshold at 100 percent.
Tip When you push the slider left or right, a tooltip ( ) appears above the slider’s handle. This tooltip tells you the object’s current percentage of density.
DMD applies the new density to the selected object.
Note![]() The change occurs immediately. DMD does not prompt you to confirm this action.
The change occurs immediately. DMD does not prompt you to confirm this action.
Tip You can restore an object that was changed accidentally. Simply choose Edit > Undo immediately afterward. The object returns to its previous state.
Step 4![]() Stop. You have completed this procedure.
Stop. You have completed this procedure.
- Would you like to change anything else about this object?
See the “Manipulate a Text Object” section.
Apply Dynamic Text Effects
Dynamic text effects can help to promote viewer interest in your message. In addition, these effects lower the incidence of burn-in and image persistence on screens. You can set a text object to scroll or fade.
Note![]() DMD does not support scrolling in DMD text box or RSS feed with Arabic language. Use fading effect alternatively.
DMD does not support scrolling in DMD text box or RSS feed with Arabic language. Use fading effect alternatively.
- Verify that the object is not locked. You cannot change a locked object.
- See Text Rendering Delay with Chinese or Japanese Characters.
Step 1![]() Select the object that should change. You can:
Select the object that should change. You can:


Step 2![]() Check the Scroll check box (
Check the Scroll check box ( ), on the Style tab in the Properties drawer.
Tip Do this even if your text should fade in and out and not “scroll.”
A list loads under the check box. Its options are the dynamic text effects that we support in this release. For example:

Step 3![]() Choose an option to use it.
Choose an option to use it.
|
|
|
||
|---|---|---|---|
|
|
|
|
|

|

|

|
|

|

|

|
|

|

|

|
|


 in its tray? If so, your design might not be optimal for your DMPs. Click the icon to see the design assistant. Then, you can:
Step 4![]() Stop. You have completed this procedure.
Stop. You have completed this procedure.
- Would you like to change anything else about this object?
See the “Manipulate a Text Object” section.
Reference
DMD Font Reference
|
(in DMD) |
(from Type Foundry) |
|
|---|---|---|

|
||

|
||

|
||

|
||

|
||

|
||

|
||
 Feedback