Cisco UCS Director Fundamentals Guide, Release 6.5
Bias-Free Language
The documentation set for this product strives to use bias-free language. For the purposes of this documentation set, bias-free is defined as language that does not imply discrimination based on age, disability, gender, racial identity, ethnic identity, sexual orientation, socioeconomic status, and intersectionality. Exceptions may be present in the documentation due to language that is hardcoded in the user interfaces of the product software, language used based on RFP documentation, or language that is used by a referenced third-party product. Learn more about how Cisco is using Inclusive Language.
- Updated:
- July 21, 2017
Chapter: Application Provisioning
Application
Provisioning
- Application Provisioning Overview
- Application Categories
- Application Containers
- Catalogs
- Self-Service Provisioning
Application Provisioning Overview
After you have allocated your resources among your user groups, you can set up application provisioning for your end users. Application provisioning includes the following:
-
(Optional) Application categories for each cloud account that define the workload for a particular type of application. For example, you can create an application category for a CPU intensive web server application and another for a storage intensive database application.
-
Application container templates that include policies, workflows, and VM tempates, and that determine how a specific application is to be provisioned for the end user. How you create the application container template depends upon whether your data center includes an integration with Cisco Application Centric Infrastructure (Cisco ACI).
-
Catalog items that represent a VM template or application container template. End users can only see the catalog items that are available within the vDCs for their user group.
Application Categories
Application categories are an optional configuration that enable you to define the type of workload for a VM. If you do not use application categories, Cisco UCS Director assumes that all VMs provisioned for your users are generic VMs and configures them to handle CPU-intensive workloads. Whether you choose to use the default application categories or to create your own, you can provide your users with a pre-defined set of workloads that match their application needs.
The workload options for application categories include the following:
-
CPU intensive
-
Network I/O intensive
-
Disk I/O intensive
-
Memory intensive
-
Any combination of the above
After you create your application categories, you can go to the desired cloud account and assign the vDC policies to the application categories. This assignment determines the boundaries of the infrastructure where the application can be provisioned. You can also use application categories to allocate clusters based on the type of application. For example, Cluster 1 is allocated for Web applications and Cluster 2 is allocated for database applications.
When an application category is chosen by a user, Cisco UCS Director uses the vDC assignment to determine which location, within the boundary of the vDC, best meets the application's workload needs. For example, if the user chooses a CPU-intensive application category, Cisco UCS Director provisions the application in the available infrastructure with the least CPU utilization.
For more information about application categories, see the Cisco UCS Director Administration Guide.
Application Containers
Application containers are a templatized approach to provisioning applications for end users. When you want to configure Cisco UCS Director to allow users to provision applications, you must create one or more application containers with the appropriate policies, workflows, and templates. The application container determines how the application is provisioned for the end user. It can define some or all of the following:
-
Physical server or virtual machine
-
Amount of reserved storage
-
Maximum available CPU
-
Maximum available memory
-
Version of operating system
-
Range of VLANs
-
Gateway or firewall, if desired
-
Load balancer, if desired
-
Required approvals, if desired
-
Costs associated with the application container, if desired
Cisco UCS Director supports multiple types of application containers. The type of application container that you need to implement depends upon your deployment configuration. The steps required to configure the application container depend upon which type you plan to implement.
For more information about application containers, see the Cisco UCS Director Application Container Guide.
- Types of Application Containers
- Options for Application Containers
- General Application Container Creation Process
- APIC Application Containers
Types of Application Containers
There are several application container types for use in various deployment scenarios:
-
Fenced Virtual—The most common type of application container for use with VMs.
-
Virtual Secure Gateway (VSG)—This container type is used to provide for enhanced security in virtual environments.
-
Application Centric Infrastructure Controller (APIC) container—This container type is used in APIC deployments. For more information, see the Cisco UCS Director APIC Management Guide and the Cisco UCS Director Application Container Guide.
-
Fabric—This container type is used in Dynamic Fabric Automation (DFA) network deployments. For more information on application containers in a DFA network, see the Cisco UCS Director Unified Fabric Automation Guide.
-
Virtual Application Container Services (VACS) container—This container type is used in deployments of Cisco Virtual Application Cloud Segmentation Services. 
Note
This container type is available in Cisco UCS Director only if the VACS modules are installed. For more information, see the Cisco Virtual Application Cloud Segmentation Services Configuration Guide.
Options for Application Containers
In addition to the different types of application containers, Cisco UCS Director supports a variety of different options for those application containers. You can configure an application container to provision either a single tier or a multi-tier application, and you can choose to add application services, such as a load balancer or a firewall, that will be provisioned with the application. Before you create your application container, you need to decide which of these options you want to implement.
Single Tier Application
A single tier application is typically a simple application that is contained within a single VM. This VM includes the application interface and database and is usually in the application server tier.
Multi-Tier Application
A multi-tier application typically requires multiple VMs. The number of VMs depends upon several factors, such as the application complexity and the users. For example, you could have a three tier application with a VM for each of the web server, application server, and database server.
If required by your application architecture, a tier can include multiple networks.
Firewall
You can add a firewall as an internal or external gateway to the application. The gateway redirects and creates a tunnel through the firewall to the application. If you use a firewall, the user does not need to know the IP address of any of the application VMs. Instead, the user logs in through the IP address of the gateway and is redirected to the application or database VM. You can also create rules that define the type of traffic that is permitted through the gateway.
You define the firewall that you want to use in a tiered application gateway policy. This policy is then included in the application container template. You can add one of the following types of firewalls:
-
Linux VM—This default option provisions the appropriate firewalls and NAT rules on the VM.
-
Cisco ASA—This physical gateway allows one-way (inside to outside) connections without an explicit configuration for each internal system and application.
-
Cisco ASAv—This virtual gateway is typically cloned from a VM template during the application provisioning. It allows one-way (inside to outside) connections without an explicit configuration for each internal system and application.
Load Balancer
You can include a load balancer for a multi-tier application. The load balancer manages communication and workloads between the servers. For example, a load balancer can identify and redirect a user to one of several application servers to ensure that none of the application servers are overloaded.
For information about supported load balancers, see the Cisco UCS Director Compatibility Matrix.
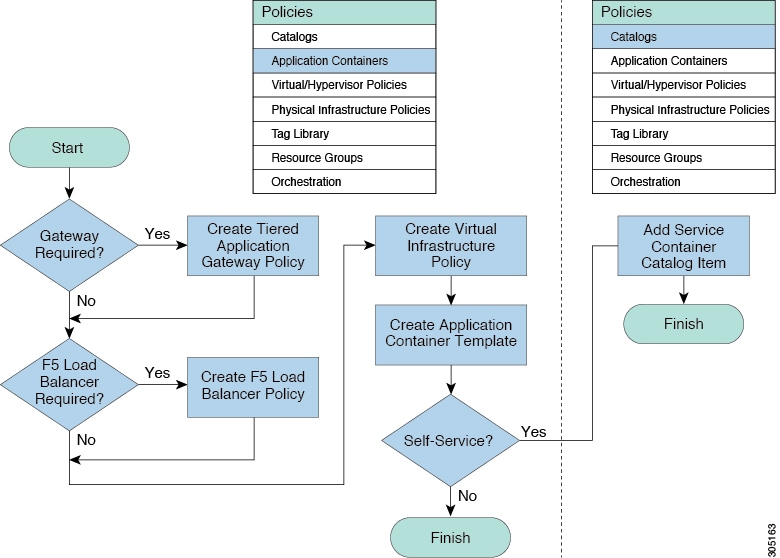
General Application Container Creation Process
The following process explains the creation of an application container in Cisco UCS Director.
Note | The process for creating an Application Centric Infrastructure Controller (APIC) managed container is different. |
-
If a gateway is required, create a tiered application gateway policy.
-
If a load balancer is required, create a load balancer policy.
-
Create a virtual infrastructure policy to define the cloud account, the type of container and, if appropriate, the tiered application gateway and load balancer policies.
-
Create an application container template.
-
Add networks (one network per application tier).
-
Add virtual machines and bare metal servers.
-
Add a compute policy, storage policy, network policy, and systems policy. If desired, you can also add a cost model.
-
Add an end user self-service policy and configure the self-service options.
-
Add the container setup workflow required to deliver the service offering to the user as part of a service request. The workflow must consider the type of container and the application to be provisioned.
-
-
Create a container based on the container template.
The figure illustrates the creation of the general application container template within Cisco UCS Director.
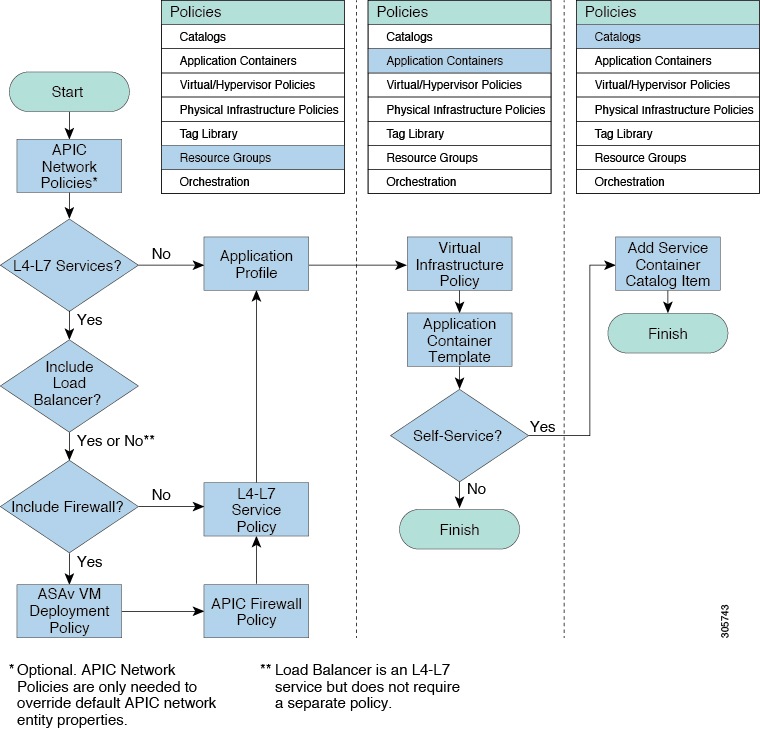
APIC Application Containers
Cisco UCS Director lets you create application containers that support a Cisco Application Policy Infrastructure Controller (APIC). For additional information, see the Cisco UCS Director APIC Management Guide for this release. APIC application containers let you do the following:
-
Establish networks in a VMware environment.
-
Provision multiple VMs from a network.
-
Provide a way to isolate those networks using gateways (for example, ASAv).
-
Allow load balancing the container network using VPX or SDX load balancers.
-
Use a Cisco Application Centric Infrastructure (ACI).
-
Provision a bare metal server and/or VMs.
APIC Application Container Limitations
Cisco UCS Director APIC application containers have the following limitations:
-
Tenant onboarding must be done before container creation and usage.
-
Resource groups must contain the accounts necessary to manage a container's resources. This can be any combination of storage, compute, network, and virtual resources.
-
For application container configuration that requires physical servers, only UCS managed servers are currently supported.
APIC Application Container Creation Process
The figure below illustrates the flow of the APIC Application Container creation process within Cisco UCS Director.
Catalogs
Catalogs are collections of predefined workflows and application containers that enable a user to request and provision applications, VMs, or bare metal servers. You can choose to make a catalog available to end-users for self-service provisioning through the End User Portal, only to administrators for provisioning through Cisco UCS Director, or both.
When you publish a catalog, you can choose one of the following types.
Catalog Organization
The End User Portal organizes the catalogs in folders by name. A set of default folders, named for the catalog types, are automatically created and sorted alphabetically. However, you do not have to use these default folders. When you create a catalog, you can place it in a default folder or into a custom folder with a name that you choose. For example, if you create a Standard Catalog to provision a Windows 2012 operating system for a VM, you can allow Cisco UCS Director to place it in the Standard folder, or you can create a custom folder with a name that identifies the operating system, such as VM-Windows2012OS.
Catalog folders created by administrators in Cisco UCS Director display in the End User Portal.
In the Catalog pane, you can use the Move Up and Move Down icons to change the organization of the catalog folders.
Note | You can also use the Manage Folder icon to choose a folder and move it in relation to existing folders. While creating a catalog in Cisco UCS Director, an administrator can specify a user group or a specific users that can view the catalog. If you are a user in the selected group, then your view is populated with the appropriate catalogs. |
Self-Service Provisioning
You can provision virtual machines (VMs) or applications through self-service provisioning. To provision a VM or an application using self-service provisioning, you must first create a service request. This action initiates a VM-creation workflow that includes the following:
Service Requests
You can use the self-service provisioning feature to create a service request to provision virtual machines (VMs), services, or applications. The service request process produces a provisioning workflow for VM creation that includes the following actions:
-
Budget validation
-
Dynamic resource allocation
-
Approvals
-
Provisioning
-
Lifecycle setup and notification
Note | If you change the number of CPU Cores or memory allocation while in the Deployment Configuration screen, the total cost is automatically updated and displayed. |
To provision a VM or execute an orchestration workflow, you must first create a service request. If desired, you can require approval from one or two administrators or designated users before the VM is provisioned or the workflow executed. VMs can be immediately approved or scheduled to be approved within a maximum of 90 days from the original request.
Service Request Workflow and Details
After you create a service request, you can check its status and workflow, cancel the request, resubmit the request, and so on. These actions are controlled by the toolbar buttons at the top of the service request lists.
Service Request Workflow
The Workflow Status box displays details about the service request and the workflow steps. A typical service request workflow to provision a VM includes the following steps:
-
Initiation—Service request is initiated by the user.
-
Resource Allocation—Required resources, such as virtual compute, are allocated to the VM.
-
Approval—VM provisioning is approved, if required. During this step, an email is sent to the approvers defined in the catalog chosen for VM provisioning.
-
Provision—VM is created and provisioned.
-
Set Up Lifecycle Schedule—Lifecycle scheduling is configured with the setup, scheduled times, and termination times.
-
Notify—User is notified by email that the VM has been created and provisioned.
Following is a graphical representation of the workflow.
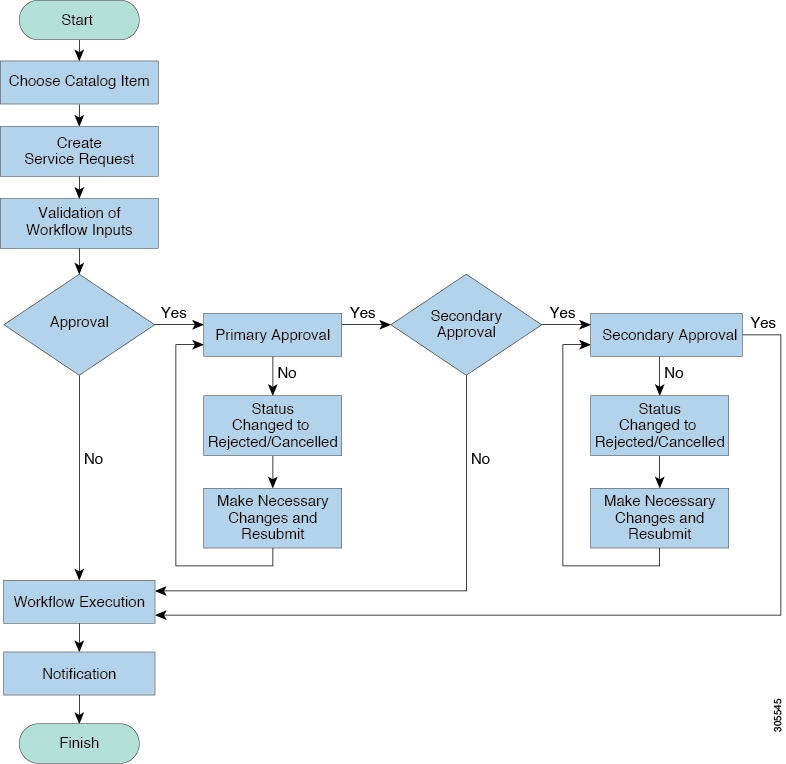
Optional service request workflow steps include Budget Watch and Check Resource Limits:
-
Budget Watch—An administrator has to enable budgeting for a group. This step determines if a sufficient budget is available for provisioning a new VM in that group.
-
Check Resource Limits—Resource limits for a group must be enabled by an administrator. This step determines if sufficient resources are available for provisioning a new VM in that group.
Any user who has been assigned the Read-Group Service Request permission can view the progress of a service request.
Service Request Details
Service Request details include items under Overview, Ownership, Catalog Information, and the Current Status of the service request, as follows:
| Name | Description |
|---|---|
|
Overview |
|
|
Request ID |
The service request ID number. |
|
Request Type |
The type of request (in this case, creating a VM). |
|
VDC |
The VDC where the VM is provisioned. |
|
Image |
The image from which the VM is provisioned. |
|
Request Time |
The time of the service request creation. |
|
Request Status |
The status of the service request as Complete, Canceled, Failed, and so on. |
|
Comments |
Any comments. |
|
Ownership |
|
|
Group |
The group to which the service request initiating user belongs. |
|
Initiating User |
The user who has initiated the service request. |
|
Duration Hours |
The amount of time that the VM is active. If this time is defined, the VM is deleted after the specified time. |
|
Scheduled Time |
The time at which the VM is provisioned. If defined, the VM is provisioned at 6 a.m. on the scheduled date. If not defined, the VM is provisioned when the workflow steps for the service request are complete. |
| Catalog Information | |
|
VDC Owner Email |
The email ID provided by the administrator when creating a VDC. |
|
Approving Users |
The user (if defined) who must approve the service request for VM provisioning. |
|
Catalog Name |
The catalog item name from which the VM is provisioned. |
|
Catalog Description |
The catalog item description. |
|
Service Request Cost |
The cost (projected) of provisioning the VM. This cost is determined based on the Cost Model that is defined for the catalog item. |
You can view the status of each workflow step. Details such as warning or error messages and the time of the request are also displayed. The workflow steps are color-coded to indicate their status:
| Color Code | Description |
|---|---|
|
Gray |
The step is incomplete. |
|
Green |
The step completed successfully. |
|
Red |
The step failed. The reason for failure is also described. |
|
Blue |
More input is required for the step to complete. For example, an approver was defined for a service request, and until the request is approved, this step is incomplete. |
Note | Approvers may look under the Approvals tab to see their assigned service requests. |
 Feedback