Setting Up a Fenced Virtual Container
This chapter contains the following sections:

Fenced Virtual Container

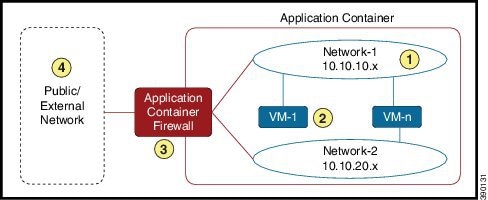
A fenced virtual container is a collection of virtual machines (VMs) with an internal private network that is created based on rules specified by the administrator. The fenced container can have one or more VMs that are guarded by a fencing gateway to the public or external cloud. Cisco UCS Director provides support for fenced containers and enables you to define container templates with one or more fenced networks and VMs. When a fenced container is created from a template, Cisco UCS Director automatically deploys VMs and configures networks and the firewall. Cisco UCS Director also automatically configures virtual and physical switches for Layer 2 changes.
Figure 1. Fenced Virtual Container - Sample


To create and manage a fenced container, perform the following steps:
  1. Define a gateway policy—In the gateway policy, you must define the gateway type for the container and on which cloud account (vCenter) the gateway gets deployed.

  2. Define fenced container template—You must perform the following tasks in the template:
    • Define the cloud account on which the container is created

    • Configure the network

    • Add VMs for the container

    • Define port mapping and outbound access control lists (ACLs)

    • Choose a gateway policy (created earlier)

    • Choose the deployment policies that define VM provisioning

    • Choose self-service options for the container

    • Choose a workflow (optional)

  3. Create a fenced container from the defined container template—A fenced container is created from the template defined in step 2. You must choose a group for which the container is created.

  4. Fenced container—After creating the fenced container, you can do various management actions, such as power management of the container, add VMs to a container, clone or delete the container, and open a console for VMs and view reports.
Fenced Virtual Container Prerequisites

The following is the prerequisite for fenced virtual container configuration:

  • If you want to use Distributed Virtual Portgroup or Distributed Virtual Portgroup N1K as the virtual network types in the Allocate Container VM Resources task, ensure that you specify primary DVSwitch and alternate DVSwitch names in the Allocate Container VM Resources task. By default, Virtual Network Portgroup is set as the virtual network type.

Fenced Virtual Container Limitations

The following is the limitation of fenced virtual container:

  • F5 Load Balancing is supported on fenced virtual containers.

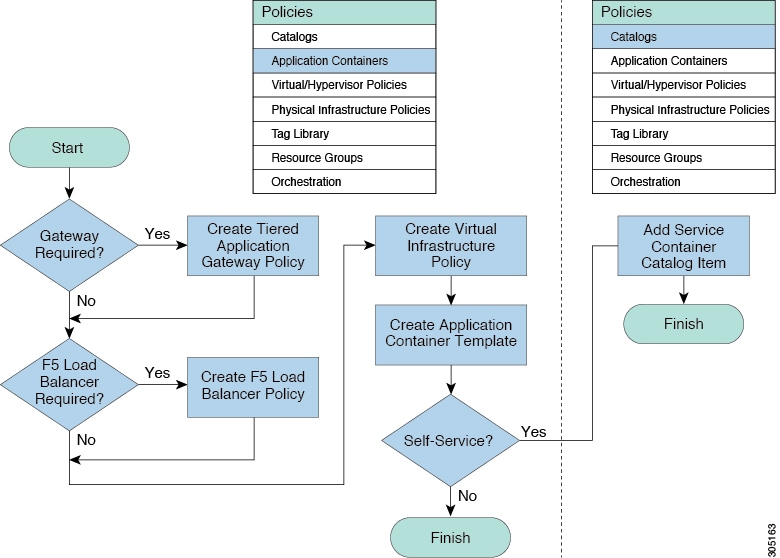
Fenced Virtual Application Container Creation Process

The following process explains the creation of a fenced virtual application container in Cisco UCS Director:

  1. If a gateway is required, create a tiered application gateway policy.

  2. If a load balancer is required, create a load balancer policy.

  3. Create a virtual infrastructure policy to define the cloud account, the type of container and, if appropriate, the tiered application gateway and load balancer policies.

  4. Create an application container template.

    1. Add networks (one network per application tier).

    2. Add virtual machines and baremetal servers.

    3. Add a compute policy, storage policy, network policy, and systems policy. If desired, you can also add a cost model.

    4. Add an end user self-service policy and configure the self-service options.

    5. Add the container setup workflow required to deliver the service offering to the user as part of a service request. The workflow must consider the type of container and the application to be provisioned.

  5. Create a container based on the container template.

The figure illustrates the creation of the fenced virtual application container template within Cisco UCS Director.

Figure 2. Process for Creating a Fenced Virtual Application Container Template

General process for creating an application container

Creating a Virtual Infrastructure Policy for a Fenced Virtual Container

Procedure


Step 1

Choose Policies > Application Containers.

Step 2

On the Application Containers page, click Virtual Infrastructure Policies.

Step 3

Click Add Policy.

Step 4

In the Virtual Infrastructure Policy Specification page, complete the following fields:

Name Description

Policy Name field

The name of the policy.

Policy Description field

The description of the policy.

Container Type drop-down list

Choose Fenced Virtual as the container type.

Select Virtual Account drop-down list

Choose a virtual account to which you want to apply the virtual infrastructure policy.

Step 5

Click Next and follow the wizard prompts.

Step 6

On the Virtual Infrastructure Policy - Fencing Gateway screen, complete the following fields:

Name Description

Gateway Required check box

Check this check box to select a gateway policy, otherwise click Next.

Select Gateway Policy drop-down list

If the Gateway Required check box is checked, this field allows you to choose a gateway policy for the virtual infrastructure policy.

Step 7

Click Next.

Step 8

On the Virtual Infrastructure Policy - Fencing Load Balancing screen, complete the following fields:

Name Description

F5 Load Balancer Required check box

Check this check box to choose an F5 load balancing for the virtual infrastructure policy.

Select F5 Load Balancer Policy drop-down list

If the F5 Load Balancer Required check box is checked, this field allows you to choose an F5 load balancing policy.

Step 9

Click Next.

Step 10

On the Summary page, click Submit.


What to do next

Create an application container template for creating a fenced virtual container.

Creating an Application Container Template for Fenced Virtual Container

To create an application container template, you must provide information regarding the following elements. This information is used to create your containers:

  • Virtual account (cloud)

  • Network configuration

  • VM configuration

  • Container security

  • Select Network, Storage, Compute, and Cost Model policies

  • Select the gateway policy, if the Gateway Required check box is enabled (optional)

  • Options for service end users

Before you begin

Create a virtual infrastructure policy. See Creating a Virtual Infrastructure Policy for a Fenced Virtual Container.

Procedure


Step 1

Choose Policies > Application Containers.

Step 2

On the Application Containers page, click Application Container Templates.

Step 3

Click Add Template. The Application Container Template screen appears. Complete the following fields:

Name

Description

Template Name field

The name of the new template.

Template Description field

The description of the template.

Step 4

Click Next

Step 5

On the Application Container Template - Select a Virtual infrastructure policy screen, from the Select Virtual Infrastructure Policy drop-down list, choose a virtual infrastructure policy that is created for the fenced virtual container type.

Step 6

Click Next.

Step 7

On the Application Container Template - Internal Networks screen, you can add and configure multiple networks for a container. These networks are applicable to the VM that is provisioned using this template.

Step 8

Click Add (+) to add a network. On the Add Entry to Networks screen, complete the following fields:

Name

Description

Network Name field

Enter unique network name for the container. You can use a maximum of 128 characters.

Network Type drop-down list

Choose a network type.

Information Source drop-down list

Choose the information source. It can be one of the following:

  • Inline

  • Static Pool

VLAN ID Range field

Enter a VLAN ID range.

Network IP Address field

The IP address of the network (for example, 10.10.10.0). A unique subnet is chosen for each internal network.

Network Mask field

The network mask address (for example, 255.255.255.0).

Gateway IP Address field

The IP address of the default gateway for the network. A NIC with this IP address is created on the GW VM.

Step 9

Click Submit.

Next, you can add and configure the VM that will be provisioned in the application container.

Step 10

Click Next.

Step 11

On the Application Container Template - VMs, click Add (+) to add a VM. The Add Entry to Virtual Machines screen appears. Complete the following fields:

Name

Description

VM Name field

The VM name.

Description field

The description of the VM.

Provision VM using Content Library Template check box

Check to view and choose a VM template from the content library VM templates. If unchecked, you have to choose VM template from VM image templates.

Content Library VM Template field

This field appears only when the Provision VM using Content Library VM Template check box is checked. Click Select to view a list of available VM templates. Check the check box of the template that you want to use and click Select.

VM Image drop-down list

This field appears only when the Provision VM using Content Library Template check box is unchecked. Choose the image to be deployed.

Use Linked Clone check box

This check box is enabled only when you choose a VM template with a snapshot. Check this box to deploy new VMs using linked clone feature which enables them to be provisioned faster and storage efficient.

Snapshot field

This field appears only when the Use Linked Clone check box is checked. Click Select to choose a snapshot that need to be used to provision a new VM using linked clone feature.

Number of Virtual CPUs drop-down list

The number of virtual CPUs to be allocated to the VM.

Memory drop-down list

The memory to be allocated (in MB).

CPU Reservation (MHz) field

The CPU reservation for the VM.

Memory Reservation (MB) field

The memory reservation for the VM.

Disk Size (GB) field

The custom disk size for the VM. To use the template disk size, specify the value of 0. The specified disk size overrides the disk size of the selected image.

VM Password Sharing Option drop-down list

Choose an option for how to share the VM's username and password with the end users. If Share after password reset or Share template credentials is chosen, the end user needs to specify a username and password for the chosen templates.

Use Network Configuration from Image check box

If checked, the network configuration from the image is applied to the provisioned VM.

Windows License Pool drop-down list

Choose a Windows license version for the image, from the list of licenses that gets populated based on licenses defined in the OS License tab (Policies > Service Delivery > OS License).

This field appears in one of the following conditions:

  • When the Provision VM using Content Library Template check box is checked. The chosen Windows license version will be considered for the image only when the selected content library VM template has the Windows OS.

  • When a windows image is chosen in the VM Image drop-down list.

VM Network Interface field

Enter the VM network interface information.

Maximum Quantity field

The maximum number of instances that can be added in this container after it is created.

Initial Quantity field

The number of VM instances to provision when the container is created.

Step 12

Click Submit.

Step 13

Click Next.

Step 14

On the Application Container Template - External Gateway Security Configuration screen, click Add (+) to add port mappings. On the Add Entry to Port Mappings screen, complete the following fields:

Name

Description

Protocol drop-down list

Choose a protocol. It can be one of the following:

  • TCP

  • UDP

Mapped Port field

Enter the mapped port.

Remote IP Address field

Enter the IP address

Remote Port field

Enter the remote port field.

Step 15

On the Application Container Template - External Gateway Security Configuration screen, click the Add (+) to add outbound ACL. On the Add Entry to Outbound ACLs screen, complete the following fields:

Name

Description

Protocol drop-down list

Choose a protocol. It can be one of the following:

  • IP

  • TCP

  • UDP

  • ICMP

Select Network drop-down list

Choose a network.

Source address field

Enter a source address.

Destination address field

Enter a destination address.

Action field

Choose an action. It can be one of the following:

  • Accept

  • Drop

  • Reject

Step 16

Click Submit.

Step 17

Click Next. The Application Container Template - Deployment Policies screen appears.

You must select the compute, storage, network, system policy, and cost model required for VM provisioning. A policy is a group of rules that determine where and how a new VM is to be provisioned within an application container (based on the availability of system resources).

  • The network policy is used only to deploy the outside interface of the virtual firewall (container gateway).

    Note 

    If the gateway type is CISCO ASAv for the container, the network policy must first add the ASAv management interface and then the outside interface in the VM networks, in the same order.

  • The selected Portgroup in Network Policy should be on the host on which the Gateway VM is provisioned.

  • The network policy can use either a Static IP Pool or DHCP. However, for a container-type VSG the network policy should use a Static IP Pool only. The VSG VM requires IP addresses as input. There is no current provision to specify DHCP for deploying a VSG VM.

  • The network adapter settings for a provisioned VM (container gateway) should be similar to the settings in the template. You may or may not have to check the Copy Adapter from Template check box in the network policy used for this application container.

Complete the following fields:

Name

Description

Compute Policy drop-down list

Choose a compute policy.

Storage Policy drop-down list

Choose a storage policy.

Network Policy drop-down list

Choose a network policy.

Systems Policy drop-down list

Choose a systems policy.

Cost Model drop-down list

Choose a cost model.

Step 18

Click Next. The Application Container Template - Options screen appears.

You can select options to enable or disable certain privileges for the self-service end user. Complete the following fields:

Name

Description

End User Self-Service Policy drop-down list

Choose a self-service policy for end users.

Enable Self-Service Deletion of Containers check box

Check to allow end users to delete application containers created with this template.

Enable VNC Based Console Access check box

Check to allow VNC access to VMs on the container host.

Technical Support Email Address field

Enter a comma-separated list of email addresses. Automated notifications are sent to these emails.

Step 19

Click Next. The Application Container Template - Setup Workflows screen appears. Complete the following field:

Name

Description

Container Setup Workflow drop-down list

Choose a container setup workflow. By default, a workflow is not selected. You can skip this step if the gateway type chosen for this container is Linux and the Virtual Machine Portgroup is selected in the network policy associated with the container. Choosing a specific workflow is required only if you chose CISCO ASA as the container gateway or Distributed Virtual Portgroup as the network policy. For a CISCO ASAv gateway type, choose the Application Container with ASAv Gateway.

Note 

You must perform some prerequisite steps before you can initiate the task for creating an application container template.

Step 20

Click Next. The Application Container Template - Summary screen appears, displaying your current settings.

Step 21

Click Submit to complete the creation of the application container template.


What to do next

You can customize certain aspects of template using the custom workflow task. See Creating a Custom Workflow for Fenced Virtual Containers.

Creating a Custom Workflow for Fenced Virtual Containers


Note

For more information about using the orchestration to run workflows, see the Cisco UCS Director Orchestration Guide.


  • Gateway Type: CISCO ASA—If the gateway type is CISCO ASA for the container, you must specifically choose Application Container with ASA Gateway from the list of available workflows. You can search for the workflow and check its check box in order to select it.

  • Distributed Virtual Portgroups—If you choose the Distributed Virtual Portgroup in the network policy that is associated with the container, then you must perform the following steps manually:

    1. Choose Virtual Network Type and enter its name as required in a workflow associated with the container.

    2. Choose a specific workflow. This type of workflow depends on which gateway type was associated with the container. For a Linux gateway, choose Application Container Setup workflow. For a CISCO ASA gateway type, choose the Application Container with ASA Gateway.

    3. Edit or clone the required workflow by going to the Cisco UCS Director Orchestrator application and editing the workflow on the Workflow Designer page.

    4. In the workflow window, double-click the Allocate Container VM Resources task.

    5. Choose the required virtual network type (either Distributed Virtual Portgroup or Distributed Virtual Portgroup N1K).

    6. Specify the primary DVSwitch and alternate DVSwitch names.

    7. Click Save to save the workflow.