- Preface
- New and Changed Information for this Release
- Overview
- Managing Users and Groups
- Setting Up the End User Portal
- Managing System Administration Settings
- Managing Integration Settings
- Managing a Physical Infrastructure
- Managing a Virtual Infrastructure
- Managing Policies
- Managing Virtual Data Centers
- Managing Catalogs
- Using Self-Service Provisioning
- Multiple Disk VM Provisioning
- Using the Chargeback Module
- System Monitoring and Reporting
- Managing Lifecycles
- Managing CloudSense Analytics
Cisco UCS Director Administration Guide, Release 6.0
Bias-Free Language
The documentation set for this product strives to use bias-free language. For the purposes of this documentation set, bias-free is defined as language that does not imply discrimination based on age, disability, gender, racial identity, ethnic identity, sexual orientation, socioeconomic status, and intersectionality. Exceptions may be present in the documentation due to language that is hardcoded in the user interfaces of the product software, language used based on RFP documentation, or language that is used by a referenced third-party product. Learn more about how Cisco is using Inclusive Language.
- Updated:
- September 19, 2016
Chapter: Using Self-Service Provisioning
- Self-Service Provisioning
- Service Requests
- Service Request Workflow and Details
- About Scheduling a Service Request
- About Resubmitting a Service Request
- Other Service Request Functions
- Canceling a Service Request
- Rolling Back a Service Request
- Archiving a Service Request
- Deleting Service Requests
- Viewing Service Requests for a Particular Group
- Searching the Records of Service Requests for a Group
- Exporting a Report of Service Requests for a Group
- Reinstating an Archived Service Request
- Service Request Approval Process
- Service Request Budgeting
Using Self-Service
Provisioning
This chapter contains the following sections:
- Self-Service Provisioning
- Service Requests
- Service Request Workflow and Details
- About Scheduling a Service Request
- About Resubmitting a Service Request
- Other Service Request Functions
- Service Request Approval Process
- Service Request Budgeting
Self-Service Provisioning
You can provision virtual machines (VMs) or applications through self-service provisioning. To provision a VM or an application using self-service provisioning, you must first create a service request. This action initiates a VM-creation workflow that includes the following:
Service Requests
You can use the self-service provisioning feature to create a service request to provision virtual machines (VMs), services, or applications. The service request process produces a provisioning workflow for VM creation that includes the following actions:
-
Budget validation
-
Dynamic resource allocation
-
Approvals
-
Provisioning
-
Lifecycle setup and notification
 Note | If you change the number of CPU Cores or memory allocation while in the Deployment Configuration pane, the total cost is automatically updated and displayed. |
To provision a VM or execute an orchestration workflow, you must first create a service request. If desired, you can require approval from one or two administrators or designated users before the VM is provisioned or the workflow executed. VMs can be immediately approved or scheduled to be approved within a maximum of 90 days from the original request.
Creating a Service Request with Catalog Type—Standard
| Step 1 | On the menu bar, choose . | ||||||||||||||||||||||||||||||||||||||||
| Step 2 | Choose the Service Request tab. | ||||||||||||||||||||||||||||||||||||||||
| Step 3 | Click Create Request. | ||||||||||||||||||||||||||||||||||||||||
| Step 4 | In the Create Request dialog box, choose Standard. | ||||||||||||||||||||||||||||||||||||||||
| Step 5 | Click Submit. | ||||||||||||||||||||||||||||||||||||||||
| Step 6 | In the
Create
Service Request dialog box, complete the following fields:
| ||||||||||||||||||||||||||||||||||||||||
| Step 7 | Click Next. | ||||||||||||||||||||||||||||||||||||||||
| Step 8 | In the
Provisioning Configuration pane, complete the
following fields:
| ||||||||||||||||||||||||||||||||||||||||
| Step 9 | Click Next. | ||||||||||||||||||||||||||||||||||||||||
| Step 10 | In the
Deployment Configuration pane, complete the following
fields:
| ||||||||||||||||||||||||||||||||||||||||
| Step 11 | Click Next. | ||||||||||||||||||||||||||||||||||||||||
| Step 12 | In the
Custom
Specification pane, complete the following fields:
| ||||||||||||||||||||||||||||||||||||||||
| Step 13 | To choose a datastore for a disk, choose a disk from the list and click the Pencil icon. | ||||||||||||||||||||||||||||||||||||||||
| Step 14 | Click Select to view available datastores. | ||||||||||||||||||||||||||||||||||||||||
| Step 15 | Choose a datastore from the list and click Select. | ||||||||||||||||||||||||||||||||||||||||
| Step 16 | Click Submit. | ||||||||||||||||||||||||||||||||||||||||
| Step 17 | (Optional)For templates with multiple disks, you must choose a datastore for each disk. | ||||||||||||||||||||||||||||||||||||||||
| Step 18 | In the
Custom
Specification pane, click
Select to view available VM Networks.
| ||||||||||||||||||||||||||||||||||||||||
| Step 19 | Choose a VM Network from the list and click Select. | ||||||||||||||||||||||||||||||||||||||||
| Step 20 | Click Next. | ||||||||||||||||||||||||||||||||||||||||
| Step 21 | Complete the
details in the
Custom
Workflow pane.
| ||||||||||||||||||||||||||||||||||||||||
| Step 22 | Click
Next.
| ||||||||||||||||||||||||||||||||||||||||
| Step 23 | If you checked
the
Perform deployment assessment check box, then review
the report of the assessment displayed in the
Deployment Assessment pane.
If this assessment report identifies errors, then you must return to the previous panes and rectify the errors before submitting the request. If the assessment report shows no errors, then click Next. | ||||||||||||||||||||||||||||||||||||||||
| Step 24 | Review the summary for the service request. | ||||||||||||||||||||||||||||||||||||||||
| Step 25 | Click Submit. | ||||||||||||||||||||||||||||||||||||||||
Creating a Service Request with Catalog Type—Advanced
By choosing the advanced catalog type during the creation of a service request, you can execute orchestration workflows. The steps for creating an advanced catalog are much the same as those for creating a standard catalog.
Creating a Service Request with Catalog Type—Bare Metal
You should have created a bare metal catalog, and a provisioning policy.
What to Do Next
After you click Submit, the workflow is triggered, and the bare metal servers are provisioned. After the workflow is completed, the bare metal server is displayed in the selected group. In addition, the chargeback cycles are initiated for the servers.
If you want to change the cost model for the server, then you must edit the cost model selection in the bare metal provisioning policy.
Service Request Workflow and Details
After you create a service request, you can check its status and workflow, cancel the request, resubmit the request, and so on. These actions are controlled by the toolbar buttons at the top of the service request lists.
- Service Request Workflow
- Service Request Details
- Viewing the Workflow Status of a Service Request
- Viewing Log Details for a Service Request
Service Request Workflow
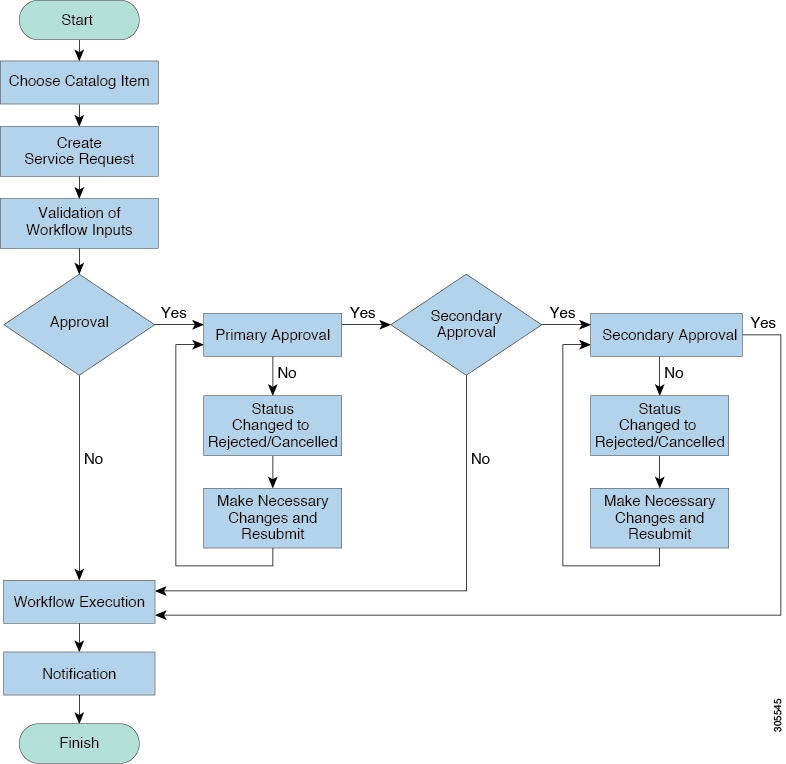
The Workflow Status box displays details about the service request and the workflow steps. A typical service request workflow to provision a VM includes the following steps:
-
Initiation—Service request is initiated by the user.
-
Resource Allocation—Required resources, such as virtual compute, are allocated to the VM.
-
Approval—VM provisioning is approved, if required. During this step, an email is sent to the approvers defined in the catalog chosen for VM provisioning.
-
Provision—VM is created and provisioned.
-
Set Up Lifecycle Schedule—Lifecycle scheduling is configured with the setup, scheduled times, and termination times.
-
Notify—User is notified by email that the VM has been created and provisioned.
Following is a graphical representation of the workflow.
Optional service request workflow steps include Budget Watch and Check Resource Limits:
-
Budget Watch—An administrator has to enable budgeting for a group. This step determines if a sufficient budget is available for provisioning a new VM in that group.
-
Check Resource Limits—Resource limits for a group must be enabled by an administrator. This step determines if sufficient resources are available for provisioning a new VM in that group.
Any user who has been assigned the Read-Group Service Request permission can view the progress of a service request.
Service Request Details
Service Request details include items under Overview, Ownership, Catalog Information, and the Current Status of the service request, as follows:
| Name | Description |
|---|---|
|
Overview |
|
|
Request ID |
The service request ID number. |
|
Request Type |
The type of request (in this case, creating a VM). |
|
VDC |
The VDC where the VM is provisioned. |
|
Image |
The image from which the VM is provisioned. |
|
Request Time |
The time of the service request creation. |
|
Request Status |
The status of the service request as Complete, Canceled, Failed, and so on. |
|
Comments |
Any comments. |
|
Ownership |
|
|
Group |
The group to which the service request initiating user belongs. |
|
Initiating User |
The user who has initiated the service request. |
|
Duration Hours |
The amount of time that the VM is active. If this time is defined, the VM is deleted after the specified time. |
|
Scheduled Time |
The time at which the VM is provisioned. If defined, the VM is provisioned at 6 a.m. on the scheduled date. If not defined, the VM is provisioned when the workflow steps for the service request are complete. |
| Catalog Information | |
|
VDC Owner Email |
The email ID provided by the administrator when creating a VDC. |
|
Approving Users |
The user (if defined) who must approve the service request for VM provisioning. |
|
Catalog Name |
The catalog item name from which the VM is provisioned. |
|
Catalog Description |
The catalog item description. |
|
Service Request Cost |
The cost (projected) of provisioning the VM. This cost is determined based on the Cost Model that is defined for the catalog item. |
You can view the status of each workflow step. Details such as warning or error messages and the time of the request are also displayed. The workflow steps are color-coded to indicate their status:
| Color Code | Description |
|---|---|
|
Gray |
The step is incomplete. |
|
Green |
The step completed successfully. |
|
Red |
The step failed. The reason for failure is also described. |
|
Blue |
More input is required for the step to complete. For example, an approver was defined for a service request, and until the request is approved, this step is incomplete. |
Note | Approvers may look under the Approvals tab to see their assigned service requests. |
Viewing the Workflow Status of a Service Request
| Step 1 | On the menu bar, choose . |
| Step 2 | From the left panel, choose a
user group.
The default is All User Groups, which lists all service requests. |
| Step 3 | Choose the Service Request tab. |
| Step 4 | Choose a service request. |
| Step 5 | Click View Details to see the details and status of the service request. By default, the Workflow Status tab appears in the dialog box. |
Viewing Log Details for a Service Request
About Scheduling a Service Request
You can schedule VM provisioning for a later date using Deferred Provisioning. The default provisioning is at 8.30 a.m. on the date of scheduling. Once a new date is set, the VM provisioning status in the workflow displays the change.
Scheduling Service Requests
| Step 1 | On the menu bar, choose . |
| Step 2 | Choose the Service Request tab. |
| Step 3 | Click Create Request. |
| Step 4 | Choose the group, catalog type, and catalog. See Creating a Service Request with Catalog Type—Standard. |
| Step 5 | Click Next. |
| Step 6 | Choose the Later option for the Provision field, and the provisioning date in the Service Request dialog box. |
| Step 7 | Click Next until the Summary window appears. |
| Step 8 | Click Submit. |
About Resubmitting a Service Request
You can resubmit a failed service request. A service request could fail for the following reasons:
-
Budget limit (if defined by administrator) is exceeded for the group under which the VM is being provisioned.
-
Resource limits (if defined by administrator) are exceeded for the group under which the VM is being provisioned.
-
Provisioning could fail if a service request lacks relevant information.
When a service request is resubmitted, the process starts again from the workflow step that failed in the earlier submissions. For example, if a service request fails in the Resource Allocation workflow (Step 2), when this service request is resubmitted, the process is re-initiated from that step.
Resubmitting a Service Request
Other Service Request Functions
Canceling a Service Request
As an administrator in the system, you can cancel any service request that has been created. If you are an MSP admin, or a group admin, you can cancel service requests that you have created, and those created by users in member groups that you manage.
| Step 1 | On the menu bar, choose . |
| Step 2 | From the left
panel, choose a user group.
The default is All User Groups, which lists all service requests. |
| Step 3 | Choose the Service Request tab. |
| Step 4 | Choose the service request entry to cancel. |
| Step 5 | Click Cancel Request. |
| Step 6 | Click Submit to cancel the service request. |
Rolling Back a Service Request
You can roll back a service request when a service request is created using orchestration workflow or fenced container deployment.
| Step 1 | On the menu bar, choose . |
| Step 2 | From the left
panel, choose a user group.
The default is All User Groups, which lists all service requests. |
| Step 3 | Choose the Service Request tab. |
| Step 4 | Choose the service request to roll back. |
| Step 5 | Right-click and select Rollback Request. |
| Step 6 | In the
Rollback
Service Request dialog box, select the tasks in the service requests
that must be rolled back.
By default, check boxes of all tasks in the service request are checked. |
| Step 7 | (Optional)Check the Abort rollback, if any rollback task fails check box. |
| Step 8 | Click Submit. |
Archiving a Service Request
| Step 1 | On the menu bar, choose . |
| Step 2 | From the left panel, choose a user group.
The default is All User Groups, which lists all service requests. |
| Step 3 | Choose the Service Request tab. |
| Step 4 | Choose the service request to archive. |
| Step 5 | Click Archive. |
| Step 6 | In the
Archive Request dialog box, click
Archive.
Choose the Archived Service Requests tab to view all the archived requests. |
What to Do Next
If you need to use this archived service request at a later time, you can re-instate it. For more information, see Reinstating an Archived Service Request.
Deleting Service Requests
You can delete archived service requests from Cisco UCS Director. The deleted service requests are removed permanently from Cisco UCS Director.
You can enter archived service requests to delete in one of two ways:
-
By selecting the service requests on the Archived Service Requests page and clicking the Delete Requests action.
-
By selecting the Purge Requests action and typing the IDs of the archived service requests.
Both methods result in the permanent removal of the specified service requests. The only difference is the method of data entry.
You can delete only archived service requests. For information about archiving service requests, see the current release of the Cisco UCS Director Administration Guide. Because active service requests cannot be archived, you cannot delete service requests that are in progress, or that contain child service requests that are in progress.
You also cannot delete a service request that has a rollback that is in progress or that has failed. For example, say that you submit a rollback for service request (SR) 100 that generates a rollback service request SR 101. You cannot delete SR 100 while SR 101 is in progress. Furthermore, you cannot delete SR 100 if SR 101 failed.
To delete service requests, do the following:
| Step 1 | Navigate to . |
| Step 2 | Click the Archived Service Requests tab. |
| Step 3 | You can either
enter service request IDs using the keyboard or choose service requests from
the
Archived
Service Requests report.
To enter service request IDs, skip to the next step. To choose service requests instead, do the following: |
| Step 4 | To enter service requests, do the following: |
Viewing Service Requests for a Particular Group
Searching the Records of Service Requests for a Group
Exporting a Report of Service Requests for a Group
| Step 1 | On the menu bar, choose . |
| Step 2 | From the left panel, choose a group name. |
| Step 3 | Choose the Service Request tab. |
| Step 4 | On the right of the toolbar, click the Export Report icon. |
| Step 5 | In the
Export
Report dialog box, choose the report format.
The report format can be PDF, CSV, or XLS. |
| Step 6 | Click
Generate
Report.
After the report is generated, the Download option appears. |
| Step 7 | Click Download to open the report and to save it on your system. |
Reinstating an Archived Service Request
Service Request Approval Process
Before the VM is provisioned, a service request must be approved by a specified approver or approvers named in the VDC. You have an option to define one or two approvers for a group.
-
Once created, the service request workflow has a step requiring VM approval that displays the name of the approver.
-
A service request notification email is sent to the approvers. Approvers may view all pending requests under the Approvals tab.
-
Once approved is granted, VM provisioning is initiated.
Note | For more information about defining approvers, see Virtual Data Centers. |
- Approving a Service Request
- Rejecting a Service Request
- Viewing Approval Information on Service Requests
- Searching the Records of Service Request Approvals
- Exporting a Report of Service Request Approvals
Approving a Service Request
| Step 1 | On the menu bar, choose . |
| Step 2 | Choose the My Approvals tab. |
| Step 3 | Choose the service request entry to approve. |
| Step 4 | (Optional)To verify the
details, click
View
Details.
You can view the Workflow and Input/Output information and click Close. |
| Step 5 | Click Approve. |
| Step 6 | Add comments in the Service Request dialog box if necessary. |
| Step 7 | Click Approve. |
Rejecting a Service Request
| Step 1 | On the menu bar, choose . |
| Step 2 | Choose the My Approvals tab. |
| Step 3 | Choose the service request entry to reject. |
| Step 4 | (Optional)Verify the details by clicking View Details and then click Close. |
| Step 5 | Click Reject. |
| Step 6 | Add comments in the Service Request dialog box if necessary. |
| Step 7 | Click Reject. |
Viewing Approval Information on Service Requests
Searching the Records of Service Request Approvals
Exporting a Report of Service Request Approvals
| Step 1 | On the menu bar, choose . |
| Step 2 | Choose the My Approvals tab. |
| Step 3 | From the list, choose a group name. |
| Step 4 | On the right of the toolbar, click the Export Report icon. |
| Step 5 | In the
Export
Report dialog box, choose the report format.
The report format can be PDF, CSV, or XLS. |
| Step 6 | Click
Generate
Report.
After the report is generated, the Download option appears. |
| Step 7 | Click Download to open the report and to save it on your system. |
Service Request Budgeting
Viewing the Current Month Budget Availability
Viewing Budget Entries
Adding a Budget Entry
| Step 1 | On the menu bar, choose . | ||||||||||||
| Step 2 | From the left panel, choose a user group. | ||||||||||||
| Step 3 | Choose the Budget Entries tab. | ||||||||||||
| Step 4 | Click Add (+). | ||||||||||||
| Step 5 | In the
Add Budget Entry dialog box, complete the
following fields:
| ||||||||||||
| Step 6 | Click Add. |
 Feedback