Configuring NVMe on RoCEv2 with ESXi

Guidelines for using RoCEv2 Protocol in the Native ENIC driver on ESXi

General Guidelines and Limitations:

  • Cisco IMC release 4.2(3b) supports RoCEv2 only on ESXi 7.0 U3.

  • Cisco recommends you check UCS Hardware and Software Compatibility specific to your Cisco IMC release to determine support for ESXi. RoCEv2 on ESXi is supported on UCS M6 C-Series servers with Cisco UCS VIC 15000 Series adapters.

  • RoCEv2 on ESXi is not supported on UCS VIC 1400 Series adapters.

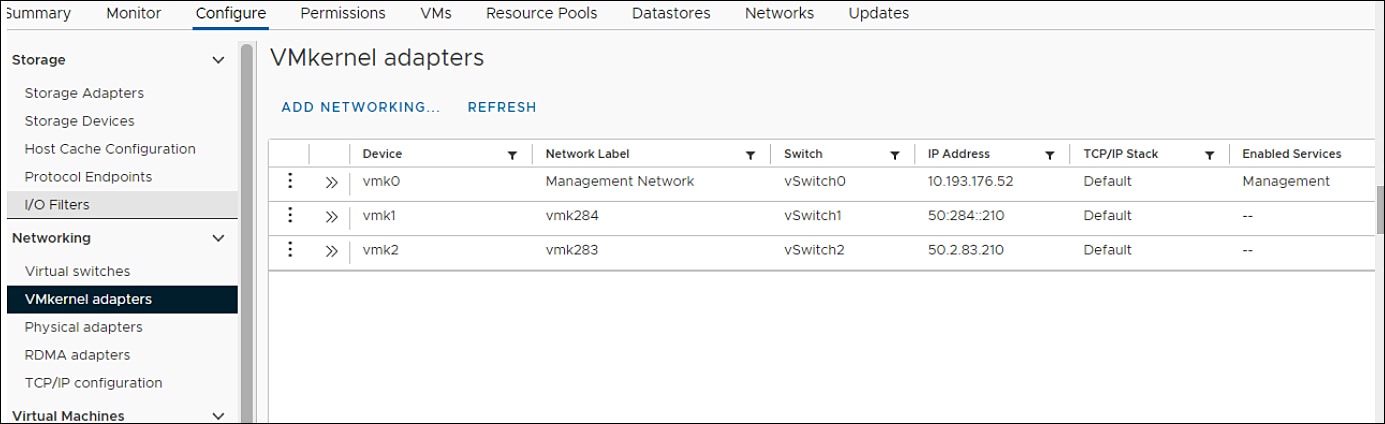
  • RDMA on ESXi nENIC currently supports only ESXi NVME that is part of the ESXi kernel. The current implementation does not support the ESXi user space RDMA application.

  • Multiple mac addresses and multiple VLANs are supported only on VIC 15000 Series adapters.

  • RoCEv2 supports maximum two RoCEv2 enabled interfaces per adapter.

  • Pvrdma, VSAN over RDMA, and iSER are not supported.

Downgrade Limitations:

  • Cisco recommends you remove the RoCEv2 configuration before downgrading to any non-supported RoCEv2 release.

ESXi nENIC RDMA Requirements

Configuration and use of RoCEv2 in ESXi requires the following:

  • VMWare ESXi version 7.0 U3.

  • Cisco IMC release 4.2.3 or later

  • RoCEv2 is supported on Cisco UCS M6 C-Series servers with Cisco UCS VIC 15xxx adapters.

  • nenic-2.0.4.0-1OEM.700.1.0.15843807.x86_64.vib provides both standard eNIC and RDMA support.

  • A storage array that supports NVMeoF connection. Currently, tested and supported on Pure Storage with Cisco Nexus 9300 Series switches.

Downgrade Limitations:

  • Cisco recommends you remove the RoCEv2 configuration before downgrading to any non-supported RoCEv2 release.

Installing NENIC Driver

The enic drivers, which contain the rdma driver, are available as a combined package. Download and use the enic driver on cisco.com.

These steps assume this is a new installation.


Note

While this example uses the /tmp location, you can place the file anywhere that is accessible to the ESX console shell.


Procedure


Step 1

Copy the enic VIB or offline bundle to the ESX server. The example below uses the Linux scp utility to copy the file from a local system to an ESX server located at 10.10.10.10: and uses the location /tmp.

scp nenic-2.0.4.0-1OEM.700.1.0.15843807.x86_64.vib root@10.10.10.10:/tmp
Step 2

Specifying the full path, issue the command shown below.

esxcli software vib install -v {VIBFILE}

or

esxcli software vib install -d {OFFLINE_BUNDLE}

Here is an example:

esxcli software vib install -v /tmp/nenic-2.0.4.0-1OEM.700.1.0.15843807.x86_64.vib
Note 

Depending on the certificate used to sign the VIB, you may need to change the host acceptance level. To do this, use the command: esxcli software acceptance set --level=<level>

Depending on the type of VIB being installed, you may need to put ESX into maintenance mode. This can be done through the VI Client, or by adding the --maintenance-mode option to the above esxcli command.

Upgrading NENIC Driver

  1. To upgrade NENIC driver, enter the command:

    esxcli software vib update -v {VIBFILE}

    or

    esxcli software vib update -d {OFFLINE_BUNDLE}
  2. Copy the enic VIB or offline bundle to the ESX server using Step 1 given above.


Configuring and Enabling RoCEv2 on Cisco IMC

Creating and Configuring the ESXi Adapter Policy in Cisco IMC

This procedure applies to configuring the ESXi adapter policy for RoCEv2.

Before you begin

Download and install the enic-nvme driver which supports RoCEv2.

Procedure


Step 1

In the Navigation pane, click the Networking menu.

Step 2

Expand Networking and click on the adapter to configure RoCEv2 vNIC.

Step 3

Select the vNICs tab.

Step 4

Perform one the following:

  • Click Add vNIC to create a new vNIC and modify the properties as mentioned in next step.

  • From the left pane, select an existing vNIC and modify the properties as mentioned in next step.

Step 5

Expand General pane.

  1. On the MAC address dropdown, select the Auto checkbox or enter the desired address.

  2. Select which VLAN you want use use from the drop-down list.

  3. Click OK.

Step 6

Expand RoCE Properties.

Step 7

Select RoCE checkbox.

Step 8

Modify the following vNIC properties:

Property

Field

Value

Ethernet Interrupt

Interrupt count field

256

Coalescing Time field

125

Interrupt Mode field

MSIx

Coalescing Type field

MIN

Ethernet Receive Queue

Count field

1

Ring Size field

512

Ethernet Transmit Queue

Count field

1

Ring Size field

256

Completion Queue

Count field

2

RoCE Properties

Queue Pairs field

1024

Memory Regions field

131072

Resource Groups field

8

Class of Service drop-down list

5

Step 9

Click Save Changes.

Step 10

Select Reboot.


ESXi NVMe RDMA Host Side Configuration

NENIC RDMA Functionality

One major difference between the use case for RDMA on Linux and ESXi is in ESXi terminology. The physical interface (vmnic) MAC is not used for RoCEv2 traffic. Instead, the VMkernel port (vmk) MAC is used.

The outgoing RoCe packets uses vmk MAC in ethernet source mac field and incoming RoCE packets use the vmk MAC in the ethernet destination mac field. The vmk MAC address is a VMware mac address assigned to the vmk interface when it is created.

Linux implementation used the physical interface MAC in source MAC address field in the ROCE packets. This Linux MAC is usually a Cisco MAC address configured to the VNIC.

If you ssh into the host and use the esxcli network ip interface list command, you can see the MAC address.

You must create a vSphere Standard Switch to provide network connectivity for hosts, virtual machines, and to handle VMkernel traffic. Depending on the connection type that you want to create, you can create a new vSphere Standard Switch with a VMkernel adapter, only connect physical network adapters to the new switch, or create the switch with a virtual machine port group.

Create Network Connectivity Switches

Use these steps to create a vSphere Standard Switch to provide network connectivity for hosts, virtual machines, and to handle VMkernel traffic.

Before you begin

Download the enic and enic-rdma drivers.

Procedure


Step 1

In the vSphere Client, navigate to the host.

Step 2

On the Configure tab, expand Networking and select Virtual Switches.

Step 3

Click on Add Networking.

The available network adapter connection types are:

  • Vmkernel Network Adapter

    Creates a new VMkernel adapter to handle host management traffic

  • Physical Network Adapter

    Adds physical network adapters to a new or existing standard switch.

  • Virtual Machine Port Group for a Standard Switch

    Creates a new port group for virtual machine networking.

Step 4

Select connection type Vmkernel Network Adapter.

Step 5

Select New Standard Switch and click Next.

Step 6

Add physical adapters to the new standard switch.

  1. Under Assigned Adapters, select New Adapters.

  2. Select one or more adapters from the list and click OK. To promote higher throughput and create redundancy, add two or more physical network adapters to the Active list.

  3. (Optional) Use the up and down arrow keys to change the position of the adapter in the Assigned Adapters list.

  4. Click Next.

Step 7

For the new standard switch you just created for the VMadapter or a port group, enter the connection settings for the adapter or port group.

  1. Enter a label that represents the traffic type for the VMkernel adapter.

  2. Set a VLAN ID to identify the VLAN the VMkernel uses for routing network trafic.

  3. Select IPV4 or IPV6 or both.

  4. Select an MTU size from the drop-down menu. Select Custom if you wish to enter a specific MTU size. The maximum MTU size is 9000 bytes.

    Note 

    You can enable Jumbo Frames by setting an MTU greater than 1500.

  5. Select a TCP/IP stack. After setting the TCP/IP stack for the VMkernel adapter. To use the default TCP/IP stack, select it from the available services.

    Note 

    Be aware that the TCP/IP stack for the VMkernel adapter cannot be changed later.

  6. Configure IPV4 and/or IPV6 settings.

Step 8

On the Ready to Complete page, click Finish.

Step 9

Check the VMkernel ports for the VM Adapters or port groups with NVMe RDMA in the vSphere client, as shown in the Results below.


The VMkernel ports for the VM Adapters or port groups with NVMe RDMA are shown below.

Example

The VRDMA Port groups created with NVMeRDMA supported vmnic appear as below.

What to do next

Create vmhba ports on top of vmrdma ports.

Creating VMHBA Ports in ESXi

Use the following steps for creating vmhba ports on top of the vmrdma adapter ports.

Before you begin

Create the adapter ports for network connectivity.

Procedure


Step 1

Go to vCenter where your ESXi host is connected.

Step 2

Click on Host>Configure>Storage adapters.

Step 3

Click +Add Software Adapter . The following dialog box is displayed.

Step 4

Select Add software NVMe over RDMA adapter and the vmrdma port you want to use.

Step 5

Click OK.

The vmhba ports for the VMware NVMe over RDMA storage adapter is displayed as shown as in the example below.


What to do next

Configure NVME.

Displaying vmnic and vmrdma Interfaces

ESXi creates a vmnic interface for each enic VNIC configured to the host.

Before you begin

Create Network Adapters and VHBA ports.

Procedure


Step 1

Ssh into the host system.

Step 2

Enter esxcfg-nics -l to list the vmnics on ESXi.

esxcli network nic list

Step 3

When the enic driver registers with ESXi the RDMA device for a RDMA capable VNIC, ESXi creates a vmrdma device and links it to the corresponding vmnic. Enter esxcli rdma device list to list the vmrdma devices.

Step 4

Use esxcli rdma device list to check the protocols supported by the vmrdma interface.

For enic, RoCE v2 will be the only protocol supported from this list. The output of this command should match the RoCEv2 configuration on the VNIC.

Step 5

Use esxcli rdma device protocol list to check the protocols supported by the vmrdma interface.

For enic, RoCE v2 will be the only protocol supported from this list. The output of this command should match the RoCEv2 configuration on the VNIC.

Step 6

Use esxcli nvme adapter list to list the NVMe adapters and the vmrdma and vmnic interfaces it is configured on.

Step 7

All vmhbas in the system can be listed using esxcli storage core adapter list.


What to do next

Configure NVME.

NVMe Fabrics and Namespace Discovery

This process is performed through the ESXi command line interface,

Before you begin

Create and configure the adapter policy.

Procedure


Step 1

Check asnd enable NVME on the vmrdma device.

esxcli nvme fabrics enable -p RDMA -d vmrdma0

The system should return a message showing if NVME is enabled.

Step 2

Discover the nvme on the array by entering the following command:

esxcli nvme fabrics discover -a vmhba64 -l transport_address

figure with esxcli nvme fabrics discover -a vmhba64 -l 50.2.84.100

The output will list the following information: Transport Type, Address Family, Subsystem Type, Controller ID, Admin Queue, Max Size, Transport Address, Transport Service ID, and Subsystem NQN

You will see output on the NVMe controller.

Step 3

Perform NVMe fabric interconnect.

esxcli nvme fabrics discover -a vmhba64 -l transport_address p Transport Service ID -s Subsystem NQN

Step 4

The NVMe controller should show a list of the controllers connected to NVMe The NVMe namespace list should show all the NVMe drives discovered.

esxcli nvme controller list RDMA -d vmrdma0


Example

The following example shows esxcli discovery commands executed on the server.

[root@ESXiUCSA:~] esxcli nvme fabrics enable -p RDMA -d vmrdma0
NVMe already enabled on vmrdma0
[root@ESXiUCSA:~] esxcli nvme fabrics discover -a vmhba64 -l 50.2.84.100
Transport Type Address Family Subsystem Type Controller ID Admin Queue Max Size Transport Address Transport Service ID Subsystem NQN
-------------- -------------- -------------- ------------- -------------------- ----------------- -------------------- -------------
RDMA            IPV4           NVM            65535          31                  50.2.84.100        4420                nq.210-06.com.purestorage:flasharray:2dp1239anjkl484

[root@ESXiUCSA:~] esxcli nvme fabrics discover -a vmhba64 -l 50.2.84.100 p 4420 -s nq.210-06.com.purestorage:flasharray:2dp1239anjkl484
Controller already connected

Deleting the ESXi RoCEv2 Interface Using Cisco IMC

Use these steps to delete the ESXi RoCEv2 configuration for a specific port.

Procedure


Step 1

In the Navigation pane, click Networking.

Step 2

Expand Networking and select the adapter from which you want to remove RoCEv2 configuration.

Step 3

Select vNICs tab.

Step 4

Select the vNIC from which you want to delete the ESXi RoCEv2 configuration.

Step 5

Expand RoCE Properties tab and uncheck the RoCE check box.

Step 6

Click Save Changes.

Step 7

Reboot the server for the above changes to take effect.