Configuring Cisco Unified Communications Manager for the IX System
Bias-Free Language
The documentation set for this product strives to use bias-free language. For the purposes of this documentation set, bias-free is defined as language that does not imply discrimination based on age, disability, gender, racial identity, ethnic identity, sexual orientation, socioeconomic status, and intersectionality. Exceptions may be present in the documentation due to language that is hardcoded in the user interfaces of the product software, language used based on RFP documentation, or language that is used by a referenced third-party product. Learn more about how Cisco is using Inclusive Language.
- Updated:
- April 22, 2015
Chapter: Configuring Cisco TelePresence Features
Ad Hoc Conferencing
The IX system supports ad hoc conferencing, in which an existing point-to-point call is escalated into a conference by adding more video and audio participants. The ad hoc conference does not require scheduling the meeting beforehand using a meeting scheduler such as TelePresence Management Suite. Ad hoc conferencing is also referred to as ad hoc escalation.
In earlier IX releases, you could only add one audio-only participant to an existing call hosted by Unified CM). With ad hoc conferencing, you can add up to 64 video and audio participants to an existing call. Ad hoc conferences with audio participants are hosted by Cisco TelePresence Server (TS). Ad hoc conferences with audio participants only are hosted by Unified CM.
You configure the maximum number of participants (video endpoints) using Unified CM settings. For more information, see the “Configuring Advanced Ad Hoc Conferencing Support” section.

Note The Cisco TelePresence Server (TS) capacity determines the actual number of participants you can add to an ad hoc conference. T
On the IX system, to add a participant to an existing call, tap Add on the Touch 10 device. Enter the number or directory entry and tap Call , and then tap Merge . As more video participants join a meeting, the screen layout on the IX system automatically adjusts.
Basic ad hoc conferencing requires that Media Resource Group Lists are configured with TelePresence Conductor. You must also configure TelePresence Conductor to support ad hoc conferences. For more information, see the Cisco TelePresence Conductor with Cisco Unified Communications Manager Deployment Guide for release XC4.0 or later.
Ad hoc conferencing support on the IX system includes the following limitations:
- To add participants to an ad hoc conference, the Advanced Ad Hoc Enabled setting must be set to True on the IX. See Table 2-1 for more information.
- Rendezvous conferences, in which other endpoints can join the conference by dialing a conference number or URI into the IX system, are not supported.
- If there are more than 16 participants in an ad hoc conference, only the 16 who were added most recently are shown in the participants list.
- When an ad hoc conference is audio-only, the list of participants is not visible.
- Dropping a particular participant from the ad hoc conference by the conference originator (active control) is not supported.
- The IX does not support Linear and Non-Linear linking of ad hoc conferences.
- The IX system can create secure conferences with both audio and video participants. Secure conferences are only possible with endpoints running IX, TX, or CTS software. If an endpoint running other software (such as CE8 or TC7) is added to a secure ad hoc conference, that endpoint is added as an audio-only participant.
Configuring Advanced Ad Hoc Conferencing Support
When configuring the IX in Unified CM, basic ad hoc conferencing is enabled using the “Multipoint Mode” field in the Product Specific Configuration Layout Area. Choose the “Use Media Resource Group List” option to use the Conference Bridge (media resources) feature on Unified CM with TelePresence Conductor. For more information, see the “Product Specific Configuration Layout Area” section.
To configure advanced Ad Hoc conferencing parameters, perform the following steps:
Step 1 Log in to the Cisco Unified CM Administration interface.
Step 2 Navigate to System > Service Parameters .
Step 3 From the Server drop-down list, choose the server.
Step 4 From the Service drop-down list, choose Cisco CallManager.
Step 5 Configure the fields in the Clusterwide Parameters (Features - Conference) area. See the Related Topics section for more information about the fields and their configuration options.
The table below lists advanced hoc conferencing parameters supported on the IX. For more complete information about ad hoc conferencing in Unified CM, see the “Ad Hoc Conferencing” chapter of the Feature Configuration Guide for Cisco Unified Communications Manager for your release.
Enabling Directory Support on the Touch 10 Device
The Directory button on the Cisco TelePresence Touch 10 allows a user to look up TelePresence phone numbers for co-workers. To support this feature for the IX system, configure either corporate directories in Unified CM, or Phone Books in Cisco TMS (TelePresence Management Suite).
For more information about configuring corporate directories, refer to the “LDAP System Setup”, “LDAP Directory Setup”, and “LDAP Authentication Setup” sections in the Cisco Unified Communications Manager Administration Guide for your Unified CM release.
To set up a Directory for the user from the Cisco Unified Communications Manager Administration interface:
Step 1 Log in to the Cisco Unified Communications Manager Administration interface.
Step 2 Navigate to System > Enterprise Parameters.
Step 3 Scroll to Self Care Portal Parameters.
Step 4 Locate Allow Directory Search from the list and choose True (the default setting) from the drop-down list.
Step 5 Click Save to save your settings. The change will take effect on next sign-in to Cisco Unified Communications Manager User Options window.
To use Cisco TMS Phone Books for your directory, the Alternate Directory Type field in the Product Specific Configuration Layout Area must be set to TMS. For more information, see the “Product Specific Configuration Layout Area” section. For more information about configuring phone books in Cisco TMS, see the “Creating and Managing Phone Books” section of the Cisco TelePresence Management Suite Administrator Guide.
Configuring the BFCP over UDP Collaboration Feature
Binary Floor Control Protocol (BFCP) is used to control access to the media resources in a meeting. BFCP allows the IX system and the remote endpoints to view presentation and main display video simultaneously. It also supports some third-party TelePresence endpoints.
The IX system offers three media lines: one for audio, one for the main video, and the other for presentation or content using the session description protocol (SDP). Also, an application line is sent in the SDP for the BFCP control channel.
The bandwidth of the presentation media line matches the capability of the IX system. For example, if the IX system is configured for the maximum rate of 1080p at 30 frames per second (fps), the presentation media line bandwidth is 4Mbps.
The IX system uses BFCP over user datagram protocol (UDP) in both secure and nonsecure BFCP modes.
BFCP Compatibility With Legacy Immersive Endpoints
BFCP is enabled by default on all Cisco TelePresence immersive endpoints beginning with CTS Release 1.8. Endpoints using CTS software prior to CTS Release 1.8 must either disable BFCP on all new SIP profiles in the Unified CM Administration interface, or upgrade all CTS endpoints to CTS Release 1.8.
Configure your system in the following order:
1. Configuring VCS To Use BFCP
2. Configuring Unified CM to Use BFCP
Configuring VCS To Use BFCP
To enable BFCP with Cisco VCS, you must perform the following steps:
- Change parameters in the VCS Zone in the Cisco VCS administration interface.
- Add a custom BFCP profile to the trunk between Cisco VCS to Unified CM in the Cisco Unified Communications Manager Administration interface.
The Video Communication Server (VCS) and Unified CM must be operational before you perform these steps.
For complete Cisco VCS configuration support and information, refer to the Cisco VCS and CUCM Deployment Guide for your VCS software release.
To change the Zone configuration in Cisco VCS:
Step 1 Log into VCS as an administrative (admin) user.
Step 2 Navigate to Configuration > Zones > Zones .
Step 3 Select the zone for the Unified CM server to which the IX system is registered by clicking the hyperlink for that zone.
Step 4 In the Advanced area, select Cisco Unified Communications Manager (8.6.1 or later) from the drop-down list.
Configuring Unified CM to Use BFCP
This section includes the steps you perform to configure BFCP for Unified CM and includes the following topics:
Adding a New BFCP Profile
To add a new profile for BFCP, follow the steps in this section.
Note Associate this profile with every trunk and device that uses BFCP for presentations. To enable BFCP for a device, navigate to Device > Phone, select the device, and check the “Allow Presentation Sharing using BFCP” check box in the “Protocol-Specific Information Area” section.
Step 1 Navigate to Device > Device Settings > SIP Profile .
Step 2 Click Add New . The SIP Profile Configuration window appears.
Step 3 Create a name for the BFCP profile. For example, “Standard BFCP SIP Profile.”
Step 4 In the SDP Information area, click to select the Allow Presentation Sharing using BFCP check box, as shown in Figure 2-1.
Note There are two SDP Profile areas. Navigate to the second one at the bottom of the page.
Figure 2-1 SIP Profile Information - Allow Presentation Sharing Using BFCP

Step 5 Leave the remaining field defaults.
Step 6 Click Save , then click Apply Config .
Step 7 Configure the BFCP trunk by performing the tasks in the “Configuring the Unified CM Trunk” section.
Configuring the Unified CM Trunk
Step 1 Navigate to Device > Trunk .
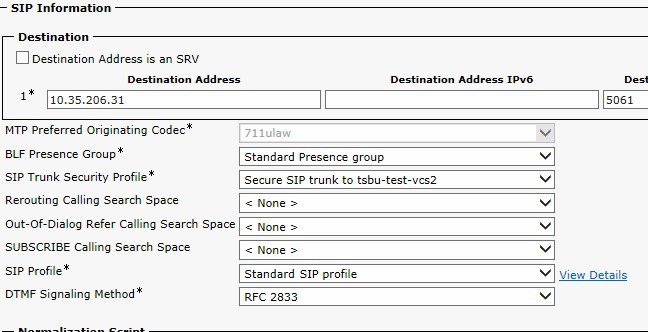
Step 2 Select the SIP trunk by clicking the hyperlink for it in the Name area.
Step 3 In the SIP Information area, change the SIP Profile field to use the trunk you created in the “Adding a New BFCP Profile” section. Figure 2-2 shows the Standard BFCP SIP Profile selected in the SIP Profile field.
Figure 2-2 Selecting the BFCP Profile
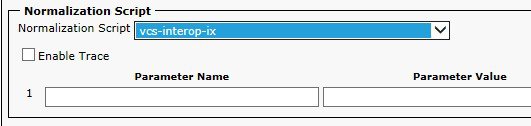
Step 4 (Optional) Configure security between the Unified CM and Cisco VCS for EX and C Series endpoints by choosing vcs-interop-ix in the Normalization Script window, as shown in Figure 2-3.
Figure 2-3 Normalization Script Window - VCS Interop Security
Step 5 Click Save to save your settings.
Step 6 During an appropriate time, click Reset to reset the trunk and apply the new BFCP settings.

Touch 10 Screen Dimming
To save power and extend the lifespan of the Cisco TelePresence Touch 10 device, the Touch 10 dims between the hours specified in the Product Specific Configuration Layout. The settings are configured in the Display on Time and Display on Duration fields. For more information, see the “Product Specific Configuration Layout Area” section.
When dimming is active, the screen is dimmed and the home button is glowing. If the Touch 10 or one of its hard buttons is touched, the device turns back on. The device stays on until the system has been idle for one hour. At that time, the screen dims again.
The screen will not dim during the specified hours when the system is in a call, recording, or troubleshooting. The screen automatically wakes up when an incoming call or popup notification appears, or when an upgrade begins.
 Feedback