-
null
Managing Applications in Selective High-Availability Environment
This chapter describes how to configure Selective High Availability in Cisco Prime DCNM appliances (OVA and ISO) deployment for Cisco Prime DCNM with Fabric enhancements.
Overview
Selective High Availability (HA) is a feature introduced in Cisco Prime DCNM Release 7.1(2). The Cisco Prime DCNM appliances (OVA and ISO) allows you to selectively enable failover for certain applications rather than forcefully applying it for all applications in Cisco Prime DCNM appliance. In Cisco Prime DCNM Release 7.1(2), you can selectively enable HA for auto-configuration, which is a crucial feature in most deployments. Since HA is not enabled for all the applications, this doesn’t require external database users or an NFS repository, thus reducing dependencies in a production environment.
The term “appliance” refers to any of the following.
- Cisco Prime DCNM Open Virtual Appliance deployed on VMWare vSphere
- Cisco Prime DCNM ISO Appliance deployed on VMWare vSphere
- Cisco Prime DCNM ISO deployed as a Kernel-based Virtual Machine
- Cisco Prime DCNM ISO deployed on a bare-metal (physical) server
This section includes the following:
- Selective High-Availability with Two Cisco Prime DCNM Appliances
- Selective High-Availability with Redundancy
Selective High-Availability with Two Cisco Prime DCNM Appliances
The below figure shows a setup in which High Availability has been selectively enabled for auto-configuration feature. This means that failover is available only for LDAP. Node-1 is configured as active with all the applications necessary for Fabric deployments. This includes DCNM, LDAP, XMPP, AMQP, TFTP, DHCP. Node-2 is configured as standby with only LDAP (necessary for auto-configuration). With the initial configuration, DCNM on Node-1 uses LDAP on Node-1 for updates. The standby LDAP (on Node-2) gets synced with the active LDAP (on Node-1) via sync replication.
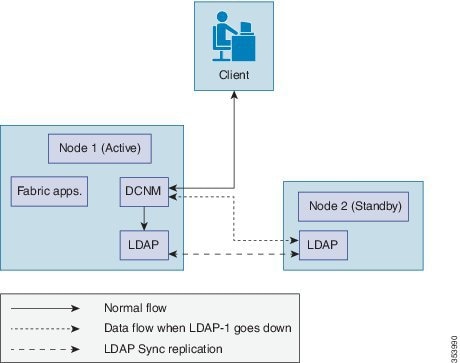
When active LDAP (on Node-1) fails, DCNM automatically uses the standby LDAP (on Node-2) to make any further updates, thus providing application failover.
Once selective HA is configured on Node-1, backups for all applications are triggered at regular intervals (by default, every six hours) and transferred to Node-2 and stored at
/var/lib/backups/selective-ha/active_backups
Once selective HA is configured on Node-2, the LDAP is backed-up at regular intervals (by default, every six hours) and transferred to Node-1 to be stored at
/var/lib/backups/selective-ha/standby_backups
On both nodes, only the last 5 backups are maintained.

Note You can change the backup interval. See Changing the Backup Interval.
Selective High-Availability with Redundancy
To have redundancy and to reduce the downtime in case of a server failure, it is advisable to deploy a redundant pair of active and standby nodes during the initial setup. The sequence would be:
- Setup Selective HA for the first pair of servers. For more information, see Selective High-Availability with Two Cisco Prime DCNM Appliances.
- Setup the second pair with an identical network configuration as the secondary server. Ensure that the IP address and port groups assigned to the interfaces of the primary server must be the same as the secondary server.
- In case of server failure of any of the hot servers, power on the corresponding spare server and restore the backup from the hot server.
Prerequisites
You must deploy two standalone Cisco Prime DCNM appliances (OVA and ISO). When you deploy both appliances, meet the following criteria:
- Both appliances should have their corresponding management access (eth0) and enhanced fabric management (eth1) interfaces in the same subnet, i.e., the management access interface of both Node-1 and Node-2 should be in the same subnet and the EFM interface of both Node-1 and Node-2 should be in the same subnet.
- Both appliances should be deployed with the same administrative password.
After the appliance is powered up, verify that all the applications are up and running by using appmgr status all command.
After the applications are up and running, stop the applications by using the appmgr stop all command.
Note When the Cisco Prime DCNM Appliance is started up for the first time, please wait for all the applications to run before you shut down any of the applications or power off the virtual appliance.
Note If you are using HA selective setup in conjunction with VMWare snapshot, please note that while using with VMWare snapshot, there are some extra steps to be updated in the restore.
If using VMWare snapshot restoration in Selective-HA setup, the sync process between selective-HA active and selective-HA standby node maybe impacted.
This sync can be restored by restoring the saved backup file from a previously saved DCNM setup.
In order to ensure that the backup file always has the updated Auto-config changes, outside periodic backups, you are recommended to trigger manual backups whenever organization, paritions or network updates are made.
To manually create a backup, execute the command /root/cluster/selective-ha/selective-ha-backup.sh.
Configuring Selective High-Availability
Because both of the Cisco Prime DCNM Appliance in an HA environment are deployed identically, either one of them can be the Active peer. The other Cisco Prime DCNM Appliance would be the Standby peer.
Note All of the configuration CLI commands in the following sections are executed from the secure shell (SSH) terminal.
This sections includes the following:
- Configuring Active Cisco Prime DCNM Appliance
- Configuring Standby Cisco Prime DCNM Appliance
- Starting Applications in Active Cisco Prime DCNM Appliance
- Starting Applications in Standby Cisco Prime DCNM Appliance
- Changing the Backup Interval
Configuring Active Cisco Prime DCNM Appliance
Step 1 Log in to the SSH terminal of the Cisco Prime DCNM Appliance of the Active appliance and enter the following command:
appmgr setup selective-ha active –feature auto-config
You are about to selectively enable High Availability in this DCNM virtual appliance for the following features
Step 2 Make sure that each prerequisite is in place and press y if not all of the pre-requisites are in place, press n to exit.
A prompt for the management IP of the standby peer appears.
After you enter the management IP of the standby appliance, the active appliance generates a pair of authentication keys and transfers it to the peer’s authorized keys.
Step 3 Enter the IP address of the NTP server and press y to continue.
After the active appliance is configured for Selective High-Availability, the following message appears:
Run 'appmgr setup selective-ha standby -feature auto-config' on 10.197.67.31 to complete the HA setup.
Step 4 Verify the HA role of the node by using the appmgr show ha-role command.
Configuring Standby Cisco Prime DCNM Appliance
Step 1 Log into the SSH terminal of Standby Cisco Prime DCNM appliance and enter the appmgr setup selective-ha standby-feature auto-config command.
The details of the active Cisco Prime DCNM appliance will be available in the standby, using which the standby appliance generates a pair of authentication keys and transfers it to the Cisco Prime DCNM appliance’s authorized keys.
Carefully check if it is the correct Cisco Prime DCNM appliance and press y to continue. Once the active appliance is configured for Selective High-Availability, and the following message is displayed.
**********************************************************************************
Run appmgr start all first on the active Cisco Prime DCNM appliance (x.x.x.x) and then appmgr start ldap on the standby Cisco Prime DCNM appliance (y.y.y.y), to start using applications.
**********************************************************************************
Step 3 Check the HA role of the node by entering the appmgr show ha-role command.
High Availability selectively enabled for Auto Configuration feature. This is a standby node running only LDAP.
Starting Applications in Active Cisco Prime DCNM Appliance
Step 1 Login into the SSH terminal of the Active Cisco Prime DCNM appliance.
Step 2 Start all applications by using the appmgr start all command.
Wait for all the applications to start.
Starting Applications in Standby Cisco Prime DCNM Appliance
Step 1 Login into the SSH terminal of the Standby Cisco Prime DCNM appliance and start the LDAP applications using the appmgr start ldap command.
Changing the Backup Interval
By default, on a node that has selective HA enabled, backup is performed every six hours. You can change the backup interval by following the below steps.
Step 1 Log into the SSH terminal of the node on which you want to change the backup interval and open the crontab in a vi editor.
Step 2 Edit the entry for the script selective-ha-backup.sh.
For example, the below configuration triggers a backup every hour.
Step 3 Load the crontab configuration file using the command
Load the crontab configuration file into crontab
Step 4 Verify the cron entry by running
Recovering Active and Standby Nodes
Cisco Prime DCNM Selective HA allows you to recover data in case of failure of peers.
This section includes the following sections:
Recovering DCNM Active Node
When Cisco Prime DCNM hot active node fails, you need to bring up the redundant spare active node, which has an identical configuration in terms of IP address and HA configuration as the original setup. (In a 4 box setup, you already have this ready, and need to likely power on the appliance to have this usable).
Step 1 Log into the SSH terminal of Standby node and navigate to the backup directory which contains the backups from the active node.
Standby-peer# cd /var/lib/backups/selective-ha/active_backups
Step 2 Identify the most recent active backup based on timestamp and move it to the spare DCNM active node.
Standby-peer#sftp root@x.x.x.x
x.x.x.x> put backup.mm_dd_yyyy__HH_MM_ss.tar.gz
Step 3 Log into the SSH terminal of DCNM active node and verify that all the applications are up and running by using the following command:
Step 4 After all the applications are up, stop the applications by using the following command:
Step 5 Restore the backup using the following command:
Active-peer# appmgr restore all backup. mm_dd_yyyy__HH_MM_ss.tar.gz
Step 6 Once the restore is completed, start all applications on active node by using the appmgr start all command.
Step 7 Log into the SSH terminal of Standby node and restart the LDAP
Standby-peer# appmgr restart ldap
Recovering DCNM Standby Node
When the DCNM hot standby node fails, bring up the spare standby node, which has an identical configuration in terms of IP address and HA configuration as the original setup. (In a 4 box setup, you already have this ready, and need to likely power on the appliance to have this usable).
Step 1 Log into the SSH terminal of active node and navigate to the backup directory location which has the backups taken on the standby node.
Active-peer# cd /var/lib/backups/selective-ha/standby_backups
Step 2 Identify the most recent standby backup based on timestamp and move it to the spare DCNM standby node.
Standby-peer#sftp root@x.x.x.x
x.x.x.x> put backup.mm_dd_yyyy__HH_MM_ss.tar.gz
Step 3 Log into the SSH terminal of spare DCNM standby node and verify if the LDAP application is up and running by using the following command:
Step 4 After the LDAP application is up, stop the application by using the following command:
Step 5 Restore the LDAP application backup by using the following command.
Standby-peer# appmgr restore ldap backup. mm_dd_yyyy__HH_MM_ss.tar.gz
Step 6 After the restore operation is completed, start the LDAP application on standby node by using the following command:
Step 7 Log into the SSH terminal of Standby node.
Step 8 Restart the LDAP application by using the following command:
Active-peer# appmgr restart ldap
Vacuum and Autovacuum Postgres Databases
It is absolutely critical to vacuum postgres databases in order for the databases to properly function.
For more information of how to vacuum the postgres database in Microsoft Windows and Linux, please refer to Data Center Network Manager (DCNM) - Vacuum and Autovacuum Postgres Databases chapter of the fundamental guide.
 Feedback